belt AUDI A4 2000 B5 / 1.G Suspension Power Steering Pump Remove And Install Workshop Manual
[x] Cancel search | Manufacturer: AUDI, Model Year: 2000, Model line: A4, Model: AUDI A4 2000 B5 / 1.GPages: 20, PDF Size: 0.51 MB
Page 6 of 20
48-48
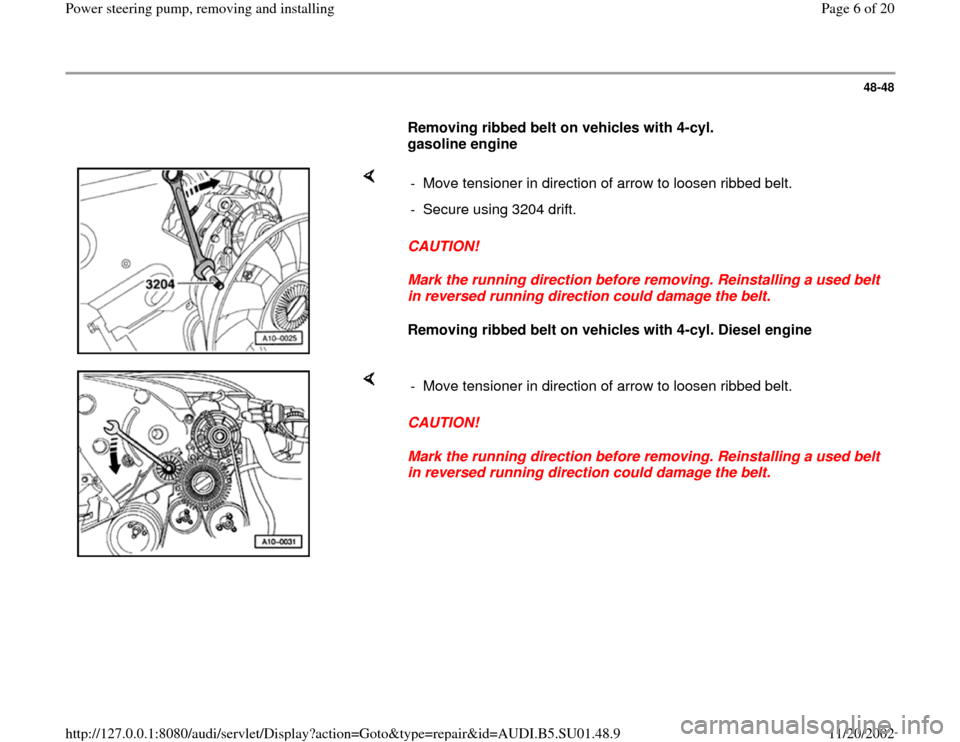
Removing ribbed belt on vehicles with 4-cyl.
gasoline engine
CAUTION!
Mark the running direction before removing. Reinstalling a used belt
in reversed running direction could damage the belt.
Removing ribbed belt on vehicles with 4-cyl. Diesel engine - Move tensioner in direction of arrow to loosen ribbed belt.
- Secure using 3204 drift.
CAUTION!
Mark the running direction before removing. Reinstalling a used belt
in reversed running direction could damage the belt. - Move tensioner in direction of arrow to loosen ribbed belt.
Pa
ge 6 of 20 Power steerin
g pum
p, removin
g and installin
g
11/20/2002 htt
p://127.0.0.1:8080/audi/servlet/Dis
play?action=Goto&t
yp
e=re
pair&id=AUDI.B5.SU01.48.9
Page 7 of 20
48-49
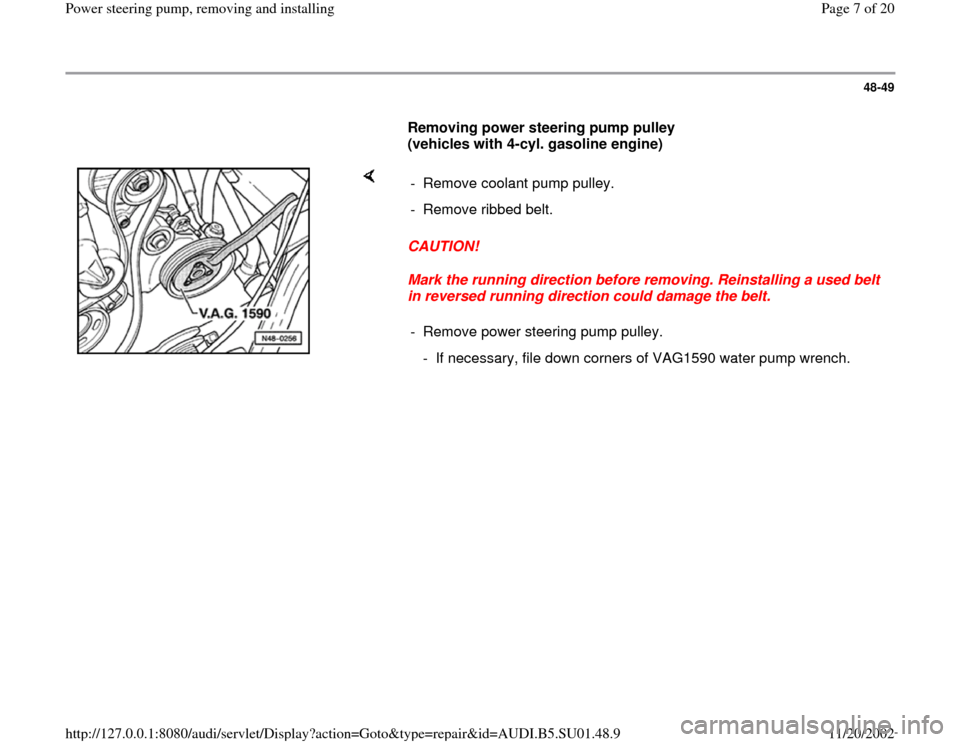
Removing power steering pump pulley
(vehicles with 4-cyl. gasoline engine)
CAUTION!
Mark the running direction before removing. Reinstalling a used belt
in reversed running direction could damage the belt. - Remove coolant pump pulley.
- Remove ribbed belt.
- Remove power steering pump pulley.
- If necessary, file down corners of VAG1590 water pump wrench.
Pa
ge 7 of 20 Power steerin
g pum
p, removin
g and installin
g
11/20/2002 htt
p://127.0.0.1:8080/audi/servlet/Dis
play?action=Goto&t
yp
e=re
pair&id=AUDI.B5.SU01.48.9
Page 13 of 20
48-55
CAUTION!
Note:
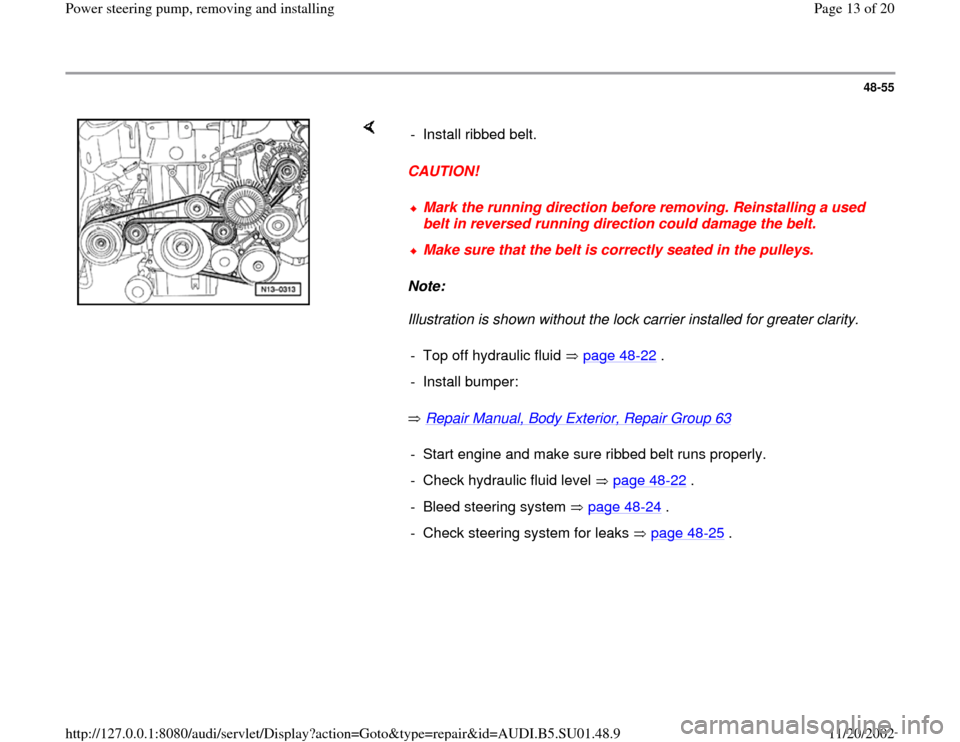
Illustration is shown without the lock carrier installed for greater clarity.
Repair Manual, Body Exterior, Repair Group 63
- Install ribbed belt.
Mark the running direction before removing. Reinstalling a used
belt in reversed running direction could damage the belt. Make sure that the belt is correctly seated in the pulleys.
- Top off hydraulic fluid page 48
-22
.
- Install bumper:- Start engine and make sure ribbed belt runs properly.
- Check hydraulic fluid level page 48
-22
.
- Bleed steering system page 48
-24
.
- Check steering system for leaks page 48
-25
.
Pa
ge 13 of 20 Power steerin
g pum
p, removin
g and installin
g
11/20/2002 htt
p://127.0.0.1:8080/audi/servlet/Dis
play?action=Goto&t
yp
e=re
pair&id=AUDI.B5.SU01.48.9
Page 15 of 20
48-57
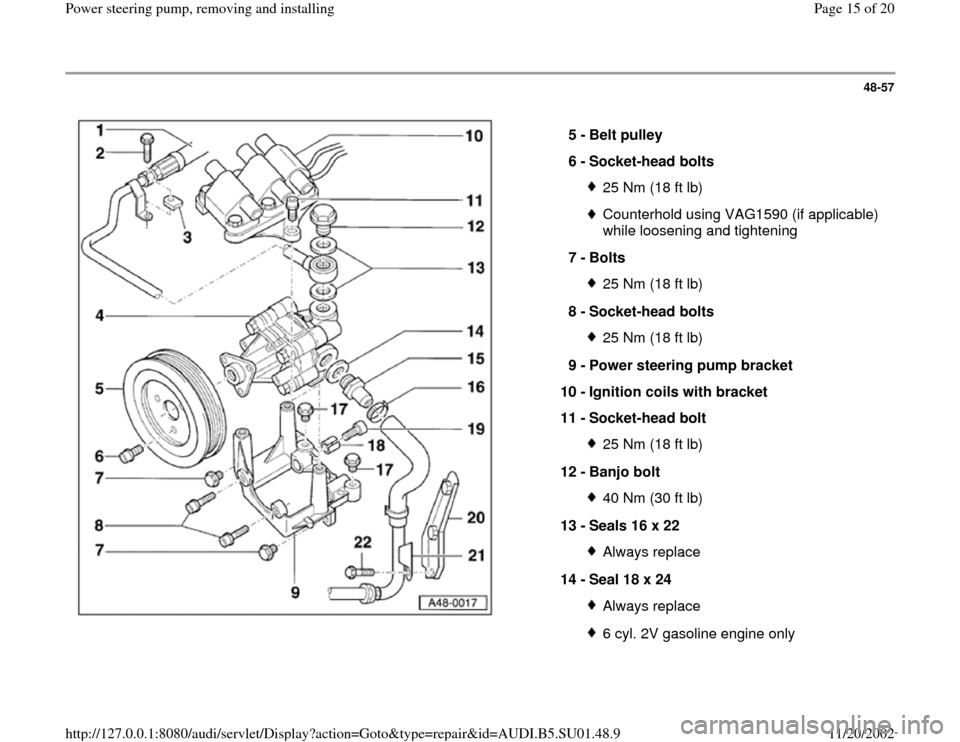
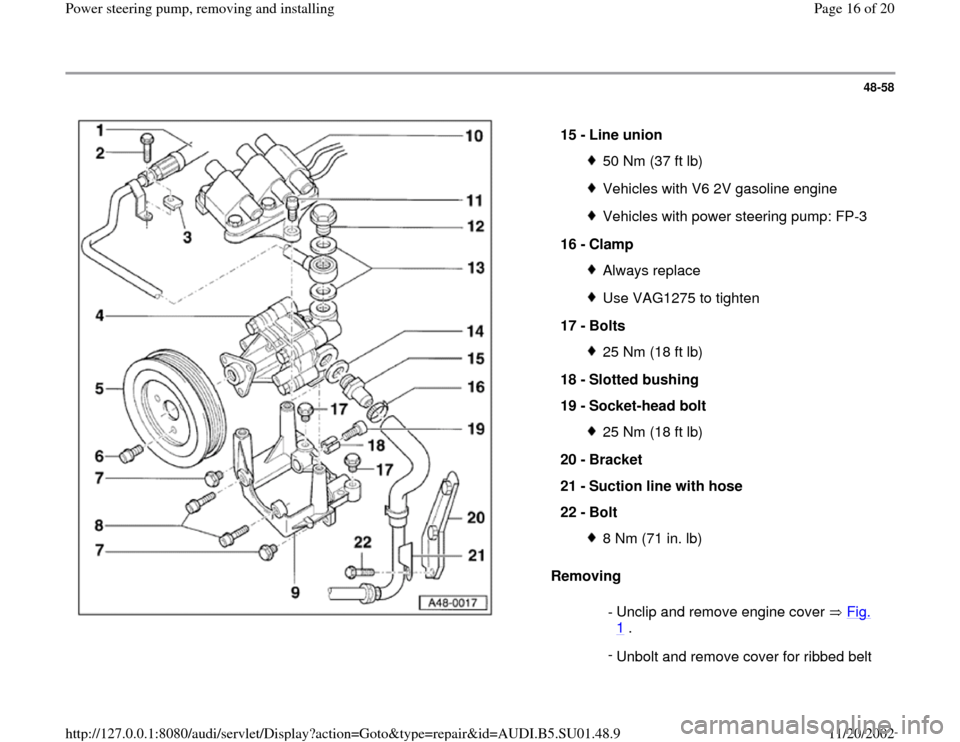
5 -
Belt pulley
6 -
Socket-head bolts
25 Nm (18 ft lb)Counterhold using VAG1590 (if applicable)
while loosening and tightening
7 -
Bolts 25 Nm (18 ft lb)
8 -
Socket-head bolts 25 Nm (18 ft lb)
9 -
Power steering pump bracket
10 -
Ignition coils with bracket
11 -
Socket-head bolt 25 Nm (18 ft lb)
12 -
Banjo bolt 40 Nm (30 ft lb)
13 -
Seals 16 x 22 Always replace
14 -
Seal 18 x 24 Always replace6 cyl. 2V gasoline engine only
Pa
ge 15 of 20 Power steerin
g pum
p, removin
g and installin
g
11/20/2002 htt
p://127.0.0.1:8080/audi/servlet/Dis
play?action=Goto&t
yp
e=re
pair&id=AUDI.B5.SU01.48.9
Page 16 of 20
48-58
Removing 15 -
Line union
50 Nm (37 ft lb)Vehicles with V6 2V gasoline engineVehicles with power steering pump: FP-3
16 -
Clamp Always replaceUse VAG1275 to tighten
17 -
Bolts 25 Nm (18 ft lb)
18 -
Slotted bushing
19 -
Socket-head bolt 25 Nm (18 ft lb)
20 -
Bracket
21 -
Suction line with hose
22 -
Bolt 8 Nm (71 in. lb)
- Unclip and remove engine cover Fig.
1 .
-
Unbolt and remove cover for ribbed belt
Pa
ge 16 of 20 Power steerin
g pum
p, removin
g and installin
g
11/20/2002 htt
p://127.0.0.1:8080/audi/servlet/Dis
play?action=Goto&t
yp
e=re
pair&id=AUDI.B5.SU01.48.9
Page 18 of 20
48-59
Installing
Note:
The ignition wires must be correctly reinstalled in
the correct firing order Fig. 4
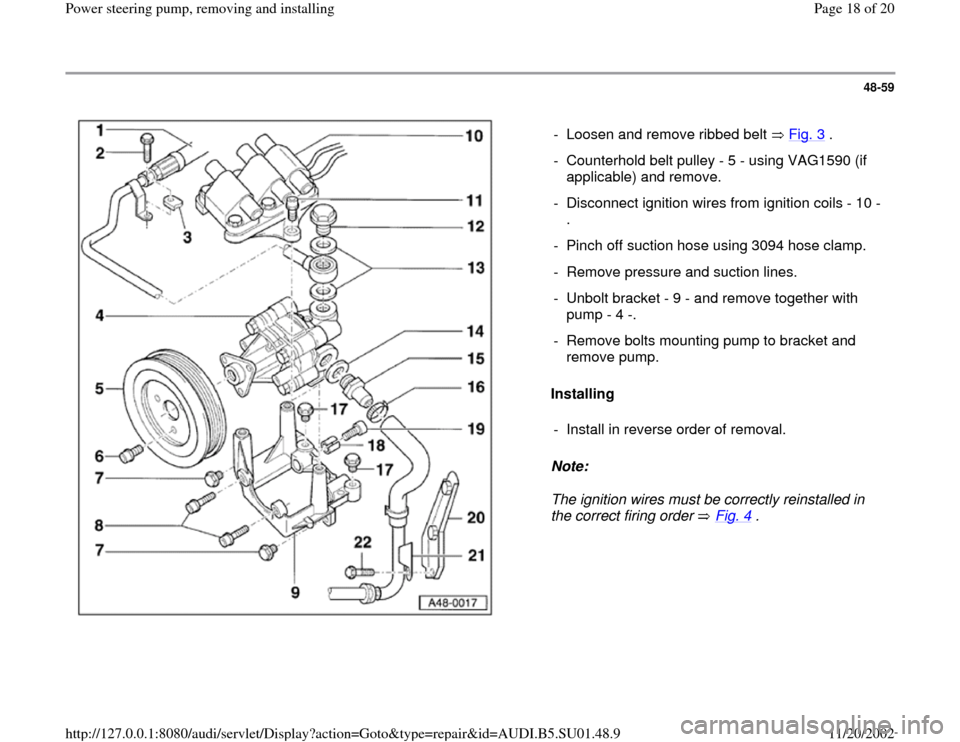
. - Loosen and remove ribbed belt Fig. 3
.
- Counterhold belt pulley - 5 - using VAG1590 (if
applicable) and remove.
- Disconnect ignition wires from ignition coils - 10 -
.
- Pinch off suction hose using 3094 hose clamp.
- Remove pressure and suction lines.
- Unbolt bracket - 9 - and remove together with
pump - 4 -.
- Remove bolts mounting pump to bracket and
remove pump.
- Install in reverse order of removal.
Pa
ge 18 of 20 Power steerin
g pum
p, removin
g and installin
g
11/20/2002 htt
p://127.0.0.1:8080/audi/servlet/Dis
play?action=Goto&t
yp
e=re
pair&id=AUDI.B5.SU01.48.9
Page 19 of 20
48-60
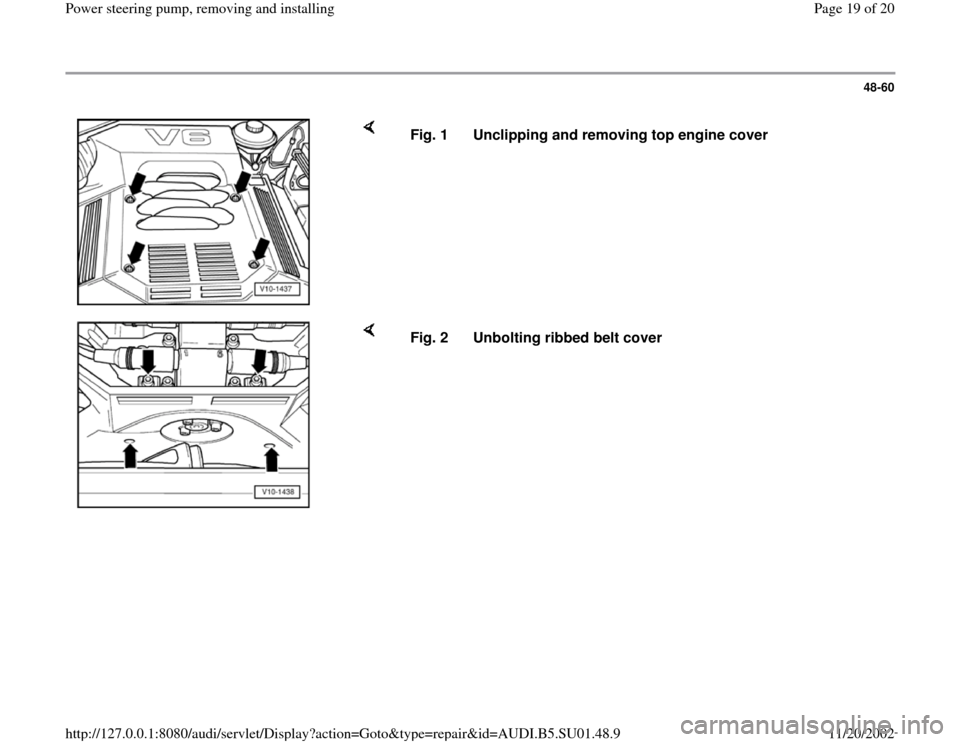
Fig. 1 Unclipping and removing top engine cover
Fig. 2 Unbolting ribbed belt cover
Pa
ge 19 of 20 Power steerin
g pum
p, removin
g and installin
g
11/20/2002 htt
p://127.0.0.1:8080/audi/servlet/Dis
play?action=Goto&t
yp
e=re
pair&id=AUDI.B5.SU01.48.9
Page 20 of 20
48-61
CAUTION!
Mark the running direction before removing. Reinstalling a used belt
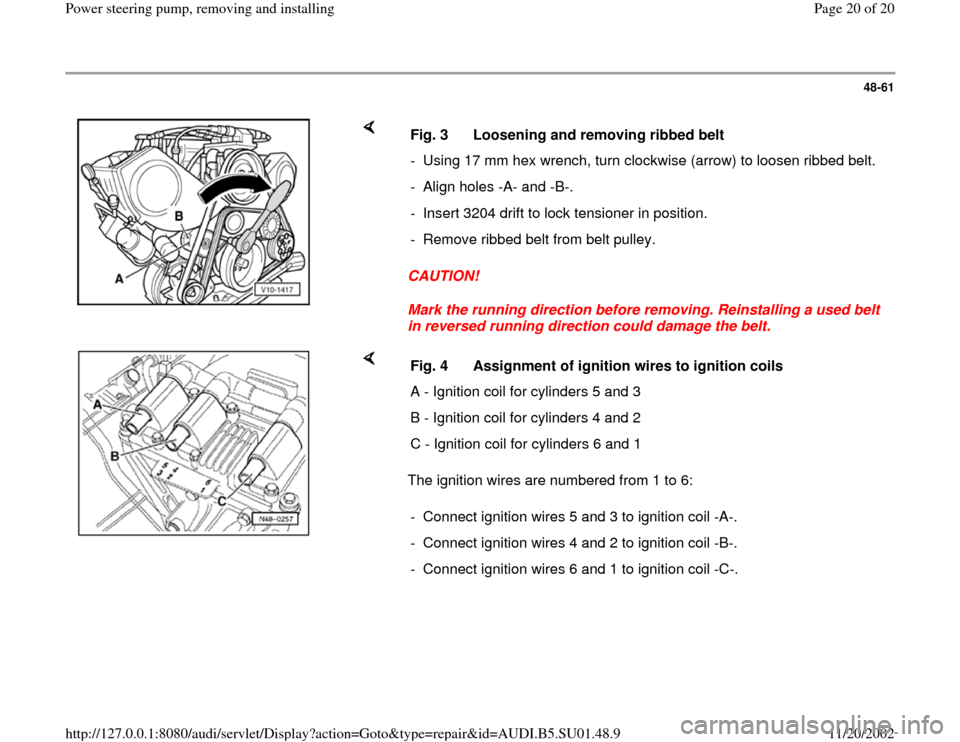
in reversed running direction could damage the belt. Fig. 3 Loosening and removing ribbed belt
- Using 17 mm hex wrench, turn clockwise (arrow) to loosen ribbed belt.
- Align holes -A- and -B-.
- Insert 3204 drift to lock tensioner in position.
- Remove ribbed belt from belt pulley.
The ignition wires are numbered from 1 to 6: Fig. 4 Assignment of ignition wires to ignition coils
A - Ignition coil for cylinders 5 and 3
B - Ignition coil for cylinders 4 and 2
C - Ignition coil for cylinders 6 and 1
- Connect ignition wires 5 and 3 to ignition coil -A-.
- Connect ignition wires 4 and 2 to ignition coil -B-.
- Connect ignition wires 6 and 1 to ignition coil -C-.
Pa
ge 20 of 20 Power steerin
g pum
p, removin
g and installin
g
11/20/2002 htt
p://127.0.0.1:8080/audi/servlet/Dis
play?action=Goto&t
yp
e=re
pair&id=AUDI.B5.SU01.48.9