ignition AUDI A4 2001 B5 / 1.G 01V Transmission Electrical Testing Workshop Manual
[x] Cancel search | Manufacturer: AUDI, Model Year: 2001, Model line: A4, Model: AUDI A4 2001 B5 / 1.GPages: 66, PDF Size: 0.28 MB
Page 6 of 66
01-276
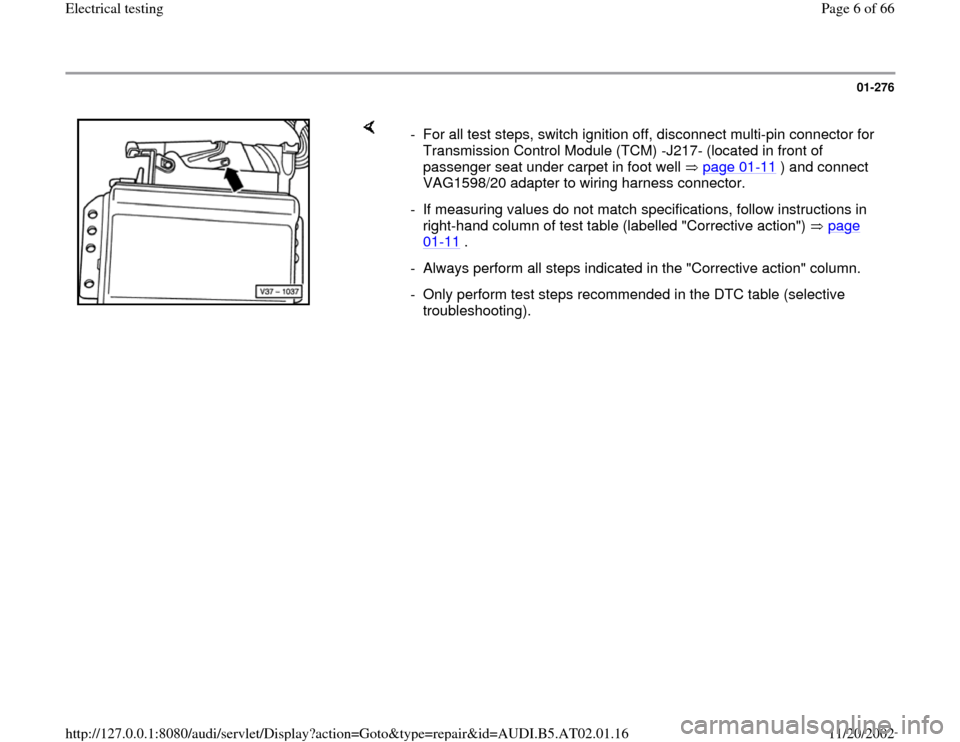
- For all test steps, switch ignition off, disconnect multi-pin connector for
Transmission Control Module (TCM) -J217- (located in front of
passenger seat under carpet in foot well page 01
-11
) and connect
VAG1598/20 adapter to wiring harness connector.
- If measuring values do not match specifications, follow instructions in
right-hand column of test table (labelled "Corrective action") page
01
-11
.
- Always perform all steps indicated in the "Corrective action" column.
- Only perform test steps recommended in the DTC table (selective
troubleshooting).
Pa
ge 6 of 66 Electrical testin
g
11/20/2002 htt
p://127.0.0.1:8080/audi/servlet/Dis
play?action=Goto&t
yp
e=re
pair&id=AUDI.B5.AT02.01.16
Page 7 of 66
01-277
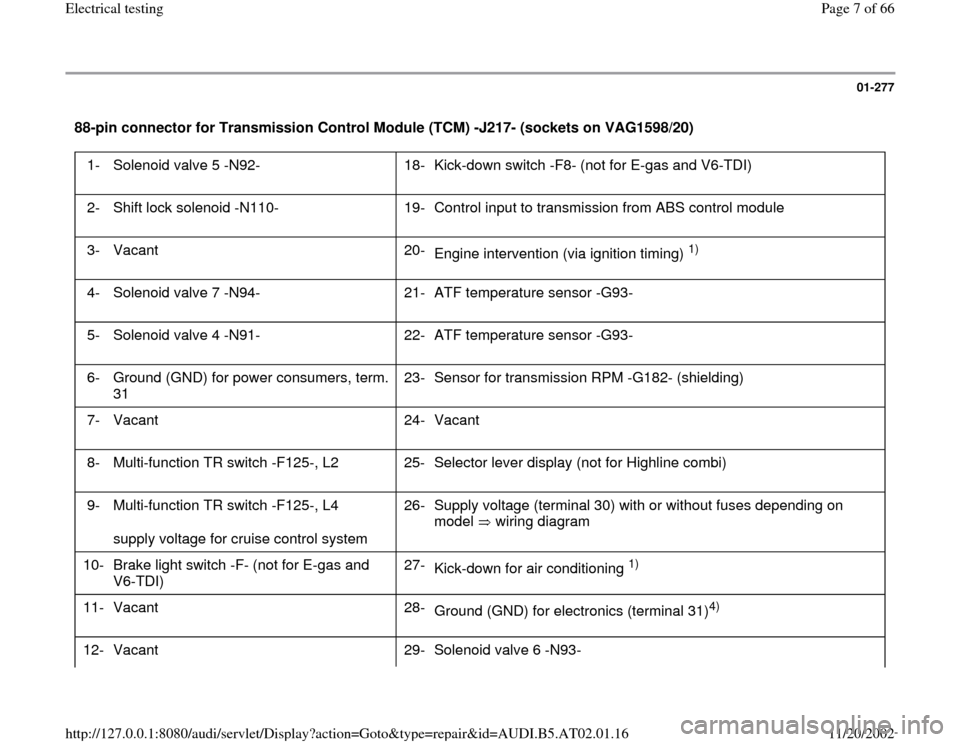
88-pin connector for Transmission Control Module (TCM) -J217- (sockets on VAG1598/20)
1- Solenoid valve 5 -N92- 18-
Kick-down switch -F8- (not for E-gas and V6-TDI)
2- Shift lock solenoid -N110- 19-
Control input to transmission from ABS control module
3- Vacant 20-
Engine intervention (via ignition timing)
1)
4- Solenoid valve 7 -N94- 21-
ATF temperature sensor -G93-
5- Solenoid valve 4 -N91- 22-
ATF temperature sensor -G93-
6- Ground (GND) for power consumers, term.
31 23-
Sensor for transmission RPM -G182- (shielding)
7- Vacant 24-
Vacant
8- Multi-function TR switch -F125-, L2 25-
Selector lever display (not for Highline combi)
9- Multi-function TR switch -F125-, L4
supply voltage for cruise control system 26-
Supply voltage (terminal 30) with or without fuses depending on
model wiring diagram
10-
Brake light switch -F- (not for E-gas and
V6-TDI) 27-
Kick-down for air conditioning
1)
11-
Vacant 28-
Ground (GND) for electronics (terminal 31)
4)
12- Vacant 29- Solenoid valve 6 -N93-
Pa
ge 7 of 66 Electrical testin
g
11/20/2002 htt
p://127.0.0.1:8080/audi/servlet/Dis
play?action=Goto&t
yp
e=re
pair&id=AUDI.B5.AT02.01.16
Page 14 of 66
01-282
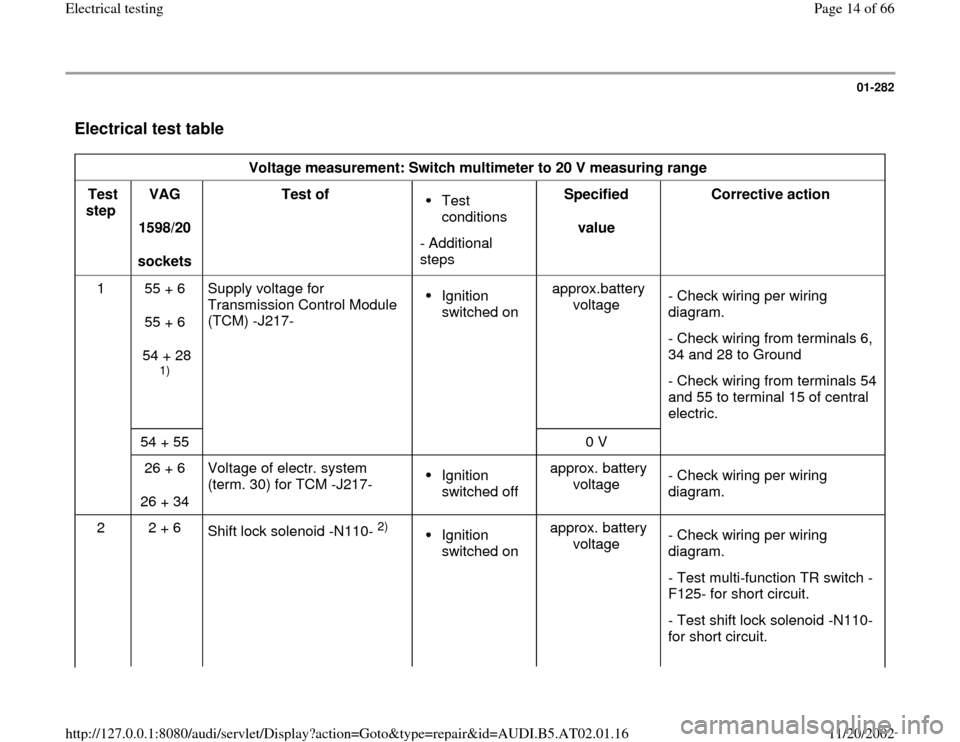
Electrical test table
Voltage measurement: Switch multimeter to 20 V measuring range
Test
step VAG
1598/20
sockets Test of
Test
conditions
- Additional
steps Specified
value Corrective action
1 55 + 6
55 + 6
54 + 28
1) Supply voltage for
Transmission Control Module
(TCM) -J217-
Ignition
switched on approx.battery
voltage - Check wiring per wiring
diagram.
- Check wiring from terminals 6,
34 and 28 to Ground
- Check wiring from terminals 54
and 55 to terminal 15 of central
electric.
54 + 55
0 V
26 + 6
26 + 34 Voltage of electr. system
(term. 30) for TCM -J217- Ignition
switched off approx. battery
voltage - Check wiring per wiring
diagram.
2 2 + 6
Shift lock solenoid -N110-
2)
Ignition
switched on approx. battery
voltage - Check wiring per wiring
diagram.
- Test multi-function TR switch -
F125- for short circuit.
- Test shift lock solenoid -N110-
for short circuit.
Pa
ge 14 of 66 Electrical testin
g
11/20/2002 htt
p://127.0.0.1:8080/audi/servlet/Dis
play?action=Goto&t
yp
e=re
pair&id=AUDI.B5.AT02.01.16
Page 16 of 66
01-283
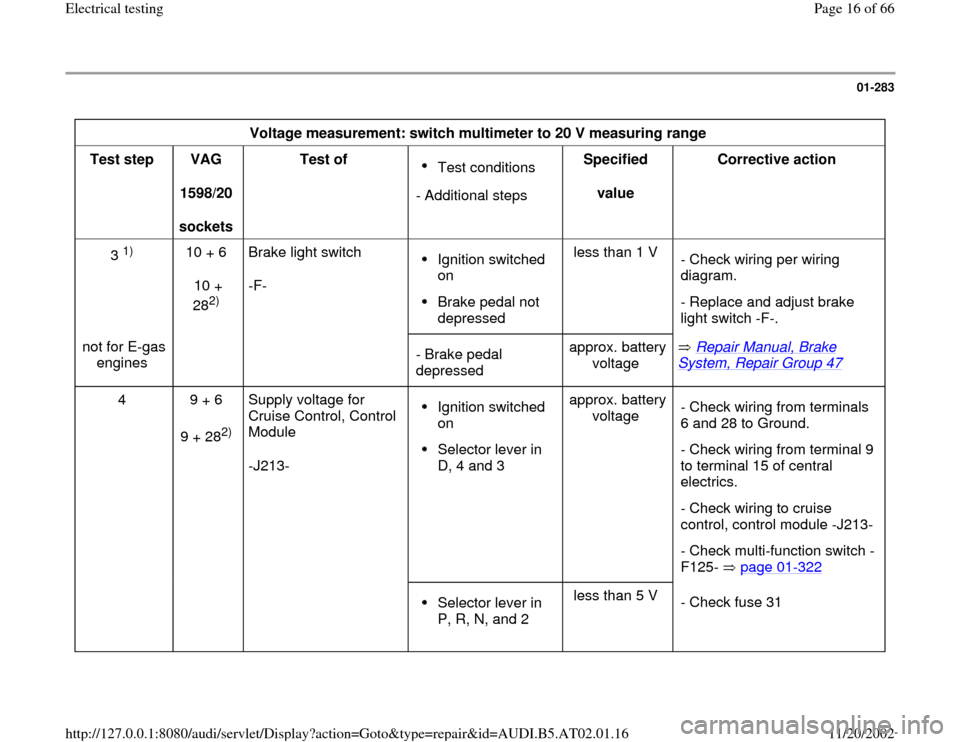
Voltage measurement: switch multimeter to 20 V measuring range
Test step
VAG
1598/20
sockets Test of
Test conditions
- Additional stepsSpecified
value Corrective action
3
1)
10 + 6
10 +
28
2) Brake light switch
-F-
Ignition switched
on Brake pedal not
depressed less than 1 V
- Check wiring per wiring
diagram.
- Replace and adjust brake
light switch -F-.
not for E-gas
engines
- Brake pedal
depressed approx. battery
voltage Repair Manual, Brake
System, Repair Group 47
4 9 + 6
9 + 28
2) Supply voltage for
Cruise Control, Control
Module
-J213-
Ignition switched
on Selector lever in
D, 4 and 3 approx. battery
voltage - Check wiring from terminals
6 and 28 to Ground.
- Check wiring from terminal 9
to terminal 15 of central
electrics.
- Check wiring to cruise
control, control module -J213-
- Check multi-function switch -
F125- page 01
-322
Selector lever in
P, R, N, and 2 less than 5 V
- Check fuse 31
Pa
ge 16 of 66 Electrical testin
g
11/20/2002 htt
p://127.0.0.1:8080/audi/servlet/Dis
play?action=Goto&t
yp
e=re
pair&id=AUDI.B5.AT02.01.16
Page 18 of 66
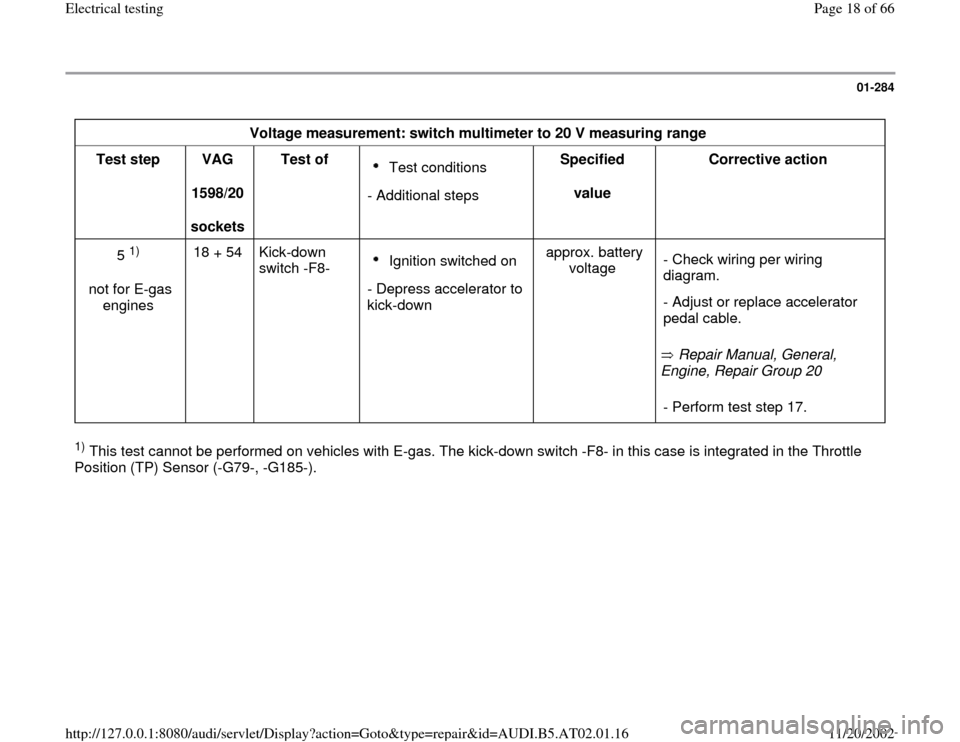
01-284
Voltage measurement: switch multimeter to 20 V measuring range
Test step
VAG
1598/20
sockets Test of
Test conditions
- Additional stepsSpecified
value Corrective action
5
1)
not for E-gas
engines 18 + 54 Kick-down
switch -F8-
Ignition switched on
- Depress accelerator to
kick-down approx. battery
voltage
Repair Manual, General,
Engine, Repair Group 20 - Check wiring per wiring
diagram.
- Adjust or replace accelerator
pedal cable.
- Perform test step 17.
1) This test cannot be performed on vehicles with E-gas. The kick-down switch -F8- in this case is integrated in the Throttle
Position (TP) Sensor (-G79-, -G185-).
Pa
ge 18 of 66 Electrical testin
g
11/20/2002 htt
p://127.0.0.1:8080/audi/servlet/Dis
play?action=Goto&t
yp
e=re
pair&id=AUDI.B5.AT02.01.16
Page 19 of 66
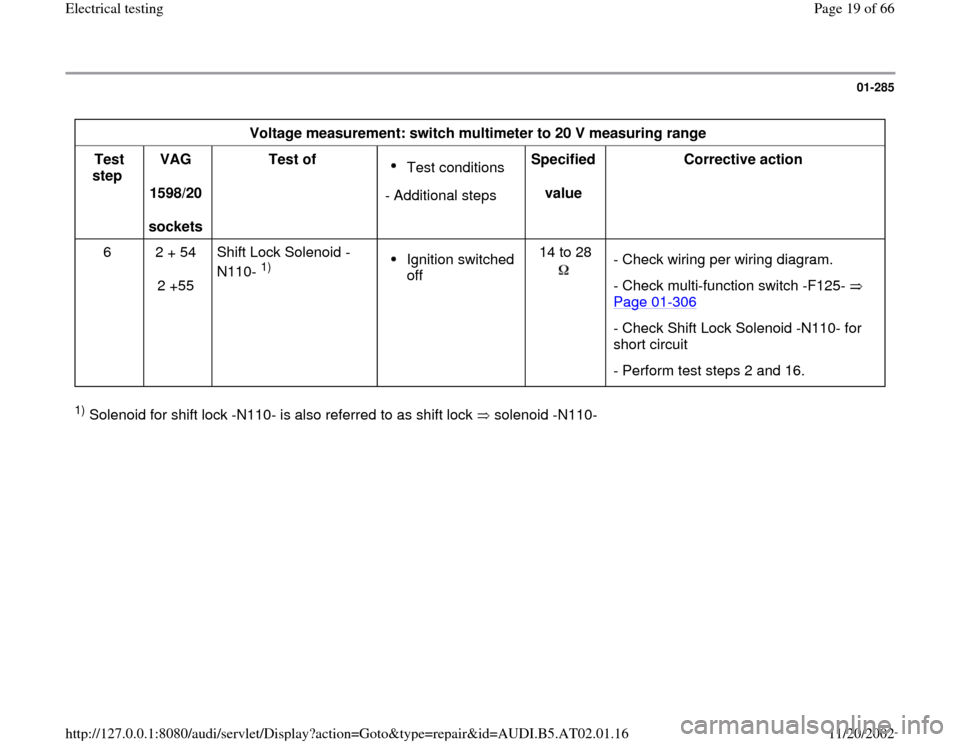
01-285
Voltage measurement: switch multimeter to 20 V measuring range
Test
step VAG
1598/20
sockets Test of
Test conditions
- Additional stepsSpecified
value Corrective action
6
2 + 54
2 +55 Shift Lock Solenoid -
N110-
1)
Ignition switched
off 14 to 28
- Check wiring per wiring diagram.
- Check multi-function switch -F125-
Page 01
-306
- Check Shift Lock Solenoid -N110- for
short circuit
- Perform test steps 2 and 16.
1) Solenoid for shift lock -N110- is also referred to as shift lock solenoid -N110-
Pa
ge 19 of 66 Electrical testin
g
11/20/2002 htt
p://127.0.0.1:8080/audi/servlet/Dis
play?action=Goto&t
yp
e=re
pair&id=AUDI.B5.AT02.01.16
Page 20 of 66
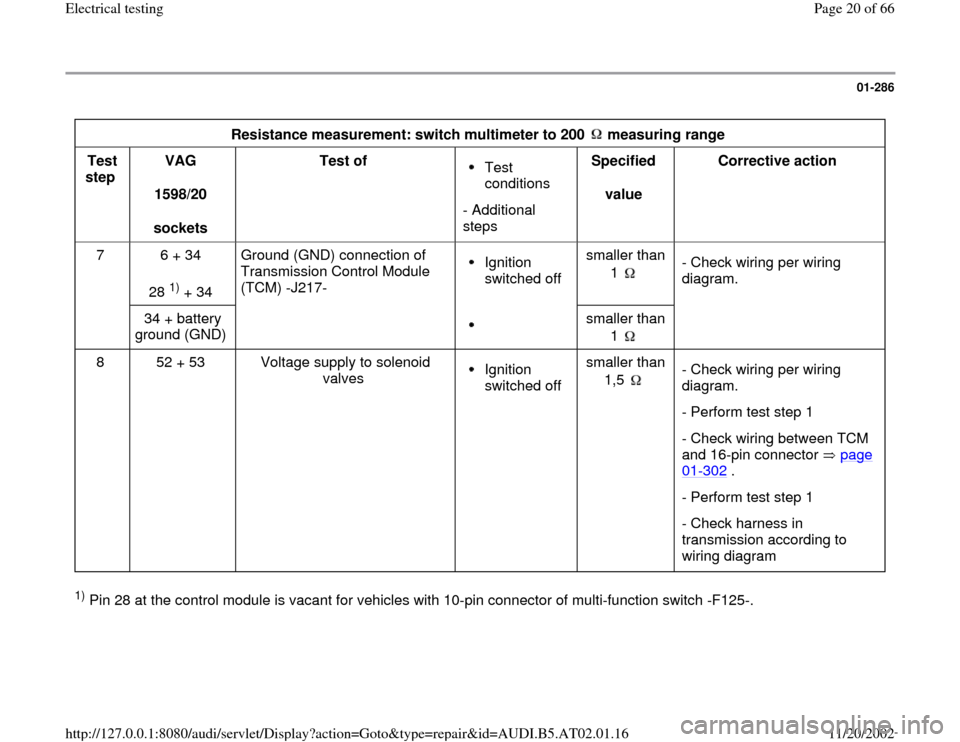
01-286
Resistance measurement: switch multimeter to 200 measuring range
Test
step VAG
1598/20
sockets Test of
Test
conditions
- Additional
steps Specified
value Corrective action
7 6 + 34
28
1) + 34 Ground (GND) connection of
Transmission Control Module
(TCM) -J217-
Ignition
switched off smaller than
1
- Check wiring per wiring
diagram.
34 + battery
ground (GND)
smaller than
1
8
52 + 53 Voltage supply to solenoid
valves
Ignition
switched off smaller than
1,5
- Check wiring per wiring
diagram.
- Perform test step 1
- Check wiring between TCM
and 16-pin connector page 01
-302
.
- Perform test step 1
- Check harness in
transmission according to
wiring diagram
1) Pin 28 at the control module is vacant for vehicles with 10-pin connector of multi-function switch -F125-.
Pa
ge 20 of 66 Electrical testin
g
11/20/2002 htt
p://127.0.0.1:8080/audi/servlet/Dis
play?action=Goto&t
yp
e=re
pair&id=AUDI.B5.AT02.01.16
Page 21 of 66
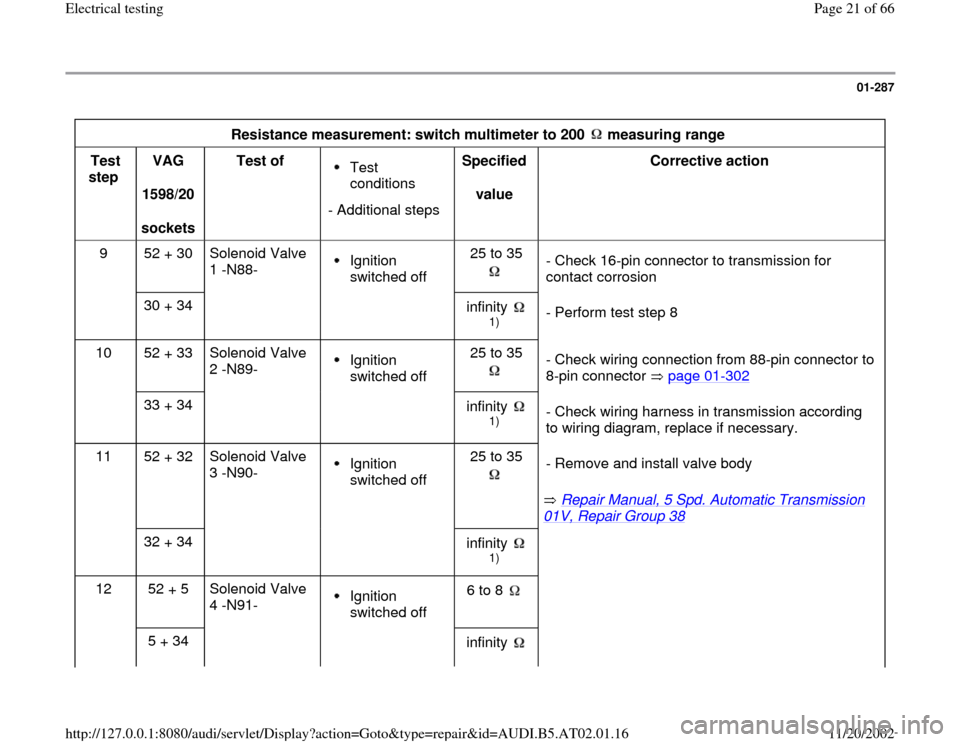
01-287
Resistance measurement: switch multimeter to 200 measuring range
Test
step VAG
1598/20
sockets Test of
Test
conditions
- Additional stepsSpecified
value Corrective action
9 52 + 30 Solenoid Valve
1 -N88- Ignition
switched off 25 to 35
- Check 16-pin connector to transmission for
contact corrosion
30 + 34
infinity
1)
- Perform test step 8
10 52 + 33 Solenoid Valve
2 -N89-
Ignition
switched off 25 to 35
- Check wiring connection from 88-pin connector to
8-pin connector page 01
-302
33 + 34
infinity
1)
- Check wiring harness in transmission according
to wiring diagram, replace if necessary.
11 52 + 32 Solenoid Valve
3 -N90-
Ignition
switched off 25 to 35
Repair Manual, 5 Spd. Automatic Transmission
01V, Repair Group 38
- Remove and install valve body
32 + 34
infinity
1)
12 52 + 5 Solenoid Valve
4 -N91-
Ignition
switched off 6 to 8
5 + 34
infinity
Pa
ge 21 of 66 Electrical testin
g
11/20/2002 htt
p://127.0.0.1:8080/audi/servlet/Dis
play?action=Goto&t
yp
e=re
pair&id=AUDI.B5.AT02.01.16
Page 23 of 66
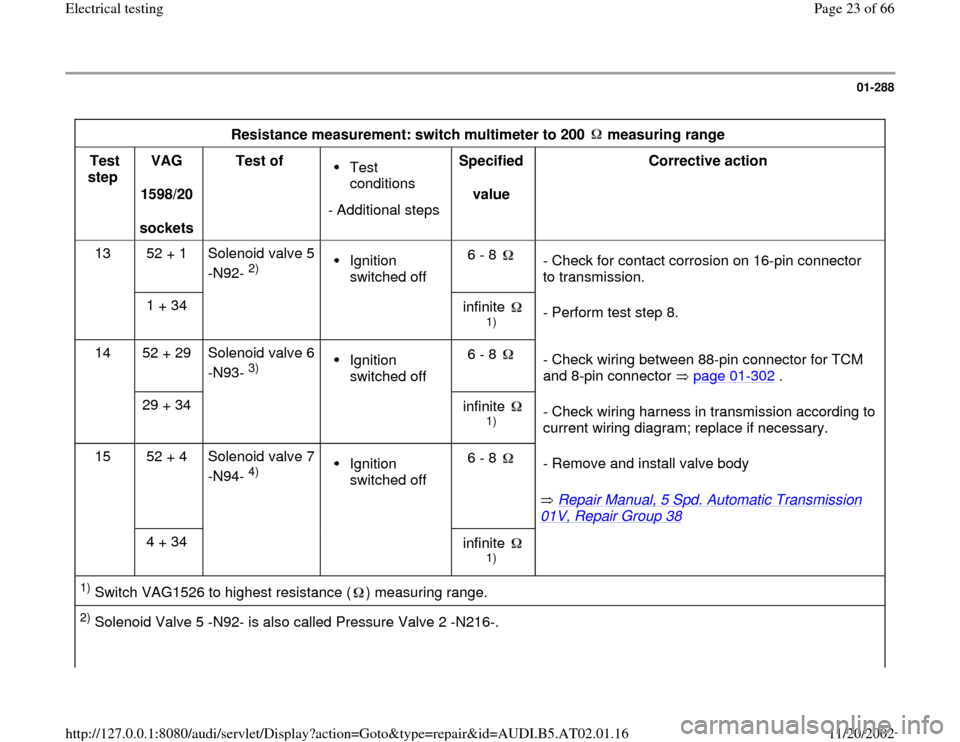
01-288
Resistance measurement: switch multimeter to 200 measuring range
Test
step VAG
1598/20
sockets Test of
Test
conditions
- Additional stepsSpecified
value Corrective action
13 52 + 1 Solenoid valve 5
-N92-
2)
Ignition
switched off 6 - 8
- Check for contact corrosion on 16-pin connector
to transmission.
1 + 34
infinite
1)
- Perform test step 8.
14 52 + 29 Solenoid valve 6
-N93-
3)
Ignition
switched off 6 - 8
- Check wiring between 88-pin connector for TCM
and 8-pin connector page 01
-302
.
29 + 34
infinite
1)
- Check wiring harness in transmission according to
current wiring diagram; replace if necessary.
15 52 + 4 Solenoid valve 7
-N94-
4)
Ignition
switched off 6 - 8
Repair Manual, 5 Spd. Automatic Transmission
01V, Repair Group 38
- Remove and install valve body
4 + 34
infinite
1)
1) Switch VAG1526 to highest resistance ( ) measuring range. 2) Solenoid Valve 5 -N92- is also called Pressure Valve 2 -N216-.
Pa
ge 23 of 66 Electrical testin
g
11/20/2002 htt
p://127.0.0.1:8080/audi/servlet/Dis
play?action=Goto&t
yp
e=re
pair&id=AUDI.B5.AT02.01.16
Page 25 of 66
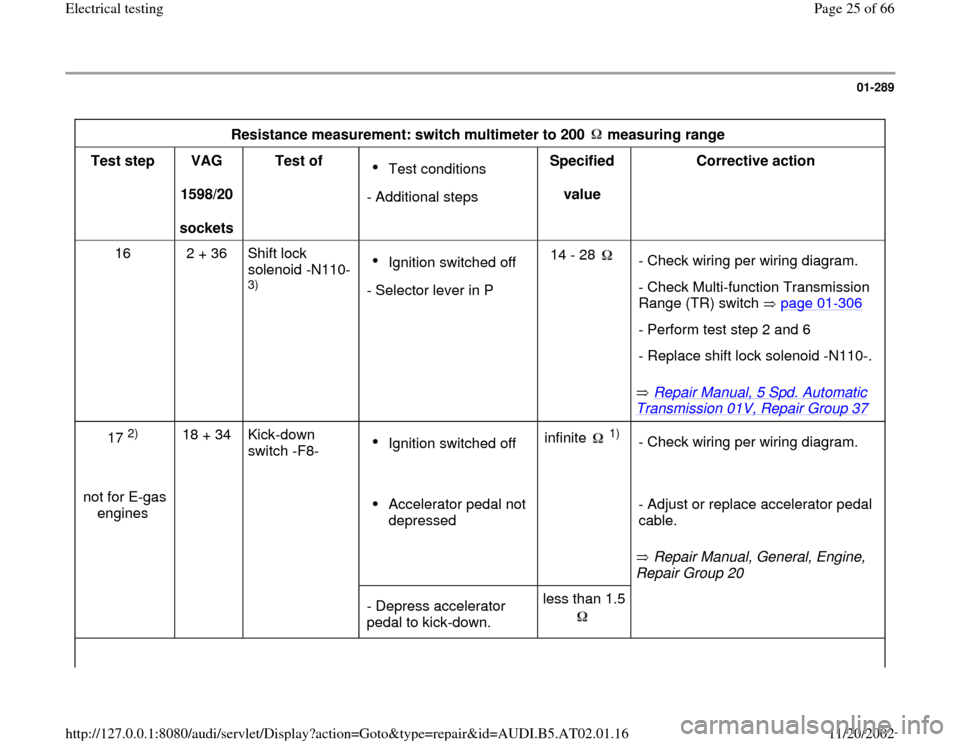
01-289
Resistance measurement: switch multimeter to 200 measuring range
Test step
VAG
1598/20
sockets Test of
Test conditions
- Additional stepsSpecified
value Corrective action
16 2 + 36 Shift lock
solenoid -N110-
3)
Ignition switched off
- Selector lever in P14 - 28
Repair Manual, 5 Spd. Automatic
Transmission 01V, Repair Group 37
- Check wiring per wiring diagram.
- Check Multi-function Transmission
Range (TR) switch page 01
-306
- Perform test step 2 and 6
- Replace shift lock solenoid -N110-.
17
2)
18 + 34 Kick-down
switch -F8-
Ignition switched off infinite
1)
- Check wiring per wiring diagram.
not for E-gas
engines
Accelerator pedal not
depressed
Repair Manual, General, Engine,
Repair Group 20 - Adjust or replace accelerator pedal
cable.
- Depress accelerator
pedal to kick-down. less than 1.5
Pa
ge 25 of 66 Electrical testin
g
11/20/2002 htt
p://127.0.0.1:8080/audi/servlet/Dis
play?action=Goto&t
yp
e=re
pair&id=AUDI.B5.AT02.01.16