selector lever position AUDI A4 2008 B8 / 4.G Owner's Manual
[x] Cancel search | Manufacturer: AUDI, Model Year: 2008, Model line: A4, Model: AUDI A4 2008 B8 / 4.GPages: 342, PDF Size: 13.14 MB
Page 170 of 342
Automatic gearbox 168
– Briefly pull the left-hand paddle lever to change down
to a lower gear.
– Briefly pull the right-hand paddle lever to change up
to a higher gear.The paddle levers are activated when the selector lever is in position
D or S, or the position for the manual shift programme (tiptronic).
The manual shift programme can, of course, still be operated using
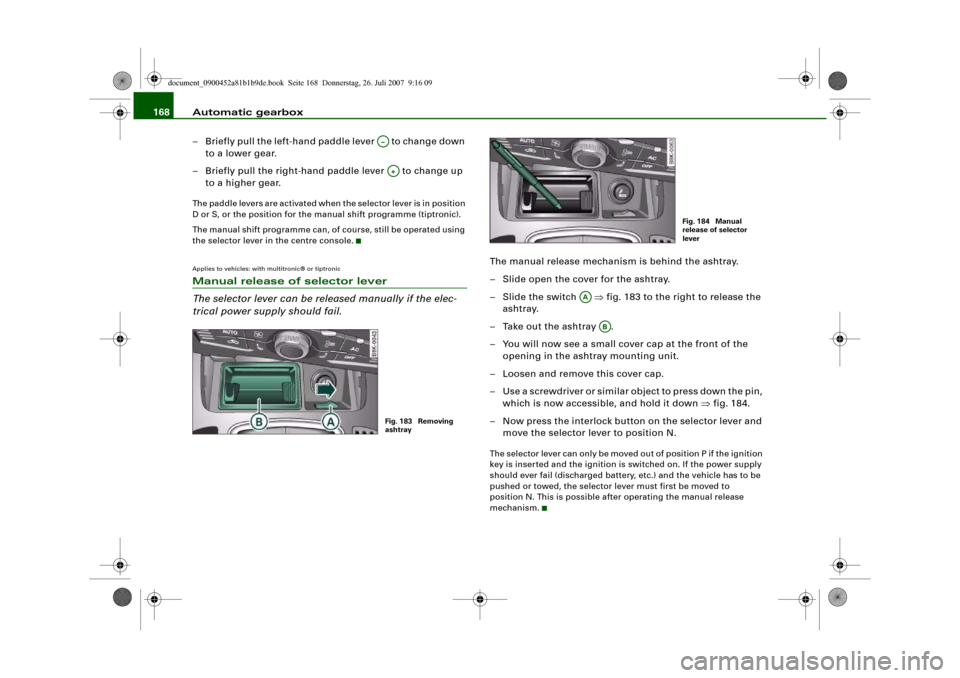
the selector lever in the centre console.Applies to vehicles: with multitronic® or tiptronicManual release of selector lever
The selector lever can be released manually if the elec-
trical power supply should fail.
The manual release mechanism is behind the ashtray.
– Slide open the cover for the ashtray.
–Slide the switch ⇒fig. 183 to the right to release the
ashtray.
– Take out the ashtray .
– You will now see a small cover cap at the front of the
opening in the ashtray mounting unit.
– Loosen and remove this cover cap.
– Use a screwdriver or similar object to press down the pin,
which is now accessible, and hold it down ⇒fig. 184.
– Now press the interlock button on the selector lever and
move the selector lever to position N.The selector lever can only be moved out of position P if the ignition
key is inserted and the ignition is switched on. If the power supply
should ever fail (discharged battery, etc.) and the vehicle has to be
pushed or towed, the selector lever must first be moved to
position N. This is possible after operating the manual release
mechanism.
A–A+Fig. 183 Removing
ashtray
Fig. 184 Manual
release of selector
lever
AA
AB
document_0900452a81b1b9de.book Seite 168 Donnerstag, 26. Juli 2007 9:16 09
Page 227 of 342
Intelligent technology225
Controls
Safety
Driving tips
General maintenance
Self-help
Technical data
WARNING
•
When applying the brakes to clean off deposits on the pads and
discs, select a clear, dry road. Be sure not to inconvenience or
endanger other road users; do not risk an accident.
•
Never let the car coast with the engine switched off (this can
cause accidents).Caution
•
Never let the brakes “drag” by leaving your foot on the pedal
when you do not really intend to brake. This overheats the brakes,
resulting in longer stopping distances and greater wear.
•
Before driving down a long, steep gradient, it is advisable to
reduce speed and move the selector lever to a lower gear. In this
way you will make use of the engine braking effect and relieve the
load on the brakes. If you still have to use the brakes, it is better to
brake firmly at intervals than to apply the brakes continuously.Note
•
If the brake servo is out of action due to a malfunction, or if the
car has to be towed, you will have to press the brake pedal consid-
erably harder to make up for the lack of servo assistance.
•
If you wish to equip the car with accessories such as a front
spoiler or wheel covers, it is important that the flow of air to the
front wheels is not obstructed, otherwise the brakes can overheat.
Power steering (servotronic)The power steering assists the driver when turning the
steering wheel (with the engine running).The power steering assists the driver by reducing the force needed
to turn the steering wheel. The degree of power assistance is
adapted electronically, depending on the speed.If a fault should occur in the servotronic system the power steering
will still operate. The degree of power assistance will, however, no
longer adapt to different speeds. If the electronic regulating system
is not working properly, this is most noticeable when turning the
steering wheel at low speeds (for instance when parking) – more
effort will be required than usual. The fault should be corrected by
a qualified workshop as soon as possible.
The power steering does not function when the engine is switched
off. In this case the steering wheel is very hard to turn.
If the steering is held at its turning limit when the car is stationary,
this will place an excessive load on the power steering system. In
this case, the power steering system will make noises. It will also
reduce the idling speed of the engine.
Caution
Do not keep the steering in the full-lock position for longer than
15 seconds when the engine is running – this could cause damage
to the power steering system.
Note
•
If the power steering should fail at any time or the engine is
switched off (for instance when being towed), the car can still be
steered. However, more effort will be required to turn the steering
wheel.
•
If the system is leaking or malfunctioning, please take the car to
a qualified workshop as soon as possible.
•
The power steering requires a special hydraulic fluid. The fluid
reservoir is located at the front of the engine compartment on the
left ⇒page 256. The correct fluid level in the reservoir is important
for the power steering to function properly. The hydraulic fluid level
is checked at the Inspection Service.
document_0900452a81b1b9de.book Seite 225 Donnerstag, 26. Juli 2007 9:16 09
Page 288 of 342
Self-help 286The TMS can be used at outside temperatures down to – 20 °C.
WARNING
After repairing a tyre please note the following points:•
Do not drive faster than 80 km/h.
•
Avoid heavy acceleration, hard braking and fast cornering.
•
Vehicle handling could be impaired.
•
Tyres which have been sealed using the TMS are only suitable
for temporary use. Damaged tyres must be renewed.
•
The TMS must NOT be used,
−on cuts and punctures larger than 4 mm
−if the wheel rim has been damaged
−if you have been driving with very low pressure or a
completely flat tyre
•
Seek professional assistance if the repair of a tyre puncture is
not possible with the sealing compound.
•
Do not allow the sealant to come into contact with your eyes,
skin or clothing.
•
If you do come into contact with the sealant immediately rinse
the eyes or skin affected with clean water.
•
Change clothing immediately if it becomes soiled with the tyre
sealant.
•
Make sure you do not breathe in the fumes!
•
If any of the tyre sealant is accidentally ingested, immediately
rinse the mouth thoroughly and drink lots of water.
•
Do not induce vomiting. Immediately contact a doctor!
•
If any allergic reactions should occur get medical help immedi-
ately.
•
Keep the sealant away from children.
For the sake of the environment
Used bottles of sealing compound can be returned to an Audi dealer
for disposal.
Note
•
If sealant should leak out, leave it to dry. When it has dried, you
can pull it off like a piece of foil.
•
Observe the expiry date stated on the sealing compound can.
Have the sealing compound exchanged by a qualified workshop.
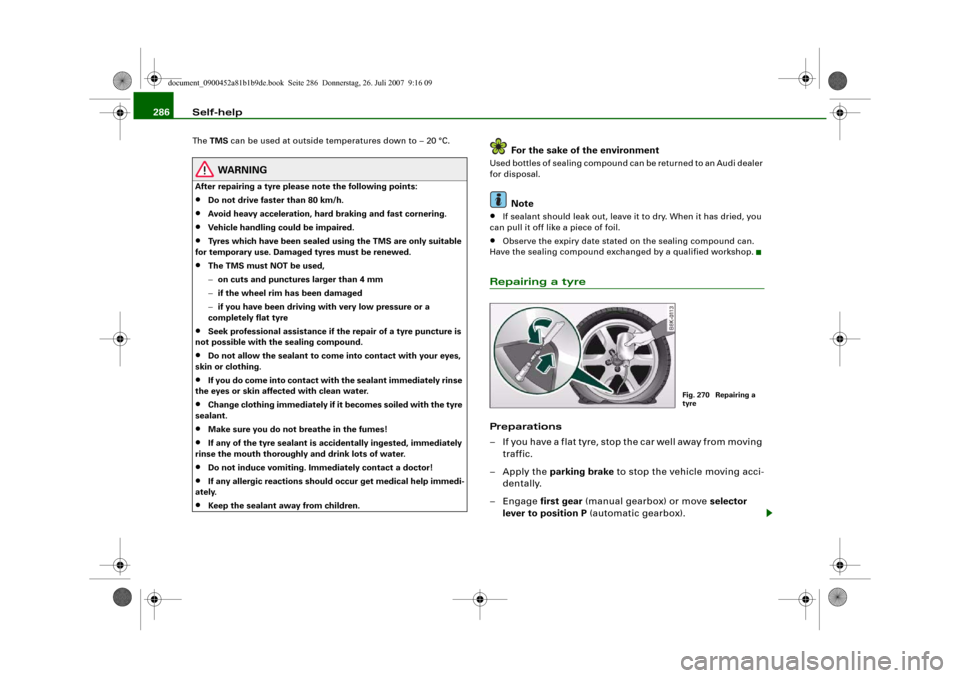
Repairing a tyrePreparations
– If you have a flat tyre, stop the car well away from moving
traffic.
– Apply the parking brake to stop the vehicle moving acci-
dentally.
–Engage first gear (manual gearbox) or move selector
lever to position P (automatic gearbox).
Fig. 270 Repairing a
tyre
document_0900452a81b1b9de.book Seite 286 Donnerstag, 26. Juli 2007 9:16 09
Page 290 of 342
Self-help 288•
Seek professional assistance if the repair of a tyre puncture is
not possible with the sealing compound.
•
If tyre pressure is less than 1.3 bar after driving about 10
minutes, the tyre is too badly damaged. Do not drive on. You
should obtain professional assistance.Caution
Take special care if you have to repair a tyre on a gradient.
Note
•
Do not use the compressor for longer than 6 minutes at a time,
as it could overheat. When the compressor has cooled down, you
can use it again.
•
If tyre sealant should leak out, leave it to dry and then pull it off
like foil.
•
After carrying out a tyre repair remember to buy a new tyre
sealant can at a qualified workshop. This will ensure that the Tyre
Mobility System is operative again.
•
Please observe the relevant regulations.
Changing a wheelPreparations
Some preparations are necessary before changing a
wheel.– If you have a flat tyre, stop the car well away from moving
traffic. Choose a location that is as level as possible.– All passengers should leave the car. They should wait in
a safe place (for instance behind the roadside crash
barrier).
– Apply the parking brake to stop the vehicle moving acci-
dentally.
–Engage first gear (manual gearbox) or move selector
lever to position P (automatic gearbox).
– When towing a trailer: unhitch the trailer from your
vehicle.
– Take the tools ⇒page 283 and the spare wheel*
⇒page 284 out of the luggage compartment.
WARNING
If you have a puncture in moving traffic, switch on the hazard
warning lights and place the warning triangle in a visible location.
This is for your own safety and also warns other road users.
Caution
If you have to change the tyre on a gradient, block the wheel oppo-
site the wheel being changed by placing a stone or similar object
under it to prevent the vehicle from rolling away.
Note
Please observe the relevant regulations.How to change a wheel
Change the wheel as described below.–Pull off the hub cap. Also refer to ⇒page 289, “Hub
caps”.
WARNING (continued)
document_0900452a81b1b9de.book Seite 288 Donnerstag, 26. Juli 2007 9:16 09
Page 297 of 342
Self-help295
Controls
Safety
Driving tips
General maintenance
Self-help
Technical data terminal must not touch metal parts of the vehicle: this can cause
short circuiting.
•
Do not bend over the batteries – risk of acid burns.
•
The screw plugs on the battery cells must be screwed in firmly.
•
Keep sparks, flame and lighted cigarettes away from batteries:
the gases given off can cause an explosion.
•
If jump-starting another vehicle, position the jump leads in
such a way that they cannot come into contact with any moving
parts in the engine compartment of the other vehicle.Caution
Please note that the above method of connecting the leads is meant
for jump-starting your vehicle. If jump-starting another vehicle, you
should not connect the negative lead (–) to the negative terminal of
the discharged battery, but directly to the engine block or a solid
metal part bolted to the engine block. If the battery of the other
vehicle does not have a gas vent, there is a risk that a mixture of
oxygen and hydrogen gas can accumulate and cause an
explosion.Tow-starting and towing awayGeneral notes
Points to observe when tow-starting or towing awayIf you use a towrope:
Notes for the driver of the towing vehicle
– The towrope must be taut before driving off.– Engage the clutch very gently when starting to move; on
vehicles with automatic gearbox press the accelerator
slowly.
Notes for the driver of the towed vehicle
– The ignition should be switched on so that the turn
signals, horn, windscreen wipers and washers can be
used. Please ensure that the steering wheel is unlocked
when you switch on the ignition, and that it moves freely.
–Put gear lever in neutral (manual gearbox) or move
selector lever to position N (automatic gearbox).
– The brake servo and power steering only work when the
engine is running. Considerably more effort is required
on the brake pedal and steering wheel when the engine
is switched off.
– Ensure that the towrope remains taut at all times when
towing.
Towrope or towbar
It is easier and safer to tow a vehicle with a towbar. You should only
use a towrope if you do not have a towbar.
A towrope should be slightly elastic to reduce the loading on both
vehicles. It is advisable to use a towrope made of synthetic fibre or
similar material.
Attach the tow-rope or tow-bar only to the towing anchorages
intended for this purpose ⇒page 296 or ⇒page 297.
Driving technique
Towing requires some experience – especially when using a
towrope. Both drivers should be familiar with the technique required
for towing. Inexperienced drivers should not attempt to tow-start or
tow away another vehicle.
WARNING (continued)
document_0900452a81b1b9de.book Seite 295 Donnerstag, 26. Juli 2007 9:16 09
Page 300 of 342
Self-help 298
WARNING
There is a high risk of accidents when tow-starting, as the towed
vehicle can easily be driven into the towing vehicle.
Caution
When tow-starting the vehicle, do not tow it further than 50 metres:
otherwise the catalytic converter could be damaged.Towing a vehicle with manual gearbox and front-wheel drive
Towing is relatively straightforward.Please observe the notes ⇒page 295.
The vehicle can be towed using a towbar or towrope in the normal
way, with all four wheels on the road; it can also be towed with
either the front or rear wheels lifted off the road. The vehicle must
not be towed faster than 50 km/h.Towing a vehicle with automatic gearbox and front-wheel drive
Certain restrictions must be observed when towing your
vehicle.Please observe the notes ⇒page 295.
The vehicle can be towed with a towbar or towrope in the normal
way, with all four wheels on the ground. When doing so, please note
the following points:•
Release the parking brake ⇒page 121.
•
Make sure the selector lever is in the N position.
•
The vehicle must not be towed faster than 50 km/h.
•
The vehicle must not be towed further than 50 km. The reason
for this is: when the engine is not running, the gearbox oil pump
does not work and the gearbox is not adequately lubricated for
higher speeds or longer distances.
If the vehicle has to be towed with a breakdown truck, it must only
be suspended at the front wheels. The reason for this is: the drive
shafts are located on the front wheels. If the car is towed with the
rear wheels lifted off the road (i.e. travelling backwards), the drive
shafts also turn backwards. The planetary gears in the automatic
gearbox then turn at such high speeds that the gearbox will be
severely damaged in a short time.Note
If it is not possible to tow the vehicle as described above, or if it has
to be towed further than 50 km, it must be transported on a special
car transporter or trailer.Towing a vehicle with manual gearbox and four-wheel drive
Certain restrictions must be observed when towing your
vehicle.Please observe the notes ⇒page 295.
The vehicle can be towed with a towbar or towrope in the normal
way, with all four wheels on the ground. It can also be towed by a
breakdown truck, with the wheels lifted at either the front or rear.
When doing so, please note the following points:•
The vehicle must not be towed faster than 50 km/h.
•
The vehicle must not be towed further than 50 km.
document_0900452a81b1b9de.book Seite 298 Donnerstag, 26. Juli 2007 9:16 09
Page 301 of 342
Self-help299
Controls
Safety
Driving tips
General maintenance
Self-help
Technical data
Note
If it is not possible to tow the vehicle as described above, or if it has
to be towed further than 50 km, it must be transported on a special
car transporter or trailer.Towing a vehicle with automatic gearbox and four-wheel drive
Certain restrictions must be observed when towing your
vehicle.Please observe the notes ⇒page 295.
The vehicle can be towed with a towbar or towrope in the normal
way, with all four wheels on the ground. When doing so, please note
the following points:•
Release the parking brake ⇒page 121.
•
Make sure the selector lever is in the N position.
•
The vehicle must not be towed faster than 50 km/h.
•
The vehicle must not be towed further than 50 km. The reason
for this is: when the engine is not running, the gearbox oil pump
does not work and the gearbox is not adequately lubricated for
higher speeds or longer distances.
The vehicle must not be towed with the wheels lifted at either the
front or rear.Note
If it is not possible to tow the vehicle as described above, or if it has
to be towed further than 50 km, it must be transported on a special
car transporter or trailer.
document_0900452a81b1b9de.book Seite 299 Donnerstag, 26. Juli 2007 9:16 09
Page 333 of 342
Index331
Controls
Safety
Driving tips
General maintenance
Self-help
Technical data Automatic air conditioner plus
SeeDeluxe automatic air conditioner plus
101
Automatic cruise control
Seeadaptive cruise control . . . . . . . . 128
Automatic gearbox
Dynamic gear control program . . . . . 166
Kick-down feature . . . . . . . . . . . . . . . . 165
Manual release (multitronic®) . . . . . . 168
multitronic® . . . . . . . . . . . . . . . . . . . . . 162
Paddle levers (tiptronic mode) . . . . . . 167
Safety interlock for ignition key . . . . . 116
Selector lever lock . . . . . . . . . . . . . . . . 165
Selector lever positions . . . . . . . . . . . 163
Steering wheel with paddle levers . . 167
tiptronic . . . . . . . . . . . . . . . . . . . . 162, 166
Automatic headlight control . . . . . . . . . . . 57
Automatic headlights . . . . . . . . . . . . . . . . . 59
Auxiliary heating
Deluxe automatic air conditioner plus . .
110
Description . . . . . . . . . . . . . . . . . . . . . . 110
Remote control . . . . . . . . . . . . . . . . . . 113
Running time . . . . . . . . . . . . . . . . . . . . 112
Switching on/off immediately . . . . . . 111
Timer . . . . . . . . . . . . . . . . . . . . . . . . . . . 111
Average fuel consumption . . . . . . . . . . . . . 25
Average speed . . . . . . . . . . . . . . . . . . . . . . . 25
Axle weights
SeePerformance, weights and
dimensions . . . . . . . . . . . . . . . . . . . . 323
BBattery
Charging . . . . . . . . . . . . . . . . . . . . . . . . 265
Low charge . . . . . . . . . . . . . . . . . . . . . . 226
Power level . . . . . . . . . . . . . . . . . . . . . . 226
Power management . . . . . . . . . . . . . . 226
Replacing . . . . . . . . . . . . . . . . . . . . . . . 266
Winter conditions . . . . . . . . . . . . . . . . 263
Battery power . . . . . . . . . . . . . . . . . . . . . . . 38
Bayonet fastener
Bulb . . . . . . . . . . . . . . . . . . . . . . . . . . . . 305
Bulb holder . . . . . . . . . . . . . . . . . . . . . . 306
Belt tensioners . . . . . . . . . . . . . . . . . . . . . . 199
Bicycle rack
Trailer . . . . . . . . . . . . . . . . . . . . . . . . . . 235
Biodiesel . . . . . . . . . . . . . . . . . . . . . . . . . . . 251
Bioethanol fuel . . . . . . . . . . . . . . . . . . . . . 251
Blower
Deluxe automatic air conditioner . . . . . 96
Deluxe automatic air conditioner plus . .
104
Bonnet
Closing . . . . . . . . . . . . . . . . . . . . . . . . . 256
Opening . . . . . . . . . . . . . . . . . . . . . . . . 254
Releasing . . . . . . . . . . . . . . . . . . . . . . . 254
Boot
SeeLoading luggage compartment . 192
SeeLuggage compartment . . . . . . . . . . 79
Boot lid
Central locking system . . . . . . . . . . . . . 51
Manual release . . . . . . . . . . . . . . . . . . . . 52Brake system
Brake assist system . . . . . . . . . . . . . . . 222
Brake fluid . . . . . . . . . . . . . . . . . . . . . . . 262
Brake light defective . . . . . . . . . . . . . . . 37
Brake pads worn . . . . . . . . . . . . . . . . . . 37
Brake servo . . . . . . . . . . . . . . . . . . . . . . 224
Electro-mechanical parking brake . . . 121
General notes . . . . . . . . . . . . . . . . . . . . 224
Malfunction . . . . . . . . . . . . . . . . . . . . . . 32
Warning lamp . . . . . . . . . . . . . . . . . . . . . 20
braking guard
SeeAudi braking guard . . . . . . . . . . . . 142
Bulb holder
Bayonet fastener . . . . . . . . . . . . . . . . . 306
Bulb monitor . . . . . . . . . . . . . . . . . . . . . . . . 37
Bulbs
Bayonet fastener . . . . . . . . . . . . . . . . . 305
Changing (general notes) . . . . . . . . . . 304
Bulbs, changing . . . . . . . . . . . . . . . . . . . . . 304
Brake lights . . . . . . . . . . . . . . . . . . . . . . 311
Bulb holder with bayonet fastener . 305,
306
Dipped headlights . . . . . . . . . . . . . . . . 308
Front fog lights . . . . . . . . . . . . . . . . . . . 310
Main beam headlights . . . . . . . . . . . . . 307
Number plate light . . . . . . . . . . . . . . . . 315
Rear fog light . . . . . . . . . . . . . . . . . . . . 314
Rear lights . . . . . . . . . . . . . . . . . . . . . . . 311
Reversing light . . . . . . . . . . . . . . . . . . . 314
Turn signals (rear) . . . . . . . . . . . . . . . . 311
Business equipment . . . . . . . . . . . . . . . . . 278
document_0900452a81b1b9de.book Seite 331 Donnerstag, 26. Juli 2007 9:16 09
Page 340 of 342
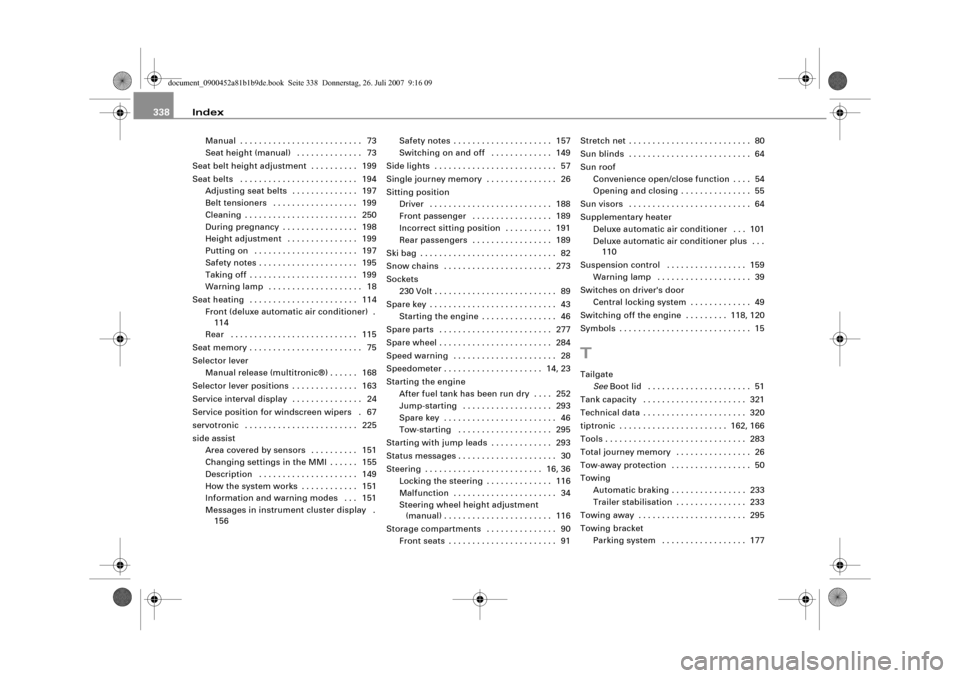
Index 338
Manual . . . . . . . . . . . . . . . . . . . . . . . . . . 73
Seat height (manual) . . . . . . . . . . . . . . 73
Seat belt height adjustment . . . . . . . . . . 199
Seat belts . . . . . . . . . . . . . . . . . . . . . . . . . 194
Adjusting seat belts . . . . . . . . . . . . . . 197
Belt tensioners . . . . . . . . . . . . . . . . . . 199
Cleaning . . . . . . . . . . . . . . . . . . . . . . . . 250
During pregnancy . . . . . . . . . . . . . . . . 198
Height adjustment . . . . . . . . . . . . . . . 199
Putting on . . . . . . . . . . . . . . . . . . . . . . 197
Safety notes . . . . . . . . . . . . . . . . . . . . . 195
Taking off . . . . . . . . . . . . . . . . . . . . . . . 199
Warning lamp . . . . . . . . . . . . . . . . . . . . 18
Seat heating . . . . . . . . . . . . . . . . . . . . . . . 114
Front (deluxe automatic air conditioner) .
114
Rear . . . . . . . . . . . . . . . . . . . . . . . . . . . 115
Seat memory . . . . . . . . . . . . . . . . . . . . . . . . 75
Selector lever
Manual release (multitronic®) . . . . . . 168
Selector lever positions . . . . . . . . . . . . . . 163
Service interval display . . . . . . . . . . . . . . . 24
Service position for windscreen wipers . 67
servotronic . . . . . . . . . . . . . . . . . . . . . . . . 225
side assist
Area covered by sensors . . . . . . . . . . 151
Changing settings in the MMI . . . . . . 155
Description . . . . . . . . . . . . . . . . . . . . . 149
How the system works . . . . . . . . . . . . 151
Information and warning modes . . . 151
Messages in instrument cluster display .
156Safety notes . . . . . . . . . . . . . . . . . . . . . 157
Switching on and off . . . . . . . . . . . . . 149
Side lights . . . . . . . . . . . . . . . . . . . . . . . . . . 57
Single journey memory . . . . . . . . . . . . . . . 26
Sitting position
Driver . . . . . . . . . . . . . . . . . . . . . . . . . . 188
Front passenger . . . . . . . . . . . . . . . . . 189
Incorrect sitting position . . . . . . . . . . 191
Rear passengers . . . . . . . . . . . . . . . . . 189
Ski bag . . . . . . . . . . . . . . . . . . . . . . . . . . . . . 82
Snow chains . . . . . . . . . . . . . . . . . . . . . . . 273
Sockets
230 Volt . . . . . . . . . . . . . . . . . . . . . . . . . . 89
Spare key . . . . . . . . . . . . . . . . . . . . . . . . . . . 43
Starting the engine . . . . . . . . . . . . . . . . 46
Spare parts . . . . . . . . . . . . . . . . . . . . . . . . 277
Spare wheel . . . . . . . . . . . . . . . . . . . . . . . . 284
Speed warning . . . . . . . . . . . . . . . . . . . . . . 28
Speedometer . . . . . . . . . . . . . . . . . . . . . 14, 23
Starting the engine
After fuel tank has been run dry . . . . 252
Jump-starting . . . . . . . . . . . . . . . . . . . 293
Spare key . . . . . . . . . . . . . . . . . . . . . . . . 46
Tow-starting . . . . . . . . . . . . . . . . . . . . 295
Starting with jump leads . . . . . . . . . . . . . 293
Status messages . . . . . . . . . . . . . . . . . . . . . 30
Steering . . . . . . . . . . . . . . . . . . . . . . . . . 16, 36
Locking the steering . . . . . . . . . . . . . . 116
Malfunction . . . . . . . . . . . . . . . . . . . . . . 34
Steering wheel height adjustment
(manual) . . . . . . . . . . . . . . . . . . . . . . . 116
Storage compartments . . . . . . . . . . . . . . . 90
Front seats . . . . . . . . . . . . . . . . . . . . . . . 91Stretch net . . . . . . . . . . . . . . . . . . . . . . . . . . 80
Sun blinds . . . . . . . . . . . . . . . . . . . . . . . . . . 64
Sun roof
Convenience open/close function . . . . 54
Opening and closing . . . . . . . . . . . . . . . 55
Sun visors . . . . . . . . . . . . . . . . . . . . . . . . . . 64
Supplementary heater
Deluxe automatic air conditioner . . . 101
Deluxe automatic air conditioner plus . . .
110
Suspension control . . . . . . . . . . . . . . . . . 159
Warning lamp . . . . . . . . . . . . . . . . . . . . 39
Switches on driver's door
Central locking system . . . . . . . . . . . . . 49
Switching off the engine . . . . . . . . . 118, 120
Symbols . . . . . . . . . . . . . . . . . . . . . . . . . . . . 15
TTailgate
SeeBoot lid . . . . . . . . . . . . . . . . . . . . . . 51
Tank capacity . . . . . . . . . . . . . . . . . . . . . . 321
Technical data . . . . . . . . . . . . . . . . . . . . . . 320
tiptronic . . . . . . . . . . . . . . . . . . . . . . . 162, 166
Tools . . . . . . . . . . . . . . . . . . . . . . . . . . . . . . 283
Total journey memory . . . . . . . . . . . . . . . . 26
Tow-away protection . . . . . . . . . . . . . . . . . 50
Towing
Automatic braking . . . . . . . . . . . . . . . . 233
Trailer stabilisation . . . . . . . . . . . . . . . 233
Towing away . . . . . . . . . . . . . . . . . . . . . . . 295
Towing bracket
Parking system . . . . . . . . . . . . . . . . . . 177
document_0900452a81b1b9de.book Seite 338 Donnerstag, 26. Juli 2007 9:16 09