buttons AUDI A4 2008 B8 / 4.G Owners Manual
[x] Cancel search | Manufacturer: AUDI, Model Year: 2008, Model line: A4, Model: AUDI A4 2008 B8 / 4.GPages: 342, PDF Size: 13.14 MB
Page 46 of 342
Doors and windows 44Data stored on remote control key
Data related to the service and maintenance of the vehicle are
stored continuously on your remote control key. Your Audi dealer
can read out the data and will then be able to tell you what service
work is required. This also applies to vehicles with advanced key.
Personal convenience settings
If two people use the same car regularly, it is a good idea for each
person to have his or her “own” remote control key. When you
switch off the ignition or lock the vehicle, your personal settings for
the following convenience features are stored and assigned to the
remote control key:•
Air conditioner
•
Central locking system
•
Windows
•
parking system*
•
adaptive cruise control*
•
Audi drive select*
•
Seat memory*
The stored settings are then recalled automatically the next time the
vehicle is unlocked, the doors are opened or the ignition is switched
on.
WARNING
•
Always take the key with you when leaving the vehicle - even if
you only intend to be gone for a short time. This is especially
important if children are left in the car. They might otherwise be
able to start the engine or use power-operated equipment such as
the electric windows - this could lead to injuries.
•
Wait for the vehicle to come to a standstill before removing the
ignition key from the lock. Otherwise the steering lock could
engage suddenly, causing an accident.
Note
The function of the remote control key may be impaired by interfer-
ence from other nearby radio signals (for example from a mobile
telephone or TV transmitter) if these are in the same frequency
range.Indicator lamp on remote control key
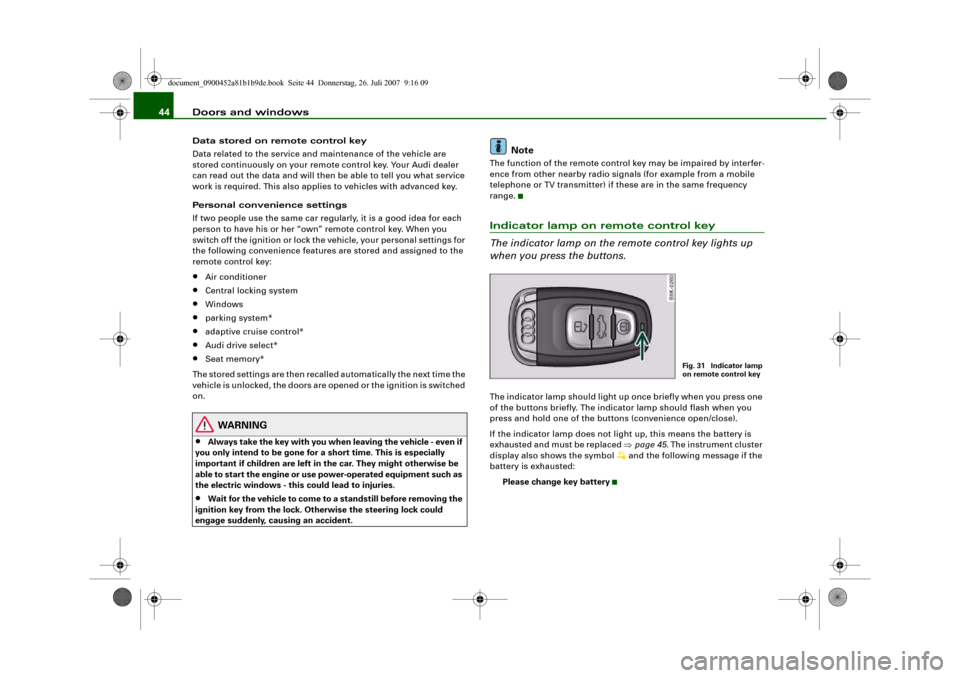
The indicator lamp on the remote control key lights up
when you press the buttons.The indicator lamp should light up once briefly when you press one
of the buttons briefly. The indicator lamp should flash when you
press and hold one of the buttons (convenience open/close).
If the indicator lamp does not light up, this means the battery is
exhausted and must be replaced ⇒page 45. The instrument cluster
display also shows the symbol
and the following message if the
battery is exhausted:
Please change key battery
Fig. 31 Indicator lamp
on remote control key
document_0900452a81b1b9de.book Seite 44 Donnerstag, 26. Juli 2007 9:16 09
Page 49 of 342
Doors and windows47
Controls
Safety
Driving tips
General maintenance
Self-help
Technical data
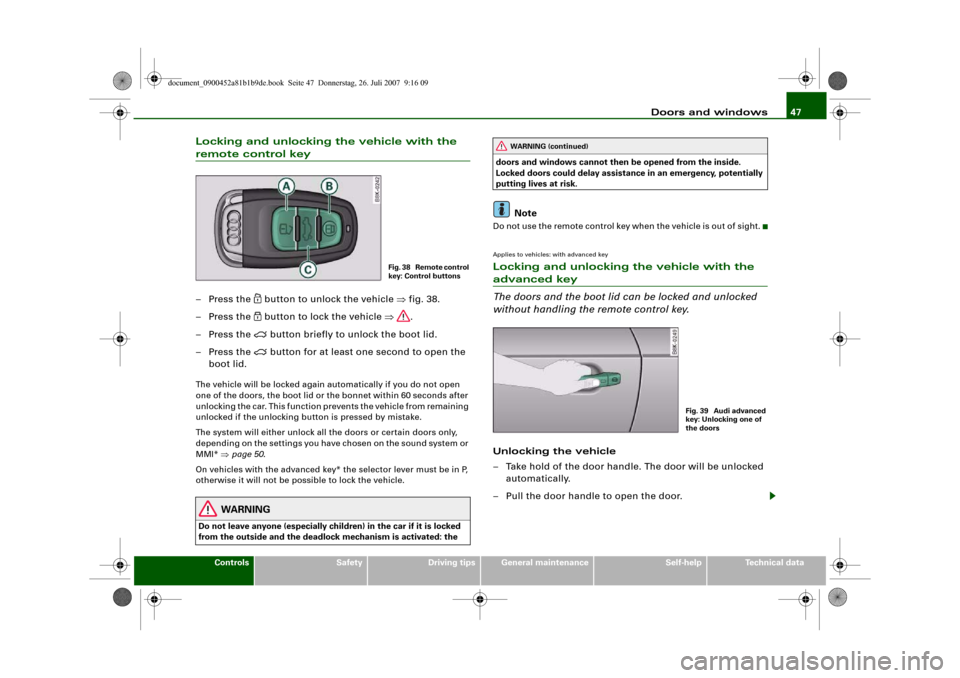
Locking and unlocking the vehicle with the remote control key– Press the
button to unlock the vehicle ⇒fig. 38.
– Press the button to lock the vehicle ⇒.
– Press the
button briefly to unlock the boot lid.
– Press the
button for at least one second to open the
boot lid.
The vehicle will be locked again automatically if you do not open
one of the doors, the boot lid or the bonnet within 60 seconds after
unlocking the car. This function prevents the vehicle from remaining
unlocked if the unlocking button is pressed by mistake.
The system will either unlock all the doors or certain doors only,
depending on the settings you have chosen on the sound system or
MMI* ⇒page 50.
On vehicles with the advanced key* the selector lever must be in P,
otherwise it will not be possible to lock the vehicle.
WARNING
Do not leave anyone (especially children) in the car if it is locked
from the outside and the deadlock mechanism is activated: the doors and windows cannot then be opened from the inside.
Locked doors could delay assistance in an emergency, potentially
putting lives at risk.
Note
Do not use the remote control key when the vehicle is out of sight.Applies to vehicles: with advanced keyLocking and unlocking the vehicle with the advanced key
The doors and the boot lid can be locked and unlocked
without handling the remote control key.Unlocking the vehicle
– Take hold of the door handle. The door will be unlocked
automatically.
– Pull the door handle to open the door.
Fig. 38 Remote control
key: Control buttons
WARNING (continued)
Fig. 39 Audi advanced
key: Unlocking one of
the doors
document_0900452a81b1b9de.book Seite 47 Donnerstag, 26. Juli 2007 9:16 09
Page 77 of 342
Seats and storage75
Controls
Safety
Driving tips
General maintenance
Self-help
Technical data
Adjusting contour of lumbar support
– Press the front or rear of switch to increase or
decrease the curvature of the lumbar support as
required.
Adjusting height of lumbar support
– Press the top or bottom of adjuster switch to move the
lumbar support upwards or downwards as required.
Moving seat backwards or forwards
– Press switch ⇒page 74, fig. 76 forwards or back-
wards.
Adjusting seat height
– Press switch up or down.
Raising/lowering seat at front
– Press the front of switch up or down.
Raising/lowering seat at rear
– Press the rear of switch up or down.
Adjusting backrest angle
– Press switch forwards or backwards.
Extending or shortening the thigh support*
– Lift the control below the seat cushion. The front seat
cushion will spring forward.
– Slide the seat cushion back to the normal position after
each use.
WARNING
•
Never adjust the driver's seat when the vehicle is moving - this
could lead to an accident.
•
The electrical seat adjustment also works when the ignition is
off and when the key is not in the ignition. To avoid accidental inju-
ries, never leave children unattended in the vehicle.
•
Be careful when adjusting the seat height. Careless or uncon-
trolled use of the height adjustment can cause injuries.
•
Do not drive with the backrests of the front seats reclined too
far as otherwise the seat belt and airbag could fail to restrain the
wearer properly in an accident, possibly leading to injury.
Seat memoryMemory for driver's seat
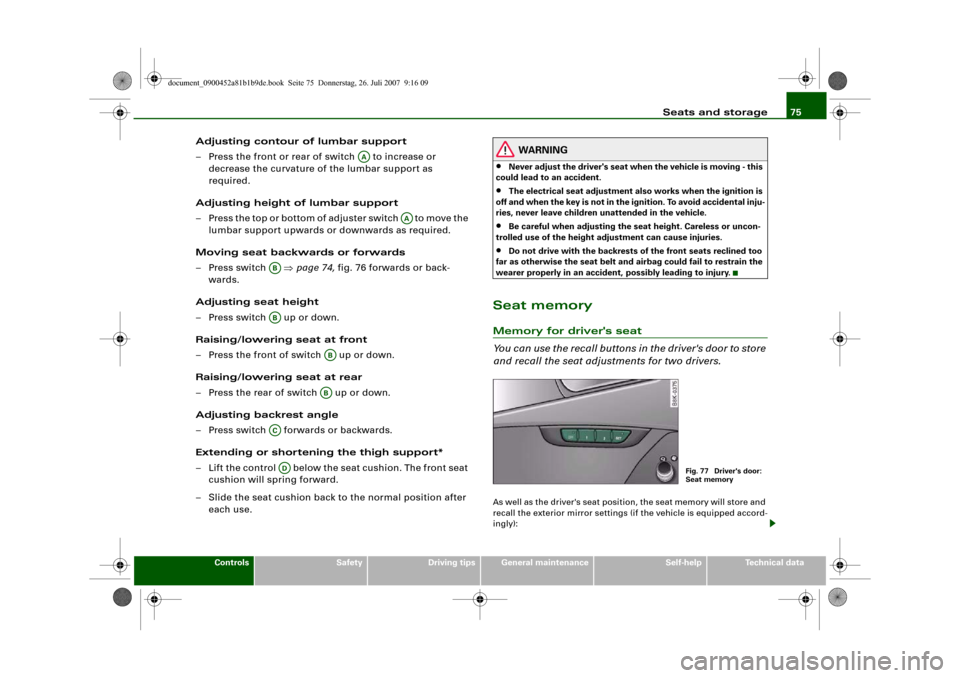
You can use the recall buttons in the driver's door to store
and recall the seat adjustments for two drivers.As well as the driver's seat position, the seat memory will store and
recall the exterior mirror settings (if the vehicle is equipped accord-
ingly):
AA
AA
ABAB
ABAB
ACAD
Fig. 77 Driver's door:
Seat memory
document_0900452a81b1b9de.book Seite 75 Donnerstag, 26. Juli 2007 9:16 09
Page 78 of 342
Seats and storage 76Storing and recalling settings
You can store and recall the settings for two different drivers using
the recall buttons 1 and 2 ⇒page 75, fig. 77 ⇒page 76.
In addition, the current settings are automatically stored when you
lock the vehicle and assigned to the remote control key that is being
used. When you unlock the vehicle, the system automatically recalls
the settings stored on that remote control key.
Switching seat memory on and off
The seat memory will be out of action if the switch has been
pressed and the diode in the switch is lit. In this case, the setting
cannot be stored.
The stored settings will all remain in the memory. However, the seat
can now only be adjusted using the conventional electrical
adjustment.Applies to vehicles: with seat memoryStoring and recalling settingsStoring settings
– Adjust the driver's seat as required.
– Adjust both exterior mirrors.
– Press the button. The diode in the switch will light
up to indicate that it is ready to store the settings. Now
press the desired recall button for at least a second.
– Release the button. The setting is now stored on the
selected recall button.
Recalling settings
– If the driver's door is open, press the desired recall
button briefly.– If the driver's door is closed, press and hold down the
desired recall button until the programmed settings are
reached.
A tone will sound and the diode in the button ⇒page 75,
fig. 77 will light up to confirm that the settings have been stored.
When you lock the vehicle the current settings are automatically
stored and assigned to the remote control key. However, the
settings assigned to the remote control key will not overwrite the
settings stored on recall buttons 1 and 2. The settings stored on the
recall buttons can be called up at any time. When you unlock the
vehicle, the settings assigned to the remote control key are recalled
automatically.
If your vehicle is also driven by other persons using your remote
control key, it is advisable to store your personal settings on one of
the recall buttons. You can then recall your own settings at any time
simply by pressing the corresponding recall button. When you lock
the vehicle these settings are then stored automatically and
assigned once again to the remote control key.
WARNING
•
For safety reasons, never recall seat settings when the vehicle
is moving - this could lead to an accident.
•
In an emergency the recall function can be stopped at any time
by pressing the switch, or by briefly pressing any of the
recall buttons.
OFF
SET
SET
ON/OFF
document_0900452a81b1b9de.book Seite 76 Donnerstag, 26. Juli 2007 9:16 09
Page 96 of 342
Heating and cooling 94and lead to an accident. Please familiarise yourself with the oper-
ating controls for the air conditioner, including the demist/defrost
functions for the windows.
Caution
•
If you suspect that the air conditioner is damaged, switch it off
to prevent further damage and have the system checked by a quali-
fied workshop.
•
Repairs to the Audi air conditioner require specialist knowledge
and special tools. For this reason, please contact a qualified work-
shop if the system is not working properly.Note
•
Keep the air intake slots in front of the windscreen clear of snow,
ice and leaves to ensure unimpaired heating and cooling, and to
prevent the windows misting over.
•
The air from the outlets flows through the passenger compart-
ment and out through the slots at the rear of the vehicle. Do not
cover these slots with clothing or other objects.
•
The air conditioner operates most effectively with the windows
and the tilting panorama roof* closed. However, if the vehicle has
heated up after standing in the sun for some time, the air inside can
be cooled more quickly by opening the windows for a short time.
Applies to vehicles: with deluxe automatic air conditionerControls
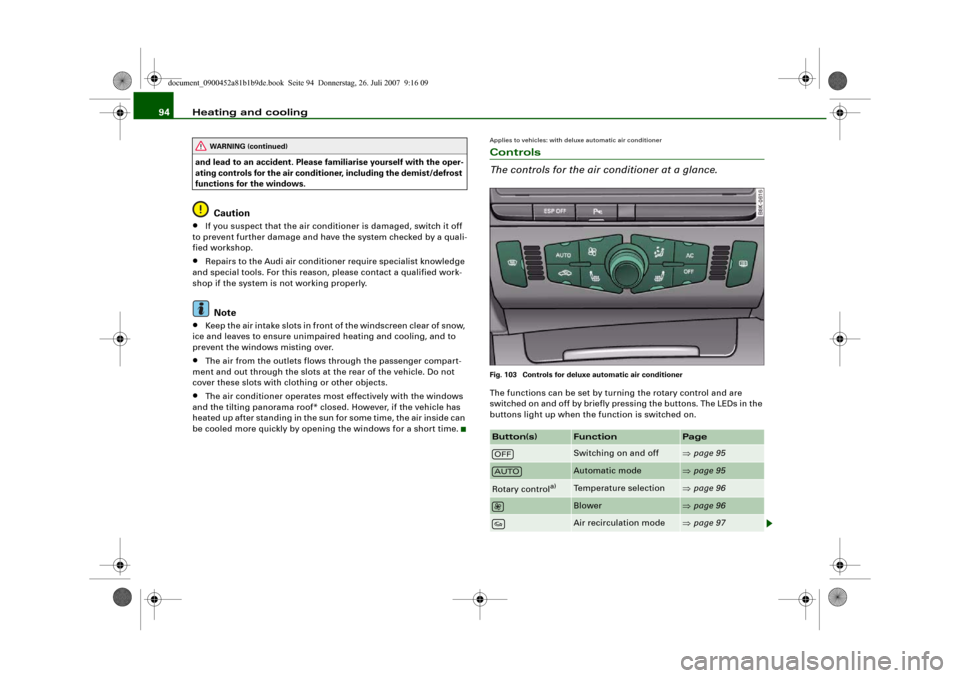
The controls for the air conditioner at a glance.Fig. 103 Controls for deluxe automatic air conditionerThe functions can be set by turning the rotary control and are
switched on and off by briefly pressing the buttons. The LEDs in the
buttons light up when the function is switched on.
WARNING (continued)
Button(s)
Function
Page
Switching on and off
⇒page 95
Automatic mode
⇒page 95
Rotary control
a)
Temperature selection
⇒page 96
Blower
⇒page 96
Air recirculation mode
⇒page 97
OFFAUTO
document_0900452a81b1b9de.book Seite 94 Donnerstag, 26. Juli 2007 9:16 09
Page 97 of 342
Heating and cooling95
Controls
Safety
Driving tips
General maintenance
Self-help
Technical data
Note
The grille on the control console ⇒page 94, fig. 103 must be kept
free. Please ensure that it is not covered by stickers or similar. Meas-
uring sensors are located behind it.Applies to vehicles: with deluxe automatic air conditionerSwitching on and offSwitching on air conditioner
– Press the button briefly, or
– Press the button.
Switching off air conditioner
– Press the button to switch off the air conditioner
and cut off the supply of fresh air from outside the
vehicle.The air conditioner will switch on again if one of the control buttons
is pressed.
Applies to vehicles: with deluxe automatic air conditionerAutomatic mode
The standard operating mode for all seasons.Switching on automatic mode
– Select a temperature between +16 °C (60 °F) and +28 °C
(84 °F).
– Press the button.The automatic mode maintains a constant temperature inside the
vehicle and dehumidifies the air. Air temperature, air delivery and
air distribution are regulated automatically to reach the desired
interior temperature as quickly as possible, and then to maintain
this temperature. The system automatically compensates for any
variations in the outside temperature and for the effect of direct
sunlight.
The automatic temperature regulation only operates at temperature
settings between +16 °C and +28 °C. If a temperature below +16 °C
is selected, LO appears on the display. If a temperature above +28 °C
is selected, the display will show HI. In the two extreme settings the
air conditioner operates continuously with maximum cooling or
heating output, and the temperature is not regulated
automatically.
Air distribution
⇒page 97
Defrosting windows
⇒page 98
Heated rear window
⇒page 98
Switching air cooling
on/off
⇒page 98
Seat heating
⇒page 114
a)The rotary control is also used to adjust the blower speed, air distribution
and seat heating.Button(s)
Function
Page
AC
OFFAUTOOFF
AUTO
AUTO
document_0900452a81b1b9de.book Seite 95 Donnerstag, 26. Juli 2007 9:16 09
Page 104 of 342
Heating and cooling 102instance, that the rear window heater is not working, it may have
been temporarily switched off by the power management function,
or regulated to a lower heat output. These systems will be available
again as soon as sufficient electrical power is available.
WARNING
For safety reasons it is important that all the windows are kept
free of ice, snow and condensation. These can cause poor visibility
and lead to an accident. Please familiarise yourself with the oper-
ating controls for the air conditioner, including the demist/defrost
functions for the windows.
Caution
•
If you suspect that the air conditioner is damaged, switch it off
to prevent further damage and have the system checked by a quali-
fied workshop.
•
Repairs to the air conditioning system require specialist knowl-
edge and special tools. For this reason, please contact a qualified
workshop if the system is not working properly.Note
•
Keep the air intake slots in front of the windscreen clear of snow,
ice and leaves to ensure unimpaired heating and cooling, and to
prevent the windows misting over.
•
The air from the outlets flows through the passenger compart-
ment and out through the slots at the rear of the vehicle. Do not
cover these slots with clothing or other objects.
•
The air conditioner operates most effectively with the windows
and the tilting panorama roof* closed. However, if the vehicle has
heated up after standing in the sun for some time, the air inside can
be cooled more quickly by opening the windows for a short time.
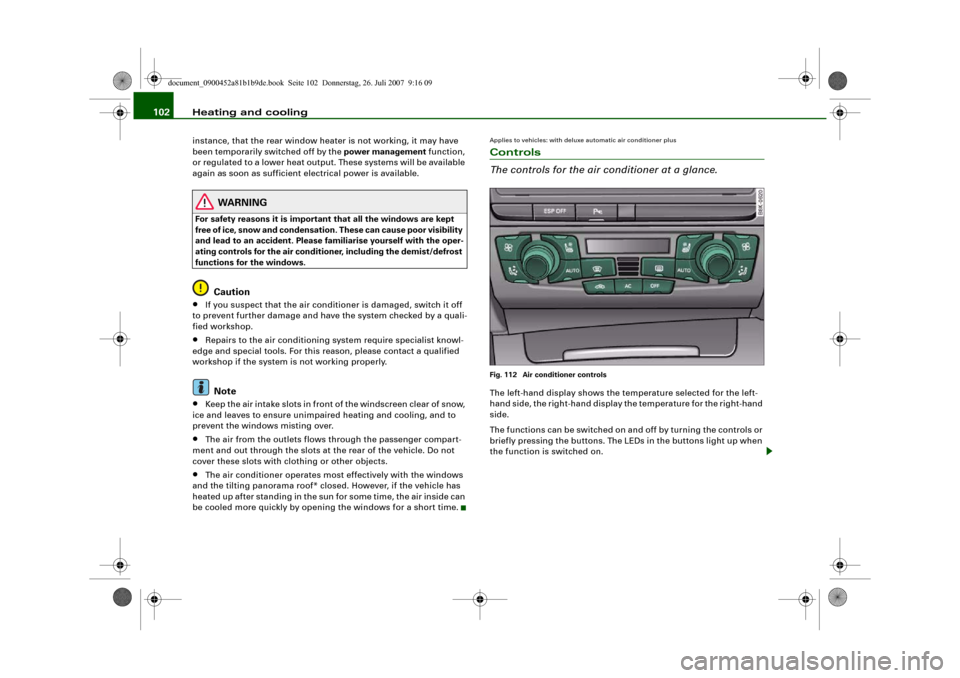
Applies to vehicles: with deluxe automatic air conditioner plusControls
The controls for the air conditioner at a glance.Fig. 112 Air conditioner controlsThe left-hand display shows the temperature selected for the left-
hand side, the right-hand display the temperature for the right-hand
side.
The functions can be switched on and off by turning the controls or
briefly pressing the buttons. The LEDs in the buttons light up when
the function is switched on.
document_0900452a81b1b9de.book Seite 102 Donnerstag, 26. Juli 2007 9:16 09
Page 181 of 342

HomeLink179
Controls
Safety
Driving tips
General maintenance
Self-help
Technical data
HomeLinkUniversal transmitterApplies to vehicles: with HomeLinkDescription
The HomeLink universal transmitter can be programmed
to replace the hand-held controls of devices already in
use.HomeLink allows you to conveniently activate garage doors, estate
gates, security systems, home or office lighting and other electric
devices by means of control buttons inside your car.
HomeLink can replace up to three hand-held transmitters operating
existing devices on your property with a single universal trans-
mitter. This will be possible for most transmitters which control the
drive units for a garage door or external gates, etc. You can
programme the individual hand-held transmitters for your remote
control at or near the centre of the radiator grille. This is where the
control unit is located.
To be able to control systems with HomeLink, you need to perform
initial programming on the HomeLink transmitter first. If systems
fail to respond after the initial programming, check whether these
systems work with a "rolling code" (variable security code)
⇒page 180.
WARNING
When you are programming the HomeLink universal transmitter,
make sure that no persons or objects are close to the devices
receiving the transmitter signals. If a gate or door is inadvertently
set into motion during programming, persons might be injured or
other damage caused by moving parts.
Note
•
For additional information on HomeLink
® and/or products
compatible with HomeLink
®, please call the toll-free HomeLink
®
hotline (0) 08000466 35465 or alternatively +49 (0) 6838 907 277, or
visit the HomeLink
® website at: www.homelink.com
•
HomeLink
® is a registered trademark of Johnson Controls.
Applies to vehicles: with HomeLinkProgramming the universal transmitter
The HomeLink unit is programmed at the radiator grille.
Fig. 197 Operating
unit in headlinerFig. 198 Radiator grille
document_0900452a81b1b9de.book Seite 179 Donnerstag, 26. Juli 2007 9:16 09
Page 182 of 342
HomeLink 180
At the operating unit
1. Switch on the ignition (do not start the engine).
2. Press and hold down the two outer HomeLink buttons
⇒page 179, fig. 197 until the indicator diode
⇒page 179, fig. 197 begins to flash after about
20 seconds. This procedure will delete the standard
factory settings and does not need to be repeated when
programming the other buttons.
3. Press the particular HomeLink button which you would
like to program.
4. Wait until the diode begins to flash. The HomeLink
module now remains in training mode for 5 minutes.
5. Now step in front of your vehicle with the original hand-
held transmitter for the garage door opener or any other
device you wish to assign to the HomeLink control
button.
At the radiator grille
6. Hold the original hand-held transmitter at or near the
centre of your car's radiator grille ⇒page 179, fig. 198.
7. Press the activator button on the original hand-held
transmitter.
8. As you do so, watch the turn signals on your vehicle.
HomeLink confirms successful programming by flashing
all four turn signals three times.
9. If the turn signals fail to flash three times, repeat the
procedure with the transmitter held at a different
distance from the radiator grille.
The proper distance between the hand-held transmitter and the
HomeLink module at the radiator grille depends on the system you
want to train. It may require several attempts.
The turn signals will flash once if the time limit for the programming
mode has been exceeded. In this case the programming procedure
needs to be performed again. Repeat the sequence at the operating
unit starting with step 3.
The programming instructions above also apply to the other control
buttons. Start with step 3 if you wish to proceed and program the
other two buttons.
If the garage door or other devices still fail to be activated with the
HomeLink control buttons after programming is completed, it is
possible that these systems might be working with a rolling code
instead of the normal fixed security code. If this is the case, a rolling
code programming is required in addition to the steps described
above. ⇒page 180Applies to vehicles: with HomeLinkRolling code programming
Some devices require rolling code programming of the
HomeLink universal transmitter.Identifying a rolling code
– Press the already programmed HomeLink button again
and hold it down.
–Watch HomeLink diode ⇒page 179, fig. 197. If the
diode starts flashing rapidly and turns into a constant
light after about 2 seconds, this indicates that the device
you wish to operate (e.g. a garage door opener) is
equipped with a rolling code.
– Program the rolling code as follows:
AA
AA
AA
document_0900452a81b1b9de.book Seite 180 Donnerstag, 26. Juli 2007 9:16 09
Page 183 of 342
HomeLink181
Controls
Safety
Driving tips
General maintenance
Self-help
Technical data
Activating the garage door opener drive unit
– Locate the programming button on the garage door
drive. The exact location and colour of the button may
vary depending on the type of garage door opener.
– Press the programming button on the door drive unit
(this will normally cause a “programming mode indicator
lamp” on the unit to light up). You now have about 30
seconds to start and complete the programming of the
HomeLink control button on the operating unit.
Programming at the operating unit in the
headliner
– Press and release the already programmed HomeLink
button.
– Press the HomeLink button again to complete rolling
code programming.After programming at the operating unit in the headliner, the
garage door opener should recognize the HomeLink signal and
respond when the HomeLink button is pressed. Now the other
control buttons can be programmed as required.
Note
•
Having a second person assist you makes programming of the
rolling code easier and faster. For some makes of garage door
openers the HomeLink button may have to be pressed a third time
to complete the training sequence.
•
If you encounter problems programming the rolling code you
may find helpful information in the operating instructions of the
garage door opener or other device you wish to operate.
Applies to vehicles: with HomeLinkOperating HomeLink
The programmed devices are activated by means of the
HomeLink control buttons in the headliner.– Make sure that the ignition is on.
– Press the programmed HomeLink button ⇒page 179,
fig. 197. The device assigned to that button (e.g. garage
door) will be activated.The HomeLink indicator diode ⇒page 179, fig. 197 will light up
when you press the button.Applies to vehicles: with HomeLinkErasing the button programming
You can erase the complete HomeLink programming by
pressing the two outer buttons.– Switch on the ignition (do not start the engine).
– Press and hold down the two outer buttons until the indi-
cator diode starts to flash ⇒page 179, fig. 197.
– Then release the buttons.After the programming of the HomeLink buttons has been erased,
the system will return to the training mode and is ready to be re-
programmed at any time.
Note
•
Programmed buttons cannot be erased individually.
•
For security reasons it is advisable to erase the programming of
the HomeLink buttons prior to selling your vehicle.
document_0900452a81b1b9de.book Seite 181 Donnerstag, 26. Juli 2007 9:16 09