dashboard AUDI A4 2008 B8 / 4.G Owners Manual
[x] Cancel search | Manufacturer: AUDI, Model Year: 2008, Model line: A4, Model: AUDI A4 2008 B8 / 4.GPages: 342, PDF Size: 13.14 MB
Page 23 of 342
Driver information system21
Controls
Safety
Driving tips
General maintenance
Self-help
Technical data
Driver information systemIntroductionGeneral notes
The driver information system in the instrument cluster
shows you the status of various on-board systems at a
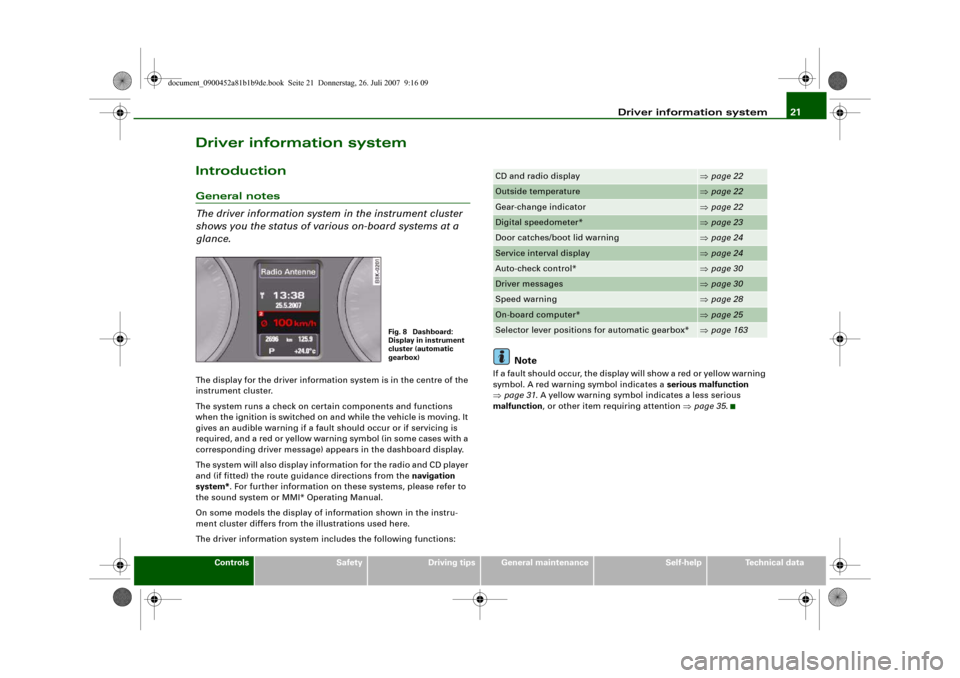
glance.The display for the driver information system is in the centre of the
instrument cluster.
The system runs a check on certain components and functions
when the ignition is switched on and while the vehicle is moving. It
gives an audible warning if a fault should occur or if servicing is
required, and a red or yellow warning symbol (in some cases with a
corresponding driver message) appears in the dashboard display.
The system will also display information for the radio and CD player
and (if fitted) the route guidance directions from the navigation
system*. For further information on these systems, please refer to
the sound system or MMI* Operating Manual.
On some models the display of information shown in the instru-
ment cluster differs from the illustrations used here.
The driver information system includes the following functions:
Note
If a fault should occur, the display will show a red or yellow warning
symbol. A red warning symbol indicates a serious malfunction
⇒page 31. A yellow warning symbol indicates a less serious
malfunction, or other item requiring attention ⇒page 35.
Fig. 8 Dashboard:
Display in instrument
cluster (automatic
gearbox)
CD and radio display
⇒page 22
Outside temperature
⇒page 22
Gear-change indicator
⇒page 22
Digital speedometer*
⇒page 23
Door catches/boot lid warning
⇒page 24
Service interval display
⇒page 24
Auto-check control*
⇒page 30
Driver messages
⇒page 30
Speed warning
⇒page 28
On-board computer*
⇒page 25
Selector lever positions for automatic gearbox*
⇒page 163
document_0900452a81b1b9de.book Seite 21 Donnerstag, 26. Juli 2007 9:16 09
Page 59 of 342
Lights and vision57
Controls
Safety
Driving tips
General maintenance
Self-help
Technical data
Lights and visionLightsSwitching lights on and off
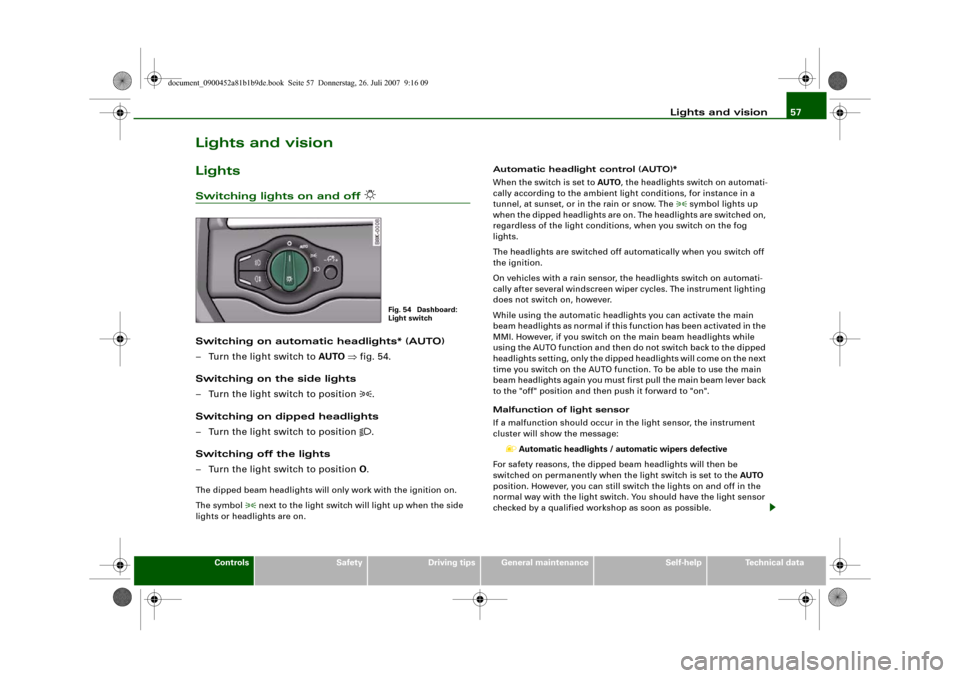
Switching on automatic headlights* (AUTO)
– Turn the light switch to AUTO ⇒fig. 54.
Switching on the side lights
– Turn the light switch to position
.
Switching on dipped headlights
– Turn the light switch to position
.
Switching off the lights
– Turn the light switch to position O.
The dipped beam headlights will only work with the ignition on.
The symbol
next to the light switch will light up when the side
lights or headlights are on.Automatic headlight control (AUTO)*
When the switch is set to AUTO, the headlights switch on automati-
cally according to the ambient light conditions, for instance in a
tunnel, at sunset, or in the rain or snow. The
symbol lights up
when the dipped headlights are on. The headlights are switched on,
regardless of the light conditions, when you switch on the fog
lights.
The headlights are switched off automatically when you switch off
the ignition.
On vehicles with a rain sensor, the headlights switch on automati-
cally after several windscreen wiper cycles. The instrument lighting
does not switch on, however.
While using the automatic headlights you can activate the main
beam headlights as normal if this function has been activated in the
MMI. However, if you switch on the main beam headlights while
using the AUTO function and then do not switch back to the dipped
headlights setting, only the dipped headlights will come on the next
time you switch on the AUTO function. To be able to use the main
beam headlights again you must first pull the main beam lever back
to the "off" position and then push it forward to "on".
Malfunction of light sensor
If a malfunction should occur in the light sensor, the instrument
cluster will show the message:
Automatic headlights / automatic wipers defective
For safety reasons, the dipped beam headlights will then be
switched on permanently when the light switch is set to the AUTO
position. However, you can still switch the lights on and off in the
normal way with the light switch. You should have the light sensor
checked by a qualified workshop as soon as possible.
Fig. 54 Dashboard:
Light switch
document_0900452a81b1b9de.book Seite 57 Donnerstag, 26. Juli 2007 9:16 09
Page 101 of 342
Heating and cooling99
Controls
Safety
Driving tips
General maintenance
Self-help
Technical data
Note
If the LED in the AC button should continue to light up when the AC
mode has been switched off (i.e. the air conditioner has been
switched off) this is due to a defect in one of the air conditioner
components. If a malfunction should occur, please contact a quali-
fied workshop.Applies to vehicles: with deluxe automatic air conditionerAir outlets
The air distribution setting directs the air to the outlets
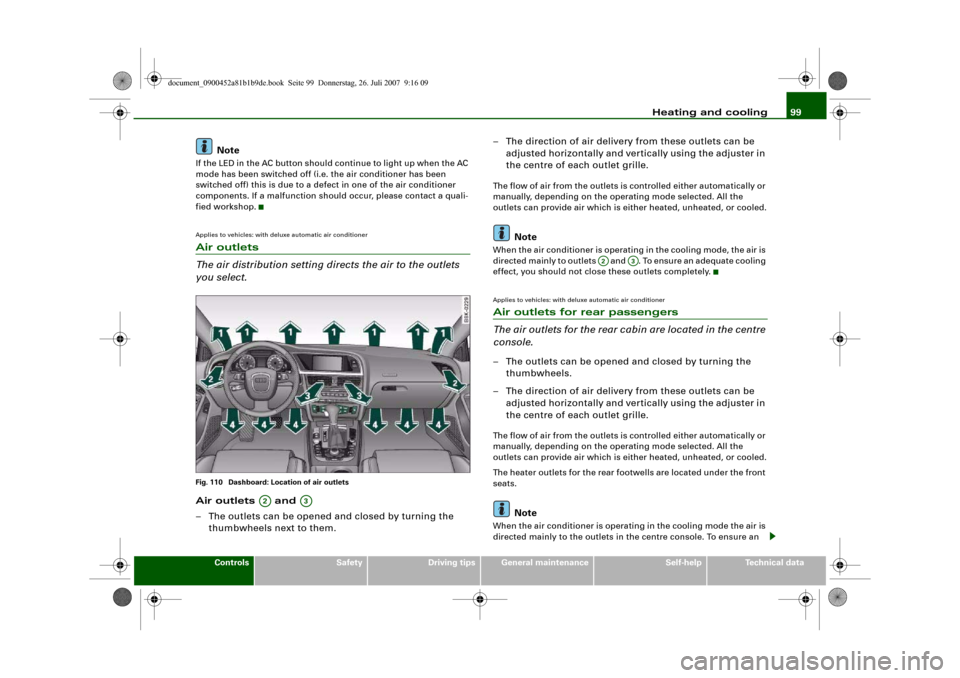
you select.Fig. 110 Dashboard: Location of air outletsAir outlets and
– The outlets can be opened and closed by turning the
thumbwheels next to them.– The direction of air delivery from these outlets can be
adjusted horizontally and vertically using the adjuster in
the centre of each outlet grille.
The flow of air from the outlets is controlled either automatically or
manually, depending on the operating mode selected. All the
outlets can provide air which is either heated, unheated, or cooled.
Note
When the air conditioner is operating in the cooling mode, the air is
directed mainly to outlets and . To ensure an adequate cooling
effect, you should not close these outlets completely.Applies to vehicles: with deluxe automatic air conditionerAir outlets for rear passengers
The air outlets for the rear cabin are located in the centre
console.– The outlets can be opened and closed by turning the
thumbwheels.
– The direction of air delivery from these outlets can be
adjusted horizontally and vertically using the adjuster in
the centre of each outlet grille.The flow of air from the outlets is controlled either automatically or
manually, depending on the operating mode selected. All the
outlets can provide air which is either heated, unheated, or cooled.
The heater outlets for the rear footwells are located under the front
seats.
Note
When the air conditioner is operating in the cooling mode the air is
directed mainly to the outlets in the centre console. To ensure an
A2
A3
A2
A3
document_0900452a81b1b9de.book Seite 99 Donnerstag, 26. Juli 2007 9:16 09
Page 109 of 342
Heating and cooling107
Controls
Safety
Driving tips
General maintenance
Self-help
Technical data remain on until the ignition is switched off. When the rear window
heating is switched on, this setting will remain activated for 15
minutes after switching off the ignition.
If the engine is started again during this period of 15 minutes, the
rear window heating will be switched on for about 10 to 20 minutes,
depending on the exterior temperature. This means you do not have
to manually switch on the rear window heating again if the vehicle
has only been parked for a short time.
For the sake of the environment
Switch off the heated rear window manually as soon as the rear
window is clear. By saving electrical power you can also save fuel.Applies to vehicles: with deluxe automatic air conditioner plusAC mode Deactivating the AC mode
– Press the button.
Activating the AC mode
– Press the button again.In the AC mode, the air cooling system is switched on and the
heating and ventilation are regulated automatically.
Note
If the LED in the AC button should continue to light up when the AC
mode has been switched off (i.e. the air conditioner has been
switched off) this is due to a defect in one of the air conditioner
components. If a malfunction should occur, please contact a quali-
fied workshop.
Applies to vehicles: with deluxe automatic air conditioner plusAir outlets
The air distribution setting directs the air to the outlets
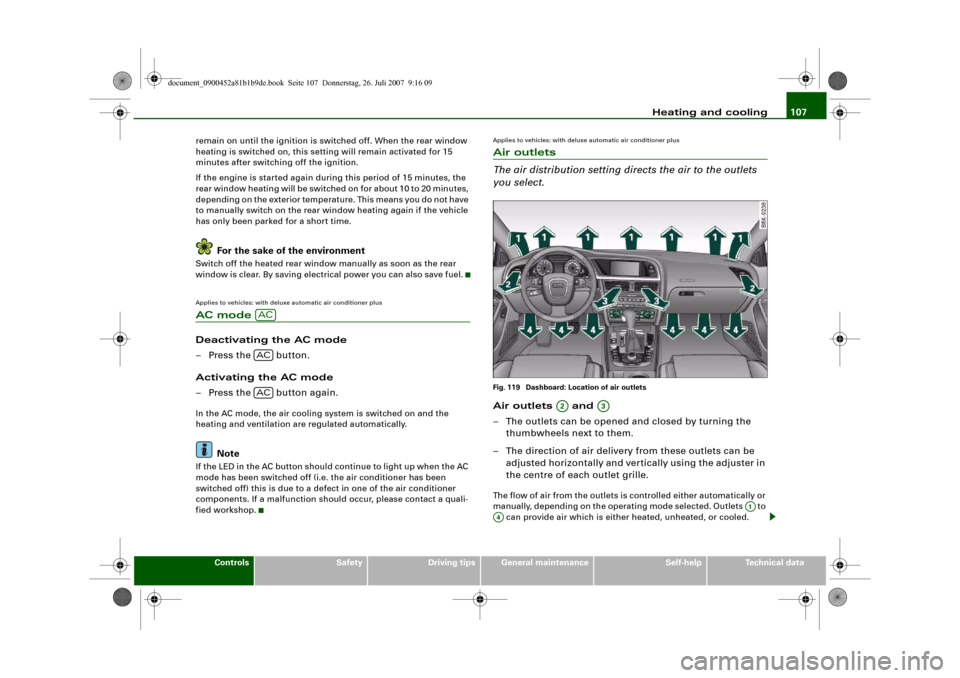
you select.Fig. 119 Dashboard: Location of air outletsAir outlets and
– The outlets can be opened and closed by turning the
thumbwheels next to them.
– The direction of air delivery from these outlets can be
adjusted horizontally and vertically using the adjuster in
the centre of each outlet grille.The flow of air from the outlets is controlled either automatically or
manually, depending on the operating mode selected. Outlets to
can provide air which is either heated, unheated, or cooled.
ACACAC
A2
A3
A1
A4
document_0900452a81b1b9de.book Seite 107 Donnerstag, 26. Juli 2007 9:16 09
Page 189 of 342
Safe driving187
Controls
Safety
Driving tips
General maintenance
Self-help
Technical data
Before every trip
The driver is responsible for the safety of the passengers
and the safe operation of the vehicle at all times.For your own safety and the safety of your passengers,
always note the following points before every trip:
– Make sure that all lights and turn signals are working
properly.
– Check the tyre pressures.
– Make sure that all windows are clean and give good visi-
bility to the outside.
– Secure all luggage and other items carefully ⇒page 79.
– Make sure that no objects can interfere with the pedals.
– Adjust the front seat, head restraint and mirrors
correctly.
– Make sure that the head restraints for all passengers are
adjusted to the correct position.
– Make sure that children are protected with suitable
safety seats and properly worn seat belts ⇒page 210.
– Sit in the correct position in your seat and make sure that
your passengers do the same. ⇒page 73.
– Fasten your seat belt correctly. Make sure that your
passengers do the same ⇒page 194.
What affects driving safety?
Safety on the road is directly related to how you drive, and
can also be affected by the passengers in the vehicle.The driver is responsible for the safety of the vehicle and all
its occupants. If your ability to drive is impaired in any way,
you endanger yourself and other road users ⇒. There-
fore:
– Do not let yourself be distracted by passengers or by
using a mobile phone, etc.
– Never drive when your driving ability is impaired (by
medication, alcohol, drugs, etc.).
– Obey all traffic regulations and speed limits and always
maintain a safe distance to the vehicle in front.
– Always adjust your speed to suit the road, traffic and
weather conditions.
– Take frequent breaks on long trips. Do not drive for more
than two hours without a stop.
– If possible, avoid driving when you are tired or stressed.
WARNING
•
Distractions while driving or any kind of impairment to your
driving ability increase the risk of accident and injury.
•
Do not store loose objects on the dashboard. These objects
could fly around the interior when the vehicle is moving (under
acceleration or whilst cornering) and distract the driver – this
could lead to an accident.
document_0900452a81b1b9de.book Seite 187 Donnerstag, 26. Juli 2007 9:16 09
Page 198 of 342
Seat belts 196The physical principles involved in a frontal collision are relatively
simple:
Both the moving vehicle and the passengers possess energy, which
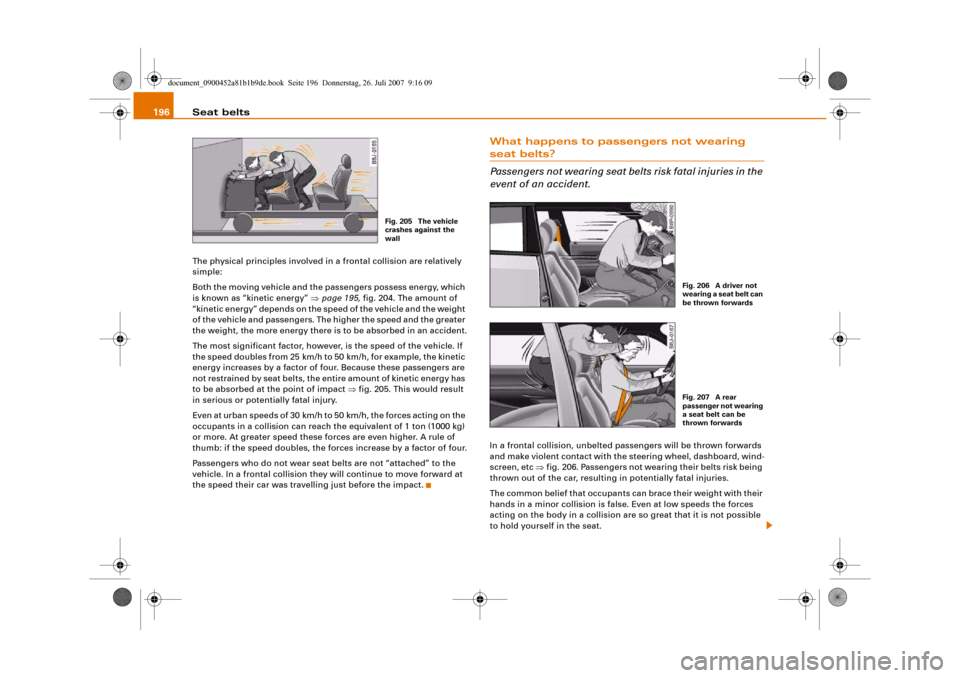
is known as “kinetic energy” ⇒page 195, fig. 204. The amount of
“kinetic energy” depends on the speed of the vehicle and the weight
of the vehicle and passengers. The higher the speed and the greater
the weight, the more energy there is to be absorbed in an accident.
The most significant factor, however, is the speed of the vehicle. If
the speed doubles from 25 km/h to 50 km/h, for example, the kinetic
energy increases by a factor of four. Because these passengers are
not restrained by seat belts, the entire amount of kinetic energy has
to be absorbed at the point of impact ⇒fig. 205. This would result
in serious or potentially fatal injury.
Even at urban speeds of 30 km/h to 50 km/h, the forces acting on the
occupants in a collision can reach the equivalent of 1 ton (1000 kg)
or more. At greater speed these forces are even higher. A rule of
thumb: if the speed doubles, the forces increase by a factor of four.
Passengers who do not wear seat belts are not “attached” to the
vehicle. In a frontal collision they will continue to move forward at
the speed their car was travelling just before the impact.
What happens to passengers not wearing seat belts?
Passengers not wearing seat belts risk fatal injuries in the
event of an accident.In a frontal collision, unbelted passengers will be thrown forwards
and make violent contact with the steering wheel, dashboard, wind-
screen, etc ⇒fig. 206. Passengers not wearing their belts risk being
thrown out of the car, resulting in potentially fatal injuries.
The common belief that occupants can brace their weight with their
hands in a minor collision is false. Even at low speeds the forces
acting on the body in a collision are so great that it is not possible
to hold yourself in the seat.
Fig. 205 The vehicle
crashes against the
wall
Fig. 206 A driver not
wearing a seat belt can
be thrown forwardsFig. 207 A rear
passenger not wearing
a seat belt can be
thrown forwards
document_0900452a81b1b9de.book Seite 196 Donnerstag, 26. Juli 2007 9:16 09
Page 205 of 342
Airbag system203
Controls
Safety
Driving tips
General maintenance
Self-help
Technical data
Front airbagsDescription of front airbags
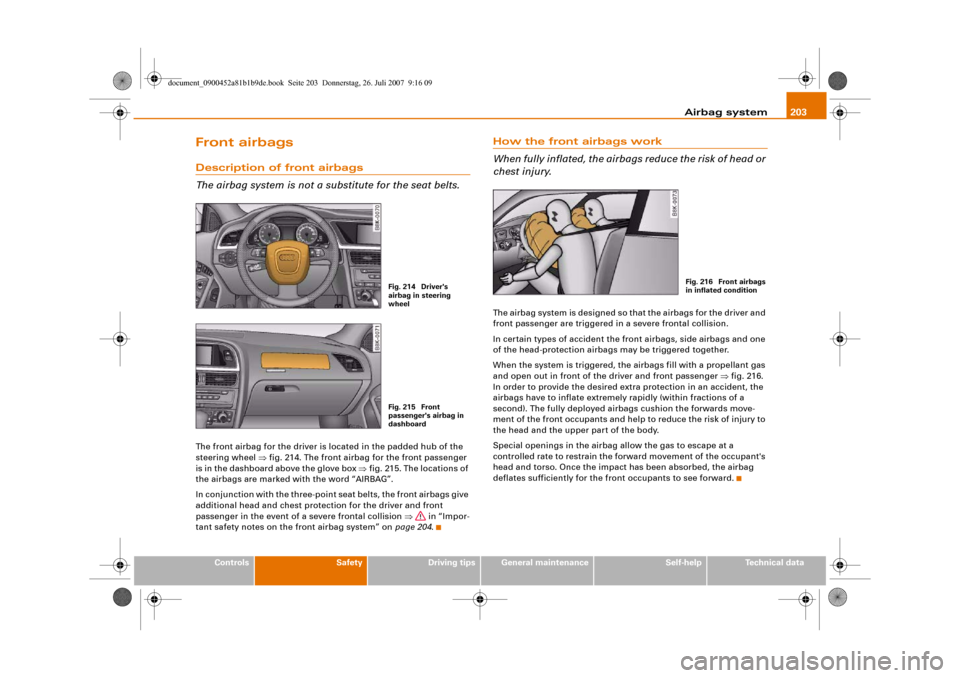
The airbag system is not a substitute for the seat belts.The front airbag for the driver is located in the padded hub of the
steering wheel ⇒fig. 214. The front airbag for the front passenger
is in the dashboard above the glove box ⇒fig. 215. The locations of
the airbags are marked with the word “AIRBAG”.
In conjunction with the three-point seat belts, the front airbags give
additional head and chest protection for the driver and front
passenger in the event of a severe frontal collision ⇒ in “Impor-
tant safety notes on the front airbag system” on page 204.
How the front airbags work
When fully inflated, the airbags reduce the risk of head or
chest injury.The airbag system is designed so that the airbags for the driver and
front passenger are triggered in a severe frontal collision.
In certain types of accident the front airbags, side airbags and one
of the head-protection airbags may be triggered together.
When the system is triggered, the airbags fill with a propellant gas
and open out in front of the driver and front passenger ⇒fig. 216.
In order to provide the desired extra protection in an accident, the
airbags have to inflate extremely rapidly (within fractions of a
second). The fully deployed airbags cushion the forwards move-
ment of the front occupants and help to reduce the risk of injury to
the head and the upper part of the body.
Special openings in the airbag allow the gas to escape at a
controlled rate to restrain the forward movement of the occupant's
head and torso. Once the impact has been absorbed, the airbag
deflates sufficiently for the front occupants to see forward.
Fig. 214 Driver's
airbag in steering
wheelFig. 215 Front
passenger's airbag in
dashboard
Fig. 216 Front airbags
in inflated condition
document_0900452a81b1b9de.book Seite 203 Donnerstag, 26. Juli 2007 9:16 09
Page 206 of 342
Airbag system 204Important safety notes on the front airbag system
There are a number of safety points concerning the airbag
system which you should remember. This will help to
reduce the risk of injury in an accident.
WARNING
•
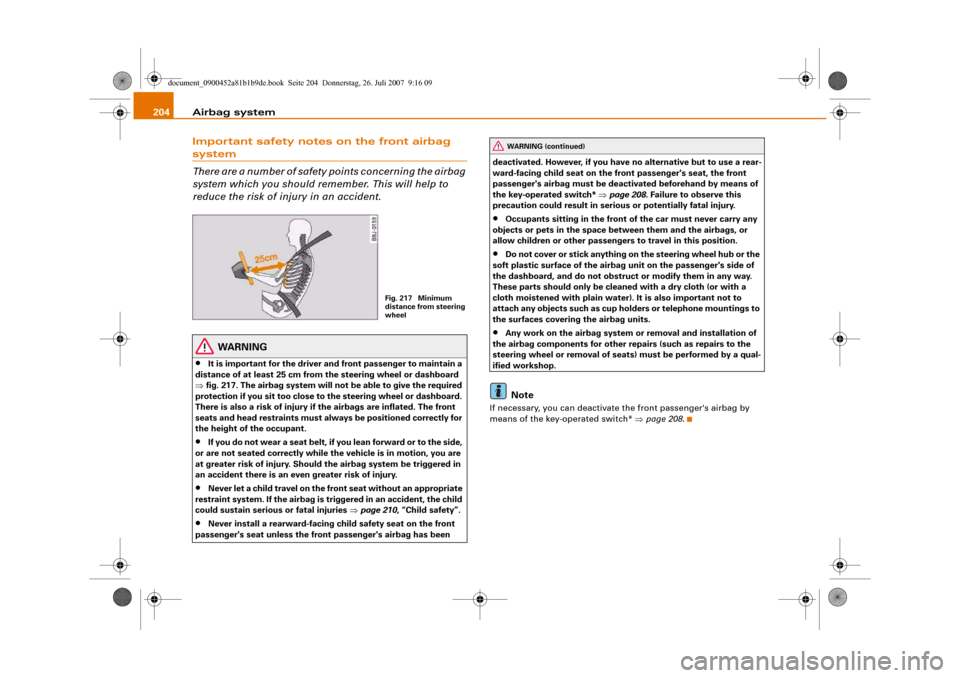
It is important for the driver and front passenger to maintain a
distance of at least 25 cm from the steering wheel or dashboard
⇒fig. 217. The airbag system will not be able to give the required
protection if you sit too close to the steering wheel or dashboard.
There is also a risk of injury if the airbags are inflated. The front
seats and head restraints must always be positioned correctly for
the height of the occupant.
•
If you do not wear a seat belt, if you lean forward or to the side,
or are not seated correctly while the vehicle is in motion, you are
at greater risk of injury. Should the airbag system be triggered in
an accident there is an even greater risk of injury.
•
Never let a child travel on the front seat without an appropriate
restraint system. If the airbag is triggered in an accident, the child
could sustain serious or fatal injuries ⇒page 210, “Child safety”.
•
Never install a rearward-facing child safety seat on the front
passenger's seat unless the front passenger's airbag has been deactivated. However, if you have no alternative but to use a rear-
ward-facing child seat on the front passenger's seat, the front
passenger's airbag must be deactivated beforehand by means of
the key-operated switch* ⇒page 208. Failure to observe this
precaution could result in serious or potentially fatal injury.
•
Occupants sitting in the front of the car must never carry any
objects or pets in the space between them and the airbags, or
allow children or other passengers to travel in this position.
•
Do not cover or stick anything on the steering wheel hub or the
soft plastic surface of the airbag unit on the passenger's side of
the dashboard, and do not obstruct or modify them in any way.
These parts should only be cleaned with a dry cloth (or with a
cloth moistened with plain water). It is also important not to
attach any objects such as cup holders or telephone mountings to
the surfaces covering the airbag units.
•
Any work on the airbag system or removal and installation of
the airbag components for other repairs (such as repairs to the
steering wheel or removal of seats) must be performed by a qual-
ified workshop.Note
If necessary, you can deactivate the front passenger's airbag by
means of the key-operated switch* ⇒page 208.
Fig. 217 Minimum
distance from steering
wheel
WARNING (continued)
document_0900452a81b1b9de.book Seite 204 Donnerstag, 26. Juli 2007 9:16 09
Page 256 of 342
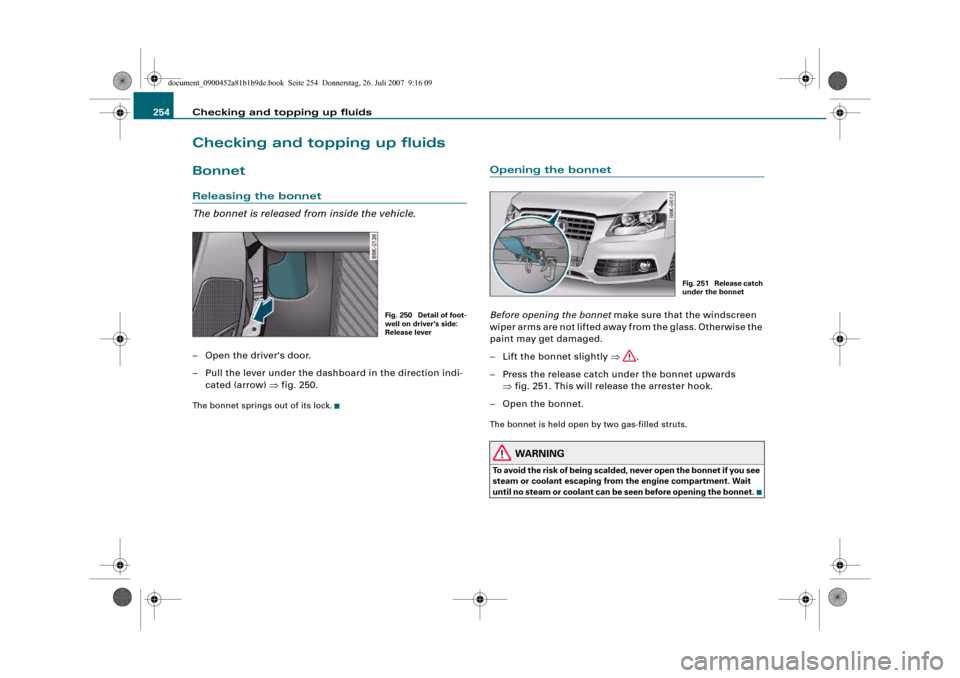
Checking and topping up fluids 254Checking and topping up fluidsBonnetReleasing the bonnet
The bonnet is released from inside the vehicle.– Open the driver's door.
– Pull the lever under the dashboard in the direction indi-
cated (arrow) ⇒fig. 250.The bonnet springs out of its lock.
Opening the bonnetBefore opening the bonnet make sure that the windscreen
wiper arms are not lifted away from the glass. Otherwise the
paint may get damaged.
– Lift the bonnet slightly ⇒.
– Press the release catch under the bonnet upwards
⇒fig. 251. This will release the arrester hook.
– Open the bonnet.The bonnet is held open by two gas-filled struts.
WARNING
To avoid the risk of being scalded, never open the bonnet if you see
steam or coolant escaping from the engine compartment. Wait
until no steam or coolant can be seen before opening the bonnet.
Fig. 250 Detail of foot-
well on driver's side:
Release lever
Fig. 251 Release catch
under the bonnet
document_0900452a81b1b9de.book Seite 254 Donnerstag, 26. Juli 2007 9:16 09