check engine light AUDI A4 2013 User Guide
[x] Cancel search | Manufacturer: AUDI, Model Year: 2013, Model line: A4, Model: AUDI A4 2013Pages: 302, PDF Size: 75.61 MB
Page 32 of 302
30 Driver information display
Resetting the service interval display
Your authorized Audi dealer will reset the cor
responding service schedule after performing
the appropriate service on yo ur vehicle . Yo u
also have the possibility to reset the oil
change schedule after having performed an
oil change according to Audi specifications.
Select
I CAR I function button > Service interval
display > Reset oil change interval
or ICARI
function button> Car systems* control but
ton
> Servicing & checks > Reset oil change
interval.
(D Note
If you disconnect the battery terminals, no
calculations can be made for the serv ice
interval display during this time and no
service rem inder wi ll appear. Remember
that observing the proper service intervals
is vitally important to extend ing the life of
your vehicle, particu larly the eng ine, and
maintaining its value. Even if the mileage
driven is low, the maximum period of one
yea r from one service to the next must not
be exceeded .
@ Tips
-Do not reset the display between oil
changes, otherwise the display will be in
correct.
- The information in the Service Reminder
r ema ins stored even when the vehicle
battery is disconnected.
On-Board Diagnostic
system (OBD)
Malfunction Indicator Lamp (MIL)
The Malfunction Indicator Lamp (MIL) (4 i n
the instrument cluster is part of the On-Board
Diagnostic (OBD II) system.
The warning/indicator light illuminates when
the ignition is switched on and goes out after
the engine starts and the idle has stabilized .
This indicates that the MIL is working proper
ly.
If the light does not go out after the engine
is started, or illuminates while you are driv
ing, a malfunction may exist in the eng ine sys
tem . If the light illuminates, the catalytic con
verter could be damaged .
Continue driving
with reduced power (avoid
ing sustained high speeds and/or rapid accel
erations) and have the cond ition corrected.
Contact your authorized Audi dealer.
If the light illuminates, the electronic speed
limiter may also be malfunct ioning. For more
information
c:> page 31 , Electronic speed
limiter.
An improperly closed fuel filler cap may also
cause the
MIL light to illuminate
c:>page 217.
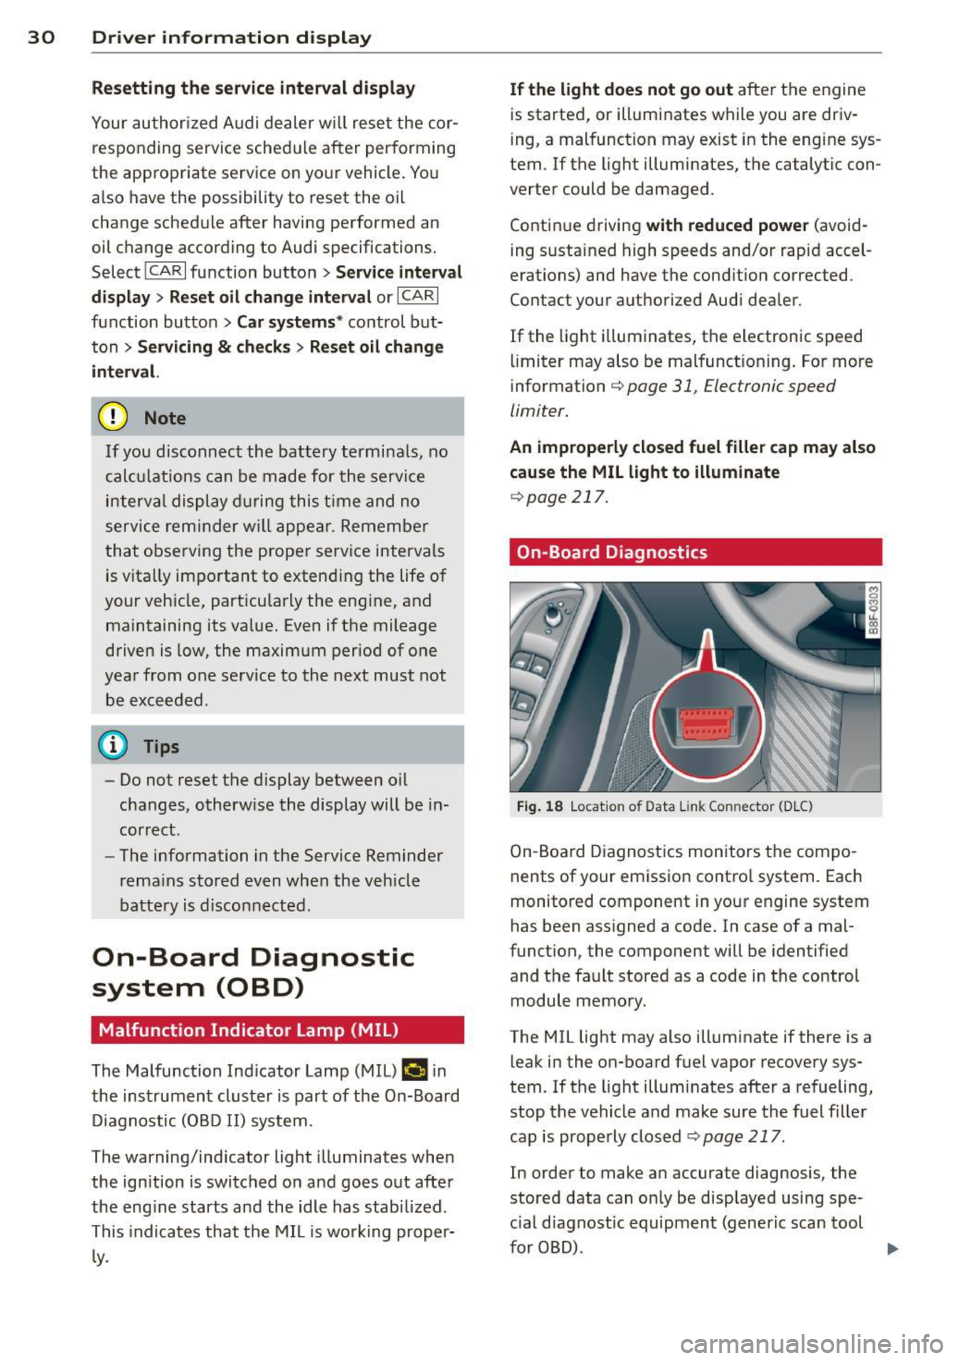
On-Board Diagnostics
Fig. 18 Locat io n of Data Link Con nector (D LC)
On-Board Diagnostics monitors the compo
nents of your emission control system . Each
monitored component in your engine system
has been assigned a code. In case of a mal
function, the component will be identified
and the fault stored as a code in the control
module memory.
The MIL light may also illuminate if there is a leak in the on-board fuel vapor recovery sys
tem. If the light illuminates after a refueling,
stop the vehicle and make sure the fuel filler
cap is properly closed
c:> page 217.
In order to make an accurate diagnosis, the
stored data can on ly be displayed using spe
c ial diagnostic equipment (generic scan tool
furOBD) .
~
Page 36 of 302
34 Openin g and clo sing
keys. Unguarded access to the keys pro
vides children the opportunity to start the engine and/or act ivate vehicle sys
tems such as the power w indows etc . Un
supervised operation of any veh icle sys
tem by ch ildren can res ult in serious in
Jury.
- Do not remove the key from the ignition
lock until the vehicle has come to a com
plete stop. Otherwise the steering col
um n loc k co uld suddenly e ngage -caus
ing the risk of an accident.
@ Tips
- The operation of the remote contro l key
c a n be tempo rarily disrupted by in terfer
ence from tran smi tters in t he v ici nity of
the veh icle work ing in the same frequen
cy ra nge (e.g . a ce ll phone, radio equip
ment).
- Fo r security reasons, replacement keys
are on ly available from Aud i dea le rs .
- Fo r De clarat ion o f Compliance to United
States FCC and Industry Canada regu la
tions
¢ page 283.
Removing the mechanical key
Fig . 20 Remot e ma ste r key: re mov ing the mec hanic al
key
.. Press the release button @¢ fig. 20.
.. Pu ll the mecha nical key @ out of the mas
te r key .
Using the mechan ica l key, you can :
- l ock and unlock* the glove compartmen t on
the passenger's s ide
¢ page 65 .
-lock and unlock t he lockable* rear bench
seat and pass-through* ¢
page 69. -
activate the child sa fety locks on the rear
doors ¢
page 42.
-lock and unlock the vehicle manua lly
~ page 38 if this should not be possible
w ith the master key.
- use t he ignition key emergency release
~ page 35.
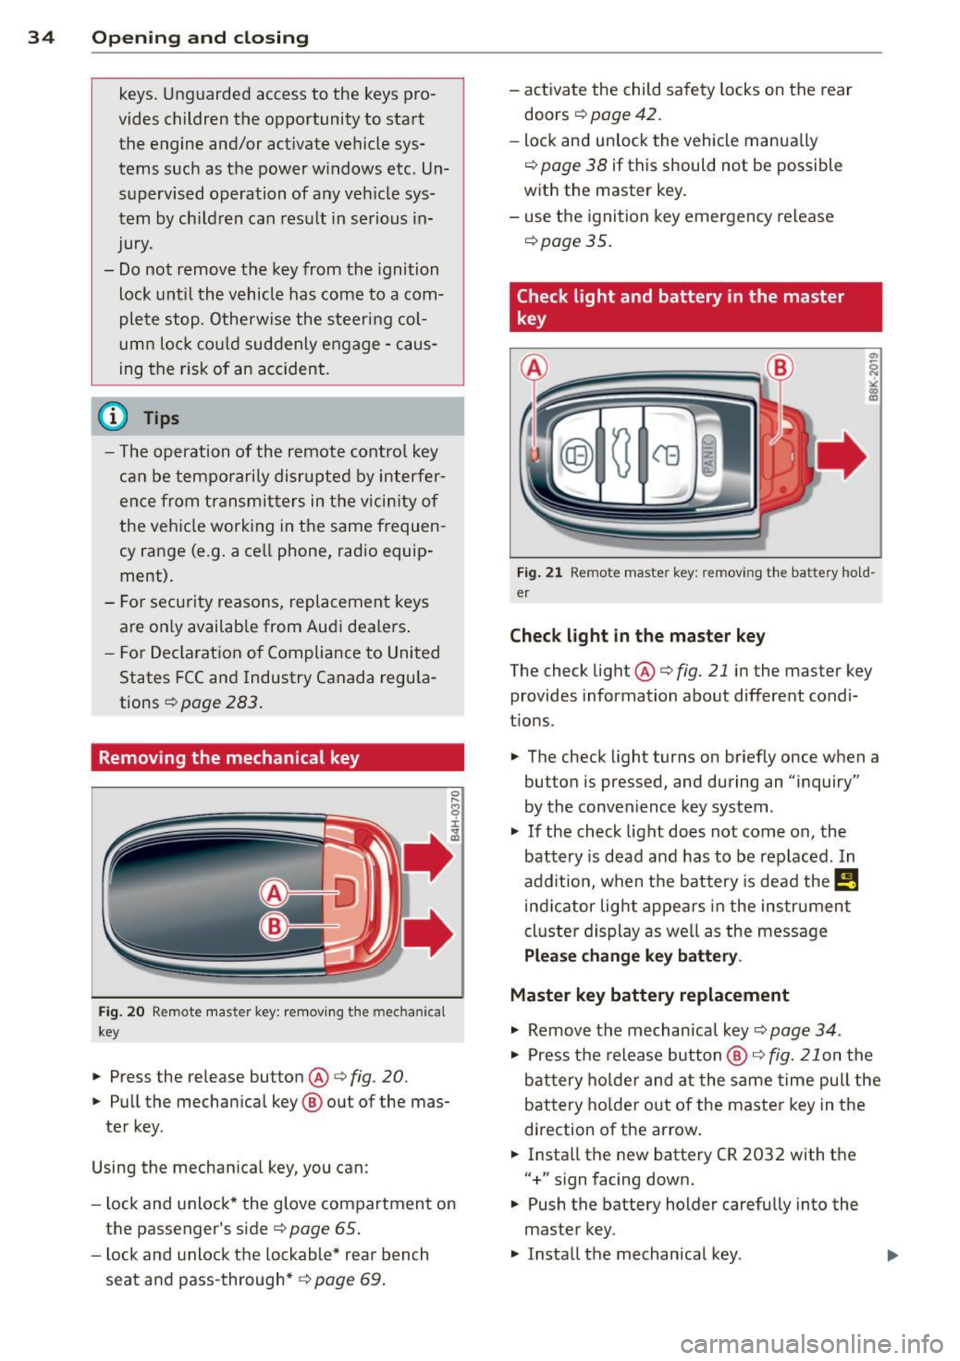
Check light and battery in the master
key
Fig. 21 Rem ote mas ter key: re m ov ing th e ba ttery h old
e r
Check light in the ma ster key
The check light @¢ fig. 21 in the mas ter key
provides information about different condi
t ions .
.. The check light turns on br iefly once when a
button is pressed, and during an "inquiry"
by the convenience key system .
.,. If the check light does not come on, the
battery is dead and has to be replaced . In
add it io n, w hen t he battery is dead
the m
indicator light appea rs in the instrument
cl uster display as we ll as the message
Please change key battery .
Master key battery replacement
.,. Remove the m echan ical key ~ page 34.
.,. Press t he release button @~
fig. 21 on the
b attery ho lde r and at the same time pull the
battery holder o ut o f the master key in the
direction of the arrow .
.. Insta ll the new battery CR 2032 with the
"+ " sign facing down.
.,. Push the battery holder carefully into the
master key .
.,. Insta ll the mechanical key .
Page 45 of 302
Opening th e windows
"' Press the switch to the firs t stop and hold it
until the window reaches the desi red posi
tion.
"' Press the switch briefly to the se cond stop
to automatically open the window .
Cl os ing th e windows
"' Pull the swi tch to the first sto p and hold it
until the window reaches the desi red posi
tion .
"' Pu ll the switch brief ly to the sec on d st op to
automatica lly close the window.
P ow er w ind ow switch es
@ Driver's door
@ Passenger's door
© Left rea r door
@ R ight rear door
® Safety button
Child safety loc ks
When the safety button® is pressed
c::> fig. 35, the ~ symbol in the button lights
up . The power w indow switches in the rear
doors are switched off.
A WARNING
- When you leave your veh icle - even if on
ly briefly - always remove the ign ition
key. This applies part icularly when chil
dren remain in the vehicle. Otherw ise the
children cou ld s tart the engine or oper
ate e lectr ica l equipment (e.g . power win
dows). The power windows a re f unction
al until the driver's door or passenger's
door has been opened.
- Pay close attention when closing the win
dows to prevent pinching of hands or
limbs.
- When locking the vehicle from outside,
the vehicle must be unoccupied s ince the
windows can no longer be opened in an
emergency.
Opening and clo sin g 43
(D Tips
After the ignition has been switched off,
the w indows can still be opened or closed
for about 10 minutes. The power windows
are not switched off until the driver's door
or passenger's door has been opened .
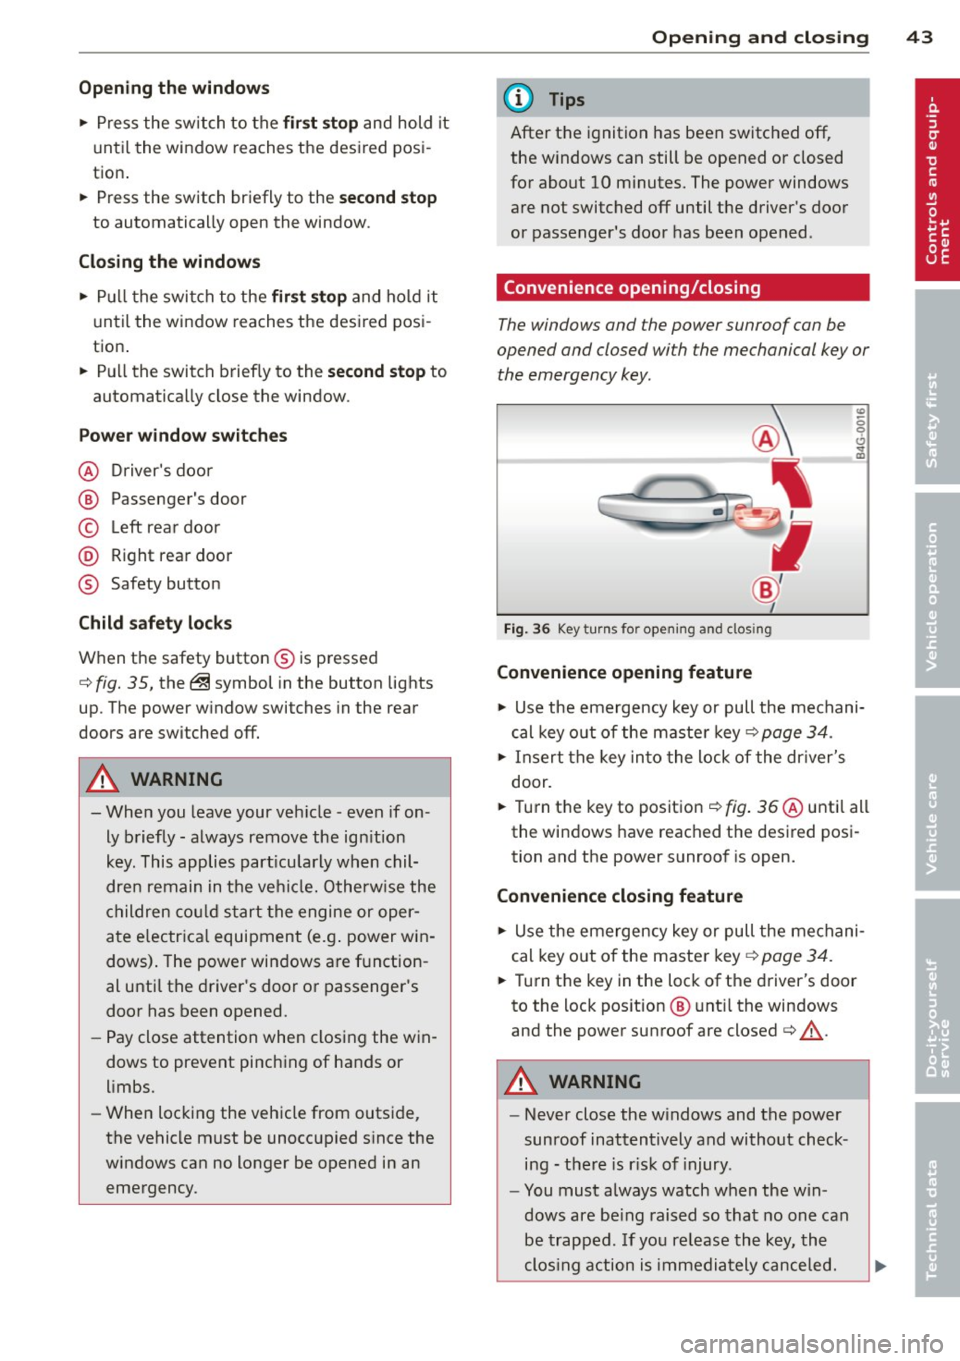
Convenience opening/closing
The windows and the power sunroof can be
opened and closed with the mechanical key or the emergency key.
Fig. 36 Key turns for opening and clos ing
Convenience opening feature
"' -0 0 t!, ., a,
"' Use the emergency key or pull the mechani
cal key out of the maste r key
c:? page 34.
"' Insert the key into the lock of the dr iver's
door.
"' Turn the key to position ¢
fig. 36 @until all
the windows have reached the desired posi
tion and the power sunroof is open.
Convenience closing f eature
"' Use the emergency key or pull the mechani
cal key out of the maste r key ¢
page 34.
"' Turn the key in the lock of the driver's door
to the lock position @ unt il the windows
and the power sunroof are closed¢
A.
A WARNING
- Never close the w indows and the power
sunroof inattentively and without check ing - the re is r isk of injury.
- You must always watch when the win
dows are be ing raised so that no one can
be trapped. If you re lease the key, the
clos ing action is immediately canceled.
Page 201 of 302
Trailer towing Driving with a trailer
General information
Your Audi was designed primarily for passen
ger transportation .
If you plan to tow a tra iler, p lease remember
that the addit ional load will affect durab ility,
economy and performance .
T railer towing not on ly places more stress on
the vehicle, it also calls for more concentra
tion from the driver.
F or this reason, a lways fo llow the operating
and driving instructions provided and use
common sense.
Technical requirements
Traile r hitch
Use a weight-carrying hitch conforming to the
gross trailer we ight. The hitch must be suita
b le for your veh icle and trailer and must be
mounted secure ly on t he veh icle's chassis at a
technically sound location . Use only a t railer
h itch w ith a removab le ball moun t. A lways
check with the tr ailer hitch man ufac tur er to
make sure that you are using the correct
hitch.
Do not use a bumper hitch.
T he hitc h must be installed in such a way that
it does not inte rfe re with the impac t-absorb
i ng b umper syst em. No modifica tions should
be made to the vehicle exhaus t and b rake sys
tems . From t ime to time, check that a ll hitch
mo unt ing bolt s remain securely fas tened.
W hen you are not tow ing a trailer, remove the
trai le r hi tch ball moun t. T h is prevents the
hi tch from causing damage sho uld your ve hi
cle be str uck from be hind
¢ &. .
Trailer brakes
If yo ur tra iler is equ ipped w it h a braking sys
tem, check to be su re that it conforms to a ll
r eg ulat io ns.
Trailer towin g 199
The trailer hyd ra ulic bra ke system must not be
direct ly connected to the vehicle's hydraulic
brake system
¢ &. .
Safety chains
Alw ays use s afety chains between your ve hicle
and t he tra ile r.
Trailer lights
Tra ile r lights m ust meet all reg ulations . Be
su re to check w ith your authorized Audi dealer
fo r c orrec t w iri ng, sw itches, and relays.
Mirrors
If you a re unable to see the traffic behind you
u sing the regula r outside m irrors, then you
must insta ll ext ended mir ro rs. It is important
t h at you
always have clea r vis io n to the rear .
.8, WARNING
- If a trai ler has elec trica l br ake s plea se
no te th at t hese bra kes are not activat ed
by the fa ctory -fit ted control unit -risk of
accident!
- After removing the t railer hi tch, do no t
s to re it in yo ur vehicle . In case of sudden
brak ing, the hitch could fly fo rward and
in ju re you or yo ur passenge rs .
Operating instructions
Maximum traile r we ight
-
A trai ler fo r you r vehicle is limited to a typical
class 1 or class 2 tra iler.
Trailer load distribution
B e sure the lo ad in the tra iler is h eld secure ly
i n p lace to p reven t it from shifting fo rward,
backward or sideways.
Never allow a passenger to ride in a trailer
¢ &. in Driving instru ctions on page 200.
Engine cooling system
T owing a t railer ma kes t he engine wor k hard
er . It is impo rta nt that the cooling system's
perfo rman ce is up to the additional load.
Make sure tha t the coo ling sys tem h as enough
f lu id . .,..
•
•
Page 202 of 302
200 Trailer towing
Tire pressure
When towing a trai le r, inflate the tir es of your
vehicle to the cold tire pressure listed under
"Full load" on the label located on the driver 's
side B-pillar (visible when the door is open).
Inflate trailer tires to trailer and tire manufac
turers' specifications.
Lights
The headlight settings should be checked with
the trailer attached before dr iving off. Check
to make sure both vehicle and tra iler lights
are working properly.
Safety chains
Be sure trailer safe ty cha ins are properly con
nected from the trailer to the hitch on the ve
hicle. Leave eno ugh slack in the chains to per
mit turning corners. When you install safety
cha ins, make sure they w ill not drag on the
road when you are driving.
The chains shou ld cross under the trai ler
tongue to prevent it from dropping in case of
separation from the hitch.
Driving instructions
Driving with a trailer always requires extra
care and consideration.
To obtain the best possible handling of vehicle
and trai ler, p lease note the following:
.,. Do not tow a loaded trailer when your car it
self is not loaded .
.,. Be especia lly careful when passing other
vehicles .
.,. Observe speed limits .
.,. Do not drive at the maximum permissible
speed.
.,. Always apply brakes early.
.,. Monitor the temperature gauge.
Weight distribution
Towing a loaded trai ler with an empty car re
sults in a highly unstable distribution of
weight . If this cannot be avo ided, drive at very
low speeds only to avoid the risk of losing
steering control. A "ba
lanced'' rig is easier to operate and con
trol. This means that the tow vehicle should be loaded to the extent possible and permissi
ble, while keep ing the trailer as light as possi
ble under the c ircumstances. Whenever poss i
ble, transfer some cargo to the luggage com
partment of the tow veh icle while obse rving
tongue load requ irements and vehicle load ing
considerations.
Speed
The higher the speed, the more d iff icu lt it be
comes for the driver to control the rig. Do not
drive at the maximum permissible speed. Re
duce your speed even more if load, weather or
wind conditions are unfavorable -pa rticularly
whe n going downhill.
Reduce veh icle speed
immediately if the trail
er shows the slightest s ign of sway ing.
Do not
try to stop the swaying by accelerating.
Observe speed limits. In some areas, speeds
for vehicles tow ing trailers are lower than for
regular vehicles .
Always apply brakes early. When driving
downh ill, shift into a lower gear to use the en
gine braking effect to slow the vehicle . Use of
the brakes alone can cause them to overheat
and fail.
Coolant temperature
The coolant temperature gauge c> page 10
must be observed carefully . If the needle
moves close to the upper end of the scale, re
duce speed immediately and/or turn off the
air conditioner.
If the coolant temperature warning light •
in the in strument cluster starts flashing, pull
off the road, stop and let the engine
idle for
abo ut two minutes to prevent heat build-up .
_& WARNING
Anyone not properly restrained in a mov
in g vehicle is at a much greater risk in an
accident. Never let anyone ride in your car
who is not p roperly wea ring the restraints
provided by Audi.
-
Page 221 of 302
Checking and filling Engine hood
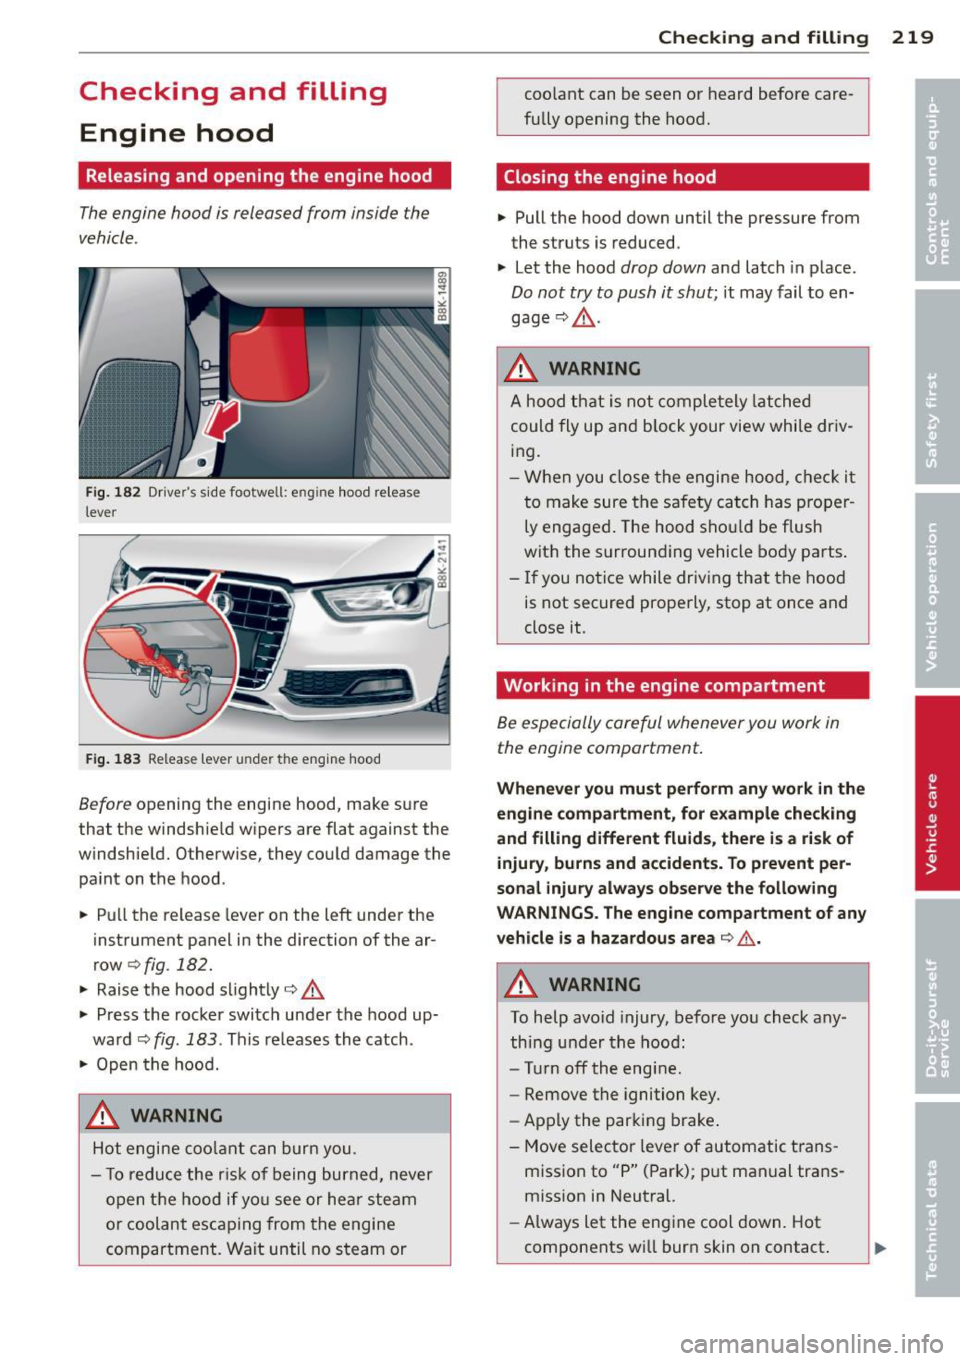
Releasing and opening the engine hood
The engine hood is released from inside the
vehicle .
Fig . 182 Dr iver's side footwell: eng ine hood release
lever
... ~ - ---
F ig . 183 Re lease lever un der the engine hood
Before opening the engine hood, make sure
that the windshield w ipers are flat against the
windshield. Otherwise, they could damage the
paint on the hood.
.. Pull the release lever on the left under the
instrument panel in the direction of the ar
row
Q fig. 182.
.. Raise the hood slightly QA
.. Press the rocker switch under the hood up
ward
c::> fig . 183 . This re leases the catch .
.,. Open the hood.
& WARNING
Hot engine coo lant can burn you.
- To redu ce the r isk of being burned, never
open the hood if yo u see or hear steam
or coolant escaping from the engine
compartment. Wait until no steam or Checkin
g and fillin g 219
coolant can be seen or heard before care
fully opening the hood.
Closing the engine hood
.. Pull the hood down until the pressure from
the struts is reduced .
.. Let the hood
drop down and latch in place.
Do not try to push it shut; it may fail to en
gage
c::> .&, .
_&. WARNING
-
A hood that is not comple tely latched
could fly up and b lock your view while dr iv
ing.
- When you close the engine hood, chec k it
to make sure the safety catch has p ro pe r
ly engaged . The hood sho uld be flush
with the surrounding vehicle body parts .
-If you notice while driv ing that the hood
is not secured prope rly, stop at once and
close it.
Working in the engine compartment
Be especially careful whenever you work in the engine compartment .
Whenever yo u mu st p erform an y w or k in th e
eng in e compa rtment, for example checking
and filling differ ent fluid s, there i s a ri sk of
injury , burns and accidents. To prevent per
sonal injury always obser ve the following
WARNINGS . The eng ine compa rtment of any
v ehicle is a hazardous are a
QA .
_&. WARNING
To help avoid injury, before you check any
thing under the hood:
- Turn off the engine.
- Remove the ignition key.
- Apply the parking brake .
- Move selector lever of automatic trans -
mission to "P" (Park); p ut manual trans
miss ion in Neutral.
- Always let the engine cool down. Hot
components w ill burn skin on contact .
Page 223 of 302
Checking and fillin g 221
Engine compartment
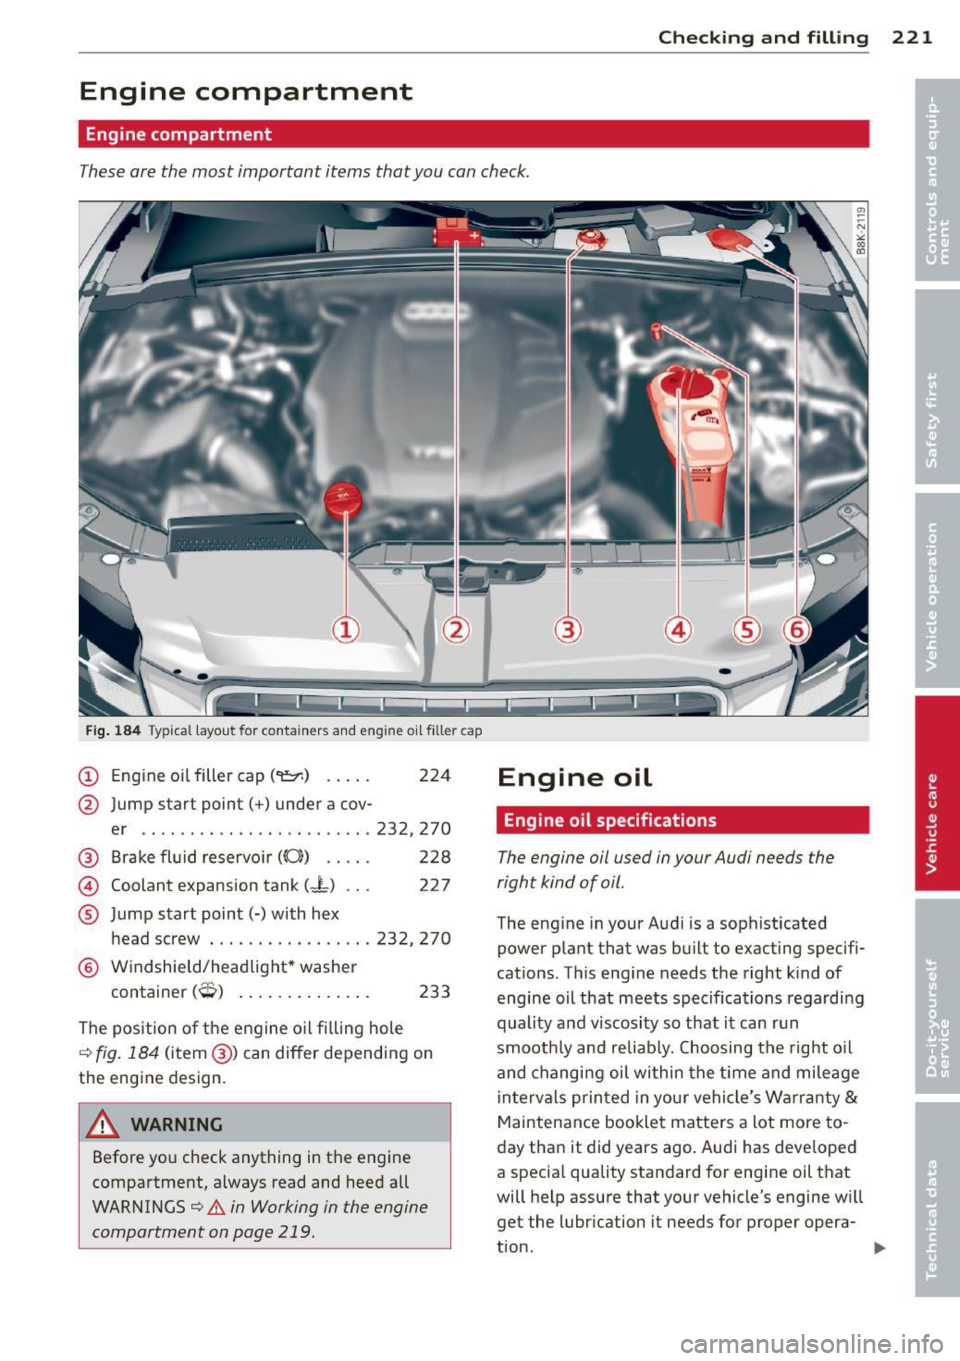
Engine compartment
These are the most important items that you can check.
Fig. 184 Typical layout for containers and engine oil filler cap
(D Eng ine oi l filler cap (
er .. .. ... ....... ........ .. 232, 270
@ Brake fl uid reservo ir
((0)) . . . . . 228
@ Coolant expansion tank (J-) . . . 227
® Jump start point(-) with hex
head screw ..... .......... .. 232, 270
® Windshie ld/headlight* washer
container
(0) . . . . . . . . . . . . . . 233
The pos ition of the engine o il fi lling hole
¢ fig . 184 (item @) can differ depending on
the engine design.
A WARNING
-
Before you check anything in the engine
compartment, always read and heed all
WARNINGS¢ &. in Working in the engine
compartment on page 219.
Engine oil
Engine oil specifications
The engine oil used in your Audi needs the
right kind of oil .
The eng ine in your Audi is a sophisticated
power p lant that was bu ilt to exacting specifi
cations . This eng ine needs the right k ind of
engine oil that meets specifications regarding
quality and viscosity so that it can run
smooth ly and reliab ly. Choosing the rig ht o il
and changi ng oil within the t ime and mileage
i n tervals printed in you r vehicle's Warranty
&
Maintenance booklet matters a lot more to
day than it did years ago . Audi has developed
a specia l quality standard for engine oil that
will help assure that your vehicle's engine w ill
get the lubr ication it needs for proper opera-
tion. .,..
Page 225 of 302
temperatures stay below freezing point for l ong periods.
Detergent add itives in the o il w il l make fresh
oil look dark after the eng ine has been run
ning fo r a short time . This is norma l and is not
a reason to change the oi l more often than
recommended.
D am ag e or m alfun ction s due to lack of
ma intenanc e
It is essential that you change your oil at the
r ecommended inte rva ls using only engine o il
t hat complies wi th A udi oi l standard
VW 502 00 . Your Limited New Vehicle War
ranty does not cover damage or malfunctions
d ue to fa ilure to fo llow recommended mainte
nance and use requ irements as set forth in
the Audi Owner's Manua l and Warranty
&
Maintenance book let . Your dea ler will have to
deny warranty coverage u nless you present to
the dea ler p roof in the fo rm of Serv ice or Re
pa ir Orde rs that all s chedu led maintenance
wa s pe rformed in a t imely manner .
Engine oil consumption
The engine in your vehicle dep ends on an ade
quate amount of oil to lubricate and cool all
of its moving parts.
In o rder to provide effective lubrication and
cool ing of i nternal engine components, a ll in
ternal comb ustion eng ines consume a cert ain
amo unt of o il. Oil cons umption varies from
engine to engine and may change significantly
over the life of the engine. Typ ica lly, engines
with a specified break-in per iod (see
¢
page 194) consume more oil during the
break-in per iod than they consume after oil
consumption has stabilized .
Under norma l conditions, the rate of oil con
sumpt ion depends on the quality and viscosity
of the oil, the RPM (revo lutions per m inute) at
which the engine is operated, the amb ient
temperature and road condit ions. Furthe r fac
tors ar e the amount of o il d ilution from wate r
condensation or fuel residue and the ox ida
tion level of the oi l. As any engine is s ubje ct to
Checkin g and fillin g 223
wear as m ileage builds up, the oil consump
tion may increase over time until replacement
of worn components may become necessary.
Wi th a ll these variab les coming into p lay, no
standard rate of oil consumpt ion can be es
tablished or specified. There is no alternative
to regular and frequent check ing of the o il lev
el, see
Note .
If the yellow engine oil leve l warning symbo l
1\1 in the instrument cluster lights up , you
sho uld check the oil leve l as soon as possib le
¢
page 224. Top off the oil at your earliest
convenience ¢
page 224.
A WARNING
Before you check anythi ng i n the engi ne
compartment, always read a nd heed all
WARNINGS¢ .&.
in Working in th e engine
c ompartment on page 219.
(D Note
D riving w ith an insufficient o il level is like
ly to cause sever e damage to the engine .
(D Tips
- The oil pressure warning display. is
not an indicator of the oil le vel. Do not
rely on it . Instead, check the oil level in
your engine at regu lar intervals, pref
erably ea ch time you refuel, and always
before going on a long trip .
-If you have the impression yo ur engi ne
c ons umes ex ce ss ive amoun ts of o il, we
recommend that you consul t an a uthor
ized Aud i dea ler to have the cause of
your concern properly d iagnosed. Keep in
mind that the accurate measu rement of
oil consumption requ ires great care and
may take some t ime. An authorized Aud i
dealer has instructions about how to
measu re oil consumption accurately.
-
•
•
Page 228 of 302
226 Check ing and filling
Engine cooling system
Coolant
The engine coolant performs two functions: it
keeps the engine from overheating and it pro
tects the engine from freezing in the winter .
The cooling system is sealed and generally re
quires little attention.
The cooling system has been filled at the fac
tory with a permanent coolant which does not need to be changed. The coolant consists of a
mixture of water and the manufacturer's gly
col-basedcoolant additive G 13 antifreeze with
anticorrosion add itives (SO% for USA mode ls;
60% for Canadian models). This mixture both
assures the necessary frost protection and protects metal components in the engine's
cooling system from corrosion and scaling. It
a lso raises the boiling point of the coolant .
Do not reduce the concentration of the coo l
ant in the summer by adding plain water .
The
p ro po rti on of c ool ant add it iv e mu st b e at
lea st 50 % but not mo re th an 60%
to main
tain antifree ze protection and cooling efficien
cy. If the coolant frost protect ion is too low,
the coolant could freeze and damage the veh i
cle heating and eng ine cooling system .
For year-round driving, antifreeze is added at
the factory for temperatures down to:
- -31° F(-3S°C)USA
- - 40 ° F ( - 40 °C) Canada.
_& WARNING
Before yo u check anything in the engine
compartment, always read and heed all
WARNINGS
¢ &. in Working in the engine
compartment on page 219.
(]) Note
-
- Before winter sets in, have the coolant
checked to see if the coo lant additive in
your vehicle is s uffic ient to meet the cli
mate cond it ions . Th is is especially impor
tant if you live in a region where the w in
ter is extremely cold . If necessary, in- crease the p
roportion of coo lant additive
to 60%.
- When adding coolant additive to your
cooling system, remember:
- We recommend us ing on ly coolant ad
d itive G12++ or G13 for your veh icle .
This coolant additive is availab le at au
thor ized Audi dealers. Other types of
ant ifreeze can s ignificantly reduce cor
rosion pro tection. The resulting cor ro
sion can cause a loss o f coolant and se
rious engine damage.
- Do not add any type of rad iator leak seal
ant to yo ur vehicle's engine coolant .
Adding radiator repair fl uid may adverse
ly affect the function and performance of
your cooling system and cou ld resu lt in
damage not covered by your New Veh icle
Limited Warranty.
' Checking the engine coolant level
The engine coolant level can be checked with
a quick glance.
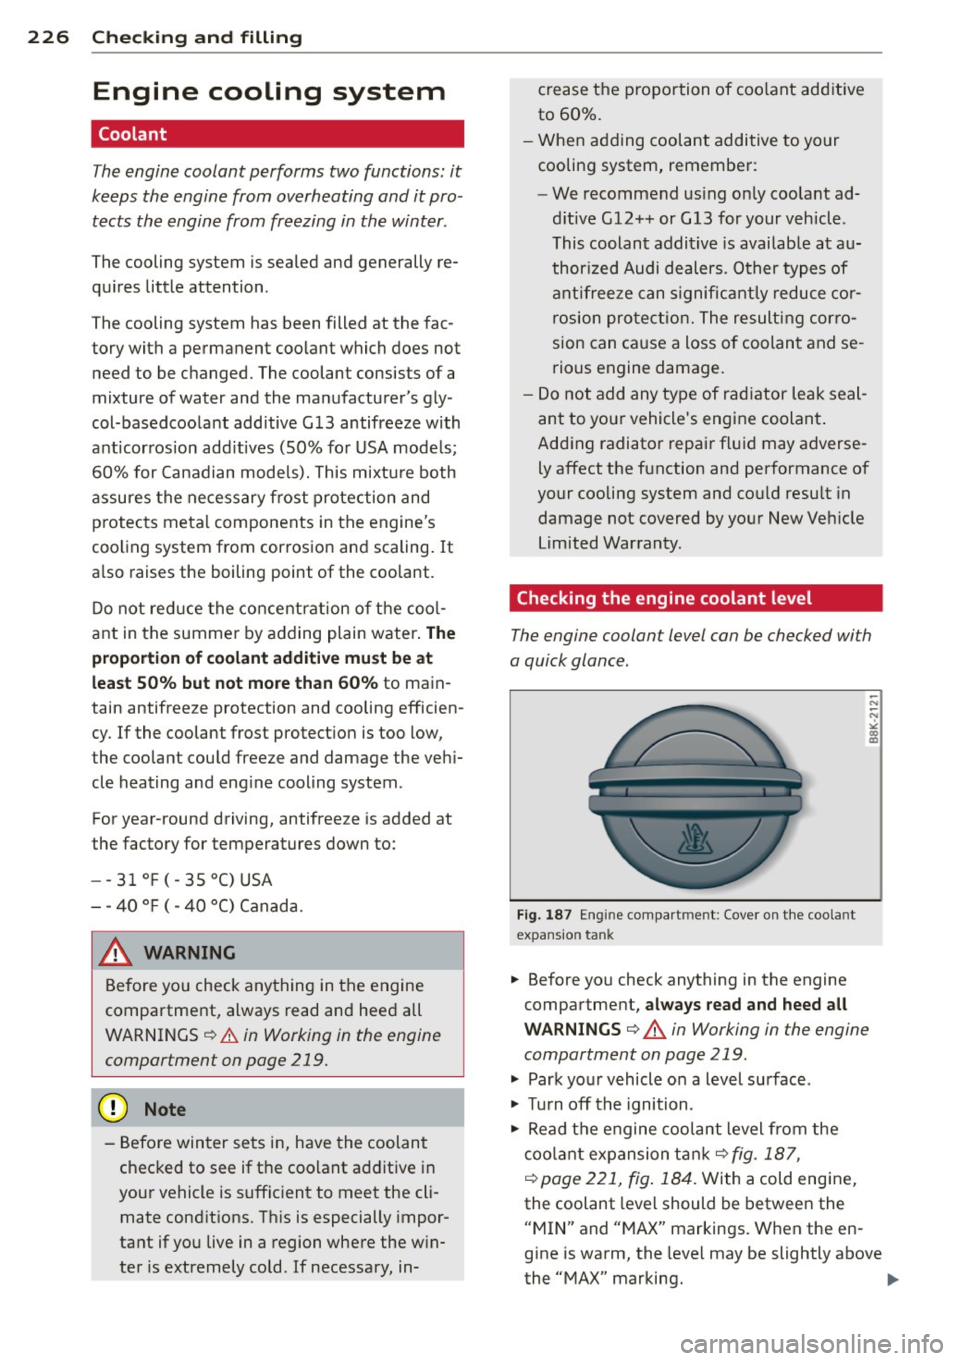
F ig. 187 En gin e compa rtm en t: Cover o n the coo la n t
expans io n ta nk
-"' -"' >< .,
"'
.. Before yo u check anything in the engine
compartment,
alwa ys read and heed all
W ARNINGS ¢ .&. in Working in the engine
compartment on page 219 .
.,. Park your vehicle o n a level surface .
.,. Tu rn off the ignition .
.. Read t he engine coolant level from the
coo la nt expansion tank ¢
fig. 187 ,
r=:> page 221, fig . 184 . With a cold engine,
the coolant leve l should be between the
"MIN" and "MAX" markings . When the en
gine is warm, the level may be slightly above
the "MAX" marking.
IJII,
Page 229 of 302

The location of the coolant expansion tank
can be seen in the engine compartment illus
tration
q page 221 .
To obtain an accurate read ing , the eng ine
must be switched off .
The expa nsion tank in you r vehicle is equipped
with an elec tric coolant level sensor.
When the coolant level is too low, the warning
light in the Auto-Check System
q page 18 wi ll
b lin k until you add coo lant and the level has
been restored to norma l. Even t hough the re is
an e lec tric coolant level sensor, we s till rec
ommend you check the coolant leve l from
time to time .
Coolant loss
Coolant loss may indi cate a leak in the coo ling
sys tem. In the event of coolant loss, the cool
ing system should be inspected immedia tely
by your authorized A udi dealer. It is not
enough merely to add coolant.
I n a
s ealed system, losses can occur only if
the boiling point of the coolant is exceeded as
a result of overheating.
A WARNING
The cooling system is unde r press ure and
can get ve ry hot. Reduce the risk of sca ld
ing from hot coolant by following these
steps.
- Turn off the engine and allow it to coo l
down.
- Protect yo ur face, hands and arms from
escaping fluid and steam by covering the
cap with a large, thick rag.
- Turn the cap slowly and very carefu lly in
a counter-clockwise direction wh ile ap
plying light, downward pressure on the
t op of the cap .
- To avoid being bu rned, do not spill ant i
freeze or coo lant on the exhaust system
o r hot eng ine parts . Unde r certai n condi
t ions, the ethy lene g lycol in engine cool
an t ca n catc h fire.
Checkin g and fillin g 22 7
@ Note
Do not ad d any type of radiator leak sea l
ant to your ve hicle's engine coolant. Add
i ng radiator repa ir flui d may adverse ly af
fect the funct ion and performance of your
cooling system and could result in damage not cove red by your New Vehicle l imi ted
Warranty .
Adding coolant
Be very careful when adding engine coolant.
Before you check anyth ing in the eng ine com
partment,
always read and heed all WARN
INGS q & in Working in the engine compart
ment on page 219 .
.,. Turn off the engine.
.,. let the engi ne cool down.
.,. Place a thick rag over the coolant expansion
tank
q page 226, fig . 187 and carefully turn
the cap counter-clockwise
~ &_ .
.,. Add coo la nt.
.,. Twist the cap o n aga in
tightly.
Rep lacement engine coo lant must confo rm to
exact specificat ions ~
page 226, Coolant. We
recommend using on ly coo lant additive G 12+
+ , G 13 or in an eme rgency G12+. Do
not use a
different additive. In an emergency use pla in
water until you can get the correct additive
and can restore the correct ratio . This sho uld
be done as soon as possible.
If you have los t a cons iderab le amount o f
coolant , then you sho uld add cold antifreeze
and co ld water on ly when the engine is cold.
A lw ays use
new engine coo lant w hen refilling.
Do not f ill coo lant above t he "MAX" mark. Ex
cess coola nt w ill be fo rced o ut through t he
pressure relief valve in the cap when the en
gine becomes hot.
A WARNING
- The cooling system is under pressure and
can get very hot. Reduce the risk of ..,.
•
•