ECU AUDI A4 2015 Owners Manual
[x] Cancel search | Manufacturer: AUDI, Model Year: 2015, Model line: A4, Model: AUDI A4 2015Pages: 304, PDF Size: 74.86 MB
Page 34 of 304
32 Opening and clo sing
- If the power locking system should ma l
function, you can lock the driver's door us ing the mechanical key
c:> page 3 7.
- If the power locking system should fail,
you can sti ll open the fue l tank flap in an
emergency
c:> page 211.
- You are we ll advised not to keep valua
bles inside an unattended vehicle, visib le
or not. Even a properly locked vehicle
cannot provide the security of a safe.
- If the LED in the upper edge of the driv
er's door panel comes on for abo ut 30
seconds after the vehicle is locked, there i s a ma lfunction in the power locki ng or
the anti-theft warning system. Have the
malfunction corrected by an author ized
A udi dealersh ip or qua lified repai r fac ili
ty.
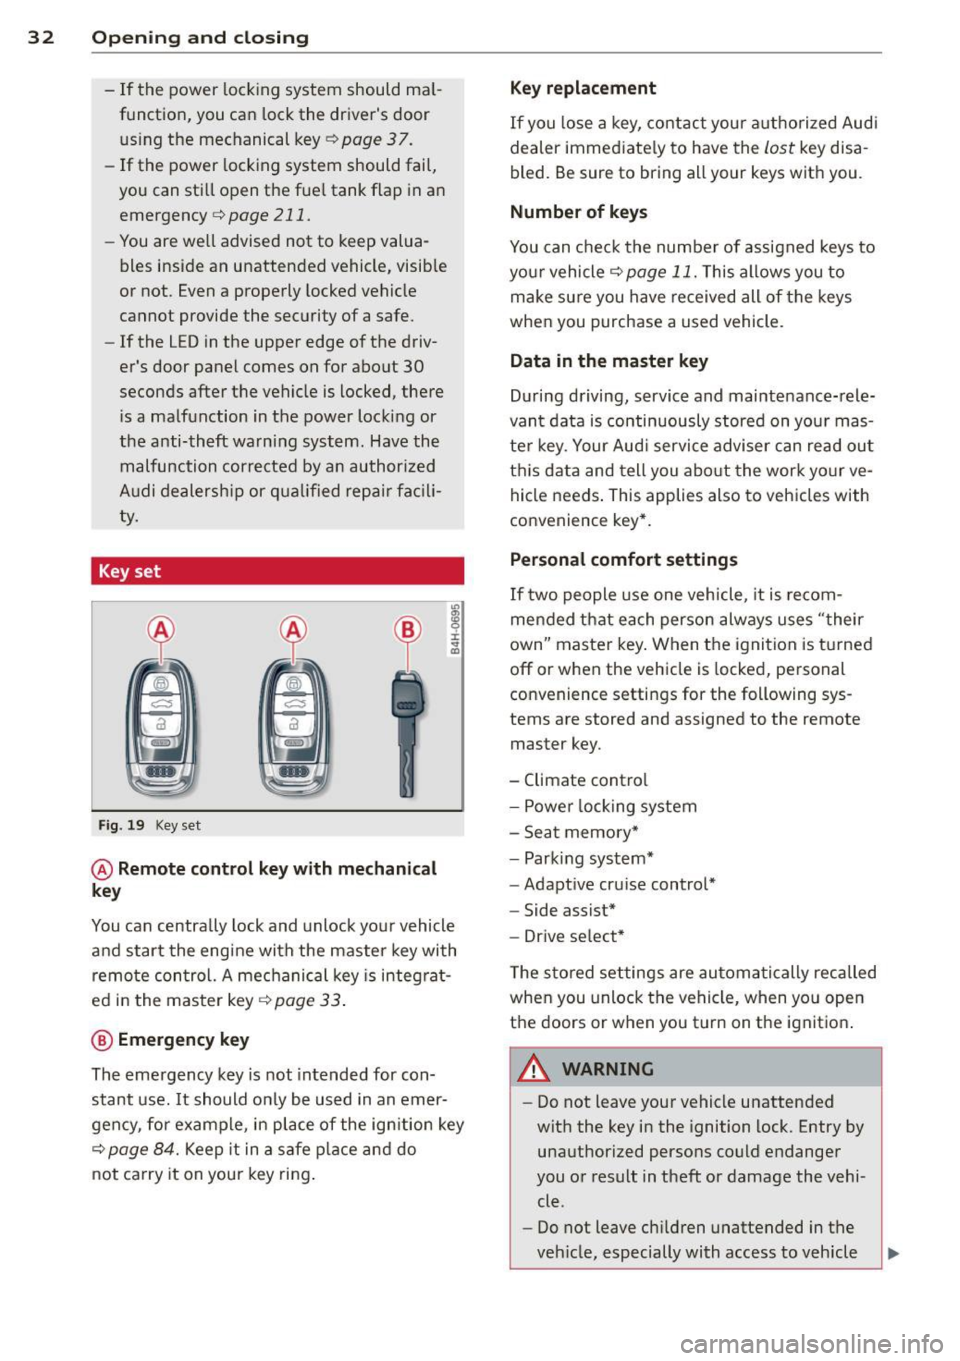
Key set
F ig . 19 Key set
@ Remote cont rol key with mechanical
key
You can centrally lock and unlock your vehicle
and start the engine with the master key with
remo te con trol. A mec hanical key is integ rat
ed i n the master key
c:> page 33 .
@ Emergency key
The emergency key is not intended for con
stant use.
It should on ly be used in an emer
gen cy, fo r example, in place of the ign ition key
cc> page 84. Keep it in a s afe p lace and do
not ca rry it on your key ring .
Key replacement
If you lose a key, contact you r authorized Audi
dealer immed iate ly to have the
Lost key disa
bled. Be sure to bring all your keys with you .
Number of keys
You can check the number of assigned keys to
yo ur vehicle
c:> page 11. This allows you to
make su re you have re ceived all of the keys
when you purchase a used vehicle.
Data in the master key
D uring d riving, s ervice and maintenance-rele
vant data is continuously stored on your mas
te r k ey. Your Aud i service adviser can read out
t hi s data and tell you abo ut the work yo ur
ve
hicle needs . This applies also to vehicles with
convenience key*.
Personal comfort settings
If two people use one veh icle, it i s r ecom
men ded that e ach person alw ays uses "t heir
own" maste r key. When the ignition is tu rne d
off or when the vehicle is locked, personal
convenience setti ngs for the following sys
tems are stored and assigned to the remote
master key.
- Climate contro l
- Powe r lock ing system
- Seat memory *
- Parking system*
- Adapt ive cru ise control*
- Side assist*
- Drive se lect*
T he s to red settings are au toma tically recalled
whe n you unlock the vehicle, when yo u open
t h e doors or w hen you t urn on t he ignitio n.
A WARNING
-Do not leave your vehicle unattended
wit h the key in the ignition lock. Entry by
unaut horized persons co uld endanger
you or result in theft or damage the vehi
cle.
- Do not leave ch ildren unattended in the
veh icle, especially with access to vehicle
Page 35 of 304
keys. Unguarded access to the keys pro
vides children the opportunity to start
the engine and/or activate veh icle sys
tems such as the power windows etc. Un supervised operation of any vehicle sys
tem by ch ildren can result in serious in
jury.
- Do not remove the key from the ignition
lock until the vehicle has come to a com
plete stop. Otherw ise the steering col
umn lock cou ld suddenly engage -caus
ing the risk of an accident.
(D Tips
- The operation of the remote contro l key
can be temporarily disrupted by interfer
ence from transmit ters in the vici nity of
the vehicle working in the same frequen
cy range (e .g . a ce ll phone, radio equip
ment).
- Fo r security reasons, replacement keys
are on ly available from authorized A udi
dealer.
- For Declaration of Compliance to United
States FCC and Industry Canada regula
tions¢
page 286.
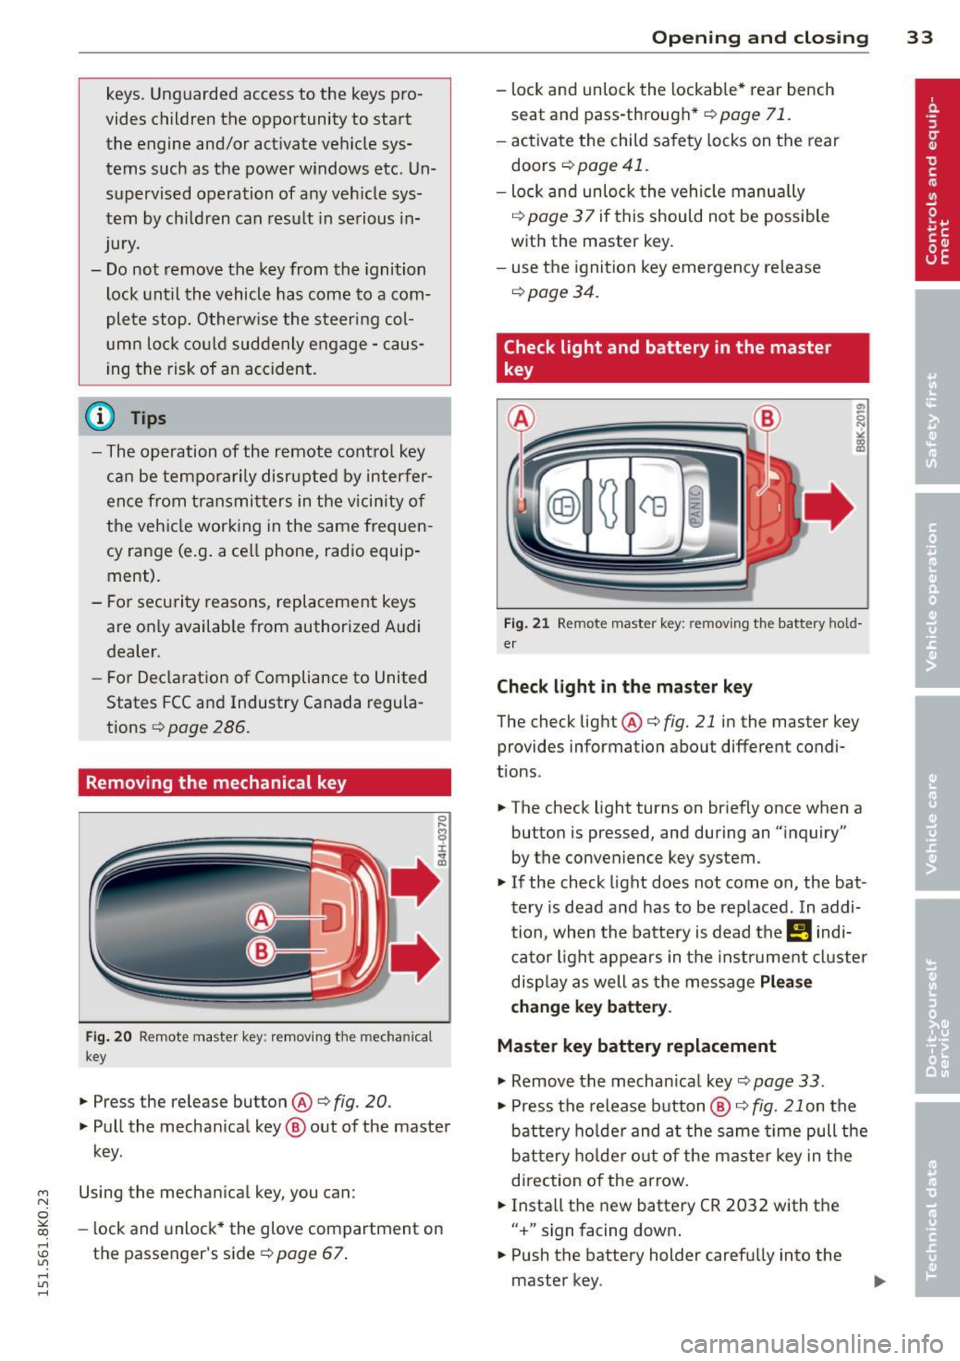
Removing the mechanical key
Fi g. 20 Remote master key: removing the mechanical
key
.,. Press the release button@¢ fig. 20.
.,. Pull the mechan ical key @ out of the master
key.
~ Using the mechanical key, you can:
~ co -lock and unlock* the glove compartment on
rl :5: the passenger's side 9 page 67.
rl l/1 rl
Op enin g an d clos ing 33
- lock and unlock the lockable * rear bench
seat and pass-through*
r=;, page 71.
- activate the child safety locks on the rear
doors
r=;, page 41.
- lock and unlock the vehicle manua lly
r=;, page 3 7 if this should not be possible
with the master key.
- use the ignition key emergency release
r=:> page 34.
Check light and battery in the master
key
Fig . 21 Remote master key: removing the battery hold
er
Che ck light in the ma ster ke y
The check light @ r=:> fig. 21 in the master key
provides information about different condi
t ions .
.,. The check light turns on briefly once when a
button is pressed, and during an "inquiry"
by the convenience key system .
.,. If the check light does not come on, the bat
tery is dead and has to be replaced. In addi
tion, when the battery is dead the
!I indi
cator light appears in the instrument cluster
disp lay as well as the message
Plea se
c hange k ey batt ery.
Master key battery replacement
"'Remove the mechan ical key r=;, page 33 .
"' Press the release button @ i=:> fig. 21 on the
battery ho lder and at the same time pull the
bat tery ho lder out o f the maste r key in the
direction of the arrow.
.,. Insta ll the new battery CR 2032 with the
" + " sign facing down .
.,. Push the battery holder carefu lly into the
master key.
Page 38 of 304
36 Openin g and clo sing
- You cannot open the doors or the rear lid
from the
outside (increased security, for ex
amp le when you are stopped at a red light).
- The diodes in the power locking switch illu
minate when all the doors are closed and
locked.
- Front doors: you can un lock and open the
doors from the inside by pu lling on the door
hand le.
- Rear doors: pu ll the door handle
once to re
lease the lock. Pull the hand le
again to open
the door.
- If you hav e a crash and the airbag is activat
ed, the doors automatically un lock.
A WARNING
- The power locking sw itch works w ith the
ignition off and automatically locks the
entire vehicle when it is actuated .
- On a vehicle locked from the outs ide the
power locking system switch is inopera
t ive .
- Locked doors make it more difficult for
emergency workers to get into the vehi
cle, which puts lives at risk . Do not leave
anyone beh ind in the vehicle, especially
children.
(D Tips
Your vehicle is locked automatically at a speed of
9 mph (15 km/h) (Auto Lock)
r:::;, page 31. You can un lock the veh icle
aga in using the opening f unction in the
power locking sys tem switch
@I .
Setting power locking
In the radio/MM!* , you can set which doors
t he central locking system will unlock.
~ Select : I CAR! funct ion button > Central lock
ing .
Or
~ Select : ~I C-A-R~ ! fu nct ion but ton > Car sys tem s*
control b utton > Vehicle setting s > (Central
loc king )*.
Single door un locking/Unl ock door s* -
you
can specify which doo rs un lock when you open
the veh icle. -
Selecting
off /All and pressing the Iii button
on the remote control key unlocks the entire
veh icle.
- Selecting
on/Dri ver and pressing the Iii but
ton on the remote control key once un locks
only the driver's door. In vehicles with a con
ven ience key*, only the door whose handle
you pull w ill unlock. I f you press the
Iii but
ton tw ice, the entire vehicle will unlock . If
you press the [@] button, the enti re vehicle
w ill always lock .
Luggage com p. loc k/Lock ext erior tr unk han
dl e -
If you select On , you can no longer open
the luggage compartment using the rear lid
hand le
r:::;, page 38, fig. 2 7. In this case, the
r ear lid can be opened with the
l=I bu tton on
the master key
r:::;, page 34, fig. 22 or w ith the
l= I* button in the driver 's doo r r:::;,page 39,
fig .
29.
Fold mirrors * if you selec t On , the outs ide
mirrors will fo ld in au tomati cally when yo u
press the
Iii button on the remote cont ro l key
r:::;, page 52.
To ne when lo cking -if you selec t On, a tone
will sound when yo u lock t he vehicle.
Auto Lo ck /Loc k when dri ving -if you select
On, the enti re vehicle w ill lock automatically
whe n the speed reaches
9 mph (1 5 km/h).
Page 42 of 304
40 Opening and closing
& WARNING
-Never close the rear lid inattentively or
without checking first. Although the
closing force of the rear lid is limited,
you can still seriously injure yourself or
others.
-Always ensure that no one is within
range of the rear lid when it is moving, in
particular close to the hinges and the up
per and lower edges -fingers or hands
can be pinched.
- To help prevent poisonous exhaust gas
from being drawn into the vehicle, al
ways keep the rear lid closed while driv ing. Never transport objects larger than
those which fit completely into the lug gage area, because then the rear lid can
not be fully closed .
- Never leave your vehicle unattended es pecially with the rear lid left open. A
child could crawl into the car through the
luggage compartment and pull the lid
shut, becoming trapped and unable to get out . To reduce the risk of personal in
jury, never let children play in or around
your vehicle . Always keep the rear lid as
well as the vehicle doors closed when not in use.
- If there is a luggage rack or bicycle rack
mounted on the rear lid, it may not be
able to open completely or an opened rear lid may close by itself because of the
added weight . So the open rear lid must
be supported or the weight must be re
moved from the luggage rack first .
(D Tips
-When the vehicle is locked, the rear lid
can be unlocked separately by pressing
the button
~ on the master key. When
the rear lid is closed again, it locks auto
matically .
- The following applies to vehicles equip
ped with the convenience key* feature: if
the remote control key is left in the lug
gage compartment, luggage compart
ment will automatically unlock itself af- ter you
lock the vehicle. This prevents
you from unintentionally locking your
key in the luggage compartment.
- If the vehicle battery charge drops be
low a certain level, you can still open or
close the rear lid manually, however, you
will need to apply more force to close it.
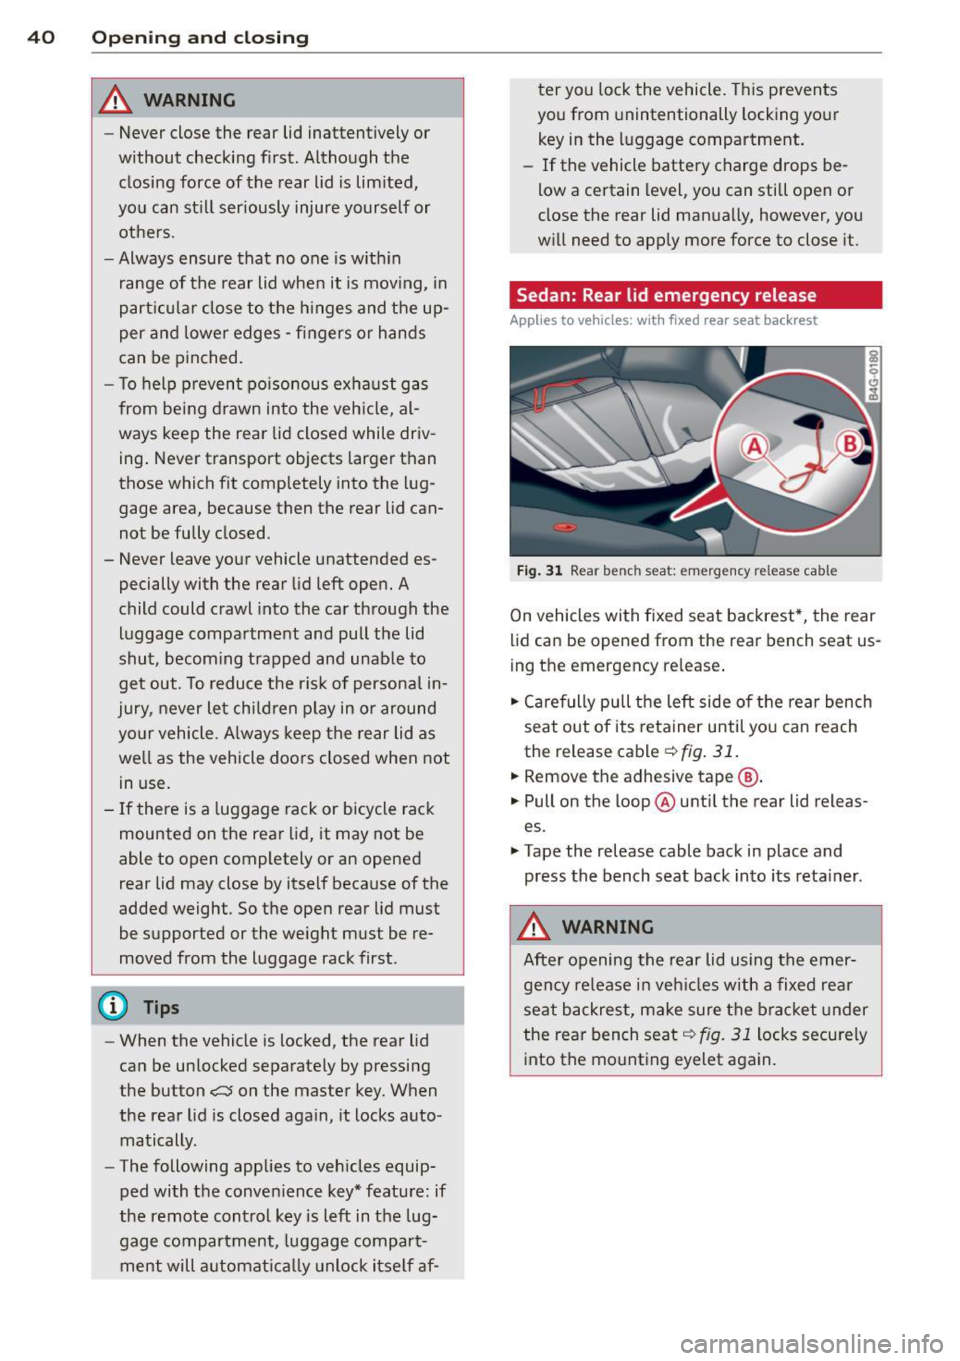
Sedan: Rear lid emergency release
Applies to vehicles: with fixed rear seat backrest
Fig. 31 Rear ben ch s eat: e merg ency r ele ase ca ble
On vehicles with fixed seat backrest*, the rear
lid can be opened from the rear bench seat us
ing the emergency release.
.,. Carefully pull the left side of the rear bench
seat out of its retainer until you can reach
the release cable
¢ fig. 31.
.,. Remove the adhesive tape @.
.,. Pull on the loop @ until the rear lid releas
es.
.,. Tape the release cable back in place and
press the bench seat back into its retainer .
& WARNING
After opening the rear lid using the emer
gency release in vehicles with a fixed rear
seat backrest, make sure the bracket under
the rear bench seat
qfig. 31 locks securely
into the mounting eyelet again.
Page 47 of 304
M N
~ co
rl I.O
"' rl
"' rl
Valet parking
Applies to vehicles: with fold ing and lockable rear seat
backs
The valet parking feature protects the lug
gage comportment from unauthorized ac
cess.
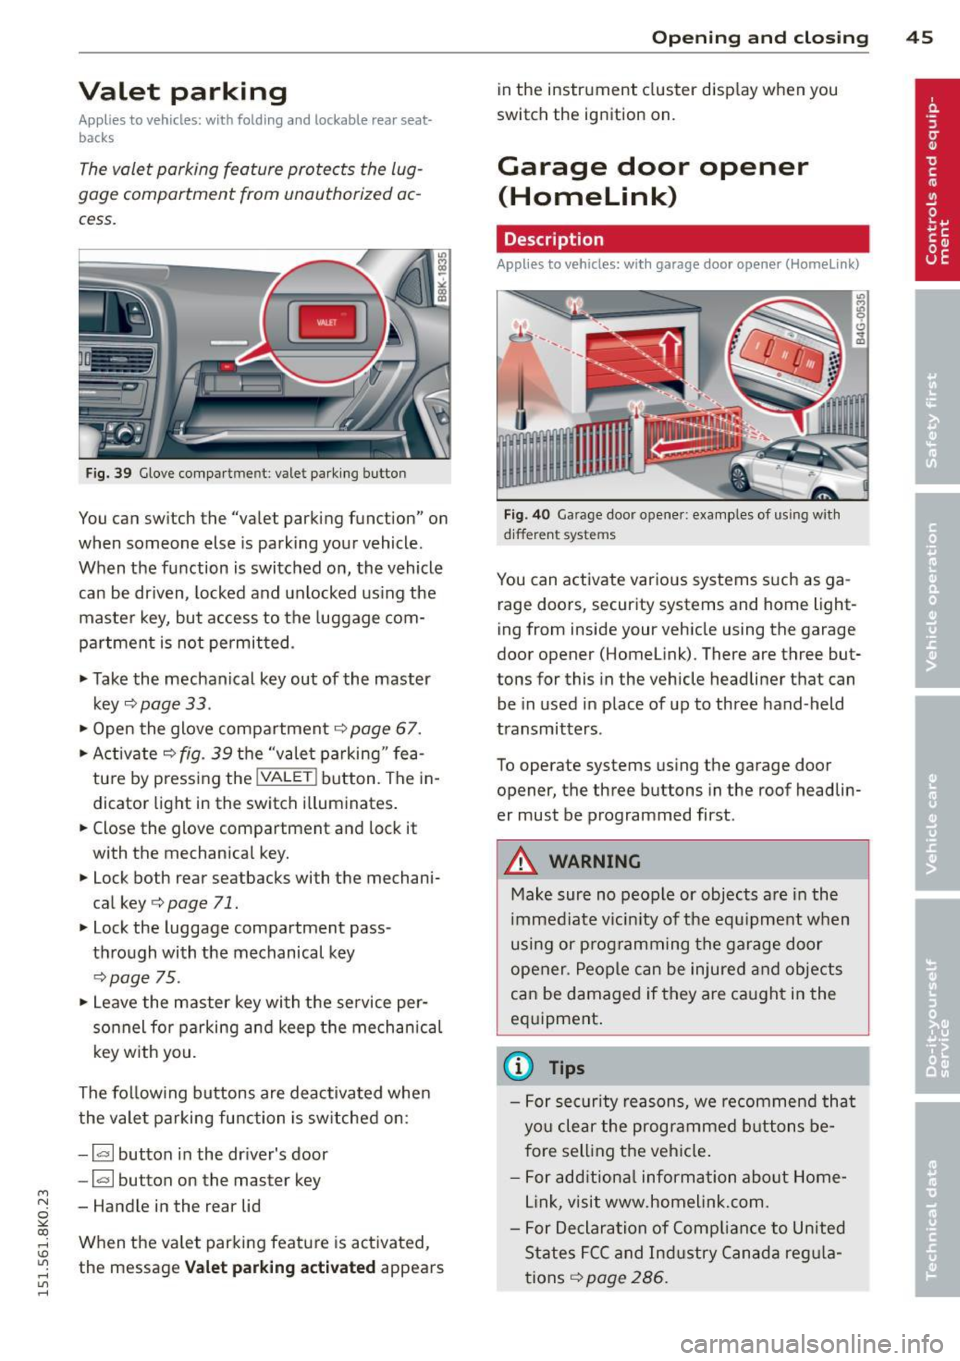
Fig. 39 Glove compa rtment: valet parking button
You can switch the "valet parking function" on
when someone else is parking your vehicle.
When the function is switched on, the vehicle
can be driven, locked and unlocked us ing the
maste r key, but access to the luggage com
partment is not permitted .
• Take the mechanical key out of the master
key
c;, page 33 .
• Open the glove compartment c;, page 67.
• Activate
c;, fig. 39 the "valet parking " fea
tu re by press ing the
! VALET ! button. The in
dicator light in the switch i lluminates.
• Close the glove compartment and lock it
with the mechanical key.
• Lock both rear seatbacks with the mechani
cal key
c;, page 71.
• Lock the luggage compartment pass
through with the mechanical key
c;, poge 75.
• Leave the master key with the service per
sonnel for parking and keep the mechanica l
key w ith you.
The fol low ing buttons are deac tivated when
the valet parking function is sw itched on:
- I a I button in the driver's door
-la l button on the master key
- Handle in the rear lid
When the va let parking feature is activated ,
the message
Vale t p arking act ivat ed appears
Op enin g an d clos ing 45
in the instrument cluster display when you
switch the ignition on.
Garage door opener
(Homelink)
Description
App lies to vehicles: wit h garage door opener (Homelink)
Fig. 40 Garage door opener: examples of using with
d ifferent systems
You can activate various systems s uch as ga
rage doors, security systems and home light
ing from inside your vehicle using the garage
door opener (Homelink). There are three but
tons for this in the vehicle headliner that can
be in used in place of up to three hand-held
transmitters .
To operate systems using the garage door
opener, the three buttons in the roof headlin
er must be programmed first.
A WARNING
Make sure no people or objects are in the
i mmediate vicin ity of the equ ipment when
using or p rogramming the garage door
opener. People can be injured and objects
can be damaged if they are ca ught in the
eq uipment .
(D Tips
-For security reasons, we recommend that
you clear the programmed b uttons be
fore sell ing the vehicle .
- For add itiona l information about Home
L ink, visit www.homelink.com.
- For Declaration of Comp lian ce to United
States FCC and Ind ustry Canada reg ula
tions
c;, page 286.
Page 57 of 304
M N
~ co
rl I.O
"' rl
"' rl
Rear window sun shade
Applies to vehicles: with rear window s un shade
Q;l I n<11• ' ~---
,, ,,-, 7~~, I , .,,,-~;'j ·,
· . .. , a., , . , , . ~ ..
l . -~ '_I ~~ V
l ---..--~IIJl!I.II &iii.a
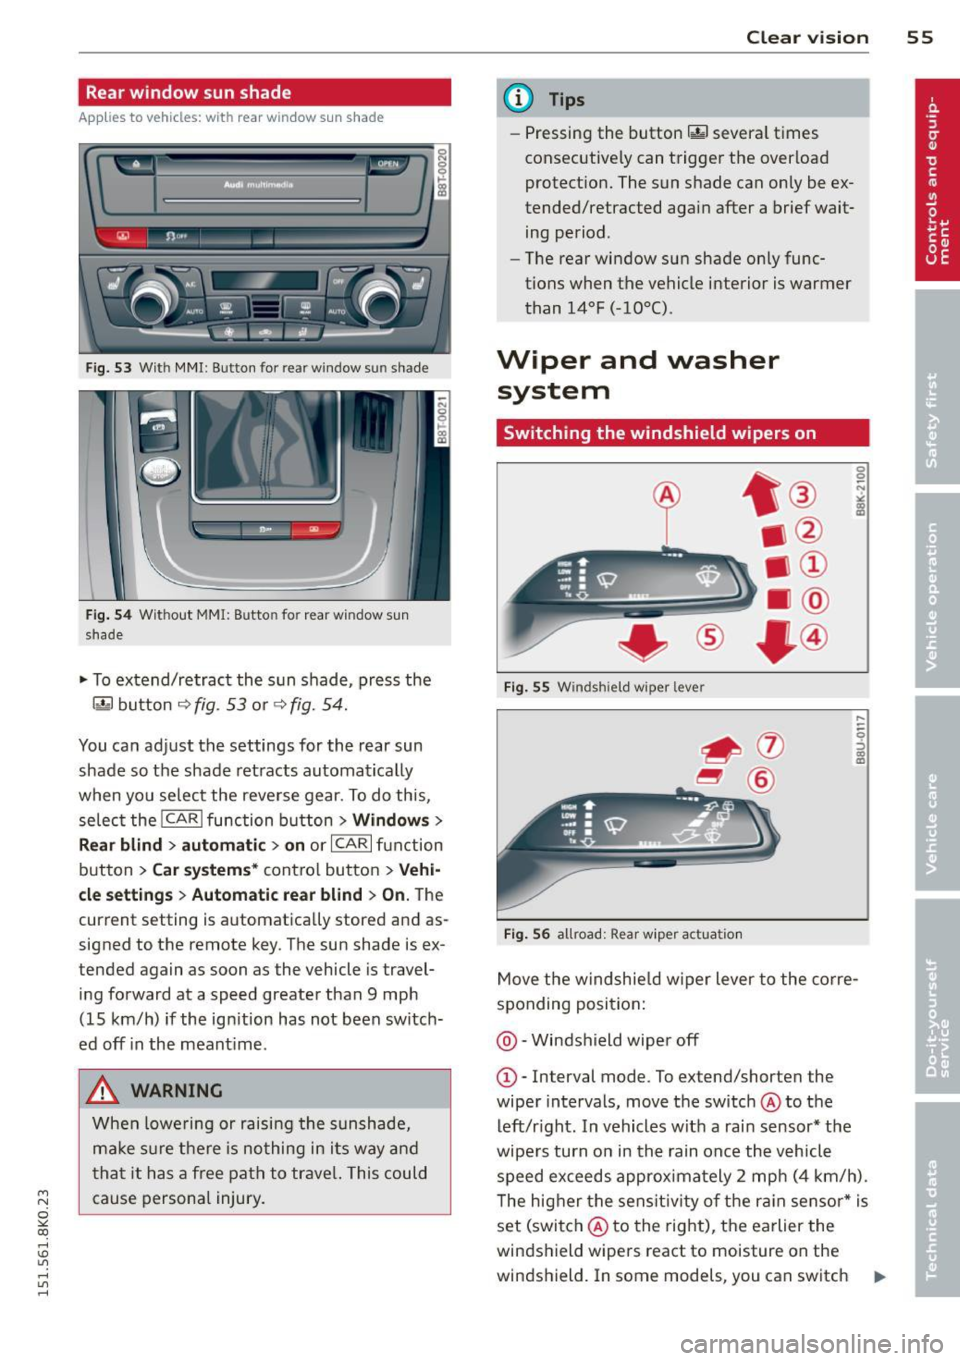
Fig. 53 W ith MMI : Button for re ar window sun shade
Fig . 54 W ithout MMI: B utto n for rear wi ndow s un
s hade
.. To extend/retract the sun shade, press the
rn button ~ fig. 53 or ~ fig. 54.
You can adjust the settings for the rear sun
shade so the shade ret racts automat ically
when you se lect the reve rse gear. To do this,
selec t the
!CARI function button> Window s>
R ear blind > automati c> on
or ICAR I fu nction
button >
Car systems * contro l button > Vehi
cle setting s > Autom atic rear blind
> On. The
current setting is automatically stored and as
signed to the remote key. The sun shade is ex
tended again as soon as the vehicle is travel
ing forward at a speed greater than 9 mph
(15 km/h) if the ign ition has not been switch
ed off in the meant ime .
A WARNING
When lowe ring or raising the sunshade,
ma ke s ure t he re is no thing in i ts way and
t ha t it has a free path to trave l. This could
cause persona l injury .
Clear vi sion 55
@ Tips
- Pressing the button rn severa l t imes
consecutive ly can trigger t he over load
protect ion. The sun shade can only be ex
tended/retracted aga in after a brief wait
ing period.
- The rear window sun shade only func
tions when the vehicle interior is warmer
than
14°F (-10°() .
Wiper and washer
system
Switching the windshield wipers on
F ig . 55 W indshiel d wiper lever
Fig . 56 all road: Rear wiper ac tu ati on
0 0 N
"' :8
....
-
-0 ::, a) m
Move t he windshie ld w iper lever to the co rre
sponding posi tion:
@ -Windshield wiper off
G)-Interval mode. To ex tend/shorten the
wiper intervals, move the switch @to the
left/r ight. In vehicles w it h a rai n sensor* the
wipe rs turn on in the rain once the vehicle
speed ex ceeds approxima tely 2 mph (4 km/h) .
T he hig her the sens it iv ity of the r ain sensor * is
set (switch @to the right), the earlier the
windshield wipers react to moisture on the
w indshield. In some models, you can switch ..,.
Page 69 of 304
M N
~ co
rl I.O
"' rl
"' rl
(upholder
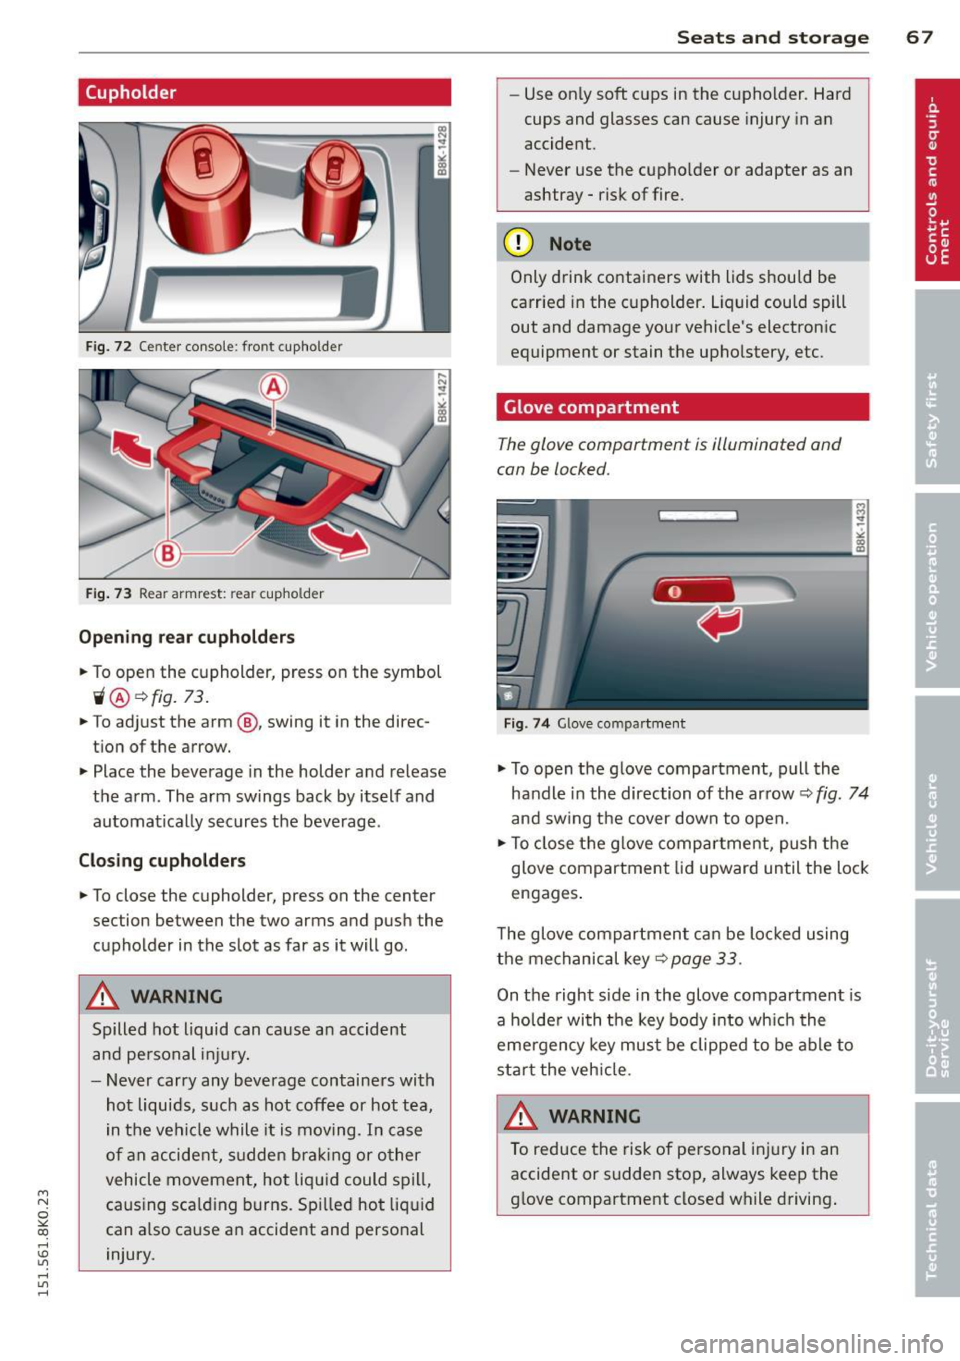
Fig. 72 Ce nter console: front cupholder
Fig. 73 Rear armrest: rea r cupho lder
Opening rear cupholders
~ To open the cupholder, press on the symbol
"® ~fig. 73.
~ To ad just the arm @, swing it in the direc
tion of the arrow.
~ Place the beverage in the holder and release
the arm. The arm swings back by itself and
automatically secures the beverage .
Closing cupholders
~ To close the cupholder, press on the center
section between the two arms and push the
cupholder in the slot as far as it will go.
A WARNING
Spilled hot liquid can cause an accident
and personal injury.
- Never carry any beverage containers with
hot liquids, such as hot coffee or hot tea,
in the vehicle while it is moving . In case
of an accident, sudden braking or other
vehicle movement, hot liquid could spill,
caus ing scald ing burns . Spilled hot liquid
can also ca use an accident and personal
injury.
Seats and storage 67
-Use on ly soft cups in the cupholder. Hard
cups and glasses can cause injury in an
accident.
- Never use the cupho lder or adapter as an
ashtray -risk of fire.
(D Note
Only drink containers with lids should be
carried in the cupholder. Liquid could spill
out and damage your vehicle's electronic
equipment or stain the upholstery, etc.
Glove compartment
The glove compartment is illuminated and
can be locked.
Fig . 74 Glove compar tment
~ To open the glove compartment, pull the
handle in the direction of the arrow~
fig. 74
and swing the cover down to open.
~ To close the glove compartment, push the
glove compartment lid upward until the lock
engages .
T he glove compartment can be locked using
the mechanical key~
page 33.
On the right side in the glove compartment is
a holder with the key body into which the
eme rgency key must be clipped to be able to
start the veh icle.
&_ WARNING
To reduce the risk of personal injury in an
accident or sudden stop, always keep the
glove compartment closed while driving.
-
Page 72 of 304
70 Seat s a nd s tor ag e
damage to the load and even the vehicle
itse lf.
- Make sure that the open rear lid and the
sunroof do not come into contact with
objects on the roof.
Loading the roof rack
Always distribute loads evenly. J\llake sure
anything on the roof rock is securely tied
down.
.. Always dist ribute the loads on the roof rack
evenly .
.. Always attach items to the roof rack securely
before you drive off.
The maximum permissible roof weight is
2 00 lb (90 kg ). The roof weight is the total of
the we ight of the roof rack, the attachments
and the cargo you are carry ing. You must also
not exceed the maximum load weight for the
roof rack you are using .
When us ing a roof rack system which has a
lower load carry ing capac ity , you must not use
up the total max imum perm issible load carry
ing capacity specified above. Instead, you
should load the roof rack system only to the maximum capacity spec ified by the manufac
turer of the roof rack system.
A WARNING
Weak, damaged or improper straps used
to secure items to the roof rack can fail
during hard braking or in a co llision and
cause serious personal injury.
- Make sure the roo f rack is insta lled exact
ly as specified above
,=;,page 69.
- Always use suitable mounting straps for
sec uring items to the roof rack to help
prevent items from shifting or flying for
ward.
- Items on the roof rack must always be
sec urely mo unted.
- T he use of a roof rack can negative ly af
fect the way a vehicle handles . Cargo
that is large, heavy, bulky, long or flat
will have a greater negative influence on
.
the vehicle's aerodynamics, center of
grav ity and overall handling. Always
drive s lowly, avoid sudden braking and
maneuvers when transporting cargo on
the roof of your vehicle.
- Never exceed the maximum permissible
load carrying capacity of the roof of your
veh icle, the permissible axle weights and
the permissible total weight of you r vehi
cle~
page 280, Weights.
(D Note
Make sure that the opened rear lid does
not come in contact with the cargo on the
r oof.
@ For the sake of the environment
As a result of the increased wind resist
ance created by a roof rack, you r vehicle is
us ing fuel unnecessarily . So remove the
r oof rack after using it.
Luggage compartment
General information
A WARNING
Read and follow t he important safety pre
cautions o n
~ page 132, S towing lug
gage.
Page 73 of 304
M N
~ co
rl I.O
"' rl
"' rl
Luggage compartment cover
Applies to vehicles: with luggage compartment cover
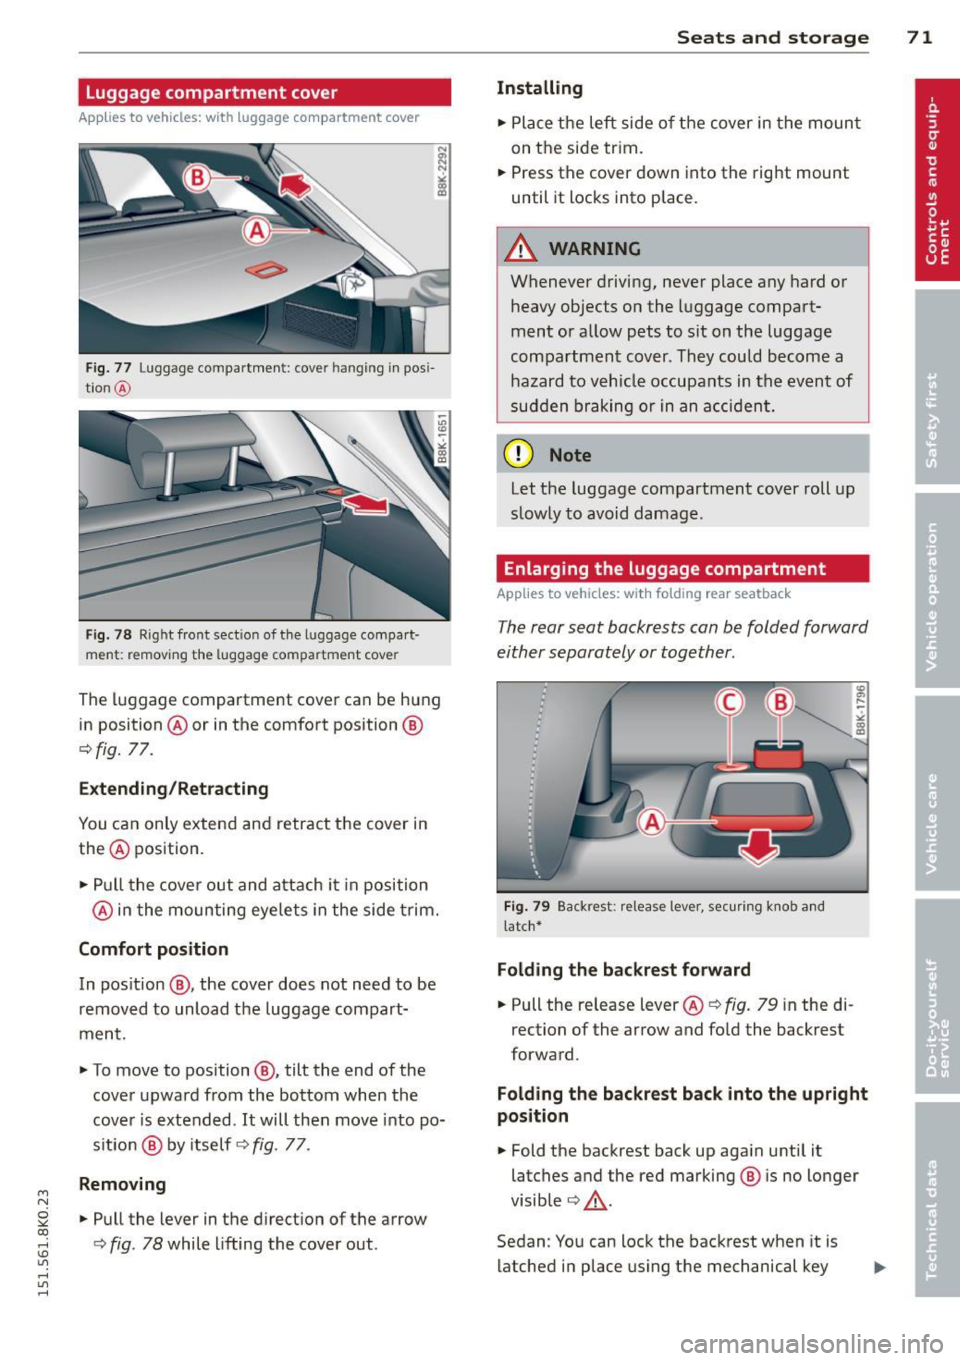
Fig. 77 Luggage compartment: cover hanging in pos i
t ion @
Fig. 78 R ight front section of the luggage compart
ment: remov ing the luggag e compartment cover
The luggage compartment cover can be hung
in position @or in the comfort position @
¢fig. 77.
Extending/Retracting
You can only extend and retract the cover in
the @ position .
• Pull the cover out and attach it in position
@ in the moun ting eyelets in the side trim.
Comfort position
In pos ition @, the cover does not need to be
removed to unload the luggage compart·
ment.
• To move to position @, tilt the end of the
cover upward from the bottom when the
cover is extended. It will then move into po·
s ition @ by itself ¢
fig. 77 .
Removing
• Pull the lever in the direction of the arrow
¢
fig . 78 while lifting the cover out .
Seats and storage 71
Installing
• Place the left side of the cover in the mount
on the side trim.
• Press the cover down into the rig ht mount
until it locks into place.
A WARNING
=
Whenever driving, never place any hard or
heavy objects on the luggage compart·
mentor allow pets to sit on the luggage
compartment cover . They could become a
hazard to vehicle occupants in the event of
sudden braking or in an accident.
ffi Note
Let the luggage compartment cover roll up
slow ly to avoid damage.
Enlarging the luggage compartment
Applies to vehicles: wit h fo lding rear seatback
The rear seat backrests can be folded forward
either separately or together.
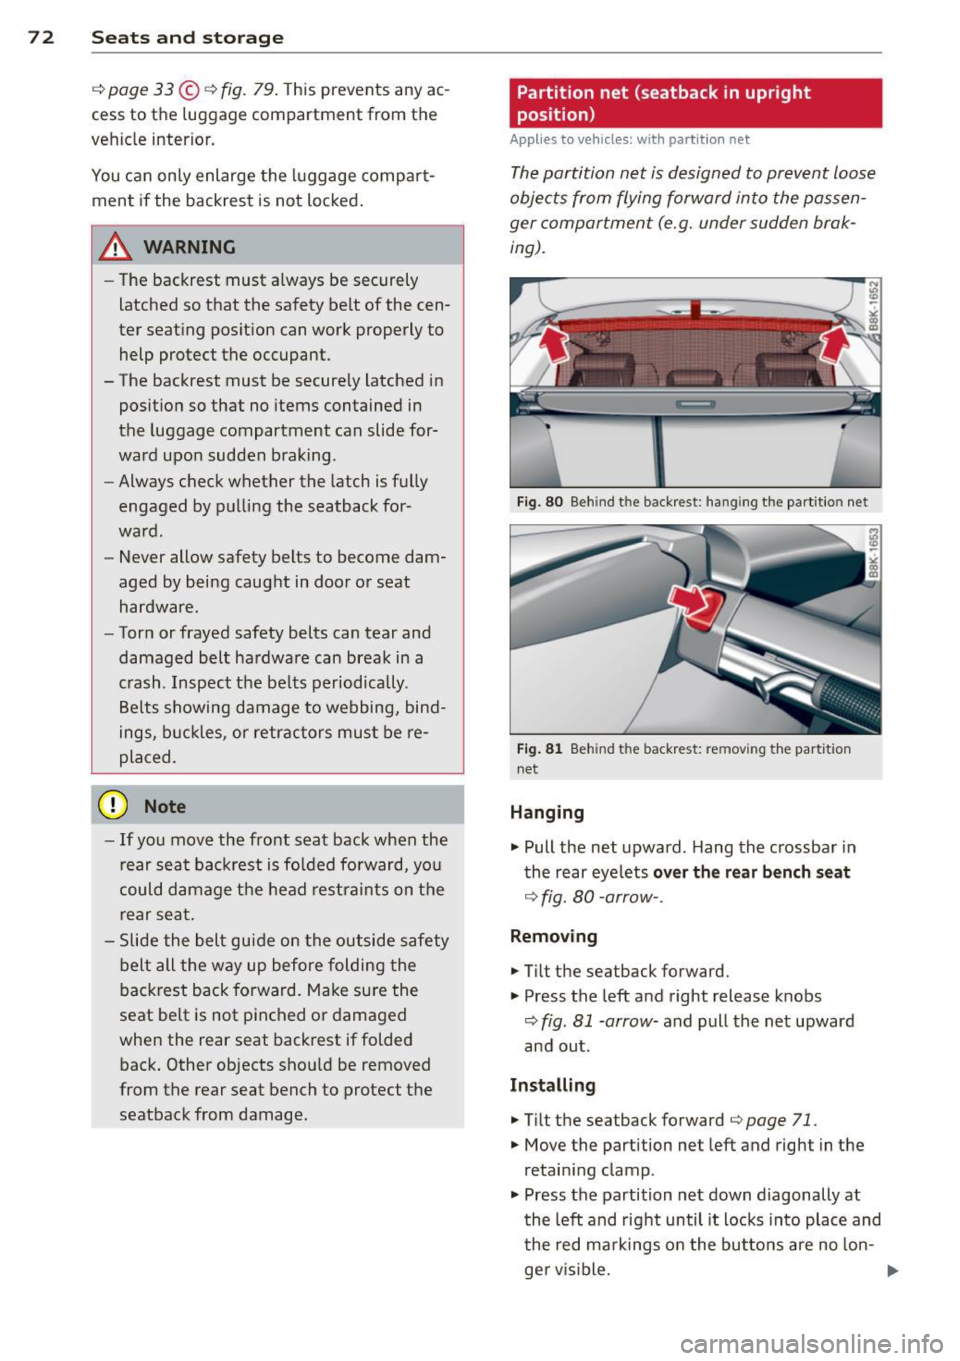
Fig. 79 Backrest : relea se lever, securing knob and
l a tc h*
Folding the backrest forward
• Pull the release lever @¢ fig. 79 in the di
rection of the arrow and fold the backrest
forward.
Folding the backrest back into the upright
position
• Fold the backrest back up again until it
latches and the red marking @ is no longer
visible ¢
_&..
Sedan: You can lock the backrest when it is
latched in place using the mechanical key
Page 74 of 304
7 2 Seats and storage
.::> page 33 ©.::>fig. 79 . This prevents any ac
cess to the luggage compartment from the
vehicle interior.
You can on ly enlarge the luggage compar t
ment if the backrest is not locked .
~ WARNING
-
-The backrest must a lways be securely
latched so that the safety belt of the cen
ter seating pos ition can work properly to
help protect the occupant .
- The backrest must be secure ly latched in
posit ion so that no items contained in
the luggage compartment can slide for
ward upon sudden braking .
- Always check whether the latch is f ully
engaged by pu lling the seatback for
wa rd.
- Never allow safety belts to become dam
aged by being caught in doo r o r seat
hardware.
- Torn or frayed safety belts can tear and
damaged belt ha rdware can break in a
c rash. Inspect the be lts periodica lly.
B elt s showing damage to webbing, bind
ings, buckles, or retractors must be re
placed.
(D Note
- If you move the front seat back when the
r ear seat ba ckrest is fo lded fo rward, yo u
could d amage t he head res tra ints on the
rear sea t.
- Slide the belt guide on the outside safety
belt all the way up before folding the
backrest back forward. Make su re the
seat belt is not pinched o r damaged
when the rear seat backrest if folded back. Other objects shou ld be removed
from the rear seat bench to protect the seatback from damage. Partition net (seatback in upright
position)
Applies to vehicles: with partition net
The partition net is designed to pr event loose
objects from flying forward into the passen
ger compartment (e.g. under sudden brak
ing).
Fi g. 80 Beh ind t he backrest : hang ing t he part itio n net
Fi g. 8 1 Beh ind t he backrest: re m ov ing the part it ion
ne t
Hanging
.,. Pull the net upward . Hang the c rossbar in
the rear eye lets
over th e re ar bench seat
¢ fig. 80 -arrow-.
Removing
.,. Ti lt the seatback forward.
.,. Press the left and right release knobs
¢ fig. 81 -arrow-and pull the net upward
and out.
Installing
• Ti Lt the seatback forward
¢ page 71 .
.,. Move the partition net left and right in the
retain ing clamp .
.,. Press the partition net down diagonally at
t he left and right until it locks into place and
t he red ma rkings o n the bu ttons are no lon-
ger v is ible. ..,.