rear view mirror AUDI A4 2020 Owners Manual
[x] Cancel search | Manufacturer: AUDI, Model Year: 2020, Model line: A4, Model: AUDI A4 2020Pages: 296, PDF Size: 80.45 MB
Page 9 of 296
8W1012721BB
Quick access
@0 Center armrest with storage com-
partment. Depending on vehicle
equipment, it may have:
— Audi music interface .......... 196
—Audi phone box ............... 160
— Starting the engine when there is
A
MALPUNGEION 2 2 aceon 2 wom © & ae 92
@) Electromechanical parking brake
BUGEON sieves so emene @ oe ent oo eecnie 102
@ Selector lever (automatic transmis-
SION) seve & # sere & o ES Go OE GB 94
@3 Storage compartment .......... 78
@) [START ENGINE STOP]button .... 92
@) Audi music interface ............ 196
@8 Steering wheel adjustment ...... 62
@) Lever for:
— Cruise control system ......... 123
— Audi adaptive cruise control .... 127
Button for switching the head-up
display on/off, adjusting the height . 23
Instrument illumination ......... 52
Connection port for the On Board
©®®
O®
©
Diagnostic System (OBD) ........ 269
Light switch ......... 0... e ee eee 48
Hoodireleased « a asics x x wosne x x smasain 215
Buttons for:
—All-weather lights ............ 48
—Rear fog lights ..............- 48
G4 Luggage compartment lid button . 36
65) Exterior mirror adjustment ...... 52
G8) Buttons for:
— Power windows .............. 42
—Child safety lock .............. 41
@ Tips
Some the equipment listed here is only instal-
led in certain models or is available as an op-
tion.
Indicator lights overview
The indicator lights in the instrument cluster
blink or turn on. They indicate functions or mal-
functions. Some warning and indicator lights
turn on when you switch the ignition on and must
turn off when the engine is running or while driv-
ing.
With some indicator lights, messages may ap-
pear and warning signals may sound. The indica-
tor lights and messages may be covered by other
displays. To show them again, select the second
tab for messages with the multifunction steering
wheel © page 12.
Some indicator lights in the display can display in
several colors.
Oe elle Ue
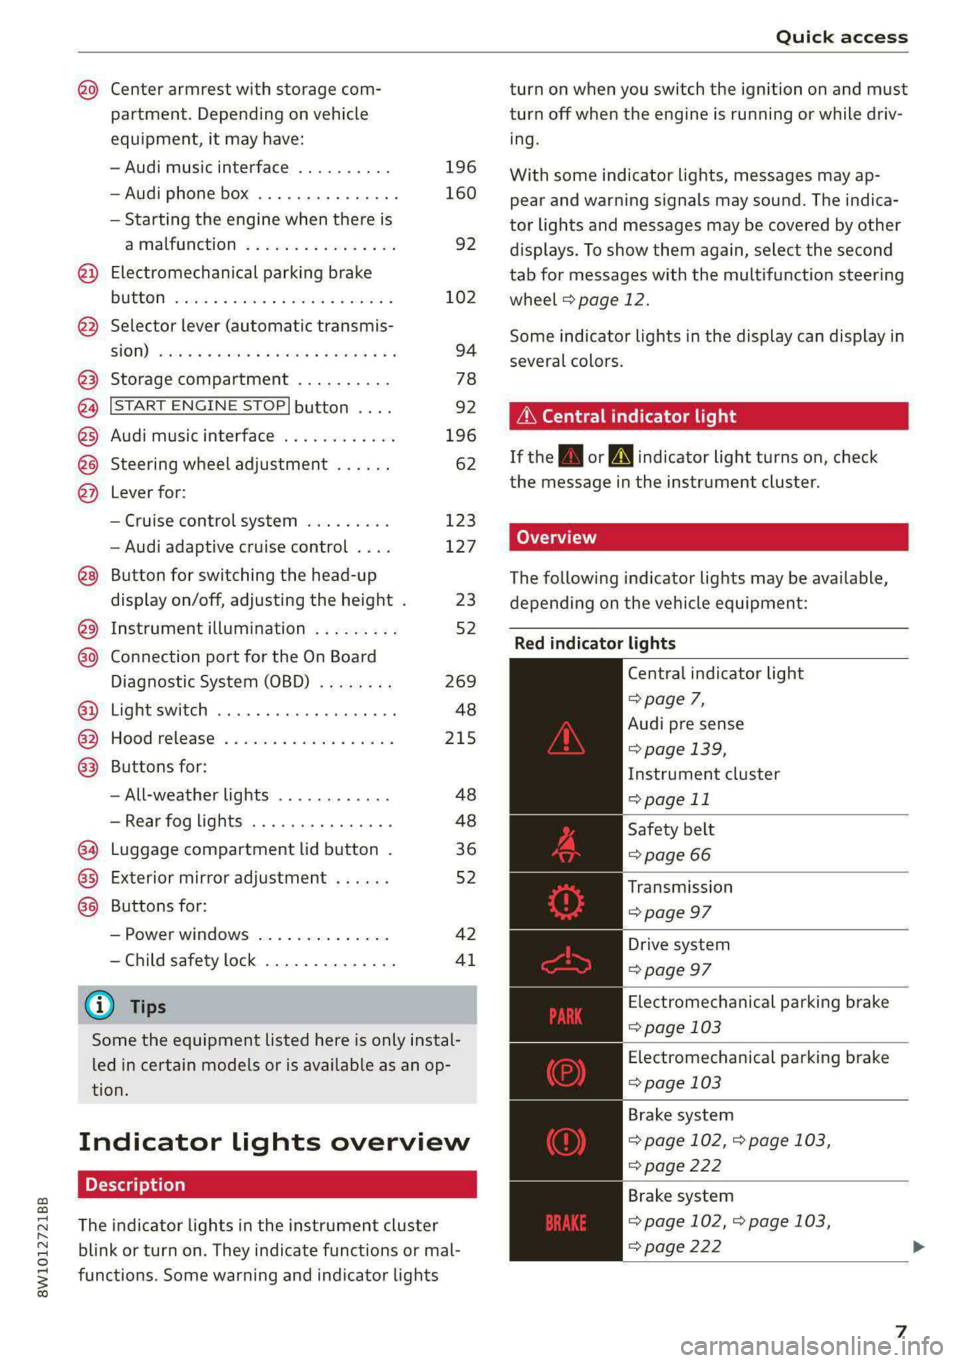
If the A or A indicator light turns on, check
the message in the instrument cluster.
Coal
The following indicator lights may be available,
depending on the vehicle equipment:
Red indicator lights
Central indicator light
=> page 7,
Audi pre sense
=> page 139,
Instrument cluster
=> page 11
Safety belt
=> page 66
Transmission
=> page 97
Drive system
=> page 97
Electromechanical parking brake
=> page 103
Electromechanical parking brake
=> page 103
Brake system
=> page 102, > page 103,
=> page 222
Brake system
=> page 102, > page 103,
=> page 222
Page 51 of 296
8W1012721BB
Lights and Vision
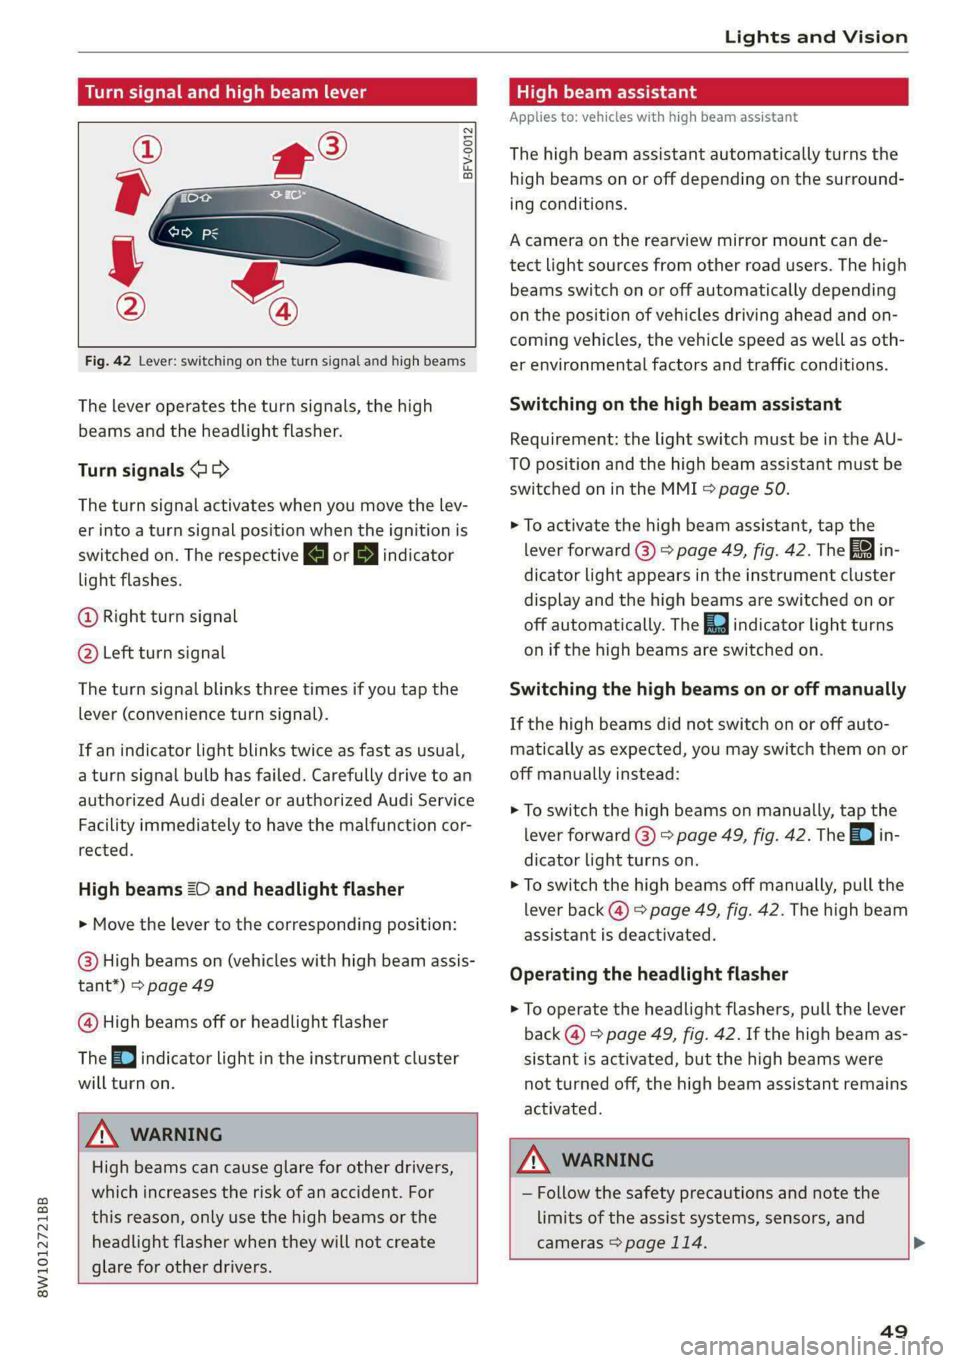
Turn signal and high beam lever
BFV-0012
Fig. 42 Lever: switching on the turn signal and high beams
The lever operates the turn signals, the high
beams and the headlight flasher.
Turn signals 15>
The turn signal activates when you move the lev-
er into a turn signal position when the ignition is
switched on. The respective a or B indicator
light flashes.
@ Right turn signal
@® Left turn signal
The turn signal blinks three times if you tap the
lever (convenience turn signal).
If an indicator light blinks twice as fast as usual,
a turn signal bulb has failed. Carefully drive to an
authorized Audi dealer or authorized Audi Service
Facility immediately to have the malfunction cor-
rected.
High beams 20 and headlight flasher
> Move the lever to the corresponding position:
@) High beams on (vehicles with high beam assis-
tant*) > page 49
@ High beams off or headlight flasher
The
=o) indicator light in the instrument cluster
will turn on.
Z\ WARNING
High beams can cause glare for other drivers,
which increases the risk of an accident. For
this reason, only use the high beams or the
headlight flasher when they will not create
glare for other drivers.
teh m eu ielad
Applies to: vehicles with high beam assistant
The high beam assistant automatically turns the
high beams on or off depending on the surround-
ing conditions.
A camera on the rearview mirror mount can de-
tect light sources from other road users. The high
beams switch on or off automatically depending
on the position of vehicles driving ahead and on-
coming vehicles, the vehicle speed as well as oth-
er environmental factors and traffic conditions.
Switching on the high beam assistant
Requirement: the light switch must be in the AU-
TO position and the high beam assistant must be
switched on in the MMI > page 50.
> To activate the high beam assistant, tap the
lever forward @) > page 49, fig. 42. The FM in-
dicator light appears in the instrument cluster
display and the high beams are switched on or
off automatically. The Ea indicator light turns
on if the high beams are switched on.
Switching the high beams on or off manually
If the high beams did not switch on or off auto-
matically as expected, you may switch them on or
off manually instead:
> To switch the high beams on manually, tap the
lever
forward @) > page 49, fig. 42. The Ea in-
dicator light turns on.
> To switch the high beams off manually, pull the
lever back @) > page 49, fig. 42. The high beam
assistant is deactivated.
Operating the headlight flasher
> To operate the headlight flashers, pull the lever
back @) > page 49, fig. 42. If the high beam as-
sistant is activated, but the high beams were
not turned off, the high beam assistant remains
activated.
ZA WARNING
— Follow the safety precautions and note the
limits of the assist systems, sensors, and
cameras > page 114. >
49
Page 55 of 296

8W1012721BB
Lights and Vision
0 - Deactivates all adjustment functions.
Q/ ®- Selects the left or right exterior mirror.
To adjust the mirror glass in a mirror, press the
knob in the desired direction.
GR - Heats the mirror glass depending on the out-
side temperature.
S) - Folds the exterior mirrors*. To fold the mir-
rors out, turn the knob to one of the other posi-
tions. In the MMI, you can select if the mirrors
fold in automatically when you lock the vehicle
> page 31.
Front passenger's exterior mirror tilt
function*
Requirement: the knob must be in the position
for the front passenger’s exterior mirror.
To help you see the curb when backing into a
parking space, the surface of the mirror will tilt
slightly when reverse gear is selected.
You can adjust the mirror surface by turning the
knob in the desired direction.
The mirror moves from the reversing position
back to the original position:
— When you switch the ignition off
— Once you drive forward at speeds faster than 9
mph (15 km/h)
— When the knob is no longer in the position for
the front passenger exterior mirror
Z\ WARNING
Curved mirror surfaces (for example convex)
enlarge the field of vision. However, they
make objects in the mirror appear smaller and
farther away. When using these mirrors to es-
timate your distance to vehicles behind you
when changing lanes, you could estimate in-
correctly, which increases the risk of an acci-
dent.
@) Note
— Applies to: vehicles with power folding exte-
rior mirrors: If the mirror housing was
moved by outside forces (such as an impact
when maneuvering), you must use the pow-
er folding function to fold the mirror all the
way out. The mirrors will make a loud noise
when they latch into place. The mirror hous-
ing must not be moved back into place by
hand because this could impair the function
of the mirror mechanism.
— Applies to: vehicles without power folding
exterior mirrors: If the mirror housing was
moved by outside forces (such as an impact
when maneuvering), you must move it back
in place by hand.
— If you wash the vehicle in an automatic car
wash, you must fold the exterior mirrors in
to reduce the risk of damage to the mirrors.
Never fold power folding exterior mirrors*
by hand. Only fold them in and out using
the power controls.
@) Tips
—If the power adjusting function malfunc-
tions, the glass in both mirrors can be ad-
justed by pressing on the edge of it by hand.
— Certain settings are automatically stored
and assigned to the active user.
Dimming the mirrors
Manual dimming rearview mirror
> Pull the lever on the bottom of the mirror back.
Automatic dimming rearview mirror*
> The interior and exterior mirrors* dim automat-
ically when light shines on them, for example
from headlights on a vehicle behind you.
Z\ WARNING
— If the glass on an automatic dimming mir-
ror* breaks, electrolyte can leak out. This
liquid can irritate the skin, eyes and respira-
tory system. If there is contact with the flu-
id, flush immediately with plenty of water.
Consult a physician if necessary.
— Repeated or long-term exposure to electro-
lyte fluid can lead to irritation of the air-
ways, especially in people with asthma or
other respiratory conditions. Take deep >
53
Page 56 of 296
Lights and Vision
breaths immediately after leaving the vehi-
cle or, if this is not possible, open all of the
doors and windows as wide as possible.
— If electrolyte fluid comes into contact with
the eyes, flush them thoroughly with plenty
of clean water for at least 15 minutes and
then seek medical attention.
— If electrolyte fluid comes into contact with
the skin, flush the affected area with clean
water for at least 15 minutes, and then
clean with soap and water and seek medical
attention. Clean affected clothing and shoes
thoroughly before wearing again.
— If the fluid was swallowed and the person is
conscious, flush the mouth with water for at
least 15 minutes. Do not induce vomiting
unless this is recommended by medical pro-
fessionals. Seek medical attention immedi-
ately.
If the glass on an automatic dimming mirror*
breaks, electrolyte can leak out. This liquid
damages plastic surfaces and paint. Clean
this liquid as quickly as possible, for example
with a wet sponge.
— If the light reaching the rearview mirror is
obstructed, the automatic dimming mirror*
will not function correctly.
— The automatic dimming mirrors* do not dim
when the interior lighting is turned on or re-
verse gear is selected.
Sun visors
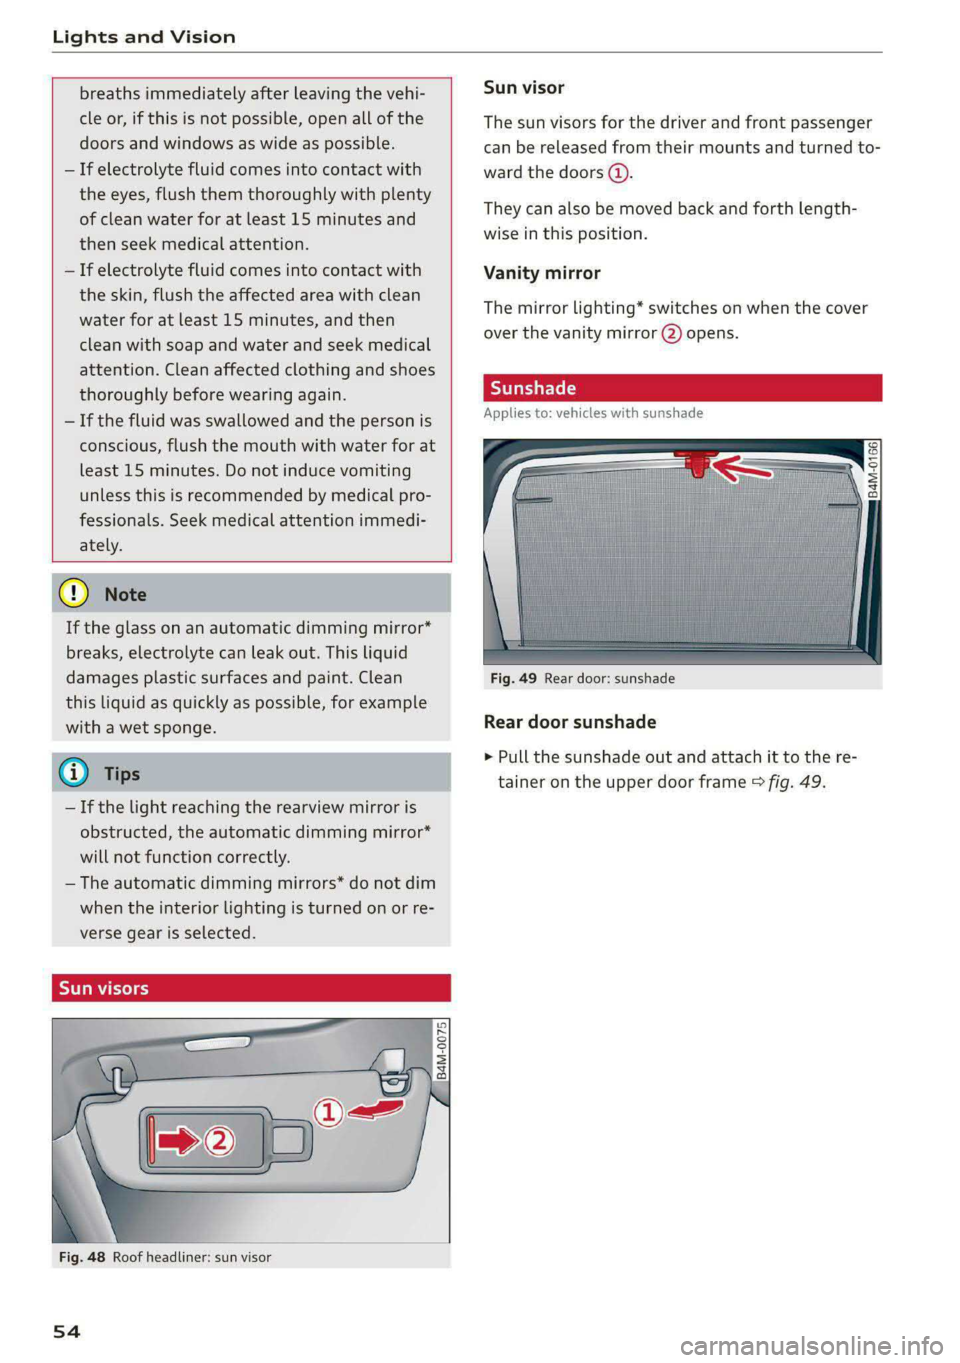
Fig. 48 Roof headliner: sun visor
54
Sun visor
The
sun visors for the driver and front passenger
can be released from their mounts and turned to-
ward the doors (a).
They can also be moved back and forth length-
wise in this position.
Vanity mirror
The mirror lighting* switches on when the cover
over the vanity mirror @) opens.
Applies to: vehicles with sunshade
<—=
oe oS gz
= <7 oO
Fig. 49 Rear door: sunshade
Rear door sunshade
> Pull the sunshade out and attach it to the re-
tainer on the upper door frame > fig. 49.
Page 59 of 296
8W1012721BB
Lights and Vision
@) Note
— The windshield wipers must only be folded
up when in the service position! Otherwise,
you risk damaging the paint on the hood or
the windshield wiper motor.
— You should not move your vehicle or press
the windshield wiper lever when the wiper
arms are folded up from the windshield. The
windshield wipers would move back into
their original position and could damage the
hood and windshield.
@ Tips
— You can also use the service position, for ex-
ample, if you want to protect the windshield
from icing by using a cover.
— You cannot activate the service position
when the hood is open.
Cleaning/ch g rear wiper blade
Applies to: vehicles with rear window wiper
B8R-0380
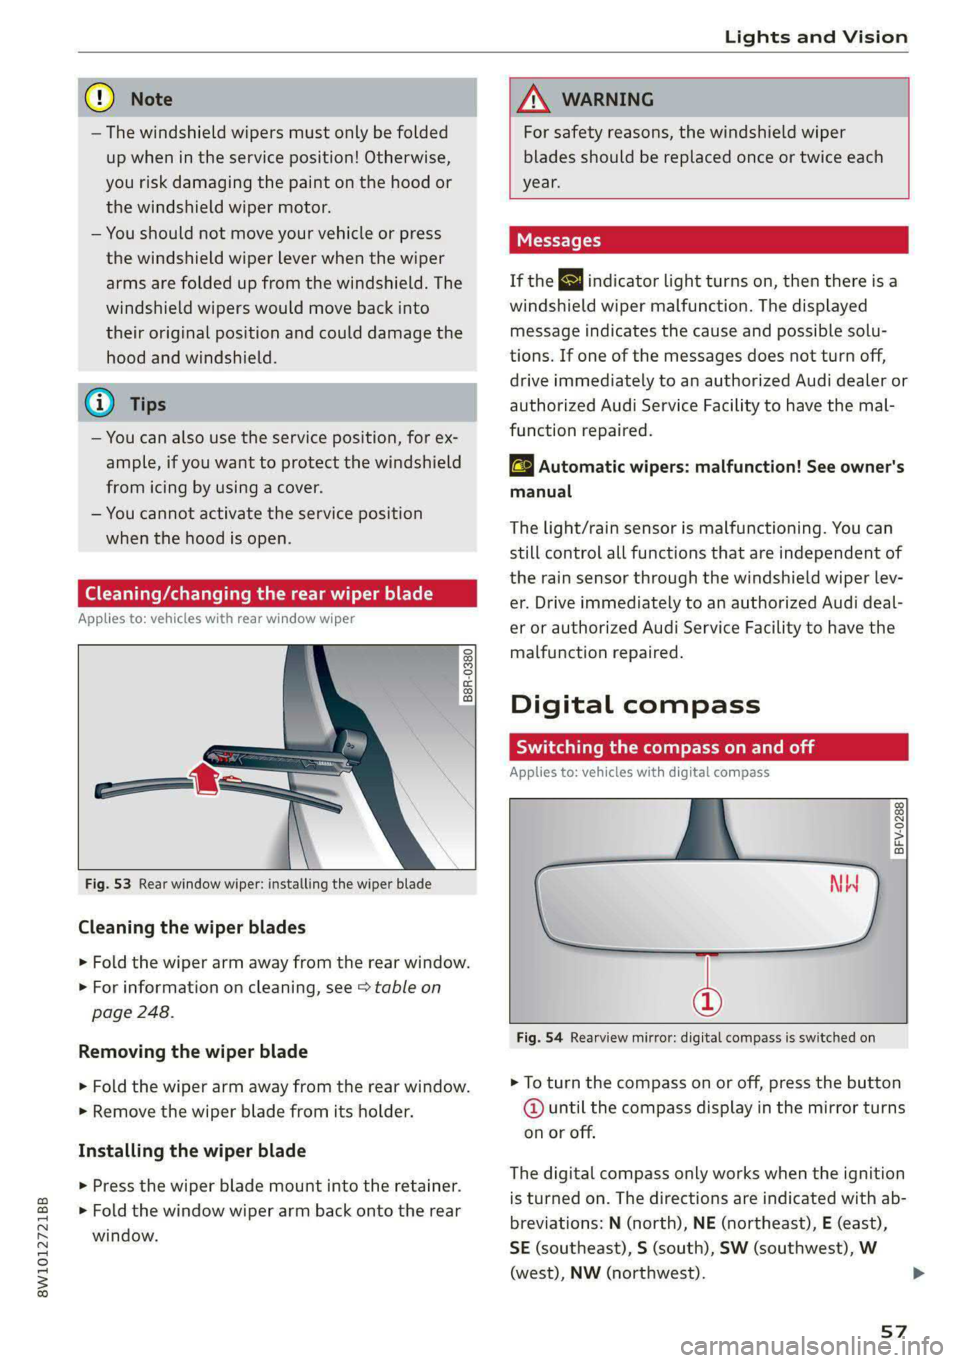
Fig. 53 Rear window wiper: installing the wiper blade
Cleaning the wiper blades
> Fold the wiper arm away from the rear window.
> For information on cleaning, see > table on
page 248.
Removing the wiper blade
> Fold the wiper arm away from the rear window.
>» Remove the wiper blade from its holder.
Installing the wiper blade
> Press the wiper blade mount into the retainer.
> Fold the window wiper arm back onto the rear
window.
ZX WARNING
For safety reasons, the windshield wiper
blades should be replaced once or twice each
year.
Messages
If the > indicator light turns on, then there is a
windshield wiper malfunction. The displayed
message indicates the cause and possible solu-
tions. If one of the messages does not turn off,
drive immediately to an authorized Audi dealer or
authorized Audi Service Facility to have the mal-
function repaired.
a Automatic wipers: malfunction! See owner's
manual
The light/rain sensor is malfunctioning. You can
still control all functions that are independent of
the rain sensor through the windshield wiper lev-
er. Drive immediately to an authorized Audi deal-
er or authorized Audi Service Facility to have the
malfunction repaired.
Digital compass
Sialic ma meelil eel mela
Applies to: vehicles with digital compass
BFV-0288
Fig. 54 Rearview mirror: digital compass is switched on
> To turn the compass on or off, press the button
@ until the compass display in the mirror turns
on or off.
The digital compass only works when the ignition
is turned on. The directions are indicated with ab-
breviations: N (north), NE (northeast), E (east),
SE (southeast), S (south), SW (southwest), W
(west), NW (northwest).
57
Page 60 of 296
Lights and Vision
To prevent inaccurate compass readings, do
not bring any remote controls, electrical devi-
ces or metallic objects near the mirror.
B42-0405
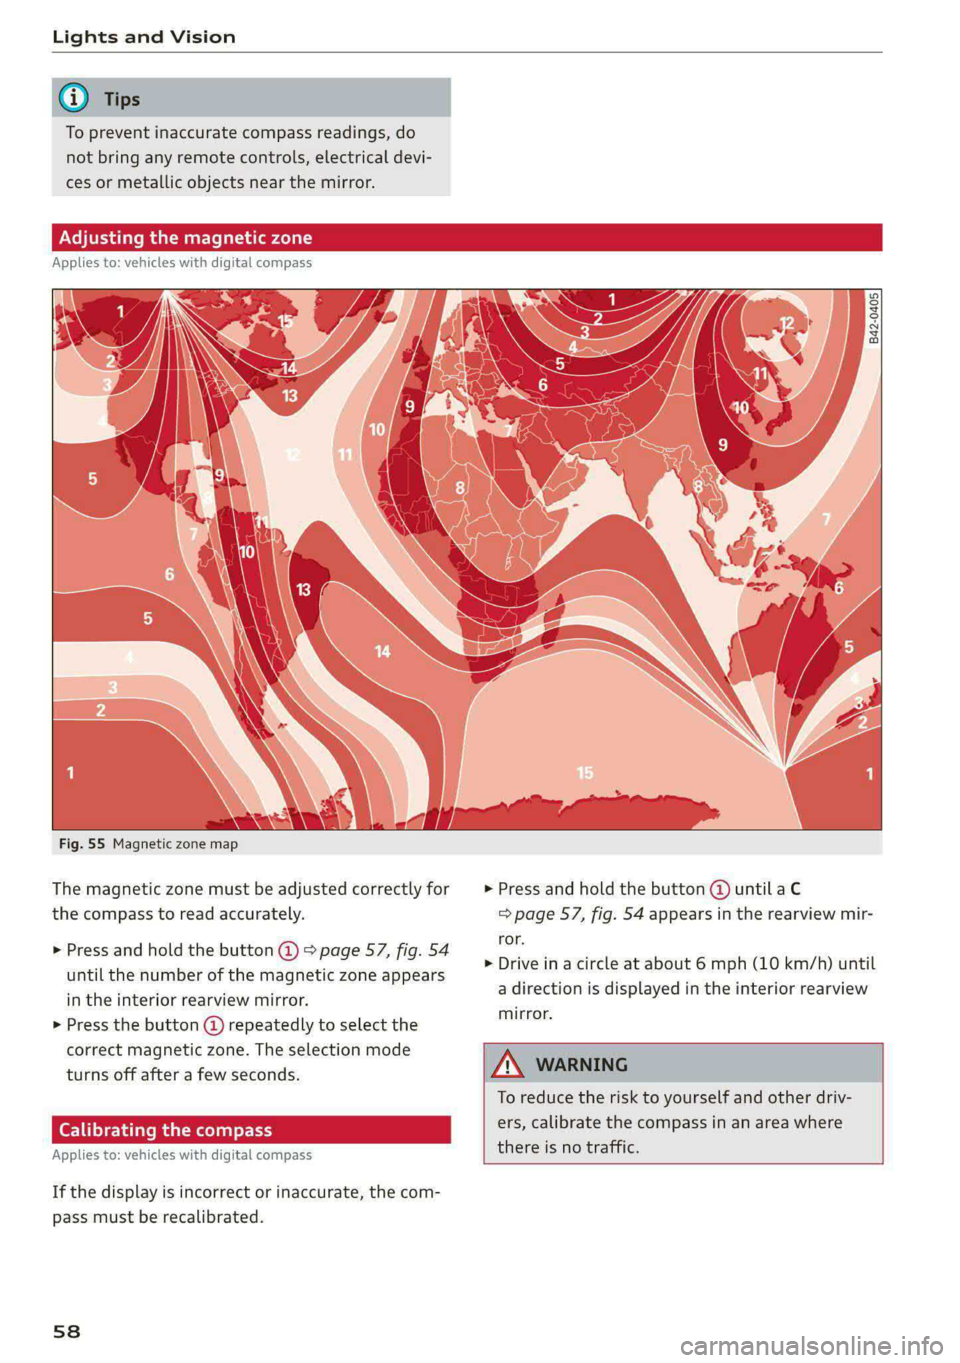
Fig. 55 Magnetic zone map
The magnetic zone must be adjusted correctly for > Press and hold the button @ until a C
the compass to read accurately. => page 57, fig. 54 appears in the rearview mir-
ror.
> Drive in a circle at about 6 mph (10 km/h) until
a direction is displayed in the interior rearview
mirror.
> Press and hold the button @ > page 57, fig. 54
until the number of the magnetic zone appears
in the interior rearview mirror.
> Press the button @ repeatedly to select the
correct magnetic zone. The selection mode
turns off after a few seconds.
To reduce the risk to yourself and other driv-
ers, calibrate the compass in an area where eat hark ree
there is no traffic. Applies to: vehicles with digital compass
If the display is incorrect or inaccurate, the com-
pass must be recalibrated.
58
Page 61 of 296
8W1012721BB
Sitting correctly and safely
Sitting correctly and
safely
Correct passenger
seating position
General information
As the driver, you are responsible for making sure
every passenger is sitting correctly in their seat
and maintaining this seating position while driv-
ing. Make sure that:
— Every passenger in the vehicle has adjusted his
or her seat correctly > page 59
— The steering wheel is adjusted correctly
=> page 62
— The mirrors are adjusted so that there is a suffi-
cient view of the area around the vehicle
=> page 52
— Every passenger in the vehicle has his or her
head restraint adjusted correctly > page 63
— Every passenger in the vehicle has his or her
safety belt fastened correctly > page 64
—The activation status of the front passenger's
airbag is suitable for the passenger in the front
passenger's seat > page 70
— Children are secured in suitable child safety
seats that are secured to appropriate vehicle
seats > page 72. Read and observe the impor-
tant safety information pertaining to the use of
child safety seats on the front passenger's seat
=> A\ in General information on page 72.
Examples of incorrect seating positions
Safety belts can only provide its optimal protec-
tion when they are routed correctly. Incorrect
seating positions significantly reduce the protec-
tive functions of the safety belts and increase the
risk of injury due to incorrect belt routing.
The following list includes examples of seating
positions that could be dangerous for all vehicle
occupants. This is not a complete list. The pur-
pose is to provide examples to increase your
awareness of the topic. The following points ap-
ply when the vehicle is in motion:
— Never stand inside the vehicle.
— Never stand on the seats.
— Never kneel on the seats.
— Never tilt your backrest too far back.
— Never lean against the instrument panel.
— Never lie down on the rear bench seat.
— Never sit only on the front section of the seat.
— Never sit sideways on the seat.
— Never lean against the window.
— Never place your feet out of the window.
— Never place your feet on the instrument panel.
— Never place your feet on the seat cushion.
— Never ride in the footwell.
— Never sit on the armrests.
— Never drive or ride in a seat without fastening
your safety belt.
— Never ride in the luggage compartment.
ZA WARNING
Incorrect seating positions, failure to wear a
safety belt, or being too close to an airbag in-
crease the risk of serious or fatal injury to ve-
hicle occupants, especially if the airbags de-
ploy and come into contact with occupants
who are not seated correctly. Note the impor-
tant information and warnings in the chapters
for the topics given above.
Gi) Tips
If you or other vehicle passengers have physi-
cal limitations that prevent sitting in a correct
position, modifications to the vehicle may be
necessary. For more information, contact an
authorized Audi dealer or authorized Audi
Service Facility, or call Audi customer support
at 1-800-822-2834.
Front seats
General information
Make sure that:
— You can press the pedals down completely
while your legs are slightly bent
— The distance between your upper body and the
steering wheel or instrument panel is at least
10 inches (25 cm)
— The distance between your knees and the in-
strument panel is at least 4 inches (10 cm)
59
>
Page 146 of 296

Driver assistance
when the detected object is in the “blind
spot”, at the latest.
@ You are slowly passing another vehicle. If the
difference in speed between the two vehicles
is less than 9 mph (15 km/h), the display in
the exterior mirror will turn on.
Information stage
If you do not activate a turn signal, the system
will inform you about objects classified as critical
by turning on the display in the respective exteri-
or mirror. The display remains dim in the infor-
mation stage so that you are not distracted while
looking forward.
Warning stage
Once you activate a turn signal, the system will
inform you about objects classified as critical by
turning on the display in the respective exterior
mirror.
Depending on vehicle equipment, the display
may also provide a warning when the turn signal
is not activated: if driver assist systems detect
that your vehicle is about to leave a lane, the dis-
play will blink to warn you about objects classi-
fied as critical. You can also be warned with cor-
rective steering > page 137, Audi active lane as-
sist.
System limitations
The system uses the data from the radar sensors
at the rear corners of the vehicle > page 116,
fig. 107. They are designed to detect the left and
right adjacent lanes when the road lanes are the
normal width. In some situations, the system
may react to vehicles in your own lane or lanes
that are not directly adjacent to yours, or to ob-
jects on the side of the road. In this case, the dis-
play will turn on even though there is no vehicle
in the critical area. These situations may include:
— Driving on the edge of your own lane
— Narrow lanes
— Curves
— High barriers on the side of the road
144
AN WARNING
— Follow the safety precautions and note the
limits of the assist systems, sensors, and
cameras > page 114.
— The display may not appear on time when
vehicles are approaching or being passed
very quickly.
G) Tips
— If the window glass in the driver's door or
front passenger's door has been tinted, the
display in the exterior mirror may be incor-
rect.
— For an explanation on conformity with the
FCC regulations in the United States and the
Industry Canada regulations, see
=>page 275.
Adjusting side assist
Applies to: vehicles with side assist
You can adjust the side assist to your preferences.
The settings depend on the vehicle equipment.
> Applies to: MMI: Select on the home screen:
VEHICLE > Driver assistance > Side assist.
Possible settings:
The system can be switched on and off. If the sys-
tem is switched on, the displays in the exterior
mirrors will turn on briefly each time the ignition
is switched on.
Brightness - Change the brightness only when
side assist is switched on, so that the selected
setting can be checked in the exterior mirror dis-
plays. Adjust the brightness to a level where the
display will not interfere with your view ahead.
Because the display brightness automatically
adapts to the ambient light, it may have already
been adjusted to the highest or lowest setting
during the automatic adaptation.
G) Tips
— If you switch side assist on or off, the exit
warning will also switch on or off.
Page 152 of 296

Parking and maneuvering
> Press bin the center display if the visual dis-
tance indicator is shown > page 148, fig. 129.
The system can be activated at low speeds, such
when maneuvering.
Automatic activation
The system activates automatically when reverse
gear is engaged while the engine is running. A
brief tone will sound.
Automatic deactivation
The system will deactivate automatically once
the vehicle exceeds a certain speed while driving
forward.
ZA\ WARNING
Follow the safety precautions and note the
limits of the assist systems, sensors, and
cameras > page 114.
Clean rearview camera
Applies to: vehicles with rearview camera/peripheral cameras
Depending on vehicle equipment, you may be
able to manually initiate rear view camera clean-
ing.
> Move the window wiper lever S7 into the posi-
tion for cleaning the rear window & & page 55.
Z\ WARNING
Follow the safety precautions and note the
limits of the assist systems, sensors, and
cameras > page 114.
Applies to: vehicles with rearview camera/peripheral cameras
Fig. 131 Center display: aiming at a parking spot
150
When parking with the rearview camera or pe-
ripheral camera, the parking aid plus audio and
visual warnings* will also assist you > page 148.
Visual orientation lines
@ The orange orientation lines show the vehi-
cle's direction of travel > @®. Turn the steer-
ing wheel until the orange orientation lines
align with the parking space.
@ Use the blue markings to help you estimate
the distance to an obstacle. Each marking
represents approximately 3 feet (1 meter).
The blue area represents an extension of the
vehicle's outline by approximately 16 feet (5
meters) to the rear.
@ You can recognize the rear bumper in the
lower display.
@® You should stop driving in reverse when the
red orientation line touches the edge of an
object, at the latest.
Symbols
Applies to: vehicles with peripheral cameras
If *2/&2/< is displayed and the display area
represented by that symbol is not available, then
the camera on the that side is not available. The
power exterior mirrors may have been folded in
or a door or the luggage compartment lid may
have been opened.
If % is displayed, there is a system malfunction
and the display area represented by that symbol
is not available. The camera is not working in this
area.
If one of the symbols continues to be displayed,
drive immediately to an authorized Audi dealer or
authorized Audi Service Facility to have the mal-
function repaired.
Z\ WARNING
— Follow the safety precautions and note the
limits of the assist systems, sensors, and
cameras > page 114.
— Sensors and cameras have spots in which
the surrounding area cannot be detected.
Objects, animals, and people may only be
detected with limitations may not be detect-
ed at all. Always monitor the trafficand the |>
Page 153 of 296

8W1012721BB
Parking and maneuvering
vehicle's surroundings directly and do not ner of the vehicle does not collide with any
become distracted. obstacles.
— Keep enough distance from the curb to
@) Note avoid damage to the rims.
— Only use the images provided by the camera
on the rear of the vehicle when the luggage
compartment lid is completely closed. Make
sure any objects you may have mounted on
the luggage compartment lid do not block
the rearview camera.
— The orange orientation lines @ show the di-
rection the rear of the vehicle will be travel-
ing, based on the steering wheel angle. The
front of the vehicle swings out more than
the rear of the vehicle. Maintain plenty of
distance so that an exterior mirror or a cor-
Operating the peripheral cameras
Applies to: vehicles with peripheral cameras
> To select a view, press (2) - %) in the center dis-
play or tap in an area to show the vehicle in the
side view )),
Selecting a view in the side area
The vehicle surroundings are shown in the side
area of the display. You can switch between a vis-
ual display (Graphic) and the vehicle surround-
ings (Camera).
Fig. 132 Center display: peripheral cameras.
On vehicles with peripheral cameras, you can se- > Select |---| > View in the center display when the
lect among different views. parking aid is active.
Selecting the views
> To display the entire selection bar, tap the cur-
rent view () or swipe at the edge of the selec-
tion bar from left to right.
Symbol/Descrip-
tion Description
Front corner This view makes it easier to drive out of tight parking spaces or areas and
or display the selec- | intersections with poor visibility. It shows an almost 180° panorama view
tion bar in front of the vehicle.
This view assists you in using the full area for maneuvering in front of the F
a vehicle.
This view helps you to maneuver and position the vehicle more precisely.
Surroundings _ |The area around the vehicle is shown using the camera images. The vehi-
cle image is shown by the system > A\.
This view assists you in using the full area for maneuvering behind the ve-
Rear
hicle. This is the rearview camera image.
®|
©
|®}]
©
D_ Requirement: The vehicle surroundings (Camera) must be
selected in the View in the side area.
151