Cockpit AUDI A4 2021 Owner´s Manual
[x] Cancel search | Manufacturer: AUDI, Model Year: 2021, Model line: A4, Model: AUDI A4 2021Pages: 304, PDF Size: 107.89 MB
Page 4 of 304
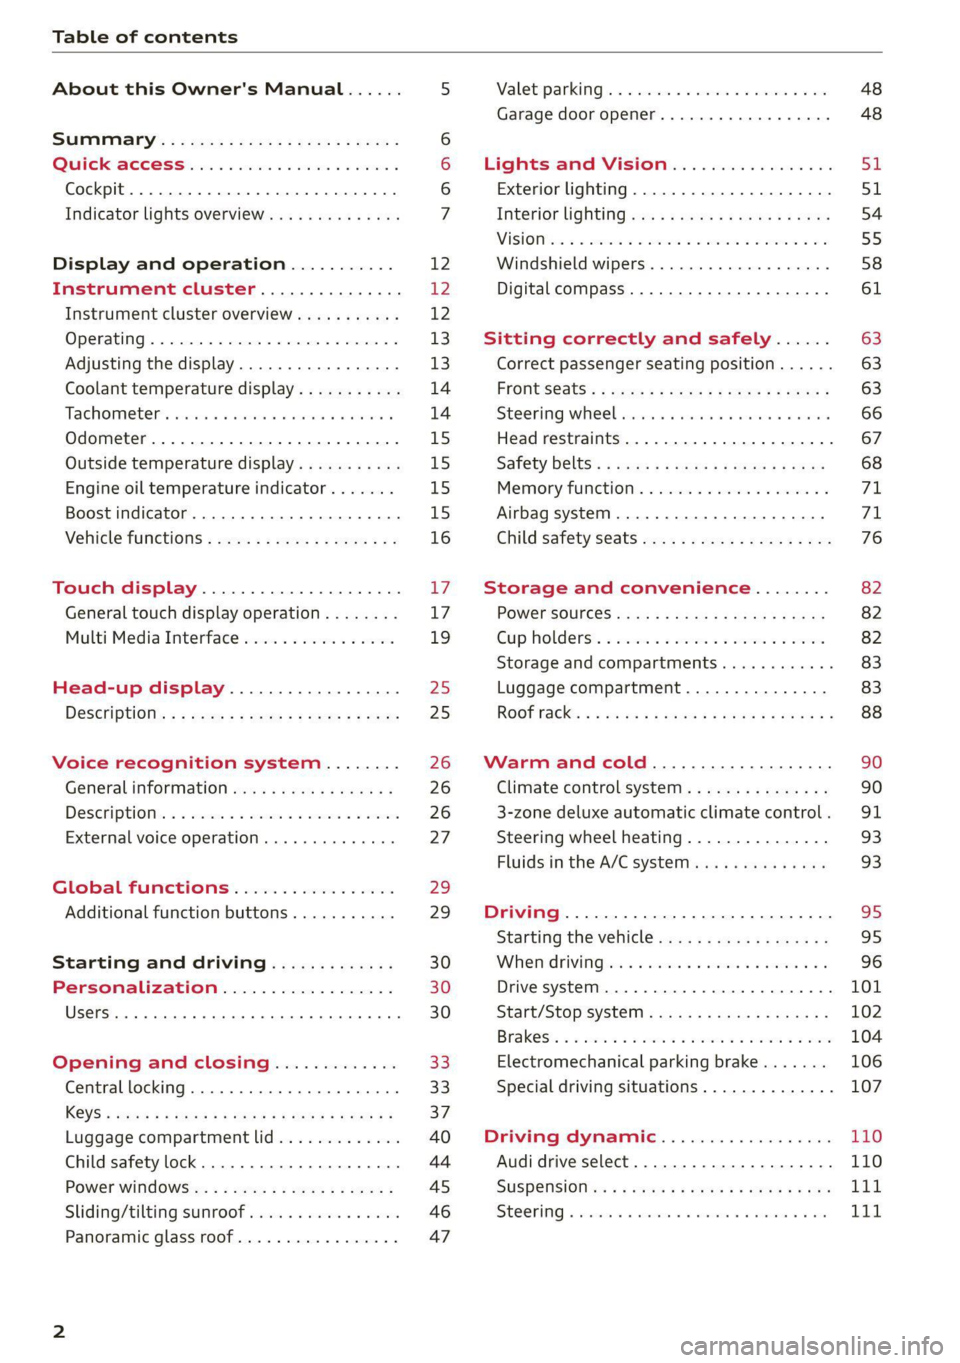
Table of contents
About this Owner's Manual......
SUMIMAry: < = exe : eens: Seen cs sens
QutckeaeCe ssh: «i esis se ois a eaves @
Cockpit. ...... 0... eee eee eee eee
Indicator lights overview...........4..
Display and operation...........
Instrument cluster...............
Instrument cluster overview...........
Operating. ecccuse w+ were oo wens oo ayes 9 ¥
Adjusting the display.................
Coolant temperature display...........
Tachometer’ series i ewe so snes ¥ & ome
Odometer.............. cee eee eee ee
Outside temperature display...........
Engine oil temperature indicator.......
Boost indicator...............0--000.
Vehicle functions...............-----
Touch display.....................
General touch display operation........
Multi Media Interface................
Head-up display..................
DeSeriptions: s wees « x wows ¢ cess so eee
Voice recognition system........
Generalinformation.................
DeSeriptions. «+ seams x x arucsms x 0 seine oo coer
External voice operation..............
Global FUNGtHIONS:. icc: 5 6 ese. 6 6 sce
Additional function buttons...........
Starting and driving.............
Personalization..................
Opening and closing.............
Central locking..............00-e eee
Child safety lock.............00.-000
Power WindOWSic« s < sews ys wey 5 2 em 5
Sliding/tilting:SUNTOOF escinie os wise a 6 soe
Panoramic glass roof.................
NOD
OO
12 12 12
13
13
14 14
15
15
15
15
16 17 17 19
Z5
25
26 26 26 27
29;
29
30 30 30
33
33)
37
40
44
45
46 47
Valetiparking = s ss-e «x cscs ov cree a ¥ os 48
Garage door opener..........--.00 eee 48
Lights and Vision................. 51
Exterior lighting...................4. 51
Interior liQhting ss =e aves ss eews so eos 54
ViSIOMsn « 3 ses 3 3 ema oo wena vo ae © ove 55
Windshield wipers.............-..45- 58
Digital compass.............-.-0000- 61
Sitting correctly and safely...... 63
Correct passenger seating position...... 63
Frontseats:: » ssw. « ¢ sews & » saws +s ewe < 63
Steering wheel seis < «cies ¥ eerie ss eee 66
Head restraints.................0000. 67
Safety Beltsi: s sass x eeups ¢ < saves 2 e cee 68
Memory function . « scons ecw ee cro ee 71
Airbag system... ... 2.62... 0 ee eee eee 7X
Child safety seats.................04- 76
Storage and convenience........ 82
POWErSOURCES coisa gs seen ss wae se aes 82
Gup holders. ¢ ssn ss wee 2 2 see 2 & pee 82
Storage and compartments............ 83
Luggage compartment............... 83
ROOF hacks « = weies x = wae 2 s eae 2 & ween 2 88
Warm and cold................... 90
Climate control system............... 90
3-zone deluxe automatic climate control. 91
Steering wheel heating............... 93
Fluids in the A/C system. .........0065 93
Driving .............. 0.0... eee eee 95
Starting the vehicle...............0.0. 95
When driving isis ss iovsvie se aerswce oo anes oe 96
Drive system... 2.2... ee eee eee eee 101
Start/Stop system .........ee cece eee 102
BrakeS's so isemi 2 wane w aman a 2 oer as ie 104
Electromechanical parking brake....... 106
Special driving situations.............. 107
Driving: dynamic. . « sic. 6 6 see a 6 se 110
Audi drive select..................00. 110
SUSPENSION es « + exes ¢ ¢ eres +o ees vv eae 111
SUECOMIING 6 vessse oo csisweue io & stone 6 a toma ww Bs Lid
Page 8 of 304
Quick access
Quick access
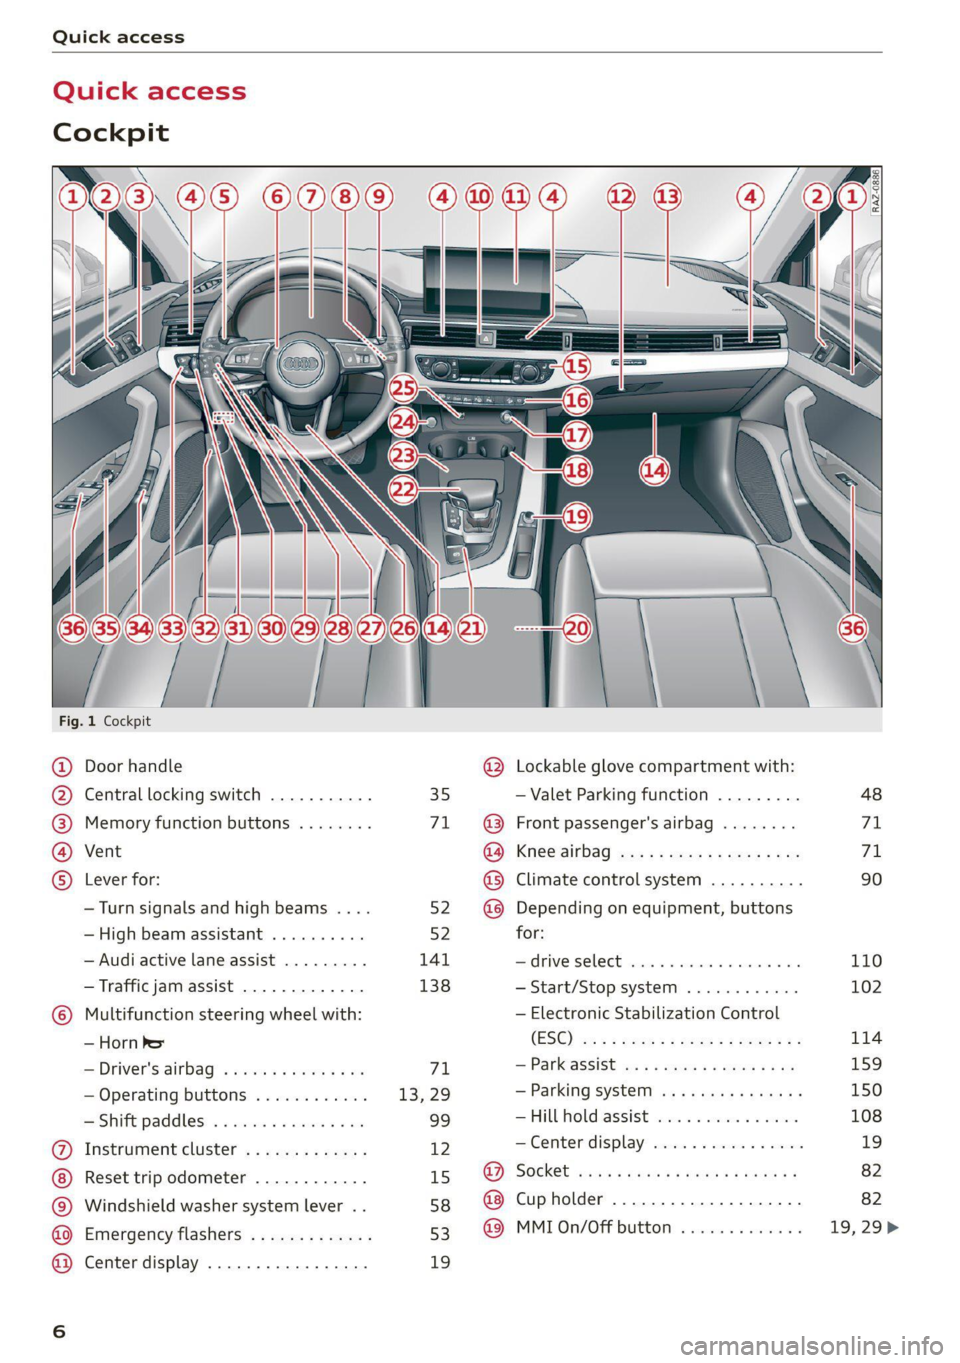
Cockpit
[RAZ-0886.
Fig. 1 Cockpit
@ Door handle @ Lockable glove compartment with:
@ Central locking switch ........... 35 — Valet Parking function ......... 48
@ Memory function buttons ........ 71. ~@ Front passenger's airbag ........ 71
@ Vent GO; KSC Sia auc 2 x wee so ews 2 ae 71
© Lever for: @® Climate control system .......... 90
—Turn signals and high beams .... 52. @@ Depending on equipment, buttons
— High beam assistant .......... 52 for:
— Audi active lane assist ......... 141 drive SELCCE cassis «6 sossan © 4 esr © 6s 110
— Traffic jam assist ............. 138 —Start/Stop system ............ 102
© Multifunction steering wheel with: — Electronic Stabilization Control
_iHorn' bet (ES@) we < = ween «seme se ee zea 114
—Driver's airbag .............0- 71 — Panassist ws 5 2 aque « s quae x # me 159
— Operating buttons ............ 13, 29 — Parking system ..........-..+. 150
—Shift paddles ................ 99 — FUL Fold aSSi8t cies 2 4 onus oo ees 108
@ Instrument cluster ............. 12 — Center display .............0 0s 19
Reset trip odometer ............ 15 @ Socket .......seeseeeee eens 82
© Windshield washer system lever .. 58 @ Cupholder ........ 0.0 seer eee 82
@ Emergency flashers ............ 53 @© MMI0n/Off button ............. 19,29>
@ Center display ................. 19
Page 14 of 304
Instrument cluster
trument clu
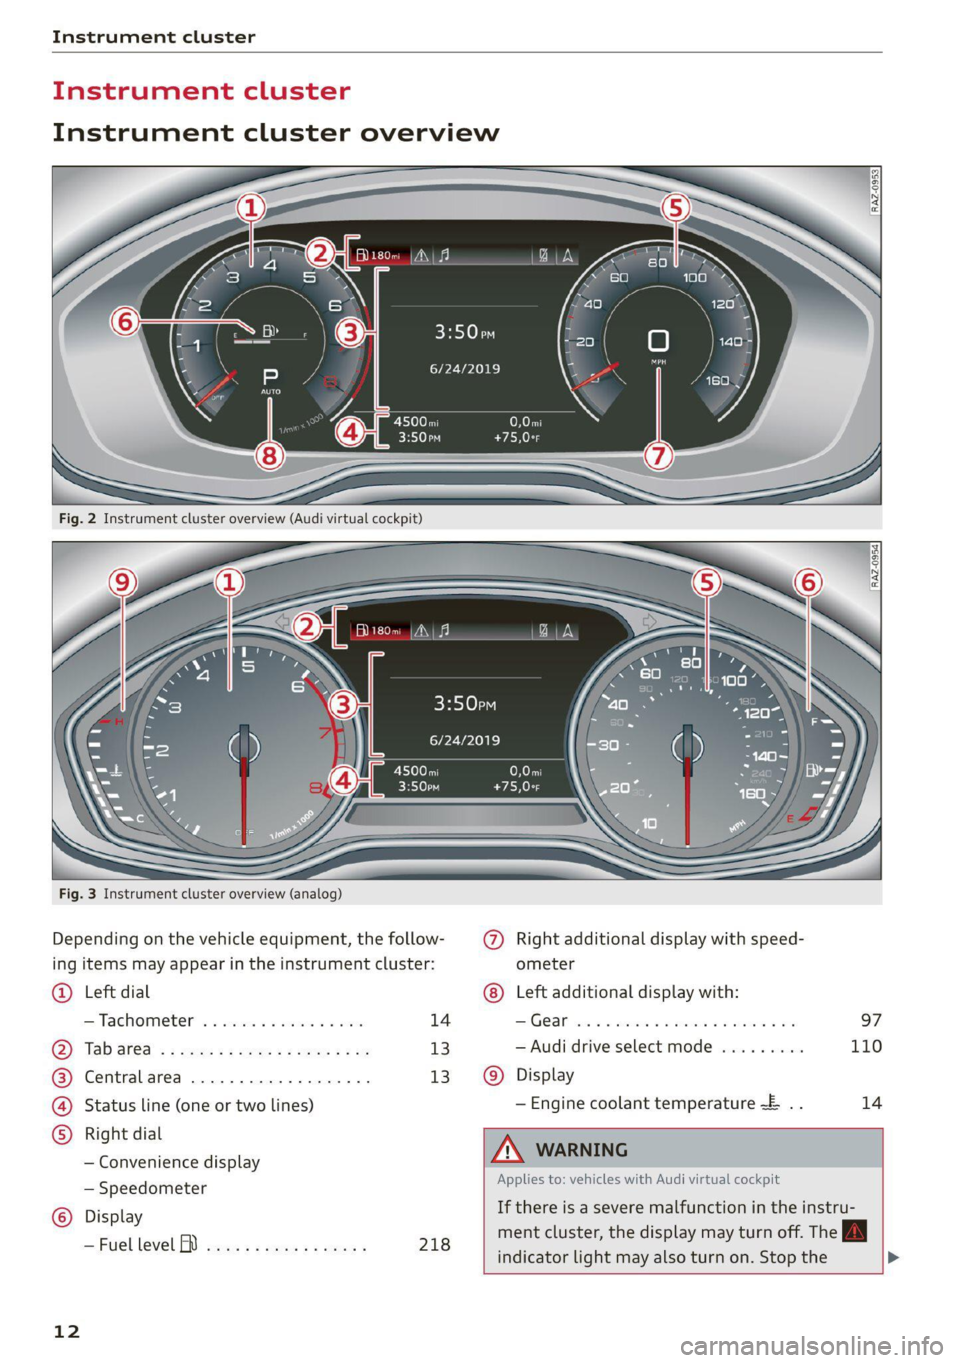
Instrument cluster overview
Belo
6/24/2019
6/24/2019
C100 T
Fig. 3 Instrument cluster overview (analog)
Depending on the vehicle equipment, the follow- @) Right additional display with speed-
ing items may appear in the instrument cluster: ometer
Left dial @® Left additional display with:
—Tachometer .........00.. 000s 14 SIG OOM wice es eosenes 2 a were 2 8 wate @ oe 97
Tab
af@a « < sees se oes x eee gee 13 — Audi drive select mode ......... 110
Centralarea .............0.000. 13 Display
Status line (one or two lines) — Engine coolant temperature ~E .. 14
Right dial i
— Convenience display ZX WARNING
— Speedometer Applies to: vehicles with Audi virtual cockpit
Display If there is a severe ECD in the instru-
—FuellevelfD .....-..e0eeec ee. 218 ment cluster, the display may turn off. The
indicator
light may also turn on. Stop the >
12
Page 15 of 304
8W1012721BC
Instrument cluster
vehicle safely. See an authorized Audi dealer
or authorized Audi Service Facility for assis-
tance.
G) Tips
— The following pages primarily show illustra-
tions of the Audi virtual cockpit*. The dis-
play or location of the items that are shown
may vary on the different versions of the in-
strument cluster.
— You can select the units used for tempera-
ture, speed, and other measurements
=> page 212.
— Speeds are displayed in mph (miles per
hour) or km/h (kilometers per hour).
— Certain instrument cluster content can also
be displayed in the head-up display*
=>page 25.
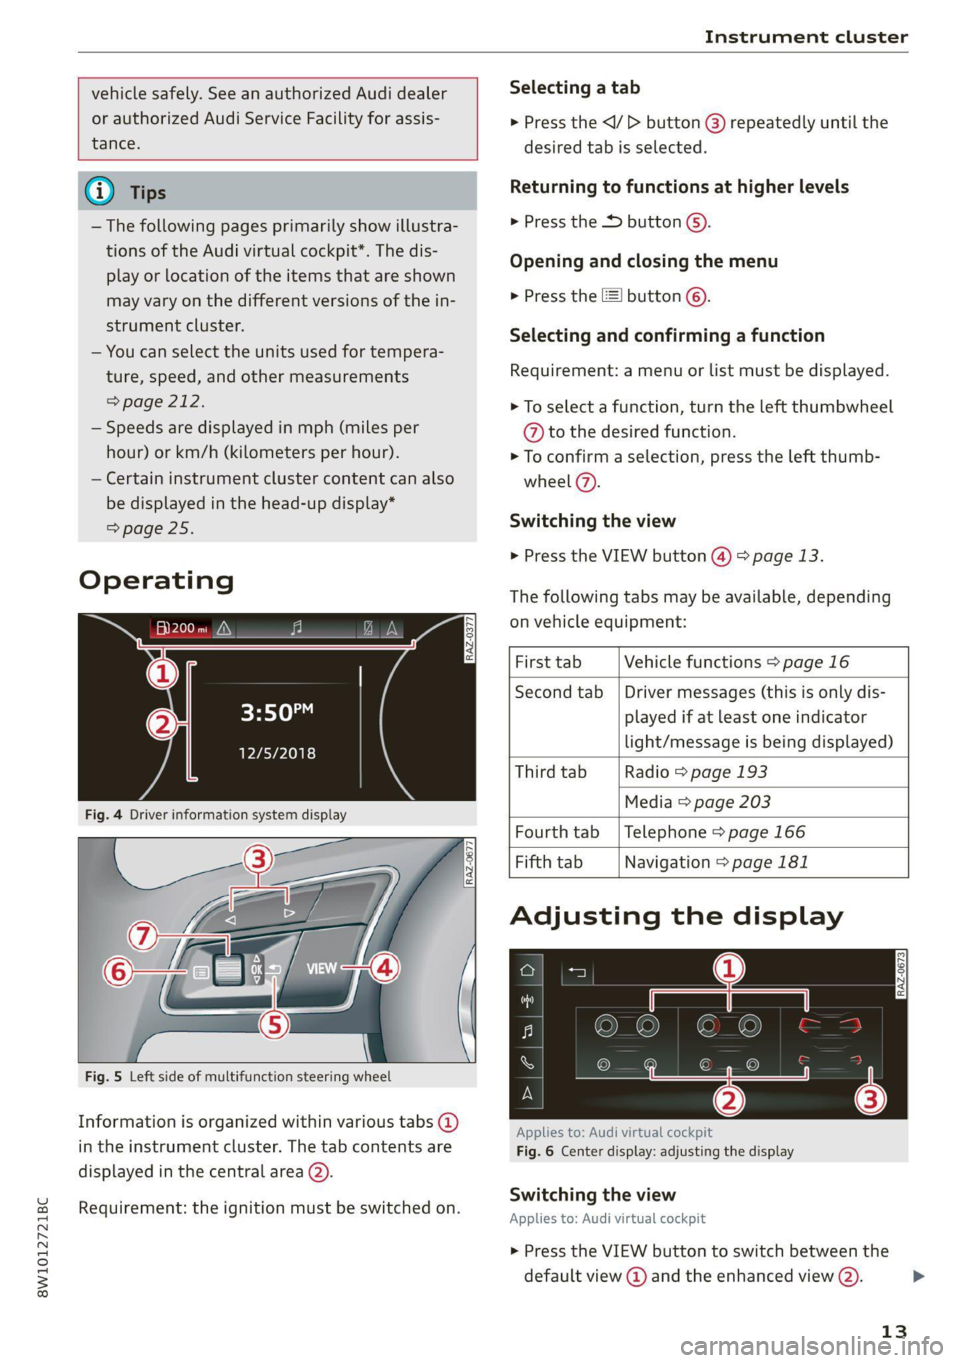
Operating
Fig. 5 Left side of multifunction steering wheel
Information is organized within various tabs @)
in the instrument cluster. The tab contents are
displayed in the central area (2).
Requirement: the ignition must be switched on.
RAZ-0377
Selecting a tab
> Press the
desired tab is selected.
Returning to functions at higher levels
> Press the D button ©).
Opening and closing the menu
» Press the [=] button ©).
Selecting and confirming a function
Requirement: a menu or list must be displayed.
> To select a function, turn the left thumbwheel
@ to the desired function.
> To confirm a selection, press the left thumb-
wheel (7).
Switching the view
> Press the VIEW button @) > page 13.
The following tabs may be available, depending
on vehicle equipment:
First tab Vehicle functions > page 16
Second tab | Driver messages (this is only dis-
played if at least one indicator
light/message is being displayed)
Third tab Radio > page 193
Media > page 203
Fourth tab | Telephone > page 166
Fifth tab Navigation > page 181
Adjusting the display
RAZ-0673
Applies to: Audi virtual cockpit
Fig. 6 Center display: adjusting the display
Switching the view
Applies to: Audi virtual cockpit
> Press the VIEW button to switch between the
default view @ and the enhanced view (2).
13
Page 16 of 304
Instrument cluster
Adjusting the layout
Applies to: Audi virtual cockpit
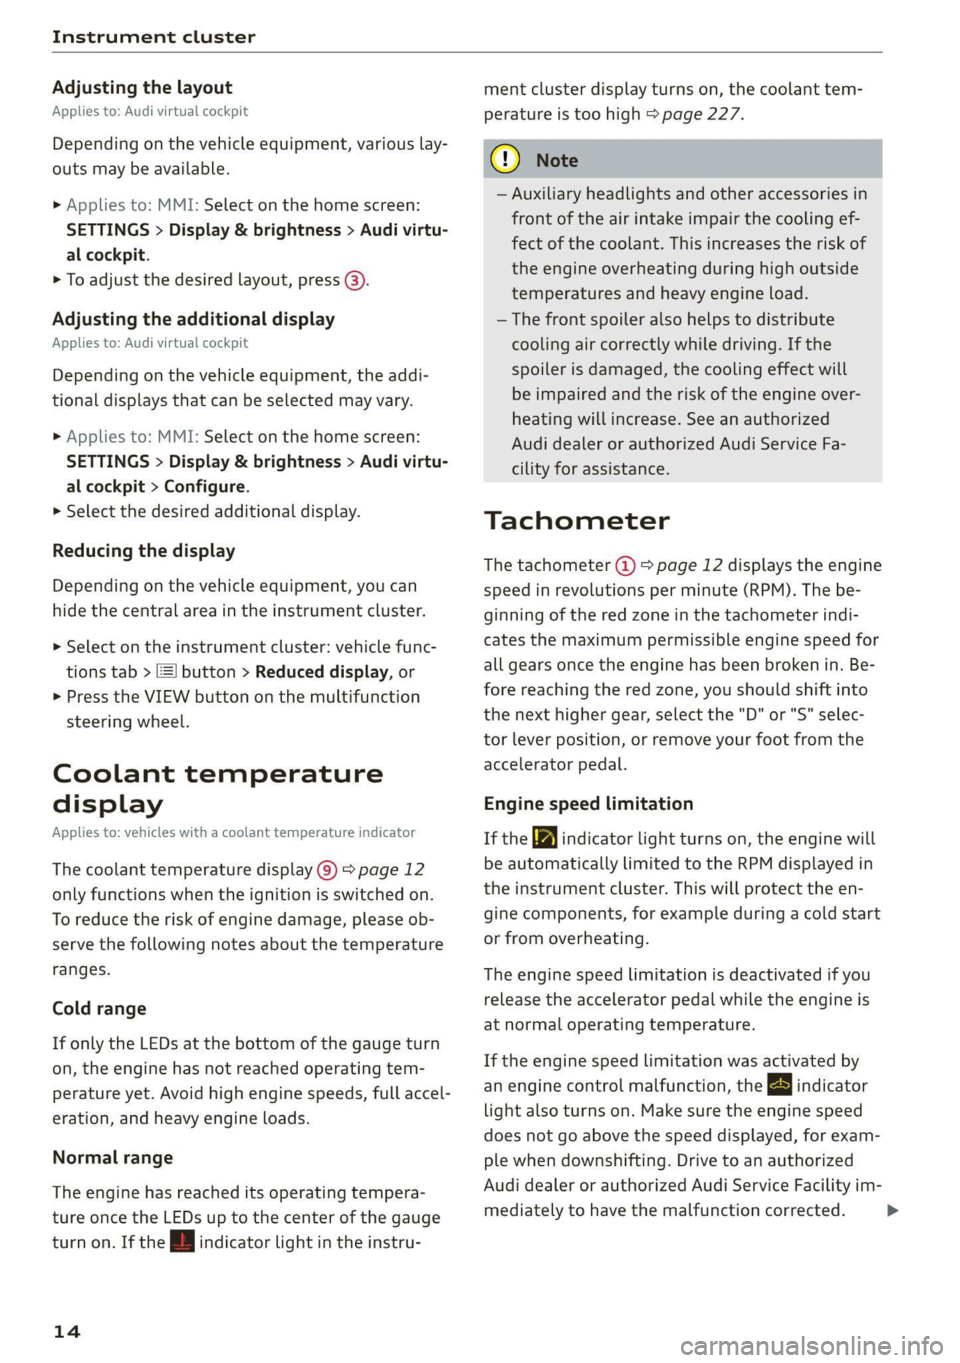
Depending on the vehicle equipment, various lay-
outs may be available.
> Applies to: MMI: Select on the home screen:
SETTINGS > Display & brightness > Audi virtu-
al cockpit.
> To adjust the desired layout, press @).
Adjusting the additional display
Applies to: Audi virtual cockpit
Depending on the vehicle equipment, the addi-
tional displays that can be selected may vary.
> Applies to: MMI: Select on the home screen:
SETTINGS > Display & brightness > Audi virtu-
al cockpit > Configure.
> Select the desired additional display.
Reducing the display
Depending on the vehicle equipment, you can
hide the central area in the instrument cluster.
> Select on the instrument cluster: vehicle func-
tions tab > [=] button > Reduced display, or
> Press the VIEW button on the multifunction
steering wheel.
Coolant temperature
display
Applies to: vehicles with a coolant temperature indicator
The coolant temperature display @) > page 12
only functions when the ignition is switched on.
To reduce the risk of engine damage, please ob-
serve the following notes about the temperature
ranges.
Cold range
If only the LEDs at the bottom of the gauge turn
on, the engine has not reached operating tem-
perature yet. Avoid high engine speeds, full accel-
eration, and heavy engine loads.
Normal range
The engine has reached its operating tempera-
ture once the LEDs up to the center of the gauge
turn on. If the | indicator light in the instru-
14
ment cluster display turns on, the coolant tem-
perature is too high > page 227.
() Note
— Auxiliary headlights and other accessories in
front of the air intake impair the cooling ef-
fect of the coolant. This increases the risk of
the engine overheating during high outside
temperatures and heavy engine load.
— The front spoiler also helps to distribute
cooling air correctly while driving. If the
spoiler is damaged, the cooling effect will
be impaired and the risk of the engine over-
heating will increase. See an authorized
Audi dealer or authorized Audi Service Fa-
cility for assistance.
Tachometer
The tachometer @) > page 12 displays the engine
speed in revolutions per minute (RPM). The be-
ginning of the red zone in the tachometer indi-
cates the maximum permissible engine speed for
all gears once the engine has been broken in. Be-
fore reaching the red zone, you should shift into
the next higher gear, select the "D" or "S" selec-
tor lever position, or remove your foot from the
accelerator pedal.
Engine speed limitation
If the tA indicator light turns on, the engine will
be automatically limited to the RPM displayed in
the instrument cluster. This will protect the en-
gine components, for example during a cold start
or from overheating.
The engine speed limitation is deactivated if you
release the accelerator pedal while the engine is
at normal operating temperature.
If the engine speed limitation was activated by
an engine control malfunction, the By indicator
light also turns on. Make sure the engine speed
does not go above the speed displayed, for exam-
ple when downshifting. Drive to an authorized
Audi dealer or authorized Audi Service Facility im-
mediately to have the malfunction corrected. >
Page 17 of 304
8W1012721BC
Instrument cluster
@) Note
The needle in the tachometer may only be in
the red area of the gauge for a short period of
time before there is a risk of damaging the
engine. The location where the red zone be-
gins varies depending on the engine.
Odometer
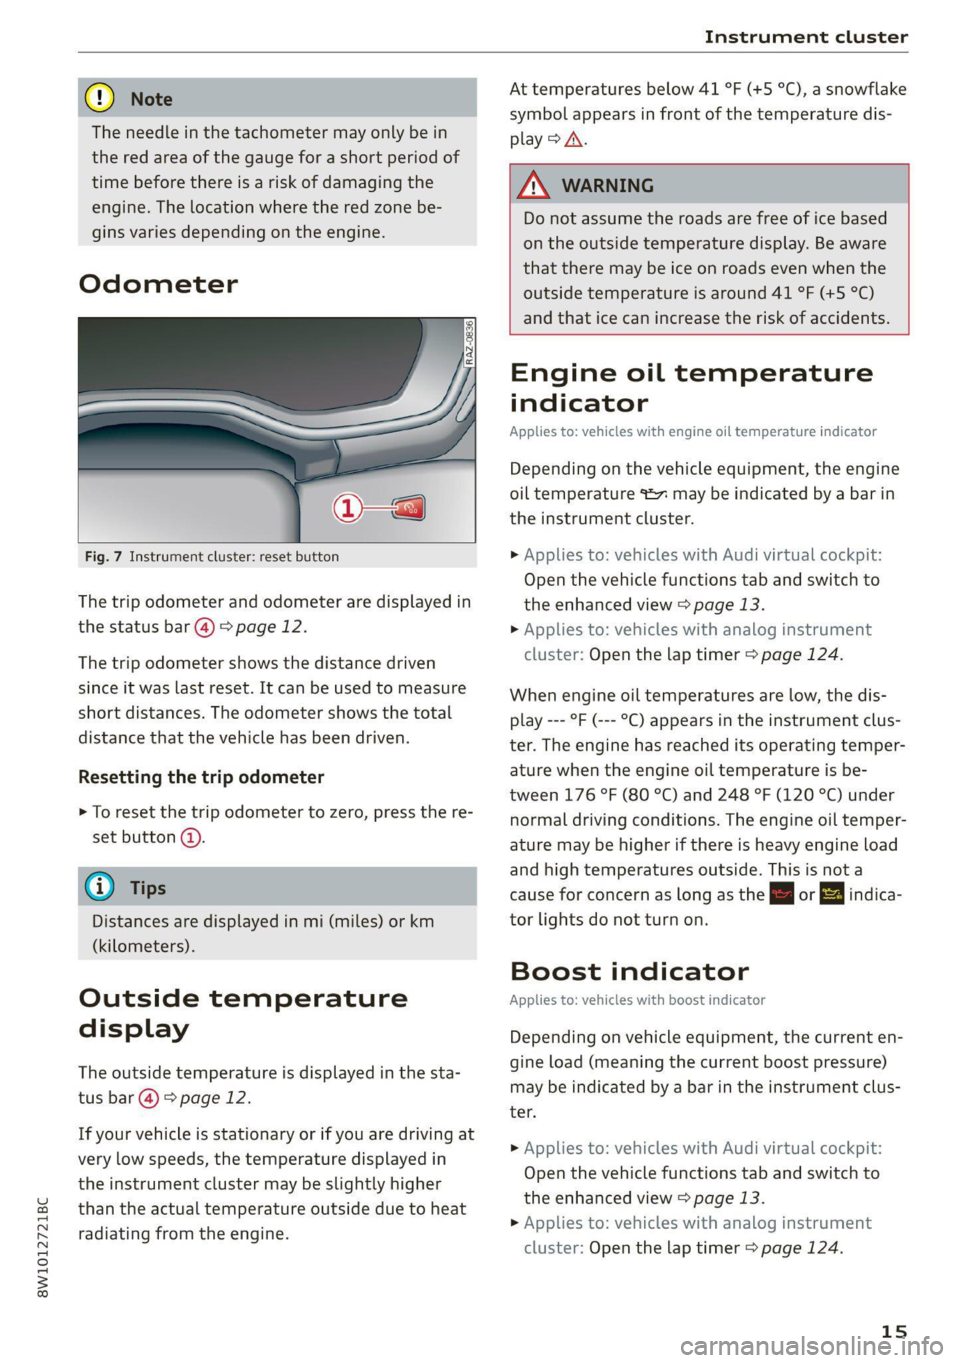
Fig. 7 Instrument cluster: reset button
The trip odometer and odometer are displayed in
the status bar @) > page 12.
The trip odometer shows the distance driven
since it was last reset. It can be used to measure
short distances. The odometer shows the total
distance that the vehicle has been driven.
Resetting the trip odometer
> To reset the trip odometer to zero, press the re-
set button @.
@) Tips
Distances are displayed in mi (miles) or km
(kilometers).
Outside temperature
display
The outside temperature is displayed in the sta-
tus bar @) 9 page 12.
If your vehicle is stationary or if you are driving at
very low speeds, the temperature displayed in
the instrument cluster may be slightly higher
than the actual temperature outside due to heat
radiating from the engine.
At temperatures below 41 °F (+5 °C), a snowflake
symbol appears in front of the temperature dis-
play > A\.
7 WARNING
Do not assume the roads are free of ice based
on the outside temperature display. Be aware
that there may be ice on roads even when the
outside temperature is around 41 °F (+5 °C)
and that ice can increase the risk of accidents.
Engine oil temperature
indicator
Applies to: vehicles with engine oil temperature indicator
Depending on the vehicle equipment, the engine
oil temperature %7% may be indicated by a bar in
the instrument cluster.
> Applies to: vehicles with Audi virtual cockpit:
Open the vehicle functions tab and switch to
the enhanced view > page 13.
> Applies to: vehicles with analog instrument
cluster: Open the lap timer > page 124.
When engine oil temperatures are low, the dis-
play --- °F (--- °C) appears in the instrument clus-
ter. The engine has reached its operating temper-
ature when the engine oil temperature is be-
tween 176 °F (80 °C) and 248 °F (120 °C) under
normal driving conditions. The engine oil temper-
ature may be higher if there is heavy engine load
and high temperatures outside. This is not a
cause for concern as long as the | or 3 indica-
tor lights do not turn on.
Boost indicator
Applies to: vehicles with boost indicator
Depending on vehicle equipment, the current en-
gine load (meaning the current boost pressure)
may be indicated by a bar in the instrument clus-
ter.
> Applies to: vehicles with Audi virtual cockpit:
Open the vehicle functions tab and switch to
the enhanced view > page 13.
> Applies to: vehicles with analog instrument
cluster: Open the lap timer > page 124.
15
Page 47 of 304
8W1012721BC
Opening and closing
respective rear door and turn the key switch
with the mechanical key in the direction of the
arrow or opposite the direction of the arrow
> fig. 37. This will disable the function of the
rear door handle.
> Make sure the child safety lock is working by
checking the function on the rear power win-
dow switch and door handle.
Applies to: vehicles with power child safety locks:
It is not possible to operate the rear climate con-
trol system* when the child safety lock is activat-
ed. The SET REAR function allows you to adjust
all settings in the rear using the climate control
system controls in the cockpit.
Message in the instrument cluster display
@/ Child safety lock: malfunction! Please
contact Service
There is a malfunction in the child safety lock.
Press the @/ & button again.
If the message stays on, drive immediately to an
authorized Audi dealer or authorized Audi Service
Facility to have the malfunction repaired.
Z\ WARNING
— Observe the safety precautions > page 33.
—A malfunction in the child safety lock could
allow
the rear doors to be opened from the
inside, which increases the risk of an acci-
dent.
Power windows
Opening and closing the windows
RAZ-0723
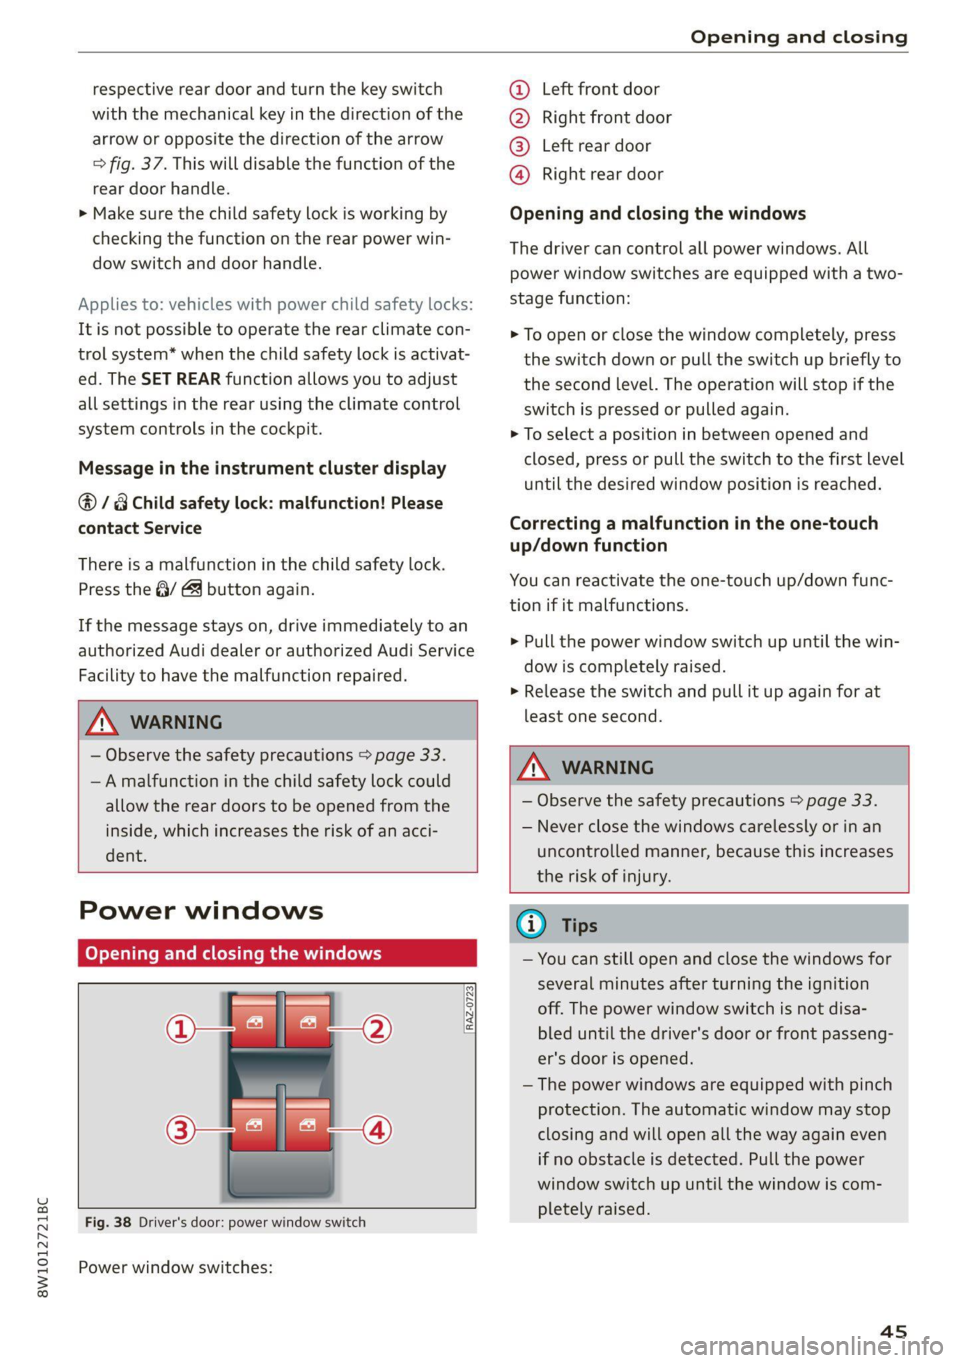
Fig. 38 Driver's door: power window switch
Power window switches:
@ Left front door
® Right front door
@® Left rear door
@ Right rear door
Opening and closing the windows
The driver can control all power windows. All
power window switches are equipped with a two-
stage function:
> To open or close the window completely, press
the switch down or pull the switch up briefly to
the second level. The operation will stop if the
switch is pressed or pulled again.
> To select a position in between opened and
closed, press or pull the switch to the first level
until the desired window position is reached.
Correcting a malfunction in the one-touch
up/down function
You can reactivate the one-touch up/down func-
tion if it malfunctions.
> Pull the power window switch up until the win-
dow is completely raised.
> Release the switch and pull it up again for at
least one second.
Z\ WARNING
— Observe the safety precautions > page 33.
— Never close the windows carelessly or in an
uncontrolled manner, because this increases
the risk of injury.
G) Tips
— You can still open and close the windows for
several minutes after turning the ignition
off. The power window switch is not disa-
bled until the driver's door or front passeng-
er's door is opened.
— The power windows are equipped with pinch
protection. The automatic window may stop
closing and will open all the way again even
if no obstacle is detected. Pull the power
window switch up until the window is com-
pletely raised.
4s
Page 57 of 304
8W1012721BC
Lights and Vision
Interior lighting
Applies to: vehicles with interior lighting
The ambient lighting turns on when the ignition
is switched on. The O light switch position deacti-
vates the interior lighting.
You can adjust the interior lighting individually.
The settings depend on the vehicle equipment.
>» Applies to MMI: Select on the home screen: VE-
HICLE > Light & Visibility > Interior lighting.
You can choose from various color profiles, such
as Maritime.
Additional settings and profiles:
— Brightness: you can adjust the brightness for
all of the interior lighting.
— Individual: you can adjust the brightness and
color of the interior lighting separately, divided
into contour and surface lighting.
— Audi drive select: the contour and surface
lighting color changes depending on the select-
ed drive select* mode.
@ Tips
Depending on vehicle equipment, when the
drive select function is activated, the color of
the contour and surface lighting may briefly
change to red or blue when the interior tem-
perature is manually increased or decreased.
Display brightness
You can adjust the instrument and display illumi-
nation separately. The settings depend on the ve-
hicle equipment.
> Applies to MMI: select on the home screen:
SETTINGS > Display & brightness.
Possible settings in the MMI:
— Cockpit dimming
— Head-up display
—MMI
— Audi virtual cockpit
Pitt aaa ce aria eda)
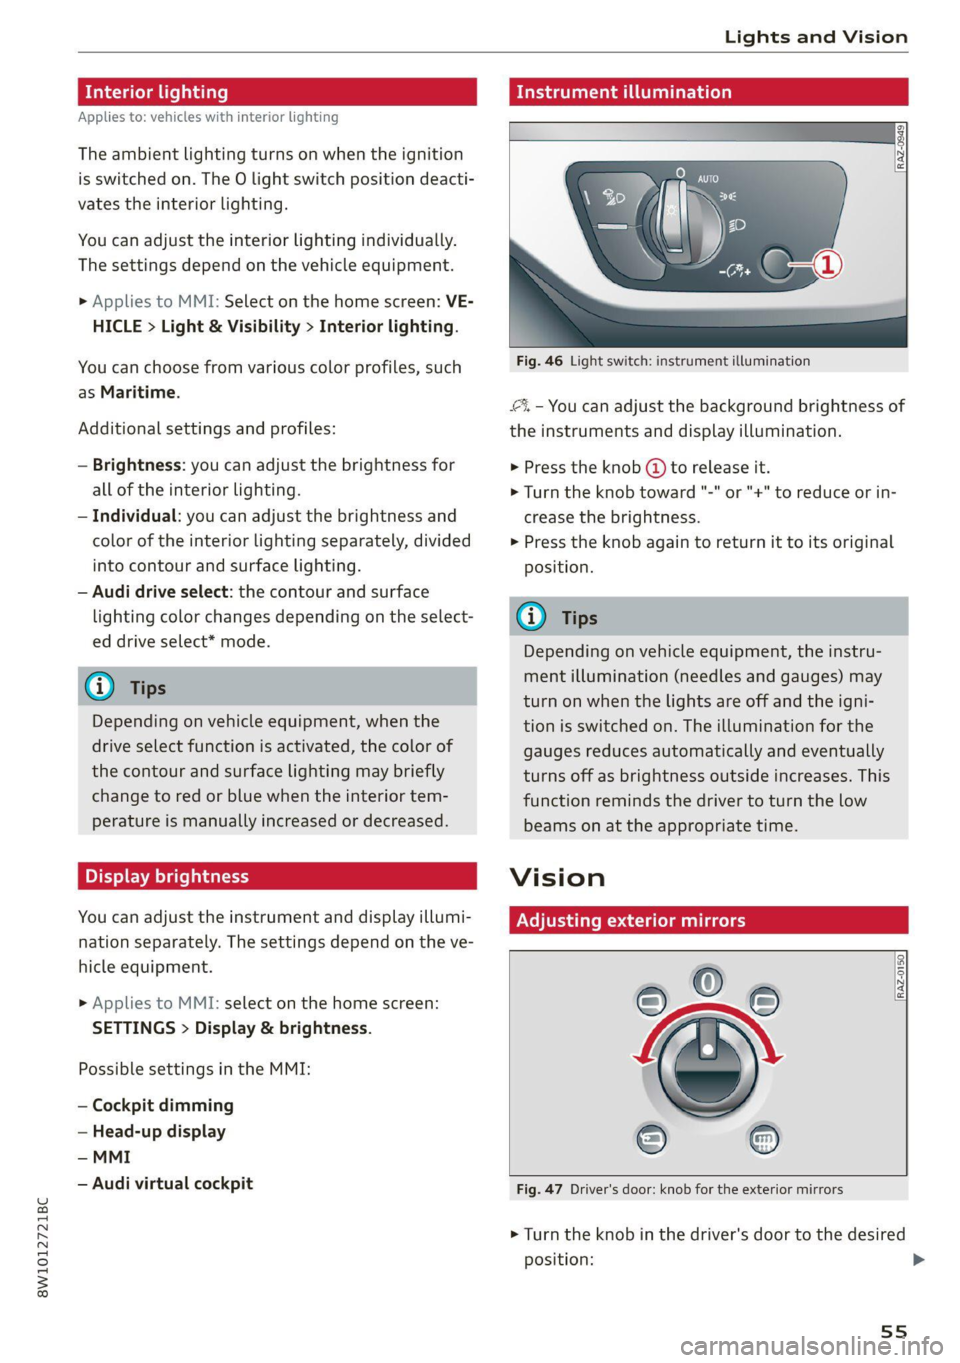
Fig. 46 Light switch: instrument illumination
%, - You can adjust the background brightness of
the instruments and display illumination.
> Press the knob (@) to release it.
> Turn the knob toward "-" or "+"
crease the brightness.
> Press the knob again to return it to its original
Position.
Ow
Depending on vehicle equipment, the instru-
ment illumination (needles and gauges) may
turn on when the lights are off and the igni-
tion is switched on. The illumination for the
gauges reduces automatically and eventually
turns off as brightness outside increases. This
function reminds the driver to turn the low
beams on at the appropriate time.
to reduce or in-
Vision
Adjusting exterior mirrors
RAZ-0150
©
Fig. 47 Driver's door: knob for the exterior mirrors
©
> Turn the knob in the driver's door to the desired
position:
55
>
Page 93 of 304
8W1012721BC
Warm and cold
3-zone deluxe automatic climate control
Applies to: vehicles with 3-zone deluxe automatic climate control system
B8W-0137
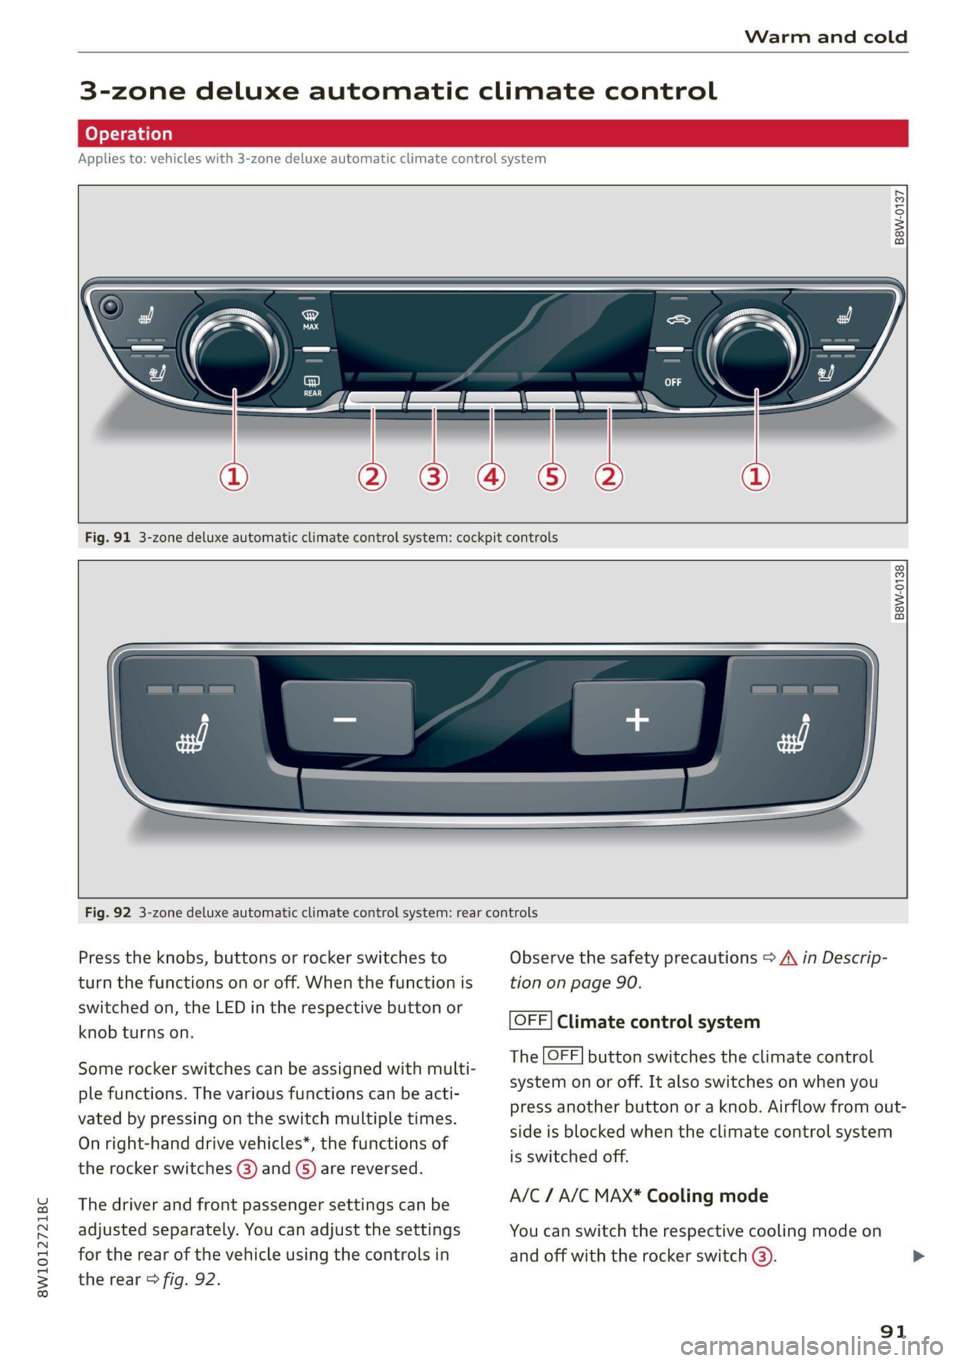
Fig. 91 3-zone deluxe automatic climate control system: cockpit controls
B8W-0138
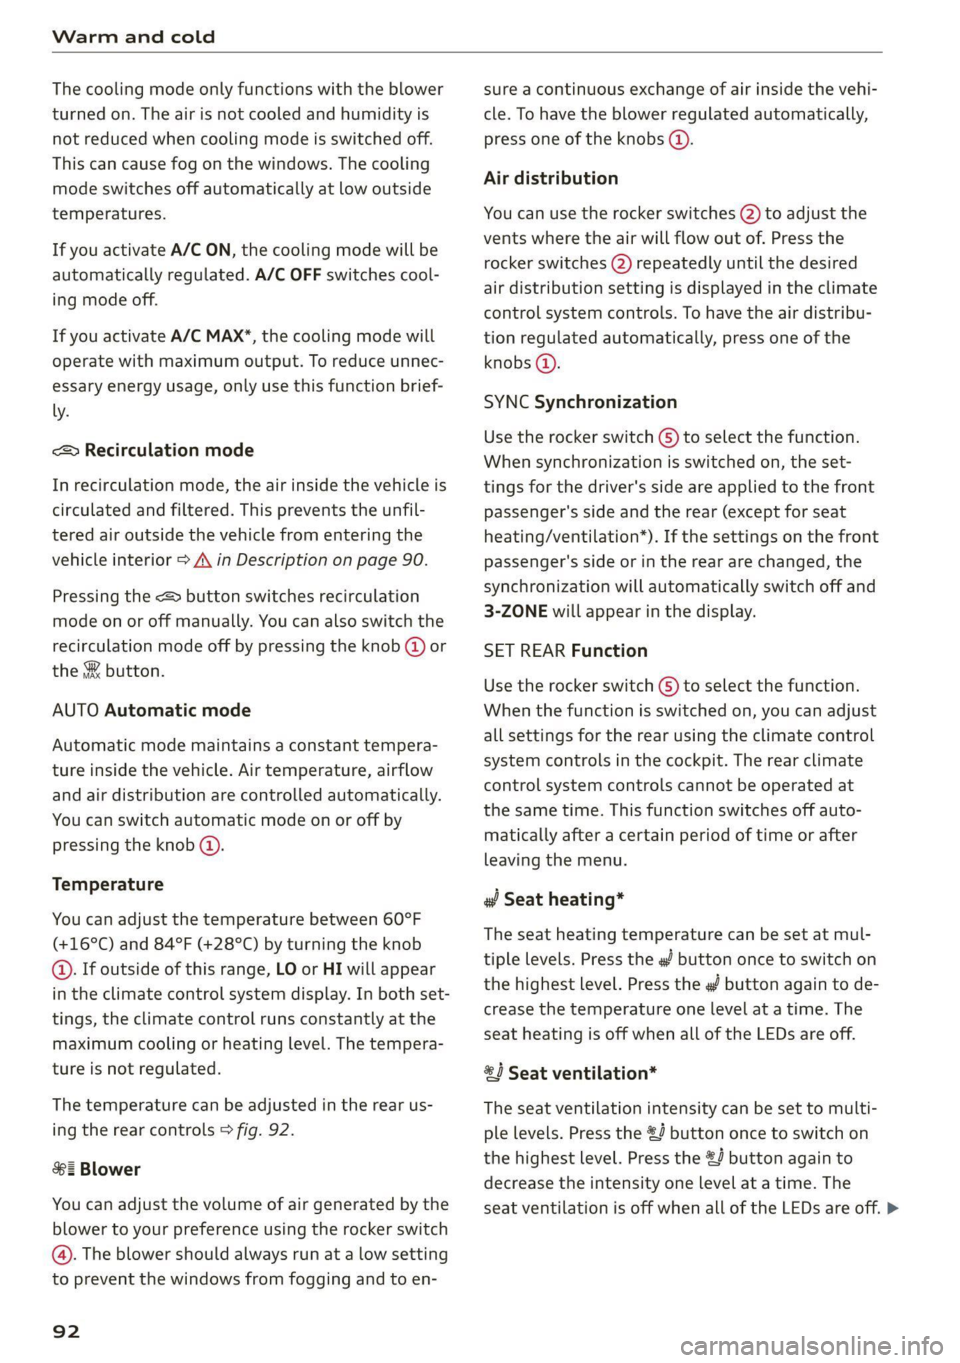
Fig. 92 3-zone deluxe automatic climate control system: rear controls
Press the knobs, buttons or rocker switches to Observe the safety precautions > A\ in Descrip-
turn the functions on or off. When the function is tion on page 90.
switched on, the LED in the respective button or
knob turns on.
OFF] Climate control system
The [OFF] button switches the climate control
system on or off. It also switches on when you
press another button or a knob. Airflow from out-
side is blocked when the climate control system
is switched off.
Some rocker switches can be assigned with multi-
ple functions. The various functions can be acti-
vated by pressing on the switch multiple times.
On right-hand drive vehicles*, the functions of
the rocker switches @) and ©) are reversed.
The driver and front passenger settings can be A/C / A/C MAX* Cooling mode
adjusted separately. You can adjust the settings You can switch the respective cooling mode on
for the rear of the vehicle using the controls in and off with the rocker switch @).
the rear > fig. 92.
91
Page 94 of 304
Warm and cold
The cooling mode only functions with the blower
turned on. The air is not cooled and humidity is
not reduced when cooling mode is switched off.
This can cause fog on the windows. The cooling
mode switches off automatically at low outside
temperatures.
If you activate A/C ON, the cooling mode will be
automatically regulated. A/C OFF switches cool-
ing mode off.
If you activate A/C MAX*, the cooling mode will
operate with maximum output. To reduce unnec-
essary energy usage, only use this function brief-
ly.
<= Recirculation mode
In recirculation mode, the air inside the vehicle is
circulated and filtered. This prevents the unfil-
tered air outside the vehicle from entering the
vehicle interior > A\ in Description on page 90.
Pressing the <> button switches recirculation
mode on or off manually. You can also switch the
recirculation mode off by pressing the knob @ or
the §% button.
AUTO Automatic mode
Automatic mode maintains a constant tempera-
ture inside the vehicle. Air temperature, airflow
and air distribution are controlled automatically.
You can switch automatic mode on or off by
pressing the knob @).
Temperature
You can adjust the temperature between 60°F
(+16°C) and 84°F (+28°C) by turning the knob
©. If outside of this range, LO or HI will appear
in the climate control system display. In both set-
tings, the climate control runs constantly at the
maximum cooling or heating level. The tempera-
ture is not regulated.
The temperature can be adjusted in the rear us-
ing the rear controls > fig. 92.
$= Blower
You can adjust the volume of air generated by the
blower to your preference using the rocker switch
@. The blower should always run at a low setting
to prevent the windows from fogging and to en-
92
sure a continuous exchange of air inside the vehi-
cle. To have the blower regulated automatically,
press one of the knobs (@).
Air distribution
You can use the rocker switches (2) to adjust the
vents where the air will flow out of. Press the
rocker switches (2) repeatedly until the desired
air distribution setting is displayed in the climate
control system controls. To have the air distribu-
tion regulated automatically, press one of the
knobs @).
SYNC Synchronization
Use the rocker switch (5) to select the function.
When synchronization is switched on, the set-
tings for the driver's side are applied to the front
passenger's side and the rear (except for seat
heating/ventilation*). If the settings on the front
passenger's side or in the rear are changed, the
synchronization will automatically switch off and
3-ZONE will appear in the display.
SET REAR Function
Use the rocker switch G) to select the function.
When the function is switched on, you can adjust
all settings for the rear using the climate control
system controls in the cockpit. The rear climate
control system controls cannot be operated at
the same time. This function switches off auto-
matically after a certain period of time or after
leaving the menu.
a Seat heating*
The seat heating temperature can be set at mul-
tiple levels. Press the w button once to switch on
the highest level. Press the button again to de-
crease the temperature one level at a time. The
seat heating is off when all of the LEDs are off.
#4 Seat ventilation*
The seat ventilation intensity can be set to multi-
ple levels. Press the £J button once to switch on
the highest level. Press the £4 button again to
decrease the intensity one level at a time. The
seat ventilation is off when all of the LEDs are off. >