ECO mode AUDI A4 2021 Owner´s Manual
[x] Cancel search | Manufacturer: AUDI, Model Year: 2021, Model line: A4, Model: AUDI A4 2021Pages: 304, PDF Size: 107.89 MB
Page 9 of 304
8W1012721BC
Quick access
@9 Center armrest with storage com-
partment. Depending on vehicle
equipment, it may have:
— Audi music interface .......... 202
—Audi phone box ............... 164
— Starting the engine if there is a
MALFUMERION since oo sxosoue x 2 seems ss 95
@) Electromechanical parking brake
BUGGOT sieves so cman « 2 ewes 2s men 2 106
@) Selector lever (automatic transmis-
SIOM) seo so neon & v Howe & eRe Fa 97
@3 Storage compartment .......... 83
@ [START ENGINE STOP]button .... 95
@3) Audi music interface ............ 202
@@ Steering wheel adjustment ...... 66
@) Lever for:
— Cruise control system ......... 127
— Audi adaptive cruise control .... 130
® Button for switching the head-up
display on and off, adjusting the
height ........ 2... cee eee eee 25
@ Instrument illumination ......... 55
60) Connection port for the On Board
Diagnostic System (OBD) ........ 277
@) Headlight control switch ........ 51
@ Hood release ...............0-. 222
63 All-weather lights button ........ 51
@4 Luggage compartment lid button . 40
@5) Exterior mirror adjustment ...... 55
68 Buttons for:
— Power windows ...........00. 45
—Child safety lock .............. 44
@) Tips
Some the equipment listed here is only instal-
led in certain models or is available as an op-
tion.
Indicator lights overview
The indicator lights in the instrument cluster
blink or turn on. They indicate functions or mal-
functions. Some warning and indicator lights
turn on when you switch the ignition on and must
turn off when the drive system is switched on or
while driving.
With some indicator lights, messages may ap-
pear and warning signals may sound. The indica-
tor lights and messages may be covered by other
displays. To show them again, select the second
tab for messages with the multifunction steering
wheel > page 13.
Some indicator lights in the display can display in
several colors.
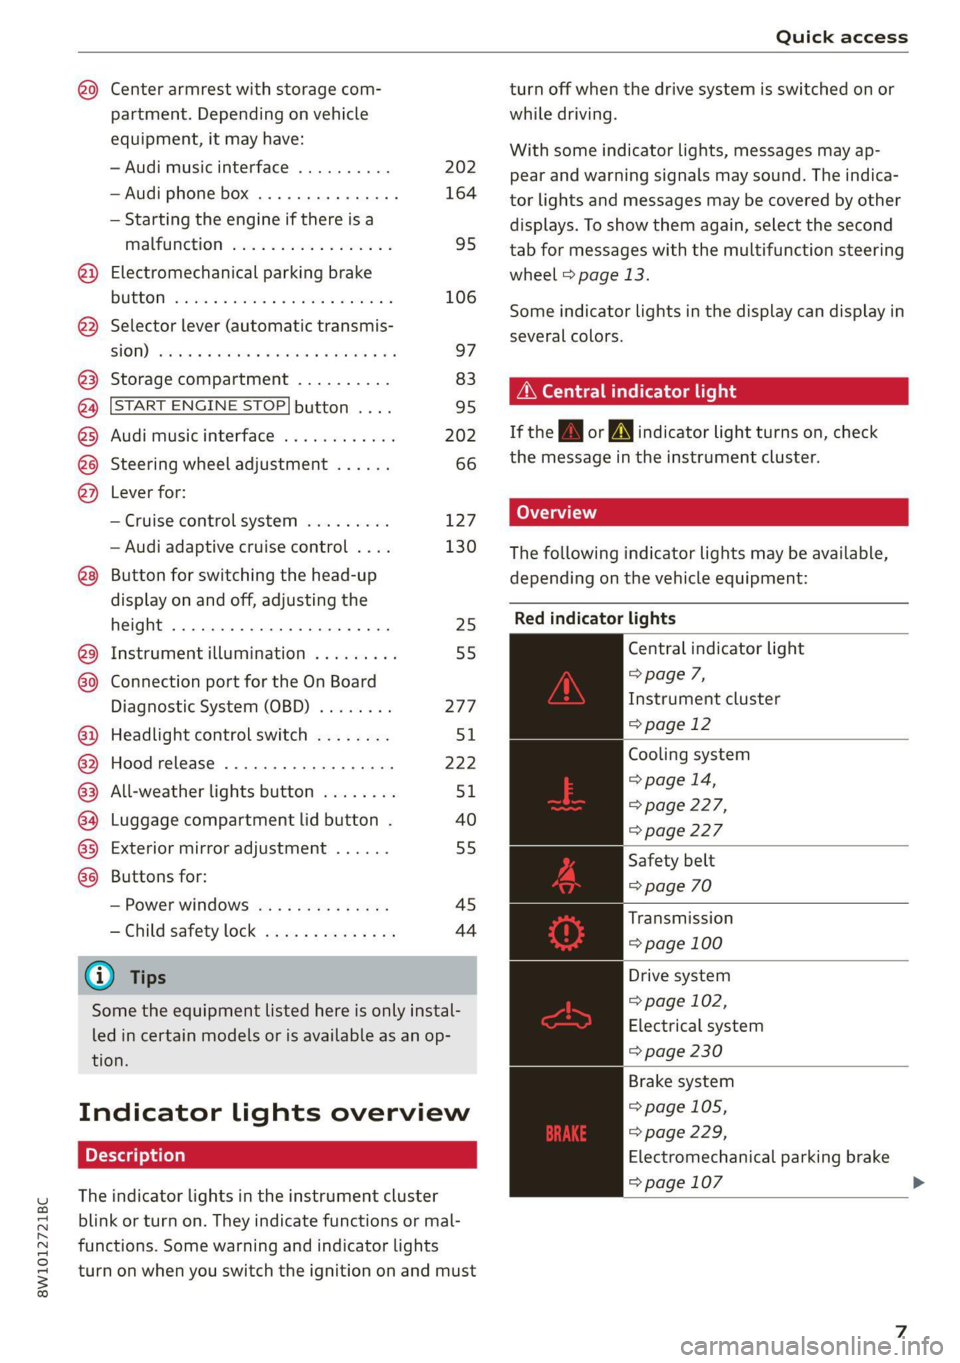
OMe eee any
If the wA or N indicator light turns on, check
the message in the instrument cluster.
The following indicator lights may be available,
depending on the vehicle equipment:
Red indicator lights
Central indicator light
=> page 7,
Instrument cluster
=>page 12
Cooling system
> page 14,
=> page 227,
=> page 227
Safety belt
=> page 70
Transmission
= page 100
Drive system
= page 102,
Electrical system
=> page 230
Brake system
=>page
105,
=>page 229,
Electromechanical parking brake
=> page 107 >
Page 52 of 304
Opening and closing
» Applies to: MMI: Select on the home screen:
VEHICLE > Settings & Service > Garage door
opener.
> Press the button for the system that you would
like to synchronize.
> Follow the instructions in the MMI.
Renaming programmed systems
You can rename the programmed systems indi-
vidually (names may have a maximum of 10 char-
acters).
» Applies to: MMI: Select on the home screen:
VEHICLE > Settings & Service > Garage door
opener.
> Press the Z button.
> Press the 7 button for the system that you
would like to rename.
> Select: Rename. If necessary, delete the preset
name, such as Garage door opener 1.
> Follow the instructions in the MMI.
Location pairing
Applies to: vehicles with location pairing
For easier operation, you can program your sys-
tem's location.
Requirements: the respective hand transmitter
must be programmed > page 49 and the vehicle
must be located in front of the system.
» Applies to: MMI: Select on the home screen:
VEHICLE > Settings & Service > Garage door
opener.
> Press the Z button.
> Press the / button for the system your vehicle
is facing.
> Select: Location pairing.
> Follow the instructions in the MMI.
Only a maximum of three systems can be dis-
played in the notification center > page 22. If
you would like to have all systems displayed,
press aa.
Deleting programmed systems
The programmed systems can be deleted individ-
ually or all at once.
sO
> Applies to: MMI: Select on the home screen:
VEHICLE > Settings & Service > Garage door
opener.
> Press the Z button.
> To delete an individual system, press the L]
button for the desired system. If the checkmark
Y is set, select: Delete.
> To delete all systems, select: All > Delete.
G) Tips
— Make sure the batteries in the hand trans-
mitter are charged before starting the pro-
gramming process.
— The programming process may take up to
30 seconds. It may be necessary for the
hand transmitter to be pressed again in the
meantime.
— The garage door opener may need to be
synchronized with the system after pro-
gramming. Follow the manufacturer's in-
structions for doing this.
G) Tips
In some cases, the system may need to be
programmed in a different mode (“D mode”).
— Switch the ignition on.
— Applies to: MMI: Select on the home screen:
VEHICLE > Settings & Service > Garage
door opener.
— Press and hold the desired button @).
— Select Yes, in D mode and follow the in-
structions on the MMI.
Page 60 of 304
Lights and Vision
Windshield wipers
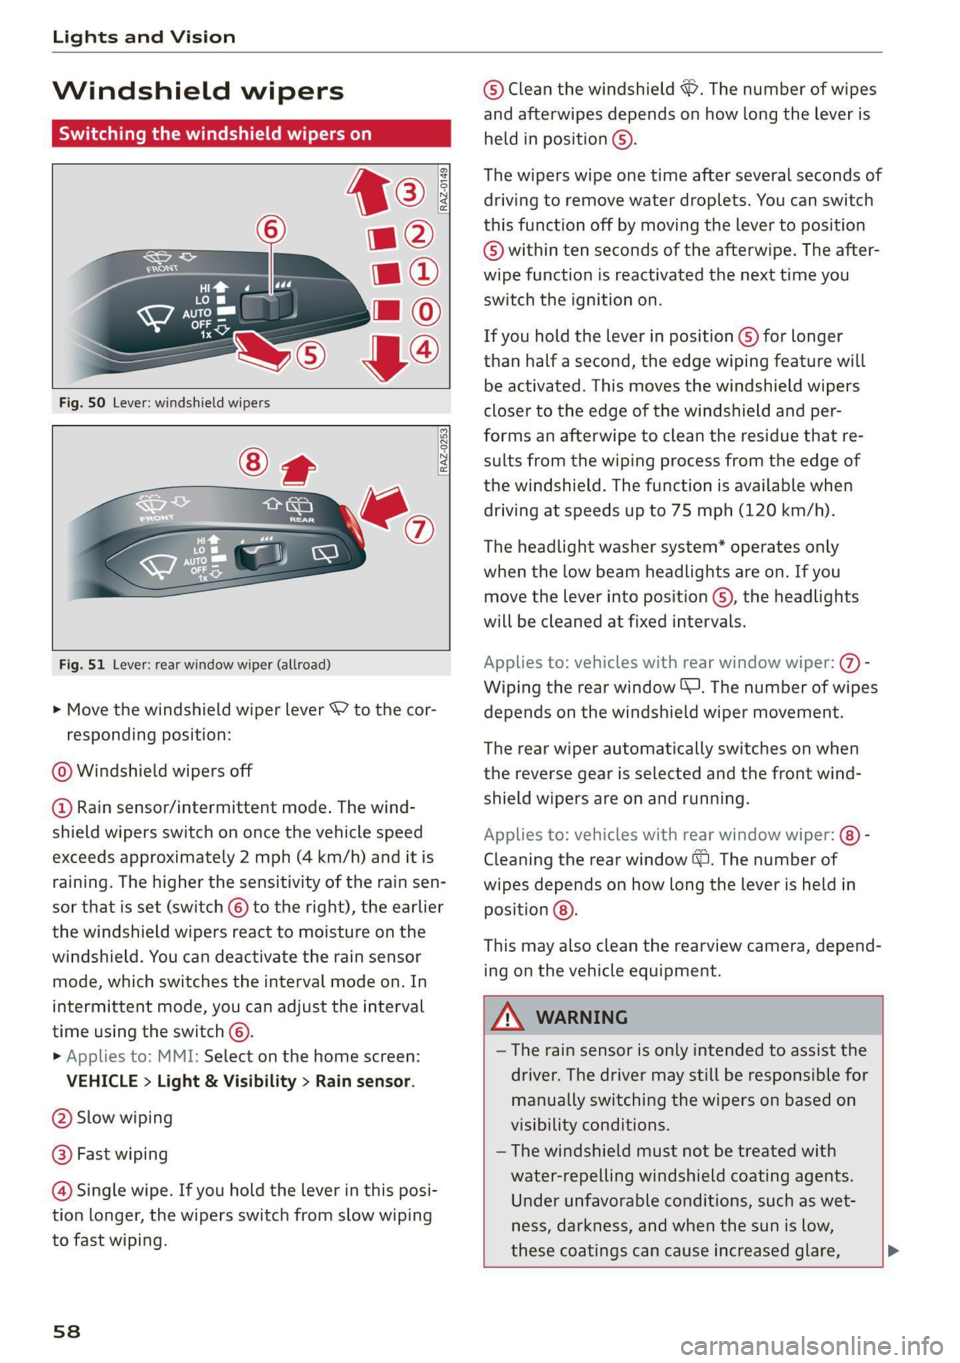
Switching the windshield wipers on
RAZ-0149.
Fig. 51 Lever: rear window wiper (allroad)
> Move the windshield wiper lever S7 to the cor-
responding position:
@ Windshield wipers off
@ Rain sensor/intermittent mode. The wind-
shield wipers switch on once the vehicle speed
exceeds approximately 2 mph (4 km/h) and it is
raining. The higher the sensitivity of the rain sen-
sor that is set (switch © to the right), the earlier
the windshield wipers react to moisture on the
windshield. You can deactivate the rain sensor
mode, which switches the interval mode on. In
intermittent mode, you can adjust the interval
time using the switch ©.
> Applies to: MMI: Select on the home screen:
VEHICLE > Light & Visibility > Rain sensor.
@ Slow wiping
@ Fast wiping
@ Single wipe. If you hold the lever in this posi-
tion longer, the wipers switch from slow wiping
to fast wiping.
58
© Clean the windshield 7. The number of wipes
and afterwipes depends on how long the lever is
held in position ©).
The wipers wipe one time after several seconds of
driving to remove water droplets. You can switch
this function off by moving the lever to position
© within ten seconds of the afterwipe. The after-
wipe function is reactivated the next time you
switch the ignition on.
If you hold the lever in position ©) for longer
than half a second, the edge wiping feature will
be activated. This moves the windshield wipers
closer to the edge of the windshield and per-
forms an afterwipe to clean the residue that re-
sults from the wiping process from the edge of
the windshield. The function is available when
driving at speeds up to 75 mph (120 km/h).
The headlight washer system* operates only
when the low beam headlights are on. If you
move the lever into position ), the headlights
will be cleaned at fixed intervals.
Applies to: vehicles with rear window wiper: @) -
Wiping the rear window J. The number of wipes
depends on the windshield wiper movement.
The rear wiper automatically switches on when
the reverse gear is selected and the front wind-
shield wipers are on and running.
Applies to: vehicles with rear window wiper: ®) -
Cleaning the rear window &. The number of
wipes depends on how long the Lever is held in
position @).
This may also clean the rearview camera, depend-
ing on the vehicle equipment.
Z\ WARNING
— The rain sensor is only intended to assist the
driver. The driver may still be responsible for
manually switching the wipers on based on
visibility
conditions.
— The windshield must not be treated with
water-repelling windshield coating agents.
Under unfavorable conditions, such as wet-
ness, darkness, and when the sun is low,
these coatings can cause increased glare, >
Page 63 of 304
8W1012721BC
Lights and Vision
Digital compass
@ ©, q
S| > a
ao.
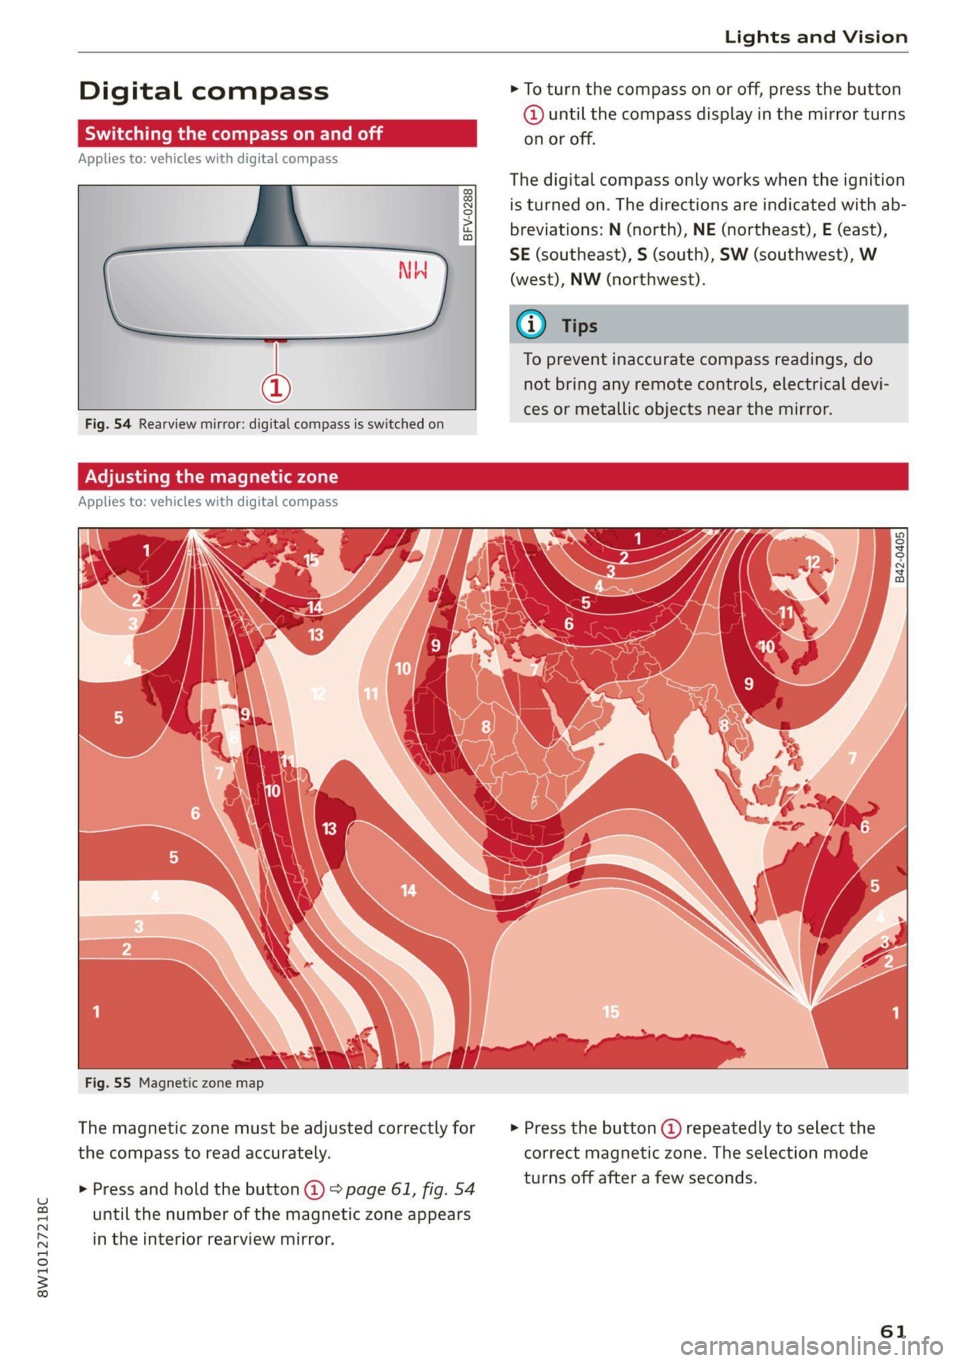
> To turn the compass on or off, press the button
@ until the compass display in the mirror turns
on or off.
The digital compass only works when the ignition
is turned on. The directions are indicated with ab-
breviations: N (north), NE (northeast), E (east),
SE (southeast), S (south), SW (southwest), W
(west), NW (northwest).
To prevent inaccurate compass readings, do
not bring any remote controls, electrical devi-
ces or metallic objects near the mirror.
B42-0405
Fig. 55 Magnetic zone map
The magnetic zone must be adjusted correctly for
the compass to read accurately.
> Press and hold the button @) > page 61, fig. 54
until the number of the magnetic zone appears
in the interior rearview mirror.
> Press the button () repeatedly to select the
correct magnetic zone. The selection mode
turns off after a few seconds.
61
Page 78 of 304

Sitting correctly and safely
that PASSENGER AIR BAG OFF #; stays
on while driving. If
PASSENGER AIR BAG OFF #¥; does not
turn on, remove the child safety seat and in-
stall it again according to the child safety
seat manufacturer instructions. If
PASSENGER AIR BAG OFF &%; still does
not turn on, the front passenger's seat must
not be used. Drive to an authorized Audi
dealer or authorized Audi Service Facility
and have the airbag system inspected.
— Fluids, electronic devices, or mechanical
damage on the front passenger's seat may
cause the front passenger seat occupant de-
tection to malfunction. The system may
then incorrectly detect if the front passeng-
er's seat is occupied. As a result, it could de-
ploy the front passenger’s airbag incorrectly
or fail to deploy it, which increases the risk
of serious or fatal injury. Make sure that no
wet objects (such as a wet hand towel) and
no fluids come into contact with the front
passenger's seat cushion. If the front pas-
senger's seat becomes wet, dry it immedi-
ately. Make sure no electronic devices (such
as a laptop or a retrofitted seat heater) are
on the front passenger's seat. Do not trans-
port any objects on or under the front pas-
senger's seat.
— Seat covers or protective covers may prevent
the advanced airbag system from correctly
detecting child safety seats or passengers in
the front passenger's seat. You must not use
seat covers or protective covers on the front
passenger's seat that are not specifically ap-
proved for use on Audi seats with an ad-
vanced airbag system.
Child safety seats
General information
When installing and using child safety seats, fol-
low the information in this Owner's Manual, the
applicable state and federal regulations, and the
manufacturer instructions for the child safety
seat.
76
You can also obtain useful and current informa-
tion from the following sources:
U.S. National Highway Traffic Safety Adminis-
tration
http://www.nhtsa.gov
http://www.safercar.gov
National SAFE KIDS Campaign
http://www.safekids.org
SafetyBeltSafe U.S.A.
http://www.carseat.org
Transport Canada Information Centre
http://www.tc.gc.ca/roadsafety
Audi Customer Experience Center
https://www.audiusa.com/help/contact-us
https://www.audi.ca/ca/web/en/models/layer/
contact.html
Z\ WARNING
To reduce the risk of serious or fatal injuries,
children must always be secured in the vehicle
with a child safety seat that is appropriate for
their body size, weight, and age.
— Children ages 12 and under must be trans-
ported using the appropriate child safety
seat. Note differences in regulations be-
tween states and countries.
— Child safety seats secured incorrectly in the
vehicle may cause serious or fatal injuries in
the event of an accident. Always secure the
child safety seat according to the manufac-
turer instructions.
— Children or babies must not under any cir-
cumstances be held on the lap of the driver
or other passengers while driving.
— Do not secure more than one child in a child
safety seat.
— Never allow a child to sit in a child safety
seat unsupervised.
— Never allow children to ride unsecured in the
vehicle or to stand or kneel on the seats
while driving. In the event of an accident, a
child could be propelled through the vehicle.
This can cause serious or fatal injuries for
the child and passengers.
— If children use an incorrect seating position
while driving, they have a higher risk of
Page 95 of 304
8W1012721BC
Warm and cold
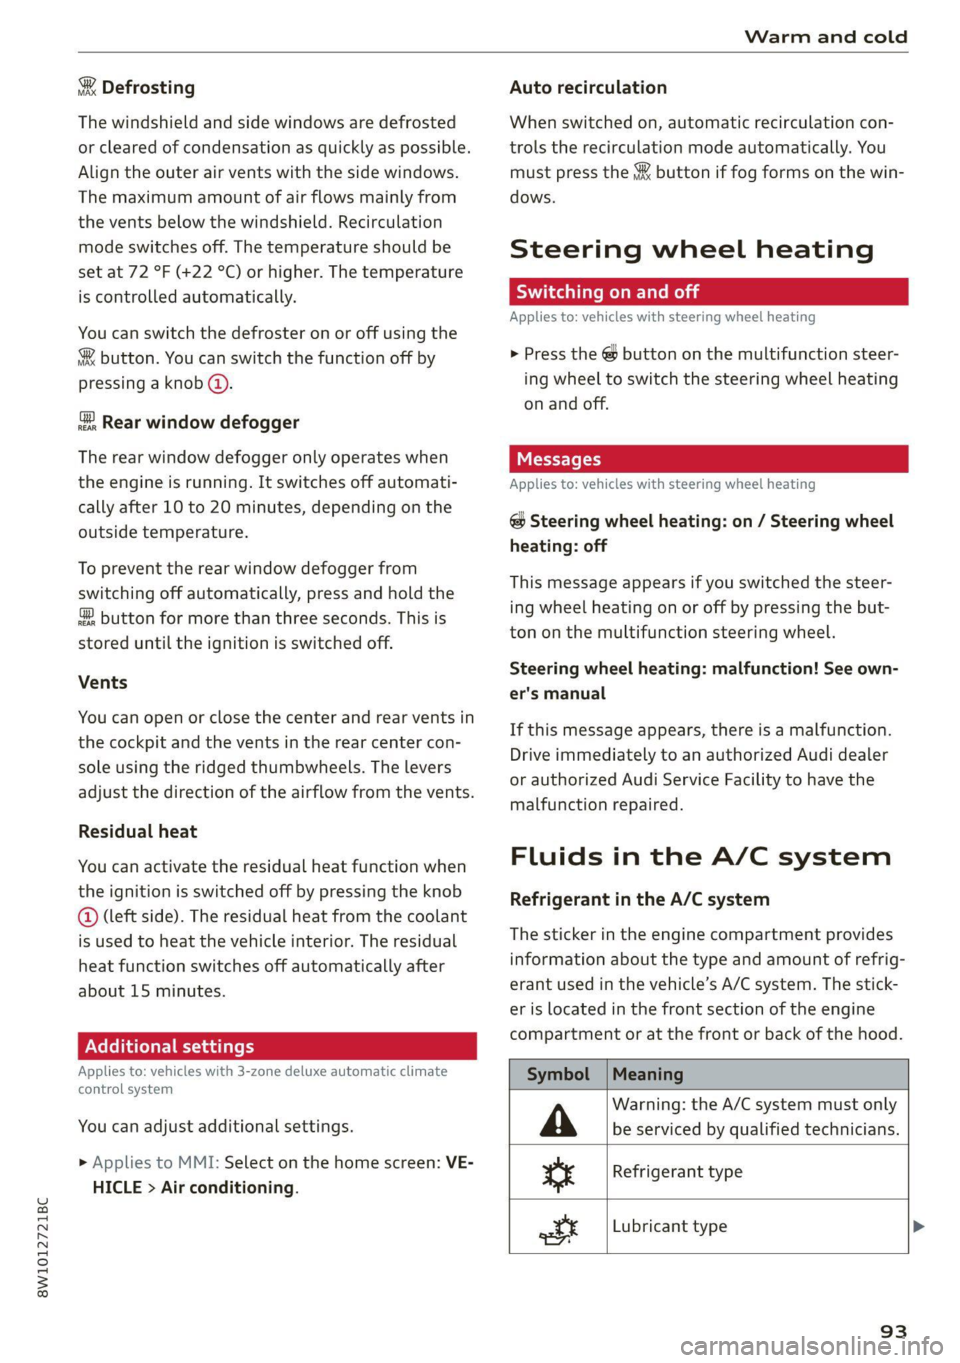
& Defrosting
The windshield and side windows are defrosted
or cleared of condensation as quickly as possible.
Align the outer air vents with the side windows.
The maximum amount of air flows mainly from
the vents below the windshield. Recirculation
mode switches off. The temperature should be
set at 72 °F (+22 °C) or higher. The temperature
is controlled automatically.
You can switch the defroster on or off using the
X& button. You can switch the function off by
pressing a knob (4).
@ Rear window defogger
The rear window defogger only operates when
the engine is running. It switches off automati-
cally after 10 to 20 minutes, depending on the
outside temperature.
To prevent the rear window defogger from
switching off automatically, press and hold the
® button for more than three seconds. This is
stored until the ignition is switched off.
Vents
You can open or close the center and rear vents in
the cockpit and the vents in the rear center con-
sole using the ridged thumbwheels. The levers
adjust the direction of the airflow from the vents.
Residual heat
You can activate the residual heat function when
the ignition is switched off by pressing the knob
@ (left side). The residual heat from the coolant
is used to heat the vehicle interior. The residual
heat function switches off automatically after
about 15 minutes.
Additional settings
Applies to: vehicles with 3-zone deluxe automatic climate
control system
You can adjust additional settings.
> Applies to MMI: Select on the home screen: VE-
HICLE > Air conditioning.
Auto recirculation
When switched on, automatic recirculation con-
trols the recirculation mode automatically. You
must press the && button if fog forms on the win-
dows.
Steering wheel heating
Sica Lie mola
Applies to: vehicles with steering wheel heating
> Press the @ button on the multifunction steer-
ing wheel to switch the steering wheel heating
on and off.
Applies to: vehicles with steering wheel heating
@ Steering wheel heating: on / Steering wheel
heating: off
This message appears if you switched the steer-
ing wheel heating on or off by pressing the but-
ton on the multifunction steering wheel.
Steering wheel heating: malfunction! See own-
er's manual
If this message appears, there is a malfunction.
Drive immediately to an authorized Audi dealer
or authorized Audi Service Facility to have the
malfunction repaired.
Fluids in the A/C system
Refrigerant in the A/C system
The sticker in the engine compartment provides
information about the type and amount of refrig-
erant used in the vehicle’s A/C system. The stick-
er is located in the front section of the engine
compartment or at the front or back of the hood.
Symbol
A
ss
at
Meaning
Warning: the A/C system must only
be serviced by qualified technicians.
Refrigerant type
Lubricant type >
93
Page 99 of 304
8W1012721BC
Driving
do not inadvertently press the accelerator
pedal and always shift into “P” when the ve-
hicle is stopped.
— If you leave the vehicle, switch the ignition
off and take the key with you. This is espe-
cially important when leaving persons or an-
imals in the vehicle. Otherwise, the vehicle
could start unintentionally, the parking
brake could release, or electronic equipment
could activate, which increases the risk of an
accident.
— No persons or animals should be left in a
locked vehicle. Locked doors make it more
difficult for emergency workers to enter the
vehicle, which puts lives at risk.
— If you do not begin driving immediately af-
ter releasing the brake pedal, your vehicle
may begin to roll backward. Press the brake
pedal
or set the parking brake immediately.
@) Note
If you have to stop on an incline, always press
the brake pedal to hold the vehicle in place to
reduce the risk of the vehicle rolling back-
ward. Do not try to hold the vehicle in place
by pressing and holding the accelerator pedal.
The transmission can overheat, which increas-
es the risk of damage.
Hill hold assist
If you take your foot off of the brake pedal when
driving on hills, the braking force will be held for
several seconds. At that time, you can start driv-
ing without the vehicle rolling backward.
Requirement: the driver's door must be closed,
the engine must be on, and the vehicle must be
traveling uphill.
> To activate hill hold assist, press and hold the
brake pedal for several seconds while the vehi-
cle is stationary.
ZA WARNING
— If you do not begin driving immediately af-
ter releasing the brake pedal, your vehicle
may begin to roll backward. Press the brake
pedal or set the parking brake immediately.
— The hill hold assist cannot hold the vehicle
on inclines in every scenario (for example,
on slippery or icy ground).
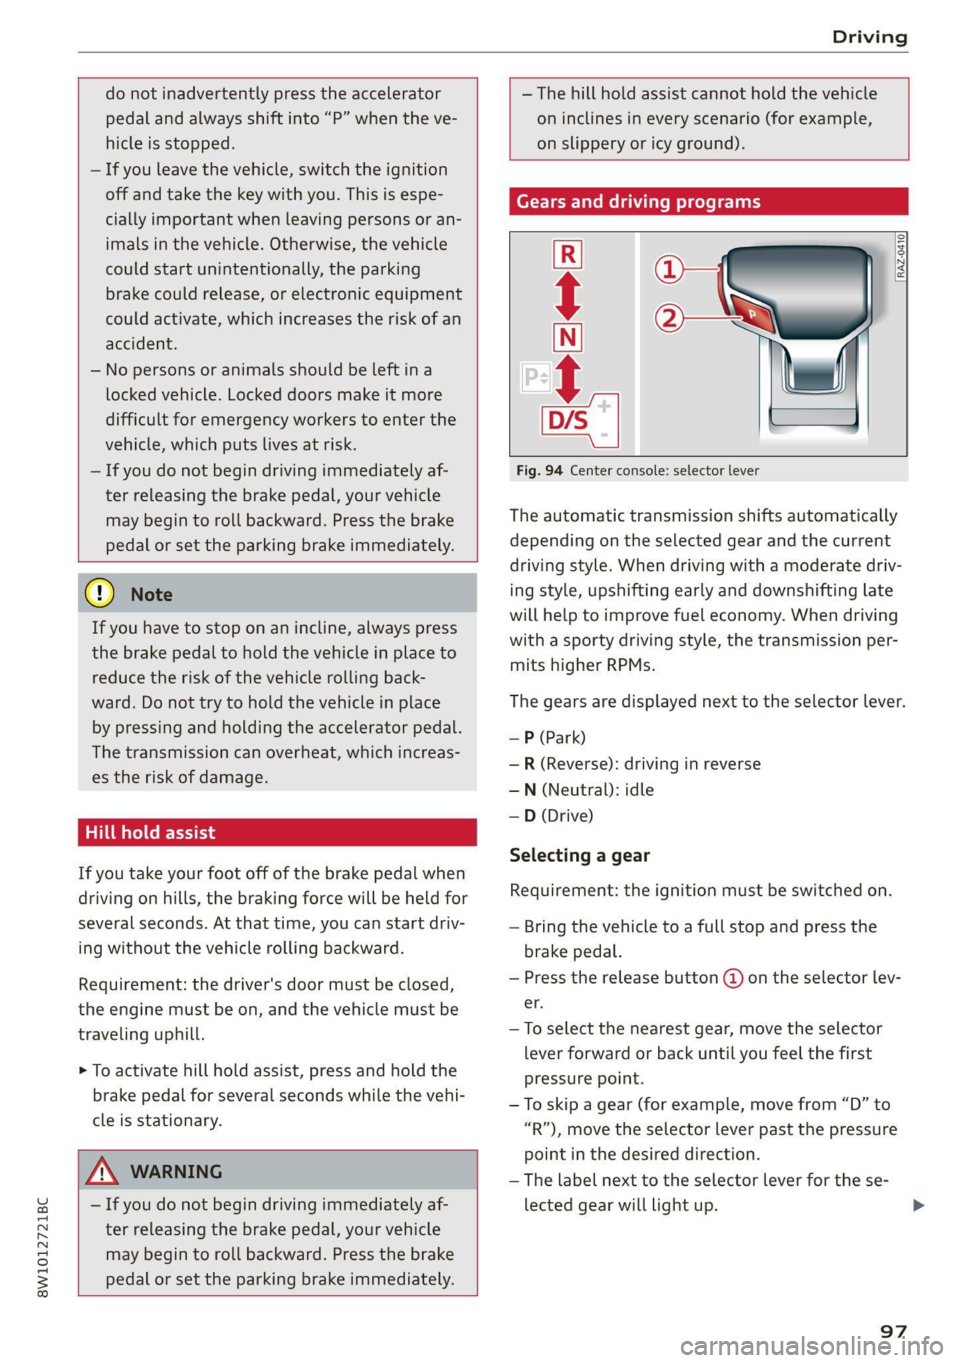
Gears and driving programs
(y—
(2—*
RAZ-0410:
R
N
i
D/S
~~ NEI
Fig. 94 Center console: selector lever
The automatic transmission shifts automatically
depending on the selected gear and the current
driving style. When driving with a moderate driv-
ing style, upshifting early and downshifting late
will help to improve fuel economy. When driving
with a sporty driving style, the transmission per-
mits higher RPMs.
The gears are displayed next to the selector lever.
— P (Park)
—R (Reverse): driving in reverse
—N (Neutral): idle
—D (Drive)
Selecting a gear
Requirement: the ignition must be switched on.
— Bring the vehicle to a full stop and press the
brake pedal.
— Press the release button () on the selector lev-
er.
—To select the nearest gear, move the selector
lever forward or back until you feel the first
pressure point.
—To skip a gear (for example, move from “D” to
“R”), move the selector lever past the pressure
point in the desired direction.
—The label next to the selector lever for the se-
lected gear will light up.
97
Page 100 of 304
Driving
“N” (Neutral) gear
In the “N” gear, power is not transmitted to the
driving wheels. Use the “N” gear in a car wash
(with conveyor belts), for example.
If you unintentionally select “N” while driving
(faster than 1 mph (2 km/h)), you can also shift
back to “D” without pressing the brake pedal.
For safety reasons, the vehicle cannot be locked
when the transmission is in the "N” gear.
“Pp” (Park) gear
Requirement: the ignition must be switched on.
The vehicle is secured from rolling away by the
parking lock when in the “P” gear.
— Bring the vehicle to a full stop and press the
brake pedal.
— Press the “P” button @) on the selector lever.
— The “P” next to the selector lever will light up.
“P” engages automatically if you switch the en-
gine off while the “D” or “R” gear is selected. If
you switch the engine off in “N”, “P” will engage
automatically after approximately 30 minutes.
If you want to switch from “P” to “D” or “R”, the
engine must be running.
If you cannot shift out of “P”, for example be-
cause the vehicle has no power, you may need to
use the emergency release for the parking lock
=> page 100.
Selecting a driving program
Various driving programs can be selected when in
the “D” gear. The programs influence when the
transmission shifts and how the accelerator ped-
al responds.
The selected driving program is displayed in the
instrument cluster.
—D (Drive): normal driving mode
— S (Sport): sporty driving mode
If you select the Dynamic mode in Audi drive se-
lect*, the “S” driving program will be activated.
When the ignition is switched off, the driving pro-
gram may be reset to “D”.
98
To switch between the current driving program
and “S”, push the selector lever toward the rear.
ZA WARNING
— Before you start driving, check if the label
for the desired selector lever position next
to the selector lever is lit up.
— Secure the vehicle against rolling before ex-
iting the vehicle > page 96.
— Power is still transmitted to the wheels
when the engine is running at idle. To pre-
vent the vehicle from “creeping”, you must
keep your foot on the brake in all selector
lever positions (except "P" and "N") when
the engine is running.
— To reduce the risk of an accident, do not
press the accelerator pedal when changing
gears if the vehicle is stationary and the en-
gine is running.
— Never select the “R" or "P” gears while driv-
ing. Doing so could cause an accident.
— The vehicle can roll even if the ignition is
switched off.
@) Tips
If you shift between “D” and “R” within one
second, you do not need to press the brake
pedal. This makes it possible to “rock” if it is
stuck, for example.
Page 104 of 304
Driving
ient and environmentally-friendly
9g
Your driving style greatly influences the amount
of fuel and energy consumed, the environmental
impact, and the wear on the engine, brakes, and
tires. Note the following information for efficient
and environmentally-conscious driving:
— Turn off electrical equipment that is not need-
ed, for example seat heating*.
— Anticipate upcoming traffic situations while
driving to avoid unnecessary acceleration and
braking.
— Avoid driving at high speeds.
— Avoid adding extra weight to the vehicle if pos-
sible, for example by not leaving roof racks or
bike racks installed when they are not needed.
— Make sure the tire pressure is correct.
— Have maintenance performed regularly on the
vehicle.
— Do not let the engine run while the vehicle
parked.
— Do not drive with winter tires during the summ-
er.
— Use the Start/Stop system.
— Utilize the engine braking effect.
— Avoid driving short distances when possible.
@® Tips
The amount of noise produced by the vehicle
can increase significantly when driving with a
sporty style. Show respect to others around
you and the environment with the way you op-
erate your vehicle, especially at night.
ME ey
Your vehicle is equipped with an intelligent ener-
gy management system for distributing electrici-
ty. This significantly improves the starting ability
and increases the vehicle battery life.
@) Tips
— If you drive short distances frequently, the
vehicle battery may not charge enough
while driving. As a result, convenience func-
tions for electrical equipment may be tem-
porarily unavailable.
102
— The vehicle battery will gradually drain if
the vehicle is not driven for long periods of
time, or if electrical equipment is used
when the engine is not running. To ensure
that the vehicle can still be started, the
electrical equipment will be limited or
switched off.
I Cr Te (1
B Drive system: malfunction! Safely stop vehi-
cle
There is a malfunction in the drive system. The
brake
booster and the power steering may stop
working. Stop the vehicle immediately or as soon
as possible and do not continue driving. Secure
the vehicle against rolling before exiting the vehi-
cle > page 96. Have the problem corrected by an
authorized Audi dealer or authorized Audi Service
Facility.
B Drive system: malfunction! Please contact
Service
There is a malfunction in the drive system. Drive
slowly to an authorized Audi dealer or authorized
Audi Service Facility to have the malfunction cor-
rected.
Start/Stop system
Applies to: vehicles with Start/Stop system
The Start/Stop system can help increase fuel
economy and reduce CO2 emissions.
In Start/Stop mode, the engine shuts off auto-
matically when stopped, for example at a traffic
light. If certain conditions are met, the engine
may stop before the vehicle has come to a com-
plete stop. If you press the accelerator pedal
when this happens, the engine will start and driv-
ing power will be transmitted.
The ignition and important assist systems such
as the brake booster will remain available during
the Stop phase. The engine will restart automati-
cally when needed.
The Start/Stop system is automatically activated
once the ignition is switched on.
Page 105 of 304
8W1012721BC
Driving
Switching the Start/Stop system off and on
The )* button is located above the selector lev-
er in the center console. The LED in the button
turns on when the function is switched off.
> Press (A)°* to switch the system on or off.
If you switch the system off during a Stop phase,
the engine will start again automatically.
Basic requirements
— The driver’s door and the hood must be closed
and the driver’s safety belt must be fastened.
—"P","N", or "D" must be engaged.
—The steering wheel must not be turned far in ei-
ther direction.
— The vehicle must have driven faster than 2 mph
(3 km/h) since the last time it stopped.
— The vehicle is not in trailer mode.
@ Note
Always switch the Start/Stop system off when
driving through water > page 103.
@ Tips
— Depending on the driving situation, the en-
gine may already stop when coasting before
the vehicle has come to a complete stop.
— If you select the "D" position after shifting
into reverse, the vehicle must be driven fast-
er than 6 mph (10 km/h) in order for the
Start/Stop system to become active again.
This makes it possible to maneuver without
stopping the engine.
Stopping and starting the engine
Applies to: vehicles with Start/Stop system
> Press and hold the brake pedal until the vehicle
has stopped. The @] indicator light appears in
the instrument cluster once the engine stops
automatically.
> The engine starts again when you remove your
foot from the brake pedal. The indicator light
turns off.
If the parking brake is set, the engine will only
start again when the accelerator pedal is pressed.
@) Tips
— Press the brake pedal during a Stop phase
to keep the vehicle from rolling.
— The ignition will turn off if you press the
START ENGINE STOP] button during a Stop
phase.
— If you leave the vehicle briefly during a Stop
phase and then enter again, the driver's
door must be closed and the safety belt
must be fastened in order for the engine to
be able to restart.
— You can control if the engine will stop or not
by reducing or increasing the amount of
force you use to press the brake pedal. For
example, if you only lightly press on the
brake pedal in stop-and-go traffic or when
turning, the engine will not switch off when
the vehicle is stationary. If you press the
brake pedal harder, the engine will switch
off.
Starting and stopping the engine automat-
ically
Applies to: vehicles with Start/Stop system
The system checks if certain conditions are met
before and during the Stop phase, and deter-
mines if the engine stops and how long it re-
mains stopped. For example, if power usage is
high, the engine will not be stopped. Along with
other conditions, the following factors influence
the automatic engine start or stop:
— Environmental conditions (slopes, inclines, ele-
vation, temperature)
— Battery (charge status, temperature, power us-
age)
— Engine temperature
— Assist systems
— Driving behavior
Depending on the engine, the Gy indicator light
may appear if the engine is not stopped.
Applies to: vehicles with Start/Stop system
Drive system: please start the vehicle manually >
103