ESP AUDI A4 2021 Owner´s Manual
[x] Cancel search | Manufacturer: AUDI, Model Year: 2021, Model line: A4, Model: AUDI A4 2021Pages: 304, PDF Size: 107.89 MB
Page 7 of 304
8W1012721BC
About this Owner's Manual
In this manual, Audi provides important informa-
tion, tips, suggestions, and warnings for using
your vehicle. “Audi” refers to AUDI AG, the re-
spective importer in a country, as well as joint
ventures.
It has always been Audi's policy to continuously
improve its products. Audi reserves the right to
make changes in design and specifications, and
to make additions or improvements in its prod-
ucts without incurring any obligation to install
them on products previously manufactured. This
owner's manual is based on the current data
available when it was printed. Text, illustrations,
and specifications in this owner's manual are
based on the most current information available
at the time of printing, and shall not constitute a
basis for liability claims.
KEEP THIS GUIDE
Keep this manual and any other applicable docu-
ments in your vehicle at all times. This is espe-
cially important if you loan your vehicle to others
or sell it.
This owner's manual describes the equipment
range for all model versions of this vehicle at the
time of printing. Individual equipment options
described may only be available at a later date or
may only be offered in certain countries.
Some sections in this manual do not apply to all
vehicles. When this is the case, the beginning of
the section indicates the validity, for example
“Applies to: vehicles with speed warning sys-
tem”. Optional or vehicle-specific equipment is
ugn also identified with an asterisk “*”.
The illustrations in this manual are a guide.
Some of the details in your vehicle may differ
from the illustration.
All directions, such as “Left”, “right”, “front” and
“rear”, are based on the vehicle's direction of
travel.
* — Optional equipment or vehicle-specific equip-
ment
b> The section continues on the next page.
=> A\ Cross reference to a “WARNING” within a
section. If a page number is indicated, the
WARNING is located outside of the section.
IN WARNING
Text with this symbol contains information
about safety and how to reduce the risk of se-
rious personal injury or death.
C) Note
Text with this symbol contains information
about reducing the risk of damage to your ve-
hicle.
(@) For the sake of the environment
Text with this symbol contains information on
protecting the environment.
G) Tips
Text with this symbol contains additional use-
ful information.
Page 18 of 304
Instrument cluster
Vehicle functions
The trip computer is displayed in the first tab of
the driver information system. Additional vehicle
functions can be accessed depending on the vehi-
cle equipment.
> Press the LE] button on the multifunction steer-
ing wheel.
— On-board computer > page 16
— Lap times > page 124
— Lap statistics > page 124
— Reduced display > page 14
On-board computer
Resetting values to zero
Requirement: the Consumption, Short-term
memory, or Long-term memory display must be
selected.
> To reset the values in the respective memory to
zero, press and hold the left thumbwheel on
the multifunction steering wheel for one sec-
ond.
Depending on the vehicle equipment, you can call
up the following displays in the on-board com-
puter one at a time by turning the left thumb-
wheel on the multifunction steering wheel:
—Time and date > page 212
— Level
— Digital speedometer
— Average consumption > page 16
— Range
— Short-term memory overview
— Long-term memory overview
— Energy consumers > page 16
— Driver assistance
— Traffic sign recognition and traffic light infor-
mation
Short-term memory and long-term memory
The short-term memory collects driving informa-
tion from the time the ignition is switched on un-
til it is switched off. If you continue driving within
two hours after switching the ignition off, the
16
new values will be included when calculating the
current trip information.
Unlike the short-term memory, the long-term
memory is not erased automatically. You can se-
lect the time period for evaluating trip informa-
tion yourself.
Average consumption
The current consumption can be shown using a
bar graph. The average consumption stored in
the short-term memory is also displayed. If the
bar is green, your vehicle is saving fuel (for exam-
ple, using recuperation).
Energy consumers
The Energy consumers view lists other equip-
ment that is currently affecting fuel consump-
tion. The display shows up to three equipment
items. The equipment using the most power is
listed first. If more than three items using power
are switched on, the equipment that is currently
using the most power is displayed. A gauge also
shows the current total consumption of all other
equipment.
Gi) Tips
The date, time of day, and time and date for-
mat can be set > page 212.
Page 23 of 304
8W1012721BC
Touch display
Configuring the overview screen
> Press and hold an information tile on the over-
view screen.
> To change the position of an information tile,
press and hold it and then slide it to the desired
position.
> To replace an information tile, press Z and se-
lect the desired information tile.
> Press Done to complete the configuration.
With quick access, you can return to the home
screen and quickly switch between four menus
that can be individually configured.
Returning to the home screen or opening a
menu quickly
> Press ( or one of the four buttons.
Configuring quick access
> Press and hold a button on the home screen
display area or in the quick access bar.
> To move a button to the quick access bar, pull it
from the display area to the quick access bar.
> To adjust the placement of the buttons in the
quick access bar, pull them to the desired posi-
tion in the bar.
> Press Done to complete the configuration.
G) Tips
The position of © cannot be adjusted.
Display area
You can freely change the location of the buttons
on the home screen display area.
Configuring the display area
> Press and hold a button on the home screen
display area.
> To adjust the placement of the buttons, pull
them to the desired locations.
> Press Done to complete the configuration.
Switching between menu pages
If a menu contains multiple menu pages, B= is
displayed in the display area. The white bar
shows the location of the current menu page.
> To switch between menu pages, swipe your fin-
ger to the right or left.
Favorites
By creating favorites, you can have quick access
to various items, such as radio stations, frequent-
ly-used contacts, or vehicle settings. In the FA-
VORITES menu, the stored favorites are sorted
by topic into information tiles.
Adding a favorite
A YY button indicates if you can add a favorite,
such as a selected radio station. Depending on
the context, you may also be able to add items
without the yy button to the favorites, such as
entries ina list.
> Press YY, or
> Press and hold an item ina list.
> Press Store as favorite. The selected item will
be added as a favorite.
Using favorites
> Applies to: MMI: Select on the home screen:
FAVORITES. The stored favorites will be dis-
played.
> To access a stored favorite, press that favorite.
Stored favorites can only be deleted or config-
ured in the corresponding menu (such as RADIO).
Arranging information tiles
> Applies to: MMI: Select on the home screen:
FAVORITES.
>» Press and hold the desired information tile.
> Pull the information tile into the desired posi-
tion.
>» Press Done to confirm the configuration.
21
Page 24 of 304
Touch display
Off Of o8
Off of af
O88 OB of of
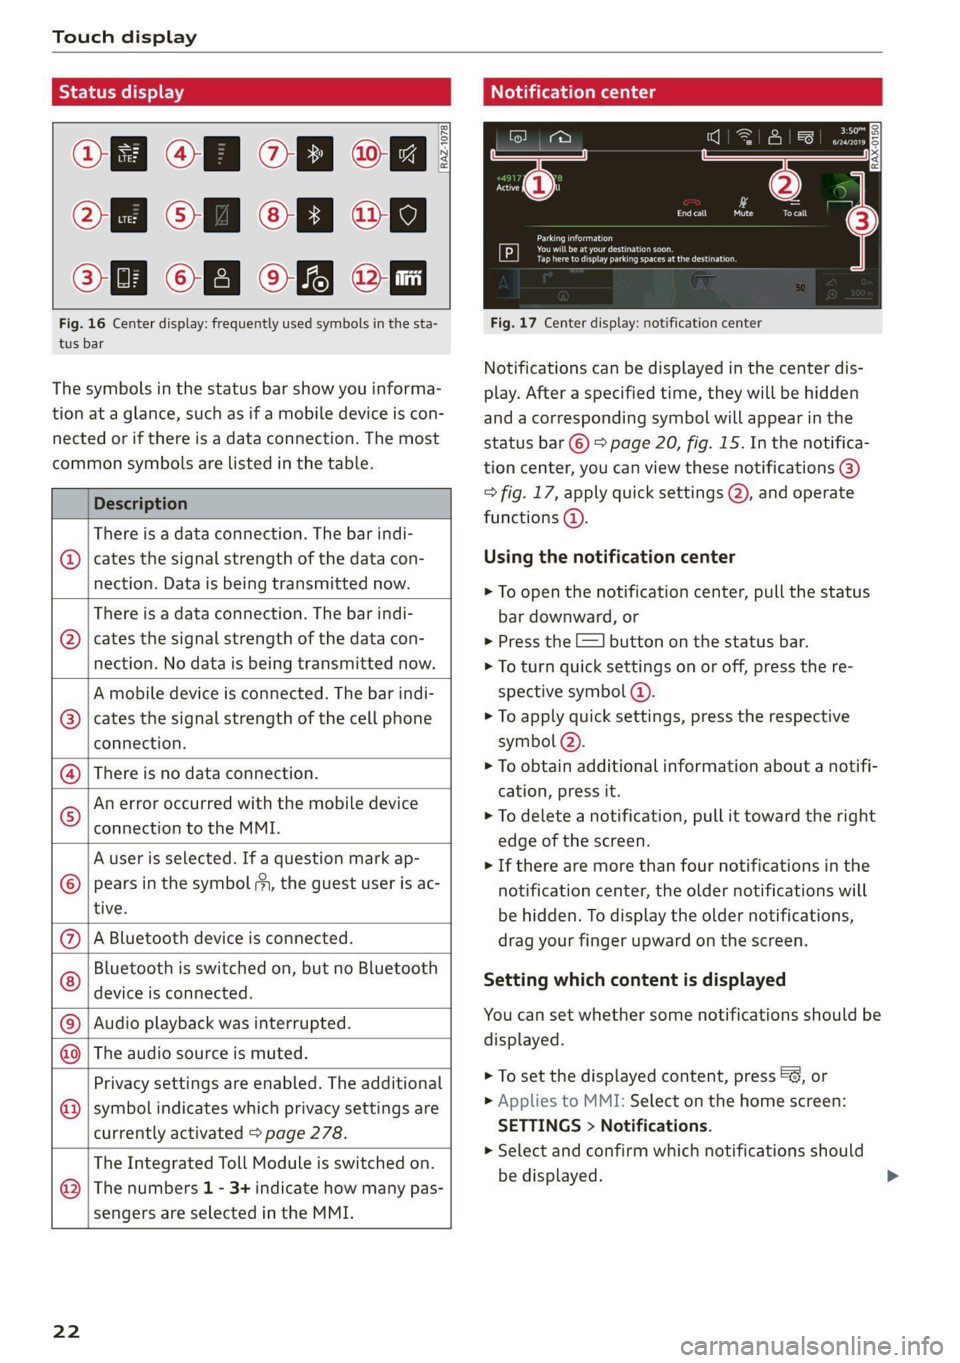
Fig. 16 Center display: frequently used symbols in the sta-
tus bar
[RAZ-1078
The symbols in the status bar show you informa-
tion at a glance, such as if a mobile device is con-
nected or if there is a data connection. The most
common symbols are listed in the table.
Description
There is a data connection. The bar indi-
@ | cates the signal strength of the data con-
nection. Data is being transmitted now.
There is a data connection. The bar indi-
cates the signal strength of the data con-
nection. No data is being transmitted now.
©
A mobile device is connected. The bar indi-
cates the signal strength of the cell phone
connection.
There is no data connection.
An error occurred with the mobile device
connection to the MMI.
A user is selected. If a question mark ap-
pears in the symbol my, the guest user is ac-
tive.
A Bluetooth device is connected.
Bluetooth is switched on, but no Bluetooth
device is connected. ©
|e;
©
|@|®|
©
Audio playback was interrupted.
NO) The audio source is muted.
Privacy settings are enabled. The additional
symbol indicates which privacy settings are
currently activated > page 278.
The Integrated Toll Module is switched on.
The numbers 1 - 3+ indicate how many pas-
sengers are selected in the MMI.
©
®
22
Notification center
Cee ay
debtors
Tap here to display parking spaces at the destination.
Fig. 17 Center display: notification center
Notifications can be displayed in the center dis-
play. After a specified time, they will be hidden
and a corresponding symbol will appear in the
status bar © > page 20, fig. 15. In the notifica-
tion center, you can view these notifications ®
> fig. 17, apply quick settings @, and operate
functions @).
Using the notification center
> To open the notification center, pull the status
bar downward, or
> Press the =] button on the status bar.
> To turn quick settings on or off, press the re-
spective symbol @).
> To apply quick settings, press the respective
symbol @).
> To obtain additional information about a notifi-
cation, press it.
> To delete a notification, pull it toward the right
edge of the screen.
> If there are more than four notifications in the
notification center, the older notifications will
be hidden. To display the older notifications,
drag your finger upward on the screen.
Setting which content is displayed
You can set whether some notifications should be
displayed.
> To set the displayed content, press &@, or
> Applies to MMI: Select on the home screen:
SETTINGS > Notifications.
> Select and confirm which notifications should
be displayed.
Page 28 of 304
Voice recognition system
Voice recognition system
General information
Applies to: vehicles with voice recognition system
You can operate many functions in the vehicle
easily using voice commands.
Using the voice recognition system optimally
> Speak clearly and distinctly at a normal volume.
Speak louder when driving faster.
> Emphasize the words in the commands evenly
and do not leave long pauses.
> Close the doors, the windows, and the sunroof*
to reduce background noise. Make sure that
passengers are not speaking when you are giv-
ing a voice command.
> Do not direct the vents toward the hands-free
microphone, which is in the roof headliner near
the front interior lights.
> Only the driver should speak to the system, be-
cause the handsfree microphone is aimed to-
ward this seating position.
ZA\ WARNING
— Direct your full attention to driving. As the
driver, you have complete responsibility for
safety in traffic. Only use the functions in
such a way that you always maintain com-
plete control over your vehicle in all traffic
situations.
— Do not use the voice recognition system in
emergencies because your voice may change
in stressful situations. The system may take
longer to dial the number or may not be
able to dial it at all. Dial the emergency
number manually.
G) Tips
There are no voice guidance* prompts when a
dialog is active.
26
Description
Operating the voice recognition system
Applies to: vehicles with voice recognition system
iS] (2) ie
>| |
STEN
Daa) re
Neer) a
Connect 5
Pre)
oy c a
ey
Cesc >
coy
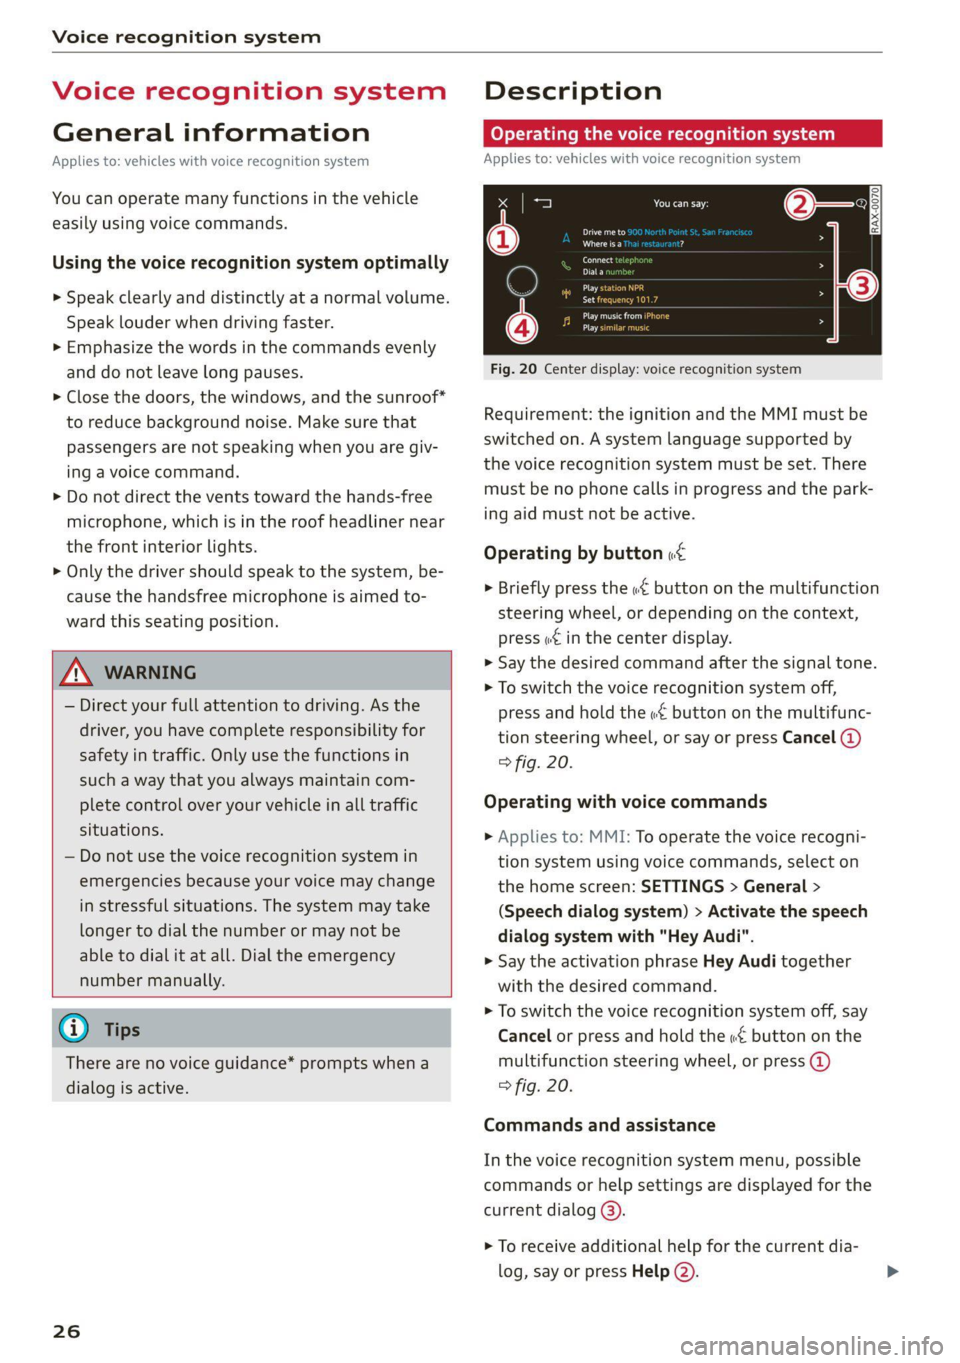
Fig. 20 Center display: voice recognition system
Requirement: the ignition and the MMI must be
switched on. A system language supported by
the voice recognition system must be set. There
must be no phone calls in progress and the park-
ing aid must not be active.
Operating by button «¢
> Briefly press the «€ button on the multifunction
steering wheel, or depending on the context,
press we in the center display.
> Say the desired command after the signal tone.
> To switch the voice recognition system off,
press and hold the «€ button on the multifunc-
tion steering wheel, or say or press Cancel (@)
> fig. 20.
Operating with voice commands
> Applies to: MMI: To operate the voice recogni-
tion system using voice commands, select on
the home screen: SETTINGS > General >
(Speech dialog system) > Activate the speech
dialog system with "Hey Audi".
> Say the activation phrase Hey Audi together
with the desired command.
> To switch the voice recognition system off, say
Cancel or press and hold the «£ button on the
multifunction steering wheel, or press @)
> fig. 20.
Commands and assistance
In the voice recognition system menu, possible
commands or help settings are displayed for the
current dialog @).
> To receive additional help for the current dia-
log, say or press Help (2).
Page 30 of 304

Voice recognition system
take any responsibility for the contents and
commands within the external voice control.
28
Page 32 of 304

Personalization
Personalization
Users
(eT e e eeu)
Applies to: vehicles with personalized user settings
Depending on vehicle equipment and your coun-
try, your vehicle may be able to manage various
users in the MMI. Each user will be assigned the
settings that they last used.
Before you begin driving, you can select a user in
the MMI and load personalized Infotainment and
vehicle settings.
Possible users in the MMI:
— myAudi user: as a myAudi user, you can use
Audi connect services that require a myAudi ac-
count. Certain settings are transferred online to
your myAudi account. If you log into your
myAudi account in another vehicle, you can
load your settings in the other vehicle.
— Local user: as a local user, you can only store
settings in the current vehicle. Your settings
cannot be transferred to other vehicles. Audi
connect services that can only be used with a
myAudi account will not be available.
— Guest: as a guest, you can store settings in the
vehicle without changing the settings for other
users. Audi recommends only using the guest
user temporarily, because settings can be over-
written by other users.
Depending on vehicle equipment, the following
options may be used to detect the active user so
that the user settings can be loaded automatical-
ly before you start driving.
— Vehicle key
Requirement: the driver's door has been opened.
The detected user must be shown in the MMI.
Confirm the user shown, select another user
= page 30, or add another user > page 30.
ZA\ WARNING
It may not be possible to load Infotainment
and vehicle settings, or they may only load
partially. The driver is always responsible for
the Infotainment and vehicle settings in order
to reduce the risk of an accident.
30
G) Tips
— Certain Infotainment and vehicle settings
(such as mirrors, last radio stations) may be
stored, depending on vehicle equipment.
You can find additional information in the
MMI. Select on the home screen: SETTINGS
> General > Legal notes > About Audi con-
nect.
— Applies to: myAudi users: The stored set-
tings can only be transferred to vehicles
that are capable of receiving the transmit-
ted information. There may be restrictions
that prevent this, particularly in other coun-
tries.
— Applies to: myAudi users: The settings can
only be transferred and loaded when there
is coverage from the applicable mobile
phone service provider.
— Applies to: myAudi users with PIN protec-
tion switched on: If the MMI displays a de-
tected user but you simply start driving or
wait without entering the 4-digit PIN, then
the guest user will be selected. Some set-
tings for the detected myAudi user will be
transferred to the guest user.
OTe le le (a4
Applies to: vehicles with user management
Opening user management
Applies to: MMI
> Press USER on the home screen.
Selecting a user
Applies to: MMI
> Press on the desired user.
> Enter the 4-digit myAudi PIN, if necessary.
Adding myAudi users
Applies to MMI and Audi connect
Requirement: you must have successfully regis-
tered at my.audi.com and have created a 4-digit
myAudi PIN.
> Press Add user.
> Press Log in now to log in with your myAudi
credentials.
> Follow the system instructions.
Page 35 of 304
8W1012721BC
Opening and closing
Opening and closing
Central locking
General information
Z\ WARNING
— If you leave the vehicle, switch the ignition
off and take the key with you. This applies
particularly when children remain in the ve-
hicle. Otherwise, children could start the ve-
hicle or operate electrical equipment (such
as power windows), which increases the risk
of an accident.
— Applies to vehicles with anti-theft alarm sys-
tem: When the vehicle is locked from the
outside, no one - especially children - should
remain in the vehicle, because the windows
can no longer open from the inside
=> page 36, Anti-theft alarm system.
Locked doors make it more difficult for
emergency workers to enter the vehicle,
which puts lives at risk.
All doors and the luggage compartment lid can
be centrally unlocked and locked at once. You can
select in the MMI if the entire vehicle or only the
driver's door should unlock when unlocking the
vehicle > page 34. The turn signals flash twice
when you unlock the vehicle and flash once when
you lock the vehicle. If they do not flash when
locking, check if all doors and lids are closed.
Depending on the vehicle equipment, you may
have different options for centrally unlocking and
locking your vehicle.
— Vehicle key > page 38
— Sensors in the door handles > page 38
— Lock cylinder in the driver's door > page 36
— Interior central locking switch > page 35
Vehicle key
The term “vehicle key” refers to the remote con-
trol key or convenience key*. The convenience
key* is a remote control key with special func-
tions > page 38 and > page 95.
Automatic locking
If you unlock the vehicle but then do not open
any of the doors, the luggage compartment, or
the hood within a short period time, the vehicle
locks again automatically. This feature prevents
the vehicle from being accidentally left unlocked
for a long period of time.
Automatic locking (Auto Lock)
The Auto Lock function locks all doors and the
luggage compartment lid once the speed has ex-
ceeded approximately 9 mph (15 km/h). The ve-
hicle will unlock again if the unlock function in
the central locking switch is pressed, the “P” gear
is engaged, or the ignition is switched off.
You can open the doors individually from the in-
side by pulling the door handle one time. To open
the rear doors individually, you must pull the
door handle twice.
In the event of a crash with airbag deployment,
the doors will also automatically unlock to allow
access to the vehicle.
Unintentionally locking yourself out
Only lock your vehicle when all of the doors and
the luggage compartment lid are closed and
there is no key in the vehicle. This reduces the
risk of locking yourself out accidentally.
The following features help to reduce the risk of
locking your vehicle key in the vehicle:
— If the driver's door is open, the vehicle cannot
be locked by pressing the & button on the re-
mote control key or by touching the locking
sensor* on a door.
— If the vehicle key that was used most recently is
inside the luggage compartment, the luggage
compartment lid will automatically open again
after it closes > ©.
— If the vehicle key that was last used is detected
inside the vehicle, then the vehicle cannot be
locked from the outside > ©.
ZA\ WARNING
Observe the safety precautions > page 33. >
33
Page 39 of 304

8W1012721BC
Opening and closing
Break-in security feature
The alarm will sound if there is a break-in at the
doors, hood, and/or luggage compartment lid.
Interior/towing protection monitor
The alarm will be triggered if there are move-
ments detected in the vehicle interior (for exam-
ple, by animals) or if there is a change in the vehi-
cle angle (for example, when the vehicle is being
towed).
You can prevent the alarm from being triggered
by deactivating the interior/towing protection
monitor.
Deactivating the interior/towing protection
monitor
There are the following options for deactivating
the interior/towing protection monitor:
> Press the & button on the vehicle key a second
time within two seconds. Or
> Applies to: vehicles with convenience key:
Touch the sensor on the door handle a second
time within two seconds. Or
> Turn the mechanical key in the door lock to the
close position a second time within two sec-
onds.
> Applies to: vehicles with MMI: Select on the
home screen: VEHICLE > Settings & Service >
Interior monitoring.
If you lock the vehicle, then the interior/towing
protection monitor will stay off until the next
time the vehicle is unlocked.
Z\ WARNING
No one, especially children, should stay in the
vehicle when it is locked from the outside, be-
cause the windows can no longer be opened
from the inside. Locked doors make it more
difficult for emergency workers to enter the
vehicle, which puts lives at risk.
@ Tips
The interior/towing protection monitoring on-
ly functions correctly when the windows and
the roof* are closed.
RAZ-0720,
Fig. 26 Your vehicle key set
@ Vehicle key
You can unlock and lock your vehicle with the ve-
hicle key.
@ Mechanical key and release buttons for
the mechanical key
A mechanical key is integrated in the vehicle key.
To remove it, press the release button and re-
move the mechanical key.
Using the mechanical key, you can:
— Applies to: vehicles with lockable glove com-
partment: locking/unlocking the glove com-
partment.
— Manually unlock and lock the doors > page 36.
— Applies to: sedan with locking backrests: Lock-
ing and unlocking the backrest > page 85.
— Unlock the luggage compartment lid using the
emergency release > page 43.
@ Key fob with vehicle code
Applies to: vehicles with Audi connect vehicle control
Open the key tag and scratch to reveal the vehicle
code. You can unlock the Audi connect vehicle
control services* for your vehicle with this vehicle
code. For additional information, see
=> page 175. If a key fob is lost, contact an au-
thorized Audi dealer or authorized Audi Service
Facility.
37
Page 42 of 304
Opening and closing
ZA\ WARNING
If batteries or coin cell batteries are swal-
lowed or enter the body in any other way, they
can cause serious or fatal injuries within a
short period of time. There is a risk of chemi-
cal burns.
— Keep vehicle keys and key fobs with batter-
ies out of the reach of children.
— Keep new or used batteries away from chil-
dren.
— If the battery compartment on a vehicle key
does not close securely, stop using the key
and keep it away from children.
— Seek medical attention immediately if you
suspect that a battery was swallowed or has
entered the body in any other way.
@ For the sake of the environment
Discharged batteries must be disposed of us-
ing
methods that will not harm the environ-
ment. Do not dispose of them in household
trash.
G) Tips
Replacement batteries for the vehicle key
must meet the same specifications as the
original battery.
Luggage compartment
lid
(ee eles)
Z\ WARNING
— Applies to vehicles with anti-theft alarm sys-
tem: When the vehicle is locked from the
outside, no one - especially children - should
remain in the vehicle, because the windows
can no longer open from the inside
= page 36. Locked doors make it more diffi-
cult for emergency workers to enter the ve-
hicle, which puts lives at risk.
— Always close and lock the luggage compart-
ment lid and the doors when the vehicle is
not in use. Otherwise someone such as a
child could enter the vehicle through the
luggage compartment and become locked
inside it. To reduce the risk of injury, do not
allow children to play in or around the vehi-
cles
—To reduce the risk of injuries by pinching,
make sure that no one is in the operating
area of the luggage compartment lid, in-
cluding the hinge areas and the upper and
lower edge of the luggage compartment lid.
—
After closing the luggage compartment lid,
make sure that it is latched. The luggage
compartment lid could open suddenly while
driving, which would increase the risk of an
accident.
— Never drive with the luggage compartment
lid ajar or open, because poisonous gases
from the surrounding area can enter the ve-
hicle interior and increase the risk of asphyx-
iation.
— If there is a luggage rack (such as a bicycle
rack) on the luggage compartment lid, the
luggage compartment lid may not open
completely under certain circumstances or it
could close by itself if open due to the extra
weight. Therefore, the open luggage com-
partment lid must be given additional sup-
port or the cargo must first be removed
from the luggage rack.
— Applies to vehicles with power-operated or
sensor-controlled luggage compartment lid:
Pay careful attention when closing the lug-
gage compartment lid. Otherwise, you could
cause serious injury to yourself or others de-
spite the pinch protection.
40
@) Note
The luggage compartment lid can bump into
objects such as the garage ceiling when open-
ing and become damaged.
@ Tips
— When the vehicle is locked, the luggage
compartment lid can be unlocked separately
by pressing the “S button twice on the vehi-
cle key. The luggage compartment lid locks
automatically when it is closed again.
— The ability to open the luggage compart-
ment lid using the handle can be deactivat-
ed or activated in the MMI > page 34. >