garage door opener AUDI A4 AVANT 2008 Owners Manual
[x] Cancel search | Manufacturer: AUDI, Model Year: 2008, Model line: A4 AVANT, Model: AUDI A4 AVANT 2008Pages: 368, PDF Size: 46.19 MB
Page 159 of 368
________________________________________________ ___:H....:..::: o:..:.m .:....:..:: e::L:.:. i.:....:n :.:..:k :..::® ::__ffllll
Homelink®
Universal radio frequency remote
control
Applies to vehicles: with Homelink® universal radio frequency remote cont ro l
How it works
The HomeLink® universal remote control can be
programmed with the hand held transmitters of the equip
ment you want to activate from inside your car.
The Homelink® system is capable of operating up to three different
remote contro lled devices from inside your vehicle using the
Homelink ® universa l radio frequency remote control.
The system lear ns t he rad io frequency codes of handheld transmit
ters used to operate garage doors, estate gates, home or outdoor
l ighting systems, and other devices 1
l.
The original handhe ld transmitters allocated to the remote
control led devices maintain their ab ility to activate these devices
and can be sti ll be used .
The Homelink® system has a nonvolati le memory, so that all
program ming will be retained after the vehicle battery has
completely discharged or been disconnected .
Before y ou can use the Homelink® universa l remote cont rol to
operate radio -frequency remote controlled devices, you wi ll first
need to program the Ho melink® transmitter.
ll Fo r the sake of readabil ity, a ga rage door opene r is always referred to in this
descr iption.
Controls and equip
ment • I I • • I
& WARNING
• Never use the Homelin kl!!I Universal Tran smitter with any
garage door opener that does have not the s afet y stop and reverse
feature a s required by federal s afety standard s. This include s any
garage door opener m odel manufa ctured before April 1 , 19 82.
• A garage door open er whi ch cannot detect an object , sign aling
the door to stop and rever se does not meet current federal s afet y
s tandard s. Using a garage door opene r without these feature s
in creases r isk of seriou s injury or de ath.
0 Note
When you program the Homelink® system, you are wel l advised to
turn off the garage door opener. A garage door opener whic h is
continuously triggered into action during programming may over
strain and damage its elect ric mot or, -an o verheated motor is a fire
hazard!
[ i ] Tips
• The Homelink® Universa l Remote Control will not affect your
equipment's current safety standard.
• The radio frequencies that are authorized for the country in
which the vehicle was sold are used. These frequencies may differ
in other countries.
• For addi tiona l informat ion cal l to ll-free 1 (800) 355 -3515 or look
up the website on the Internet for detai led instructions:
www .homelink .com •
Page 160 of 368
___ H_ o_ m_ e_L_ i_n _k_ ® __________________________________________________ _
Applies to vehicles: with Home link® univer sal rad io frequency remote contro l
Programming the HomeLink ® Universal
Remote Control
The Homelink® Universal Remote Control is programmed
in two phases: inside the vehicle at the overhead keypad
and outside the vehicle at the front bumper.
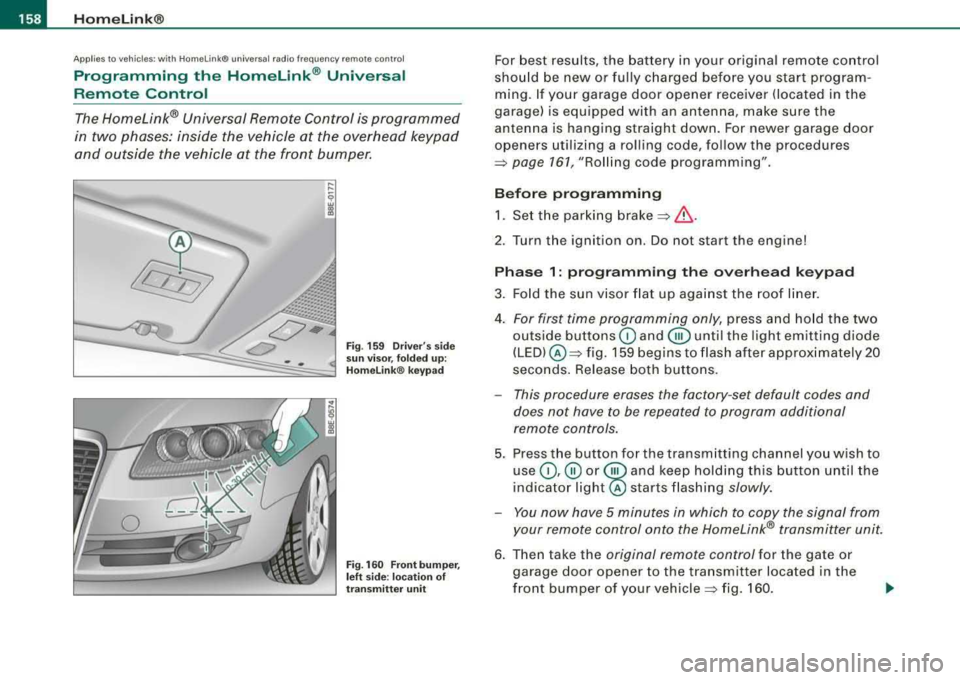
Fig . 159 Driver's side
sun visor, folded up:
Homelink ® keypad
Fig. 160 Front bumper,
left side : location of
transmitter unit
For best results, the battery in your original remote control
should be new or fully charged before you start program
ming. If your garage door opener receiver (located in the
garage) is equipped with an antenna, make sure the
antenna is hanging straight down. For newer garage door
openers utilizing a rolling code, follow the procedures
=> page 161, "Rolling code programming" .
Before programming 1. Set the parking
brake =>& .
2. Tur n the ignition on. Do not start the engine!
Phase 1: programming the overhead keypad
3. Fold the sun visor flat up against the roof liner.
4.
For first time programming only, press and hold the two
outside buttons
G) and @until the light emitting diode
(LED) @=> fig. 159 begins to flash after approximately 20
seconds. Release both buttons.
- This procedure erases the factory -set default codes and
does not have to be repeated to program additional
remote controls.
5. Press the button for the transmitting channel you wish to
use
G) ,@ or @ and keep holding this button until the
indica tor
light@ starts flashing slowly.
- You now have 5 minutes in which to copy the signal from
your remote control onto the Homelink® transmitter unit.
6. Then take the original remote control for the gate or
garage door opener to the transmitter located in the
front bumper of your
vehicle => fig. 160.
Page 161 of 368
___________________________________________________ H_ o_m_ e_ L_ i_ n _ k_ ®_~IJII
Ph ase 2:
pro gra mming th e bump er mounted transmitter
7. P oint the original remote control at the bumper below the
left
h eadlig ht => page 158, fig. 160.
8. Hold the remote control at a d istance between 0-12 in.
(0 -30 cm) to the bumper (use the shortest distance
possible).
9. Press and hold the activation button on the remote contro l (see garage door opener operating instructions)
=> page 159, "Canadian programming".
1 0 . Watch the emergency flashers on your ve hicle. Once
programming is successfu lly completed, the emergency
flashers will flash
three tim es (after about 15-60
seconds). You can now release the button on the remote
control.
-To program the two remaining buttons, repeat steps 4 to 9
with the remote control units for the devices you wish to
operate .
The required distance between the hand held transmitter and the
Homelink ® trans mitter depends on the device whose signals you
are learning . It may require several attempts at varying distances
unt il programm ing is successful.
If the 5 minute time limit is exceeded, programming will stop imme
diate ly . The
em erg ency fla sher s will flash one tim e to indicate that
this has occurred.
In this case, you wil l need to reprogram the system. Repeat the
process start ing with
Pha se 1 : programming the o verhead keypad.
If the emergency flashers do not flash three times (after about 15-
60 seconds), programming was not successful. In this case, repeat
Ph ase 2: pro gr amming the bump er mount ed tr an smitte r.
Controls and equip
ment
If programming fai ls in Ca nada, you may have to perform an alter
nate action at step 8
only => page 159, "Canadian programming" .
Perform al l other steps as described above .
& WARNING
• Fo r sa fet y re as on s never rel eas e th e parki ng br ak e o r start the
engin e while an yone i s standing in front of the v ehi cle .
• A g ara ge door or an es ta te gate m ay s ometim es be set in
motion wh en the Homelink ® univer sal remote control i s being
progr ammed . T o avo id possible i njur ies or p ropert y dama ge,
plea se alway s make ab solutely cer tain that no per son s or object s
are l ocated in the r ange of mot ion of an y eq uipm ent being oper
a ted.
0 Note
When you program the Homelink® sys tem, you are wel l advised to
turn off the garage door opener . A garage door opener which is
continuously triggered into action during programming may over
strain and damage its electric motor
-an overheated motor is a f ire
hazard!
[ i ] Tip s
As soon as the Homelink® system is programmed to work with your
garage door opener, two additiona l remote contro lled devices can
be trained on the two remaining transmitter channels. •
Applies to vehic les: with Homel in k® un iversal ra d io frequency remote control
Canadian programming
Remote con trol units for Canadian garage door openers
may require one different programming step.
Remote contro l units for Canadian garage door openers are set to
stop transmitting radio frequency signa ls after two seconds . If this .,._
Page 162 of 368
___ H_ o_m_ e_ L_ in_ k_® ____________________________________________________ _
time interval is not sufficient for the Homelink® system to learn the
radio frequency signal, perform the
alternate step 8 in Phase 2:
programming the bumper mounted transmitter:
Alternate step 8
• Press and re-press ("cycle") the activation button on your remote
control every two seconds.
Once programming is successfully completed, the emergency
flashers will flash
three times (after about 15-60 seconds). You can
now release the button on the remote control.•
Applies to vehi cles: w ith Hom eLink ® un iversal r adio frequency re mo te con tro l
Oper ating the Homelink ® universal remote
control
The Homelink® Universal Remote Control activates the
functions of your garage door opener in precisely the
same manner as the original handheld remote control
that came with the system.
... ...
9 w a,
"'
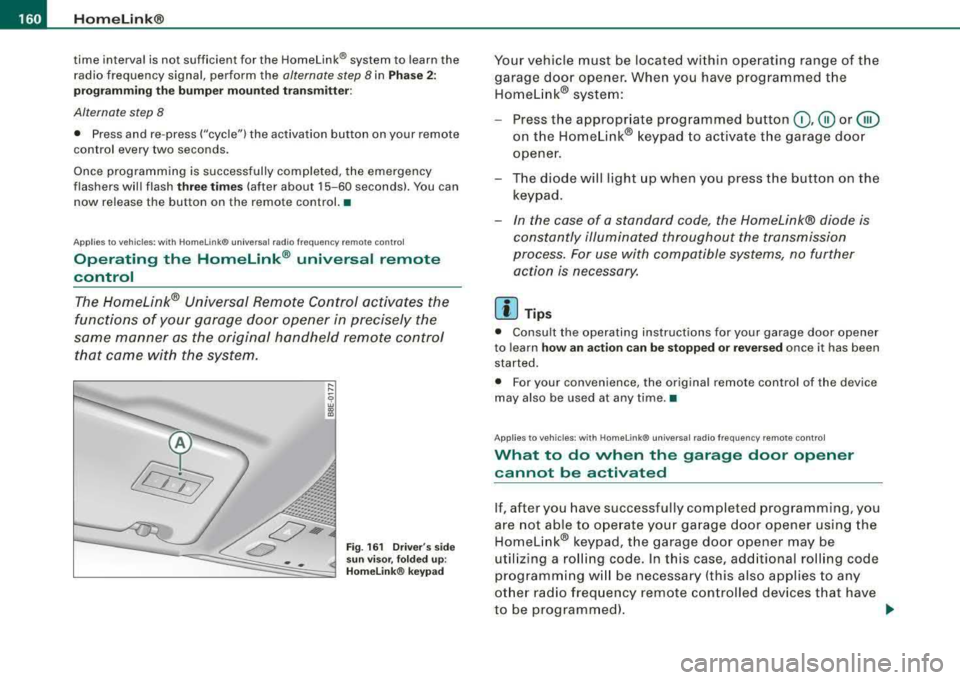
Fig. 161 Driver 's side
sun visor, folded up :
Homelink® keypad
Your vehicle must be located within operating range of the
garage door opener. When you have programmed the Homelink® system:
- Press the appropriate programmed button
0,@ or @
on the Homelink® keypad to activate the garage door
opener.
- The diode will light up when you press the button on the
keypad.
- In the case of a standard code, the Homelink® diode is
constantly illuminated throughout the transmission
process. For use with compatible systems, no further action is necessary.
[ i ] Tips
• Consult the operating instructions for your garage door opener
to learn
how an action can be stopped or reversed once it has been
started.
• For your convenience, the original remote control of the device
may also be used at any time. •
Applies to vehicles : wi th HomeLink® universal radio frequency remote cont ro l
What to do when the garage door op ener
cannot b e activat ed
If, after you have successfully completed programming, you
are not able to operate your garage door opener using the
Homelink® keypad, the garage door opener may be
utilizing a rolling code. In this case, additional rolling code
programming will be necessary (this also applies to any
other radio frequency remote controlled devices that have
to be programmed).
~
Page 163 of 368
_________________________________________________ H_ o_m _ e_L _i_n _k _® __ ftllll
Identifying a rolling code:
-Press the button for the programmed transmitter
channel again and hold it down.
- If the light emitting
diode @=> page 160 , fig. 161 first
flashes quickly and then remains lit after 2 seconds, the
garage door opener is using a rolling code.
•
A pplies to vehicle s: w it h H omelin k® u niv ers al radio fr equ enc y remot e con tro l
Rolling code programming
A rolling code is programmed in two phases: at the
garage door opener motor and inside the vehicle at the
overhead keypad.
Phase 1:
programming the garage door opener motor
1. Make sure that your vehicle is located within operat ing
range of the remote controlled garage door opener.
2. Locate the set button (teach button) on the garage door
opener motor (refer to the operating instructions for the
garage door opener).
3. Press the set button (teach button) on the garage door
opener motor.
Phase 2: programming the overhead keypad
4. Set the parking brake.
5. Turn the ignition on. Do not start the engine!
6. On the overhead keypad press the button for the previ
ously programmed transmitter channel.
7. Press this button a
second time in order to finish the
rolling code programming.
Controls and equip
ment The vehicle should be
located no further than 15 ft (5 m) from the
remote controlled garage door opener to remain within the average
signal range o f mos t remote con trolled systems.
Refer to the garage door opener operating instructions to locate the
set button (t each button) on the garage door opener motor .
After the keypad has been programmed, the g arage door opener
should recognize the radio frequency s ignal from the Homelink ®
Universal Remote Control and respond to signals from it.
[ i] Tips
Having a second person assist you makes programming of the
rolling code easier and faster . For some makes of garage door
op eners t he Homelink ® button may have to b e press ed a third time
to complete the teaching sequence. •
Applies to vehic le s: w it h Hom elink® univ ers al ra dio fr eque ncy remote c ontro l
Erasing the programming of the Homelink ®
universal remote control
When you erase the programming, the programming on
all three of the transmitter channels with be lost!
1. Set the parking brake.
2. Turn the ignition on. Do not start the engine!
3. Hold down both outside buttons
Ci) and @=> page 160,
fig. 161 simultaneously, until the diode begins to flash
(after about 20 seconds).
4. Release both buttons immediately. The programming on
all three transmitter channels is now erased.
.,_
Page 329 of 368

Fuses and bulbs -
----------------
0 Note No. Equipment Amps
• On no account should fuses be repaired (e.g. patched up with tin 13 Steering column module 10
foil or wire) as this may cause serious damage elsewhere in the elec -14 Brake lights 10
trical circuit or cause fire.
15 Instrument cluster, Navigation system 10
• If a fuse blows repeatedly, do not keep replacing it. Instead, have
the cause for the repeated short circuit or overload tracked and Garage door opener
5
fixed.
•
Level, tire pressure control, park assist,
17 light/rain sensor 10
Fuse list Automatic headlight range control, left 5
Fuses which can be replaced. 19 Fog lights, rear fog light 15
20
Not used
No. Equipment Amps
21 Not used
1 Air conditioner 10 Front doors 15
2
Footwell illumination 5 23 Rear doors 15
3 Heated washer jets 5 Central convenience electrical system 20
4 Radiator fan 5 25 Heater blower 30
5
Telephone, oil level sensor, multifunction 10 26 Rear window defogger 30
switch, rear heated Seat, shift gate
27 Socket for trailer towing (controller) 30
6
Air conditioner (air quality sensor), air pressure 5 28 Fuel pump 20 sensor
Electronic Stabilization Program (ESP), brake
29 Not used
7 light switch, clutch pedal switch, steering angle 10 Power sunroof 20
sensor Automatic transmission, mirror dimming, diag-
31 15 8 Telephone 5 nosis socket
9 Brake booster (vacuum pump) 15 Towing assembly 15
10
Automatic headlight beam adjustment, auto -5 33 Cigarette
lighter 20
matic headlight range control, right
Electrical socket 20
11
Airbag 5 35 Luggage compartment socket 20
12
Diagnosis socket 10 Windshield wiper system 30
Do -it -yourself service
Page 359 of 368

Alph ab eti ca l ind ex -
-------------=-----
Front seats
Adjusting .... .... ....... .... .... 169
Adjusting the manual seats .... .... . 96
Child restraints in the front seat .... 189
Heated seats . . . . . . . . . . . . . . . . . . . . . 132
Front seats adjustment Importance for safe driving and riding 95
Frontal c ollisions and the laws of physics ..
177
Fuel Fuel gauge ...... .... .... ... .... .. 16
Fuel consumption Average ....... .. .... .... .... ..... 40
F uel filler flap
Un locking the fuel fi ller flap by hand 271
F uel gauge .... .... .... .... .... .... .. 16
Fuel supp ly
Addi tives ... .. .... .... ...... ... .. 267
Blended gasol ine ... .. .... ... .... . 267 Fuse arrangement
............. .... .. 327
G
Garage door opener ... .... .... .... .. 157
Gas discha rge lamps .. ...... .... ... . 328
Gauges Engine coolant temperature ......... 13
Fuel gauge .. ....... .... .... ...... 16
Speedometer ... .. .... .... .... ... . 15
Tachome te r .. ... .... .... .... .... . 13
Tr ip odometer .. ...... .... .... ... . 15
Gearsh ift lever .... .. ... .. .... .... ... 142
Genera l il lustration
Instruments and controls .. .... ..... 11
Generator Warning/ind ica tor lights ...... .... .. 22
G lossary of tire and loading term inology ...
29 4
Fuel fi ller neck ... .... .... ...... .. 268 G love compartment ... .. .... .... .... 122
Fuel gauge ...... .... .... ... .... .. 16 Light .... .... .... .... .... .... ... . 81
Fuel tank capacity ............. 16,268 Gross Veh ic le Weight Rating (GVWR) ... 341
Gaso line .. ....... .... .... ....... 267
Gaso line additives ................ 268
H
Instantaneous fuel consumption ..... 41
Octane rating .................... 267 Head restraints ..
.... .... .... ....... 171
Recommendation .... .... ..... .. . 267 Adjusting
....... ... .. .... .... ... 171
Re fuel ling ....................... 269 Rear seats
.......... ...... .... ... 106
Un locking the fuel fi ller flap by hand 271 Headl
ight
Fuel supp ly too low .. .... .... .... .... . 34 Defective .....
........ ............ 35
Fue l tank Headlight
range co ntr ol
Capacity ... .. .... .... ... .... .... 268 de
fective ..... ... .... .... .... .... . 34
Capacity (ga llons/l it res) .. ...... .... 1 6 Headlight washer reservoir ........... 291 Headlights
.. ... .... ... .. ...... .... .. 72
Adaptive light .. .... ............. .. 75
Front fog l ig hts .................... 76
Switching off ..................... 72
Switching on .......... ........ .... 72
Washer system . ....... ... .... .... . 87
Heated rear seats ...... .... .... .... ... .. 133
Heated outside mirrors ... .... .... ..... 91
Heated seats rear . ... .. .... .... ... .... ..... .. 1 33
Heated washer jets Wiper and washer system ........... 85
Heavy cl othing and safety belts .. ...... 1 80
High beam ....... ........ ....... . 72, 80
Warning/ind icator lights ........ .... 23
High vo ltage warning label ........... 340
Ho melink® U niversal Rad io- Frequency Re-
mote Contro l .. .. .... ...... .... . 157
Hood Opening ...... .... ... .... .... ... 272
Release lever ....... ... .... .... ... 272
Hor n ... .... .... .... .... ... .... .... . 1 1
How many airbags does my vehicle have? ..
19 4
How often shou ld I check my tire pressures?
300
How safety be lt tensioners work ....... 185
How to increase the loading surface .. . 104
Hydroplaning ..... ... .... .... ...... . 30 4
Controls and equip
ment Safety first Vehicle operation
Vehicle care Do-it-yourself service Technical data