engine AUDI A4 CABRIOLET 2009 Owner's Manual
[x] Cancel search | Manufacturer: AUDI, Model Year: 2009, Model line: A4 CABRIOLET, Model: AUDI A4 CABRIOLET 2009Pages: 340, PDF Size: 77.32 MB
Page 51 of 340
Master key battery replacement
Each master key contains a battery housed under the
cover.
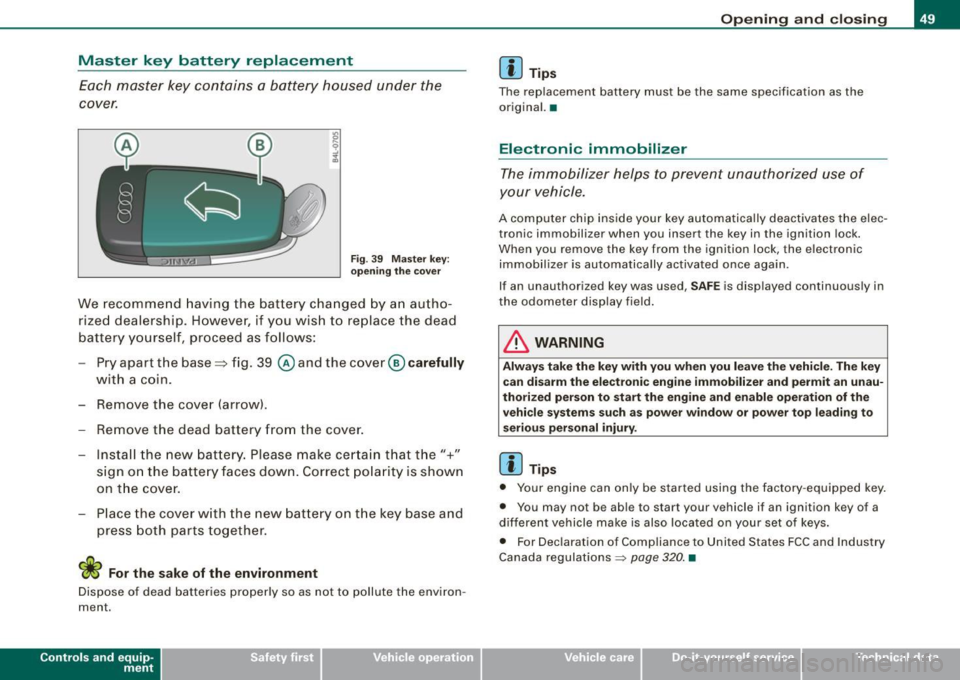
Fig. 39 Master key:
opening the cover
We recommend having the battery changed by an autho
rized dealership. However, if you wish to replace the dead
battery yourself, proceed as follows:
- Pry apart the base=> fig. 39
@ and the cover @carefully
with a coin.
- Remove the cover (arrow).
- Remove the dead battery from the cover.
- Install the new battery. Please make certain that the"+"
sign on the battery faces down. Correct polarity is shown
on the cover.
- Place the cover with the new battery on the key base and
press both parts together.
W For the sake of the environment
Dispose of dead batteries properly so as not to pollute the environ
ment.
Contro ls and eq uip
ment
Opening and closing
[ i] Tips
The replacement battery must be the same specification as the
original. •
Electronic immobilizer
The immobilizer helps to prevent unauthorized use of
your vehicle.
A computer chip inside your key automatically deactivates the elec
tronic immobilizer when you insert the key in the ignition lock.
When you remove the key from the ignition lock, the electronic
immobilizer is automatically activated once again.
If an unauthorized key was used,
SAFE is displayed continuously in
the odometer display field.
in. WARNING
Always take the key with you when you leave the vehicle. The key
can disarm the electronic engine immobilizer and permit an unau
thorized person to start the engine and enable operation of the
vehicle systems such as power window or power top leading to
serious personal injury.
[ i] Tips
• Your engine can only be started using the factory -equipped key.
• You may not be able to start your vehicle if an ignition key of a
different vehicle make is also located on your set of keys.
• For Declaration of Compliance to United States FCC and Industry
Canada regulations
~ page 320. •
~ehicle care irechnical data
Page 53 of 340
& WARNING (co ntin u ed)
• Do n ot l ea ve c hildr en i ns ide th e vehicle un sup erv is ed. In an
e m erg en cy it w ould be impo ssible to op en the door s from the
out side without the key.
[ i ] Tip s
• In the event of a crash with airbag deployment all locked doors
wi ll be automat ically unlocked to give access to the vehicle occu
pants from the outside.
• If the power locking system should fail, you can st ill open the
fue l tank flap in an emergency~
page 248.
• You are we ll advised not to keep va luables inside an unattended
vehic le, visible or not. Even a properly locked vehicle cannot provide
the security of a safe! •
Keyless entry remote control
General description
The remote controls allows you to:
• lock or un lock the vehicle
• selective ly un lock the rear lid.
The turn signals wi ll flash briefly whenever you lock or unlock the
vehic le . Also, the interior light will come on or go off whenever you
open or c lose the driver's door.
The transmitter and battery are located in the head of the remote
control. The receiver is located inside the vehicle. The maximum
effective range depends on severa l things. Remember, if the battery
is weak, the effective range decreases .
The remote -control key contains a fo ld-ou t key that you can use to
manual ly lock or unlock the vehicle and to start the engine .
Controls and eq uip
ment
Op enin g and clo sing
If you need to replace the remote control, or if you need to have it
repaired, you must see your authorized Audi dealer. Only then can
you use the key again. •
Unlocking and locking the vehicle with the
remote control
How the remote control works.
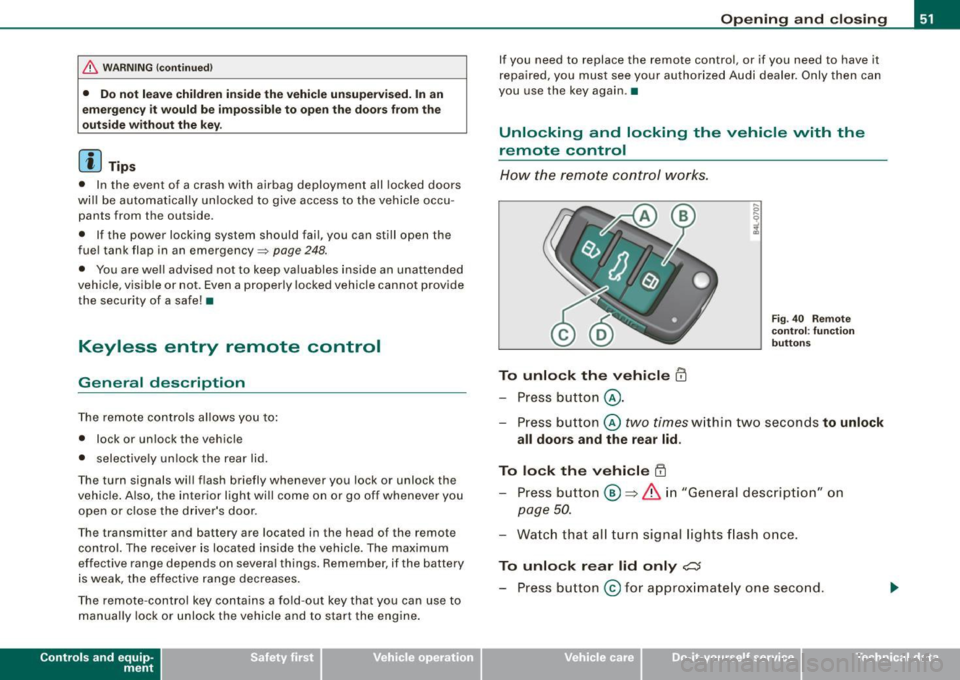
To unlock the v ehicle m
- Press button @.
Fig. 40 Remo te
co ntr ol: fu nctio n
b utt ons
- Press button @two times within two seconds to unlock
all doors and the rear lid .
To lock the vehicle [II
-Press bu tton @ => &, in "Gener al descri ption" on
page 50.
- Watch that all turn signal lights flash once.
To unlo ck r ear lid only ,c::;
- Press button @for approx imate ly one second.
~ehicle care Technical data
Page 54 of 340

Opening and clos ing
PANIC Button
- Push the red button@to activate the panic function. The
horn sounds and the turn signals flash.
- Push the button® again to deactivate the panic f unc
tion.
& WARNING
R ead a nd fo llo w all W ARNING S => & in "Ge nera l desc ription " on
page 50.
[ i ] Tips
• In order to make sure the locking function is working, you should
always keep your eye on the vehicle to make sure it is properly
locked.
• Do not use the remote control if you are inside the car, otherwise
you may unintentionally lock the vehic le, and then you would set off
the anti-theft alarm when you try to start the engine or open a door.
In case this happens anyhow, push the unlock button@.
• Use the panic function only if you are in an emergency
situation .•
R ese tting the remote control
The remote c ontr ol must be reset if the vehicle does not
unlock .
0
Fig . 4 1 Ign itio n l ock
p os it ions
- If the ve hicle is locked, o pen the driver's door with the
mechanical key i n your remote con tro l.
- Press the unlock button
III on the remote control.
- Insert the key into the ign ition lock
CD => fig. 4 1 and turn
it to position
0 to turn the ignition on .
Turn the key back to position
CD to t urn the ig nition off
agai n.
- Pu ll the key out of t he ig nition loc k.
- Press e it her the lock-1'.D or the unlock
III button to
com plete the reset sequence .
0 Note
Do not turn the key to position 0 for resetting as this will start the
engine and may put the car in motion .•
Page 59 of 340
To unlock r ear lid
- Pu ll the switch c:::::5 ~ page 56, fig. 48 in the driver's door.
To open re ar lid
- Raise the rear lid.
The remote rear lid re lease is deactivated automatically if you lock
the rear lid using the key . This enables the driver to lock the luggage
compartment permanently with the key and prevent unwanted
access to the trunk .•
Anti-theft alarm system
Description
The anti-theft alarm triggers an alarm if anyone attempts
to break into the vehicle.
The anti -theft a larm system triggers an audible alarm and turns on
the emergency flasher if an unauthorized interference with the
veh ic le is sensed by the system.
How i s the anti -theft alarm syste m switched on ?
The anti-theft alarm system is switched on when you lock the
driver's door manually using your key, o r when you use the remote
control. The system is activated approx imately 30 seconds after the
vehic le is locked. The indicator light on top of the door trim start
fl ashing rapid ly for 30 seconds and then b link slowly.
How i s the anti -theft al arm syst em switch ed off ?
The anti-theft alarm system is switched off only when you use the
remote contro l to unlock your vehicle . If you do not open a door
with in 60 seconds after you have unlocked with the remote control,
the vehic le will lock itself again automatica lly.
Controls and equip
ment
Op ening and clo sing
If you lock just the driver's door using your key, the front
passenger's door, the rear and the fuel f iller flap remain locked.
If you use the vehicle key to unlock the driver's door, the other
doors, the rear lid and the fuel tank flap will remain locked . The
a larm system will not be deactivated unless you insert the key in the
ignition switch within 15 seconds and turn on the ignition. If you fai l
to do this, the a lar m wi ll sound.
When will the anti theft alarm system be triggered?
When the vehic le is locked, the a larm system monitors and protects
the following parts of the vehic le:
• engine compar tment
• luggage compartment
• doors
• vehic le incline
• ignition
• factory installed radio.
When the system is activated, the alarm will be triggered if one of
the doors, the engine hood or the rear lid are opened, or if the igni
tion is turned on or the radio removed or if the vehicle incline has
been changed.
The ant i-theft alarm system will also go off when you unlock the rear
lid with your key and open it. The alarm is switched off again when
you close the rear lid.
The anti-theft alarm system will also go off when the battery is d isconnected.
You can also trigge r the alarm by pressing the PANIC button on your
remote control. This will alert other people in case of emergency.
Press the
PANI C button again to turn off the a larm. .,_
Page 60 of 340
Openin g and clo sin g
How is th e a nti-th eft ala rm switch ed off whe n
t riggered ?
The alarm system is switched off when you unlock the vehicle using
the remote control or when the ignition is switched on. The a larm
will a lso switch itse lf off when it comes to the end of its cycle.
Em erg en cy flashe r
The emergen cy flashe r will blink briefly when the doors, engine
hood and rear lid are properly closed .
If the emergency flashers do not blink, check the doors, engine hood
and r ear lid to make sure they are properly closed . If you close a
door, the hood or the rear lid w ith the anti-theft a larm switched on,
the emerg ency flashers will blink only aft er you have clos ed the
door or lid.
[ i ] Tips
• For the anti -theft alarm system to function properly, make sure
all vehicle doo rs and windows are closed before leaving the vehicle .
• When you open the vehicle from the driver's door using the key,
the c entral locking switch will work only af ter you hav e swi tched on
the ignition. •
Tilt sensors ~
The tilt sensors trigger an alarm if they detect vehicle
movement.
N
ij
:c .,
"'
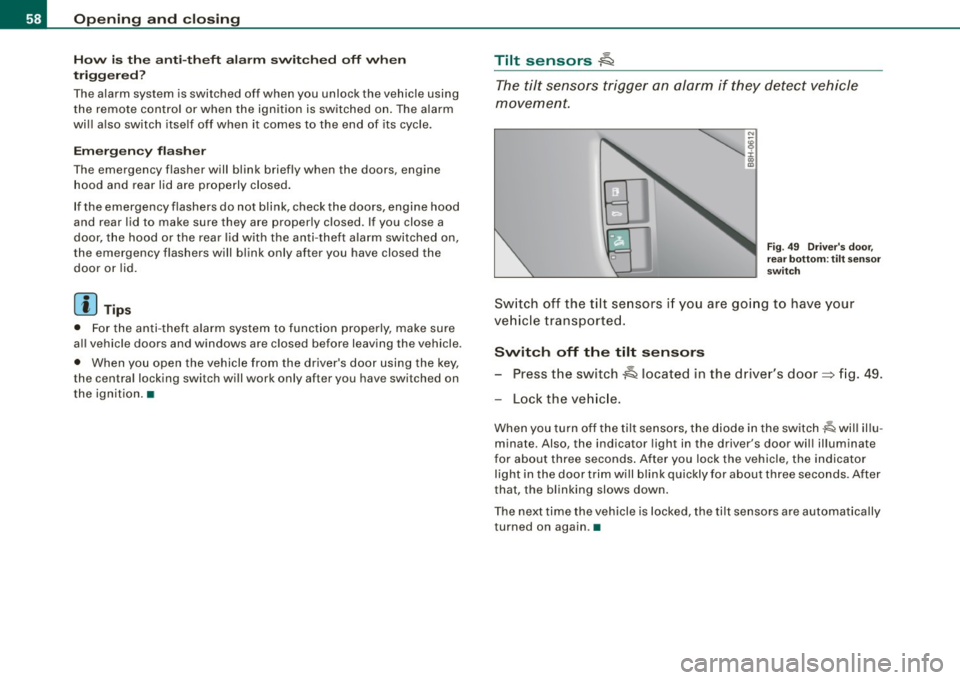
Fig . 49 D river's do or,
rear botto m: ti lt se nso r
sw itch
Sw itch off the tilt se nsors i f you are go ing to have your
ve hicle tr ansported .
Switch off the tilt s ensors
- Press the switch A located in the driver's door=> fig. 49 .
Lock the ve hicle.
When you turn off the tilt sensors, the diode in the switch -lQ wi ll illu
minate. Also , the indicator light in the driver's door wil l illuminate
for about three seconds . After you lock the vehicle, the indicator
light in the door trim will b link quickly for about three seconds . After
that, the blinking slows down.
The next time the vehicle is locked, the tilt sensors are automatically
turned on again .•
Page 61 of 340

Power windows
Controls
Fig. 50 Driver's door:
power window
switches
The switches are located in the driver's door. The front passenger's
door has a own power window switch of its own.
To open/close If the respective switch is pushed or pulled, the
window will, respectively .
Switches for front door windows
© operates the window in the driver's door.
@ operates the window in the front passenger door.
Switches for rear windows
© operates the left rear window.
@ operates the right rear window.
Switches for all windows
© operates all windows .
& WARNING
• Do not leave children unattended in the vehicle, especially with
access to vehicle keys. Unsupervised use of the keys can result in
Contro ls and eq uip
ment
Opening and closing
& WARNING (continued)
starting of the engine and use of vehicle systems such as power
windows, etc. which could result in serious injury.
• Remember -you can still open or close the power windows for
about ten minutes after the ignition is switched off. Only when
either of the front doors are opened are the power windows
switched off.
• Be careful when closing the windows . Check to see that no one
is in the way, or serious injury could result!
• Always remove the ignition key whenever you leave your
vehicle.
• If you lock your vehicle from the outside, no one, especially
chil
dren, should remain in the vehicle even when the power top is
opened.
• Do not stick anything on the windows or the windshield that
may interfere with the driver's field of vision. •
Switches in the driver's door
The driver can operate all windows.
If the respect ive switch is pushed or pulled the windo w will
open or close . The power w indow switches have a
two-posi
tion function:
Opening the windows
Push the switch to the first stop and hold it there until the
window has lowered to the desired position.
Push the switch briefly to the
second stop: the window
will automatically open all the way. ..
~ehicle care Technical data
Page 67 of 340

Power top: ca nnot b e use d
Power top not operating
This message wi ll appear in the display if the power top has been
deactivated for safety reasons or if there is a malfunction. Possible
causes are:
• vehicle speed t oo high: the power top operation is deactivated
for safety reasons if the vehic le is mov ing at a speed above 3 mph
(5 km/hi.
• battery voltage too low: the power top wil l not operate if the
battery voltage is too low . This is a precautionary feature to make
s u re that the re is always enough battery power avai lable to start the
engine. The power top can be activated again once the engine has
been started and is running.
• ove rload cut -off: if the power top is operated repeatedly the
hydraulic actuator components will be severely stressed . In this
case the over load cut -off will safeguard the system against damage.
This safeguard deactiva tes the system fo r abou t 15 to 30 minutes.
After this time the power top can be operated again as usual=> & .
• Malfunction: One possible cause of a malfunction is the fai lure
of a system component. In this case the power top can a lso be
manual ly operated =>
page 68. Turning off the ignition during the
opening or closing process may cause a malfunction. You can
correct this yourself=>
page 65.
Pow er top no t sec ure
Power top not locked in place
If the top has not opened or closed completely and the vehicle
moves then at a speed above 3 mph (5 km/h), this
warning will
appear in the instrument cluster display. Stop the vehicle. Open or
close the power top completely. The warning should disappear .
& WARNING
Never drive the car with a power top that is not securely lock ed in
place . If it i s not fir mly engaged , the top can b e blown ope n by the
Contro ls and eq uip
ment
P o w er top
& W ARN ING (conti nued )
airstre am and ca u se injur ies and damage to the vehicle . - Risk of
crash !•
Correcting a malfunction
Turning off the ignition durin g the opening or closing
process may cause a malfunction.
F ig. 57 Power top
cov er in end p osition
App ly the hand b rake.
Sw it c h t he igniti on off .
Fold the powe r top cove r upward un til it engages.
Stow the power top in the powe r top compa rtment.
T ur n on the igni tion.
Press or pull the swi tch f or p ow er top operatio n
~ page 62, fig . 52 un til the powe r top is f ully clos ed o r
open .a
~ehicle care Technical data
Page 78 of 340

Clear vision
Clear vision
Lights
Switching the headlights on and off ·'t!-·
Fi g. 85 Ins tru ment
pan el: lig ht sw itc h
Fi g.
86 Turn sig nal
lev er: high beam
ON /OFF
All switch pos itions refer to the indentation on the switc h
aligned with the spec if ied symbol. The light switch m ust not
be overt urned past the stops in either direction .
Switching on the side marker lights
- Turn t he light switch light to=> fig. 85
;oo:: .
Switching on the headlights and high beam
- T urn the light switch to ~D.
- Push the turn signa l lever forward towa rds the ins tru -
ment panel => fig. 86, to turn on the high beam, pu ll the
lever back to turn it off=>
page 83.
Swit ching off th e lights
- T urn the light switch to
0 .
The headlights only work when the ignition is switched on . While
starting the engine or when sw itching off the ignition , the head
lights wi ll go of f and only the side marker lights wil l remain lit .
& WARNING
Crashe s can happen when you cannot se e t he ro ad ah ead and
whe n you c annot b e seen by othe r motori sts.
• Alway s turn on the headlights so that you can see ahead and
s o that other s can see y our car fr om the b ack.
[ i ] Tip s
• If you remove the ignition from the ign ition lock whi le the head
lights are still on, a bu zzer will sound as long as the driver 's door is
open to remind you to switch off the lights .
• Always observe the specific local regulations for your area when
to use your lights .•
Page 84 of 340
Clear vision
inst rument panel ill umination will automaticall y become dimmer
a s the daylight fades away and eventually will go out completely
when out side l ight i s very low . Thi s is to remind you , the dri ver , to
s witch on the headlights befor e it g ets too dark.
• Canada model s: instrument panel illumination will stay bright
re gardles s of the intensity of ambient light . Alway s be aware of
c hange s in outside light cond itions while you are d riv ing . Resp ond
in time to f ading dayl ight by turning the ligh t switch to po sit ion
io
(or "AUTO" if your car is equipped with this feature) to turn on your
he adl ights . •
Ap plie s to vehic le s: wi th x eno n hea dlig ht s
Xenon headlights
After s tarting the engine, the xenon headligh ts are automatically
adjusted to the load and angle of the vehicle (for example, during
acce leration and brak ing) . This prevents oncoming tra ffic from
experienc ing unnecessa ry glare from your head lights .
If the system is not operating properly, a warning sy mbol in the
Auto -Check Contro l is displayed:::::,
page 34. •
Emergency flasher &.
The emergency flasher makes other mot orists aw are that
y o u or your vehicle are in an emergency situation.
1Jia---------------...,i ij ::c .,
"'
-
Fig. 9 3 Ce nter
cons ole: e mergen cy
fla sher swit ch
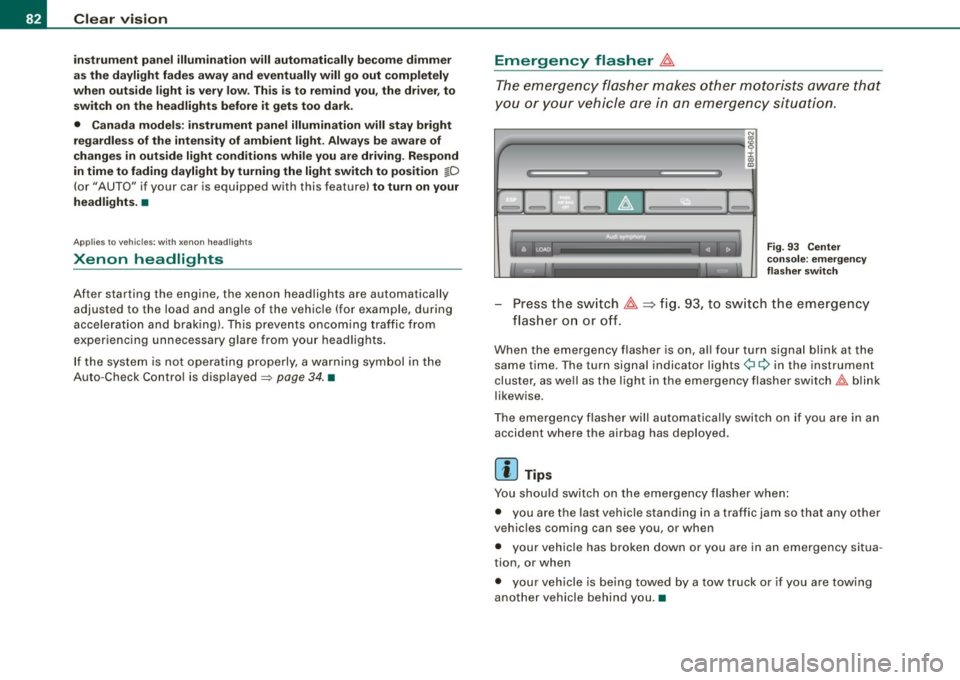
Press the sw itch ~~fig . 93, to sw itch the emergency
fl ash er o n or o ff.
When the emergency flasher is on, al l four turn signa l blink at the
same time . The turn signal indicator lights¢¢ in the instrument
cluster, as we ll as the light in the emergency flasher sw itch
t!:;,,. b link
likewise .
The emergency flasher will automatica lly switch on if you are in an
accident where the airbag has deployed .
[ i ] Tips
You should switch on the emergency flasher when :
• you are the last vehicle stand ing in a t raffic jam so that any other
veh ic les coming can see you , or when
• your vehic le has broken down or you are in an emergency situa
tion, or when
• your veh ic le is being towed by a tow truck or if you are towing
another vehicle behind you .•
Page 88 of 340
Clear vision
& WARNING
• Wiper blade s are cru cial fo r safe driving ! O nly when they are in
good cond it ion are they able to clear the window s properly to
p ro vi de un comp romi sed vis ibility . Worn or damaged wiper blade s
are a safety hazard
=> page 8 7, "In stalling new w ipe r blades "!
• The rain sen sor is onl y de signed to a ssis t and support the
driver. It remain s ent irely the driver' s re spon sibility to monitor
o ut side weather condit ion s a nd to manually acti vate the wipers a s
soon a s rain or drizzle reduces vi sibility through the wind shield .
• The wind shield mu st not be treat ed w ith water -repellent mate
rials. They can increase glare under poor visibility conditions such
a s w etne ss, darknes s, or when the sun i s lo w on t he horizon . In
addition , they can cause the windshield wipers to chatter .
0 Note
In freezing or near freezing conditions :
• Always check that the wiper blades are not frozen to the g lass
before you turn the wipers on. Loosen a wiper b lade which is frozen
in place before operating the wipers to prevent damage to the wiper
b lade or the wipe r motor.
• Do not use the wipers to clear a frosted window . Using the
wipe rs as a convenient ice scraper wil l destroy the wiper blades .
• Before you take your vehicle to an automatic car wash , make sure
you have the wi ndshield w iper system switched off (lever in position
0), otherwise the windshield wiper system could get damaged in the
car wash if it should suddenly come on .
[ i ] Tips
• The rain sensor is part of the interva l wiping system . Turning off
the ignition will also deactivate the rain sensor. To reactivate the sensor, switch off the interva l wiping function, then switch it back
on aga in. • I
f you switch off the ignition with the windshield wiper lever sti ll
in the interva l wipe position and then come back a while late r and
drive off, the rain sensor will reactivate itself after the vehicle speed
has exceeded 4 mph (6 km/h) .
• Worn or dirty windshield wiper b lades cause smearing which
can affect the operation of the rain sensor . Check the condition of
your windshield wiper b lades regularly .
• Make sure the washer fluid reservoir in the engine co mpartment
is topped off before going on a long trip. Look up=>
page 266 for
checking and f illing the washer container .•
Headlight washer system
The headlight washer system cleans the headlights.
Operate the w indshie ld wiper/washer system, leve r posi
tion
© =>page 85, fig. 97, w ith the head lig hts switched
on
by h old ing the lever for longer than o ne second .
The washer jets extend forward out of the front bumper driven by
water pressure to s pray the front headlights with water .
You should inspec t the head lights regu larly (for examp le when refu
e ling) and c lean off any so lid dirt or insects from the lenses .
To ensure the sys tem works proper ly in winter, keep the washer jets
free of snow and
remove any ice using a de -icing spray .•