bulbs AUDI A4 SEDAN 2013 Owners Manual
[x] Cancel search | Manufacturer: AUDI, Model Year: 2013, Model line: A4 SEDAN, Model: AUDI A4 SEDAN 2013Pages: 294, PDF Size: 73.71 MB
Page 5 of 294
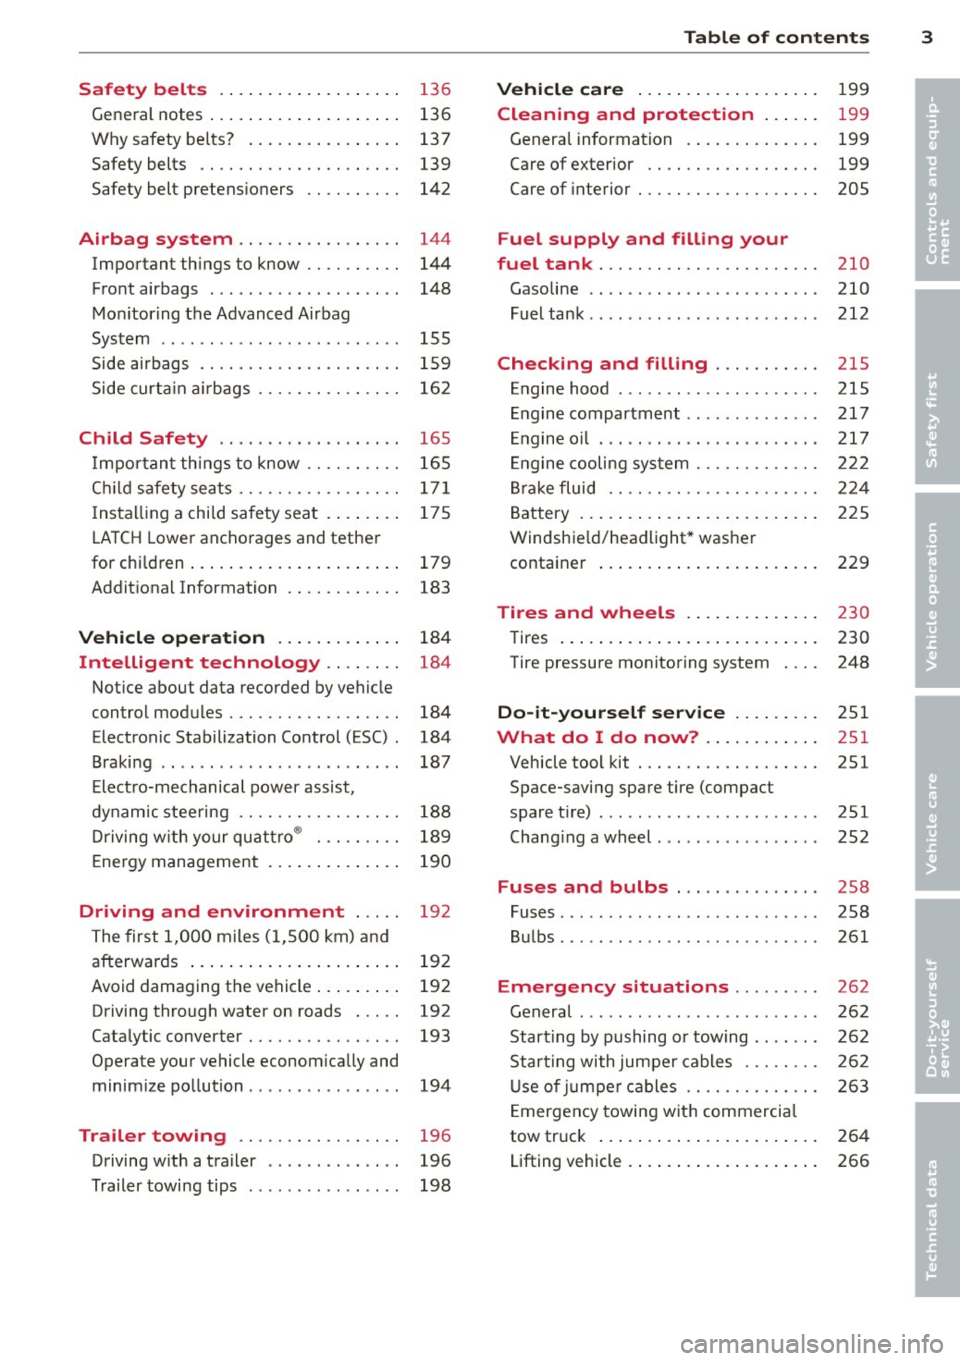
Safety belts . . . . . . . . . . . . . . . . . . . 136
General notes . . . . . . . . . . . . . . . . . . . . 136
Why safety be lts? . . . . . . . . . . . . . . . . 137
Safety belts . . . . . . . . . . . . . . . . . . . . . 139
Safety belt pretens ioners . . . . . . . . . . 142
Airbag system ................ .
Important things to know ......... .
Front airbags ................... .
Mon itor ing the Advanced Airbag
System ........................ .
Side airbags ............. .... .. . .
Side curta in a irbags .............. .
Child Safety ........ .... ... .. . .
Impor tant th ings to know ......... .
C hi ld safety sea ts ................ .
I nstall ing a chi ld safety seat . ... .. . .
L A T CH Lower anchorages and tether
for children ... .... .... ... .. .. .. . .
Addit ional Information
Vehi cle operat ion ..... .. .. .. . .
Intelligent technology .. .. .. . .
Not ice about data recorded by vehicle
control modules .......... .... .. . .
Electronic Stabilization Control (ESC) .
Braking .. ... ................ ... .
E lect ro-mechanical power assist ,
dynamic stee ring ................ .
Driving w ith your qu attro ® ... .. .. . . 144
144
148
155
1 59
162
165
165
17 1
175
179
183
184
184
184
184
187
188
189
E nergy management . . . . . . . . . . . . . . 190
Driving and environment . . . . . 192
The first 1,000 miles (1,500 km) and
afterwards . . . . . . . . . . . . . . . . . . . . . . 192
Avoid damaging the vehicle . . . . . . . . . 192
Driving through water on roads . . . . . 192
Catalytic converter . . . . . . . . . . . . . . . . 193
Operate your vehicle econom ically and
minim ize pollution . . . . . . . . . . . . . . . . 194
Trailer towing . . . . . . . . . . . . . . . . . 196
Driving w ith a trailer . . . . . . . . . . . . . . 196
Trailer towing tips . . . . . . . . . . . . . . . . 198
Table of contents 3
Vehicle care . . . . . . . . . . . . . . . . . . .
199
Cleaning and protection . . . . . . 199
Genera l information . . . . . . . . . . . . . . 199
Care of exterior . . . . . . . . . . . . . . . . . . 199
Care of interior . . . . . . . . . . . . . . . . . . . 205
Fuel supply and filling your
fuel tank ... .. .. .. . .............
210
Gasoline . . . . . . . . . . . . . . . . . . . . . . . . 210
Fuel tank .. .. .. .. .. . .. .... ...... . 212
Checking and filling . . . . . . . . . . . 21S
Engine hood . . . . . . . . . . . . . . . . . . . . . 215
Engine compartment . . . . . . . . . . . . . . 217
E ngine oil . . . . . . . . . . . . . . . . . . . . . . . 217
E ngine cooling system . . . . . . . . . . . . . 222
B ra ke fluid . . . . . . . . . . . . . . . . . . . . . . 224
Battery . . . . . . . . . . . . . . . . . . . . . . . . . 225
Windshie ld/headlight* washer
container . . . . . . . . . . . . . . . . . . . . . . . 229
Tires and wheels . . . . . . . . . . . . . . 230
Tires . . . . . . . . . . . . . . . . . . . . . . . . . . . 230
Tire pressure monitoring system 248
Do-it-yourself service . . . . . . . . . 251
What do I do now? . . . . . . . . . . . . 251
Vehicle tool kit . . . . . . . . . . . . . . . . . . . 251
Space-saving spare tire (compact
spare tir e) . . . . . . . . . . . . . . . . . . . . . . . 251
Changi ng a wheel . . . . . . . . . . . . . . . . . 252
Fuses and bulbs . . . . . . . . . . . . . . . 258
Fuses ... .. .. .. .. .. . .. .... ...... . 258
Bulbs . . . . . . . . . . . . . . . . . . . . . . . . . . . 261
Emergency situations . . . . . . . . . 262
General . . . . . . . . . . . . . . . . . . . . . . . . . 262
Starting by pushing or towing . . . . . . . 262
Star ting with jumpe r cables . . . . . . . . 262
U se of jumpe r cables . . . . . . . . . . . . . . 263
E mergency towing with commercia l
tow truck . . . . . . . . . . . . . . . . . . . . . . . 264
Lifting vehicle . . . . . . . . . . . . . . . . . . . . 266
•
•
Page 25 of 294
Instruments and warning/indicator lights 23
=/4 Ignit ion lock
l!J Ignition lock defective
There is a malfunction in the electron ic igni
tion lock. Please go to an authorized Aud i
dealer or other qualified workshop to have the
malfunct ion repaired.
¢ Q Turn signals
Whenever you use the left II or the right IJ
turn signal, the indicator light blinks. When
you use the emergency flashers, both indica
tor lights flash .
If one of the turn signal light bulbs burn out,
the turn signal will blink twice as fast as nor
mal. Carefully drive to your authorized Audi
dealer immediately to have the malfunction
corrected.
Page 253 of 294
What do I do now?
Vehicle tool kit
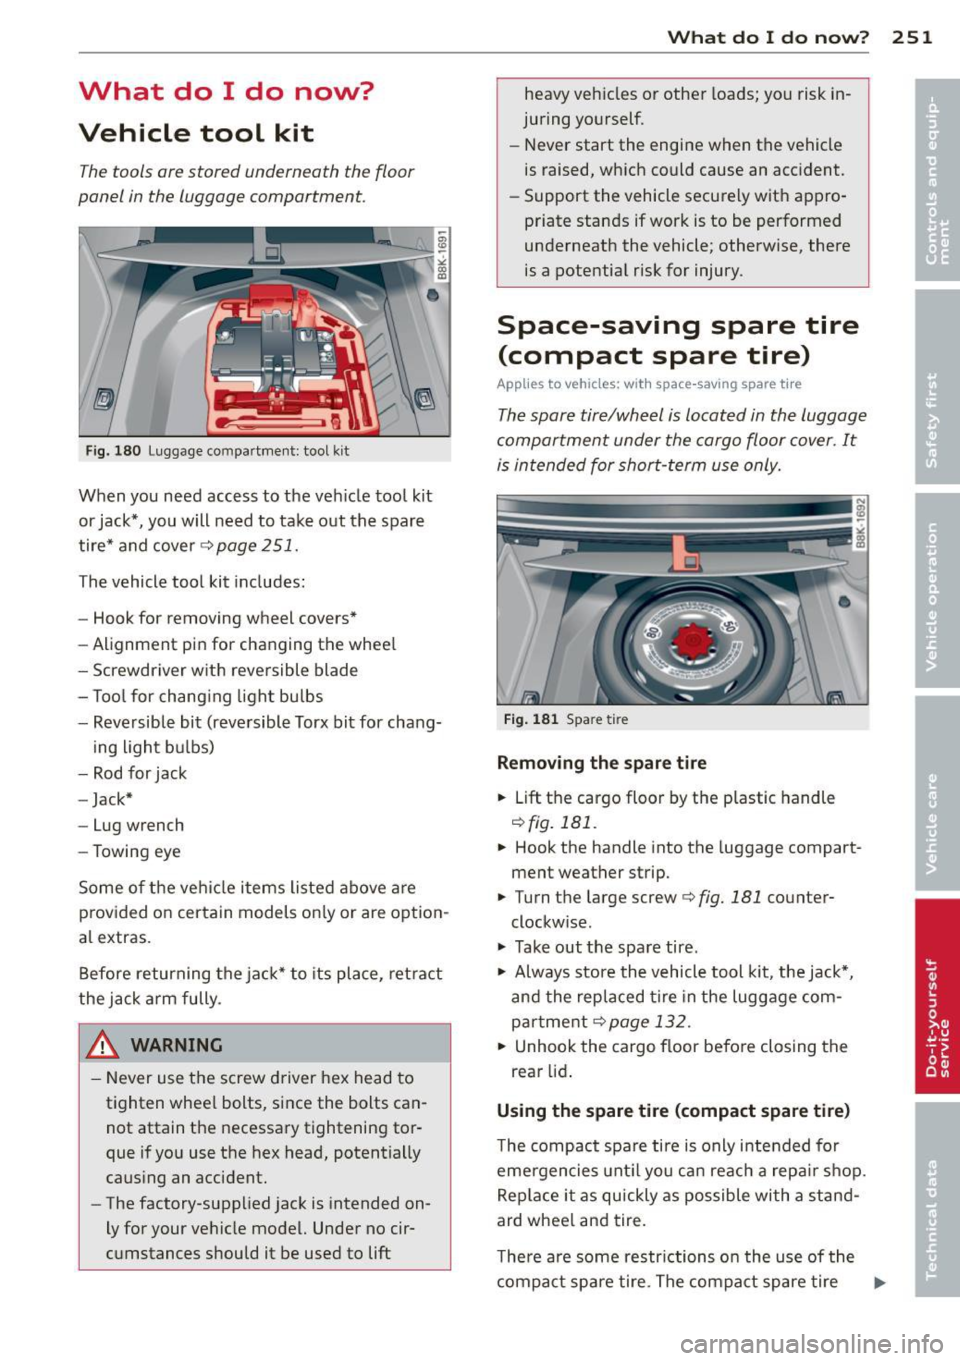
The tools ore stored underneath the floor
panel in the luggage comportment.
F ig . 180 Luggage compartment: tool kit
When you need access to the veh icle tool kit
or jack*, you will need to take o ut the spare
tire* and cover¢
page 251.
The vehicle tool kit includes:
- Hook for removing wheel covers*
- Alignment pin for changing the whee l
- Screwdriver w ith reversible blade
- T ool for chang ing light bulbs
- Reversible bit (reve rsible Torx bit for chang-
ing light b ulbs)
- Rod for jack
- Jack*
- Lug wrench
- Towing eye
Some o f the ve hicle items listed above are
p rov ided o n certain models on ly or are opt ion
a l extras.
Before returning the ja ck* to its place, ret ra ct
the jack a rm fully.
& WARNING
- Never use t he screw driver hex head to
tighten whee l bolts, since the bolts can
not attain the necessary tightening tor
que if yo u use the hex head, potentially
caus ing an accident.
- The factory-supplied jack is intended on
ly for your ve hicle model. Unde r no cir
c u mstances should it be used to
lift
What do I d o now ? 251
heavy ve hicles o r other loads; yo u risk in
juring yo urself.
- Never start the engi ne when the vehicle
is raised, which could cause an acc ident.
- Support the vehicle secu re ly wit h app ro
priate stands if wor k is to be performed
underneath the vehicle; otherwise, there
is a pote ntia l risk for injury.
Space-saving spare tire
(compact spare tire)
App lies to vehicles: wi th space -saving spare tir e
The spore tire/wheel is located in the luggage
comportment under the cargo floor cover. It
is in tended for shor t-term use only.
Fig. 181 Spare tire
Removing the spare ti re
.. Lift
th e ca rgo floo r by the p lastic handle
r:!) fig. 1 Bl.
.. Hook the handle into the luggage compart
ment weather strip.
.. Turn t he large screw ¢
fig. 181 counter
clockw ise.
.. Take out the spa re tire .
.. Always store the vehicle tool kit, the jack*,
an d the replaced tir e in the luggage com
par tme nt
¢page 132.
.. Unhook the cargo floor befo re closing the
rear lid .
Using the spare tire (compact spare tire)
The compact spa re ti re is only intended for
eme rgencies unt il yo u ca n reac h a repa ir sh op.
Rep lace i t as quickly as possible with a stan d
ard whee l and tire.
T he re a re some restr ictions o n the use of the
compact sp are tire. The compa ct spare tire
IJ>
Page 260 of 294
258 Fuses a nd bulb s
Fuses and bulbs
Fuses
Replacing a fuse
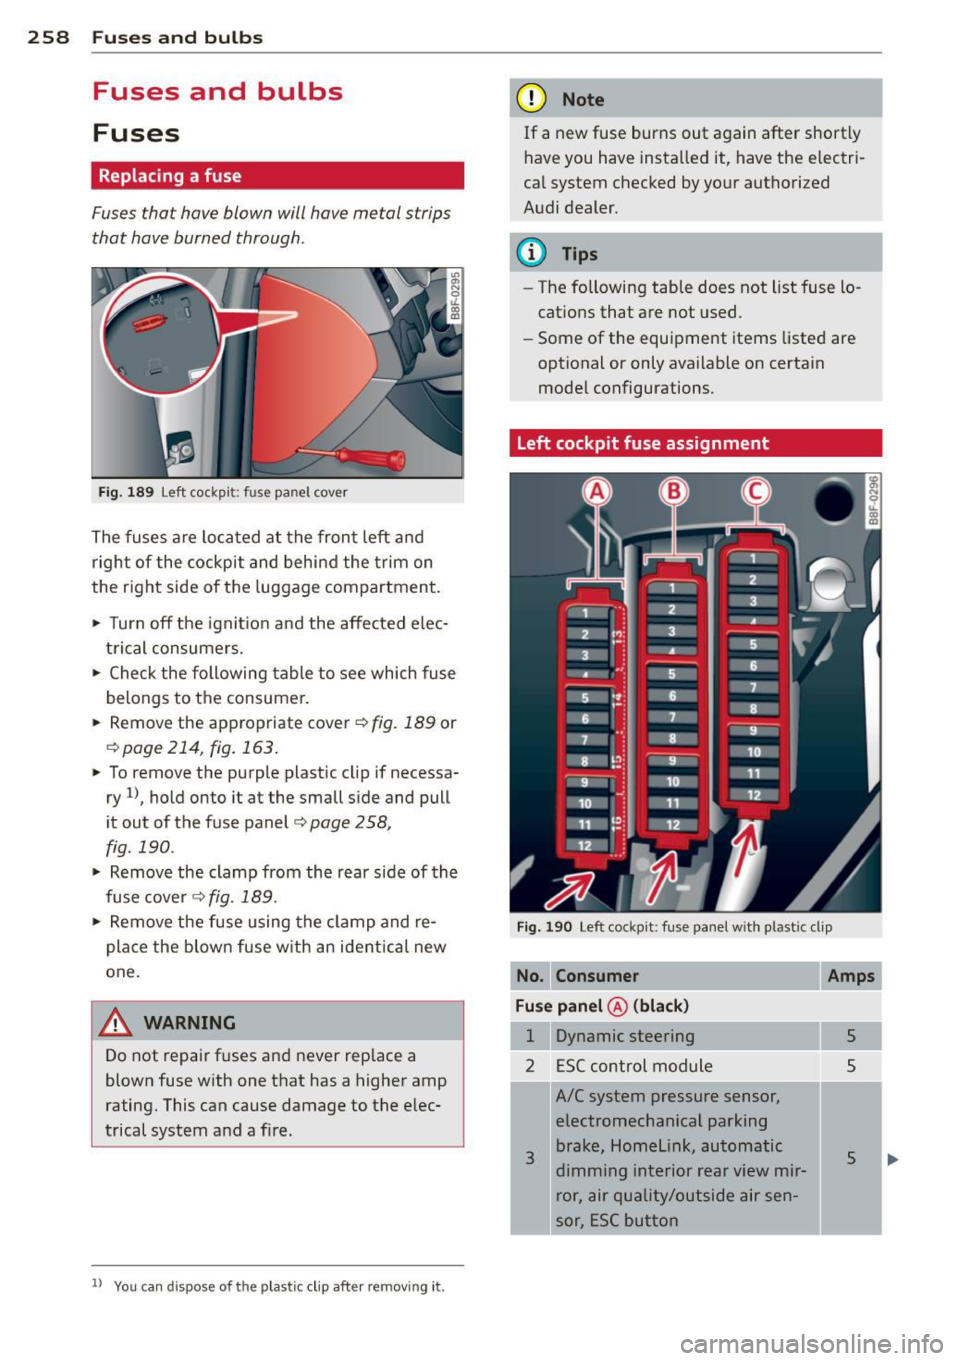
Fuses that have blown will have metal strips
that have burned through.
Fig. 189 Left cockpit: fuse panel cover
The fuses are located at the front left and
right of the cockpit and behi nd the trim on
the right side of the luggage compartment.
• Turn off the ignit ion and the affected elec
trical consumers.
• Check the following table to see which fuse
belongs to the consumer.
• Remove the appropriate cover ¢
fig. 189 or
¢page 214, fig.163.
• To remove the purple plastic cl ip if necessa
ry
1l, hold onto it at the small side and pull
it out of the fuse panel
c:> page 258,
fig. 190 .
• Remove the clamp from the rear side of the
fuse cover ¢
fig. 189.
• Remove the fuse using the clamp and re
pla ce the blown fuse w ith an ident ical new
one.
A WARNING
Do not repair fuses and never replace a
blown fuse with one that has a higher amp
rating. This can cause damage to the elec
trical system and a fire.
ll You can dis pose of the plastic clip after removing it.
(D Note
If a new fuse burns out again after shortly
have you have installed it, have the electri
cal system checked by your authorized
Audi dealer.
(D Tips
- The following table does not list fuse lo
cations that are not used.
- Some of the equipment items listed are
optional or only available on certain
model configurations.
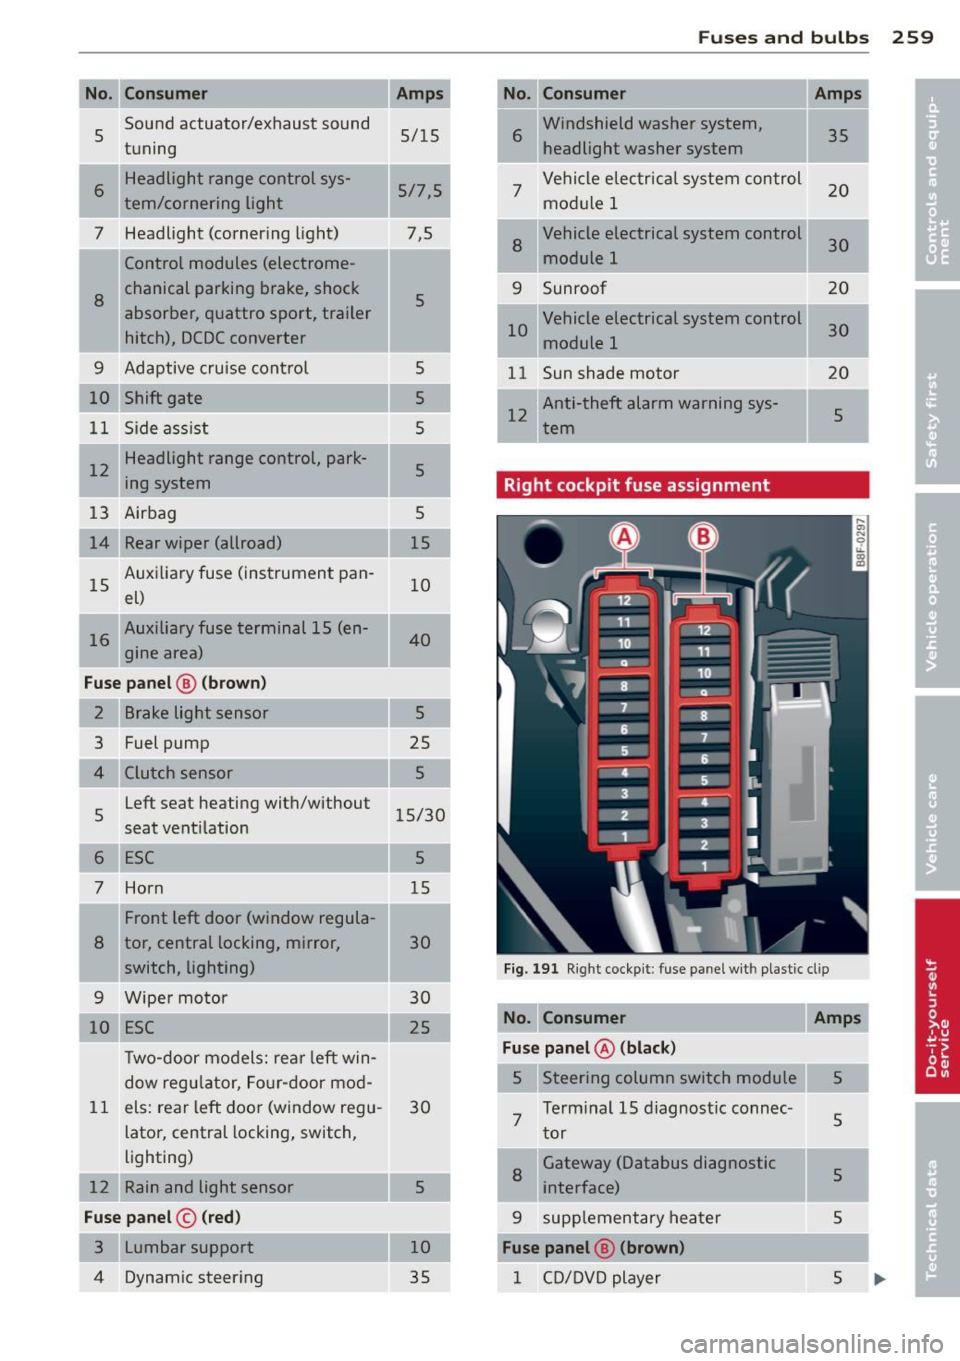
Left cockpit fuse assignment
Fig. 190 Left cockpit: fuse panel with plastic clip
No. Consum er
Fu se pan el@ (bl ack)
1 Dynamic steering
2 ESC control module
3
A/C system pressure sensor,
electromechanical parking brake, Homelink, automatic
dimming interior rear view mir ror, air quality/outside air sen
sor, ESC button
Amp s
5
5
5
Page 261 of 294
Fuses and bulbs 259
-No. No. Consumer Amps
5 Sound
actuato r/exhaust sound
5/15
tuning 6
Windshield washer system,
35
headlight washer system
.
6 Headlight range control sys-
5/7,5
tern/cornering light 7 Vehicle electrical system control
20
module 1
7 Headlight (cornering light) 7,5
Control modules (electrome-
8
Vehicle electrical system control
30
module 1
'
8
chanical parking brake, shock
5
absorber, quattro sport, trailer
hitch), DCDC converter 9 Sunroof 20
10 Vehicle electrical system control
30
module
1
9 Adaptive cruise control 5
11 Sun shade motor 20
10 Shift gate
5
11 Side assist 5 12 Anti-theft alarm
warning sys-
5
tern
I 12 Headlight range control, park-
5
ing system
Right cockpit fuse assignment
13 Airbag 5
14 Rear wiper (allroad) 15
15 Auxiliary fuse (instrument pan-
10
el)
I 16 Auxiliary fuse terminal 15 (en-
40
gine area)
Fuse panel @ (brown)
2 Brake light sensor 5
3 Fuel pump
25
4
5 Left seat
heating with/without
15/30
seat ventilation
6
7 Horn Front left door (window regula-
8 tor, central locking, mirror, 30
switch, lighting)
Fig. 191 Right cockpit : fuse panel with plastic cl ip
9 Wiper motor 30
10 ESC 25
No. Consumer Amps
Two-door models: rear left win-Fuse panel @ (black)
dow regulator, Four-door mod- 5 Steering column switch module 5
11
els:
rear left door (window regu-
30
lator, central locking, switch, 7 Terminal 15 diagnostic connec-
5
tor
lighting)
12 Rain and light sensor 5
8
Gateway (Databus diagnostic
5
interface)
-..
Fuse panel © (red) 9 supplementary heater 5
3
Fuse panel @ (brown)
4 Dynamic steering
1 CD/DVD player 5
Page 263 of 294
Bulbs
Replacing bulbs
For your safety, we recommend that you have
your authorized Audi dealer replace any bulbs
for you .
It is becoming increasingly more and more
difficult to replace vehicle light bulbs since in
many cases, other parts of the car must first
be removed before you are able to get to the
bu lb . T his appl ies especially to the light bu lbs
in the front of your car which you can on ly
reach through the engine compartment .
Sheet metal and bulb ho lders can have sharp
edges that can cause ser ious cuts, parts must
be correctly taken apart and then p roperly put
back together to help prevent breakage of
parts and long term damage from water that
can enter housings that have not been proper
l y resealed.
F or your safety, we recommend that you have
your authorized Audi dealer replace any bulbs
for you, since your dealer has the proper tools,
the correct bu lbs and the expertise.
G as disch arge la mp s (Xe no n li ght s)*:
Due to the high electrical vo ltage, have the
bu lbs rep laced by a qualified technician.
H eadlights with Xenon l ight a re identified by
the high voltage sticker.
& WARNING
Changing Xenon lamps without the neces
sary equipment can cause serious personal
injury.
- Bul bs are pressurized and can exp lode
when being changed . Potential risk of in
jury!
- On vehicles equipped with gas discharge
bulbs (Xenon light) * life-threatening in
jur ies can result from improper handling
of the high-voltage portions of such
lamps!
- Only your authorized Aud i dea ler or a
qualified workshop should change the
bulbs in gas discharge lamps. There a re
Fu ses and bulb s 261
parts with sharp edges on the open ings
and on the bulb holders that can cause
serious cuts. If you are uncertain about
what to do, have the work performed by
an author ized Audi dealer or other quali
fied workshop . Ser ious personal injury
may result from improperly perfo rmed
wo rk.
(j) Tips
- If you still prefer to replace the light
bulbs yourself , be aware that the engine
compartment is a hazardous area to
work in
c::> page 208, Engine compart
ment
o=:> ,& .
-It is best to ask your authorized Audi
dealer whenever yo u want to change a
bulb .
•
•
Page 280 of 294
278 Index
Automatic Shift Lock (ASL) . . . . . . . . . . . . 86
Automatic transmission . . . . . . . . . . . 83, 89
Automatic Shift Lock (ASL) . . . . . . . . . . . 86
Driving .. .. .... .. ... .... .. .. .. .. .. 84
Dynamic shift program . . . . . . . . . . . . . . 87
Emergency mode . . . . . . . . . . . . . . . . . . . 88
Emergency release . . . . . . . . . . . . . . 89, 95
Kick-down . . . . . . . . . . . . . . . . . . . . . . . . . 87
Manual shift program . . . . . . . . . . . . . . . 88
multitronic . . . . . . . . . . . . . . . . . . . . . . . . 83
Removal lock (ignition key) ..... .. .. .. 72
Selector lever . . . . . . . . . . . . . . . . . . . . . . 85
S tron ic .. .. ................ ... ... . 89
tiptronic . . . . . . . . . . . . . . . . . . . . . . . . . . 83
also refer to S tron ic transmission ..... 89
Automatic wipers . . . . . . . . . . . . . . . . . . . . 50
Auto Safety Hotline ................. 134
Average speed . . . . . . . . . . . . . . . . . . . . . . . 25
Avoid damaging the vehicle .. .. .. .... . 192
B
Battery ..... ................ .. 17,225
Battery location inside the luggage com-
partment ........ ....... .. .. .... .
226
Charging . .. ... .. ..... ... .... .. .. . 228
Important warnings when working on
the battery .... ... .... ..... .. .. .. .
226
Jump starting . ........... .. .. .. .. . 262
Low . .. .. .. ............. .. .. .. .. . 190
Replacing the battery . .. .. .. .. .. .. . 229
State of charge ............ ... .... . 190
Winter operation .......... ... .... . 225
Working on the battery ..... .... ... . 226
Before driving .. ........... .... .... . 126
Bio-ethanol (Fuel) ............ .. .. .. . 211
Blended gasoline ................... 210
Blower (automatic climate control) . . . . . . 70
Body cavity sealing ........... .. .. .. . 204
Booster seats ...... ....... .. .. .... . 173
Brake fluid
Changing the brake flu id . ........ .. .
225
Check ing the brake fluid level . .. .. ... 224
Reservoir ... ............ .. .. .. .. . 224
What is the correct brake fluid level? . . 224
What should I do if the brake fluid warn-
ing light comes on? ........ ... .. ...
224
Brake system .... .. ............. .... 224
Anti- lock braking system ............. 19
Brake assist system ................ 184
Brake fluid .... .. ......... .... .... 224
Brake fluid specifications for refill and re-
placement ...... ................ .
225
Brake light defective . . . . . . . . . . . . . . . . 21
Brake power assist unit .......... ... 187
Brakes .. .. .. .. . ............ .... .. 187
Ceramic brakes . .. ... ... ... .... .. .. 187
Electromechanical parking brake ...... 77
Warning/indicator lights .......... .. . 15
Worn brake pads symbol . . . . . . . . . . . . . 20
Braking
Emergency braking funct ion ... .. .. .. .
79
braking guard . . . . . . . . . . . . . . . . . . . . . . . 97
Messages ..... .. .. ... ........... . 105
Settings .. ... ... .. .............. . 104
Break-in period . . . . . . . . . . . . . . . . . . . . . 192
Tires . .. .. .. .. .. ............. .. .. 192
Bulbs .......... .. ............. .... 261
C
Californ ia Proposition 65 Warn ing . .... 216
Battery specific .. ... .......... .. .. 227
Capac1t1es .. ... ... .. .............. . 270
Car care ........ .. ............. .... 199
Interior . .. .. .. .. ............. .. .. 205
Plastic and vinyl .. ... ...... .... .. .. 202
Care of exterior .... ................. 199
Cargo area
refer to Luggage compartment. . . 64, 132
Catalytic converter . . . . . . . . . . . . . . . . . . 193
Center armrest . . . . . . . . . . . . . . . . . . . . . . 56
Central lock ing .. .. .......... ...... .. 32
Central lock ing switch .... ...... .. .. . 36
Convenience key . . . . . . . . . . . . . . . . . . . . 36
Remote control key ............ .... . 35
Ceramic b rake ro tors
New brake pads .. ..... ........... .
18 7
Certification . ..... ................ . 275
Changing a flat t ire . ......... .... .... 252
Changing a wheel .. ......... .... .... 252
Changing engine oil
Chassis 221
Undercoating .. .. ... .. ... ..... .. .. 204