buttons AUDI A4 SEDAN 2013 Owners Manual
[x] Cancel search | Manufacturer: AUDI, Model Year: 2013, Model line: A4 SEDAN, Model: AUDI A4 SEDAN 2013Pages: 294, PDF Size: 73.71 MB
Page 11 of 294
CD
@
®
©
®
®
(j)
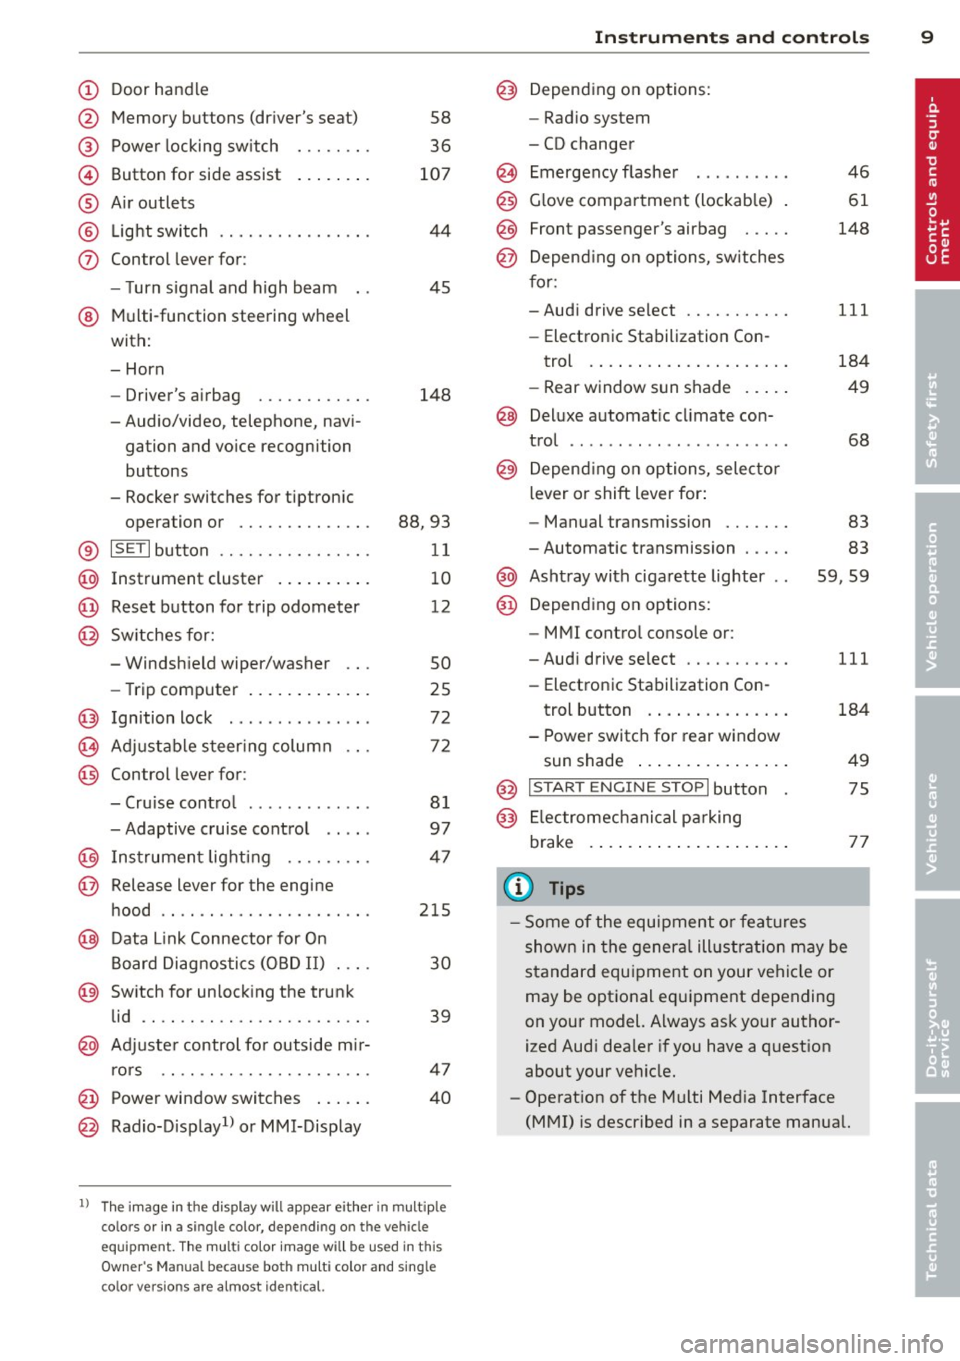
Door handle
Memory buttons (dr iver's seat)
Power locking sw itch
Button for side ass ist
A ir outlets
L ight switch
Control lever for :
- T urn signal and high beam
@ Multi-function steering wheel
with:
- Horn
- Driver's airbag
- Audio/video, telephone, navi
gation and vo ice recognition
buttons
- Rocker switches for tiptron ic 58
36
107
44
45
148
opera tion or . . . . . . . . . . . . . . 88, 93
® ISET lbutton . . . . . . . . . . . . . . . . 11
@ Instrument cluster . . . . . . . . . . 10
@ Reset button for trip odometer 12
@ Sw itches for:
- Windsh ield wiper/washer 50
- Trip computer . . . . . . . . . . . . . 25
@ Ignition lock ............. . .
(8) Adjustable s teer ing column
@ Control lever for :
- Cruise contro l ......... ... .
- Adaptive cruise control .. .. .
@ Ins trumen t lighting .... .. .. .
@ Release lever for the engine
hood .. .. .. .. ........... .. .
@ Data L ink Connector for On
B oard Diag nostics (OBD II) . .. .
@ Sw itch for unlock ing the trunk
lid .. .. .. ................. .
@ Adjuster control fo r outside m ir-
r ors .. .. .. .. ........... .. .
@ Power window switches ... .. .
@ Rad io-Display1l or MMI-Display 72
72
8
1
97
47
215
30
39
47
40
l) T he image in t he d is pl ay will app ear e it h er in mu lt iple
c o lor s or in a singl e co lor , de pen din g o n th e vehicl e
e q ui pment. T he m ulti co lo r im age w ill b e used i n this
O w ner's M anual becau se bo th mu lt i co lo r and sin gle
c o lor ver sio ns are almos t ide ntic al.
In strument s and control s 9
@) Depending on options:
- Rad io system
- CD changer
Emergency flasher
G love compartment (lockab le)
Front passenger's airbag .....
Depend ing o n options, sw itches
for:
46
61
148
- Audi drive se lect .......... .
111
- Electronic Stabilization Con-
trol . ... .. .. .. . .. ... .... .
- Rear window sun shade .. .. . 184
49
@ Deluxe automat ic cl imate con-
trol ...... .. .... .......... .
@) Depending on options, selecto r
lever or shift lever for :
68
-Manual transmission . . . . . . . 83
- Automatic transmission . . . . . 83
@ Asht ray with ciga rette lighter 59, 59
@ Depend ing on options:
- MMI contro l console or :
- Aud i drive select........... 111
- Electronic Stabilizat ion Con-
trol button . . . . . . . . . . . . . . . 184
- Power switch for rear window sun shade . . . . . . . . . . . . . . . . 49
@ I STA RT ENGI NE STOPI button 75
@) Electromec hanical pa rking
brake . . . . . . . . . . . . . . . . . . . . . 77
(D Tips
-Some of the equipment o r fea tures
show n in the genera l ill ustration may be
standard equ ipment on your vehicle or
may be optional eq uipment depending
on your model. Always as k your author
ized Aud i dea ler if you have a quest ion
about your vehicle.
- Operat ion of the Multi Med ia Interface
(MMI) is described in a separate manua l.
Page 45 of 294
Valet parking
Applies to vehicles: with folding a nd lockable rear seat
backs
The valet parking feature protects the lug
gage comportment from unauthorized ac
cess.
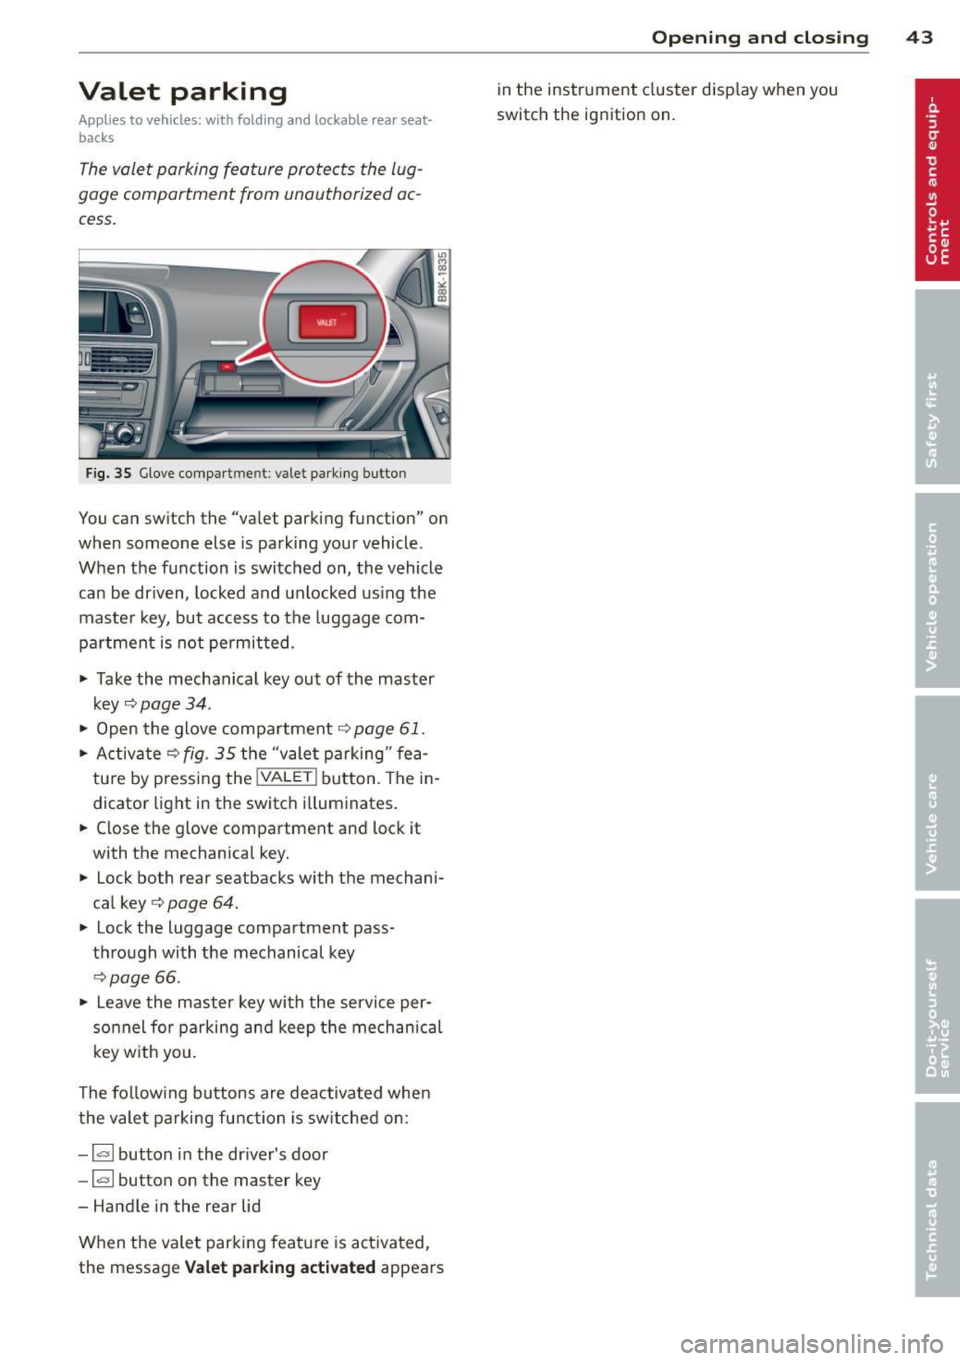
Fig. 35 Glove compa rtm en t: val et parking button
You can switch the "valet park ing function" on
when someone else is parking your vehicle .
When the function is switched on, the vehicle
can be dr iven, locked and unlocked us ing the
maste r key, but access to the luggage com
partment is not permitted .
• Take the mechanical key out of the master
key
c::> page 34 .
• Open the glove compartment c::> page 61 .
• Activate c::> fig . 35 the "valet parking " fea
tu re by p ress ing the
!VALET ! button. The in
dicator light in the switch i lluminates.
• Close the glove compartment and lock it
with the mechanical key.
• Lock both rear seatbacks with the mechani
cal key
c::> page 64.
• Lock the luggage compartment pass
through with the mechanical key
c::>poge 66.
• Leave the master key with the service per
sonnel for parking and keep the mechanica l
key with you.
The fol low ing buttons are deac tivated when
the valet parking function is sw itched on:
-I a I button in the dr iver's door
-la l button on the master key
- Handle in the rear lid
When the valet parking feature is activated,
the message
Valet parking activated appears
Opening and closing 43
in the instrument cluster display when you
switch the ignition on.
Page 60 of 294
58 Seats and storage
Install ing the head restraints
.,. Slide the posts on the head restra int down
into the guides un til you feel the posts click
into place.
.,. Press the button @
Q fig. 55 and slide the
head restraint all the way down. You sho uld
not be able to pull the head restra int out of
the backrest .
So that the driver can have a better view to
the rear, the head restraints should be pushed
down complete ly when the rear seats are not
occupied.
A WARNING
- Read and heed all WARNINGS
9page 130 .
-Only remove the rear seat head rest raints
when necessa ry in order to install a chi ld
sea t
Q page 173. Insta ll the head re
stra in t again immedia tely once the c hild
sea t is removed. Driving w ithout head re
st raints or w ith head restra ints that a re
not properly adjusted increases the risk
of serious or fata l neck injury dramatical
ly.
@ Tips
Correctly adjus ted head restraints and
safety belts are an extremely effective
comb inat ion of safety features .
Seat memory
Description
Applies to vehicles: wit h memory fu nctio n
The memo ry function a llows you to quickly
and eas ily s to re and reca ll personal seating
profiles for the dr iver. The memory func tion is
operated through the master key and the memory buttons in the driver's door .
The driver's seating profi le is stored and as
signed to the master key each t ime the vehicle
is locked. The seating p rof ile is recalled auto
matica lly when the vehicle is un locked. If two
peop le use one vehicle, it is recommended t
h at each person always uses "their own"
master key .
Up to 2 seat p rofiles can be stored i n the
memo ry but tons in the drive r's door . Once
they are stored, these seat profiles can be se
lected at any time.
In add ition to the dr iver's se at settings, yo u
c a n a lso store and access the exterior mirror
adjus tment setti ngs * using the remote con
tro l key or memory button.
Remote control key
Applies to veh icles: w it h seat memory
To assign the dr iver's seat settings to the re
mote control key when locking the vehicle, the
funct ion must be act ivated in the radio or
MMI*
.,. Select: !CAR ! function button> Seat adjust
ment > Dr iver's seat
> Remote control ke y >
on.Or
.,. Select : I CAR I function b utton > Car systems
cont ro l butto n > Ve hicle setting s > Seats >
Driver's sea t> Remote contr ol ke y> On.
(@ Tips
If yo u do not want anothe r drive r's set·
ti ngs to be assigned to the remote key,
swi tc h off the memory f unct ion usi ng the
radio or
M MI* or th e IOFFI butto n
9page 58.
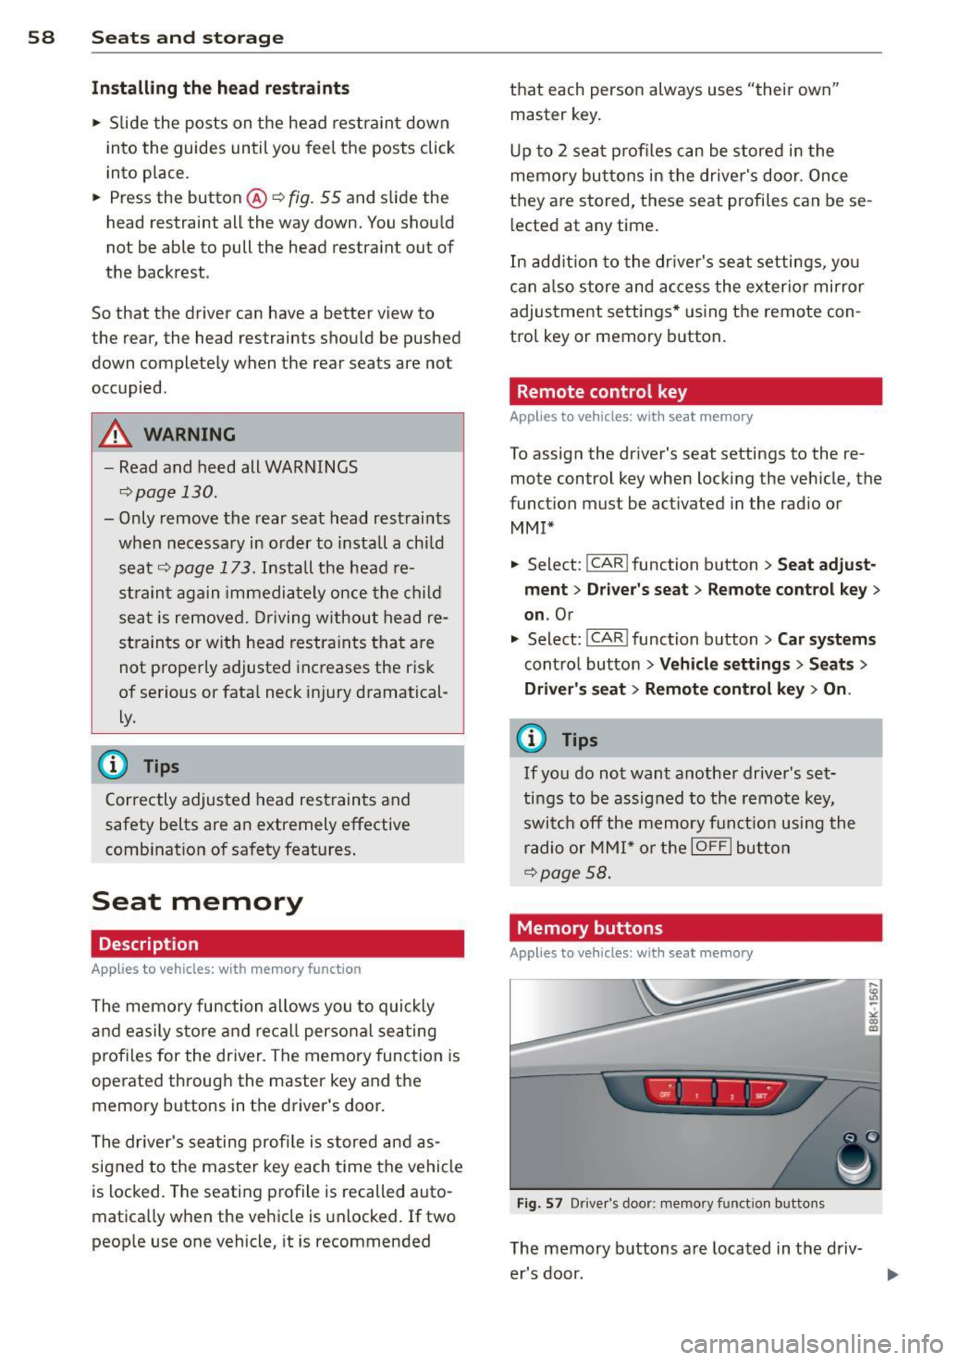
Memory buttons
Applies to veh icles : w it h seat memory
Fig . 57 Drive r's door : mem ory function buttons
The memory buttons a re located in the driv
er's door.
Page 61 of 294
Switching the memory function on/off
• Press the !O FF ! button to sw itch the memo
ry function on/off. The word
OFF lights up
when the memory function is switched off .
S eat profi le s are not stor ed .
Storing a seat profile
" Press the !SE T! button. When the word SET
lights up, the memory is ready to store set
tings.
" Press a memory button
([II or rn ) briefly. A
tone confirms that the s ett ing s wer e stored.
Accessing a seat profile
" If the driver's door is open, press a memory
button.
" If the driver 's door is closed, press and ho ld
the memory button until the seat adjust
ment is complete .
.&_ WARNING
- For safety reasons, the seat sett ing can
only be recalled when the veh icle is sta
tionary- otherwise you risk having an ac
c ident .
- In an emergency the recall procedure can
be cancelled by press ing the
!OF F! switch
or by tapping the memory buttons .
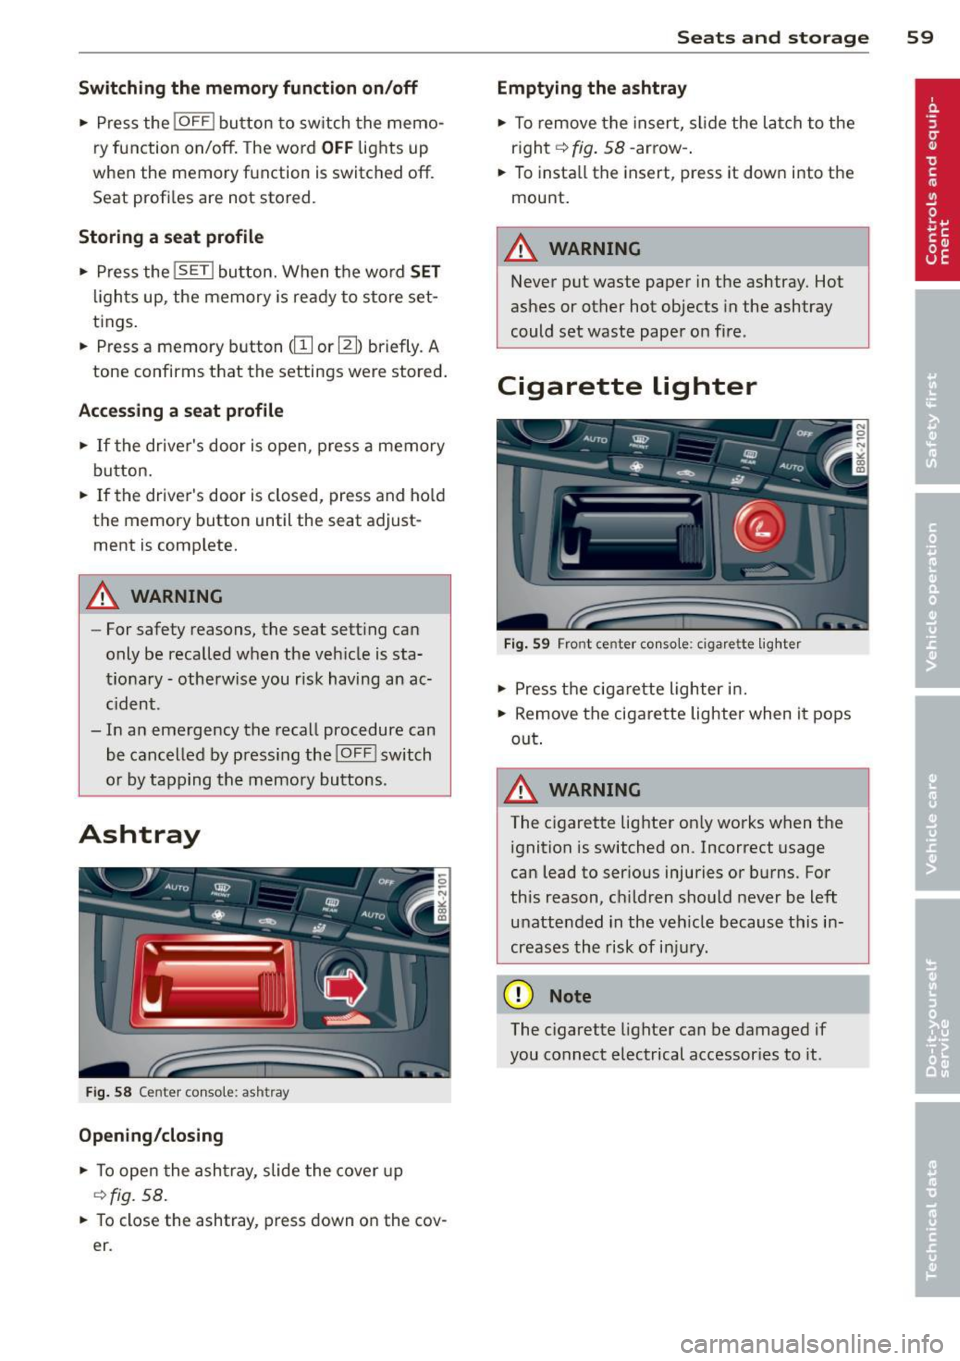
Ashtray
Fig. 58 Cente r conso le: ash tray
Opening /closing
• To open the ashtray , slide the cover up
¢ fig. 58 .
.. To close the ashtray, press down on the cov
e r.
Seats and storage 59
Emptying the ashtray
" To remove the insert, slide the latch to the
r ight ¢
fig. 58 -arrow- .
.. To insta ll the insert, press it down into the
mount.
.&_ WARNING
--Never put waste paper in the ashtray. Hot
ashes or other hot objects in the ashtray
could set waste paper on fire .
Cigarette lighter
Fig. 59 Fro nt ce nter con sole : cigare tte lighter
" Press the cigarette lighter in.
" Remove the cigarette lighter when it pops
out .
A WARNING
The cigarette lighter on ly works when the
ignition is switched on .1ncorrect usage
can lead to ser ious injuries or burns. For
this reason, children should never be left
unattended in the vehicle because this in
creases the risk of injury .
(D Note
The cigarette lighter can be damaged if
you connect electrical accessories to it .
Page 71 of 294
Warm and cold 69
Operation
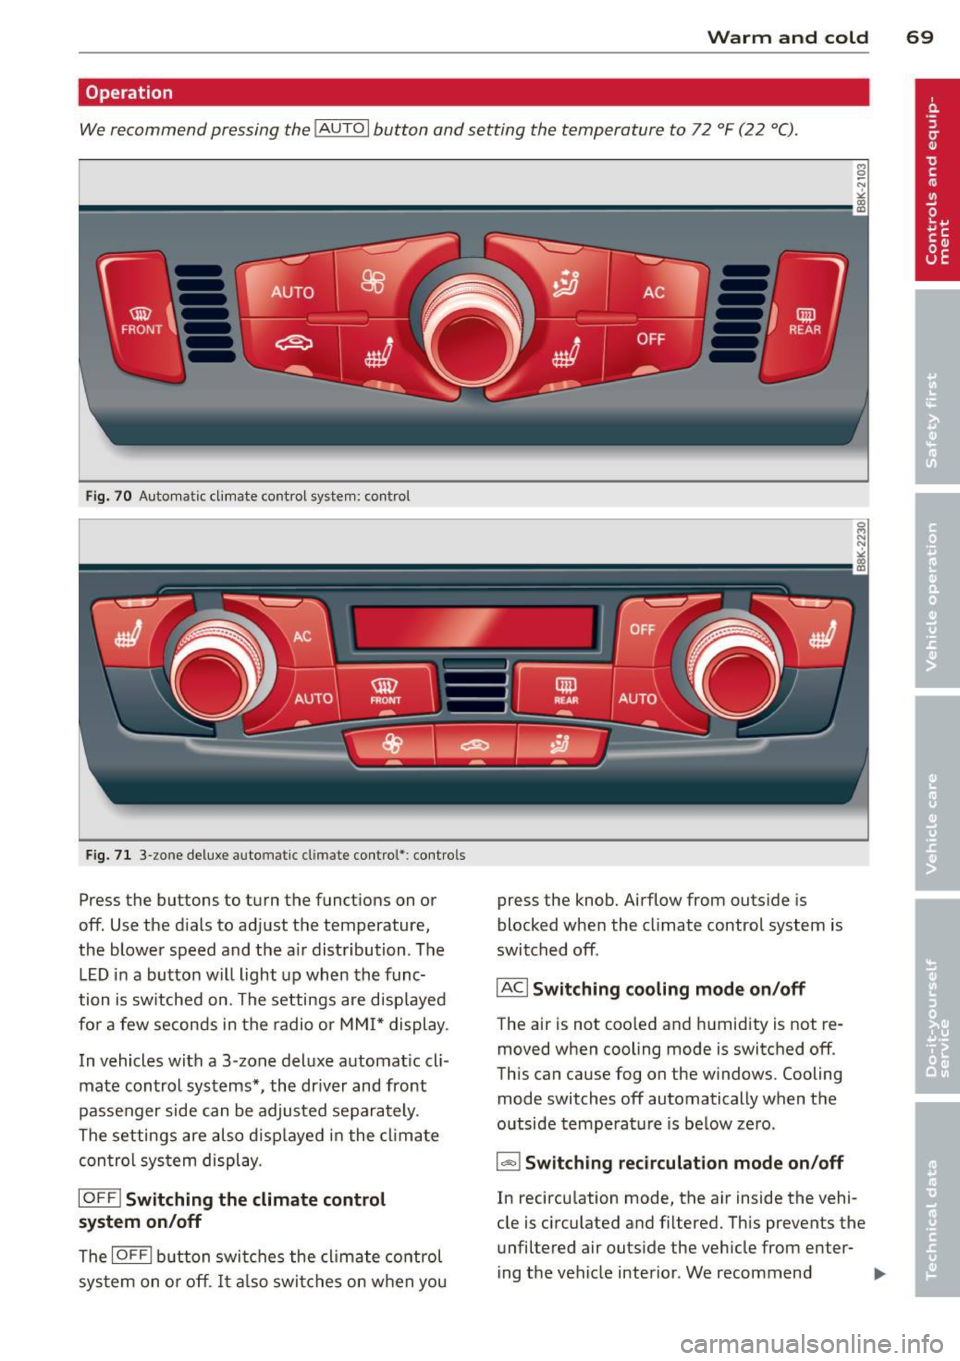
We recommend pressing the IAUTO I button and setting the temperature to 72 °F (22 °C).
Fig. 70 Automatic cl imate control system: control
Fig. 71 3-zone deluxe automatic cl imate control': controls
Press the buttons to turn the functions on or
off. Use the d ials to adjust the temperature,
the blower speed and the a ir distribution. The
LE D in a button will light up when the func
tion is switched on. The settings are displayed
for a few seconds in the radio or MMI* display.
In vehicles with a 3-zone deluxe automat ic cl i
mate control systems *, the dr iver and front
passenger side can be adjusted separately.
The settings are also d isplayed in the climate
con trol system display.
IOFFI Switching the climate control
system on/off
The IOF FI button switches the climate control
sys tem on or off.
It also switches on when you press the knob. Airflow from
outside is
blocked when the climate control system is
switched off.
IACI Switching cooling mode on/off
The air is not coo led and humidity is not re
moved when cooling mode is switched off.
This can cause fog on the w indows. Cooling
mode switches off automatically when the
outside temperature is be low zero.
1- 1 Switching recirculation mode on/off
In recircu lation mode, the air inside the vehi
cle is circulated and filtered. This prevents the
unfiltered air outside the vehicle from enter
ing the vehicle interior. We recommend
Page 90 of 294
88 Transmission
Manual shift program
Applies to vehicles: with multitronic or tiptron ic
Using the manual shift program you can
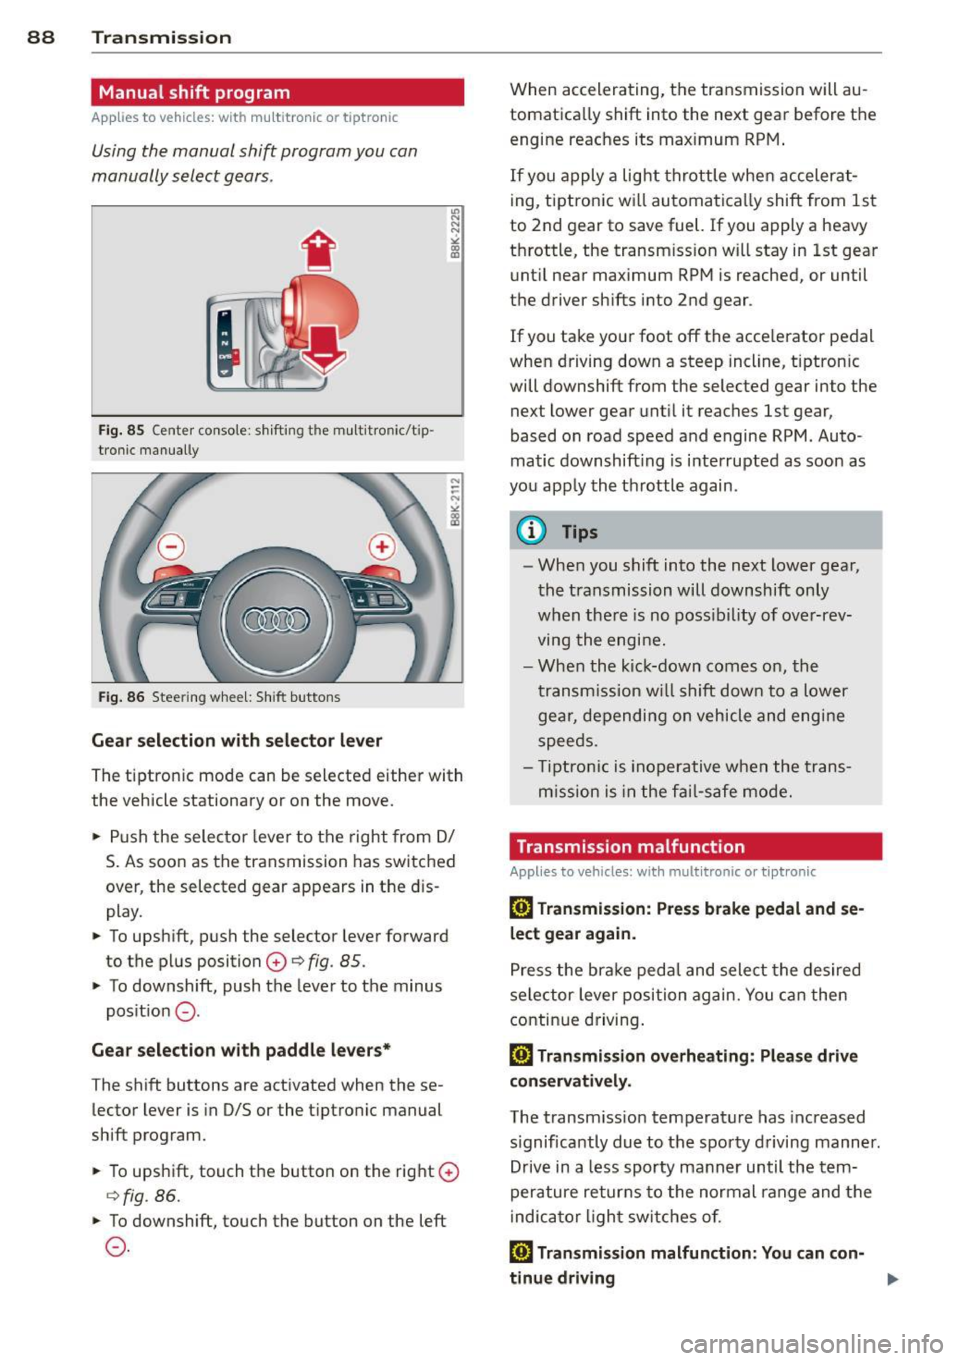
manually select gears .
Fig. 85 Center console : shift ing t he multitro nic/t ip ·
tronic manual ly
Fig . 86 Steering wheel: Shift buttons
Gear selection with selector lever
"' N
N
~
" a> CD
The tiptronic mode can be selected either with
the vehicle stationary or on the move .
.,. Push the selector lever to the right from
DI
S. As soon as the transmission has switched
over , the selected gear appears in the dis
play.
.,. To upshift, push the selector lever forward
to the plus position
0 ¢ fig. 85 .
.,. To downshift, push the lever to the minus
position
0 -
Gear selection with paddle levers*
The shift buttons are activated when these
lector lever is in D/S or the tiptronic manual
shift program.
.,. To upshift, touch the button on the right
0
¢fig . 86.
.,. To downshift, touch the button on the left
0-
When accelerating, the transmission will au
tomatically shift into the next gear before the
engine reaches its maximum RPM .
If you apply a light throttle when accelerat
ing, tiptronic will automatically shift from 1st
to 2nd gear to save fuel. If you apply a heavy
throttle, the transm iss ion will stay in 1st gear
until near maximum RPM is reached, or until
the driver shifts into 2nd gear .
If you take your foot off the accelerator pedal
when driving down a steep incline, tiptronic
will downshift from the selected gear into the
next lower gear until it reaches 1st gear,
based on road speed and engine RPM . Auto ·
matic downshifting is interrupted as soon as
you apply the throttle again .
(D Tips
-When you shift into the next lower gear,
the transmission will downshift only
when there is no possibility of over-rev
ving the engine.
- When the kick-down comes on, the
transmission will shift down to a lower
gear, depending on vehicle and engine
speeds .
- Tiptronic is inoperative when the trans
m ission is in the fail-saf e mode.
Transmission malfunction
Applies to vehicles: with mult itronic or tiptronic
[O] Transmission: Press brake pedal and se
lect gear again .
Press the brake pedal and select the desired
selector lever position again. You can then
continue driving.
[O] Transmission overheating: Please drive
conservatively.
The transmission temperature has increased
s ignificantly due to the sporty driving manner.
Drive in a less sporty manner until the tern·
perature returns to the normal range and the
indicator light switches of.
[O] Transmission malfunction: You can con-
tinue driving ..,.
Page 95 of 294
press the brake pedal to prevent the ve
hicle from rolling .
- Allow ing the ve hicl e to roll when the en
gine is stopped and the selector lever is i n N will dama ge the S tronic transm is
s ion because it is not lubricated under
those c ircumstances.
@ Tips
For safety reasons, the park ing brake is re
leased automatically only when the dr iv-
er's safety belt is engaged in the buck le.
Hill descent control
Applies to vehicles: with S tro nic transmiss ion and hill de
scent co ntrol
T he hill descen t control sys tem assists the
driver when driving down declines .
Hill desce nt co ntrol is activated when these
l ec to r lever is in D/S and you press the bra ke
p edal. The S tro nic tr ansm ission au tom atically
shifts down into a gear sui table for the de
cline. Hi ll descent control tr ies to maintain
the speed achieved at the time of braking,
wit hin physical and techn ica l limitations . If
may still be necessary to adjust the speed
with the brakes.
H ill descent control switches off once the de
cline levels out or you press t he accelerator
pedal.
On ve hicles with the cruise co ntrol system *
c::> page 81, hill descent control is also act ivat
ed when the speed is set.
A WARNING
-
Hi ll descent control cannot overcome
physical l imitations, so it may not be able
t o m aintain a cons tant speed under all
c o nditions. Alway s be r eady to app ly th e
br ak es.
Transm ission 93
Manual shift program
Applies to vehicles: wit h S tronic transm ission
Using the manual shift program you can
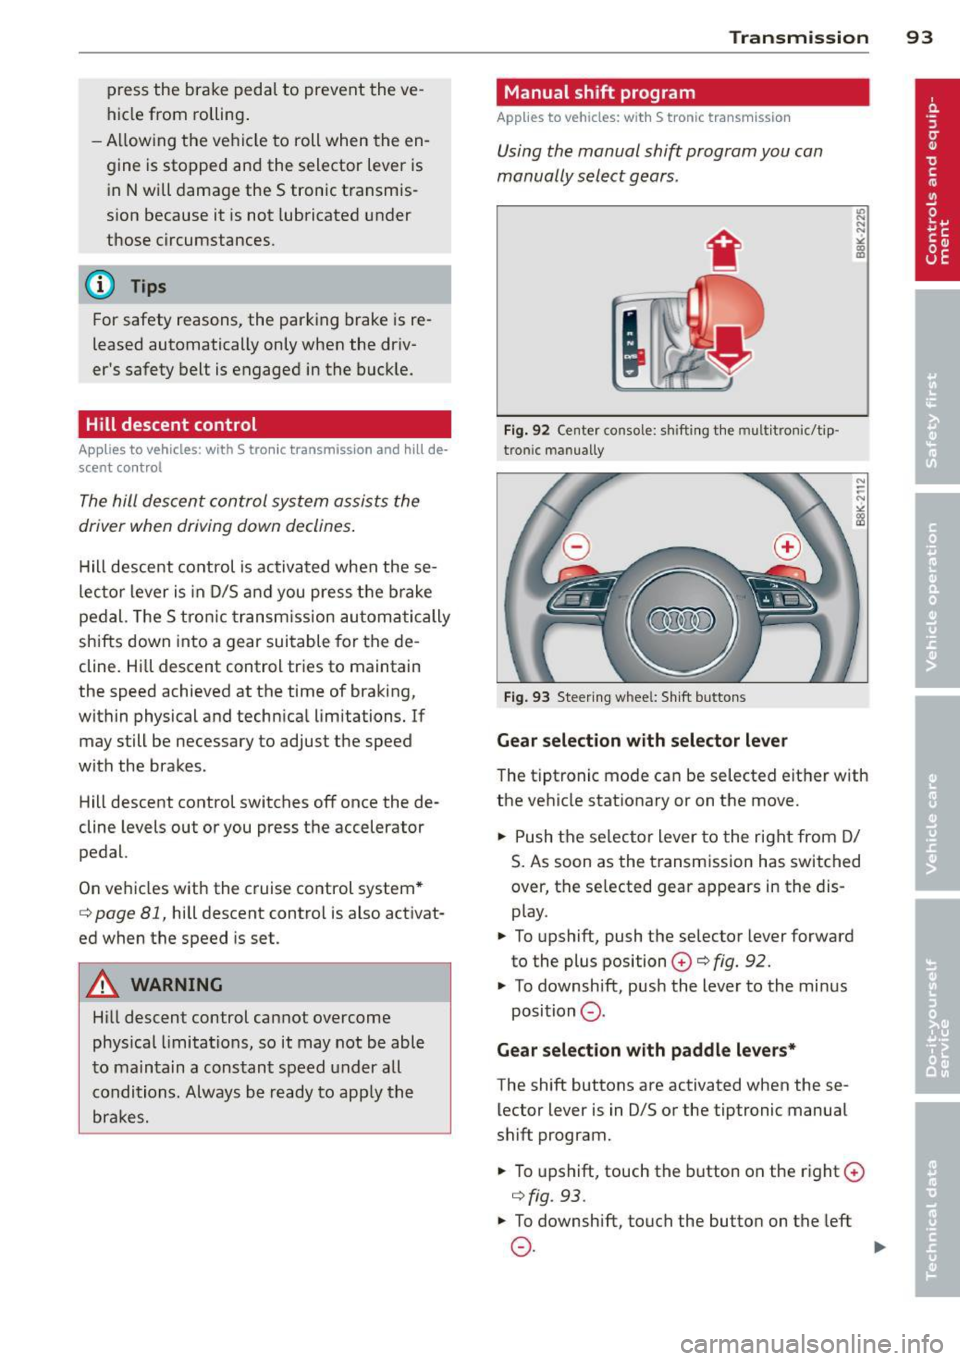
manually select gears .
Fig. 92 Center console : sh ift in g t he m ult itron ic/t ip ·
tro nic m an u ally
Fig. 93 Steering w hee l: S hift b utto ns
Gear selection with selector lever
"' ... .... "!
"' co a,
The tipt ronic mode can be selected eit her with
the ve hicle stat ionary or on the move.
.,. Push the se lec tor lever to the rig ht from D/
S. As soon as the t ransmission has switched
over, the se lected gear ap pears in the dis
p lay .
.,. To upshift, push the se lector lever forward
to the plus position
0 c::> fig. 92.
.,. To downshift, pus h the lever to the mi nus
position
0 .
Gear selection with paddle levers*
The shift buttons are activated when these
lector lever is in D/S or the tiptronic manual
shift program .
.,. To upshift, touch the button o n the right ©
c::> fig. 93 .
.,. To downshift , touch the butto n on the left
0 . ~
Page 124 of 294
122 Homelink®
Programming the transmitter (version
A)
Applies to vehicles: with Homelink
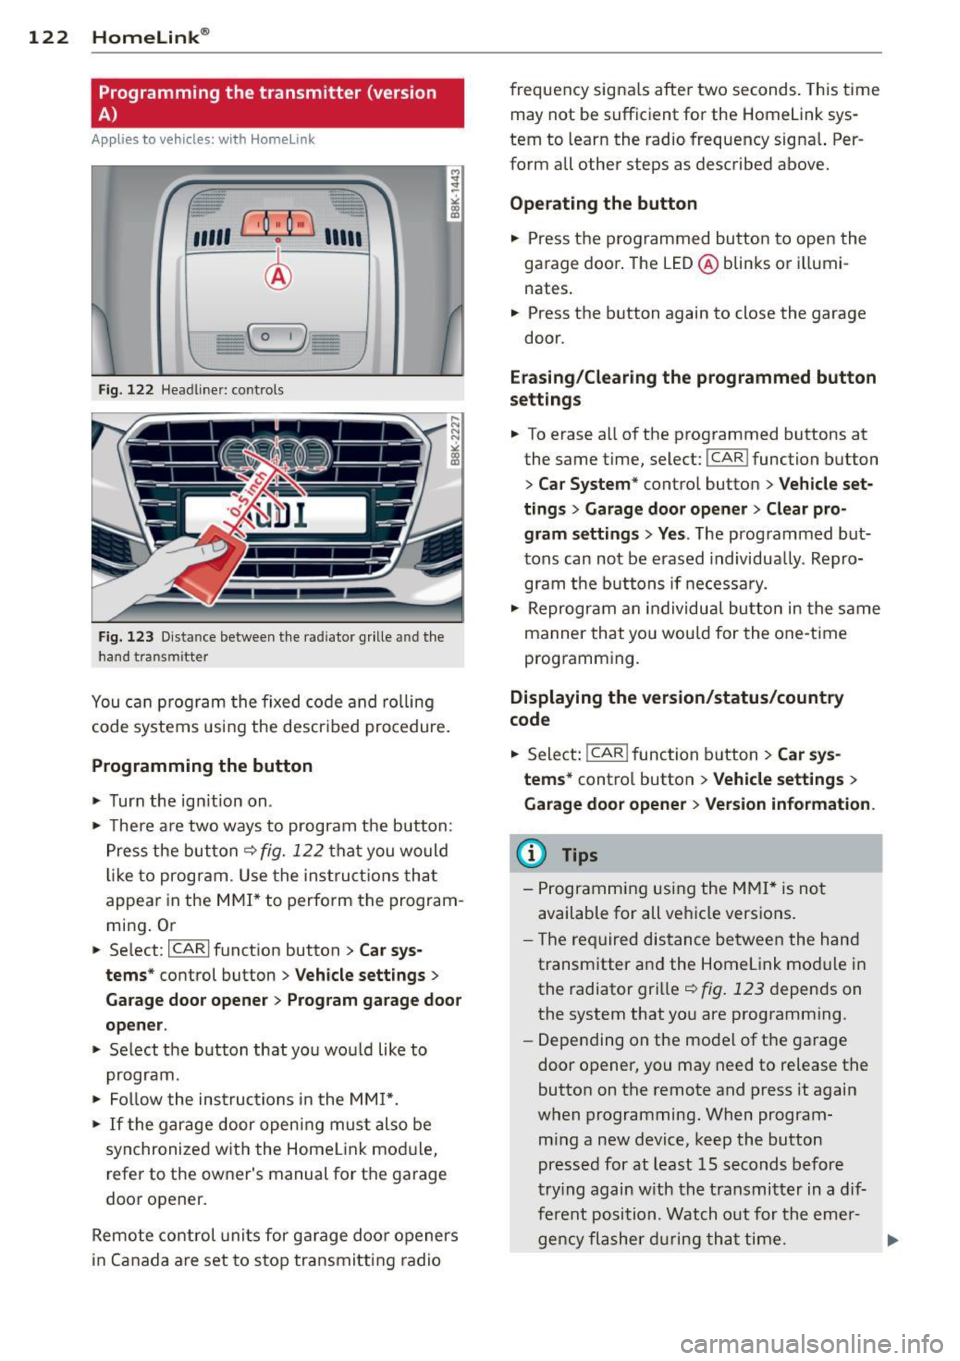
Fig. 122 Head line r: controls
Fig. 123 Dista nce between the radiator grille and the
hand transm itter
You can program the fixed code and rolling
code systems using the described procedure.
Programming the button
.,. Turn the ignition on .
.,. There are two ways to program the button:
Press the button
q fig. 122 that you would
like to program . Use the instructions that
appear in the MMI* to perform the program
ming. Or
.,. Select :
~IC~A~R~I function button > Car sys
tems*
control button > Vehicle settings>
Garage door opener> Program garage door
opener .
.,. Select the button that you would like to
program.
.,. Follow the instructions in the
MMI*.
.,. If the garage door opening must also be
synchronized with the Homelink module,
refer to the owner's manual for the garage
door opener.
Remote control units for garage door openers
in Canada are set to stop transmitting radio frequency
signals after two seconds. This time
may not be sufficient for the Homelink sys
tem to learn the radio frequency signal. Per
form all other steps as described above.
Operating the button
.,. Press the programmed button to open the
garage door. The LED@blinks or illumi
nates .
.,. Press the button again to close the garage
door.
Erasing/Clearing the programmed button
settings
.,. To erase all of the programmed buttons at
the same time, select:
I CAR ! function button
> Car System* control button > Vehicle set·
tings
> Garage door opener> Clear pro
gram settings> Yes .
The programmed but
tons can not be erased individually. Repro
gram the buttons if necessary .
.,. Reprogram an individual button in the same
manner that you would for the one-time
programming .
Displaying the version/status/country
code
.,. Select: !CAR ! function button> Car sys
tems*
control button > Vehicle settings >
Garage door opener > Version information .
@ Tips
- Programming using the MMI* is not
available for all vehicle versions.
- The required distance between the hand
transmitter and the Homelink module in
the radiator grille
q fig. 123 depends on
the system that you are programming .
- Depending on the model of the garage
door opener, you may need to release the
button on the remote and press it again
when programming. When program
ming a new device, keep the button
pressed for at least 15 seconds before
trying again with the transmitter in a dif
ferent position . Watch out for the emer-
gency flasher during that time. .,..
Page 125 of 294
-For security reasons, we recommend that
you clear the programmed buttons be
fore se lling the vehicle .
Programming the transmitter (version
B)
Applies to vehicles: with Home Link
,,,,, r ,o :O·,) ,,;;~
®
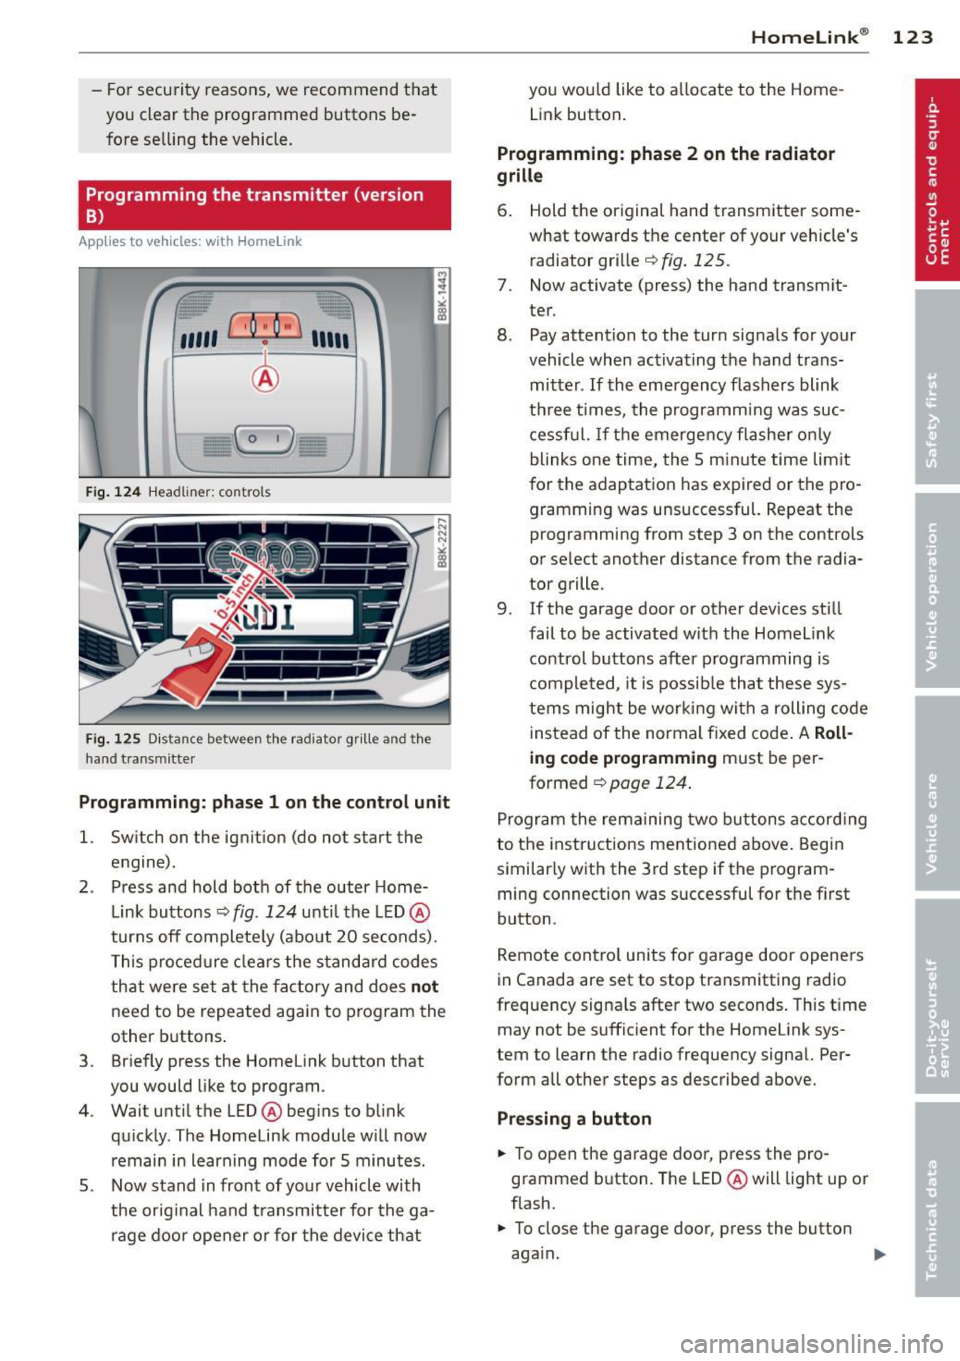
Fig. 124 Hea dli ner: c o n tro ls
Fig. 125 Dis ta n ce betw een th e radiato r gri lle a nd the
hand t rans mitte r
Programming: phase 1 on the control unit
l. Switch on the ignition (do not start the
engine) .
2 . Press and hold both of the outer Home
Link buttons ¢
fig. 124 unti l the LED @
turns off completely (about 20 seconds).
This procedure clears the standard codes
that were set at the factory and does
not
need to be repeated again to program the
other buttons .
3 . Briefly press the Homelink button that
you would like to program .
4. Wait until the LED @beg ins to blink
quickly . The Homelink module will now
remain in learning mode for 5 minutes.
5 . Now stand in front of your vehicle with
the original hand transmitter for the ga
rage door opener or for the device that
Homelink ® 123
you wou ld like to allocate to the Home
Link button .
Programming: phase 2 on the radiator
grille
6. Hold the or iginal hand transmitter some
what towards the center of your vehicle's radiator grille ¢
fig. 125.
7. Now activate (press) the hand transm it
ter.
8. Pay attention to the turn sig nals for your
vehicle when activating the hand trans
mitter .
If the emergency flashers blink
three times, the programm ing was suc
cessful. If the emergency flasher only
blinks one time, the 5 minute time lim it
for the adaptation has expired or the pro
gramming was unsuccessful. Repeat the
programming from step 3 on the controls
or se lect another distance from the radia
tor grille.
9. If the garage door or other devices still
fail to be activated with the Homelink control buttons after programming is
completed, it is possible that these sys
tems might be working with a roll ing code
instead of the normal fixed code . A
Roll
ing code programming must be per
formed ¢
page 124.
Program the remaining two buttons according
to the instructions ment ioned above . Begin
similarly with the 3rd step if the program
ming connection was successful for the f irst
button .
Remote contro l units for garage door openers
in Canada are set to stop transmitting radio
frequency signa ls after two seconds . This time
may not be sufficient for the Homelink sys
tem to learn the radio frequency signal. Per
form all other steps as described above.
Pressing a button
.,. To open the garage door, press the pro
grammed b utton. The LED @will light up or
flash.
.,. To close the garage door, press the button
aga in.
Page 126 of 294
124 Homelink®
Erasing the button s
.. Switch on the igni tion (do not start the en
gine) .
.. Press and ho ld both of the o uter buttons
until the LED @ turns off complete ly (about
20 seconds) to erase all of the buttons si
multaneously .
.. Programmed buttons cannot be erased indi
vidually . Reprogram the buttons if necessa
ry.
Reprog ramming the button s
.. Switch on the ignition (do not start the en
gine).
.. To reprogram an ind ividual button, press
and hold the des ired button unt il the L ED @
begins to blink (about 10 seconds) . Re lease
the button .
.. Wait until the L ED@ begins to blink quic k
ly . T he Homelink module will now remain in
l earning mode for 5 minutes .
.. Cont in u e with step 5 .
(D Tips
-The requ ired distance between the hand
transmitter and the Homelin k module in
the radiator grille¢
fig. 125 depends on
the system that you are programming.
- Depending on the mode l of the garage
door opener, you may need to release the
button on the remote and press it again
when programming. When program ming a new dev ice, keep the button
pressed for at least 15 seco nds befo re
trying again with the transmitte r in a dif
ferent pos it ion. Watch out fo r the emer
gency flasher duri ng t hat time.
- Fo r secu rity reaso ns, we recommend that
you clear the programmed but tons be
fore se lling the vehicle.
Programming the rolling code
Applies to veh icles: w ith Homelink
Additionally, a rolling code programming for
the Homelink universal remote control is re
quired for some systems .
Identifying the rolling code
.. Press the previously programmed HomeLink
button again and hold it down .
.. Look at the LED@¢
page 123, fig . 124 . If
the L ED blinks q uickly, the feat ures, such as
the garage door opene r, a re eq uipped w ith
t he rol ling code.
.. Program the rolling code as follows:
Activating the garage door opener motor
unit
.. Locate the setting but ton on the garage
door opene r motor un it. The exac t loca tion
and colo r of the bu tton may vary depending
on the garage door opener manufacturer .
.. Press the setting button on the garage door
opener motor unit ( usua lly this will activate
a "setting light display" on the motor unit).
Now you will have about
3 0 seconds time to
pe rform the Homelink button programm ing
on the controls .
Programming on the controls
.. Quickly press the p rev iously programmed
Homelink b utton .
.. Press the Home link button once more to
end the roll ing code programm ing .
After the controls have been programmed, the garage door opener s hou ld recognize the
Homelink signa l and operate when the Home
Li nk button is pressed. Now you may program
the other buttons as needed .
(D Tips
-Programming the rolling code can be
performed quicke r and more easily with
th e help of a second person. The Home
Li nk button may need to be pressed a
t hird t ime to en d the adjus tment pro ce
dure for some garage door openers.