open bonnet AUDI A5 2008 8T / 1.G Owners Manual
[x] Cancel search | Manufacturer: AUDI, Model Year: 2008, Model line: A5, Model: AUDI A5 2008 8T / 1.GPages: 313, PDF Size: 12.13 MB
Page 14 of 313
Instruments and warning/indicator lamps 12Warning symbol in instrument cluster
If the symbol
lights up in the display, this means that either the
coolant temperature is too high or the coolant level is too low
⇒page 32.
If the needle is at the top end of the dial, this means the coolant
temperature is too high. Stop the vehicle, switch off the engine and
wait for it to cool down. If the warning lamp starts flashing again
after just a short distance, contact a qualified workshop.
WARNING
•
Before opening the bonnet and checking the coolant level,
please observe the warning information on ⇒page 231, “Working
on components in the engine compartment”.
•
Never open the bonnet if you can see or hear steam or coolant
escaping from the engine compartment; there is a risk of being
scalded. Wait until you can no longer see or hear escaping steam
or coolant.Caution
•
Additional lights and other accessories in front of the air inlet
reduce the cooling effect of the radiator. At high outside tempera-
tures and high engine loads, there is a risk of the engine over-
heating.
•
The front spoiler also ensures proper distribution of the cooling
air when the vehicle is moving. If the spoiler is damaged this can
reduce the cooling effect, which could cause the engine to overheat.
You should obtain professional assistance.
Rev counter
The rev counter indicates the number of engine revolu-
tions per minute.You should select a lower gear if the engine speed drops below
1500 rpm. The start of the red zone on the dial indicates the
maximum engine speed which may be used briefly when the engine
is warm and after it has been run in properly. However, it is advisable
to change up a gear or move the selector lever to “D” (or lift your
foot off the accelerator) before the needle reaches the red zone.
Caution
Never allow the rev counter needle ⇒page 11, fig. 2 to go into
the red zone on the dial for more than a very brief period: there is a
risk of damaging the engine. The start of the red zone on the dial is
different for some engine versions.
For the sake of the environment
Changing up a gear early will help you to save fuel and minimise
engine noise.
button
This button has a number of different functions.
A2
SET
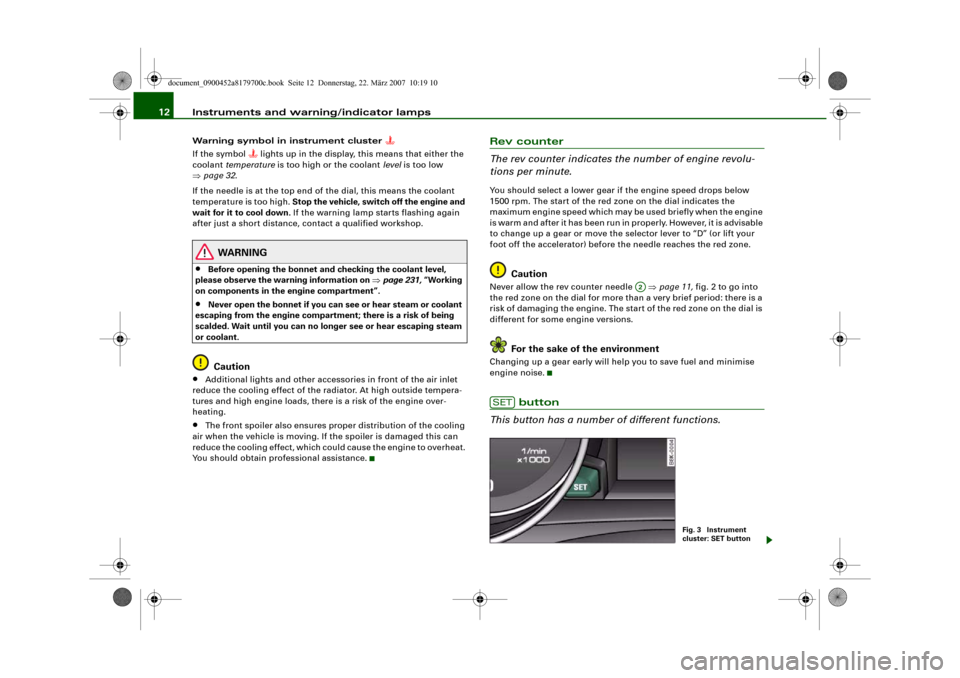
Fig. 3 Instrument
cluster: SET button
document_0900452a8179700c.book Seite 12 Donnerstag, 22. März 2007 10:19 10
Page 20 of 313
Instruments and warning/indicator lamps 18Anti-lock brake system (ABS)
The warning lamp monitors the ABS and the electronic
differential lock (EDL).The warning lamp
lights up for a few seconds when the ignition
is switched on and while the engine is being started. The lamp goes
out again once the system has run through an automatic test
sequence.
There is a fault in the ABS if:
•
the warning lamp
does not light up when the ignition is
switched on,
•
the warning lamp does not go out again after a few seconds,
•
the warning lamp lights up when the vehicle is moving.
The vehicle can still be braked in the normal way (except that the
ABS control function is out of action). Please take the vehicle to a
qualified workshop as soon as possible. For further information on
the ABS ⇒page 197.
If a fault occurs in the ABS, the ESP warning lamp will also light up.
Fault in the main brake system
If the ABS warning lamp
lights up together with the brake
warning lamp
⇒page 31, this indicates a fault in the ABS func-
tion, and possibly a malfunction in the main brake system as well
⇒.
If there is a malfunction in the brake system the symbol
will light
up in the instrument cluster. Please refer to ⇒page 31.
Fault on the electronic differential lock (EDL)
The EDL works in conjunction with the ABS. If a malfunction should
occur in the EDL, this is indicated by the ABS warning lamp .
Please take the vehicle to a qualified workshop as soon as possible.
For further information on the EDL ⇒page 199.
WARNING
•
Before opening the bonnet and checking the brake fluid level,
observe the warning information on ⇒page 231, “Working on
components in the engine compartment”.
•
If the brake warning lamp
should light up together with the
ABS warning lamp
, stop the vehicle immediately and check the
brake fluid level in the reservoir. If the fluid level has dropped
below the "MIN" mark you must not drive on - otherwise there may
be an increased accident risk. You should obtain professional
assistance.
•
If the brake fluid level is OK, the fault in the brake system may
have been caused by a failure of the ABS control function. As a
result the rear wheels can lock relatively easily when braking. This
could cause the tail of the vehicle to skid sideways. Drive carefully
to the nearest qualified workshop and have the fault rectified.
Applies to vehicles: with Audi hold assistAudi hold assist
This warning lamp monitors the Audi hold assist function.Audi hold assist helps the driver to keep the vehicle stationary while
the engine is running, for instance on steep gradients, at traffic
lights or in stop-and-go traffic. When the Audi hold assist function
is on, you don't have to keep your foot on the brake to prevent the
vehicle from accidentally rolling away. Once it detects that the
vehicle is stopped, Audi hold assist keeps the vehicle stationary. The
green symbol
in the instrument cluster indicates that the func-
tion is activated. You can now take your foot off the brake pedal.
When the vehicle has been stationary for an extended period, Audi
hold assist will automatically apply the parking brake. In this case,
the green symbol will change to red
.
document_0900452a8179700c.book Seite 18 Donnerstag, 22. März 2007 10:19 10
Page 21 of 313
Instruments and warning/indicator lamps19
Controls
Safety
Driving tips
General maintenance
Self-help
Technical data
Electro-mechanical parking brake
This warning lamp monitors the electro-mechanical
parking brake.The warning lamp
lights up when the parking brake is applied
with the ignition on. After the ignition has been switched off the
lamp will stay on for about 30 seconds. The warning lamp will light
up for about 30 seconds if the parking brake is applied with the igni-
tion switched off.
The warning lamp should go out when the parking brake is released.
If the warning lamp flashes continuously after the parking brake has
been applied, the brake may not be strong enough to hold the
vehicle on a slope. This may be due to the brakes overheating.
Please note the following points:
•
If the gradient is too steep to park the vehicle safely, the display
will show the message Caution: Vehicle parked too steep.
•
In the event of a fault in the parking brake system the symbol
will also appear in the instrument cluster display together with the
message Parki ng b rake! You should have the fault corrected by a
qualified workshop without delay.
Brake system
The warning lamp flashes if the brake fluid level is too low
or if there is a fault in the ABS system or the parking
brake.If the warning lamp
flashes, there is a fault in the brake system.
The symbol
in the instrument cluster display will flash at the
same time. You can press the button to obtain a message
explaining the fault ⇒page 31.
If a failure should occur in the ABS, the ABS warning lamp
will
light up together with the brake warning lamp
⇒.
WARNING
•
Before opening the bonnet and checking the brake fluid level,
observe the warning information on ⇒page 231, “Working on
components in the engine compartment”.
•
If the brake warning lamp does not go out, or if it lights up
when driving, the brake fluid level in the reservoir is too low – this
may cause an increased accident risk. Stop the vehicle and do not
drive on. You should obtain professional assistance.
•
If the brake warning lamp lights up together with the ABS
warning lamp, this can mean that the control function of the ABS
is out of action. As a result the rear wheels can lock relatively
easily when braking. This could cause the tail of the vehicle to skid
sideways. Drive carefully to the nearest qualified workshop and
have the fault rectified.
Fuel gaugeThe gauge only works when the ignition is switched on.
When the needle reaches the reserve zone, the symbol
lights up
in the instrument cluster display ⇒page 36 together with the
message Please refuel. At this point there are still about 8 litres of
fuel left in the tank. This is your reminder to fill up soon.
The tank capacity of your vehicle is given in the Technical data
section ⇒page 293.
Caution
Never run the tank completely dry. If there is an irregular fuel supply,
misfiring can occur. This allows unburnt fuel to enter the exhaust
system, which could cause overheating and damage the catalytic
converter.
SET
document_0900452a8179700c.book Seite 19 Donnerstag, 22. März 2007 10:19 10
Page 34 of 313
Driver information system 32
Parking brake ! Please contact workshop
– If the symbol appears after you switch on the ignition
when the vehicle is stationary, please check whether you
can release the parking brake. If this is possible, you
should drive without delay to the nearest qualified work-
shop and have the fault rectified. If the parking brake
cannot be released you should obtain professional
assistance.
– If this symbol should appear while driving, there may be
a malfunction in the drive-away assist or the emergency
brake functions. You may not be able to apply the parking
brake. It is also possible that you cannot release the
parking brake after it has been applied. Drive the vehicle
to a qualified workshop and have the fault repaired.If the ABS fails, the ABS warning lamp
will light up together with
the brake warning symbol
⇒.
WARNING
•
Before opening the bonnet and checking the brake fluid level,
observe the warning information on ⇒page 231, “Working on
components in the engine compartment”.
•
If the brake fluid level in the reservoir is too low, this could
result in an accident. Do not drive on. You should obtain profes-
sional assistance.
•
If the brake warning lamp lights up together with the ABS
warning lamp, this can mean that the control function of the ABS
is out of action. As a result the rear wheels can lock relatively
easily when braking. This could cause the tail of the vehicle to skid
sideways. Drive carefully to the nearest qualified workshop and
have the fault rectified.
Note
The warning lamp
in the instrument cluster will start flashing as
well if there is a fault in the brake system.
Fault in the cooling system
Faults in the cooling system must be rectified immedi-
ately.If the
symbol flashes in the display, this means that
either the coolant temperature is too high or the coolant
level is too low. The symbol is accompanied by a driver
message giving you more information about the fault. This
message will disappear after about 5 seconds, but you can
call it up again at any time by pressing the button:
Switch off engine, check coolant level
–Stop the vehicle.
– Switch off the engine.
– Check the coolant level ⇒page 236.
– Add more coolant if necessary ⇒page 236.
– Wait for the symbol to go out before driving on.
– Obtain professional assistance if necessary.
If the coolant level is correct, the overheating may be caused by a
malfunction of the radiator fan.
If the alternator warning lamp lights up as well ⇒page 31, it is
possible that the drive belt has broken.
SET
document_0900452a8179700c.book Seite 32 Donnerstag, 22. März 2007 10:19 10
Page 35 of 313
Driver information system33
Controls
Safety
Driving tips
General maintenance
Self-help
Technical data
WARNING
•
If your vehicle should break down for technical reasons, stop it
at a safe distance away from moving traffic, switch off the engine
and turn on the hazard warning lights ⇒page 58, “Hazard
warning lights ”.
•
Never open the bonnet if you can see or hear steam or coolant
escaping from the engine compartment; there is a risk of being
scalded. Wait until you can no longer see or hear escaping steam
or coolant.
•
The engine compartment of any motor vehicle is a dangerous
place. Before carrying out any work in the engine compartment,
switch off the engine and allow it to cool down. Please observe the
important safety warnings ⇒page 231, “Working on components
in the engine compartment”.Caution
Do not drive on if the symbol
has come on to indicate a fault in
the cooling system, otherwise there is a risk of damaging the
engine.
Engine oil pressure too low
If the engine oil pressure is too low the fault must be recti-
fied immediately.If the
symbol flashes in the display, the oil pressure is
too low. The symbol is accompanied by a driver message
giving you more information about the fault. This message
will disappear after about 5 seconds, but you can call it up
again at any time by pressing the button:
Switch off engine and check oil level
–Stop the vehicle.– Switch off the engine.
– Check the engine oil level ⇒page 234.
– Obtain professional assistance if necessary.
If the engine oil level is too low
If the engine oil level is too low, add more oil ⇒page 234.
If the engine oil level is correct
If the
symbol flashes and the engine oil level is correct, obtain
professional assistance. Do not drive on. Do not continue to run the
engine, not even at idle speed.
Note
The oil pressure warning lamp
is not an indicator for the oil
level. The oil level should therefore be checked regularly.
Fault in the steering system
The steering wheel cannot be unlocked if there is a fault
in the electronic steering lock.If the symbol
flashes in the display, there is a malfunc-
tion in the electronic steering lock. The symbol is accompa-
nied by a driver message giving you more information
about the fault. This message will disappear after about
5 seconds, but you can call it up again at any time by
pressing the button:
Do not drive vehicle. Steering defective
– You should obtain professional assistance.
–Do not have the vehicle towed away.
SET
SET
document_0900452a8179700c.book Seite 33 Donnerstag, 22. März 2007 10:19 10
Page 45 of 313
Doors and windows43
Controls
Safety
Driving tips
General maintenance
Self-help
Technical data Lock function can be switched on and off on the sound system or
MMI* ⇒page 44.
In the event of an accident in which the airbags inflate, the doors
will be automatically unlocked to facilitate access and assistance.
Deadlock mechanism
The central locking system is combined with a deadlock mecha-
nism. Once the vehicle has been locked from the outside, the door
handles on the inside are deactivated. This makes it more difficult
to break into the vehicle.
Anti-theft alarm system*
If the anti-theft alarm system senses interference with the vehicle it
triggers an audible and visible alarm.
The anti-theft alarm system switches on automatically when the
vehicle is locked. It switches off automatically if you unlock the
vehicle using the remote control.
If you unlock the vehicle by inserting the key in the drivers door, the
ignition must be switched on within 15 seconds, otherwise the
alarm will be triggered. On some export versions, the alarm is trig-
gered immediately when you open a door.
To deactivate the alarm, press the unlock button on the remote
control key or switch on the ignition. The alarm will also switch itself
off when it comes to the end of its cycle.
Switch off the interior monitor and tow-away protection if you wish
to prevent the alarm from being triggered accidentally.
Turn signals
The turn signals will flash twice when the vehicle is unlocked and
once when the vehicle is locked. If the turn signals do not flash, one
of the doors, the bonnet or the boot lid is still open.
Accidental lock-out
The central locking system prevents you from being locked out of
the vehicle in the following situations:
•
When the driver's door is open, it cannot be locked together with
the other door by pressing the central locking switch and then
closing the door ⇒page 47.
•
On vehicles with advanced key*, the boot lid will be released
again automatically if the remote control key that was last in use is
left inside the boot when the boot lid is closed ⇒page 48.
To prevent yourself from being locked out, do not lock the vehicle
with the remote control key before closing the doors or boot lid.
WARNING
Do not leave anyone (especially children) in the car if it is locked
from the outside and the deadlock mechanism is activated: the
doors and windows cannot then be opened from the inside.
Locked doors could delay assistance in an emergency, potentially
putting lives at risk.
Note
•
Never leave any valuable items in the vehicle unattended. Even a
locked vehicle is not a safe.
•
If the diode on the driver's window sill lights up for about 30
seconds when the vehicle is locked, the central locking system or
anti-theft alarm* is not working properly. Please have the malfunc-
tion repaired by an Audi dealer or qualified workshop.
•
The interior monitor of the anti-theft alarm* system will only
function as intended if the windows and the tilting panorama roof*
are closed.
document_0900452a8179700c.book Seite 43 Donnerstag, 22. März 2007 10:19 10
Page 46 of 313
Doors and windows 44Setting the central locking system
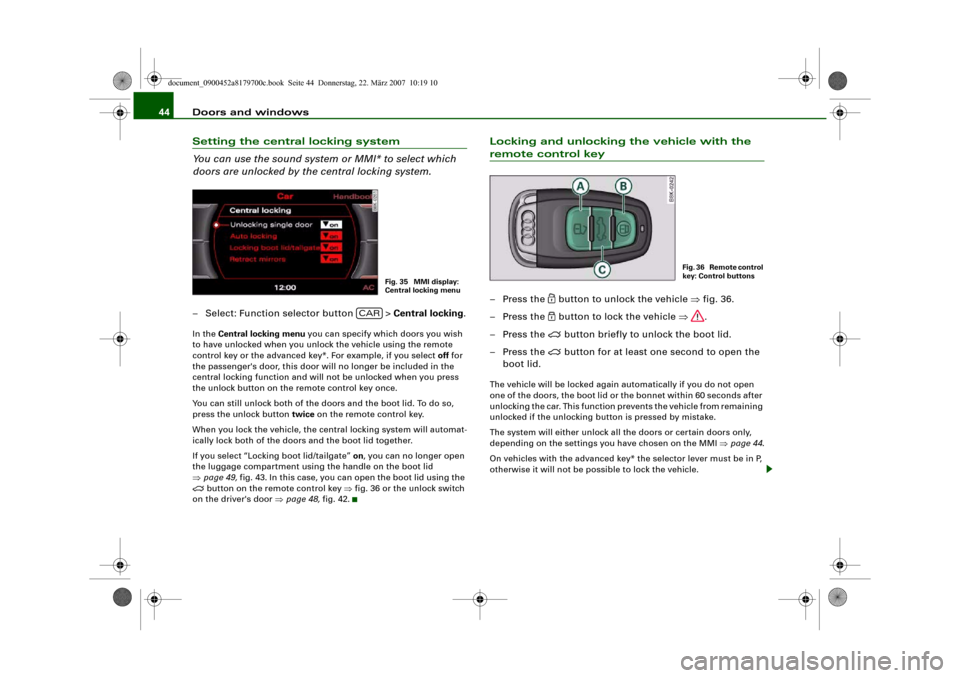
You can use the sound system or MMI* to select which
doors are unlocked by the central locking system.– Select: Function selector button > Central locking.In the Central locking menu you can specify which doors you wish
to have unlocked when you unlock the vehicle using the remote
control key or the advanced key*. For example, if you select off for
the passenger's door, this door will no longer be included in the
central locking function and will not be unlocked when you press
the unlock button on the remote control key once.
You can still unlock both of the doors and the boot lid. To do so,
press the unlock button twice on the remote control key.
When you lock the vehicle, the central locking system will automat-
ically lock both of the doors and the boot lid together.
If you select “Locking boot lid/tailgate” on, you can no longer open
the luggage compartment using the handle on the boot lid
⇒page 49, fig. 43. In this case, you can open the boot lid using the
button on the remote control key ⇒fig. 36 or the unlock switch
on the driver's door ⇒page 48, fig. 42.
Locking and unlocking the vehicle with the remote control key– Press the
button to unlock the vehicle ⇒fig. 36.
– Press the button to lock the vehicle ⇒.
– Press the
button briefly to unlock the boot lid.
– Press the
button for at least one second to open the
boot lid.
The vehicle will be locked again automatically if you do not open
one of the doors, the boot lid or the bonnet within 60 seconds after
unlocking the car. This function prevents the vehicle from remaining
unlocked if the unlocking button is pressed by mistake.
The system will either unlock all the doors or certain doors only,
depending on the settings you have chosen on the MMI ⇒page 44.
On vehicles with the advanced key* the selector lever must be in P,
otherwise it will not be possible to lock the vehicle.
Fig. 35 MMI display:
Central locking menu
CAR
Fig. 36 Remote control
key: Control buttons
document_0900452a8179700c.book Seite 44 Donnerstag, 22. März 2007 10:19 10
Page 134 of 313
Automatic gearbox 132Reverse gear must only be engaged when the vehicle is stationary
and the engine is idling ⇒.
To move the selector lever to position R, press in the interlock
button and at the same time press the brake pedal. Depending on
the model, one or two reversing lights will come on in selector lever
position R (when ignition is switched on).
N - Neutral
In this position the gearbox is in neutral ⇒.
D - Drive (forwards)
In this position the gearbox automatically selects the best gear
ratio. This depends on the engine load, the road speed and the
dynamic gear control program (DCP).
Press the brake pedal when moving the selector lever from N to D if
the vehicle is stationary or at speeds below 5 km/h ⇒.
In some situations (such as on mountain roads or when towing a
trailer or caravan) it can be advantageous to switch temporarily to
tiptronic mode ⇒page 134, so that the gear ratios can be selected
manually to suit the driving conditions.
S - Sport position
Select this position if you wish to take full advantage of the car's
performance. This setting makes use of the engine's maximum
power output. When accelerating the gear shifts will be noticeable.
Press the brake pedal when moving the selector lever from N to S if
the vehicle is stationary or at speeds below 5 km/h ⇒.
WARNING
•
Never move the selector lever to R or P when driving, as this
could cause an accident.
•
In selector position D or S the vehicle must always be held with
the foot brake when the engine is running. This is because an auto-
matic gearbox still transmits power even at idling speed, and the vehicle tends to “creep”. The throttle must on no account be
opened inadvertently (for instance by hand from the engine
compartment) when a gear is engaged with the vehicle stationary.
The vehicle could otherwise start moving immediately (in some
cases even if the parking brake is engaged) and possibly cause an
accident.
•
To avoid accidents, apply the parking brake and put the
selector lever in position P before opening the bonnet and working
on the vehicle with the engine running. Please observe the impor-
tant safety warnings ⇒page 231, “Working on components in the
engine compartment”.
Applies to vehicles: with multitronic®Selector lever lock
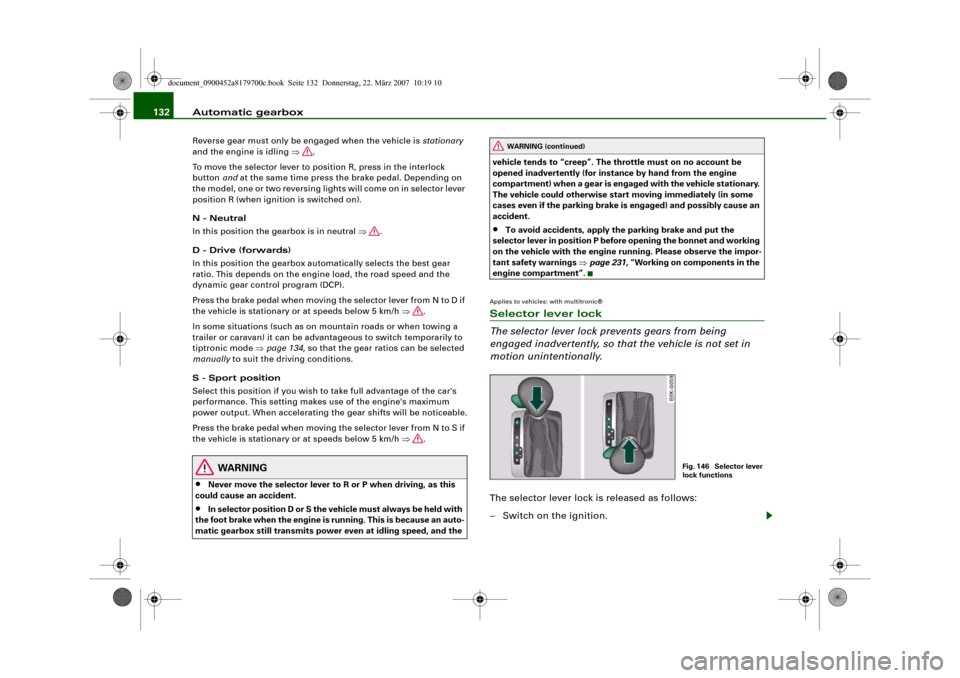
The selector lever lock prevents gears from being
engaged inadvertently, so that the vehicle is not set in
motion unintentionally.The selector lever lock is released as follows:
– Switch on the ignition.
WARNING (continued)
Fig. 146 Selector lever
lock functions
document_0900452a8179700c.book Seite 132 Donnerstag, 22. März 2007 10:19 10
Page 232 of 313
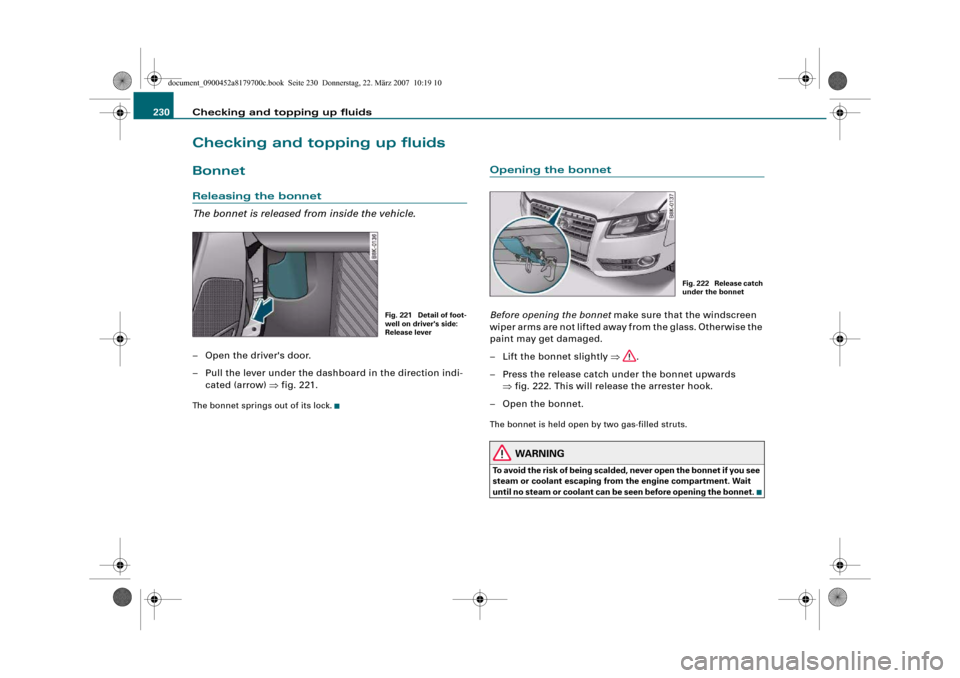
Checking and topping up fluids 230Checking and topping up fluidsBonnetReleasing the bonnet
The bonnet is released from inside the vehicle.– Open the driver's door.
– Pull the lever under the dashboard in the direction indi-
cated (arrow) ⇒fig. 221.The bonnet springs out of its lock.
Opening the bonnetBefore opening the bonnet make sure that the windscreen
wiper arms are not lifted away from the glass. Otherwise the
paint may get damaged.
– Lift the bonnet slightly ⇒.
– Press the release catch under the bonnet upwards
⇒fig. 222. This will release the arrester hook.
– Open the bonnet.The bonnet is held open by two gas-filled struts.
WARNING
To avoid the risk of being scalded, never open the bonnet if you see
steam or coolant escaping from the engine compartment. Wait
until no steam or coolant can be seen before opening the bonnet.
Fig. 221 Detail of foot-
well on driver's side:
Release lever
Fig. 222 Release catch
under the bonnet
document_0900452a8179700c.book Seite 230 Donnerstag, 22. März 2007 10:19 10
Page 243 of 313
Checking and topping up fluids241
Controls
Safety
Driving tips
General maintenance
Self-help
Technical data
•
Do not expose the battery to direct sunlight over a long period of
time, as the intense ultraviolet radiation can affect the battery
housing.
•
If the car is left standing for long periods, protect the battery
from extreme cold temperature so that it does not “freeze up” and
become damaged.
Charging the battery
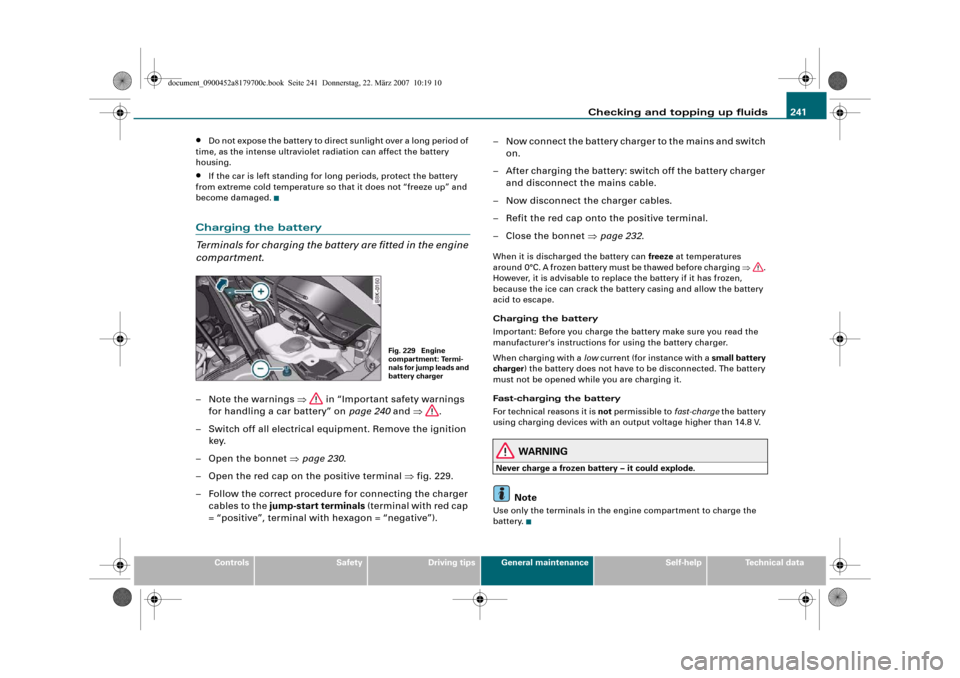
Terminals for charging the battery are fitted in the engine
compartment.– Note the warnings ⇒ in “Important safety warnings
for handling a car battery” on page 240 and ⇒.
– Switch off all electrical equipment. Remove the ignition
key.
– Open the bonnet ⇒page 230.
– Open the red cap on the positive terminal ⇒fig. 229.
– Follow the correct procedure for connecting the charger
cables to the jump-start terminals (terminal with red cap
= “positive”, terminal with hexagon = “negative”).– Now connect the battery charger to the mains and switch
on.
– After charging the battery: switch off the battery charger
and disconnect the mains cable.
– Now disconnect the charger cables.
– Refit the red cap onto the positive terminal.
– Close the bonnet ⇒page 232.
When it is discharged the battery can freeze at temperatures
around 0°C. A frozen battery must be thawed before charging ⇒.
However, it is advisable to replace the battery if it has frozen,
because the ice can crack the battery casing and allow the battery
acid to escape.
Charging the battery
Important: Before you charge the battery make sure you read the
manufacturer's instructions for using the battery charger.
When charging with a low current (for instance with a small battery
charger) the battery does not have to be disconnected. The battery
must not be opened while you are charging it.
Fast-charging the battery
For technical reasons it is not permissible to fast-charge the battery
using charging devices with an output voltage higher than 14.8 V.
WARNING
Never charge a frozen battery – it could explode.
Note
Use only the terminals in the engine compartment to charge the
battery.
Fig. 229 Engine
compartment: Termi-
nals for jump leads and
battery charger
document_0900452a8179700c.book Seite 241 Donnerstag, 22. März 2007 10:19 10