steering AUDI A5 2015 Owner´s Manual
[x] Cancel search | Manufacturer: AUDI, Model Year: 2015, Model line: A5, Model: AUDI A5 2015Pages: 264, PDF Size: 66.83 MB
Page 78 of 264
Driving
oil pressure must first build up in the hy
draulic va lve adjusters. This is normal and
not a cause for concern .
- If yo u leave the vehicle with the ign ition
switched on, the ignition will switch off af
ter a certa in period o f time . P lease note that
electr ica l equipment suc h as exterior lights
will switch off as well when that happens.
Switching engine off
Applies to vehicles: w ith conven ience key
" Bring your veh icle to a complete stop .
" Automat ic transm iss ion: Move the se lector lev
er to the P or N pos ition .
" Press the
!S TAR T ENGINE STOPI bu tton
~page 75, fig. 80 .
Steering lock
The steering locks when you tu rn the engine off
using the
! STA RT E NG IN E STOP I button and open
the dr iver's door . The locked stee ring helps pre
vent vehicle theft .
Emergency off
If necessary, the eng ine can be sw itched off with
the selector lever in the R o r D/S pos itions . T he
engine stops if you press and hold the
I S TAR T ENGIN E ST OP I button at speeds be low
6 mph ( 10 km/h) and p ress the brake pedal.
A WARNING
- Never turn off the engine be fore the veh icle
has come to a comp lete stop. The f ull func
t ion of the b rake booster and the power
steering is not guaranteed. Yo u must use
more force to turn or bra ke if necessa ry. Be
ca use you cannot steer and b ra ke as you
usually wou ld, this could lead to c rashes
and serious injur ies .
- For safety reasons , you should always park
yo ur vehicle wi th the selec to r l ever in P . Oth
erwise, t he vehicle could inadve rten tly roll
away .
- T he rad iator fan ca n con tinue to run for up
to 10 m inutes eve n after yo u have tur ned
o ff the engine and removed the igni tion key .
T he r adiator fan c an also turn on ag ai n if t he
76
engine coolant heats up because of intense
sunlight or heat b uild- up in the eng ine com
partme nt.
- Always take the key w ith you whenever yo u
leave your vehicle . Otherwise, the engine
could be started or electrical equipment
such as the powe r windows could be operat
ed. This can lead to serio us i njur y.
(D Note
If the engine has been under heavy load for
an extended pe riod, heat bu ilds up in the en
gine compartment after the eng ine is switch
ed off -there is a risk of damaging the engine .
A llow the engi ne to run at id le for about two
m in utes before swit ching i t off.
Driver messages
Ignition is on
This message appears and a warning tone sound s
i f you open the d river's door when the ign ition is
switched on .
No key ident ified
This message appears when the
I S TAR T ENGINE ST OP I butto n is pressed if there
i s no maste r key ins ide the ve hicle or if the sys
tem does not recogni ze it. For examp le, the mas
ter key cannot be recogn ized if it is covered by an
object (e .g . a luminum brief case) wh ich
screens
the radio signal. Elect ro n ic dev ices such as cell
phon es can a lso inte rfe re with the radio signal.
Press brake pedal to start eng ine
This message appears if yo u do not press the
brake pedal to start the eng ine in a vehicle with
an a utomat ic transm ission.
Pre ss clutch pedal to start engine
This message appears if yo u do no t press the
cl utc h ped al to sta rt the eng ine in a ve hicle w it h
a manual transmission.
Shift to N or P to start eng ine
This message appears when attempt ing to star t
t h e engine if the selecto r lever for the automat ic
transmission is not in the P o r
N position. T he ..,.
Page 80 of 264
Driving
-Oc ca siona l noises when the parking brake is
applied and released are normal and are not
a cause for conce rn.
- When the vehicle is parked, the parking
brake goes thro ugh a se lf-test cycle at regu
l ar inte rvals . Any associated noises are nor
mal.
Parking
.,. Press the brake pedal to stop the vehicle .
.,. Pull the switch@¢
page 77, fig. 81 to set the
parking b rake.
.,. Automat ic transm iss ion: Move the se lector lev-
er to P.
.. Turn the eng ine off ¢,&. .
.. Manua l transmission: Shift in to 1st gea r.
.. When on inclines or declines, tu rn the steering
whee l so that the vehicle w ill roll into the curb
if it beg ins to move.
A WARNING
- When you leave your veh icle -even if only
br iefly -always remove the ignition key . This
applies part icu larly when children remain in
t h e ve hicl e. Otherwise the childre n could
s tar t the engine, release the p arking br ake
or opera te e lectr ica l equi pment (e.g . power
win dows) . There is the ris k of an acci den t.
- When the vehicle is lo cked, no one -particu
larly not children should rema in in the vehi
cl e. Locked doors make it more difficult for
emergency wor kers to get into the vehicle -
putt ing lives at risk.
Starting from rest
The starting assist function ensures that the
parking brake is released automatically upon
starting .
Stopping and applying parking brake
.. Pu ll t he swi tch @ ¢ page 77, fig. 81 to app ly
t h e parking brake.
78
-
Starting and automatically releasing the
park ing brake
.. When you sta rt to drive as usual, the parking
bra ke is automatically released and yo ur vehicle
beg ins to move.
When stop ping at a traffic signal or stopping in
c ity t raffic on vehicles with an a utomat ic t rans
mission, the parking brake can be app lied. The
vehicle does not have to be he ld with the foot
brake. The pa rking brake eliminates the tendency
to c reep with a d rive ra nge engaged. As soon as
yo u drive off as usua l, the park ing b rake is re
l eased a utomat ica lly and the vehi cle starts to
m ove .
Starting on slopes
When sta rting on inclines, the starting assist pre
ven ts the vehicle from unintentionally ro lling
bac k. The braking force of the parking b rake is
n ot released until suff icient dr iving force has
been built up at the wheels.
(D Tips
For safety reasons, the pa rking bra ke is re
l eased a utoma tically on ly w hen t he d river's
s a fety be lt is en gaged in t he b uckle.
Starting off with a trailer
To prevent rolling back unin tentionally on an in
cline, do the f ollowing:
.. Keep the sw itch @¢ page 77, fig . 81 pulled
and dep ress the accelera to r. T he pa rking brake
s t ays app lied and p revents the veh icle from
roll ing ba ckw ard .
.. Yo u can re lease the swi tch @ once you are s ure
that you are deve loping enough d riving force at
the whee ls by depressing the accelerato r.
Depend ing on the weight of the rig (vehi cle an d
t ra ile r) and the seve rity of the incline, yo u may
r o ll backwards as yo u start. You can p revent roll
i ng backwards by holding the parking brake
switch @pulled o ut and acce lerating -just as
you would when starting on a hill wi th a conven
tiona l hand b rake .
Page 88 of 264
Automatic transmission
¢ page 191. Otherwise, any increase in en
gine speed may set the veh icle in motion,
even with the parking brake applied.
(D Note
- When stopping on an incline, do not try to
hold the vehicle in place by pressing the ac
ce lerator pedal while a driving gear is se
lected. This can cause the transmission to
overheat and can damage it . Activate the
parking brake or press the brake pedal to
prevent the vehicle from rolling.
- Allowing the vehicle to roll when the engine
i s stopped and the selector lever is in
N w ill
damage the transm ission because it is not
lubr icated under those circumstances.
@ Tips
For safety reasons, the park ing brake is re
leased automatically only when the dr iver's
safety belt is engaged in the buckle.
Hill descent control
A pp lies to veh icles: w ith 5 tro nic/t iptronic
The hill descent control system assists the driver
when driving down declines.
Hill descent control is activated when the selec
tor lever is in D/S and you press the brake pedal.
The transmission automatica lly selects a gear
that is suitable for the incline. Hill descent con
trol tries to maintain the speed achieved at the
tim e of braking, within physical and technical
limitations. It may still be necessary to adjust the
speed with the brakes.
Hill descent control switches off once the decline
levels out or you press the acce lerator pedal.
On veh icles w ith the cruise control system*
¢ page 80, hill descent control is also act ivated
when the speed is set.
& WARNING
Hi ll descent control cannot overcome physical
limitations, so it may not be ab le to maintain
a constant speed under all conditions. Always
be ready to apply the brakes.
86
Manual sh ift program
App lies to vehicles: wit h S tron ic/tip tro nic
Using the manual shift program you can man
ually select gears.
'
Fig. 89 Center console: shifting the gears manually
Fig. 90 Steering wheel: sh ift padd les•
Gear selection with selector lever
The tiptronic mode can be selected either w ith
the vehicle stationary or on the move.
11> Push the se lector lever to the right from D/S.
An M appears in the instrument cluster display
as soon as the transmission has shifted .
"T o upshift, push the se lector lever forwa rd to
the plus position
G) ¢ fig. 89.
" To downshift, push the lever to the minus posi-
tion
0 .
Gear selection with shift paddles*
The shift paddles are activated when the selector
l ever is in D/S or the tiptronic manual sh ift pro
gram .
" To upshift, touch the shift padd le on the r ight
G) ¢fig. 90.
"To downshift, touch the shift paddle on the left
0 .
11o Ifyou do not press a shift p addle within a short
time while in the 0/5 position, the transmission .,.
Page 89 of 264
M N
i? co ,...., \!) 1.1'1
N 1.1'1 ,....,
will return to automatic mode. To keep shifting
using the shift paddles, move the s elector lever
to the right out of the 0/5 position.
The t ransmission automatically shifts up o r down
before critica l engine speed is reached.
The transmission only allows manua l shift ing
when the engine speed is within the permitted range .
@ Tips
-When you sh ift into the next lower gear, the
transmission will downshift only when there i s no poss ibility of over -revving the engine.
- When the kick-down comes on, the trans
mission will sh ift down to a lower gear, de
pending on vehicle and engine speeds .
- Tiptronic is inoperat ive when the transmis
s ion is in the fa il-safe mode .
Kick-down
Appl ies to vehicles: with S tro nic/t iptronic
Kick-down enables maximum acceleration.
When you depress the accelerato r pedal beyond
the resistance po int, the automatic transm iss ion
downshifts into a lower gear, depend ing o n ve hi
cle speed and engine speed. The upsh ift into the
nex t higher gear ta kes place once the maximum
specified engine speed is reached .
A WARNING
Please note that the drive wheels can spin if
kick-down is used on a smooth slippery road -
there is a risk of sk idding.
Launch Control Program
App lies to vehicles: with S tro nic
Th e Launch Control Program provides the best
acceleration possible when starting from a stop .
Requirement: The engine must be at operating
temperature and the steering wheel must not be
turn ed .
.,. Press the
1.$ O FF I button ¢ page 171 while the
engine is running. The
II i ndicator light ill umi
nates i n the instrument cluster and
Stabiliza-
Aut omatic transm issio n
tion control (ESC): Sport. W arning! Re stri cted
s tability
appears in the driver information sys
tem display .
.,. Move the sele ctor leve r to the 0/5 position to
select spo rt mode (5) or se lect the
d y namic
driving mode in drive se lect* ¢ page 103 .
.,. Press the brake pedal strongly with your left
foot and ho ld it down fo r at least 1 second.
.,. At the same time, press the accelerator pedal
down comp lete ly with yo ur right foot u nti l th e
eng ine reaches and mainta ins a high R PM .
.,. Remove your foot from the brake pedal within 5
seconds ¢
,A.
A WARNING
-Always adapt your dr iving to the traff ic flow.
- Onl y use the Launch Cont ro l Program when
road and traffic cond itions allow it and oth
er drivers will not be endangered or annoyed by your driving and the vehicle's acce lera
tion .
- Please note that the driving wheels can spin
and the vehicle can break away when sport
mode is switched on, especially when the
road is s lippery .
- Once you have accelerated, you shou ld
sw itch sport mode off by pressing the
l.f3 OFF I button .
(D Tips
-The tra nsmission temperature may increase
signif icant ly after us ing the Launch Contro l
Program. If that happens , the program may
not be availab le for a few minutes.
It wi ll be
available again afte r a cool-down per iod.
- When acc elerating using the Launch Control
program, a ll vehicle parts are subject to
heavy loads. Thi s can resu lt in in creased
wear.
Transmission malfunction
App lies to vehicles : wi th S tronic/tip tro nic
[cjJ Tran smi ssion: Pre ss brake pedal and select
gear again . ..,.
87
Page 104 of 264
Audi drive select
Audi drive select
Driving settings
Introduction
Applies to veh icles: w ith Audi drive select
Drive select provides the possibility to experience
d ifferent types of vehicle settings in one vehicle.
F or instance, using the three
Comfort, Auto and
Dynamic modes, the driver can switch from a
sporty to a comfortable driving mode with the press of a button.
Addit ionally, in vehicles with MM I*, the vehicle
setup for
Individual* mode can be customized by
you. This makes it possible to combine settings
such as a sporty engine tuning with comfortable
steering .
A WARNING
Improper use of the Audi drive select can
cause collisions, other acc idents and serious
personal injury.
Description
Applies to veh icles: w ith Audi dr ive select
-
The vehicle setup in each mode depends on the
veh icle's features . However, the engine, automat
ic transmission* and steering are always involved.
Engine and automatic transmission*
Depending on the mode, the engine and the au
tomatic transmission respond quicker or in a
more balanced manner to accelerator pedal
movements. In the sporty dynamic mode, the au
tomatic transmission shifts at higher RPMs.
Steering
The steering adapts in terms of steering effort
and steering ratios. Indirect steer ing that moves
easily, like the steering in comfort mode, is best
suited to long drives on a highway. In contrast,
dynamic mode provides sporty, direct stee ring.
The follow ing applies to vehicles with dynam ic
steer ing*: the steering ratio changes based on ve
h icle speed in order to maintain optimum steer
ing effort for the dr iver at all times. This sets the
s teer ing to be less sensitive at higher speeds in
102
order to provide improved vehicle control. At re
duced speeds, however, steering is more direct in
order to keep the steer ing effort as m inima l as
possib le when the driver is maneuver ing the vehi
cle. At low and average speeds, dynam ic steering
additionally provides more responsive steering
performance.
Adaptive dampers*
The adaptive dampers* use sensors to record in
formation regarding steering movements, brak ing and acceleration operations by the driver,
road surface, driving speed, and load. This makes
i t possible to adapt damp ing to the driving situa
tion virtually in real t ime . Drive select also makes
i t possible to sat isfy the desire fo r sporty suspen
s ion (Dynamic) and comfortable suspension
(Comfo rt) without giving up ba lanced tuning (Au
to).
Sport differential*
As a compone nt of the all whee l dr ive system
(quattro)
<> page 174, t he sport differential* dis
tributes the driving power to the rear axle de
pending on the situation. The distribution of
power varies depending on the mode selected.
The goal is a high level of agility and ability to ac
ce lerate on curves. The vehicle is very responsive
to steering.
Audi adaptive cruise control*
The behavior when accelerating can be adjusted
from comfortable to sporty, depending on the drive select mode. Adaptive cruise control a lso
responds to the driving behavior of the vehicle
ahead in a more conservative or sporty manner.
Engine sound*
The sound of the engine is adapted to the select
ed mode and ranges from subtle to sporty.
(D Tips
- In some models, the maximum vehicle
speed can only be reached in the
Auto and
Dynamic modes.
- For vehicles with an automatic transmis-
sion, se lecting the
Dynamic mode results in 1111-
Page 105 of 264
M N
0 loo
rl I.O
"' N
"' rl
sporty sh ifting charac ter istics . The 5 gear
position engages automatically.
- In vehicles that have dynamic steering*, op
erating noise is hea rd when starting or sto p
p ing the engine . This does not indicate a
problem.
Selecting the driving mode
Applies to vehicles: with Audi drive select
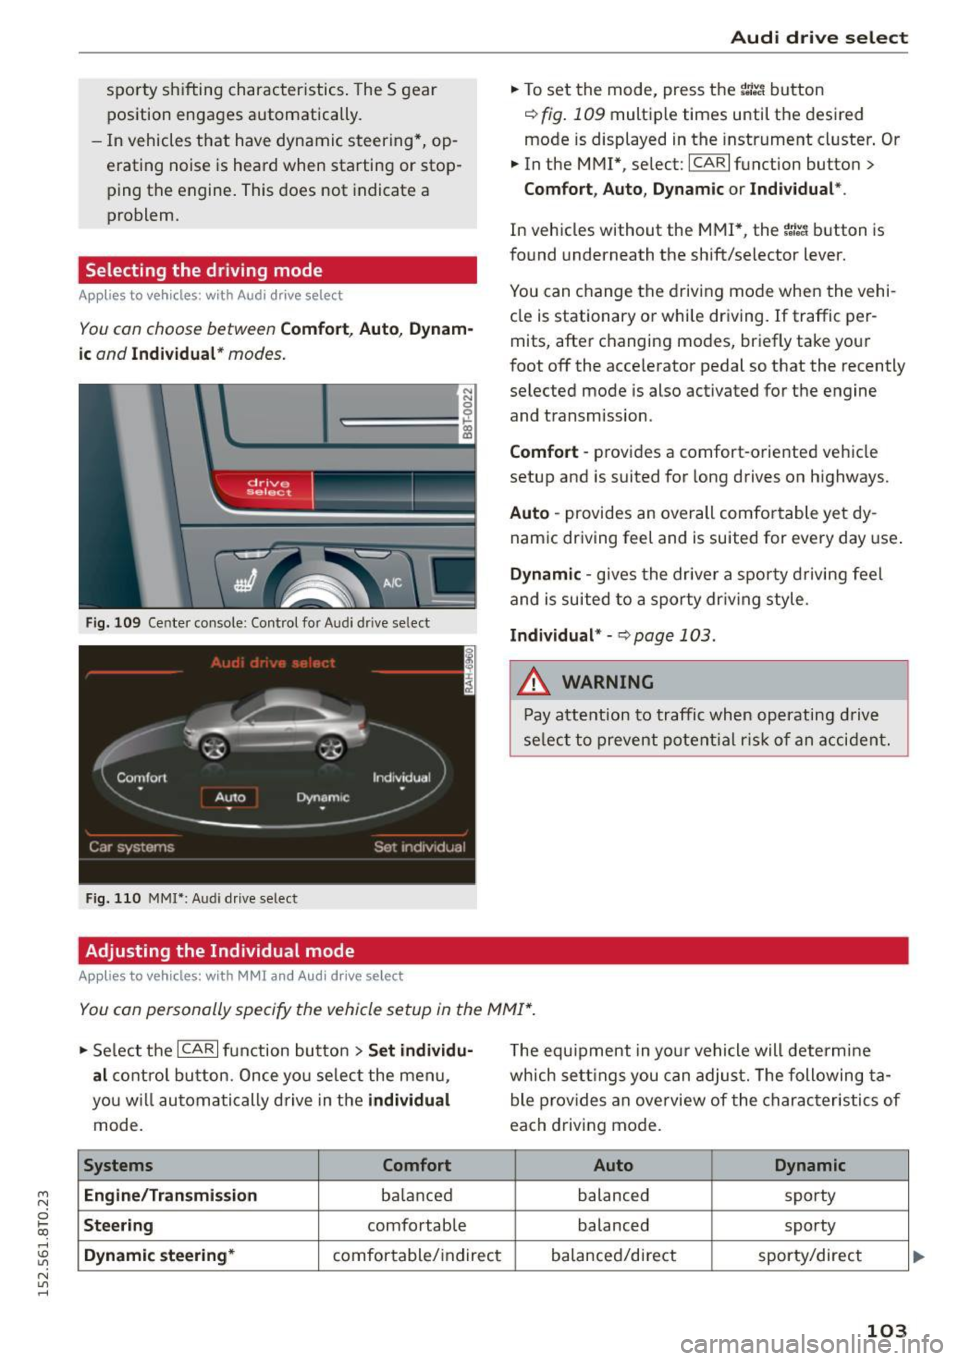
You con choose between Comfort , Auto , Dynam·
ic
and Individual * modes.
N N 0
~=== =:::: ~ ~
drive I se lect _ ~ -~-
F ig . 109 Ce nter co nso le : Con trol fo r A udi dri ve se lect
F ig. 110 MMI*: Audi drive se lect
Adjusting the Individual mode
Applies to vehicles: with MMI an d Aud i d rive select
Aud i drive select
.,. To set the mode, press the r.:i:.~ button
~ fig . 109 multip le times until the des ired
mode is displayed in the instrument cl uster . Or
.,. In the M MI*, se lect : ICARlfunction button>
Comfort , Auto , Dyn amic or Individual *.
In veh icles without the MMI*, the r:l:e'i button is
fo und underneath the shift/selector lever.
You can change the driving mode when the vehi
cle is stationary or while dr iving.
If traffic per
mits, after c hanging modes, briefly take your
foot off the acce lerator pedal so that the recently
selected mode is also activated for t he engine
and transmission .
Comfort -provides a comfort-o riented veh icle
setup and is suited for long drives on highways.
Auto -provides an overall comfo rtable ye t dy
nam ic dr iving feel and is suited for every day use .
Dynamic -gives the driver a spor ty driving feel
and is suited to a sporty dr iv ing style.
Individual * -~ page 103 .
.&, WARNING
-Pay atte ntion to tra ffic when op era ti ng d rive
se lect to preven t pote ntial r is k of an a cci dent.
You con personally specify the vehicle setup in the MMI* .
.,. Se lect the ICAR I function bu tton > Set individu·
al
c o ntro l bu tton. Once yo u se lec t the me nu,
yo u will a utoma tical ly dr ive in the
individual
mode.
Systems Comfort
Engine/Transmi ssion
balan ced
Steering comfo rtable
Dynamic steering* comfor table/ indirect T
he equipment in you r vehicle will determine
wh ich se tt in gs y ou can adjust. The following ta
ble p rov ides an overview of the charac teristics of
each driving mode.
Auto Dynamic
balanced sporty
balanced sporty
ba lanced/direct sporty/direct
103
Page 111 of 264
M N
0 loo
rl I.O
"' N
"' rl
-You can change the volume and pitch of the
signals as well as the display ¢
page 111.
-What appears in the display is time-delayed.
Reverse Parking
Applies to vehicles: with parking system (rear, with rear view
camera)
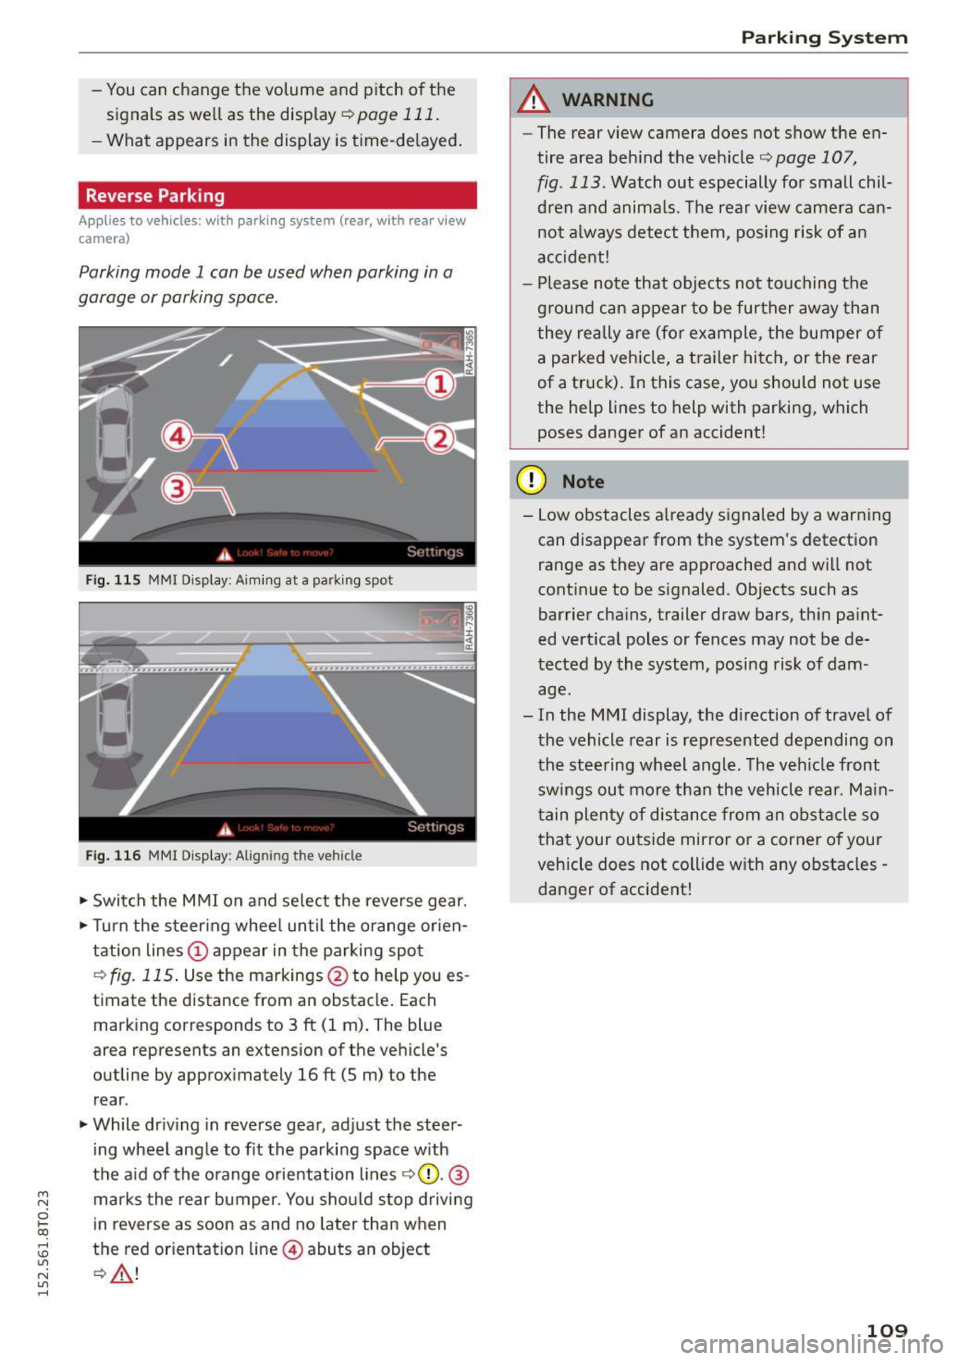
Parking mode 1 can be used when parking in a
garage or parking space.
Fig. 11S MMI Disp lay: A imin g at a parking spot
Fig. 116 MMI Display: Aligning the vehicle
.,. Switch the MMI on and select the reverse gear .
.,. Turn the steering wheel until the orange orien
tation lines
(D appear in the parking spot
¢fig. 115. Use the markings @to help you es
timate the distance from an obstacle. Each
marking corresponds to 3
ft (1 m). The blue
area represents an extension of the vehicle's
outline by approximately
16 ft (5 m) to the
rear .
.,. While driving in reverse gear, adjust the steer
ing wheel angle to fit the parking space with
the aid of the orange orientation lines ¢0 .@
marks the rear bumper. You should stop driving
in reverse as soon as and no later than when
the red orientation line@) abuts an object
¢ ,&. !
Parking System
A WARNING
--The rear view camera does not show the en-
tire area behind the vehicle¢
page 107,
fig . 113.
Watch out especially for small chil
dren and animals. The rear view camera can not always detect them, posing risk of an
accident !
- Please note that objects not touching the
ground can appear to be further away than
they really are (for example, the bumper of a parked vehicle, a trailer hitch, or the rear
of a truck). In this case, you should not use
the help lines to help with parking, which
poses danger of an accident!
(D Note
- Low obstacles already signaled by a warning
can disappear from the system's detection
range as they are approached and will not
continue to be signaled. Objects such as
barrier chains, trailer draw bars, thin paint
ed vertical poles or fences may not be de
tected by the system, posing risk of dam age.
- In the MMI display, the direction of travel of
the vehicle rear is represented depending on
the steering wheel angle. The vehicle front
swings out more than the vehicle rear. Main
tain plenty of distance from an obstacle so
that your outside mirror or a corner of your
vehicle does not collide with any obstacles -
danger of accident!
109
Page 114 of 264
Driving safety
Driving safety
Basics
Safe driving habits
Please remember -safe ty first!
This chapter contains important information,
tips, instructions and warnings that you need to
read and observe for your own safety, the safety
of your passengers and others. We have summar ized here what you need to know about safety
belts, airbags, child restraints as well as child
safety. Your safety is for us
priority number 1. Al
ways observe the information and warnings in
this section - for your own safety as well as that
of your passengers .
The information in this section applies to all
model versions of your vehicle . Some of the fea
tures described in this sections may be standard
equipment on some models, or may be optional
equipment on others. If you are not sure, ask
your authorized Audi dealer.
A WARNING
- Always make sure that you follow the in
structions and heed the WARNINGS in this
Manual.
It is in your interest and in the in
terest of your passengers.
- Always keep the complete Owner's Litera
ture in your Audi when you lend or sell your
vehicle so that this important information
will always be available to the driver and
passengers.
-
- Always keep the Owner's literature handy so
that you can find it easily if you have ques
tions .
Safety equipment
The safety features are part of the occupant re
straint system and work together to help reduce
the risk of injury in a wide variety of occident sit
uations.
Your safety and the safety of your passengers
should not be left to chance. Advances in tech
nology have made a variety of features available
to help reduce the risk of injury in an accident.
112
The following is a list of just a few of the safety
features in your Audi:
-sophisticated safety belts for driver and all pas-
senger seating positions,
- belt force limiters for the front seats,
- belt pretensioners for the seats,
- head restraints for each seating position,
- front airbags,
- side airbags in the front seats,
- side curtain airbags,
- special LATCH anchorages for child restraints,
- adjustable steering column.
T hese individual safety features, can work to
gether as a system to help protect you and your
passengers in a wide range of accidents . These
features cannot work as a system if they are not
always correctly adjusted and correctly used.
Safety is everybody's responsibility!
Important things to do before driving
Safety is everybody's job! Vehicle and occupant
safety always depends on the informed and care
ful driver.
For your safety and the safety of your passen
gers,
before driving always:
.,. Make sure that all lights and signals are operat
ing correctly .
.,. Make sure that the tire pressure is correct.
.,. Make sure that all windows are clean and afford
good visibility to the outside .
.,. Secure all luggage and other items carefully
Q page 60.
.,. Make sure that nothing can interfere with the
pedals .
.,. Adjust front seat, head restraint and mirrors
correctly for your height.
.,. Instruct rear seat passengers to adjust the
head restraints according to their height.
.,. Make sure to use the right child restraint cor
rectly to protect ch ildren
c> page 151 , Child
safety .
.,. Sit properly in your seat and make sure that
your passengers do the same
Q page 54, Seats
and storage.
Page 115 of 264
M N
0 loo
rl I.O
"' N
"' rl
.. Fasten your safety belt and wear it properly. Al
so instruct your passengers to fasten their safe
ty belts properly
¢ page 121.
What impairs driving safety?
Safe driving is directly related to the condition of
the vehicle, the driver as well as the driver's abili
ty to concentrate on the road without being dis
tracted .
The driver is responsible for the safety of the ve
hicle and all of its occupants. If your ability to
drive is impaired, safety risks for everybody in the
veh icle increase and you also become a hazard to
everyone else on the road ¢.&, .Therefore:
.. Do not let yourself be distracted by passengers
or by using a cellular te lephone .
.. NEVER drive when your driv ing ability is im
paired (by medicat ions, alcohol, drugs, etc.).
.. Observe all traffic laws, rules of the road and
speed limits and plain common sense .
.. ALWAYS adjust you r speed to road, traff ic and
weather cond itions .
.. Take frequent breaks on long trips. Do not drive
for more than two hours at a stretch .
.. Do NOT drive when you are tired , under pres
sure or when you are stressed.
A WARNING
Impaired driving safety increases the risk of
ser ious personal injury and death whenever a
vehicle is being used.
Driving safety
Correct passenger
seating positions
Proper seating position for the driver
The proper driver seating position is important
for safe, relaxed driving.
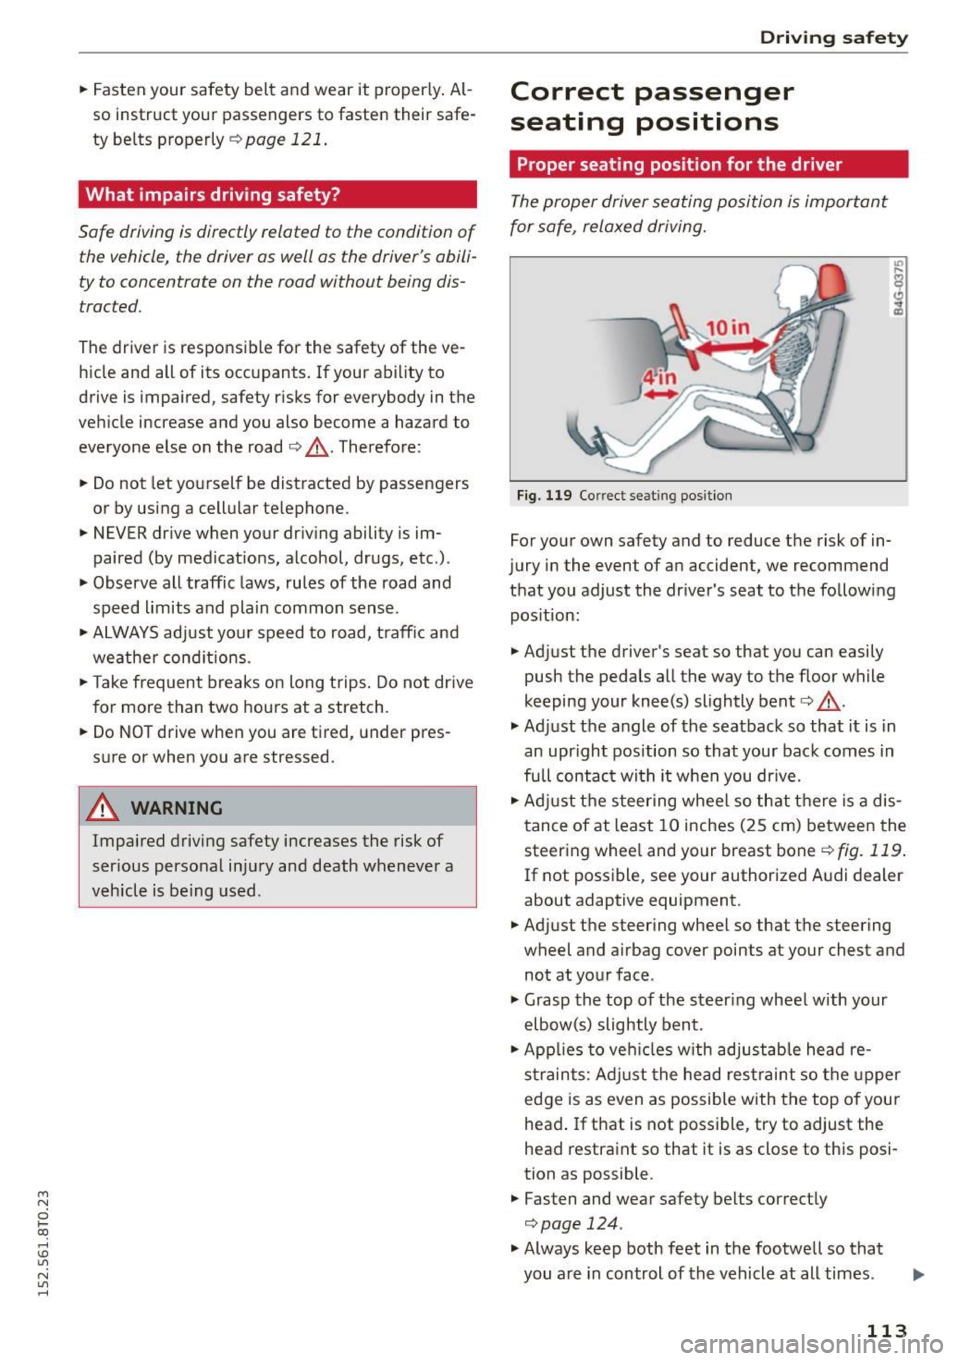
Fig. 119 Correct se ating position
For your own safety and to reduce the risk of in
jury in the event of an accident, we recommend
that you adjust the driver's seat to the following pos ition:
.. Adjust the driver's seat so that you can easily
push the pedals all the way to the floor while
keeping your knee(s) slightly bent¢.&, .
.,. Adjust the angle of the seatback so that it is in
an upright position so that your back comes in
fu ll contact wi th it when you dr ive.
.. Adjust the steer ing wheel so that there is a dis
tance of at least 10 inches (25 cm) between the
steering whee l and your breast bone
¢fig. 119 .
If not possible, see your authorized A udi dealer
about adaptive equipment.
.. Adjust the steering wheel so that the steering
wheel and airbag cover points at your chest and
not at your face .
.,. Grasp the top of the steer ing wheel with your
elbow(s) slightly bent.
.. App lies to veh icles w ith adjustable head re
s tra ints: Adjust the head restraint so the upper
edge is as even as possible with the top of your
head . If that is not possible , try to adjust the
head restraint so that it is as close to this posi
tion as possible.
.. Fasten and wear safety belts correctly
¢page 124.
.,. Always keep both feet in the footwell so that
you are in control of the vehicle at all times.
113
Page 116 of 264
Driving safety
For detailed information on how to adjust the
driver's seat, see
¢ page 55.
A WARNING
Drivers who are unbelted, out of position or
too close to the airbag can be seriously in
jured by an airbag as it unfolds. To help re duce the risk of serious personal injury:
- Always adjust the driver's seat and the
steering wheel so that there are at least
10 inches (25 cm) between your breastbone
and the steering wheel.
- Always hold the steering wheel on the out
side of the steering wheel rim with your
hands at the 9 o'clock and 3 o'clock posi
tions to help reduce the risk of personal in
jury if the driver's airbag inflates .
- Never hold the steering wheel at the
12 o'clock position or with your hands at
other positions inside the steering wheel
rim or on the steering wheel hub . Holding
the steering wheel the wrong way can cause
serious injuries to the hands, arms and head
if the driver's airbag deploys.
- Pointing the steering wheel toward your
face decreases the ability of the supplemen
tal driver's airbag to protect you in a colli
sion.
- Always sit in an upright position and never
lean against or place any part of your body
too close to the area where the airbags are located .
- Before driving, always adjust the front seats
and head restraints properly and make sure
that all passengers are properly restrained.
- Never adjust the seats while the vehicle is
moving . Your seat may move unexpectedly
and you could lose control of the vehicle.
- Never drive with the backrest reclined or
tilted far back! The farther the backrests are
tilted back, the greater the risk of injury due
to incorrect positioning of the safety belt and improper seating position.
- Children must always ride in child safety
seats
¢page 151. Special precautions ap
ply when installing a child safety seat on the
front passenger seat¢
page 129 .
114
-
Proper seating position for the front
passenger
The proper front passenger seating position is
important for safe, relaxed driving.
For your own safety and to reduce the risk of in
jury in the event of an accident, we recommend
that you adjust the seat for the front passenger
to the following position :
.,. Move the front passenger seat back as far as
possible . There must be a minimum of 10 in
ches (25 cm) between the breastbone and the
instrument panel¢,&. .
.,. Adjust the angle of the seatback so that it is in
an upright position and your back comes in full
contact with it whenever the vehicle is moving.
.,. Applies to vehicles with adjustable head re
straints: Adjust the head restraint so the upper
edge is as even as possible with the top of your head. If that is not possible, try to adjust the
head restraint so that it is as close to this posi
tion as possible .
.,. Keep both feet flat on the floor in front of the
front passenger seat.
.,. Fasten and wear safety belts correctly
¢ page 124.
For detailed information on how to adjust the
front passenger's seat, see ¢
page 54.
A WARNING
Front seat passengers who are unbelted, out
of position or too close to the airbag can be
seriously injured or killed by the airbag as it
unfolds . To help reduce the risk of serious per
sonal injury :
- Passengers must always sit in an upright po sition and never lean against or place any
pa rt of their body too close to the area
where the airbags are located.
- Passengers who are unbelted, out of posi
tion or too close to the airbag can be seri
ously injured by an airbag as it unfolds with
great force in the blink of an eye .
-Always make sure that there are at least 10
inches (25 cm) between the front passen
ger's breastbone and the instrument panel.