fuel cap release AUDI A5 2015 Owner´s Manual
[x] Cancel search | Manufacturer: AUDI, Model Year: 2015, Model line: A5, Model: AUDI A5 2015Pages: 264, PDF Size: 66.83 MB
Page 31 of 264

M N
0 loo
rl I.O
"' N
"' rl
the possibility to reset the oi l change schedu le af
ter having performed an oil change according to
Audi specif ications. Select
ICARI function button
> Service interval display > Reset oil change in
terval
or I CAR ! function button > Car systems*
control button > Servicing & checks > Reset oil
change interval.
(D Note
- Only reset the oil change d isp lay when you
have completed an oil change .
- If you d isconnect the battery terminals, no
calculations can be made for the service in
terval display during this t ime and no serv
i ce reminder will appear . Remember that
obse rv in g the proper serv ice intervals is vi
tally impor tant to extending the life of your
vehicle, particularly the engine, and main
taining its value. Even if the mi leage driven
i s low, the maximum period of one year
from one service to the next must not be ex
ceeded.
(D Tips
The information in the Service Reminder re
mains stored even when the veh icle battery is
disconnected.
On Board Diagnostic
System (OBD)
Malfunction Indicator Lamp (MIL)
The Malfunction Indicator Lamp (MIL) ¢-4 in the
instrument cluster is part of the On-Board Diag
nostic (OBD II) system.
The warning/indicator light illuminates when the
ignition is switched on and goes out after the en
gine starts and the idle has stabilized. This indi
cates that the MIL is working properly.
If the light does not go out after the engine is
started, or illuminates while you are driving, a malfunct ion may exist in the engine system. If
the light illuminates, the catalytic converter
could be damaged.
Continue driving
with reduced power (avoiding
sustained high speeds and/or rapid accelerations)
Dri ver information system
and have the condition corrected. Contact your
authorized Audi dea ler.
If t he light illuminates, the electronic speed lim
ite r may also be ma lf u nctioning. For more infor
mation
¢ page 30, Electronic speed limiter .
An improperly closed fuel filler cap may also
cause the MIL light to illuminate ¢
page 188.
On-Board Diagnostics
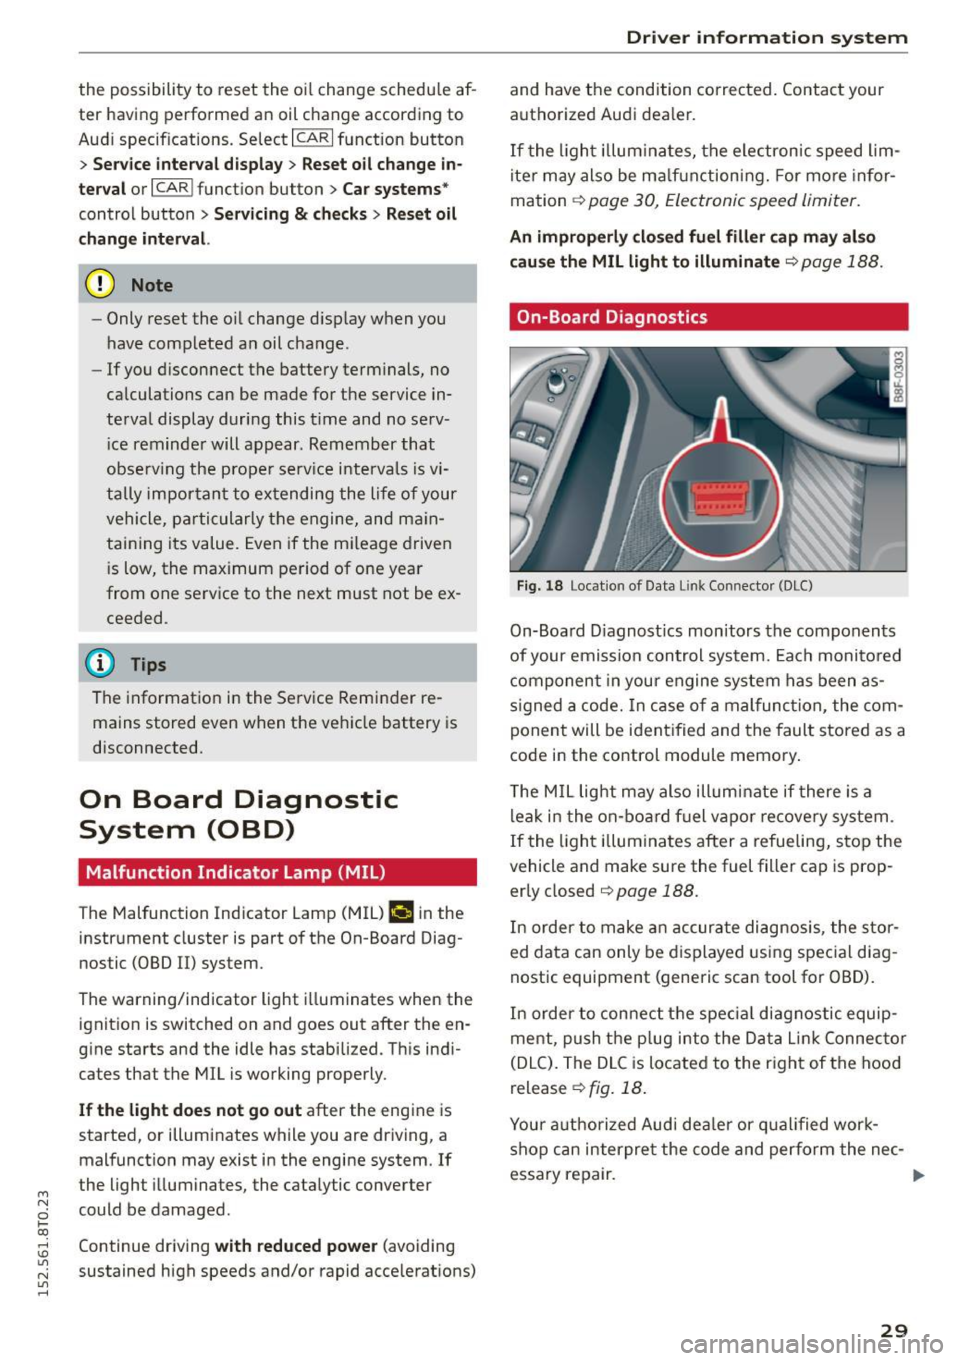
Fig. 18 Locat ion of Data Link Connector (DLC)
On-Board D iagnost ics monitors the components
of your emission control system. Each monito red
component in your engine system has been as
signed a code. In case of a malfunction, the com
ponent will be ident ified and the fault stored as a
code in the control module memory.
T he MIL light may also illum inate if there is a
leak in the on-board fuel vapo r recovery system .
If the light illuminates after a refueling, stop the
vehicle and make sure the fuel filler cap is prop
erly closed
¢ page 188.
In order to make an accurate diagnosis, the stor
ed data can only be displayed using special diag
nostic equipment (generic scan tool for OBD).
In order to connect the spec ial diagnostic equip
ment, push the plug into the Data Lin k Connec tor
(DLC). The DLC is located to the right of the hood
release
¢ fig. 18.
Your authorized Audi deale r or qualified work
shop can interpre t the code and perform the nec-
essary repair. .,,.
29
Page 191 of 264

M N
i? co ,...., \!) 1.1'1
N 1.1'1 ,....,
When activating the central locking, the fuel fi ll
er flap is automatically un locked or locked . Re
fue l the vehicle with the ignit ion turned
off.
Tak ing th e fu el cap off
.,. Turn off the ignit ion.
.,. Press the left side o f the fue l filler flap to open
it
r=;, fig . 155 -arrow -.
.,. Unscrew fuel cap counter-clockwise and hang it
on the fue l filler flap
c> fig. 156.
R efuellin g proc edu re
.,. Inse rt the fue l nozz le from the gasol ine p ump
into the fuel filler neck as far as it will go .
.,. Se lect a medium refuelling rate so that the
nozzle switches off automatica lly when the
tank is full.
P utting the fuel cap back on
.,. After fi lling your tank, tw ist the fuel cap clock-
wise as far as it wi ll go.
.,. Close the fuel filler flap .
To avo id f uel spi lling or evaporating from the fue l
tank always close fuel cap properly and com
p letely.
A WARNING
Improper refueling or handling of fue l can
cause fire, exp losion and severe burns.
-
- Fuel is highly flammable and can cause se
vere burns and other injuries.
- Failure to shut the engine off whi le refuel
ing and/or to insert the pump nozzle fu lly
into the fuel filler neck could cause fue l to
spray out of f iller neck or to overflow. Fuel
spray and overflow ing fuel can cause a fire.
- Never use a cellular telephone wh ile refuel
ing. The electromagnetic radiation can
cause sparks that can ignite fuel vapors and
cause a fire.
- Never get back into your vehicle while refu
eling. If in exceptional c ircumstances you
must get back in your vehicle while refuel
ing, make certain that you close the door
and touch meta l to discharge static e lectric
ity before touching the filler nozzle again.
Fu el and R efu elin g
Static electricity can cause sparks that can
ignite fuel vapors released during refue ling.
- Never smoke or have an open f lame any
where in or near your vehicle when refueling or filling a portable fuel conta iner .
- For your safety, we strongly recommend
that you do not travel with a portable f uel
container in your veh icle. The container, full
or empty may leak and cou ld cause a fire,
especially in a crash .
- If, under exceptional c ircumstances, you
must transport a portab le fuel container,
please observe the following:
- Never fill a portable fuel container while it
is anywhere in or on the vehicle (for exam
ple, in the l uggage compartment, or on
the trunk). Static e lectric ity can build up
while filling and can ignite fuel vapors
caus ing a fire .
-Always place a portab le fue l conta iner on
the ground before fill ing .
- Always keep the filler nozzle completely
inside the portable container before and
during f il li ng.
- If filling a portab le container made of
metal, the f iller nozzle must always be in
contact with the container. This will help prevent static electricity from d ischarging
and cause a fi re.
- Never spill fuel inside the vehicle or lug
gage compartment. Fuel vapors are highly
flammable.
- Always observe local and state/provincial
laws regarding the use, storage and trans
po rtation of fue l conta iners.
- Make certain the fuel conta iner meets in
dustry standards (ANSI/ AS TM F852 -86).
(D Note
If any fuel has sp illed onto the car, it should
be removed immediately to prevent damage
to the pa int.
@) For the sake of the environment
As soon as the correct ly operated nozzle
switches off automat ically for the first time,
189
Page 192 of 264

Fuel and Refueling
the tank is full. Do not try to add more fuel
because fuel may spill out. In addition, the
expansion space in the fuel tank will be filled -
causing the fuel to overflow when it becomes
warm and pollute the environment.
(D Tips
- Running your engine while refuelling may
cause vapors to escape or even cause fuel to
spill out of the tank. This would then shut
off the fuel nozzle before the tank is full.
- Do not refuel your vehicle with the ignition
turned on. The fuel gauge may otherwise
not indicate the correct fuel level after refu
elling.
- The fuel filler flap of your vehicle is not
locked when you lock the vehicle from the
inside .
Unlocking the fuel filler flap by hand
You can open the fuel filler flap by hand if the
power locking system should fail.
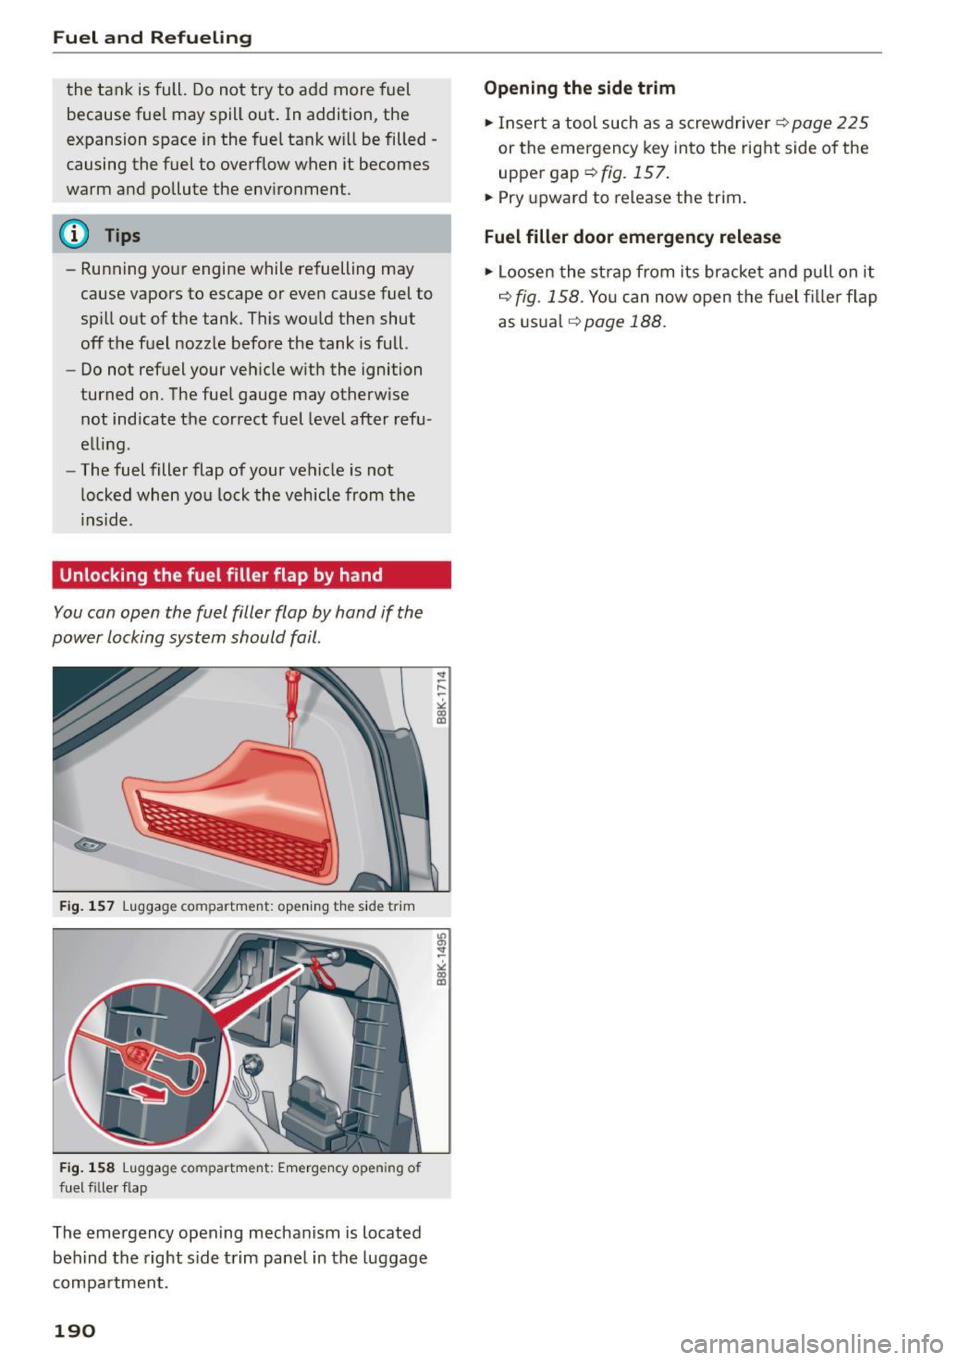
F ig. 157 Luggag e compartment: open ing the sid e trim
Fig. 158 Luggag e compart ment: Emergency open ing of
fuel filler flap
The emergency opening mechanism is located
behind the right side trim panel in the luggage
compartment.
190
"' a, st
-
" co
"'
Opening the side trim
.. Insert a tool such as a screwdrive r c:> page 225
or the emergency key into the right side of the
upper gap
¢fig. 157.
.. Pry upward to release the trim .
Fuel filler door emergency release
.. Loosen the strap from its bracket and pu ll on it
¢ fig. 158. You can now open the fu el filler flap
as usual
¢page 188.
Page 258 of 264

Index
Recirculation mode (automatic climate con-
trol) . . . . . . . . . . . . . . . . . . . . . . . . . . . . . . . . . 70
Refuelling . . . . . . . . . . . . . . . . . . . . . . . . . . .
188
Release lever for hood . . . . . . . . . . . . . . . . . 191
Remote control
Garage door opener (Homelink) . . . . . . . . .
41
Remote control key .......... .... ... .. . . 32
Personalizing . . . . . . . . . . . . . . . . . . . . . . . . 32
un locking/locking . . . . . . . . . . . . . . . . . . . . 34
Remote rear lid release 37
Repair manuals . . . . . . . . . . . . . . . . . . . . . . . 244
Repairs
Airbag system . . . . . . . . . . . . . . . . . . . . . .
142
Replacement key . . . . . . . . . . . . . . . . . . . . . . 32
Replacing bulbs 235
Replacing w iper blades . . . . . . . . . . . . . . . . . 51
Reporting Safety Defects . ....... .. . 119, 120
Reset button . . . . . . . . . . . . . . . . . . . . . . . . . . 12
Retractor . . . . . . . . . . . . . . . . . . . . . . . . . . . . 124
Right hand drive . . . . . . . . . . . . . . . . . . . . . . . 46
Rims
Roof rack
. . .. .. ................. .. ....
Roof load .. .. .. ... ... ... .... .. .. ... .
219
62
63
Roof weight . . . . . . . . . . . . . . . . . . . . . . . . . 63
s
SAFE . . . . . . . . . . . . . . . . . . . . . . . . . . . . . . . . 12
Safe driving habits . . . . . . . . . . . . . . . . . . . . 112
Safe lock . . . . . . . . . . . . . . . . . . . . . . . . . . . . . . 31
Safety
Airbag system .... ........... .. .. .. .
Belts
. . .. .. .. ... ... .... ..... .. .. .. .
Cargo
129
121
118
Correct seating position . . . . . . . . . . . . . . 113
Pedalarea .. .. ............... .. .. ... 117
Safety belt position . . . . . . . . . . . . . . . . . . . 125
Safety belts worn by pregnant women 126
Safety belt pretensioner
Service and disposal . . . . . . . . . . . . . . . . .
127
Safety belts .. .. ............... .. . 121, 124
Danger to passengers who do not wear a
safety belt . . . . . . . . . . . . . . . . . . . . . . . . .
122
Fastening . . . . . . . . . . . . . . . . . . . . . . . . . . 124
Improperly worn . . . . . . . . . . . . . . . . . . . . 126
Not worn ....................... ... 122
Safety belt position . . . . . . . . . . . . . . . . . . 125
256
Safety instructions . . . . . . . . . . . . . . . . . . . 123
Securing child safety seats . . . . . . . . . . . . 160
Spec ial considerations for pregnant wom-
en . . . . . . . . . . . . . . . . . . . . . . . . . . . . . . . .
126
Unfastening . . . . . . . . . . . . . . . . . . . . . . . . 126
Warning/indicator light . . . . . . . . . . . . . . . 121
w · r h arnrng 1g t . . . . . . . . . . . . . . . . . . . . . . . . 16
Worn properly . . . . . . . . . . . . . . . . . . . . . . 123
Safety belt warning light . . . . . . . . . . . . . . . 121
Safety comp liance sticker . . . . . . . . . . . . . . 241
Safety equ ipment . . . . . . . . . . . . . . . . . . . . . 112
Safety features for occupant restraint and
protection . . . . . . . . . . . . . . . . . . . . . . . . . . .
112
Safety gu idel ines
Seats . . . . . . . . . . . . . . . . . . . . . . . . . . . . . . .
54
Safety instructions
Engine compartment ................ .
191
for side curtain airbags . . . . . . . . . . . . . . . 150
for using child safety seats . . . . . . . . . . . . 154
for using safety belts . . . . . . . . . . . . . . . . . 123
Monitoring the Advanced Airbag System 141
Seat adjustment
Head restraints
Seat belt s
115
refer to Safety belts . . . . . . . . . . . . . . . . . . 121
Seat heating . . . . . . . . . . . . . . . . . . . . . . . . . . 70
Seating capacity
Seating position
121
Driver . . . . . . . . . . . . . . . . . . . . . . . . . . . . . 113
Front passenger . . . . . . . . . . . . . . . . . . . . . 114
How to adjust the front seats . . . . . . . . . . 114
Incorrect seat position . . . . . . . . . . . . . . . . 116
Occupants ... .. .. .. .. ........... .. .. 113
Rear passengers . . . . . . . . . . . . . . . . . . . . . 115
Seats
Adjusting . . . . . . . . . . . . . . . . . . . . . . . . . . .
55
Adjusting in the MMI . . . . . . . . . . . . . . . . . . 56
Convenience side view . . . . . . . . . . . . . . . . . 56
Correct seating position . . . . . . . . . . . . . . 113
Driver 's seat . . . . . . . . . . . . . . . . . . . . . . . . . 54
Fo ldi ng . . . . . . . . . . . . . . . . . . . . . . . . . . . . . 64
Front passenger's seat . . . . . . . . . . . . . . . . . 55
Number of seats . . . . . . . . . . . . . . . . . . . . 121
Power easy entry function . . . . . . . . . . . . . . 56
Safety guidelines . . . . . . . . . . . . . . . . . . . . . 54
Seat symmetry . . . . . . . . . . . . . . . . . . . . . . . 56
Seat ventilation . . . . . . . . . . . . . . . . . . . . . . . 70