torque AUDI A5 2015 Owner´s Manual
[x] Cancel search | Manufacturer: AUDI, Model Year: 2015, Model line: A5, Model: AUDI A5 2015Pages: 264, PDF Size: 66.83 MB
Page 84 of 264
Automatic transmission
Automatic transmission
Manual transmission
Gearshift lever
Applies to vehicles: with manual transmission
The clutch pedal must be depressed all the way
before you can start the engine .
The manual transmission in your Audi is equipped
with an
interlock-feature.
• Depress the clutch pedal all the way.
• Start the engine with the gearshift lever in Neu
tral and the clutch pedal depressed.
(D Note
Always depress the clutch pedal fully when
changing gears . Do not hold the vehicle on a
hill with the clutch pedal partially depressed.
This may cause premature clutch wear or damage.
@ Tips
- Resting your hand on the gearshift lever
knob while driving will cause premature
wear in the transmission.
- The back-up lights go on when you sh ift into
Reverse with the ignit ion on.
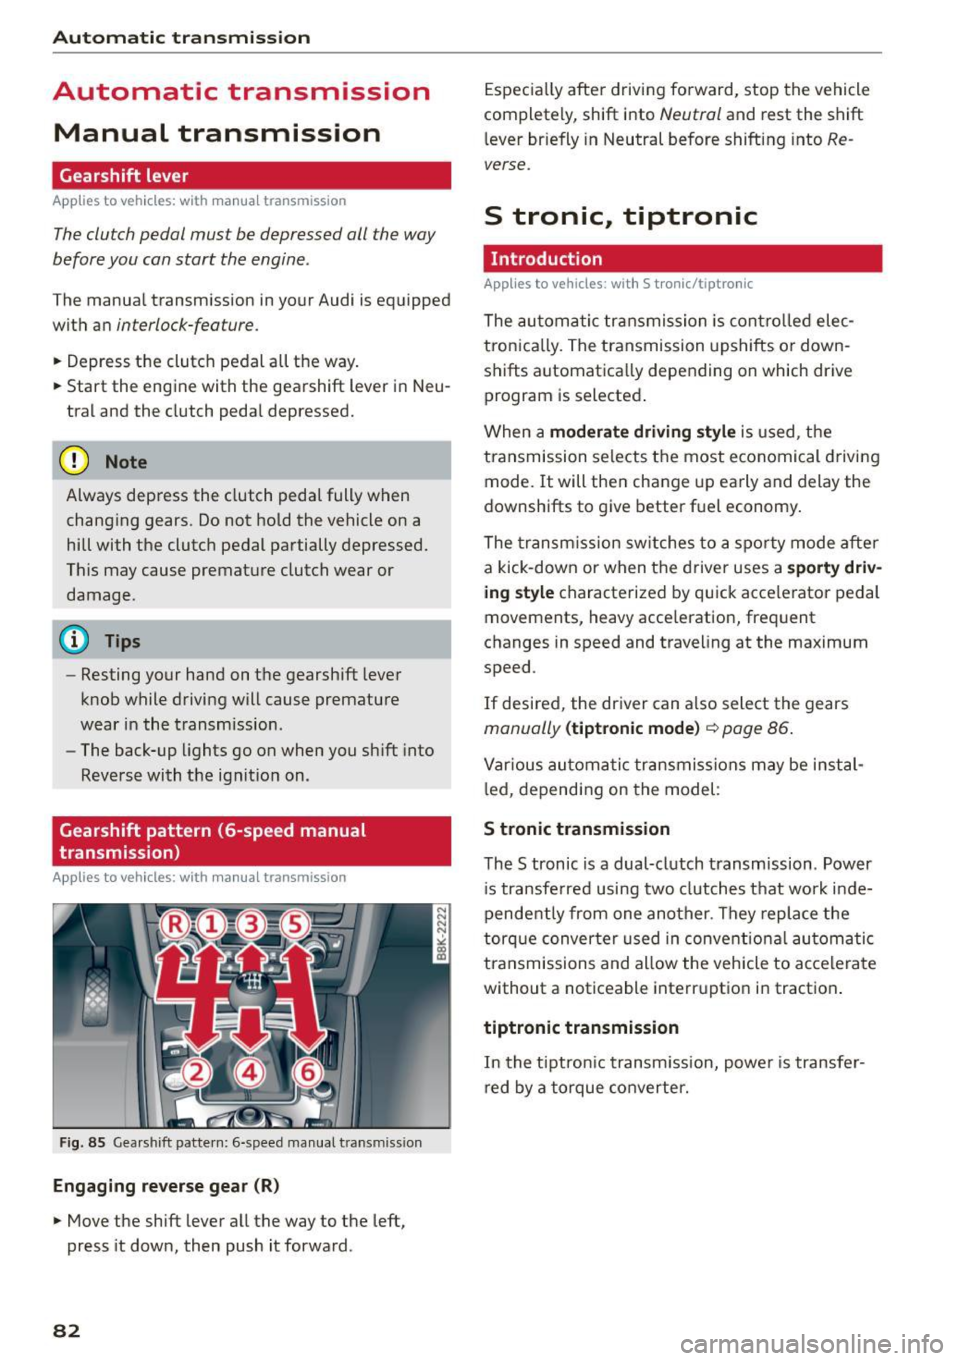
Gearshift pattern (6-speed manual
transmission)
Applies to vehicles: with manual transmission
Fig. 85 Gearshift pattern: 6-speed manual transmiss ion
Engaging reverse gear (R)
• Move the shift lever all the way to the left,
press it down, then push it forward .
82
Especially after driving forward, stop the vehicle
completely, shift into
Neutral and rest the shift
lever briefly in Neutral before shifting into
Re
verse.
S tronic, tiptronic
Introduction
Applies to vehicles: with S tronic/tiptronic
The automatic transmission is controlled elec
tron ically. The transmission upshifts or down
shifts automatica lly depending on which drive
program is selected .
When a
moderate driving style is used, the
transmission selects the most economical driving
mode. It will then change up early and delay the
downshifts to give better fuel economy.
The transmission switches to a sporty mode after
a kick-down or when the driver uses a
sporty driv
ing style
characterized by quick acce lerator pedal
movements, heavy acce leration, frequent
changes in speed and traveling at the maximum
speed .
If desired, the driver can a lso select the gears
manually (tiptronic mode) c::> page 86.
Various automatic transmissions may be instal
l ed, depending on the model :
S tronic transmission
The S tronic is a dual-clutch transmission . Power
i s transferred using two clutches that work inde
pendently from one another . They replace the
torque converter used in conventio nal automatic
transmissions and allow the vehicle to accelerate
without a noticeable interruption in traction .
tiptronic transmission
In the tiptronic t ransm ission, power is transfer
red by a torque converter.
Page 173 of 264
M N
0 loo
rl I.O
"' N
"' rl
In extreme cases, EDL a utomatica lly switches off
to help keep the brake on the braked whee l from
overheating. EDL w ill switch on again automati
cally when conditions have returned to normal.
Steering re commendat ion
The ESC helps to stabilize the ve hicle by chang ing
the steering torque.
I n vehicles with dynamic steeri ng*, ESC also
h e lps to stabilize the steering in critical s itua
tions .
Electronic interaxle differential lock* /
sel ectiv e wheel torque control*
The electron ic in teraxle d iffe ren tial lock (front
wheel drive) or the selective wheel torq ue contro l
(all wheel drive) operates when driving through
curves. The front whee l on the ins ide of the cu rve
or both whee ls on the inside of the curve are
braked selectively as needed. Thi s allows more
precise driving in curves. The applicable system
may not activate when driving in wet or snowy
conditions .
_&, WARNING
- The ESC and its integrated systems cannot
overcome the laws of physics. This is espe
ci al ly impo rtant on slippe ry or wet roads. If
the sys tems begin acting to stabilize your
Switching on/off
Smart Technology
veh icle, you shou ld immediately change
your speed to matc h the road and traffic
conditions. Do not let the increased safety
provided by these systems tempt you to
take risks . Do ing so will increase the risk of a
loss of vehicle control, collision and serious
personal injuries.
- Always adapt your speed to road, traffic and
weather conditions. The risk of losing con
trol of the vehicle inc reases when dr iving
too fast, espec ially through curves and on
slippery or wet roads, and when dr iving too
close to vehicles up ahead . The ESC and its
integrated systems cannot a lways prevent
coll isions -there is sti ll a risk of accidents!
- Always accelerate with special care on even,
smooth su rfaces such as those that are wet
or covered with ice and snow. The drive
wheels can spin even with these assistance
systems that can not always help to reduce
the risk of loss of vehicle cont rol.
{!) Tips
-ABS and ASR only work correct ly when a ll
four wheels are equipped w ith ident ica l
tires. Different tire sizes can lead to a reduc
tion in engine power.
- You may hear noises when the systems de
scribed are working.
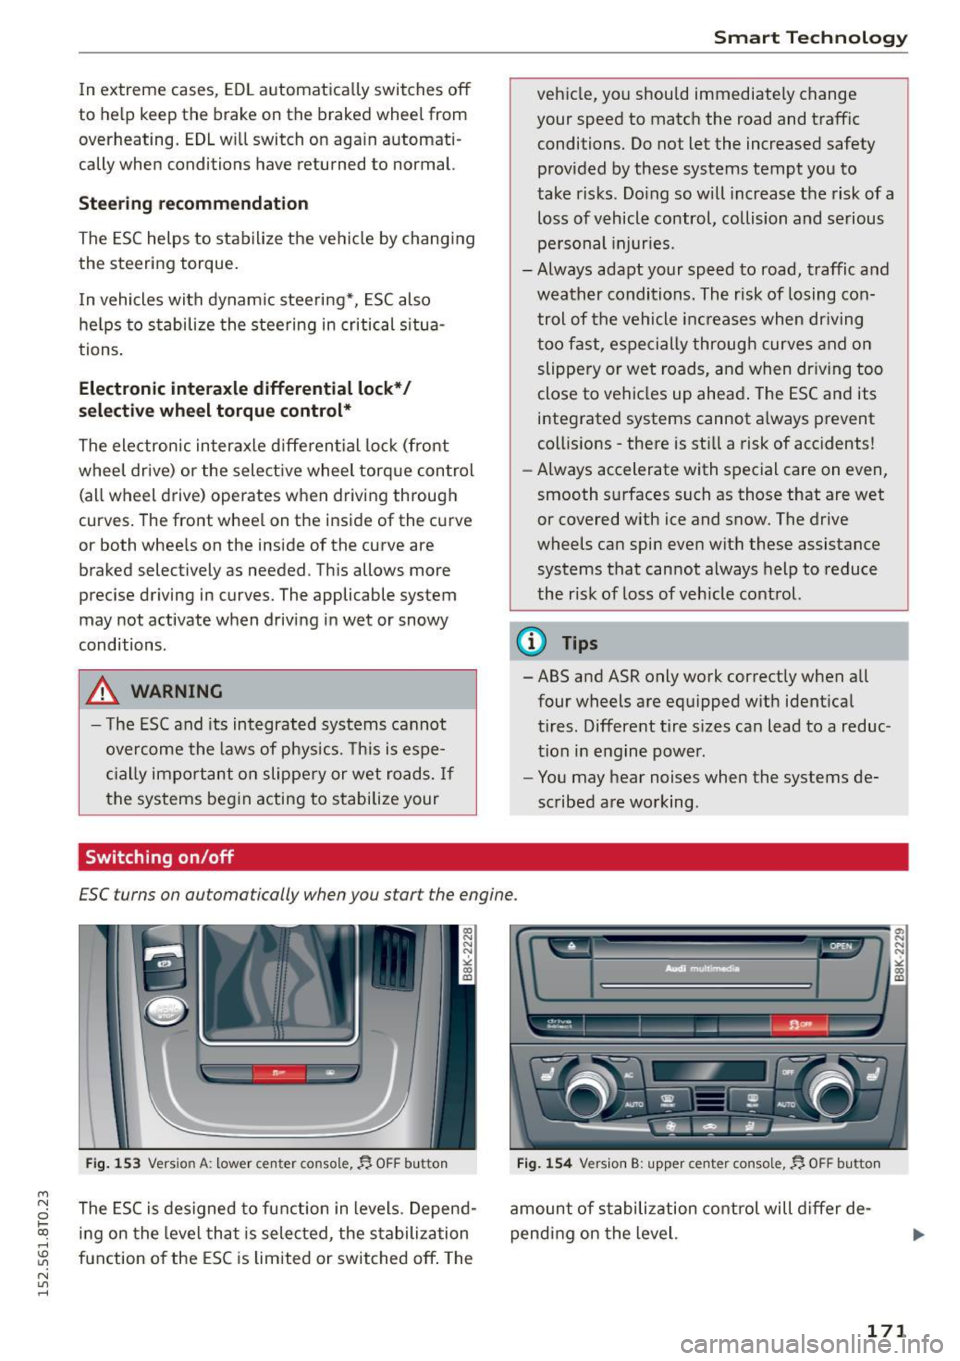
ESC turns on automatically when you start the engine.
Fig. 153 Version A: lowe r ce nter console,~ OFF button
The ESC is designed to function in levels. Depend
i ng on the level that is selected, the stabilization
function o f the ESC is limited or switched off . The
F ig. 154 Versio n B: uppe r ce nter console,~ OFF button
amount of s tabilization control will differ de
pend ing on the level.
a, N N N ,.: CX) m
171
Page 176 of 264
Smart Technolog y
Clean off accumulated salt coating from
brake discs and pads w ith a few carefu l
brake applications .
- If you damage the front spoiler, or if you in
stall a d ifferent spoiler, be sure the air flow
to the front brakes is not obstructed. Other
wise the brake system could overheat reduc
ing the effectiveness of the entire brake sys
tem.
- Failure of one brake c ircuit will impair the
braking capab ility result ing in an increased
stopp ing distance. Avoid driving the veh icle
and have it towed to the nearest autho rized
Audi dealer or qualified workshop.
- Never let the vehicle ro ll to a stop with the
engine shut off .
- If the brake booster is not work ing, the
brake pedal must be pressed considerably
harder to make up for the lack of booste r as
sistance .
Electro-mechanical
power assist, dynamic
steering
The electro-mechanical power assist helps the
driver when steering.
Power steering adapts electronically based on
the vehicle speed .
Indicator lights and me ssages
• Stee ring defe cti ve! D o not dr ive vehicle!
If this indicator light tu rns on and stays on and
this message appears, the power steering may
have fai led .
Do
not contin ue driving. See yo ur authorized
Aud i dealer o r a qua lified repair facility for assis
tance.
l ;r- ij Dynami c steering : S ys te m fault! You can
c on tinu e dr iving
If the indicator light turns on and the message
appears, the steer ing may be more difficult to
move or mo re sensitive than us ual. The steer ing
wheel may also be at an ang le when dr iv ing
straight.
174
Drive slowly to your authorized Audi dea ler or
qualified workshop to have the ma lf u nction cor
rected.
' -r, ij Dynamic ste ering: i nitializing
If this driver message appears and the indicator
li ght is flashing on the i nstrume nt pane l, dynam
i c steer ing* is being rein it ia lized . After sta rting
the engine, the steer ing whee l w ill move sligh tly.
Re-initialization might be necessary if the steer
ing whee l was moved hard to th e left and right
whi le the vehicle was not moving . The display
goe s out as soon as initiali zation is comp lete.
A WARNING
,-
H ave the dynamic steering* system malfunc-
tion repaired as soon as possible by an author
ized Audi dealer or qualified workshop - r isk
of accid ent!
@ Tips
- If the . or 'T fl indicator light only stays on
for a short time, you may cont inue driving.
- The dynamic steering* stab ility system s are
not availab le in the event of a system mal
function .
- For add itional information on dynamic
steering*, refer to<=> page 102 .
Driving with your quattro
Applies to vehicles : wit h all -w hee l drive
With all-wheel drive , all four wheels are driven .
General information
With a ll-wheel drive, power is distrib uted to a ll
fo ur wheels . This happens automatica lly depend
i ng on your driving style and the road conditions
at the t ime . See also <=> page 1 70 .
A center d ifferential distributes the driving power
variab ly to the front and rear ax le. It works to
gether w ith select ive whee l torque control , which
activates when drivi ng throug h curves
¢ page 171 . W ith the sport diffe rential*, power
distribution to the rear wheels is var iable and can
be ad justed with d rive select ¢ page 102 .
1111-
Page 227 of 264
M N
0 loo
rl I.O
"' N
"' rl
Emergency assistance
Vehicle tool kit
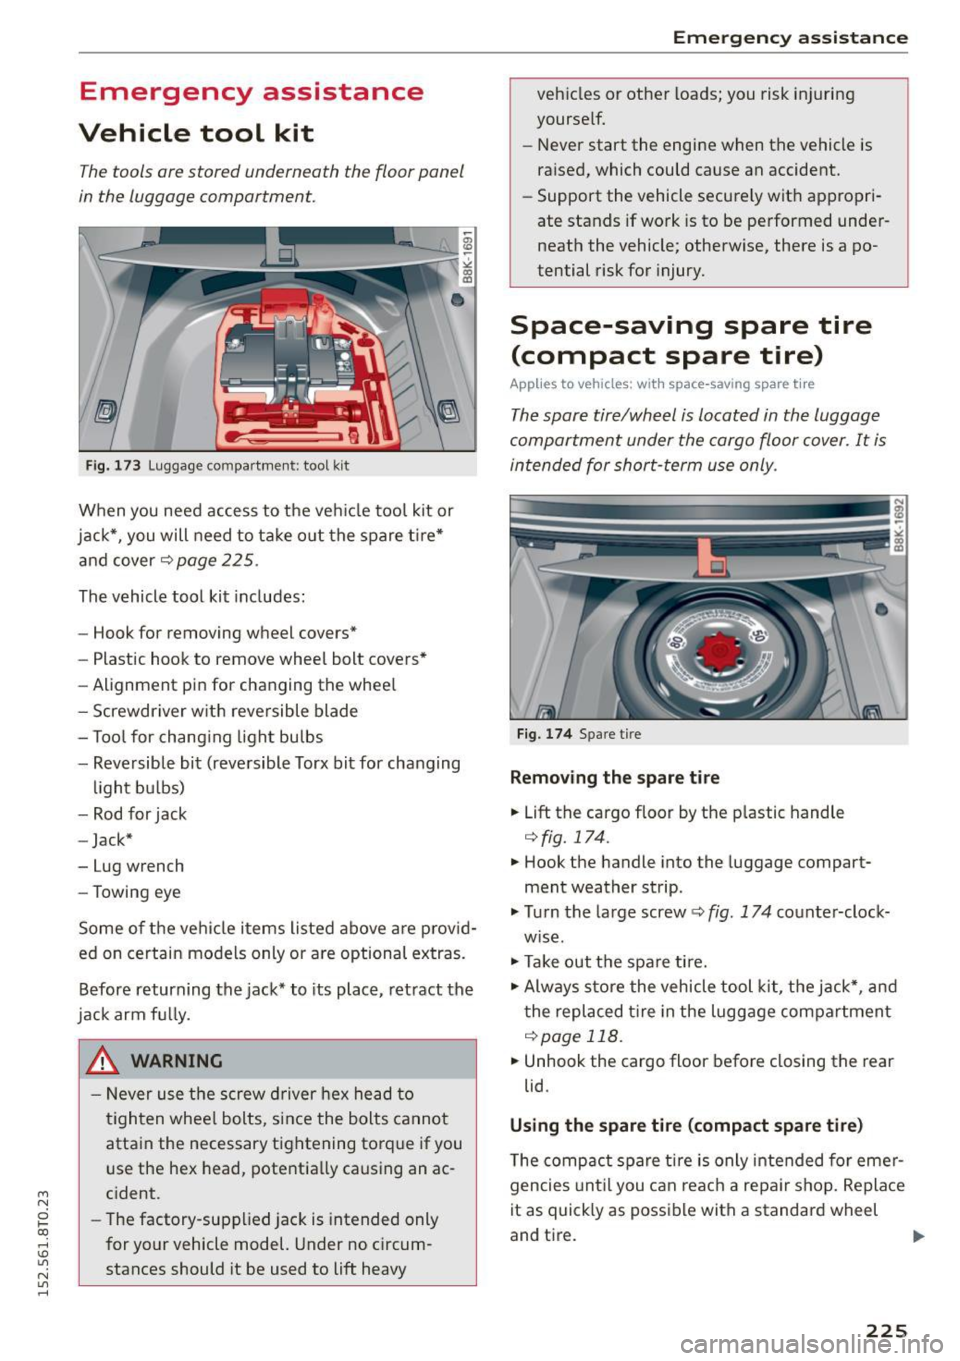
The tools ore stored underneath the floor panel
in the luggage comportment.
Fig. 173 Luggage compartme nt: tool kit
When you need access to the veh icle tool kit or
jack*, you will need to take out the spare t ire*
and cover¢
page 225.
The vehicle tool kit includes:
- Hook for removing wheel covers*
- Plastic hook to remove wheel bolt covers*
- Alignment pin for changing the whee l
- Screwdriver w ith reversible blade
- Tool for chang ing light bulbs
- Reversible bit (reversible Torx bit for changing
light bulbs)
- Rod for jack
- Jack*
- Lug wrench
- Towing eye
Some of the vehicle items listed above are prov id
ed on certain models only or are optional extras.
Before returning the jack* to its place, retract the
jack arm fu lly.
_& WARNING
- Never use the screw driver hex head to
t ighten whee l bolts, since the bolts cannot
attain the necessary tightening torque if you
use the hex head, potentially causing an ac
cident.
- The factory-suppl ied jack is intended only
for your vehicle model. Under no c ircum
stances should it be used to lift heavy
Emergen cy assistance
vehicles or other loads; you risk injuring
yourself.
- Never start the engine when the vehicle is
raised, which could cause an accident.
- Support the vehicle securely with appropri
ate stands if work is to be performed under
neath the vehicle; otherwise, there is a po
tential risk for injury.
Space-saving spare tire
(compact spare tire)
Applies to vehicles: with space-saving spare tire
The spore tire/wheel is located in the luggage
comportment under the cargo floor cover. It is
intended for short-term use only.
Fig. 174 Spare tire
Removing the spare tire
.,. Lift the cargo floor by the p lastic handle
¢fig. 174.
.,. Hook the handle into the luggage compart
ment weather strip.
., Turn the large screw ¢
fig. 174 counter-clock
wise.
., Take out the spare ti re .
., Always store the vehicle tool kit, the jack*, and
the replaced tire in the luggage compartment
¢page 118.
.,. Unhook the cargo floor before closing the rear
lid.
Using the spare tire (compact spare tire)
The compact spare tire is only intended for emer
gencies until you can reach a repa ir shop. Replace
it as quickly as possible with a standard wheel
and tire. ..,
225
Page 229 of 264

M N
0 I-co
rl I.O
"' N
"' rl
the wheel diagona lly opposite the wheel be
ing changed with the folding chocks or ot h
er objects. When one front wheel is lifted
off the ground, placing the Automatic Trans
mission in "P" (Pa rk) wi ll
not prevent the ve
hicle from moving .
- Before you change a wheel, be sure the
ground is level and fi rm.
If necessary, use a
sturdy board under the jac k.
- Always store the vehicle tool kit, the jack*
and the replaced tire in the luggage com
partment c::>
page 118 .
(D Note
If you are chang ing the wheel o n a steep in
cline, use a rock or sim ila r object to block the
opposite whee l to prevent the vehicle from
moving.
@ Tips
Obey a ll laws.
Changing a wheel
When you change a wheel, follow the sequence
described below step -by -step and in exactly that
order.
1. Remove the decorati ve w heel co ver* or the
w he el bolt caps *. For more details see a lso
c::> page 22 7, Decorative wheel covers or
c::> page 228, Wheels with wheel bolt caps .
2. Loosen the whe el bolt s c::> page 228.
3. Lo cate the proper mo unti ng po int for the
jack and align the jack below tha t point
c::> page229.
4. Lift the car wit h the jack c::> page 229.
5. Remove the wheel with the flat tire and then
install the
spare t ire c::> page 230.
6 . Tighten all wheel bo lts light ly.
7 .
Low er the veh icle w ith the jack.
8 . Use the wheel bolt wrench and
firmly tighten
9.
all whee l bolts in a crissc ross pattern
c::> page 228.
Replace t he de corative wh ee l c over* or the
whe el bolt cap s*.
Em erg en cy ass is tan ce
A WARNING
-Always read and follow all WARNINGS and in-
formation
c::> .&. in Raising the vehicle on
page
229 and c::> page 231.
After changing a wheel
A wheel change is not complete without the do
ing the following.
.. Always store the vehicle tool k it, the jack*, and
the replaced t ire in the luggage compartment
c::>page 118.
.. Check the tir e pr essure of the spare ti re as soon
as poss ible .
.. As soon as possib le, have the
tightening to r
que s
on a ll whee l bolts checked wi th a torque
wrench . Th e cor rect tigh tening torque is 90 ft
lbs .
(120 Nm).
.. Have the flat tire
replaced as soon as possible.
@ Tips
- If you not ice tha t the wheel bo lts are cor
roded and difficult to turn while changing a
tire, they should be replaced before you check the tightening torque.
- Dr ive at reduced speed until you have the
tightening torques checked .
Decorative wheel covers
Applies to vehicles: with decorative w heel covers
The decorative wheel covers must be removed
first to access the wheel bolts .
Fig. 1 75 Chang ing a w heel: re m ovi ng t he w heel cove r
227
Page 233 of 264

M N
i? co ,...., \!) ..,.,
N ..,., ,....,
Tires with unidirectional tread design
Tires with unidirectional tread design must be
mounted with their tread pattern pointed in the
right dir ection .
Using a spare tire with a tread pattern
intended for use in a specific direction
When us ing a spa re tire w ith a t read pa tte rn in
t e nded fo r use in a specific d ir e ct ion, p lease no te
the following:
- The direction of rotation is marked by an
arrow
on the side of the tire .
-If the spare t ire has to be installed in the incor
rect direction, use the spare tire only tempora
rily since the tire will not be able to achieve i ts
o ptimum performanc e character istics wit h re
gard to aquaplaning, noise and wea r.
- We recommend that you pay pa rticular atten
t io n t o this fact du ring wet weat he r and t hat
yo u adju st yo ur sp eed to match road condi
t ions.
- Re place the fla t tire w ith a new one and have i t
i nsta lled on yo ur vehicle as s oon as po ssible to
re store the han dling a dvan tages o f a un idirec
t io na l tire.
Notes on wheel changing
P lease read the information ¢ page 212, New
tires or wheels
i f you are going to use a spare tire
which is different from the tires on your ve hicle.
Afte r you change a tire:
- Check the tire pressure on the spare immedi
ately after installation.
- Have the wheel bolt tightening torque
checked with a torque wrench as soon as po s
sible by your authorized Audi dealer or quali
fied workshop .
- With steel and alloy wheel rims , the wheel
bolts are correctly tightened at a torque of 90
ft lbs. (120 Nm ).
- If you notice th at the wheel bolt s are corroded
and difficult to turn while changing a tire ,
they should be replaced before you check the
tightening torque .
Emergency assistance
-Replace the flat tire with a new one and have
it installed on your vehicle as soon as possi
ble. Remount the wheel cover .
Until then , drive with extra care and at reduced
speed s.
_& WARNING
- If you are going to e quip your ve hicl e wit h
tires o r rims which differ from those which
were factory installed, then be sure to read
the information ¢
page 212, New tires or
wheels.
- Always make sure the damaged wheel o r
even a flat tire a nd the jack a nd too l kit a re
p roperly secu red in the luggage compart
men t and are not loos e in t he passeng er
compa rt m ent.
- In an acci dent or sudde n man euver they
could fly forwa rd, inj uring a nyone in t he ve
h icle.
- Always s to re damag ed wh eel , jack and tools
s ecure ly in the luggage co mpart ment. Ot h
e rwi se, in an accident o r sud den man euver
they co uld fly forward, causing injury to pas
sen gers in t he ve hicle.
(D Note
D o not use co mmercially ava ilab le tire seal
a nts. O therwise, the e le ct ric al c ompone nts of
the tire pre ssure monit oring sys tem * w ill no
l on ger wor k properly and t he sensor for the
tire pressu re monito ring system * wi ll have to
b e replaced by qu alified workshop.
-
231
Page 245 of 264
M N
i? co ,...., \!) 1.1'1
N 1.1'1 ,....,
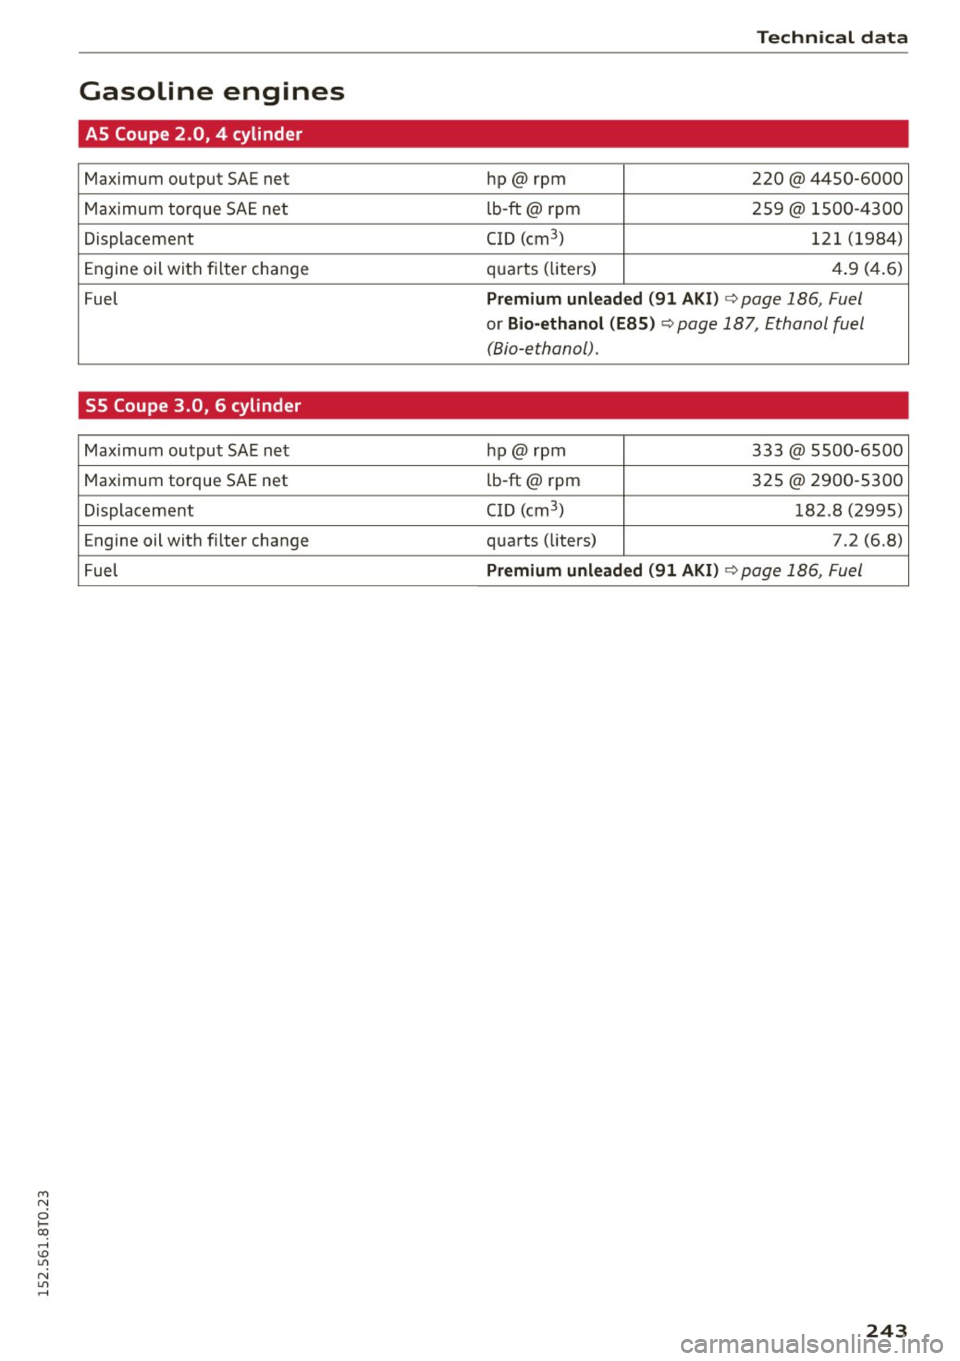
Gasoline engines
AS Coupe 2.0, 4 cylinder
Maximum output SAE net
Maximum torque SAE net
Displacement
Engine oil with filter change
Fuel
S5 Coupe 3 .0, 6 cylinder
Maximum output SAE net
Maximum torque SAE net
Displacement
Engine oil with filter change
Fuel
Techni cal data
hp@ rpm 220@ 4450-6000
l b-ft@ rpm 259@ 1500-4300
CID (cm
3 ) 121 (1984)
quarts (liters) 4.9 (4.6)
Premium unleaded (91 AKI) ¢ page 186, Fuel
or Bio-ethanol (E85) r::.> page 187, Ethanol fuel
(Bio-ethanol).
hp@ rpm 333@ 5500-6500
lb-ft@ rpm 325 @ 2900-5300
CID (cm
3 ) 182.8 (2995)
quarts (liters) 7.2 (6.8)
Premium unleaded (91 AKI) r::;, page 186, Fuel
243