display AUDI A5 2021 Manual Online
[x] Cancel search | Manufacturer: AUDI, Model Year: 2021, Model line: A5, Model: AUDI A5 2021Pages: 318, PDF Size: 85.96 MB
Page 170 of 318
Parking and maneuvering
The driver must decide if the parking space
displayed is suitable for the vehicle.
— Certain conditions near the parking space
may cause the parking process to fail, such
as if the parking space is near trees or posts,
or if the ground is covered, for example,
with gravel, snow, or ice.
@) Tips
— If you did not drive past a suitable parking
space too quickly, the parking space search
can also be activated afterward by pressing
Pe.
— The Electronic Stabilization Control (ESC)
must not be switched off during the parking
process. If the ESC intervenes, the parking
process
will be canceled.
— You can also drive into a perpendicular park-
ing space yourself and then activate the sys-
tem. If this is the case, the front of the vehi-
cle should already be in the space (@)
=> page 166, fig. 138 so that the sensors
can measure the space.
— The system is not available when certain as-
sist systems are switched on.
— If there are suitable parking spaces on both
sides of the street, for example on a one-
way street, you can change the side where
the system is searching for parking spaces
by activating the turn signal for the other
side or by pressing on that side in the center
display.
— The park systems do not provide support for
assisted parking on tight curves.
Park assist
General information
Applies to: vehicles with park assist
The park assist helps you when parking and exit-
ing parking spaces after the parking space
search. The park assist takes over the steering of
the vehicle while the driver accelerates, brakes,
and monitors the vehicle's surroundings. Park as-
sist can be interrupted at any time.
168
ZA WARNING
— Observe the safety precautions and note the
limits of the assist systems, sensors, and
cameras > page 126.
— The driver is always responsible when enter-
ing or exiting a parking space and during
similar maneuvers.
— Do not use this function if the vehicle cannot
move freely, for example when on a vehicle
jack.
— Sensors and cameras have spots in which
the surrounding area cannot be detected.
Objects, animals, and people may only be
detected with limitations may not be detect-
ed at all. Always monitor the traffic and the
vehicle's surroundings directly and do not
become distracted.
@) Note
— Do not use the park assist systems when
transporting cargo that extends out of the
vehicle, when snow chains are mounted, or
when the parking space is on a hill or in-
cline.
— Park assist guides the vehicle either away
from curbs or onto them if other vehicles
are parked on the curb. Make sure that your
vehicle's tires and rims are not damaged.
Resume control of the vehicle in time or
stop the parking process if needed to pre-
vent damage.
G) Tips
Follow the legal regulations in the country
where you are located when using Park assist.
Parking with the park assists
Applies to: vehicles with park assist
Requirement: a suitable parking space must be
found and selected > page 166. The vehicle must
initially be stationary.
In the center display, arrows and symbols on the
vehicle roof 2) > page 167, fig. 140 indicate
what action is needed, such as applying the >
Page 171 of 318
8W7012721BB
Parking and maneuvering
brakes or changing the direction. Park assist au-
tomatically steers the vehicle into the parking
space while the driver presses the pedals.
» After stopping the vehicle briefly, make sure
the actual direction the vehicle is traveling
matches the direction indicated by the park as-
sist.
> Remove your hands from the steering wheel.
> Pay attention to the path of the vehicle. If the
traffic situation permits, accelerate carefully
> AX. The maximum parking speed is approxi-
mately 4 mph (7 km/h).
> Follow the visual instructions in the center dis-
play and the warning tones until the parking
process has ended.
ZA WARNING
— Observe the safety precautions and note the
limits of the assist systems, sensors, and
cameras > page 126.
— The park assist is an assist system. The driv-
er is still responsible for monitoring the ve-
hicle's surroundings and preventing colli-
sions when using the system.
— When using park assist to drive into or out
of a parking space, the steering wheel turns
quickly on its own. Reaching into the steer-
ing wheel spokes while this is happening can
result in injury.
tomatically steers the vehicle out of the parking
space while the driver presses the pedals.
> Start the engine.
> Press the Pe button in the center console.
> Wait until a message appears in the center dis-
play that specifies the direction of travel re-
quired to exit the parking space.
> Activate the turn signal on the desired side or,
depending on vehicle equipment, press that
side next to the vehicle in the center display.
» Make sure the actual direction the vehicle is
traveling matches the direction indicated by the
park assist.
> Remove your hands from the steering wheel.
> Pay attention to the path of the vehicle. If the
traffic situation permits, accelerate carefully
> AX. The maximum speed for exiting a parking
space is 3 mph (5 km/h).
> Follow the visual instructions in the display and
the warning tones until the vehicle has finished
exiting the parking space.
>» The process of exiting the parking space has
ended if additional corrective movements are
no longer necessary and the specified steering
wheel angle is sufficient to drive out of the
parking space. Resume control of the steering
wheel >@).
G) Tips
You can also cancel the driving direction set
by the system by shifting between a forward
gear and reverse gear. Based on the position
of the vehicle, the system then calculates the
additional steering and driving directions for
maneuvering.
Exiting parking spaces with park assist
Applies to: vehicles with park assist
If you parked the vehicle in a parallel parking
space, park assist can help you drive out of it.
In the center display, arrows and symbols on the
vehicle roof @) > page 167, fig. 140 indicate
what action is needed, such as applying the
brakes or changing the direction. Park assist au-
Z\ WARNING
— Observe the safety precautions and note the
limits of the assist systems, sensors, and
cameras > page 126.
— The park assist is an assist system. The driv-
er is still responsible for monitoring the ve-
hicle's surroundings and preventing colli-
sions when using the system.
— When using park assist to drive into or out
of a parking space, the steering wheel turns
quickly on its own. Reaching into the steer-
ing wheel spokes while this is happening can
result in injury.
CG) Note
Resume steering immediately after the last
corrective movement and the takeover
prompt, so that the specified steering wheel
angle is not recentered.
169
Page 172 of 318
Parking and maneuvering
Interrupting the park assists
Applies to: vehicles with park assist
Park assist will be canceled automatically in the
following scenarios:
— You switch the system off.
— You start steering.
— The speed is too high.
— The time limit is exceeded.
— An obstacle is detected.
— ESC intervenes.
Resume control of the vehicle, end the parking
Process manually, or:
— You can resume the parking process in some sit-
uations. Press the Pe button in the center con-
sole.
— To continue exiting the parking space, switch
the engine off and on. Press the Pe button.
Z\ WARNING
Observe the safety precautions and note the
limits of the assist systems, sensors, and
cameras > page 126.
Messages
Applies to: vehicles with park assist
If the BB oe" or Pa} indicator light turns on, the
park assist is not available or was interrupted.
A message that indicates the cause and possible
solution may appear with some displays. The
weather conditions may be too poor or a sensor
may be covered. Clean the area in front of the
sensors > page 128 and try to turn on the sys-
tems again later.
If the malfunction remains, drive to an author-
ized Audi dealer or authorized Audi Service Facili-
ty immediately to have the malfunction correct-
ed.
170
Page 173 of 318
8W7012721BB
Telephone
Telephone
Introduction
Applies to: vehicles with telephone
You can operate various telephone functions easi-
ly through the MMI in your vehicle.
Depending on the country and the vehicle equip-
ment, the following options may be available:
— Connecting a cell phone with Bluetooth
— Using two telephones
— Using the Audi phone box
ZA WARNING
— Medical experts warn that mobile devices
can interfere with the function of pacemak-
ers. Always maintain a minimum distance of
about 7.9 inches (20 cm) between the mo-
bile device antennas and the pacemaker.
— Do not carry the mobile device in a pocket
directly over the pacemaker when the
phone is switched on.
— Switch the mobile device off immediately
if you suspect it may be interfering with
the pacemaker.
— Do not use the voice recognition system*
= page 27 in emergencies because your
voice may change in stressful situations. The
system may take longer to dial the number
or may not be able to dial it at all. Dial the
emergency number manually.
— Switch your mobile device off in areas where
there is a risk of an explosion. These loca-
tions are not always clearly marked. This
may include gas stations, fuel and chemical
storage facilities or transport vehicles, or lo-
cations where fuel vapors (such as propane
or gasoline vapor in vehicles or buildings),
chemicals or large quantities of dust parti-
cles (such as flour, sawdust or metal) may
be present in the air. This also applies to all
other locations where you would normally
turn your vehicle engine off.
— The demands of traffic require your full at-
tention. Always read the chapter > page 20,
Traffic safety information.
CG) Note
Read the information about Audi connect, and
be sure to note the connectivity costs section
=> page 182.
G@) Tips
— The Bluetooth connection range is limited
to inside the vehicle.
—Aselection of supported Bluetooth devices
can be found in the database for tested mo-
bile devices at www.audi.com/bluetooth.
Setup
Connecting a mobile phone via Bluetooth
Applies to: vehicles with telephone
Requirement: the vehicle must be stationary and
the ignition must be switched on. The Bluetooth
settings must be open on your mobile device dur-
ing the connection setup. The mobile device to be
connected must not be actively connected to any
other Bluetooth device. The MMI must only be
connected to one mobile device.
> Enable the Bluetooth function and visibility on
the MMI = page 222 and the mobile phone.
> Applies to: MMI: Select on the home screen:
PHONE.
> Follow the system instructions. The available
Bluetooth devices will be displayed after sever-
al seconds.
> Press on the desired mobile device in the list of
displayed Bluetooth devices.
> To update the list, press OQ.
A PIN for a secure Bluetooth connection will be
generated.
> Confirm the PIN on your mobile device.
> Follow the system instructions.
> Pay attention to any other system prompts on
the MMI and on your cell phone.
After connecting successfully
The cell phone contacts are automatically loaded
in the MMI. This process can take several mi-
nutes, depending on the number of contacts.
Depending on your cell phone and the connection
type, you can use the following functions:
171
>
Page 174 of 318
Telephone
Handsfree
Requirement: your cell phone must be connected
to the MMI via a Bluetooth Hands Free Profile
(Bluetooth HFP).
You can use the hands-free system. You can make
calls using the antenna on your mobile device.
Sending and receiving messages
See > page 179.
@) Tips
— Pay attention to any system prompts dis-
played on your mobile device or the MMI,
for example if the system should connect
automatically in the future. Depending on
the mobile device, you may need to down-
load contacts and confirm access to your
messages separately.
— You can also search for the MMI on your mo-
bile device using the Bluetooth device
search.
— You only have to pair your device one time.
Bluetooth devices that are already paired
automatically connect to the MMI when the
Bluetooth function is switched on, when
they are within range, and when the ignition
is switched on. The last connected mobile
device is given first priority.
— You can manage additional settings for con-
nected mobile devices in the Connected de-
vices menu > page 223.
— When leaving the vehicle, the Bluetooth
connection to the mobile device will auto-
matically disconnect. Depending on your
mobile device, phone calls in progress may
be automatically redirected from the MMI
to your mobile device so that you can con-
tinue the call on your phone.
Using two telephones
Applies to: vehicles with telephone, and Audi phone box
You can connect two mobile phones to the MMI
at the same time using the Bluetooth HFP, for ex-
ample a business phone and a private phone. You
can be reached in your vehicle through both mo-
bile phones.
172
Applies to: mobile devices with Bluetooth Mes-
sage Access Profile (MAP): You can send and re-
ceive messages with both mobile devices
=>page 179.
Connecting another mobile device
Requirement: a mobile device must be connected
to the MMI. The vehicle must be stationary and
the ignition must be switched on. The Bluetooth
settings must be open on your mobile device dur-
ing the connection setup. The mobile device to be
connected must not be actively connected to any
other Bluetooth device.
> Enable the Bluetooth function and visibility on
the MMI = page 222 and the mobile phone.
> Applies to: MMI: Select on the home screen:
PHONE > (°, or
> Applies to: MMI: Select on the home screen:
SETTINGS > Connected devices > Telephone 1
or Telephone 2 > New connection.
> Follow the system instructions. The available
Bluetooth devices will be displayed after sever-
al seconds.
> Press on the desired mobile device in the list of
displayed Bluetooth devices.
> To update the list, press OQ.
A PIN for a secure Bluetooth connection will be
generated.
> Confirm the PIN on your mobile device.
> Follow the system instructions.
> Pay attention to any other system prompts on
the MMI and on your cell phone.
After connecting successfully
See > page 171, After connecting successfully.
Switching between two mobile devices
Requirement: phone 1 and phone 2 must be con-
nected to the MMI.
> Applies to: MMI: Select on the home screen:
PHONE > <1.
@) Note
Read the information about Audi connect, and
be sure to note the connectivity costs section
=> page 182.
Page 176 of 318
Telephone
— You MUST cease operating this device im-
mediately if requested by ISED or a licensed
wireless service provider.
— WARNING: £911 location information may
not be provided or may be inaccurate for
calls served by using this device.
@) Tips
The system complies with United States FCC
regulations and ISED regulations > page 297.
Making phone calls using the exterior
ental ar-)
Applies to: vehicles with Audi phone box
With the Audi phone box, you can make calls us-
ing the exterior antenna on the vehicle. Using the
external antenna helps when there is a low signal
and also provides better reception quality.
Requirement: the ignition must be switched on.
> To make phone calls through the vehicle's exte-
rior antenna using your mobile device, lay your
device on the phone symbol @) > page 173,
fig. 141 in the center of the Audi phone box
with the display facing up.
eee laa mem MOM) mil ltig
Applies to: vehicles with Audi phone box
You can charge your mobile device using a special
USB adapter with the Audi phone box
=> page 211.
Requirement: the ignition must be switched on.
> To charge your mobile device via USB, connect it
to the USB input @ > page 173, fig. 141.
G) Tips
— You can purchase a USB adapter from an au-
thorized Audi dealer or authorized Audi
Service Facility, or at specialty stores.
— Audi recommends using Audi Genuine Ac-
cessories. Audi has verified their reliability,
safety, and suitability.
174
Charging a mobile device wirelessly
Applies to: vehicles with Audi phone box
You can charge your mobile device wirelessly us-
ing the Audi phone box.
Requirement: the ignition must be switched on.
Your mobile device must meet the Qi standard.
> Make sure that the wireless charging function is
switched on:
> Applies to: MMI: Select on the home screen:
SETTINGS > General > Reminder signal and
mobile device charging.
> Switch the Mobile device wireless charging
function on.
> To charge your mobile device wirelessly, lay it
on the @ symbol @ © page 173, fig. 141 in the
center of the Audi phone box with the display
facing up.
ZA WARNING
— The mobile device may become hot during
wireless charging. Pay attention to the tem-
perature of your mobile device and be care-
ful when removing it from the Audi phone
box.
— An alternating magnetic field is used for
wireless charging. Maintain a minimum dis-
tance of approximately 2.4 inches (6 cm) to
the Audi phone box charging plate. The
thresholds for prolonged exposure at this
distance comply with ICNIRP1998. There-
fore, interactions such as irritation of senso-
ry organs, malfunctions of active implants
(such as pacemakers, infusion pumps, or
neurostimulators) or effects on passive im-
plants (such as prosthetic limbs) is highly
unlikely. If you have an implant, consult a
medical specialist if you have any questions.
You can also switch the function for wireless
charging in the Audi phone box on and off.
You can continue to charge your mobile de-
vice using a cable connection.
G@) Tips
— The maximum charging output is 5 W.
—The charging time and temperature will vary
depending on the mobile device being used.
Page 177 of 318
8W7012721BB
Telephone
Mobile device reminder signal
Applies to: vehicles with Audi phone box
When the device reminder signal is switched on,
you will be notified that your mobile device is still
in the Audi phone box when you leave the vehicle.
Requirement: your mobile device must be located
in the Audi phone box (if Qi-capable) or connect-
ed to the Audi music interface with a USB adapt-
er, and the Audi smartphone interface must be
active or your iPhone must be connected to the
MMI via Bluetooth and charging using a USB
adapter connected to the Audi music interface.
> Applies to: MMI: Select on the home screen:
SETTINGS > General > Reminder signal and
mobile device charging.
The following settings may be available, depend-
ing on vehicle equipment:
— Signal tone
— Off
Spoken cue
this setting is switched on at the factory.
Mobile device notes: reminder, charge level
When this function is switched on, the charge
status of your mobile device is displayed. You will
also be reminded not to forget your mobile de-
vice when leaving the vehicle.
Using the telephone
Accessing the telephone functions
Applies to: vehicles with telephone
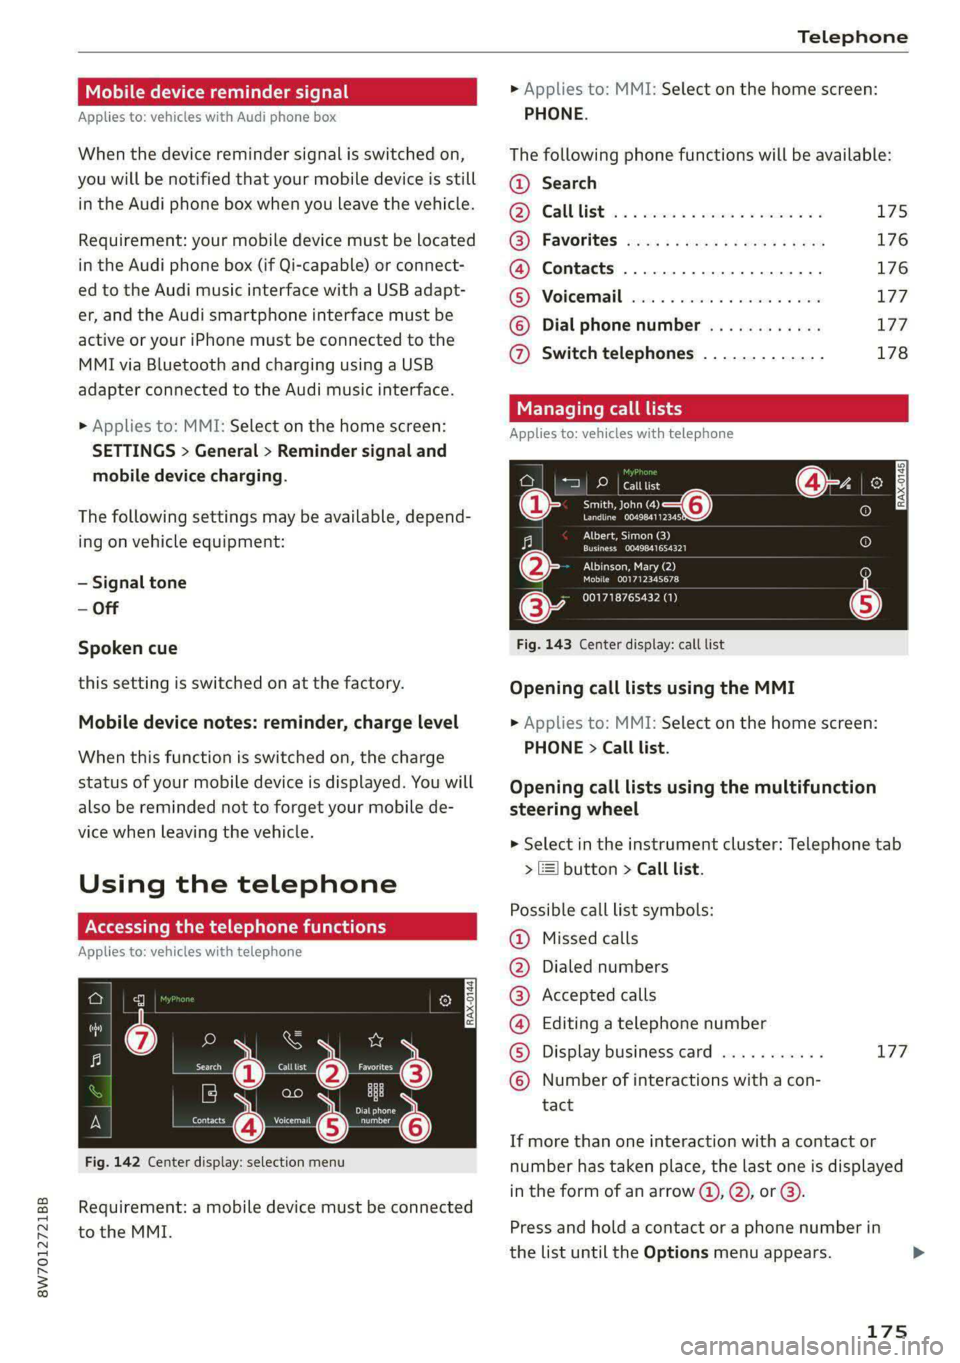
nn @y
ee oo ar
Fig. 142 Center display: selection menu
Requirement: a mobile device must be connected
to the MMI.
> Applies to: MMI: Select on the home screen:
PHONE.
The following phone functions will be available:
@ Search
OS) GAMUT ISE oc sesone 2 0 cweeme oe comes as 175
@) Favorites eco: ss esses yeeeys vows 176
@ Contacts .............0.0.000. 176
(BS) “Voicemail sie: «2 ceca 2 2 wiccovs 2 4 snsoa 177
© Dial phone number ............ 177
@ Switch telephones ............. 178
call
Applies to: icles with telephone
Pe DP | catttist
Te ny o—@
Prec rer a
j fo}
[RAX-0145]
U7
on
Albert, Simon (3)
a) Creme ZEY |
Albinson, Mary (2)
esCM Are 27)
(34 001718765432 (1)
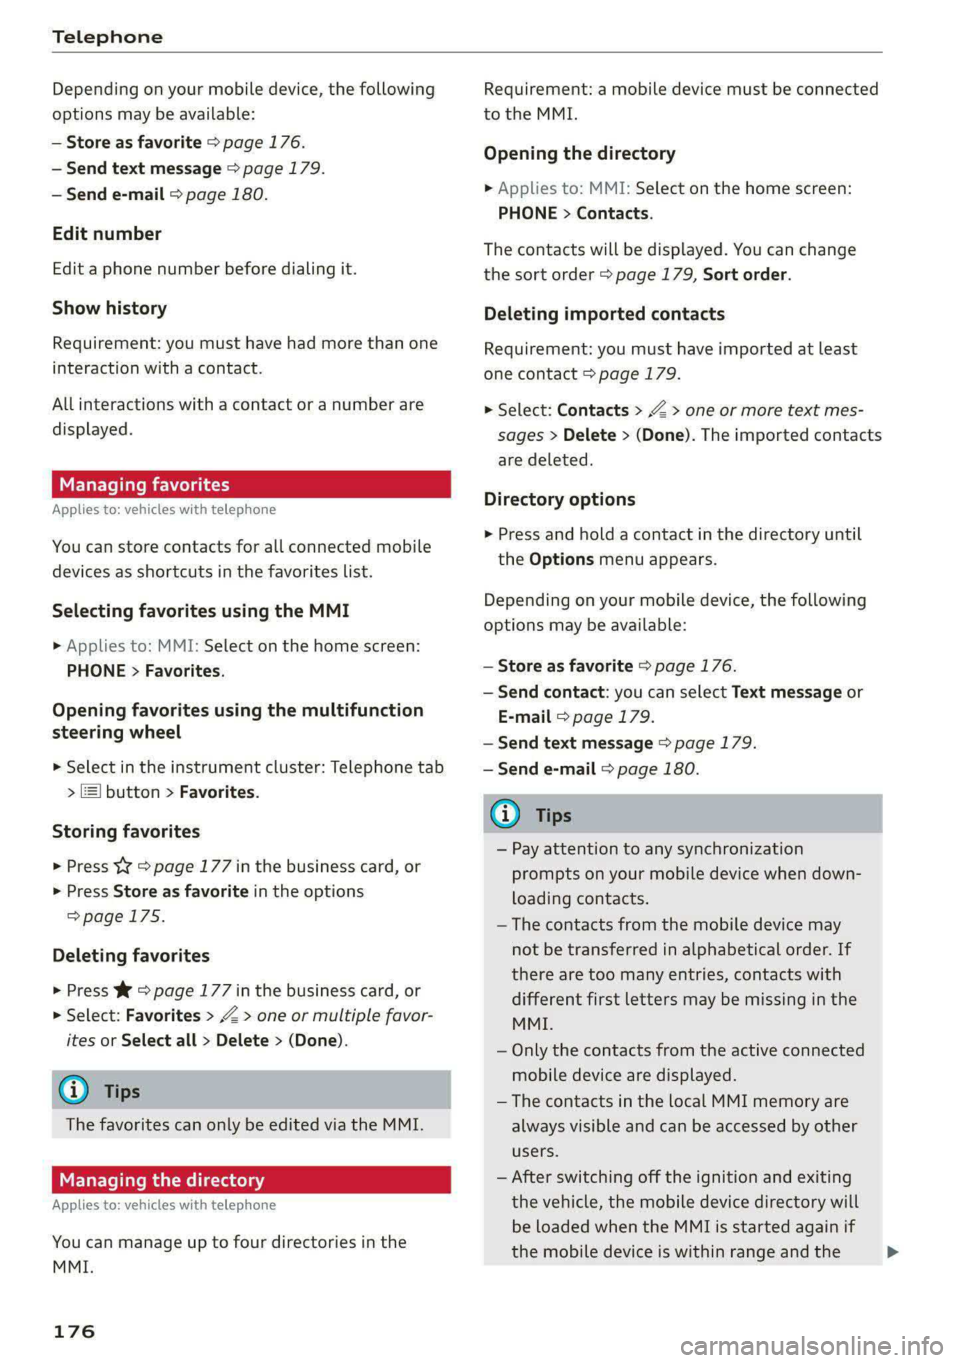
Fig. 143 Center display: call list
Opening call lists using the MMI
> Applies to: MMI: Select on the home screen:
PHONE > Call list.
Opening call lists using the multifunction
steering wheel
> Select in the instrument cluster: Telephone tab
> 2) button > Call list.
Possible call list symbols:
Missed calls
Dialed numbers
Accepted calls
Editing a telephone number
Display business card ........... 177
©OOOCOLO Number of interactions with a con-
tact
If more than one interaction with a contact or
number has taken place, the last one is displayed
in the form of an arrow @), @), or @).
Press and hold a contact or a phone number in
the list until the Options menu appears.
175
Page 178 of 318
Telephone
Depending on your mobile device, the following
options may be available:
— Store as favorite > page 176.
— Send text message > page 179.
— Send e-mail > page 180.
Edit number
Edit a phone number before dialing it.
Show history
Requirement: you must have had more than one
interaction with a contact.
All interactions with a contact or a number are
displayed.
Managing favorites
Applies to: vehicles with telephone
You can store contacts for all connected mobile
devices as shortcuts in the favorites list.
Selecting favorites using the MMI
> Applies to: MMI: Select on the home screen:
PHONE > Favorites.
Opening favorites using the multifunction
steering wheel
> Select in the instrument cluster: Telephone tab
> 2) button > Favorites.
Storing favorites
> Press Y¥ > page 177 in the business card, or
> Press Store as favorite in the options
>page 175.
Deleting favorites
> Press Ww © page 177 in the business card, or
> Select: Favorites > Z > one or multiple favor-
ites or Select all > Delete > (Done).
G) Tips
The favorites can only be edited via the MMI.
Managing the directory
Applies to: vehicles with telephone
You can manage up to four directories in the
MMI.
176
Requirement: a mobile device must be connected
to the MMI.
Opening the directory
> Applies to: MMI: Select on the home screen:
PHONE > Contacts.
The contacts will be displayed. You can change
the sort order > page 179, Sort order.
Deleting imported contacts
Requirement: you must have imported at least
one contact > page 179.
> Select: Contacts > Z > one or more text mes-
sages > Delete > (Done). The imported contacts
are deleted.
Directory options
> Press and hold a contact in the directory until
the Options menu appears.
Depending on your mobile device, the following
options may be available:
— Store as favorite > page 176.
— Send contact: you can select Text message or
E-mail > page 179.
— Send text message > page 179.
— Send e-mail > page 180.
i) Tips
— Pay attention to any synchronization
prompts on your mobile device when down-
loading contacts.
— The contacts from the mobile device may
not be transferred in alphabetical order. If
there are too many entries, contacts with
different first letters may be missing in the
MMI.
— Only the contacts from the active connected
mobile device are displayed.
— The contacts in the local MMI memory are
always visible and can be accessed by other
users.
— After switching off the ignition and exiting
the vehicle, the mobile device directory will
be loaded when the MMI is started again if
the mobile device is within range and the >
Page 181 of 318
8W7012721BB
Telephone
Switch telephones: the device name of the avail-
able mobile device is displayed. You can switch
the phone by pressing the button.
Ringtone and volume settings
— Ringtone and message volume: you can adjust
the volume using the slider.
— Ringtone: select a ringtone from the list.
— Microphone input level: you can adjust the in-
put level of the microphone using the slider.
Data module serial number (IMEI)
Applies to: vehicles with data module
The serial number (IMEI) will be displayed.
Directory settings
Applies to: vehicles with telephone
>» Applies to: MMI: Select on the home screen:
PHONE > Contacts > ©.
Switching between two mobile devices
Requirement: telephone 1 and telephone 2 must
be connected.
Switch telephones: the device name of the avail-
able mobile device is displayed. You can switch
the phone by pressing the button.
The directory for the selected phone will be dis-
played.
Hide grayed-out contacts
When this function is switched on, contacts that
have no phone numbers stored for them will be
hidden.
Sort order
You can sort the contacts by Last name or First
name.
Download contacts
Requirement: a mobile device must be connected
to the MMI.
To update the contacts in the MMI, you can man-
ually download your mobile device contacts. De-
pending on the mobile device, you may need to
disconnect and reconnect the Bluetooth connec-
tion to update the contacts.
Importing contacts
Requirement: a USB storage device must be con-
nected to the Audi music interface > page 211.
The USB storage device contains contacts in the
vCard format (.vcf). They must not be located in
sub-folders.
Applies to MMI: Select: Import contacts > Search
for import data > USB device 1/USB device 2 >
desired contacts or Select all contacts > Start
import.
@ Tips
—The imported contacts are stored in the lo-
cal MMI memory.
— There should be no other files or folders on
the storage medium containing the contacts
to be imported.
— Apple devices and MTP devices (such as
smartphones) are not recognized as USB
storage devices.
Messages
Text messages
Applies to: vehicles with telephone
Requirement: your mobile device must be con-
nected to the MMI via Bluetooth Message Access
Profile (Bluetooth MAP).
> Applies to: MMI: Select on the home screen:
MESSAGES > (®) > e-mail (phone 1)/e-mail
(phone 2)*.
The following functions are available:
— New text message*
— Inbox
— Sent
— Outbox*
— Drafts*
— Deleted
User defined*
If necessary, user-defined folders will be copied
to your mobile device.
Message options
Press ona text message.
179
Page 182 of 318
Telephone
Depending on the country, the following options
may be available:
— Read out
— Reply
— Forward
— More
To switch between messages, press < or >.
Press More. Depending on your mobile device
and the selected mailbox, additional options may
be available:
- Call
— Forward
— Navigate
— Extract numbers
— Send again
Settings
Press ©}.
New text message notification
When the function is switched on, an envelope
in the MMI status bar will indicate when there is
a new text message.
G) Tips
Only new received messages may be displayed
depending on your mobile device.
Applies to: vehicles with telephone
Requirement: your mobile device must be con-
nected to the MMI via Bluetooth Message Access
Profile (Bluetooth MAP).
> Applies to: MMI: Select on the home screen:
MESSAGES > (©) > e-mail (phone 1)/e-mail
(phone 2)*.
The following functions are available:
— New e-mail
— Inbox
— Sent
— Outbox
— Drafts*
— Deleted*
User defined*
180
If necessary, user-defined folders will be copied
to your mobile device.
Message options
Press on an e-mail.
Depending on the country, the following options
may be available:
— Read out
— Reply
— Reply all
— Forward
— More
To switch between messages, press < or >.
Press More. Depending on your mobile device
and the selected mailbox, additional options may
be available:
— Call
— Forward
— Extract e-mail
— Navigate
— Extract numbers
— Show all recipients
— Send again
Settings
Press ©}.
New e-mail notification
When the function is switched on, an envelope M
in the MMI status bar will indicate when there is
a new e-mail.
@) Note
Read the information about Audi connect, and
be sure to note the connectivity costs section
=> page 182.