roof AUDI A5 2021 Owners Manual
[x] Cancel search | Manufacturer: AUDI, Model Year: 2021, Model line: A5, Model: AUDI A5 2021Pages: 318, PDF Size: 85.96 MB
Page 4 of 318
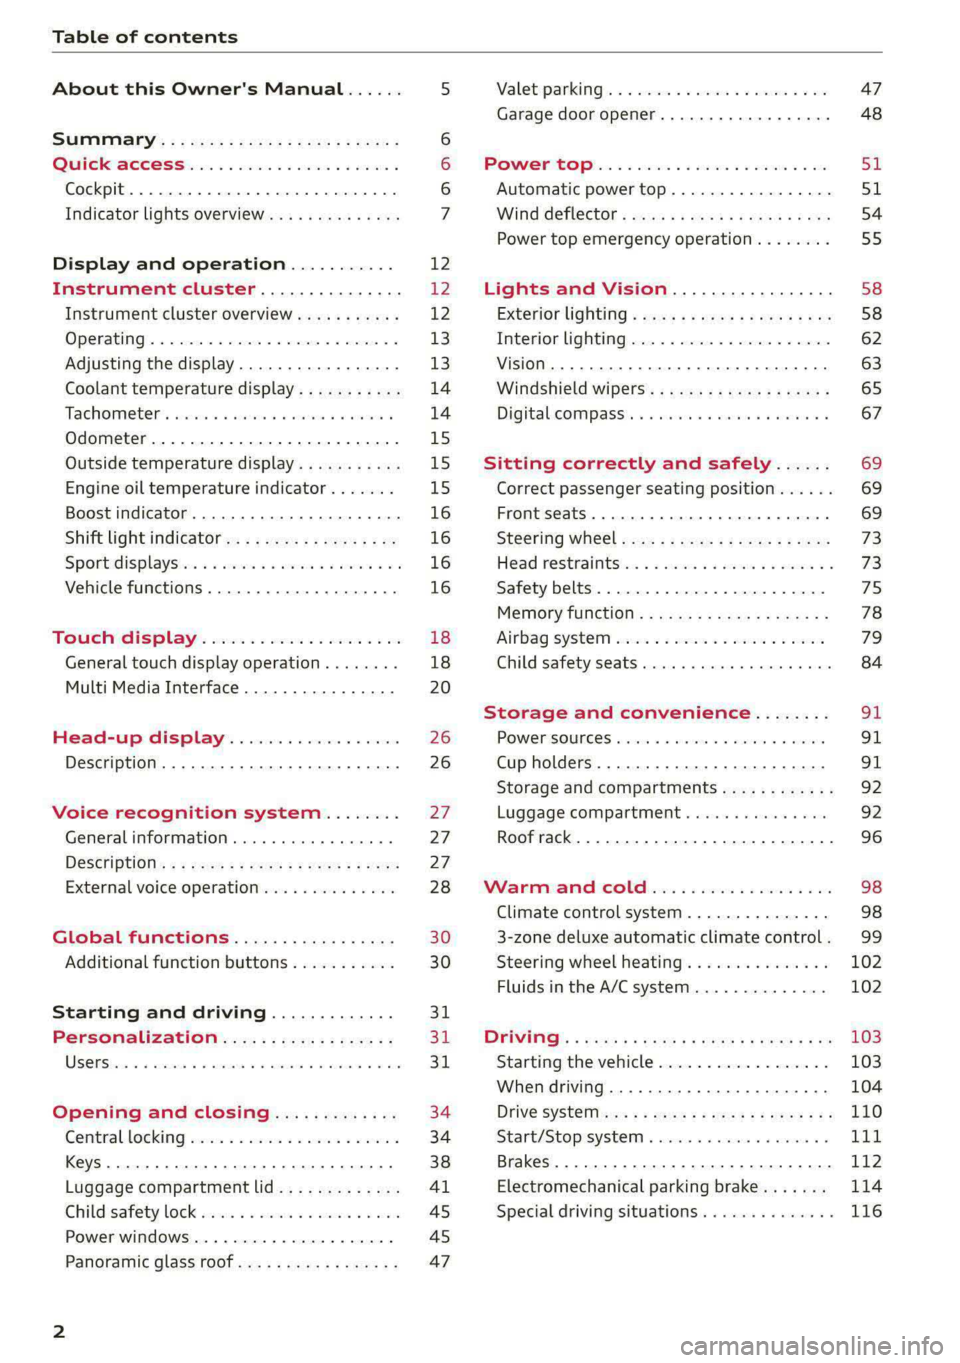
Table of contents
About this Owner's Manual......
SUMIMAry: < = exe : eens: Seen cs sens
QutckeaeCe ssh: «i esis se ois a eaves @
Cockpit. ...... 0... eee eee eee eee
Indicator lights overview...........4..
Display and operation...........
Instrument cluster...............
Instrument cluster overview...........
Operating. ecccuse w+ were oo wens oo ayes 9 ¥
Adjusting the display.................
Coolant temperature display...........
Tachometer’ series i ewe so snes ¥ & ome
Odometer.............. cee eee eee ee
Outside temperature display...........
Engine oil temperature indicator.......
Boost indicator...............0--000.
Shift light indicator..................
Sportidisplaystens « scwne x » eum os vomew «02
Vehicle functions ..............00000.
TOUCH AISPLAY ' sevece: 3 seisas 6 sessen 6 6 ws
General touch display operation........
Multi Media Interface................
Head-up display..................
Description............0.. ee cee eee
Voice recognition system........
General information..............00.
DESGriptiOns « = seen ¢ = seme xs eee st eee
External voice operation..............
Global functions.................
Additional function buttons...........
Starting and driving.............
Personalization..................
Opening and closing.............
Central locking) sani x x swasien © x sponae 2 aaaonor
Keys... eee
Luggage compartment lid.............
Childisafety lock seis 2 « sere ¥ © were 3 ¢ overs
Power windows............000eeeeee
Panorartiic glass roof 0... ieee s ieee es
12 12 12
13
13
14 14
15
15
15
16
16
16
16 18
18
20 26 26 27 27 27
28
30
30
311.
Bi
3,
34
34
38
Al 45 45
47
Valetiparking = s ssse «x cscs ov crue a ¥ oe 47
Garage door opener..........--.00 eee 48
POWOEPRtOP lies. 5 6 sisi. ae sic ao oie & wae 51
Automatic power top................. 51
Wind deflect6r « cccs ss pees sv eeea sv ees 54
Power top emergency operation........ 55
Lights and Vision................. 58
Exteriorlighting « css < «sees < ¢ caew soars 58
Interior lightinGpenis « « sen 0 mew © 2 amore 62
VISION. 2... eee ee eee eee 63
Windshield wipers..................- 65
Digital. compass’. « . ceria ss caw s cei es 67
Sitting correctly and safely...... 69
Correct passenger seating position...... 69
Front seats ....... 0c eee 69
Steering Wheel sows » s wou sg wane x x see 73
Head restraintsti:. «ose a a nase ao oan ae 73
Safety belts. .............0...00000. 75
Memory function..............ee sees 78
‘Airbag SYSteM eviscie co soaae es werae oo eee 79
Child
safety seats... ...... 00... eee eee 84
Storage and convenience........ 91
POWEPISQUIGES vases + arouse « 6 eomaime « + eects 91
Cup holders............. eee eee eee 91
Storage and compartments............ 92
Luggage compartment............... 92
Roof rack... 2.0.2... 2c eee eee eee 96
Warmandicoled ioc. es isco & 6 anes 9 5 ae 98
Climate control system............... 98
3-zone deluxe automatic climate control. 99
Steering wheel heating............... 102
Fluids in the A/C system.............. 102
DYPIVITVE: « eens ¢ & cars ¢ & seme 4 2 HasEE Ee 103
Starting the vehicle.................. 103
When driving.............00eeee eens 104
Drive SYStE Misses ¢ = sawe + « mee se eee sb 110
Start/Stopisystei « sso so aceon 4 @ suena a 111
Brakes... . 2.2.2.0... 2c eee ee eee eee 112
Electromechanical parking brake....... 114
Special driving situations.............. 116
Page 29 of 318
8W7012721BB
Voice recognition system
Voice recognition system
General information
Applies to: vehicles with voice recognition system
You can operate many functions in the vehicle
easily using voice commands.
Using the voice recognition system optimally
> Speak clearly and distinctly at a normal volume.
Speak louder when driving faster.
» Emphasize the words in the commands evenly
and do not leave long pauses.
> Close the doors, the windows, and the sunroof*
to reduce background noise. Make sure that
passengers are not speaking when you are giv-
ing a voice command.
> Do not direct the vents toward the hands-free
microphone, which is in the roof headliner near
the front interior lights.
> Only the driver should speak to the system, be-
cause the handsfree microphone is aimed to-
ward this seating position.
ZA\ WARNING
— Direct your full attention to driving. As the
driver, you have complete responsibility for
safety in traffic. Only use the functions in
such a way that you always maintain com-
plete control over your vehicle in all traffic
situations.
— Do not use the voice recognition system in
emergencies because your voice may change
in stressful situations. The system may take
longer to dial the number or may not be
able to dial it at all. Dial the emergency
number manually.
G) Tips
There are no voice guidance* prompts when a
dialog is active.
Description
eye aU mame ees eR
Applies to: vehicles with voice recognition system
Se
Drive me to
Where is a a
Connect
Pre)
Play
Eg
Maes
coy
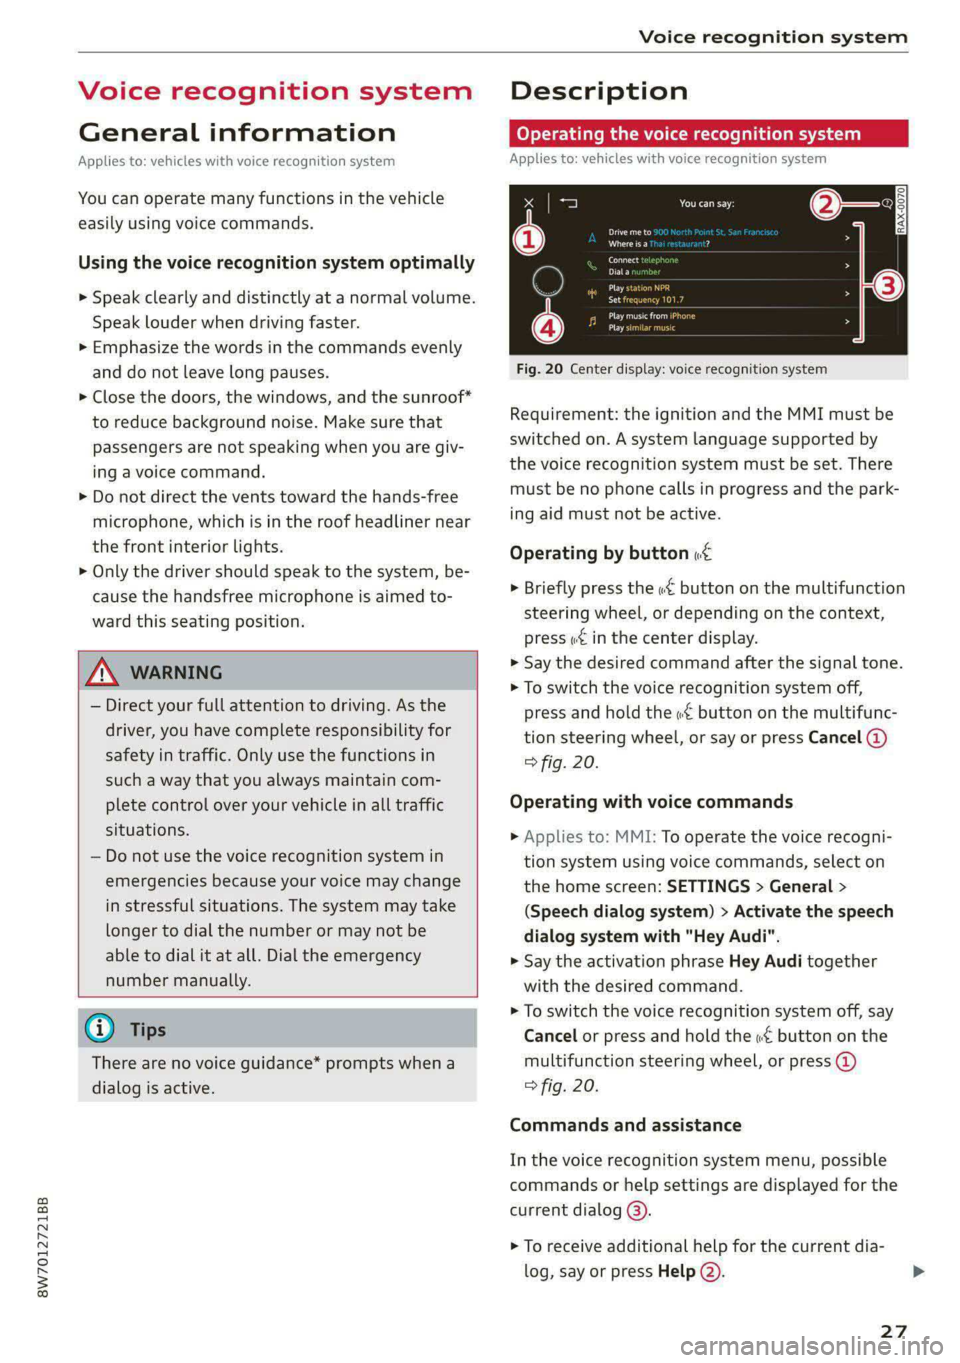
Fig. 20 Center display: voice recognition system
Requirement: the ignition and the MMI must be
switched on. A system language supported by
the voice recognition system must be set. There
must be no phone calls in progress and the park-
ing aid must not be active.
Operating by button «£
> Briefly press the «€ button on the multifunction
steering wheel, or depending on the context,
press we in the center display.
> Say the desired command after the signal tone.
> To switch the voice recognition system off,
press and hold the «€ button on the multifunc-
tion steering wheel, or say or press Cancel (@)
> fig. 20.
Operating with voice commands
> Applies to: MMI: To operate the voice recogni-
tion system using voice commands, select on
the home screen: SETTINGS > General >
(Speech dialog system) > Activate the speech
dialog system with "Hey Audi".
> Say the activation phrase Hey Audi together
with the desired command.
> To switch the voice recognition system off, say
Cancel or press and hold the «£ button on the
multifunction steering wheel, or press @)
> fig. 20.
Commands and assistance
In the voice recognition system menu, possible
commands or help settings are displayed for the
current dialog @).
> To receive additional help for the current dia-
log, say or press Help (2).
27
Page 37 of 318
8W7012721BB
Opening and closing
@) Note
The following applies when locking the vehi-
cle:
— If the vehicle key that was last used is de-
tected inside the passenger compartment,
then the vehicle cannot be locked from the
outside using the sensor. Take the vehicle
key with you and lock the vehicle again. Oth-
erwise, the vehicle will not be protected
against unauthorized access.
— If you try to lock the vehicle using the but-
ton on the vehicle key while the front pas-
senger's or rear door is open, and you acci-
dentally place the vehicle key inside the pas-
senger compartment and close the door,
the vehicle will lock at first. But if the key-
less system detects a vehicle key inside the
vehicle after it locks, then the vehicle will
unlock again. The turn signals will flash sev-
eral times to indicate this. If you do not
open the vehicle to remove the vehicle key
within a brief period, then the vehicle will
lock automatically. This prevents the vehicle
from being left unlocked for long periods of
time. The vehicle key will then be locked in-
side the vehicle.
— If the luggage compartment lid closes and
the system detects that the last vehicle key
that was used is inside the luggage com-
partment, then the luggage compartment
lid will open again. The turn signals will
flash several times to indicate this. The
doors will lock. Always take the vehicle key
with you, or unauthorized persons may be
able to enter the vehicle.
@ Tips
— Do not leave valuables unattended in the ve-
hicle. A locked vehicle is not a safe!
—The LED in the driver's door rail blinks when
you lock the vehicle. If the LED turns on for
approximately 30 seconds after locking,
there is a malfunction in the central locking
system. Have the problem corrected by an
authorized Audi dealer or authorized Audi
Service Facility.
Setting the central locking system
You can adjust the central locking system to your
preferences. The settings depend on the vehicle
equipment.
> Applies to MMI: Select on the home screen: VE-
HICLE > Settings & Service > Central locking.
Door unlocking
—If you select All, all doors and the luggage
compartment lid will be unlocked when unlock-
ing the vehicle.
— If you select Driver's door, only the driver's
door will be unlocked. To unlock all doors and
the luggage compartment lid, press the (9 but-
ton on the vehicle key twice. In vehicles with a
convenience key”, only the driver's door will un-
lock when you pull the driver's door handle. If
you pull another door handle, the entire vehicle
will be unlocked.
The entire vehicle will always be locked f you
press the &@ button.
Long press to open windows
You can select if all windows and the panoramic
glass roof* should open using the vehicle key
= page 46, Convenience opening and closing. If
you press and hold the f button on the vehicle
key, all of the windows and the panoramic glass
roof* will close.
Disable rear lid handle
You can select if the luggage compartment lid
can open with the handle. If you activate this
function, the luggage compartment lid can only
be opened with the <¥ or 4s button on the vehi-
cle key or in the driver's door. In vehicles with a
convenience key*, you can still open the luggage
compartment lid using the handle if an author-
ized convenience key is detected > page 41.
Fold mirrors
You can select if the exterior mirrors automatical-
ly fold in when locking.
35
Page 40 of 318
Opening and closing
Break-in security feature
The alarm will sound if there is a break-in at the
doors, hood, and/or luggage compartment lid.
Interior/towing protection monitor
The alarm will be triggered if there are move-
ments detected in the vehicle interior (for exam-
ple, by animals) or if there is a change in the vehi-
cle angle (for example, when the vehicle is being
towed).
You can prevent the alarm from being triggered
by deactivating the interior/towing protection
monitor.
Deactivating the interior/towing protection
monitor
There are the following options for deactivating
the interior/towing protection monitor:
> Press the & button on the vehicle key a second
time within two seconds. Or
> Applies to: vehicles with convenience key:
Touch the sensor on the door handle a second
time within two seconds. Or
> Turn the mechanical key in the door lock to the
close position a second time within two sec-
onds.
> Applies to: vehicles with MMI: Select on the
home screen: VEHICLE > Settings & Service >
Interior monitoring.
If you lock the vehicle, then the interior/towing
protection monitor will stay off until the next
time the vehicle is unlocked.
ZA WARNING
No one, especially children, should stay in the
vehicle when it is locked from the outside, be-
cause the windows can no longer be opened
from the inside. Locked doors make it more
difficult for emergency workers to enter the
vehicle, which puts lives at risk.
@) Tips
The interior/towing protection monitoring on-
ly functions correctly when the windows and
the roof* are closed.
38
RAZ-0720,
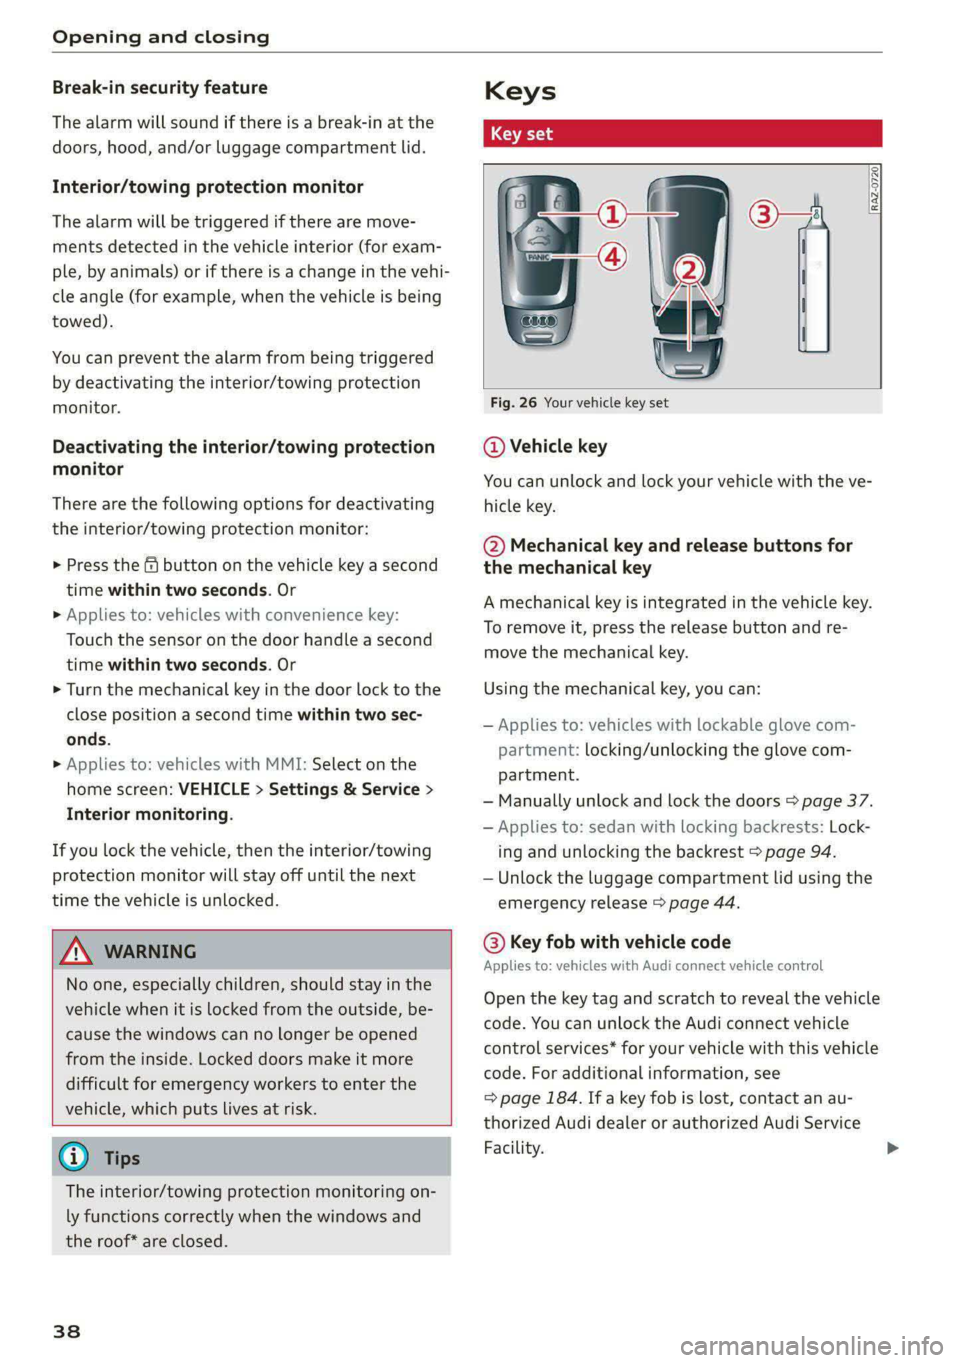
Fig. 26 Your vehicle key set
@ Vehicle key
You can unlock and lock your vehicle with the ve-
hicle key.
@ Mechanical key and release buttons for
the mechanical key
A mechanical key is integrated in the vehicle key.
To remove it, press the release button and re-
move the mechanical key.
Using the mechanical key, you can:
— Applies to: vehicles with lockable glove com-
partment: locking/unlocking the glove com-
partment.
— Manually unlock and lock the doors > page 37.
— Applies to: sedan with locking backrests: Lock-
ing and unlocking the backrest > page 94.
— Unlock the luggage compartment lid using the
emergency release > page 44.
@® Key fob with vehicle code
Applies to: vehicles with Audi connect vehicle control
Open the key tag and scratch to reveal the vehicle
code. You can unlock the Audi connect vehicle
control services* for your vehicle with this vehicle
code. For additional information, see
=> page 184. If a key fob is lost, contact an au-
thorized Audi dealer or authorized Audi Service
Facility.
Page 48 of 318

Opening and closing
Power window switches:
Left front door
Right front door
Left rear door*
Right rear door*
OOOO Central switch* for opening or closing all side
windows at the same time
Opening and closing the windows
The driver can control all power windows. All
power window switches are equipped with a two-
stage function:
> To open or close the window completely, press
the switch down or pull the switch up briefly to
the second level. The operation will stop if the
switch is pressed or pulled again.
> To select a position in between opened and
closed, press or pull the switch to the first level
until the desired window position is reached.
Correcting a malfunction in the one-touch
up/down function
You can reactivate the one-touch up/down func-
tion if it malfunctions.
> Pull the power window switch up until the win-
dow is completely raised.
> Release the switch and pull it up again for at
least one second.
until the driver's door or front passenger's
door has been opened.
— The power windows are equipped with pinch
protection. The automatic window may stop
closing and will open all the way again even
if no obstacle is detected. Pull the power
window switch up until the window is com-
pletely raised.
Convenience opening and closing
Applies to: vehicles with convenience key
For power top* convenience opening/closing, re-
fer to the information in > page 52.
Convenience opening and closing the
windows and roof*
You can set in the MMI if all windows or the roof*
should open or close all at once > page 35, Set-
ting the central locking system.
> Press and hold the & or & button on the vehicle
key until all windows and the roof* have
reached the desired position > /A\.
> Touch the sensor* on the door handle until all
of the windows and the roof* are closed. Do not
place your hand in the door handle when doing
this.
When all of the windows and the roof* are
closed, the turn signals will flash once.
ZA WARNING
— Observe the safety precautions > page 34.
— Never close the windows carelessly or in an
uncontrolled manner, because this increases
the risk of injury.
G) Tips
— The windows will automatically open slight-
ly when you open the doors.
— If the window in the driver's or front pas-
senger's door is completely open, it will
raise slightly when the door is opened. The
window will lower again when you close the
door.
— You can still open and close the windows for
several minutes after turning the ignition
off. The power windows do not switch off
46
ZA WARNING
— Never close the windows or the roof* care-
lessly or in an uncontrolled manner, because
this increases the risk of injury.
— For security reasons, the windows and the
roof* can only be opened and closed with
the vehicle key at a maximum distance of
approximately 6.5 feet (2 m) away from the
vehicle. Always pay attention when using
the f& button to close the windows and the
roof* so that no one is pinched. The closing
process will stop immediately when the f&
button is released.
Page 49 of 318

8W7012721BB
Opening and closing
Panoramic glass roof Roof emergency closing
If an object is detected when closing, the roof
“Si au seGe will open again automatically. In this case, you
Applies to: vehicles with panoramic glass roof and roof sun- can then close it with the power emergency clos-
shade ing function.
Operating the panoramic glass roof and
> Within five seconds after the sunroof opens au-
tomatically, pull the applicable button until the
roof is closed.
Z\ WARNING
To reduce the risk of injury, always pay atten-
tion when closing the roof. Always switch the
ignition off and take the key with you when
leaving the vehicle.
Fig. 38 Headliner: panoramic glass roof and sunshade*
buttons CG) Note
The control buttons are equipped with a two- Always close the roof when you leave the vehi-
stage function. cle and when there is precipitation to reduce
the risk of damage to the interior equipment,
Operating the roof sunshade particularly the electronic equipment.
> Opening and closing the sunshade: push the )
switch in the headliner @ briefly toward the @ Tips
rear or forward to the second level. — Interior airflow: wind inside the vehicle can
> Partially opening the sunshade: press the be reduced by the roof sunshade when the
switch to the first level until the sunshade panoramic glass roof is all the way open.
reaches the desired position. When the sunshade is all the way open,
close it approximately 4 inches (10 cm) until
Opersting the‘reur the wind inside the vehicle subsides.
» Tilting the roof: press the A> switch in the — After switching off the ignition, the roof and
headliner briefly up to the second level (@). sunshades can still be operated for several
> Closing the tilted roof: pull the 2> switch down minutes as long as neither of the front
briefly to the second level. doors have been opened.
> Opening the roof: slide the > switch back — It is not possible to open the roof when
briefly twice in a row to the second level @). temperatures are too low.
> Closing the opened roof: push the 2S switch
forward briefly to the second level. Valet pa rki ng
> Opening or closing partially: slide the A>
switch to the first level and hold it there until
the roof reaches the desired position.
Applies to: vehicles with valet parking function
The valet parking function can protect the lug-
gage compartment from unauthorized access.
Quick opening
The [VALET] button for valet parking is in the
glove compartment.
You can also open the roof and roof sunshade in
one movement.
> Push the 4S switch back briefly to the second
level ) twice in a row.
47
Page 53 of 318

8W7012721BB
Power top
Power top
Automatic power top
eT e e eeu)
Applies to: vehicles with power top
The power top opens and closes automatically.
When open, the power top is stored completely
in the power top compartment. The power top
can be opened or closed at speeds up to 30 mph
(50 km/h). The power top will not open when the
temperature is below -5 °F (-15 °C).
Under normal conditions, the power top is wind-
and waterproof. In rare cases, small droplets of
water may form under extreme weather condi-
tions, such as torrential or prolonged rain. That is
normal and no cause for concern.
Follow the care instructions to keep the power
top free of leaks and to maintain its appearance
=> page 267, Care and cleaning. Also observe the
following:
— Open and stow the power top only when it is
clean and dry. Stowing the power top when it is
damp can create imprints in it, and mildew and
other damage can result if it is left stowed
while damp for long periods of time.
— To prevent scratching or damaging the power
top, do not use any sharp-edged objects to re-
move ice and snow. The rear window may be
cleared of ice with a standard ice scraper.
— Do not leave the power top open for several
weeks or the creases in it may become discol-
ored.
— Do not open the power top when the tempera-
ture is below 32 °F (0 °C). The fabric in the
power top loses elasticity in sub-zero tempera-
tures.
Opening and closing the power top
Applies to: vehicles with power top
e 8
a
2
= e a
Fig. 39 Center console: power top switch
Requirement: the luggage compartment lid must
be closed.
Opening and closing the power top
> Switch the ignition on.
> To open the power top, pull and hold the switch
@ during the entire process.
> To close the power top, pull and hold the switch
@ during the entire process.
Opening and closing the power top
(automatic operation)
It is not necessary to hold the switch.
Requirement: the speed must be between 4 mph
(6 km/h) and 30 mph (50 km/h). There must be
no passengers or objects on the rear bench seat.
> Switch the ignition on.
> To open the power top completely, pull the
switch @ briefly.
> To close the power top completely, pull the
switch @) briefly.
The status of the power top is shown in the in-
strument cluster display when operating the
power top switch.
You can close the power top when the wind de-
flector is installed > page 54.
A message will appear in the instrument cluster
if the power top cannot be opened or closed.
ZX WARNING
—When operating the power top, make sure
the function is not affected by wind or other
51
Page 67 of 318
8W7012721BB
Lights and Vision
— If electrolyte fluid comes into contact with
the eyes, flush them thoroughly with plenty
of clean water for at least 15 minutes and
then seek medical attention.
— If electrolyte fluid comes into contact with
the skin, flush the affected area with clean
water for at least 15 minutes, and then
clean with soap and water and seek medical
attention. Clean affected clothing and shoes
thoroughly before wearing again.
— If the fluid was swallowed and the person is
conscious, flush the mouth with water for at
least 15 minutes. Do not induce vomiting
unless this is recommended by medical pro-
fessionals. Seek medical attention immedi-
ately.
@) Note
Applies to: vehicles with automatic dimming mirrors
Electrolyte fluid can leak out from broken mir-
ror glass. This liquid damages plastic surfaces
and paint. Clean this liquid as quickly as possi-
ble, for example with a wet sponge.
@ Tips
Applies to: vehicles with automatic dimming mirrors
— If the light reaching the rearview mirror is
obstructed, the automatic dimming mirror
will not function correctly,
— The automatic dimming mirrors do not dim
when the interior lighting is turned on or
the reverse gear is selected.
Fig. 59 Roof headliner: sun visor
Sun visor
The sun visors can be moved out of their brackets
and turned toward the doors (@).
They can also be moved back and forth length-
wise in this position.
Vanity mirror
The mirror light switches on when the cover over
the
vanity mirror @) opens.
Windshield wipers
Switching the windshield wipers on
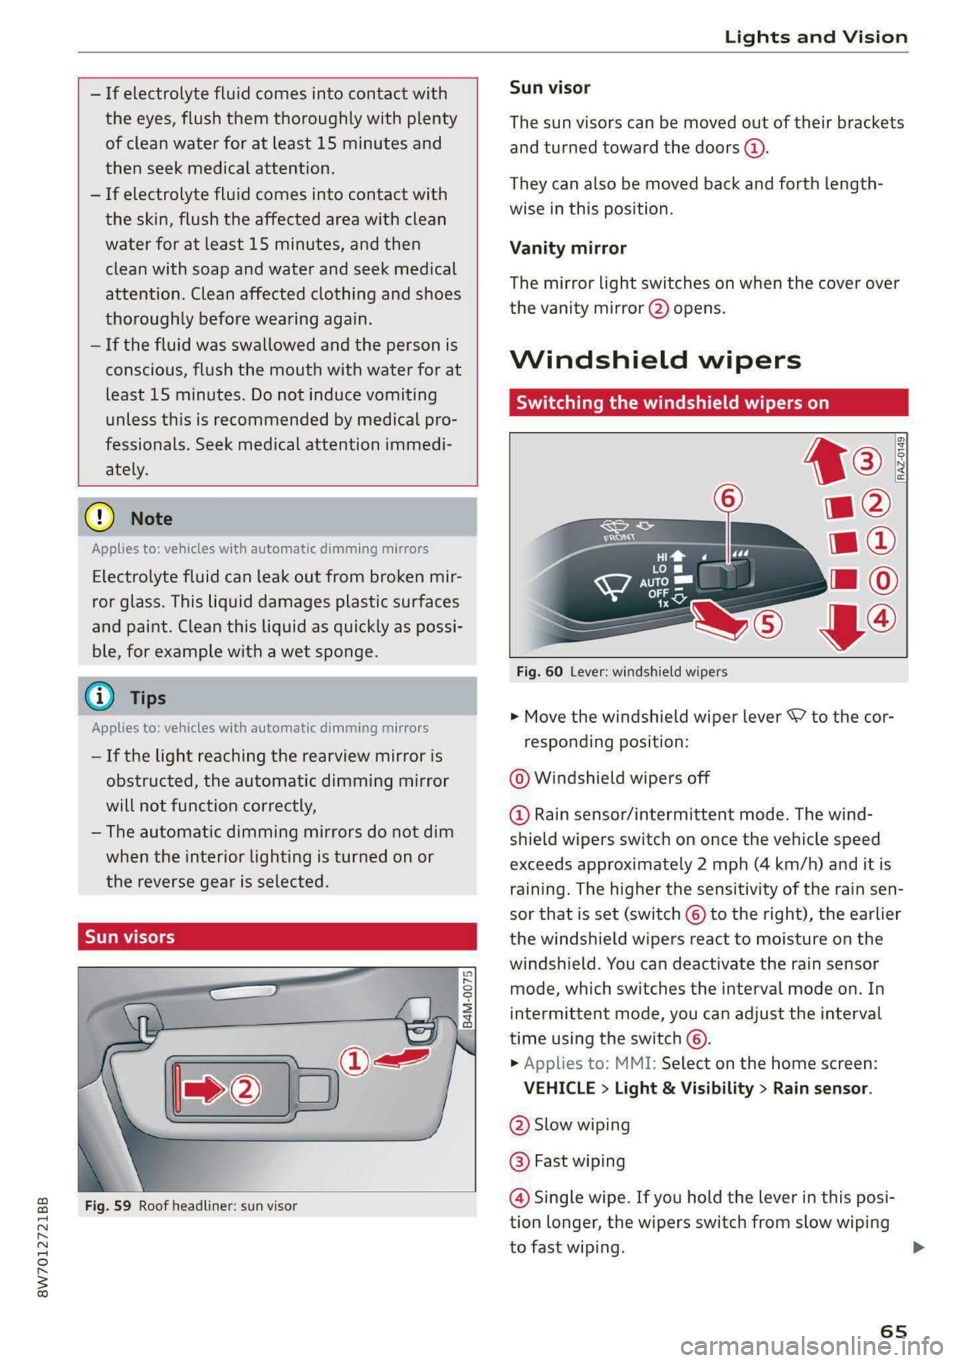
Fig. 60 Lever: windshield wipers
> Move the windshield wiper lever 7 to the cor-
responding position:
@ Windshield wipers off
@ Rain sensor/intermittent mode. The wind-
shield wipers switch on once the vehicle speed
exceeds approximately 2 mph (4 km/h) and it is
raining. The higher the sensitivity of the rain sen-
sor that is set (switch © to the right), the earlier
the windshield wipers react to moisture on the
windshield. You can deactivate the rain sensor
mode, which switches the interval mode on. In
intermittent mode, you can adjust the interval
time using the switch ©.
> Applies to: MMI: Select on the home screen:
VEHICLE > Light & Visibility > Rain sensor.
@ Slow wiping
@ Fast wiping
@ Single wipe. If you hold the lever in this posi-
tion longer, the wipers switch from slow wiping
to fast wiping. >
65
Page 72 of 318

Sitting correctly and safely
— Your thighs are lightly supported by the front
surface of the seat
— The backrest is in an upright position and your
back is resting against it
— You have a sufficient view of the area around
the vehicle
— You have a clear view of the instrument cluster,
indicator lights, and the head-up display*
Z\ WARNING
— If you are too close to the steering wheel or
instrument panel, the airbag system cannot
provide the optimal protection, which in-
creases the risk of injury and death.
— To reduce the risk of injury in the event of
sudden braking maneuvers or accidents,
never drive with the backrest reclined very
far. The airbag system and seat belts can on-
ly provide optimal protection when the back-
rest is in an upright position and the driver
is wearing the seat belt correctly. If the
backrest is angled back too far, the safety
belt can shift to soft areas of the body, such
as the stomach, which increases the risk of
injury.
—To reduce the risk of an accident, only adjust
the seats when the vehicle is stationary.
— Be careful when adjusting the seat. Lack of
control or attention when adjusting can re-
sult in injuries due to pinching to vehicle oc-
cupants both in the front seats and rear
seats.
— Never place objects in the driver's footwell.
Objects could shift and enter the area
around the pedals, which could prevent you
from using them. You would then be unable
to use the pedals if sudden driving or brak-
ing maneuvers were needed, which increas-
es the risk of an accident.
— Make sure that the floor mats are always se-
curely attached.
— To reduce the risk of an accident, never place
additional floor mats or other floor covers
over the installed floor mats, because this
reduces the pedal's range of motion and can
impair pedal operation.
—To reduce the risk of injury, never place your
feet on the instrument panel, out of the
70
window, or on the seat surfaces. This also
applies to passengers in the rear seats.
(@) Note
Applies to: vehicles with manually adjustable head re-
straints
To reduce the risk of damage, be very careful
when adjusting the seat to make sure the
head restraints do not come into contact with
the headliner or the sunroof*.
Power seat adjustme
Fig. 65 Front seat: adjusting the seat (version B)
The settings depend on the vehicle equipment.
Adjusting the backrests
> To move the backrest forward or backward,
press the button @) forward or backward.
Adjusting the seat position
> To move the seat forward or backward, push
the button @) forward or backward.
> To adjust the seat upward or downward, push
the rear section of the button @) upward or
downward.
> To adjust the seat surface, press the front part
of the button @) upward or downward.
Page 98 of 318

Storage and convenience
downs and luggage com
Fig. 95 Luggage compartment: luggage compartment net*
stretched out
Observe the safety precautions > page 92.
Tie-downs
There are tie-downs (@ in the luggage compart-
ment to secure pieces of luggage and objects.
» Use the tie-downs to secure the cargo.
Cargo net
Applies to: vehicles with cargo net
Use the cargo net (2) to secure lighter objects in
the luggage compartment
> Fold the clip for the tie-downs upward.
> Attach the hooks for the cargo net to the tie-
downs.
96
Roof rack
General information
Applies to: vehicles with roof rack mount
rr + a 2 a
oO
Applies to: Coupe
Fig. 96 Roof: mounting points
B8Ww-0244
Applies to: Sportback
Fig. 97 Roof: mounting points
If luggage or cargo is to be carried on the roof,
you must observe the following:
— These roof racks are the basis for a complete
roof rack system. Only roof racks that are suita-
ble for your vehicle may be used. Audi recom-
mends roof racks and attachments from the
Audi Genuine Accessories program.
— Make sure the roof rack is mounted on the vehi-
cle only at the specified locations.
— Note the permitted axle load, permitted total
weight, and permitted roof load of your vehicle
=> page 300. The roof load is the total of the
weight of the roof rack, the attachments and
the cargo you are carrying. However, you must
also note the permitted load of the carrier sys-
tem being used.
— Follow the installation instructions provided
with the roof rack system. If you do not