warning lights AUDI A5 2021 Owners Manual
[x] Cancel search | Manufacturer: AUDI, Model Year: 2021, Model line: A5, Model: AUDI A5 2021Pages: 318, PDF Size: 85.96 MB
Page 9 of 318
8W7012721BB
Quick access
@) Center armrest with storage com-
partment. Depending on vehicle
equipment, it may have:
— Audi music interface .......... 211
—Audi phone box ............... 173
— Starting the engine if there is a
MALFUMERION since oo sxosoue x 2 seems ss 103
@) Electromechanical parking brake
BUGGOT sieves so cman « 2 ewes 2s men 2 114
@) Selector lever (automatic transmis-
SIOM) seo so neon & v Howe & eRe Fa 105
@4 Storage compartment .......... 92
@) [START ENGINE STOP]button .... 103
@6 Audi music interface ............ 211
@) Steering wheel adjustment ...... 73
Lever for:
— Cruise control system ......... 136
— Audi adaptive cruise control .... 139
@9) Button for switching the head-up
display on and off, adjusting the
height ........ 2... cee eee eee 26
60 Instrument illumination ......... 63
@) Connection port for the On Board
Diagnostic System (OBD) ........ 290
@2 Headlight control switch ........ 58
@3) Hood release .............-.0-% 231
@4 All-weather lights button ........ 58
@5) Luggage compartment lid button . 41
G8 Exterior mirror adjustment ...... 63
6 Buttons for:
— Power windows ...........00. 45
— Central power window switch ... 45
—Child safety lock .............. 45
G@) Tips
Some the equipment listed here is only instal-
led in certain models or is available as an op-
tion.
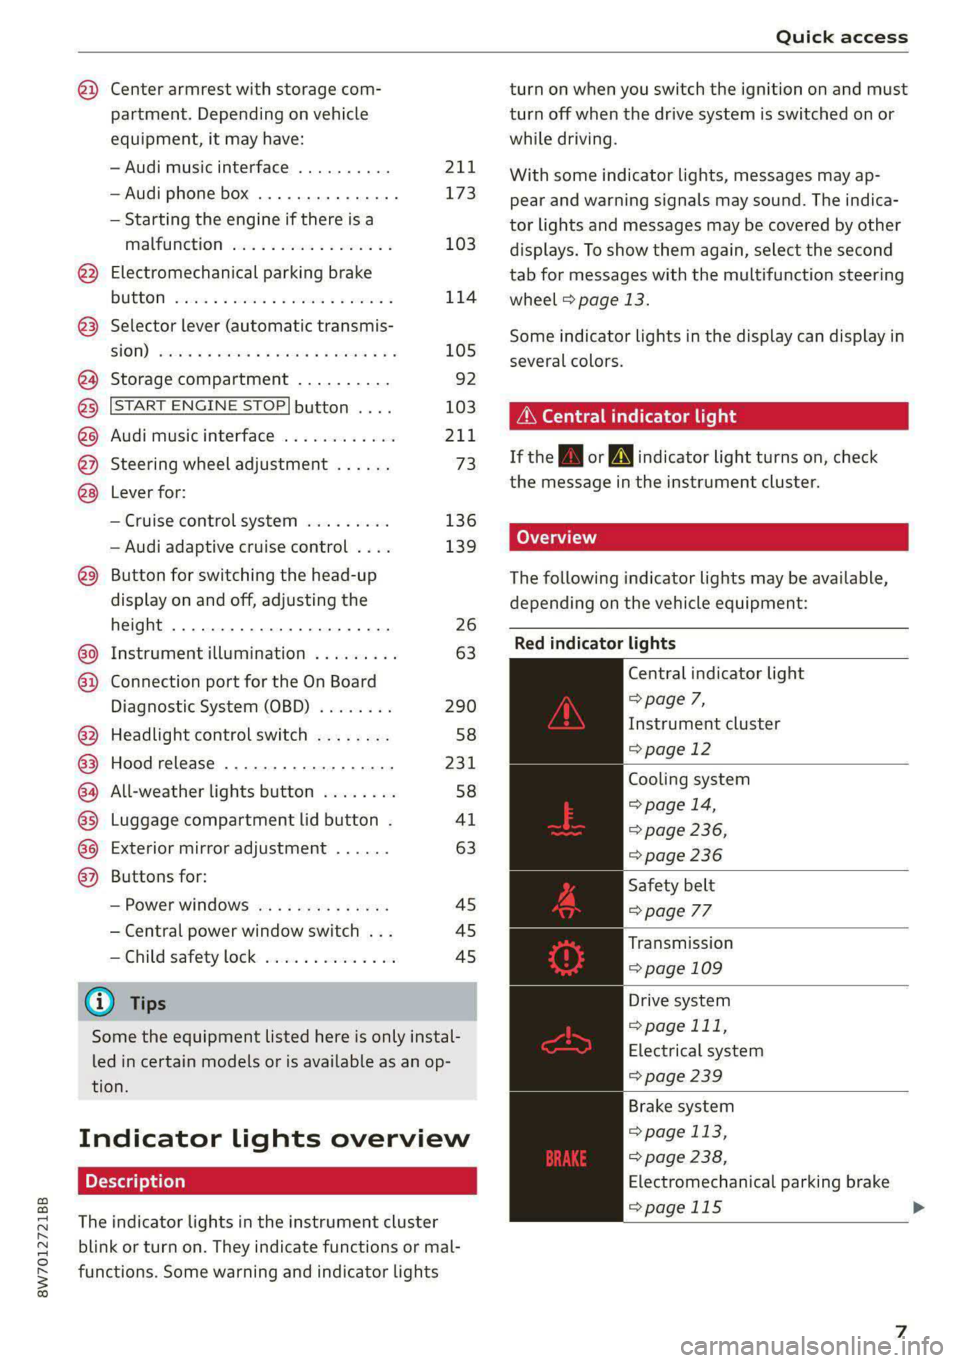
Indicator lights overview
The indicator lights in the instrument cluster
blink or turn on. They indicate functions or mal-
functions. Some warning and indicator lights
turn on when you switch the ignition on and must
turn off when the drive system is switched on or
while driving.
With some indicator lights, messages may ap-
pear and warning signals may sound. The indica-
tor lights and messages may be covered by other
displays. To show them again, select the second
tab for messages with the multifunction steering
wheel > page 13.
Some indicator lights in the display can display in
several colors.
OMe ere ella Uf
If the wA or AN] indicator light turns on, check
the message in the instrument cluster.
(oT T\ i
The following indicator lights may be available,
depending on the vehicle equipment:
Red indicator lights
Central indicator light
=> page 7,
Instrument cluster
=>page 12
Cooling system
=> page 14,
=> page 236,
=> page 236
Safety belt
=> page 77
Transmission
=> page 109
Drive system
> page 111,
Electrical system
=> page 239
Brake system
= page 113,
> page 238,
Electromechanical parking brake
=>page 115 >
Page 10 of 318
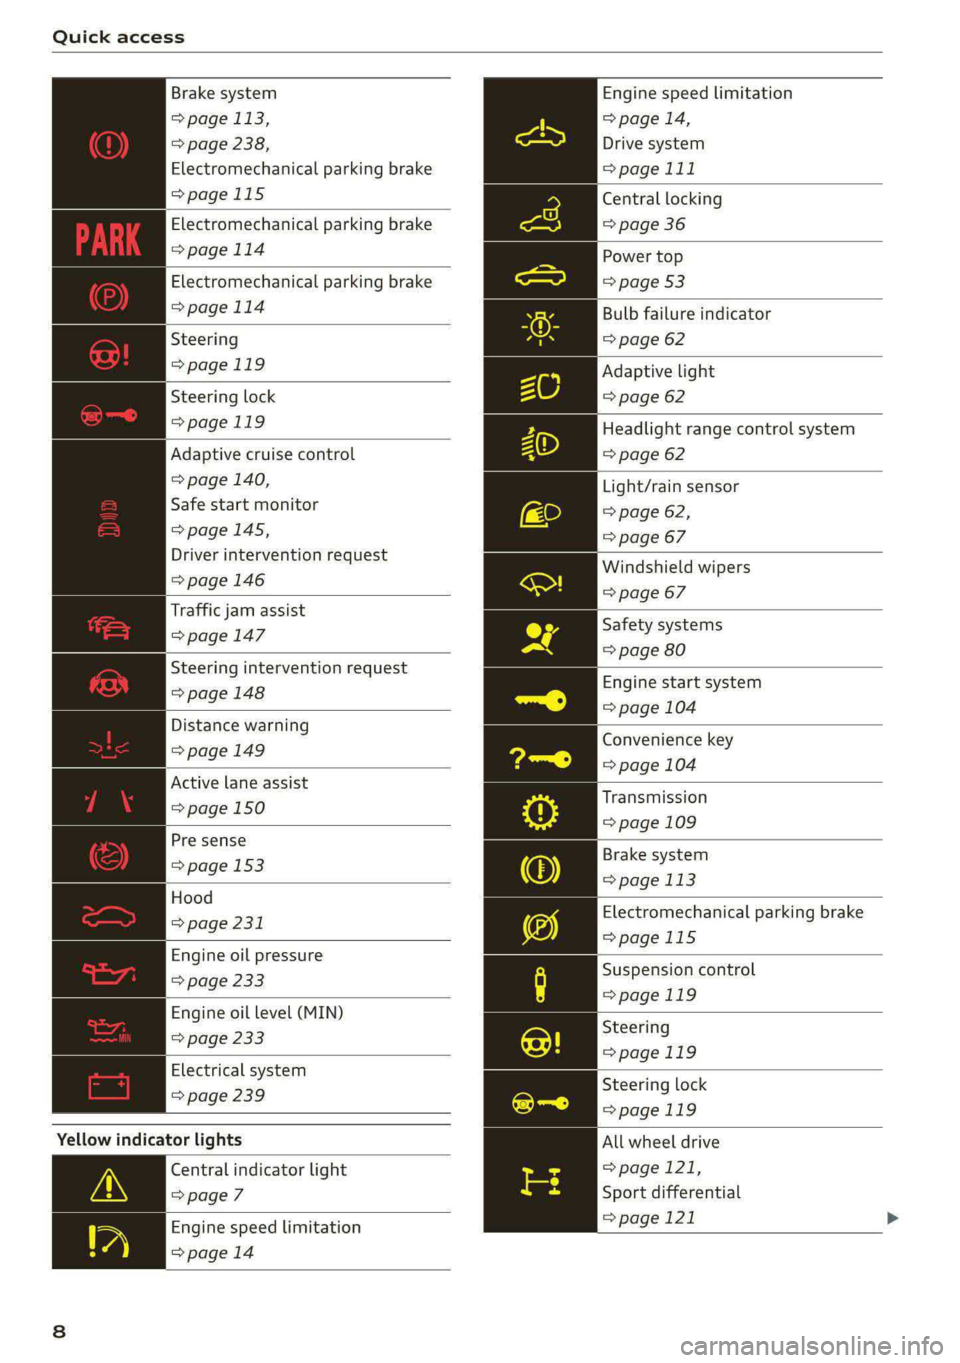
Quick access
Brake system
> page 113,
> page 238,
Electromechanical parking brake
>page 115
Electromechanical parking brake
=>page 114
Electromechanical parking brake
>page 114
Steering
=>page 119
Steering lock
>page 119
Adaptive cruise control
=> page 140,
Safe start monitor
=>page 145,
Driver intervention request
=>page 146
Traffic jam assist
=>page 147
Steering intervention request
=>page 148
Distance warning
=>page 149
Active lane assist
=> page 150
Pre sense
> page 153
Hood
> page 231
Engine oil pressure
=> page 233
Engine oil level (MIN)
=> page 233
Electrical system
> page 239
Yellow indicator lights
Central indicator light
=> page 7
Engine speed limitation
=>page 14
Engine speed limitation
> page 14,
Drive system
>page 111
Central
locking
=> page 36
Power top
=> page 53
Bulb failure indicator
=> page 62
Adaptive light
=> page 62
Headlight range control system
=> page 62
Light/rain sensor
=> page 62,
=> page 67
Windshield wipers
=> page 67
Safety systems
=> page 80
Engine start system
=> page 104
Convenience key
=> page 104
Transmission
=> page 109
Brake system
=> page 113
Electromechanical parking brake
=>page 115
Suspension control
=>page 119
Steering
>page 119
Steering lock
>page 119
All wheel drive
> page 121,
Sport differential
=> page 121
Page 11 of 318

8W7012721BB
Quick access
Electronic Stabilization Control
(ESC)
=> page 122
Electronic Stabilization Control
(ESC)
=> page 122
Electronic Stabilization Control
(ESC)
=> page 122
Anti-lock Braking System (ABS)
=>page 122
Anti-lock Braking System (ABS)
=> page 122
Adaptive cruise control
> page 147,
Traffic jam assist
=> page 148
Steering intervention request
=> page 148,
=>page 151
Distance warning
=> page 149
Active lane assist
=> page 150,
=> page 152
Pre sense
> page 152
Side assist, exit warning
>page 157
Parking systems
=>page 161
Rear cross-traffic assist
>page 165
Park assist
=>page 170
Emergency call function
> page 188
Tank system
=> page 227
Malfunction Indicator Lamp (MIL)
=> page 227,
> page 229
Engine oil level (MIN)
=> page 233
Engine oil level (MAX)
=> page 233
Engine oil sensor
=> page 233
Engine warm-up request
=> page 233
Electrical system
> page 239
Washer fluid level
=> page 242
Tire pressure
=> page 262,
=> page 263,
=> page 265,
=> page 265,
=> page 266
Tire pressure
=> page 263,
=> page 266
Other indicator lights
Low beam headlights
=> page 58
Parking lights
=>page 58
Turn signals
=> page 59,
=> page 61
Turn signals
=>page 59,
=> page 61
Start/Stop system
=> page 111
Cruise control system
=> page 136
Cruise control system
=> page 136
Efficiency assist
=> page 138,
> page 138
Efficiency assist
=> page 138
Page 12 of 318

Quick access
Efficiency assist
=> page 138
Efficiency assist
=> page 138
Efficiency assist
=> page 138
Efficiency assist
=> page 138
Efficiency assist
> page 138
Adaptive cruise control
=> page 140
Adaptive cruise control
=> page 140
Adaptive cruise control
=> page 140
Adaptive cruise control
=> page 140
Adaptive cruise control
=> page 145
Traffic jam assist
=> page 147
Traffic jam assist
=> page 147
Active lane assist
=> page 150
High beam headlights
=> page 59,
=>page 59
High beam assistant
=> page 59,
=> page 60
Laser lights
=> page 60
Child safety lock
=>page 45
Child safety lock
=> page 45
Child safety lock
=>page 45
10
Power top
=> page 53
High beam assistant
=> page 59,
=> page 60,
=> page 62
Convenience key
=> page 104
Transmission
=> page 109
Start/Stop system
> page 112
Electromechanical parking brake
>page 115
Electromechanical parking brake
=>page 115
Hold assist
=>page 115
Steering
=>page 119
Speed warning system
=> page 130
Speed warning system
= page 130
Camera-based traffic sign recog-
nition
> page 131
Cruise control system
=> page 136,
=> page 137,
=> page 137
CRUISE
Cruise control system
=> page 136,
=> page 137,
=> page 137
Efficiency assist
=> page 138,
Predictive control
> page 143,
Adaptive cruise control
=> page 147,
Traffic jam assist
=>page 148
Adaptive cruise control
=> page 143
Page 28 of 318
Head-up display
Head-up display
Description
Applies to: vehicles with head-up display
RAZ-0847
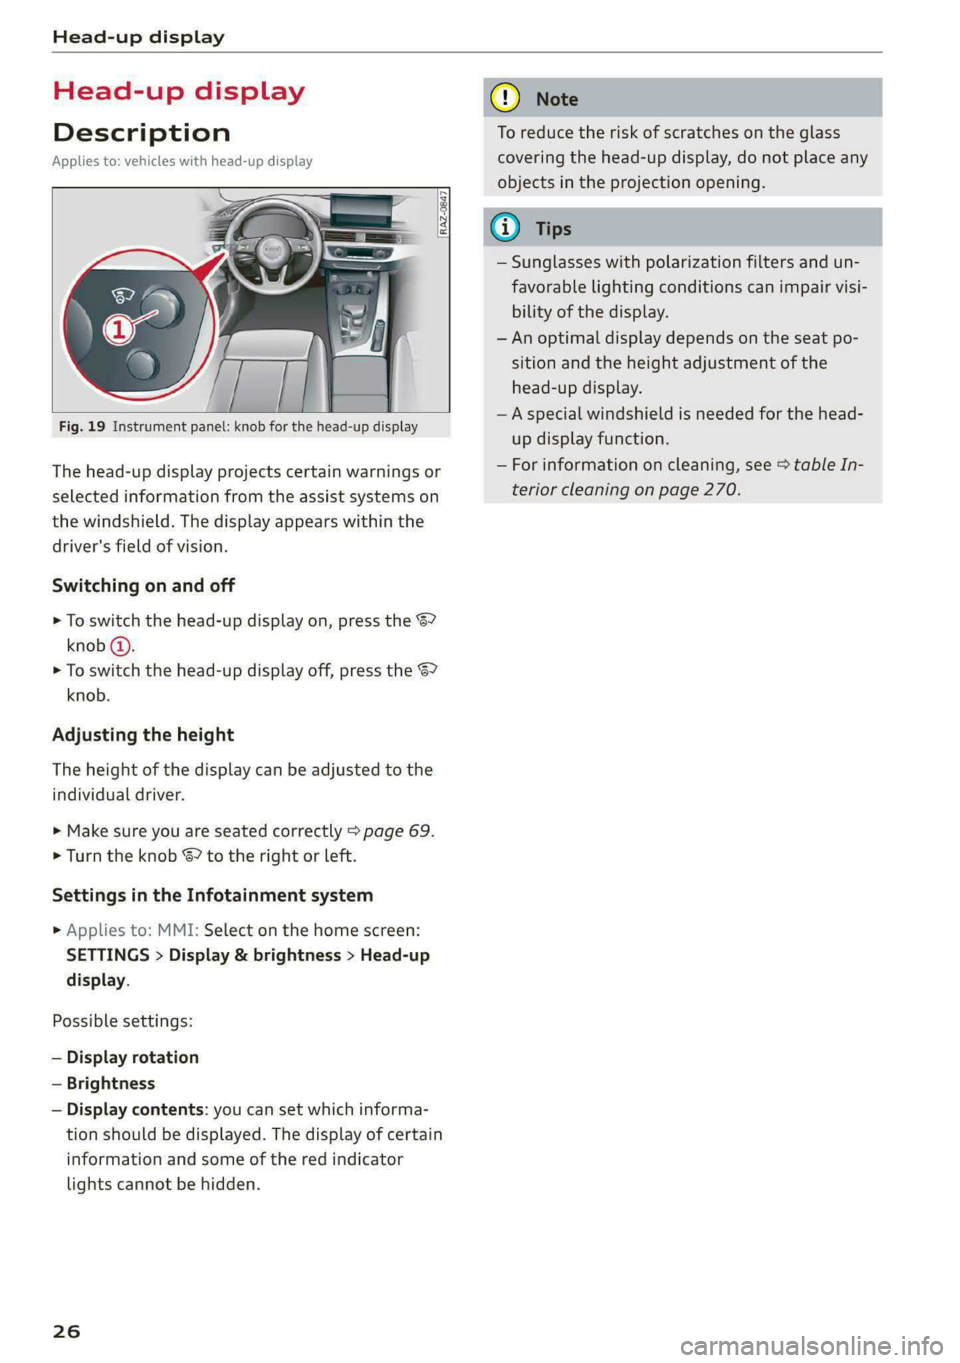
The head-up display projects certain warnings or
selected information from the assist systems on
the windshield. The display appears within the
driver's field of vision.
Switching on and off
> To switch the head-up display on, press the 67
knob @).
> To switch the head-up display off, press the S7
knob.
Adjusting the height
The height of the display can be adjusted to the
individual driver.
> Make sure you are seated correctly > page 69.
> Turn the knob &? to the right or left.
Settings in the Infotainment system
> Applies to: MMI: Select on the home screen:
SETTINGS > Display & brightness > Head-up
display.
Possible settings:
— Display rotation
— Brightness
— Display contents: you can set which informa-
tion should be displayed. The display of certain
information and some of the red indicator
lights cannot be hidden.
26
@) Note
To reduce the risk of scratches on the glass
covering the head-up display, do not place any
objects in the projection opening.
@ Tips
— Sunglasses with polarization filters and un-
favorable lighting conditions can impair visi-
bility of the display.
— An optimal display depends on the seat po-
sition and the height adjustment of the
head-up display.
— A special windshield is needed for the head-
up display function.
— For information on cleaning, see > table In-
terior cleaning on page 270.
Page 29 of 318
8W7012721BB
Voice recognition system
Voice recognition system
General information
Applies to: vehicles with voice recognition system
You can operate many functions in the vehicle
easily using voice commands.
Using the voice recognition system optimally
> Speak clearly and distinctly at a normal volume.
Speak louder when driving faster.
» Emphasize the words in the commands evenly
and do not leave long pauses.
> Close the doors, the windows, and the sunroof*
to reduce background noise. Make sure that
passengers are not speaking when you are giv-
ing a voice command.
> Do not direct the vents toward the hands-free
microphone, which is in the roof headliner near
the front interior lights.
> Only the driver should speak to the system, be-
cause the handsfree microphone is aimed to-
ward this seating position.
ZA\ WARNING
— Direct your full attention to driving. As the
driver, you have complete responsibility for
safety in traffic. Only use the functions in
such a way that you always maintain com-
plete control over your vehicle in all traffic
situations.
— Do not use the voice recognition system in
emergencies because your voice may change
in stressful situations. The system may take
longer to dial the number or may not be
able to dial it at all. Dial the emergency
number manually.
G) Tips
There are no voice guidance* prompts when a
dialog is active.
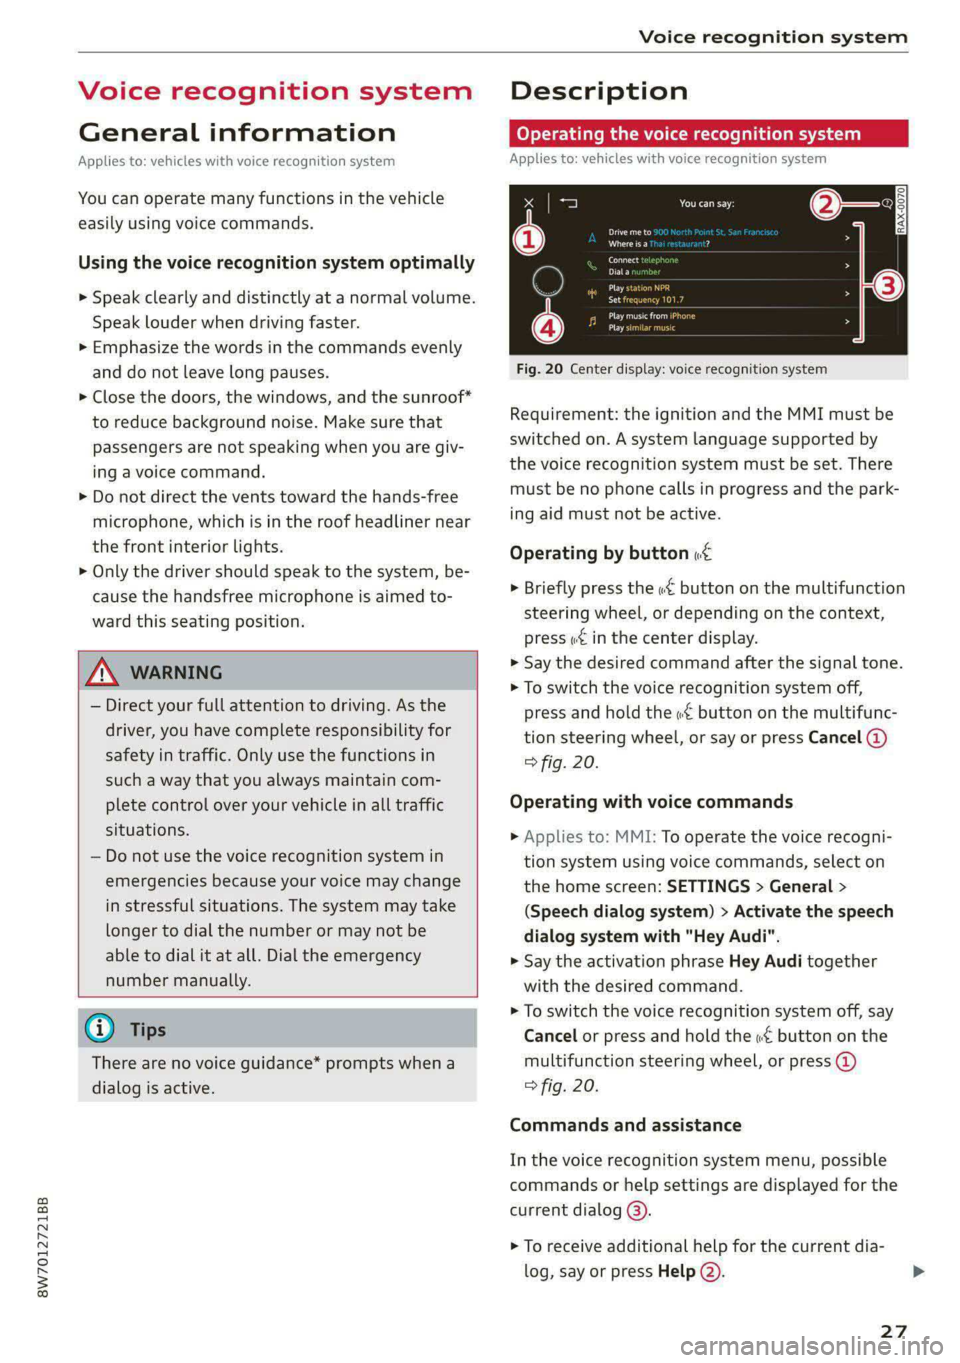
Description
eye aU mame ees eR
Applies to: vehicles with voice recognition system
Se
Drive me to
Where is a a
Connect
Pre)
Play
Eg
Maes
coy
Fig. 20 Center display: voice recognition system
Requirement: the ignition and the MMI must be
switched on. A system language supported by
the voice recognition system must be set. There
must be no phone calls in progress and the park-
ing aid must not be active.
Operating by button «£
> Briefly press the «€ button on the multifunction
steering wheel, or depending on the context,
press we in the center display.
> Say the desired command after the signal tone.
> To switch the voice recognition system off,
press and hold the «€ button on the multifunc-
tion steering wheel, or say or press Cancel (@)
> fig. 20.
Operating with voice commands
> Applies to: MMI: To operate the voice recogni-
tion system using voice commands, select on
the home screen: SETTINGS > General >
(Speech dialog system) > Activate the speech
dialog system with "Hey Audi".
> Say the activation phrase Hey Audi together
with the desired command.
> To switch the voice recognition system off, say
Cancel or press and hold the «£ button on the
multifunction steering wheel, or press @)
> fig. 20.
Commands and assistance
In the voice recognition system menu, possible
commands or help settings are displayed for the
current dialog @).
> To receive additional help for the current dia-
log, say or press Help (2).
27
Page 50 of 318

Opening and closing
You can switch the valet parking function on, for
example when someone else is parking your vehi-
cle ). The vehicle can be driven, locked, and un-
locked using the vehicle key, but access to the
luggage compartment is blocked.
> Remove the mechanical key > page 38.
> Press the [VALET] button in the glove compart-
ment. The LED in the button turns on if the
function is switched on.
> Lock the glove compartment with the mechani-
cal key.
>» Applies to: vehicles with lockable pass-through
and lockable rear seat backrests: To secure the
luggage compartment from the vehicle interior,
lock the pass-through and the rear seat backr-
ests using the mechanical key > page 95,
=> page 94.
> Give your vehicle key to the service personnel
who are parking your vehicle and keep the me-
chanical key.
The following buttons are deactivated when the
valet parking function is switched on:
— <3 Button in the driver's door
— &s Button on the vehicle key
— Handle in the luggage compartment lid
If the valet parking function is switched on, a
message will appear every time the ignition is
switched on.
@ Tips
Please note that the luggage compartment
can still be accessed from the vehicle interior
in vehicles with fixed rear seat backrests or
ones that cannot be locked, even when the
valet parking function is switched on.
Garage door opener
Applies to: vehicles with garage door opener
With the garage door opener, you can activate
systems such as the garage doors, security sys-
D_ This function is not available in all countries.
2) The possible number of hand-held transmitters depends
on the equipment.
48
tems or house lights from inside your vehicle.
These functions are operated in the MMI. Multi-
ple receivers can be programmed, which can con-
trol the functions of up to eight2) hand-held
transmitters.
ZA WARNING
— When operating or programming the garage
door opener, make sure that no people or
objects are in the area immediately sur-
rounding the equipment. People can be in-
jured or property can be damaged if struck
when closing.
— Do not allow yourself to be distracted from
traffic by the viewing and operating the dis-
plays.
Gi) Tips
— Ifyou sell your vehicle, reset all settings to
the factory default settings > page 222.
— The system complies with United States FCC
regulations and ISED regulations
=> page 297.
(i) Tips
Before you program your system to the ga-
rage door opener, first check the compatibili-
ty:
— Ask an authorized Audi dealer or authorized
Audi Service Facility or check at www.
homelink.com. You can also find more infor-
mation about HomeLink there.
— You can display information about Home-
Link (compatibility level/status/country
code/HomeLink generation) in the MMI:
— Select on the home screen: VEHICLE > Set-
tings & Service > Garage door opener > @.
Applies to: vehicles with garage door opener
Requirements: the remote control transmitter
must be programmed > page 49, the vehicle >
Page 60 of 318

Lights and Vision
Lights and Vision
Exterior lighting
Switching the lights on and off
Fig. 51 Instrument panel: light switch with button
@ Light switch &
Turn the light switch @ to the corresponding po-
sition when the ignition is switched on. The 2
symbol and the selected position will turn on (ex-
cept position 0).
O - The daytime running lights* will automatical-
ly turn on. In vehicles for some markets, you can
switch the automatic daytime running lights on
and off in the MMI.
AUTO - The headlights will automatically adapt to
the surrounding brightness.
300: — Parking lights
2D - Low beam headlights
When the low beam headlights or parking lights
are switched on, the corresponding BB or 200 in-
dicator light will turn on depending on vehicle
equipment.
@ All-weather lights Zo
Requirement: the light switch must be in the AU-
TO or ZO position.
The headlights automatically adjust so that there
will be less glare, for example when the road sur-
face is wet.
Automatic headlight range control
Your vehicle is equipped with automatic head-
light range control. It reduces glare for oncoming
58
traffic if the vehicle load changes. The headlight
range adjusts automatically.
Audi adaptive light
Applies to: vehicles with Audi adaptive light
Audi adaptive light provides better visibility when
driving in the dark. The lights are adapted to the
road conditions based on speed, such as when
driving on expressways, rural roads, at intersec-
tions, and around curves. The adaptive lights only
function when the light switch is in the AUTO po-
sition and the all-weather lights are switched off.
ZA WARNING
— Observe the safety precautions and note the
limits of the assist systems, sensors, and
cameras > page 126.
— Automatic headlights are only intended to
assist the driver. The driver is still responsi-
ble for controlling the headlights and may
need to switch them on and off manually
depending on light and visibility conditions.
For example, fog cannot be detected by the
light sensors. So always switch on the low
beams ZO under these weather conditions
and when driving in the dark.
(i) Tips
— If the vehicle battery has been discharging
for a while, the parking light may switch off
automatically. Avoid using the parking
lights for several hours.
— When using lighting equipment, the driver
is responsible for adhering to any local ap-
plicable regulations while driving and when
parking the vehicle.
— Only the front headlights turn on when the
daytime running lights are switched on*. In
vehicles in certain markets, the tail lights
will also turn on.
—Incool or damp weather, the inside of the
headlights, turn signals, and tail lights can
fog
over due to the temperature difference
between the inside and outside. They will
clear shortly after switching them on. This
does not affect the service life of the light-
ing.
Page 61 of 318

8W7012721BB
Lights and Vision
Turn signal and high beam lever
BFV-0012
Fig. 52 Lever: switching on the turn signal and high beams
The lever operates the turn signals, the high
beams and the headlight flasher.
Turn signals 15>
The turn signal will activate when you move the
lever into a turn signal position while the ignition
is switched on. The respective Kl or By indicator
light will flash.
@ Right turn signal
@® Left turn signal
The turn signal blinks three times if you tap the
lever (convenience turn signal).
If an indicator light blinks twice as fast as usual,
a turn signal bulb has failed. Carefully drive to an
authorized Audi dealer or authorized Audi Service
Facility immediately to have the malfunction cor-
rected.
High beams =O and headlight flasher
> Move the Lever to the corresponding position:
@) High beams on (vehicles with high beam assis-
tant*) > page 59
@ High beams off or headlight flasher
The
=o) indicator light in the instrument cluster
will turn on.
Z\ WARNING
High beams can cause glare for other drivers,
which increases the risk of an accident. For
this reason, only use the high beams or the
headlight flasher when they will not create
glare for other drivers.
thames
Applies to: vehicles with high beam assistant
The high beam assistant automatically turns the
high beams on or off depending on the surround-
ing conditions.
A camera on the rearview mirror mount can de-
tect light sources from other road users. The high
beams switch on or off automatically depending
on the position of vehicles driving ahead and on-
coming vehicles, the vehicle speed as well as oth-
er environmental factors and traffic conditions.
Activating high beam assistant
Requirement: the light switch must be in the AU-
TO position and the high beam assistant must be
switched on in the MMI > page 61.
> To activate the high beam assistant, tap the
lever forward @) > page 59, fig. 52. The fa&4 in-
dicator light will appear in the instrument clus-
ter display and the high beams will be switched
on or off automatically. The Ea indicator light
will turn on if the high beams are switched on.
Activating and deactivating the high beam
head lights manually
If the high beams did not switch on or off as ex-
pected, you may switch them on or off manually
instead:
> To activate the high beams manually, tap the
lever
forward @) > page 59, fig. 52. The & in-
dicator light will turn on.
> To deactivate the high beams manually, pull
the lever back @) > page 59, fig. 52. The high
beam assistant is deactivated.
Operating the headlight flasher
> To operate the headlight flashers, pull the lever
back @) > page 59, fig. 52. If the high beam
headlights are not switched on, the high beam
assistant will remain activated.
Z\ WARNING
— Observe the safety precautions and note the
limits of the assist systems, sensors, and
cameras > page 126.
59
Page 62 of 318
Lights and Vision
— High beam assistant is only intended to as-
sist the driver. The driver is responsible for
controlling the high beam headlights and
adjusting them to match the lighting and
visibility conditions.
— High beams can cause glare for other driv-
ers, which increases the risk of an accident.
For this reason, only use the high beams or
the headlight flasher when they will not cre-
ate glare for other drivers.
@ Tips
Adhere to any local applicable regulations
when using the lighting equipment, for exam-
ple in regard to reducing glare for other driv-
ers. The driver is always responsible for adher-
ing to the regulations applicable in the coun-
try where the vehicle is being operated.
Laser lighting
Applies to: vehicles with laser lighting
RAZ-0948
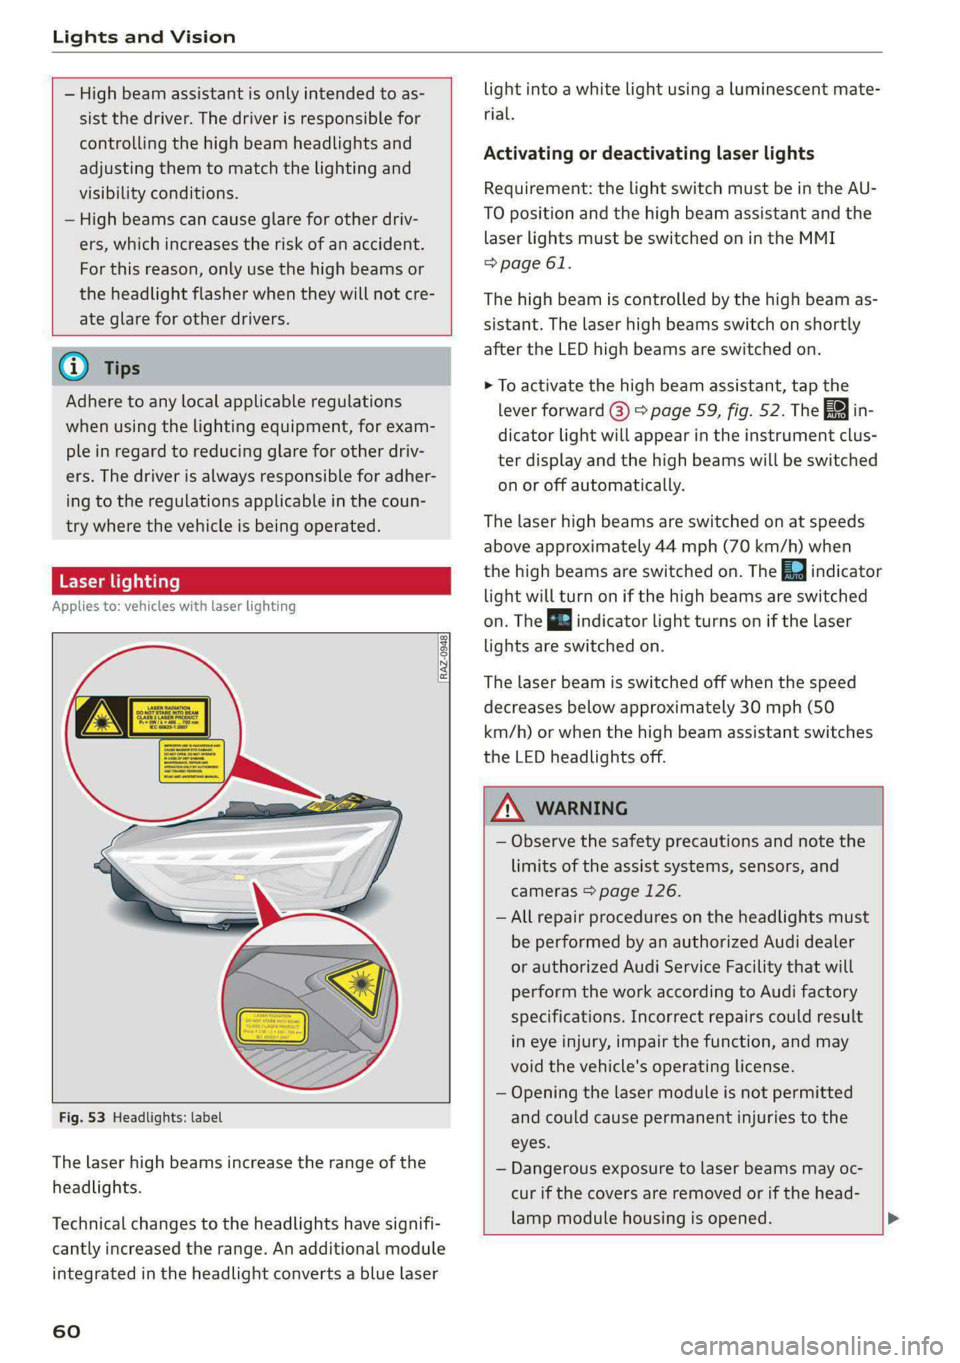
Fig. 53 Headlights: label
The laser high beams increase the range of the
headlights.
Technical
changes to the headlights have signifi-
cantly increased the range. An additional module
integrated in the headlight converts a blue laser
60
light into a white light using a luminescent mate-
rial.
Activating or deactivating laser lights
Requirement: the light switch must be in the AU-
TO position and the high beam assistant and the
laser lights must be switched on in the MMI
=> page 61.
The high beam is controlled by the high beam as-
sistant. The laser high beams switch on shortly
after the LED high beams are switched on.
> To activate the high beam assistant, tap the
lever forward @) > page 59, fig. 52. The Fa
dicator light will appear in the instrument clus-
ter display and the high beams will be switched
on or off automatically.
in-
The laser high beams are switched on at speeds
above approximately 44 mph (70 km/h) when
the high beams are switched on. The Ed indicator
light will turn on if the high beams are switched
on. The B indicator light turns on if the laser
lights are switched on.
The laser beam is switched off when the speed
decreases below approximately 30 mph (50
km/h) or when the high beam assistant switches
the LED headlights off.
ZA\ WARNING
— Observe the safety precautions and note the
limits of the assist systems, sensors, and
cameras > page 126.
— All repair procedures on the headlights must
be performed by an authorized Audi dealer
or authorized Audi Service Facility that will
perform the work according to Audi factory
specifications. Incorrect repairs could result
in eye injury, impair the function, and may
void the vehicle's operating license.
— Opening the laser module is not permitted
and could cause permanent injuries to the
eyes.
— Dangerous exposure to laser beams may oc-
cur if the covers are removed or if the head-
lamp module housing is opened.