headrest AUDI A5 CABRIOLET 2011 Owners Manual
[x] Cancel search | Manufacturer: AUDI, Model Year: 2011, Model line: A5 CABRIOLET, Model: AUDI A5 CABRIOLET 2011Pages: 364, PDF Size: 86.48 MB
Page 64 of 364

Power top
Step 9: Securing the latch
. . : . . . . .. ·
. . .
Fig. 65 Rea r of the
powe r top: Securing
t he latc h
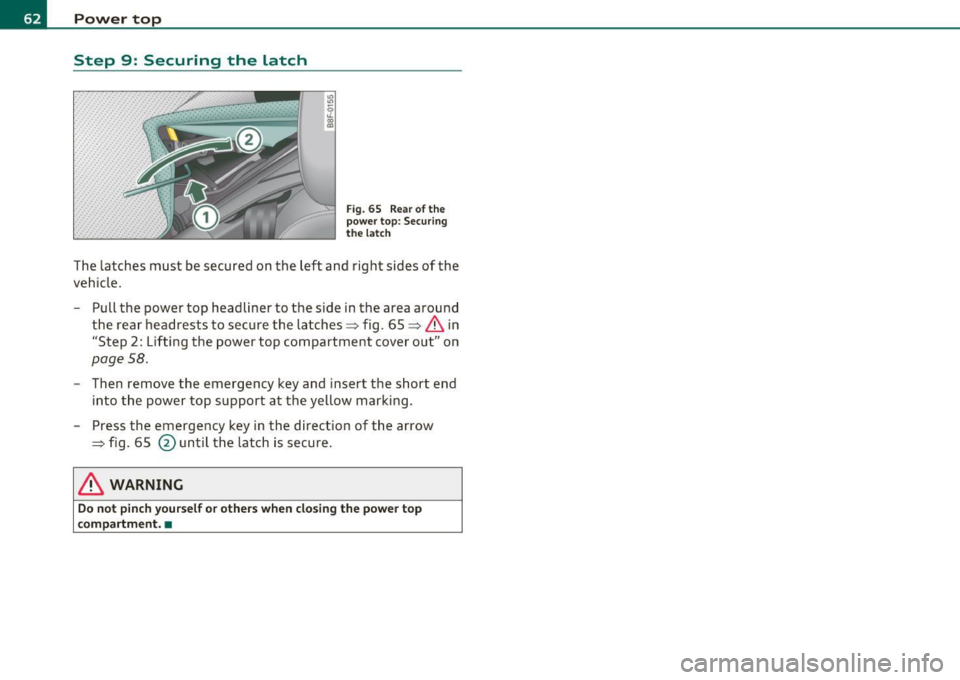
The latches must be secured on the left and right sides of the
vehicle.
- Pull the power top headliner to the side in the area around
the rear headrests to secure the latches=> fig. 65 =>
& in
"Step 2: Lift ing the power top compartment cover out" on
page 58.
- Then remove the emergency key and insert the short end
into the power top s upport at the yellow marking.
- Press the emergency key in the d irection of t he arrow
=> fig. 65
@ until t he latch is secure .
& WARNING
Do not pinch y ou rself or other s when clo sing the power top
compartment. •
Page 183 of 364

________________________________________________ D_ r_ i_ v _i_n ""'g "-- S_a_ f_ e_ l _,,y'-- __
Adjusting head restraints=> page 82.
& WARNING
Driving without head rest raints or with head restraint s that are
not properl y adju sted increa se s the risk of seriou s or fatal neck
injuriy dram atically. To help reduce the risk of injury :
• Always drive w ith the h ead restraints in place and properly
adjusted.
• Every person in the vehicle must have a prope rly adju sted head
restraint.
• Always make sure each person in the vehicle properly ad justs
their head restraint. Adju st the head restraints so the upper edge
i s as even a s pos sible with th e top of your head . If that i s not
possible, try to adjust the head re straint so that it is as close to
this position as po ssible.
• Never attempt to adjust head restraint while driving. If you
have driven off and must adjust the driver headrest for any reason ,
first stop the vehicle safely before attempting to adju st the head
restraint.
• Children must alwa ys be properly restrained in a child re straint
that is appropriate for their age and size
=> page 221 . •
Examples of improper seating positions
The occupant res traint sy stem can o nly redu ce the risk of
injury i f veh icle occup ants are properly sea ted .
Im proper seati ng positio ns can caus e ser ious inju ry o r death .
Safety belts can on ly work w hen t hey are pro perly posi tio ned
on t he body. Impro per sea tin g posit io ns re duce the effect ive
ness of safety belts and w ill even increase the risk of i njury
and deat h by moving the s afety belt to crit ic a l areas of the
body. Imp roper seati ng positions also increase the r is k of
serious injury and death when an airbag deploys and str ikes
Controls and equip
ment Safety first Vehicle operation
an occ
upan t who is not in th e proper s eati ng pos ition . A
d river is respons ib le f or t he safe ty o f all vehic le occu pants
a nd especial ly for children . Therefore:
- Never allow anyone to a ssum e an in correc t sea ting pos i-
t ion whe n the v ehic le is bei ng us ed::::;, &.
The follow ing b ulletins list only some sample positions that will
increase the risk of serious in ju ry and death. O ur hope is that these
examples will ma ke you mo re awa re of seat ing posi tions t hat are
dangero us.
Therefore, whenever the vehicle is moving :
• never stand up in the vehicle
• never stand on the seats
• never knee l on t he se ats
• never ride with the seatback reclined
• never lie down on the rear seat
• never le an up agains t th e ins tru ment panel
• never sit on the edge of the seat
• neve r sit s ideways
• never lean o ut the win dow
• never put your feet out the window
• never p ut yo ur feet on the ins trumen t panel
• never rest your feet on the seat c ush ion or back of the seat
• never ride in the footwell
• never ride in the cargo area
& WARNING
Improper seating position s in crease the ri sk of seriou s personal
injury and death whenever a vehicle is being used. _,.
Vehicle care Do-it-yourself service Technical data
Page 189 of 364

• two rollbars
• the safety belts with belt tensioners
• the windshield frame
• the rollover sensors
The active rollover protection system provides additional safety in the
event of a ro llover. Within milliseconds, sensors deploy two rollbars
located behind the headrests in the rear seats => fig. 182.
The rollbars, reinforced windshie ld frame and belt tensioners help
protect front and rear passengers in the event of a rollover .
The rollover protection system functions when the power top is both
open and closed.
& WARNING
Do not use the area behind the rear seat headrests=> fig. 181 as a
storage area. This is the area where the rollbars deploy. If the roll
over protection system is triggered, objects placed there can be
propelled through the vehicle and make it more difficult for the
rollbars to deploy . This increases the risk for serious or life-threat
ening injuries . •
When Is rollover protection deployed?
Rollover protection deploys in a collision or rollover.
Depending on the collision, sensors throughout the vehicle and the
control module trigger the rollover system to deploy.
For safety reasons, rollover protection also deploys during front, side
and rea r collisions above a certain level of severity .•
Safety first Vehicle OP-eration
Driving Safely
Retracting rollover protection
Fig. 183 Deployed
rollbar with release
loop.
Fig. 184 Deployed
rollbar w ith power top
frame facing upward.
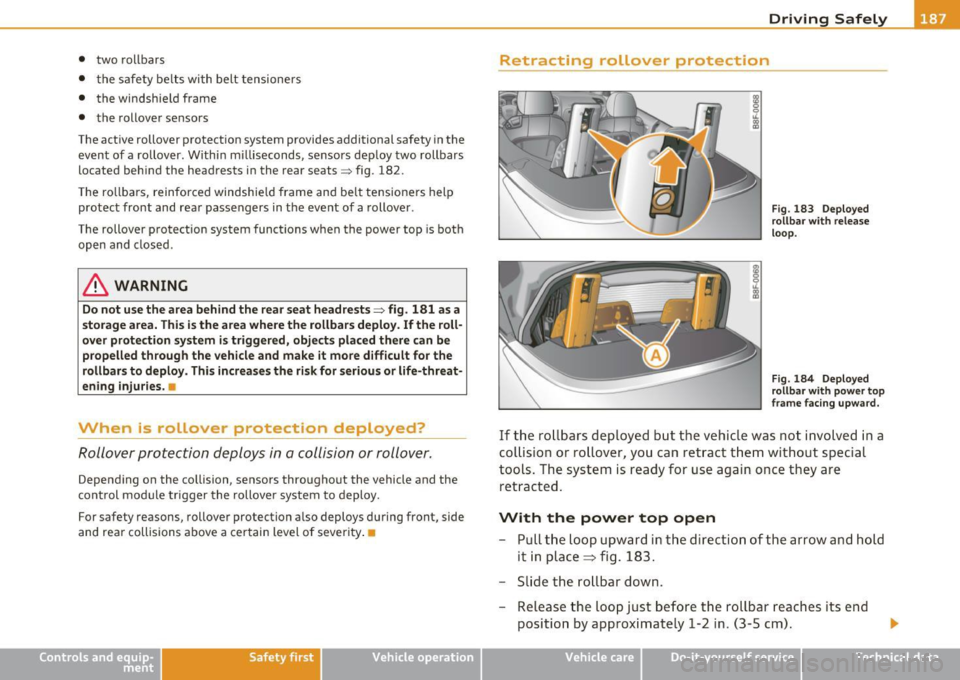
If the rollbars deployed but the vehicle was not involved in a
collision or rollover, you can retract them without special
tools . The system is ready for use again once they are
retracted.
With the power top open
- Pull the loop upward in the direction of the arrow and hold
it in place=> fig. 183.
- Slide the rollbar down.
- Release the loop just before the rollbar reaches its end
position by approximately 1-2 in. (3-5 cm). •
Vehicle care Do-it-yourselt service Technical data