door lock AUDI A5 CABRIOLET 2015 Owner's Manual
[x] Cancel search | Manufacturer: AUDI, Model Year: 2015, Model line: A5 CABRIOLET, Model: AUDI A5 CABRIOLET 2015Pages: 268, PDF Size: 66.88 MB
Page 80 of 268
Driving
"'Pu ll on the switch @ ¢fig. 92 to apply the
parking brake . The indicator lights in the switch
and . (USA models)/ . (Canada mode ls) in
the inst ru ment cluste r il lum inate.
"' With the ign ition switched on, step on the
brake pedal or the accelerator pedal and press
the switch @ at the same t ime to release the
parking b rake . The indicator lights in the switch
and . (USA models)/ . (Canada mode ls) in
the instr ument cluster go o ut.
Your veh icle is equipped w ith an electromechan i
cal parking b rake. The par king b rake is designed
to p revent the veh icle from rolling unintentional
ly and replaces the hand brake.
In addition to the norma l funct ions of a tradit ion
a l hand bra ke, the e lectromechan ical pa rking
b rake provides var ious convenience and safety
f u nctions.
When start ing f rom rest
- The integral starting assist helps you when
driv ing by automat ically releasing the parking
brake ¢
page 78, Starting from rest.
-When sta rting on inclines , the starting assist
prevents the vehicle from un intent ionally roll
ing back. The bra kin g for ce of the par kin g b rake
is no t released until sufficien t driv ing fo rce has
been built up at the wheels .
Emergency brake function
An emergency brake ensures that the vehicle ca n
be slowed down even if the
normal brakes fa il
¢ page 79, Emergency braking.
A WARNING
If a drive range is eng age d with the vehicle
stationary and the engine running, you mus t
in no instance accelerate careless ly . Otherwise
the vehicle will start to move immed iate ly
r isk of an accident.
(D Tips
- If the parking brake is applied with the igni
tion switched off, the indicator lights in the
switch and -(USA models) . (Cana
da models) in t he instrument cl uster will go
out after a certa in period of time.
78
- Occasional noises when the pa rking brake is
applied an d released a re norma l and are not
a cause for concern .
- Whe n the vehicle is pa rked, the park ing
brake goes through a self-test cycle at regu
lar intervals. Any associated noises are nor
ma l.
Parking
"'Press the brake pedal to stop the veh icle .
"' Pull the sw itch @¢
page 77, fig. 92 to set the
parking brake .
"' Move the se lector lever to P.
"' Tur n the engine off ¢_& .
"' When on inclines or de clines, turn the steering
wheel so that the veh icle will roll into the curb
if it begins to move.
A WARNING
-
- When you leave your vehicle -even if only
briefly - always remove the ignition key. This
applies pa rticularly when children remain in
the vehicle . Otherwise the ch ild ren could
start t he engine, release the parking b rake
or operate elect rical equipment (e.g. power
w indows). There is the risk of an acc ident.
- When the veh icle is locked, no one -part icu
larly no t chi ld ren shou ld remain in the ve hi
cle. Lo cked doors m ake it more d ifficul t for
emergency workers to get into the veh icle -
putting lives at risk.
Starting from rest
The star ting assist function ensures that the
parking brake is released automatically upon
starting .
Stopping and applying parking brake
"' Pull the sw itch @¢ page 77, fig. 92 to apply
the par kin g b rake.
Starting and automatically releasing the
parking brake
"' When you sta rt to dr ive as usual, the park ing
bra ke is automatically released and yo ur vehicle
beg ins to move. .,_
Page 87 of 268

M N
ci u.. co ,...., \!) 1.1"1
N 1.1"1 ,....,
At speeds above about 1 mph (2 km/h) the Auto
matic Shift Lock is automatically deactivated in
the N position.
A time delay element prevents the selector lever
from locking when it is moved through the N po
sition (going from R to D/S). The locking element
will lock the se lector lever if the lever is left in N
(Neutral) for more than approximate ly 2 seconds,
without the brake pedal being pressed.
Release button
The release button on the selector lever prevents
the lever from being accidentally shifted into cer
tain positions. Depending on the direction of the
shift, the selector lever locks at different posi
tions. The positions are highlighted in the illus
tration
c> fig . 97.
Ignition key safety interlock
The key cannot be removed from the ignition un
l ess the se lector lever is in the P park posit ion.
When the ignit ion key is removed, the selector
lever will be locked in the P position.
Driving the automatic transmission
Applies to vehicles: with m ultit ron ic/S tronic/t iptronic
F ig . 98 S hift gate on t he center conso le: selector lever w ith
re lease button
Starting the engine
~ The selector lever must be in P or N.
Starting off
~ Press and ho ld the brake pedal.
~ Press and hold the release button in the selec
tor lever handle, select the des ired selector lev
er posit ion such as D/S and release the button.
Automatic transmission
~ Wait briefly until the transmission has shifted
(you will fee l a slight movement).
~ Remove your foot from the brake pedal and ac
celerate.
Stopping temporarily
~ Keep the vehicle stationary using the braking
pedal, for example at traffic lights.
~ Do not press the accelerator peda l when doing
this.
~ To prevent the vehicle from rolling when you
start driving, set the parking brake when stop
p in g on steep inclines
c> .&_.
~ The parking brake will release automat ically
and the vehicle will start mov ing once you press
t he acce lerator pedal.
Stopping/parking
If the selector lever is not in the P position when
you open the dr iver's door, the vehicle could roll.
The message
Transmission: Car may roll! Shift
to park!
appea rs.
~ Press and hold the brake pedal until the vehicle
has come to a complete stop .
~ Apply the parking brake c:;. page 78, Parking .
~ Select the P selector lever posit ion c> .&_ .
Stopping on an incline
~ Always press the brake pedal to hold the vehi
cle in place and prevent it from "rolling back"
c:;. .&_ . Do not try to prevent the veh icle from
"rolling back" when a gear is engaged by in
creasing the engine speed
c> 0 .
Starting on an incline
~ Activate the parking brake.
~ With the driving gear selected, press the accel
erator pedal carefully. The parking brake w ill re
lease automat ically if your seat belt is fastened .
Under certain circumstances, such as driving in
the mounta ins, it may be useful to sw itch tempo
r ar ily to the manual shift program in order to ad
just the gears to the dr iv ing conditions by hand
c>page 87.
On slopes, activate the parking brake first and
then move the selector lever to the P position .
85
Page 121 of 268
M N
ci u.. co ,...., \!) 1.1'1
N 1.1'1 ,....,
Loose items in the luggage compartment can
shift suddenly , changing vehicle handling charac
ter istics . Loose items can also increase the risk of
serious personal injury in a sudden veh icle ma
neuver or in a collis ion.
~ Distribute the load evenly in the luggage com
partment.
~ Always place and properly secure heavy items in
the luggage compartment as low and as far for
ward as poss ible
c:> fig . 131 .
~ Secure luggage us ing the tie-downs provided
<=:> page 66 .
~ Make sure that the rea r seatback is secu rely
latched in p lace.
A WARNING ,~ -
Improperly stored luggage or other items can
fly through the vehicle causing serious per
sonal injury in the event of hard braking or an
accident . To help reduce the risk of serious
personal injury:
- Always put objects, for examp le, luggage or
other heavy items in the luggage compart
ment.
-Always secure objects in the luggage com
partment us ing the tie-down eye lets and
suitable straps .
A WARNING
Heavy loads will influence the way your vehi
cle handles. To he lp reduce the risk of a loss
of control leading to ser ious persona l inju ry:
- Always keep in m ind when transporting
heavy objects, t hat a change in the ce nter of
gravity ca n also cause changes in vehicle
hand ling:
- Always distribute the load as even ly as
possible.
- Place heavy objects as far forward in the
luggage compartment as possible .
- Never exceed the Gross Ax le Weight Rating
o r the Gross Vehicle Weight Rating specified
on the safety compliance sticker on the left
door jamb. Exceeding permissible weight
standards can cause the vehicle to slide and hand le different ly .
Dr ivin g s afet y
-Please observe information on safe driving
c:> page 113.
A WARNING
-To help prevent poisonous exhaust gas from
being drawn into the vehicle, always keep the
rear lid closed wh ile driving .
- Never transport objects larger than those
fitting completely into the luggage area be
cause the rear lid cannot be fully closed .
- If you absolutely must dr ive with the rear lid
open, observe the following notes to reduce
the risk of poisoning:
- Close all windows,
- Close the power top,
- Open all a ir outlets in the instrument pan-
el ,
- Switch off the air rec irculat ion,
- Set the fresh air fan to the highest speed .
A WARNING ~
Always make sure that the doo rs, all windows,
the power top and the rear lid are securely
closed and locked to reduce the risk of injury
when the vehicle is not being used.
- Afte r closing the rear lid, always make sure
that it is properly closed and locked.
- Never leave your vehicle unattended espe cially with the rea r lid left open. A child
could cr awl into the ve hicle through the lug
g age compartmen t and close the re ar lid be
coming trapped and unable to get out . Be
ing trapped in a veh icle can lead to serious
pe rsonal injury .
- Never let c hildren play in or around the vehi
cle.
- Never let passengers ride in the luggage
compa rtment . Vehicle occupants must al
ways be properly restrained in one of the ve
h icle's seating posit ions.
(D Tips
- Air circu lation helps to reduce win dow fog
ging . Stale air escapes to the outs ide
through vents i n the t rim panel. Be sure to
keep these slots free and open .
119
Page 160 of 268
Child safety
The airbag on the passenger side makes the front
seat a potentially dangerous place for a child to
ride. The front seat is not the safest place for a
child in a forward-facing child seat. It is a very
dangerous place for an infant or a larger child in
a rearward -facing seat .
A WARNING
Not using a child safety seat, using the wrong
child safety seat or improperly installing a
child restraint increases the risk of serious
personal inju ry and death in a crash.
- Never install rearward-facing child safety
seats or infant carriers on the front passen
ger seat -even w ith an Advanced Airbag Sys
tem . A child will be seriously injured and can
be killed when the inflating airbag hits the
child safety seat or infant carrier with great
force and smashes the child safety seat and
child against the backrest, center armrest,
door or roof¢
page 133, Child restraints on
the front seat -some important things to
know .
-Always install rearward -facing child safety
seats or infant carriers on the rear seat.
- Never install a rearward-facing child re
straint in the forward-facing direction. Such
restraints are designed for the special needs
of infants and very small children and can
not protect them properly if the seat is for
ward-facing .
- If you must install a rearward facing child
safety seat on the front passenger seat be
cause of exceptional circumstances and the
PASSENGER AIR BAG OFF light does not
come on and stay on, immediately install
the rearward-facing child safety seat in a rear seating position and have the airbag
system inspected by your authorized Audi
dealer.
- Always read and heed all WARNINGS when
ever using a child restrained in a vehicle is
being used
~ page 124, Safety belts,
~ page 132, Airbag system and
¢ page 152, Important information.
158
Convertible child safety seats
Properly used convertible child safety seats can
help protect toddlers and children over age one who weigh between 20 and 40 lbs. (9 and 18 kg)
in a crash .
Fig. 157 Schem atic ove rview: instal la ti on of the attach
ments applicable to a LATCH seat
Fig. 158 Sc hematic ove rview : instal lat ion of the seat using
t he vehicl e's sa fet y bel t system
.. When using the vehicle safety belt to install a
child safety seat, you must first activate the
convertible locking retractor on the safety belt
to prevent the child safety seat from moving
¢page 161 or install the seat using the LATC H
attachments.
.,. Push the chi ld safety seat down with your full
weight to get the safety belt really tight so that
the seat cannot move forward or sideways more
than one inch (2.5 cm)
~ page 161.
.. Secure unused safety belts on the rear seat
¢page 157.
A toddler or child is usually too large for an in
fant restraint if it is more than one year old and
weighs more than 20 lbs. (9 kg).
T oddlers and children who are older than one
year up to about 4 years old and weigh more than
20 lbs. (9 kg) up to 40 lbs. (18 kg) must always
Ill>
Page 165 of 268
M N
ci u.. co ,...., \!) 1.1'1
N 1.1'1 ,....,
-The inflating airbag will hit the child safety
seat or infant carrier with great force and
will smash the child safety seat and child against the backrest, center armrest, door
or roof.
- Always be especially careful if you must in
stall a rearward facing child safety seat on
the front passenger seat in exceptional cir cumstances.
-A tight tether strap on a rearward-facing child restraint attached to the front passen
ger seat can put too much pressure on the
weight-mat in the seat and register a heavi
er weight in the Advanced Airbag System .
The heavier weight registered can make the
system work as though an adult were on the
seat and deploy the Advanced Airbag when
it must be suppressed causing serious or
even fatal injury to the child.
- Make sure that the
PASSENGER AIR BAG
OFF
light comes on and stays on all the time
whenever the ignition is switched on.
- If the PASSENGER AIR BAG OFF light does
not come on and stay on, immediately in
stall the rearward-facing child safety seat in
a rear seating position and have the airbag
system inspected by your authorized Audi
dealer.
Activating the convertible locking retractor
Use the convertible locking retractor to secure a
child restraint.
Alw ays heed the child s afety seat manufacturer 's
instructions when installing a child restraint in
your vehicle . To activate the convertible locking
retractor:
.. Place the child restraint on a seat, preferably on
the rear seat.
.. Slowly pull the belt
all the way out .
.. Route it around or through the child restraint
belt path ~,& .
.. Push the child safety seat down with your full
weight to get the safety belt really tight.
.. Insert the belt tongue into the buckle for that
seating position.
Child safety
.. Guide the safety belt back into the retractor un
til the belt lies flat and snug on the child safety
seat.
.. You should hear a "clicking" noise as the belt
winds back into the inertia reel. Test the con
vertible locking retractor by pulling on the belt .
You should no longer be able to pull the belt
out of the retractor. The convertible locking re
tractor is now activated .
.. Make sure that the red release button is facing
away from the child restraint so that it can be
unbuckled quickly.
.. Pull on the belt to make sure the safety belt is
properly tight and fastened so that the seat
cannot move forward or sideways more than
one inch (2.S cm).
A WARNING
Using the wrong child restraint or an improp
erly installed child restraint can cause serious
personal injury or death in a crash.
- Always make sure that the safety belt re
tractor is locked when installing a child safe
ty seat. An unlocked safety belt retractor
cannot hold the child safety seat in place
during normal driving or in a crash.
- Always buckle the child safety seat firmly in
place even if a child is not sitting in it. A
loose child safety seat can fly around during
a sudden stop or in a crash.
- Always make sure the seat backrest to which
the child restraint is installed is in an up
right position and securely latched into
place and cannot fold forward. Otherwise,
the seatback with the child safety seat at
tached to it could fly forward in the event of
an accident or other emergency situation .
- Always read and heed all WARNINGS when
ever using a child restrained in a vehicle is
being used
Qpage 152. Special precautions
apply when installing a child safety seat on
the front passenger seat~
page 133, Child
restraints on the front seat -some impor
tant things to know.
163
Page 169 of 268
M N
ci u.. co ...... \!) ..,.,
N ..,., ......
Installing a child restraint with LATCH
lower anchorages
Whenever you install a child restraint always fol
low the child restraint manufacturer's instruc tions.
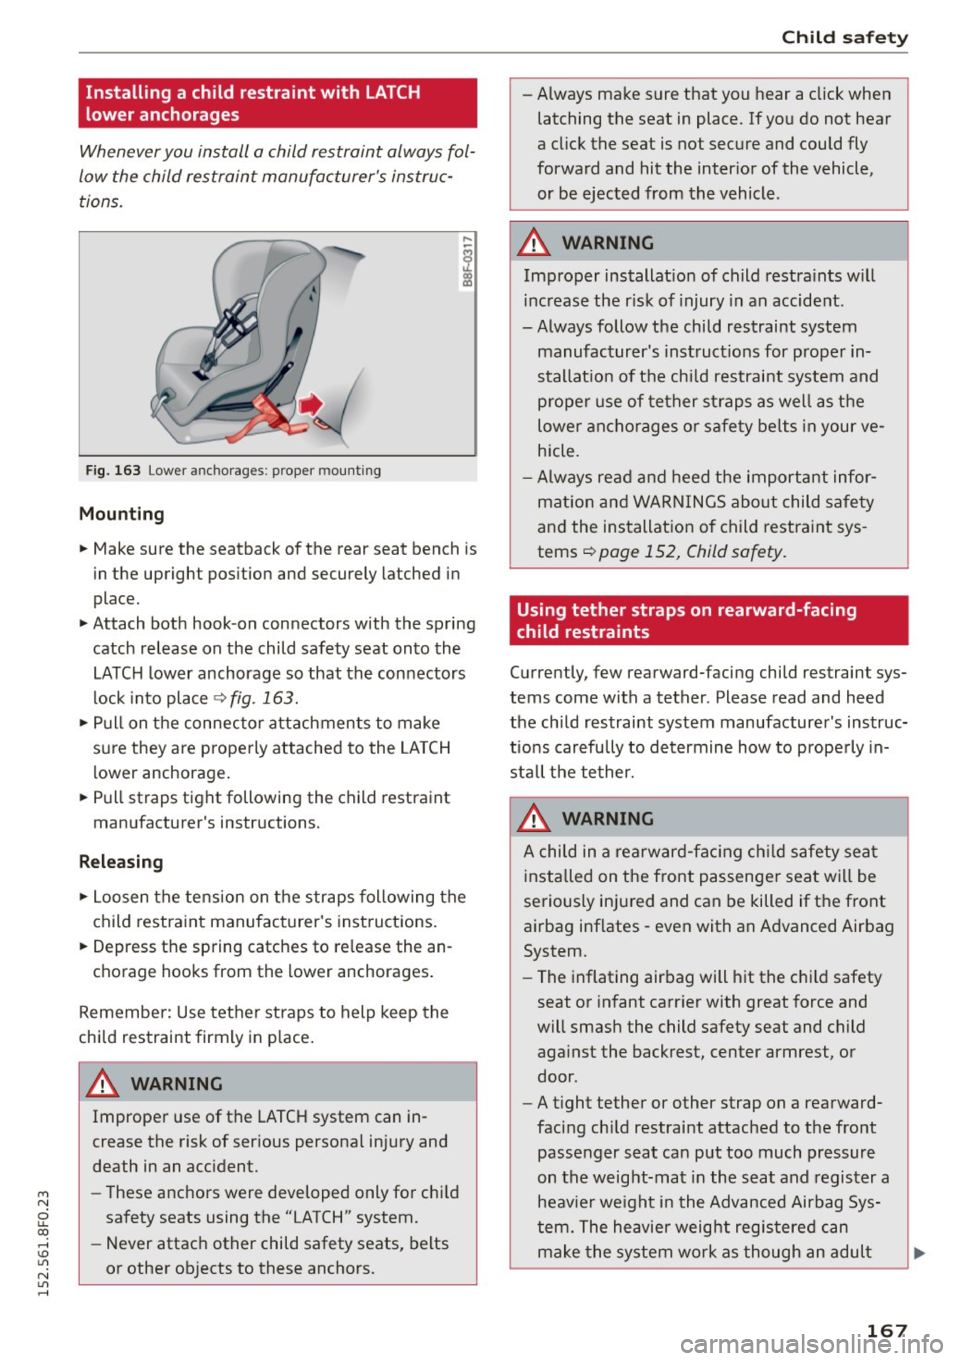
Fig. 163 Lowe r anch orages : proper mounting
Mounting
~ Make sure the seatback of the rear seat bench is
in the upright position and securely latched in
place.
~ Attach both hook-on connectors with the spring catch release on the child safety seat onto the
LATCH lower anchorage so that the connectors
lock into place
Qfig . 163.
~Pullon the connector attachments to make
sure they are properly attached to the LATCH
lower anchorage.
~ Pull straps tight following the child restraint
manufacturer's instructions.
Releasing
~ Loosen the tension on the straps following the
child restraint manufacturer's instructions.
~ Depress the spring catches to release the an
chorage hooks from the lower anchorages.
Remember: Use tether straps to help keep the
child restraint firmly in place.
A WARNING
Improper use of the LATCH system can in
crease the risk of serious personal injury and
death in an accident.
-
- These anchors were developed only for child
safety seats using the "LATCH" system.
- Never attach other child safety seats, belts
or other objects to these anchors.
Child safety
-Always make sure that you hear a click when
latching the seat in place. If you do not hear
a click the seat is not secure and could fly
forward and hit the interior of the vehicle,
or be ejected from the vehicle .
A WARNING '"---
Improper installation of child restraints will
increase the risk of injury in an accident.
- Always follow the child restraint system manufacturer's instructions for proper in
stallation of the child restraint system and proper use of tether straps as well as the
lower anchorages or safety belts in your ve
hicle.
- Always read and heed the important infor
mation and WARNINGS about child safety
and the installation of child restraint sys
tems
Q page 152, Child safety.
Using tether straps on rearward-facing
child restraints
Currently, few rearward-facing child restraint sys
tems come with a tether . Please read and heed
the child restraint system manufacturer's instruc
tions carefully to determine how to properly in
stall the tether.
A WARNING
A child in a rearward-facing child safety seat
installed on the front passenger seat will be
seriously injured and can be killed if the front
airbag inflates - even with an Advanced Airbag
System.
- The inflating airbag will hit the child safety
seat or infant carrier with great force and
will smash the child safety seat and child against the backrest, center armrest, or
door .
- A tight tether or other strap on a rearward
facing child restraint attached to the front
passenger seat can put too much pressure
on the weight-mat in the seat and register a
heavier weight in the Advanced Airbag Sys
tem. The heavier weight registered can
make the system work as though an adult
167
Page 195 of 268
M N
ci u.. co ,...., \!) 1.1'1
N 1.1'1 ,....,
When activating the central locking, the fuel fi ll
er flap is automatically un locked or locked . Re
fue l the vehicle with the ignit ion turned
off.
Tak ing th e fu el cap off
.,. Turn off the ignit ion.
.,. Press the left side o f the fue l filler flap to open
it
c:> fig . 166 -arrow -.
.,. Unscrew fuel cap counter-clockwise and hang it
on the fue l filler flap
c> fig. 167.
R efuellin g proc edu re
.,. Inse rt the fue l nozz le from the gasol ine p ump
into the fuel filler neck as far as it will go .
.,. Se lect a medium refuelling rate so that the
nozzle switches off automatica lly when the
tank is full.
P utting the fuel cap back on
.,. After fi lling your tank, tw ist the fuel cap clock-
wise as far as it wi ll go.
.,. Close the fuel filler flap .
To avo id f uel spi lling or evaporating from the fue l
tank always close fuel cap properly and com
p letely.
A WARNING
Improper refueling or handling of fue l can
cause fire, exp losion and severe burns.
-
- Fuel is highly flammable and can cause se
vere burns and other injuries.
- Failure to shut the engine off whi le refuel
ing and/or to insert the pump nozzle fu lly
into the fuel filler neck could cause fue l to
spray out of f iller neck or to overflow. Fuel
spray and overflow ing fuel can cause a fire.
- Never use a cellular telephone wh ile refuel
ing. The electromagnetic radiation can
cause sparks that can ignite fuel vapors and
cause a fire.
- Never get back into your vehicle while refu
eling. If in exceptional c ircumstances you
must get back in your vehicle while refuel
ing, make certain that you close the door
and touch meta l to discharge static e lectric
ity before touching the filler nozzle again.
Fu el and R efu elin g
Static electricity can cause sparks that can
ignite fue l vapors released during refue ling.
- Never smoke or have an open f lame any
where in or near your vehicle when refueling or filling a portable fuel conta iner .
- For your safety, we strongly recommend
that you do not travel with a portable f uel
container in your veh icle. The container, full
or empty may leak and cou ld cause a fire,
especially in a crash .
- If, under exceptional c ircumstances, you
must transport a portab le fuel container,
please observe the following:
- Never fill a portable fuel container while it
is anywhere in or on the vehicle (for exam
ple, in the l uggage compartment, or on
the trunk). Static e lectric ity can build up
while filling and can ignite fuel vapors
caus ing a fire .
-Always place a portab le fue l conta iner on
the ground before fill ing .
- Always keep the filler nozzle completely
inside the portable container before and
during f il li ng.
- If filling a portab le container made of
metal, the f iller nozzle must always be in
contact with the container. This will help prevent static electricity from d ischarging
and cause a fi re.
- Never spill fuel inside the vehicle or lug
gage compartment. Fuel vapors are highly
flammable.
- Always observe local and state/provincial
laws regarding the use, storage and trans
po rtation of fue l conta iners.
- Make certain the fuel conta iner meets in
dustry standards (ANSI/ AS TM F852 -86).
(D Note
If any fuel has sp illed onto the car, it should
be removed immediately to prevent damage
to the pa int.
@) For the sake of the environment
As soon as the correct ly operated nozzle
switches off automat ically for the first time,
193
Page 196 of 268
Fuel and Refueling
the tank is full. Do not try to add more fuel
because fuel may spill out. In addition, the
expansion space in the fuel tank will be filled -
causing the fuel to overflow when it becomes
warm and pollute the environment.
(D Tips
- Running your engine while refuelling may
cause vapors to escape or even cause fuel to
spill out of the tank. This would then shut
off the fuel nozzle before the tank is full.
- Do not refuel your vehicle with the ignition
turned on. The fuel gauge may otherwise
not indicate the correct fuel level after refu
elling.
- The fuel filler flap of your vehicle is not
locked when you lock the vehicle from the
inside .
Unlocking the fuel filler flap by hand
You can open the fuel filler flap by hand if the
power locking system should fail.
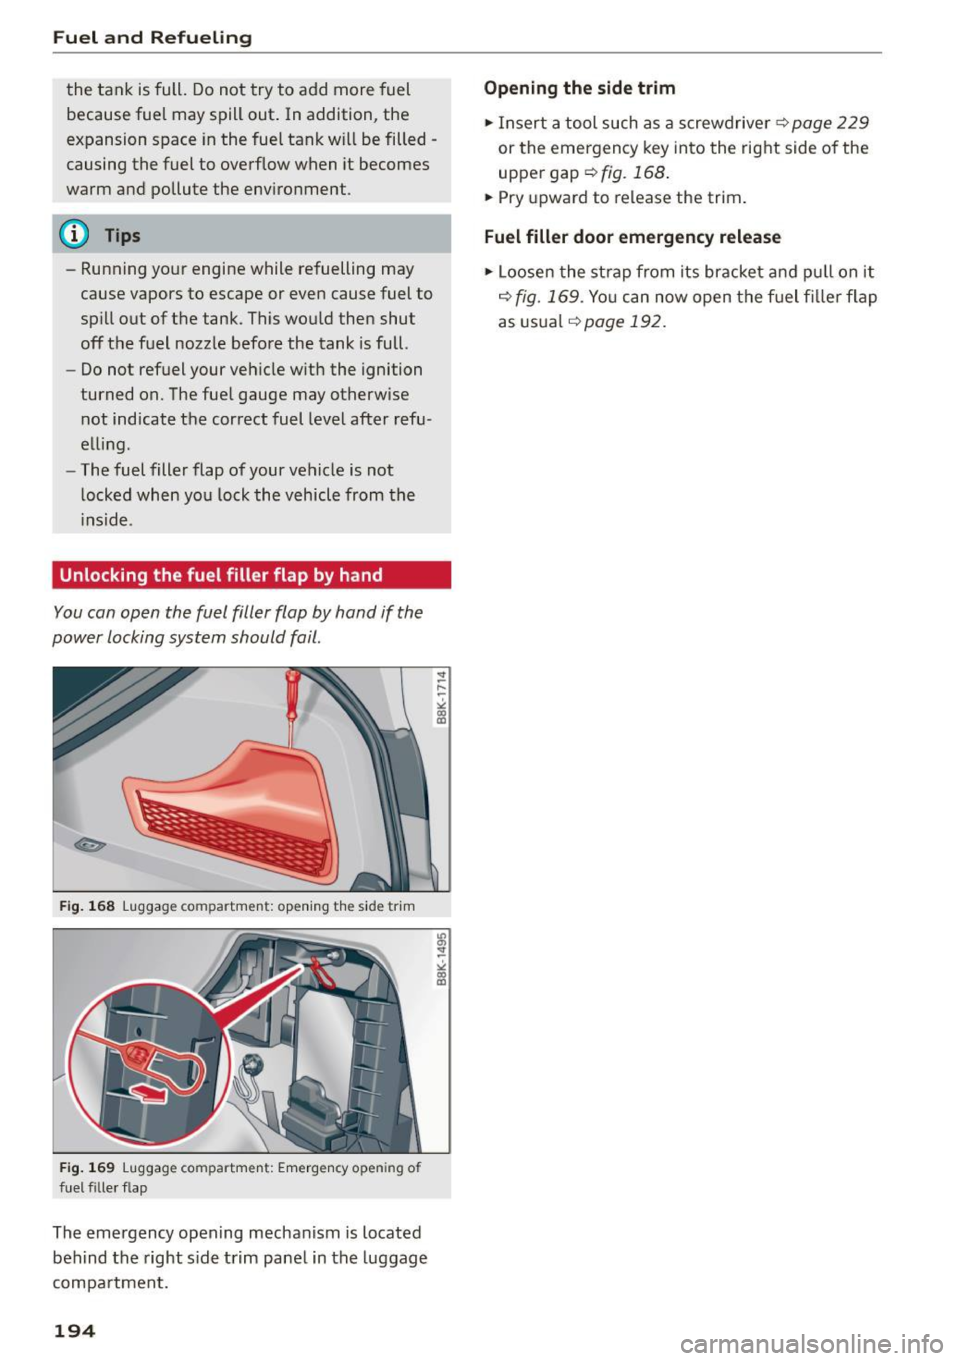
F ig. 168 Luggag e compartment: open ing the sid e trim
Fig. 169 Luggag e compart ment: Emergency open ing of
fuel filler flap
The emergency opening mechanism is located
behind the right side trim panel in the luggage
compartment.
194
"' a, st
-
" co
"'
Opening the side trim
.. Insert a tool such as a screwdrive r c:> page 229
or the emergency key into the right side of the
upper gap¢
fig. 168 .
.. Pry upward to release the trim .
Fuel filler door emergency release
.. Loosen the strap from its bracket and pu ll on it
¢
fig. 169. You can now open the fu el filler flap
as usual
¢page 192.
Page 197 of 268

M N
ci LL co
rl I.O
"' N
"' rl
Checking and Filling Hood
Releasing and opening the engine hood
The engine hood is released from inside the vehi
cle.
Fig. 170 Driver's side footwell: e ng in e hood release lever
Fig. 171 Releas e lev er un der t he e ngin e hood
Before opening the engine hood, make sure that
the windshield wipers are flat against the wind
shield . Otherwise, they could damage the paint
on the hood.
.. With the driver's door open, pu ll the lever un
der the instrument panel in the direction of the
arrow
c::> fig . 170.
.. Ra ise the hood slightly c::> &.
.. Press the rocker switch under the hood upward
c::> fig . 171. This releases the catch .
.. Open the hood.
A WARNING
Hot engine coolant can burn you.
- To reduce the r isk of being burned, never
open the hood if you see or hear steam or
coolant escaping from the engine compa rt
ment. Wait until no steam or coolant can be
Checking and Filling
seen or heard before carefully opening the
hood .
Closing the engine hood
.. Pull the hood down until the pressure from the
struts is reduced.
"' Let the hood
drop down and latch in place. Do
not try to push it shut;
it may fa il to engage
c::> &. -
A WARNING
A hood that is not comp letely latched could
fly up and block your view while driving.
- When you close the engine hood, check it to
make sure the safety catch has properly en
gaged . The hood should be flush with the
surrounding vehicle body parts.
- If you notice while driv ing that the hood is
not secured properly, stop at once and close
it.
Working in the engine compartment
Be especially careful whenever you work in the
engine compartment.
-
Whenever you must perform any work in the
engine compartment, for example checking and
filling different fluids , there i s a risk of injury ,
burns and accidents. To prevent personal injury
always observe the following WARNINGS . The
engine compartment of any vehicle is a hazard
ous area
c:> .&. .
A WARNING
-
To help avoid injury, before you check any-
thing under the hood:
- Turn off the engine.
- Remove the ignition key .
- Apply the parking brake.
- Move selector lever of automatic transmis-
sion to "P" (Park) .
-Always let the engine cool down. Hot com
ponents wi ll burn skin on contact .
- To reduce the risk of being burned, never
open the hood if you see or hear steam o r
coo lant escaping from the engine
195
Page 239 of 268

M N
ci LL co
rl I.O
"' N
"' rl
Fu se pa nel @ (black )
No. Consumer
1 Dynamic steering
2 Electron ic Stabilization Control (module)
A/C system pressure sensor, electrome-
chanical parking brake, HomeLink, auto-
3 mat
ic dimming interior rear view mirror,
air quality/outside air sensor, Electron ic
Stabilization Control (button)
s Sound actuator
6 Headlight range control/headl
ight (corner-
ing light)
7 Headlight (cornering light)
Control modu les (electromechanical park-
8 ing brake, shock absorber, q uattro sport),
DCDC converte r
9 Adaptive
cruise control
10 Shift gate/clutch sensor
11 Side assist
1 2 Headlight range cont ro l, parking system
13 Airbag
14 Rear
wiper (a llroad)
15 Auxiliary fuse (instrument panel)
16 Auxiliary
fuse termina l 15 (engine area)
Fuse p anel @ (brown )
No. C onsumer
2 Brake light sensor
3 Fuel pump
4 Clutch sensor
5
Left seat heating with/without seat venti-
lation
6 Electronic Stabilization Control (electric)
7 Ho rn
8
Front left door (window regulator, central
locking, mirror, switch, lighting)
9 Windshield wiper motor
10 Electronic Stabilization Control (valves) Fu
ses a nd bulb s
No. Consumer
Two-door mode ls: rear left window regula-
11 tor; Four-door
models: rear left door (win-
dow regulator, central locking, switch,
light ing)
12 Rain and l
ight sensor
Fuse panel © (r e d )
No . Con sumer
3 Lumbar support
4 Dynamic steering
5 Inter
ior l ight ing (Cabriolet)
6 Windshie
ld washer system, headlight
washer system
7 Vehicle electrica l system control module 1
8 Vehicle electr ica l system control module 1
9 Left rear
window regulator motor (Ca brio-
let)/su nroof
10 Vehicle electr ica l system co ntrol module 1
11 Right rear
window regulator (Cabriolet)/
sun shade motor
12 Anti-theft
alarm warning system
Right cockpit fuse assignment
Fig. 195 Right cockpit: fu se panel with plastic cl ip
237