ESP AUDI A5 COUPE 2008 Owner's Guide
[x] Cancel search | Manufacturer: AUDI, Model Year: 2008, Model line: A5 COUPE, Model: AUDI A5 COUPE 2008Pages: 313, PDF Size: 13.86 MB
Page 153 of 313
Audi parking system151
Controls
Safety
Driving tips
General maintenance
Self-help
Technical data
•
The parking aid cannot replace the full concentration of the
driver. The driver is always resp onsible for safety during parking
and other manoeuvres. Always k eep a close watch on the area
around the vehicle.
•
When parking or manoeuvring do not rely solely on the MMI
display. Some objects (e.g. narrow posts or bars) may - due to the
resolution of the display screen - not be displayed in a satisfactory
manner or may not be displayed at all.
Applies to vehicles: with parking system advancedNote on distances
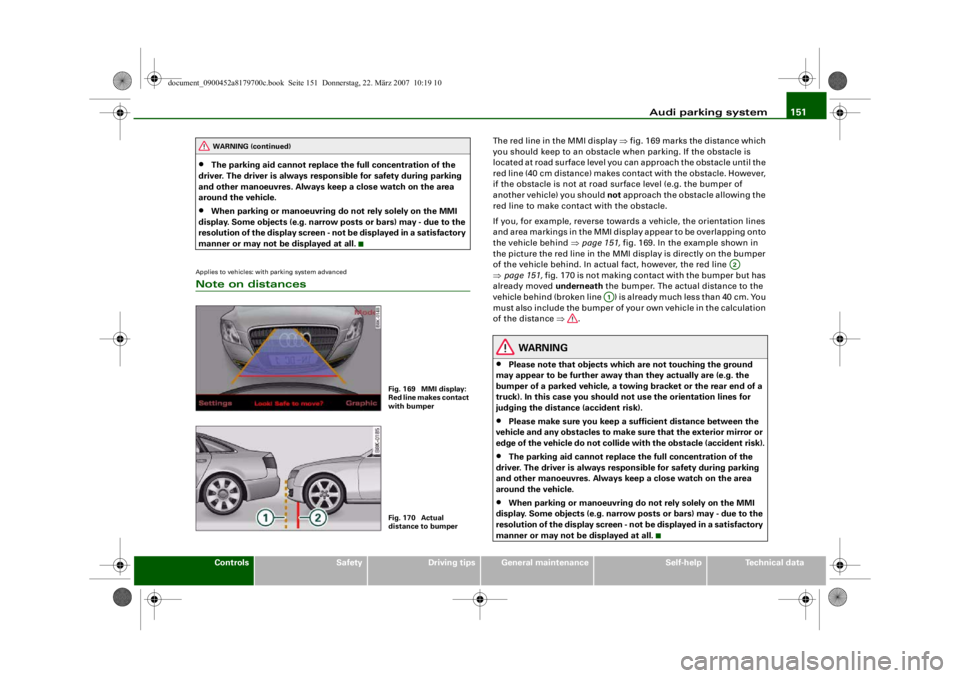
The red line in the MMI display ⇒fig. 169 marks the distance which
you should keep to an obstacle wh en parking. If the obstacle is
located at road surface level you can approach the obstacle until the
red line (40 cm distance) makes contact with the obstacle. However,
if the obstacle is not at road surface level (e.g. the bumper of
another vehicle) you should not approach the obstacle allowing the
red line to make contact with the obstacle.
If you, for example, reverse towards a vehicle, the orientation lines
and area markings in the MMI displ ay appear to be overlapping onto
the vehicle behind ⇒ page 151, fig. 169. In the example shown in
the picture the red line in the MMI display is directly on the bumper
of the vehicle behind. In actual fact, however, the red line
⇒ page 151, fig. 170 is not making contact with the bumper but has
already moved underneath the bumper. The actual distance to the
vehicle behind (broken line ) is already much less than 40 cm. You
must also include the bumper of yo ur own vehicle in the calculation
of the distance ⇒.
WARNING
•
Please note that objects which are not touching the ground
may appear to be further away than they actually are (e.g. the
bumper of a parked vehicle, a towing bracket or the rear end of a
truck). In this case you should not use the orientation lines for
judging the distance (accident risk).
•
Please make sure you keep a sufficient distan ce between the
vehicle and any obstacles to make sure that the exterior mirror or
edge of the vehicle do not collide with the obstacle (accident risk).
•
The parking aid cannot replace the full concentration of the
driver. The driver is always resp onsible for safety during parking
and other manoeuvres. Always keep a close watch on the area
around the vehicle.
•
When parking or manoeuvring do not rely solely on the MMI
display. Some objects (e.g. narrow posts or bars) may - due to the
resolution of the display screen - not be displayed in a satisfactory
manner or may not be displayed at all.
WARNING (continued)
Fig. 169 MMI display:
Red line makes contact
with bumperFig. 170 Actual
distance to bumper
A2
A1
document_0900452a8179700c.book Seite 151 Donnerstag, 22. März 2007 10:19 10
--4 -
-T
•
-+ +-
Page 154 of 313
Audi parking system
152Safety notesApplies to vehicles: with parking systemFault warning for the acoustic parking aidparking system:
If you hear a long beep when you engage reverse gear, the rear
parking aid is not functioning correctly.
parking system plus*/parking system advanced*:
If you hear a long beep for a few seconds when you engage reverse
gear and the diode in the switch
* starts flashing, there is a fault
in the rear and front parking system with graphic display.
You will be notified of a system fault
•
when you manually activate the parking system via the switch
* ⇒ page 138•
the first time you engage reverse gear after switching on the
ignition, or
•
immediately, if the fault is identified while you are using the
parking system.Note
If the system alerts you to a fault please have the fault rectified by
an Audi workshop or ot her qualified workshop.Applies to vehicles: with parking system advancedNotes on reversing cameraWe recommend that you practise parking with the reversing camera
in a quiet location (car park or similar) in order to become familiar
with the system, including the orientation lines and all the other
features. Ideally, the weather and light conditions should be good. Vehicles or other objects shown in
the MMI display appear to be
further away or closer, if:
•
you are reversing from a horizontal surface up a gradient or
down a hill,
•
you are reversing towards protruding objects,
•
the vehicle has been loaded with a greater load on the rear.
The accuracy of the orientation lines and the blue area markings
decreases if:
•
the reversing camera does not provide a reliable image, e.g. if
visibility is poor or the lens is dirty,
•
the sun is so dazzling that you cannot see the image on the
display screen.
How to clean the lens of the reversing camera:
•
Moisten the lens usin g a commercially available, alcohol-based
glass cleaning agent and clea n the lens with a dry cloth.
•
Remove snow using a small brush.
•
If possible, use de-icing spray to remove any ice ⇒.
WARNING
•
Even when using the reversing camera, the driver must still
keep a close watch on the area behind the vehicle and use the
mirrors.
•
For technical reasons, the reversing camera cannot show the
complete area behind the vehicle ⇒page 144, fig. 159. It is partic-
ularly important to ensure that there are no small children or
animals near the vehicle, as the reversing camera may not always
be able to detect th em (accident risk).
•
The parking aid cannot replace the full concentration of the
driver. The driver is always resp onsible for safety during parking
and other manoeuvres . Always keep a close watch on the area
around the vehicle.
document_0900452a8179700c.book Seite 152 Donnerstag, 22. März 2007 10:19 10
--4 -
-T
-+
0
+-
[I]
•
Page 156 of 313
HomeLink
154HomeLinkUniversal transmitterApplies to vehicles: with HomeLinkDescription
The HomeLink universal transmitter can be programmed
to replace the hand-held controls of devices already in
use.HomeLink allows you to conveniently activate garage doors, estate
gates, security systems, home or o ffice lighting and other electric
devices by means of control buttons inside your car.
HomeLink can replace up to three hand-held transmitters operating
existing devices on your property with a single universal trans-
mitter. This will be possible for most transmitters which control the
drive units for a garage door or external gates, etc. You can
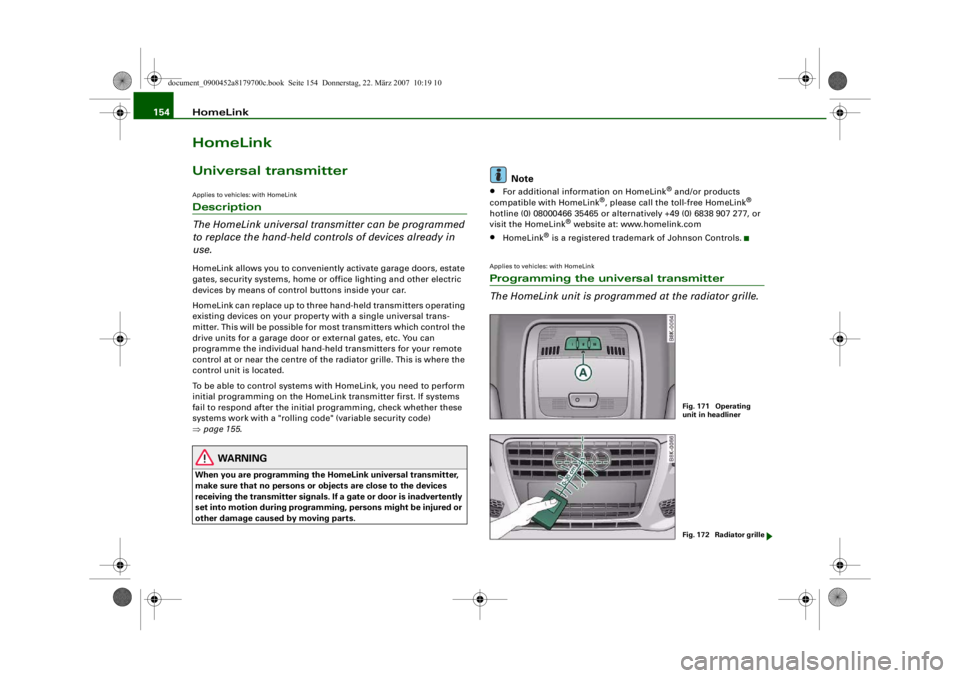
programme the individual hand-hel d transmitters for your remote
control at or near the centre of the radiator grille. This is where the
control unit is located.
To be able to control systems with HomeLink, you need to perform
initial programming on the HomeLink transmitter first. If systems
fail to respond after the initial programming, check whether these
systems work with a "rolling code" (variable security code)
⇒ page 155 .
WARNING
When you are programming the Ho meLink universal transmitter,
make sure that no persons or objects are close to the devices
receiving the transmitter signals. If a gate or door is inadvertently
set into motion during programmin g, persons might be injured or
other damage caused by moving parts.
Note
•
For additional information on HomeLink
® and/or products
compatible with HomeLink
®, please call the toll-free HomeLink
®
hotline (0) 08000466 35465 or alternatively +49 (0) 6838 907 277, or
visit the HomeLink
® website at: www.homelink.com
•
HomeLink
® is a registered trademark of Johnson Controls.
Applies to vehicles: with HomeLinkProgramming the universal transmitter
The HomeLink unit is programmed at the radiator grille.
Fig. 171 Operating
unit in headlinerFig. 172 Radiator grille
document_0900452a8179700c.book Seite 154 Donnerstag, 22. März 2007 10:19 10
--4 -
-T
[I]
•
-+ +-
Page 158 of 313
HomeLink
156
Activating the garage door opener drive unit
– Locate the programming button on the garage door drive. The exact location and colour of the button may
vary depending on the type of garage door opener.
– Press the programming button on the door drive unit (this will normally cause a “programming mode indicator
lamp” on the unit to light up). You now have about 30
seconds to start and complete the programming of the
HomeLink control button on the operating unit.
Programming at the operating unit in the
headliner
– Press and release the already programmed HomeLink button.
– Press the HomeLink button again to complete rolling code programming.After programming at the operating unit in the headliner, the
garage door opener should recognize the HomeLink signal and
respond when the HomeLink button is pressed. Now the other
control buttons can be programmed as required.
Note
•
Having a second person assist you makes programming of the
rolling code easier and faster. For some makes of garage door
openers the HomeLink button may have to be pressed a third time
to complete the training sequence.
•
If you encounter problems programming the rolling code you
may find helpful information in the operating instructions of the
garage door opener or other device you wish to operate.
Applies to vehicles: with HomeLinkOperating HomeLink
The programmed devices are activated by means of the
HomeLink control buttons in the headliner.– Make sure that the ignition is on.
– Press the programmed HomeLink button ⇒page 154,
fig. 171. The device assigned to that button (e.g. garage
door) will be activated.The HomeLink indicator diode ⇒page 154, fig. 171 will light up
when you press the button.Applies to vehicles: with HomeLinkErasing the button programming
You can erase the complete HomeLink programming by
pressing the two outer buttons.– Switch on the ignition (do not start the engine).
– Press and hold down the two outer buttons until the indi- cator diode starts to flash ⇒page 154, fig. 171.
– Then release the buttons.After the programming of the Home Link buttons has been erased,
the system will return to the training mode and is ready to be re-
programmed at any time.
Note
•
Programmed buttons cannot be erased individually.
•
For security reasons it is advisable to erase the programming of
the HomeLink buttons prior to selling your vehicle.
document_0900452a8179700c.book Seite 156 Donnerstag, 22. März 2007 10:19 10
--4 -
-T
•
-+ +-
[I]
[I]
•
•
Page 164 of 313
Safe driving
162Safe drivingGeneral notesSafety is the first priority
Your safety is our first priority.This chapter contains important information, tips, sugges-
tions and warnings that you should read and observe for
your own safety and the safety of your passengers.
WARNING
•
The information in this chapter is important for the driver of
the vehicle and all passengers. Th e other chapters in this manual
(and, where applicable, in the ot her literature supplied with the
vehicle) contain further importan t notes which you should read
and observe for your own safety and that of your passengers.
•
Ensure that the complete vehicle wa llet is always in the vehicle.
This is especially imp ortant when you lend or sell the vehicle to
others.
Safety features
The safety features listed he re are part of the vehicle's
occupant restraint system. They work together to help
reduce the risk of injury in a wide variety of accident situ-
ations.Your safety and the safety of your passengers should not be left to
chance. In the event of an accident, the safety features incorporated
in your vehicle are capable of reducing the risk of injury. These are
just a few of the safety features in your Audi:•
Optimised three-point seat belts for all seats,
•
Belt force limiters for the front seats,
•
Belt pre-tensioners for the front seats,
•
Head restraints for all seats,
•
Optimised protection against injuries of the cervical vertebrae,
•
Front airbags,
•
Side airbags in the backrests of the front seats,
•
Head-protection airbags (sideguard system),
•
“ISOFIX” mountings* for “ISOFIX” child safety seats on the rear
seats,
•
Height-adjustable head restraints on the seats,
•
Adjustable steering column.
These individual safety features are harmonised to provide you and
your passengers with the best possible protection in accident situ-
ations. However, they can only be effective if you and your passen-
gers sit in the correct position and adjust and use the safety equip-
ment properly.
For these reasons, this chapter explains why these safety features
are so important, how they can protect you, what you need to
remember when using them, and how you and your passengers can
gain the most benefit from them. There are also a number of impor-
tant safety warnings which you and your passengers should always
observe in order to minimise the risk of injury.
Safety is everyone's responsibility!
Before every trip
The driver is responsible for the safety of the passengers
and the safe operation of the vehicle at all times.For your own safety and the safety of your passengers,
always note the following points before every trip:
document_0900452a8179700c.book Seite 162 Donnerstag, 22. März 2007 10:19 10
--4 -
-T
-+ +-
•
•
Page 165 of 313
Safe driving163
Controls
Safety
Driving tips
General maintenance
Self-help
Technical data
– Make sure that all lights and turn signals are working
properly.
– Check the tyre pressures.
– Make sure that all windows are clean and give good visi- bility to the outside.
– Secure all luggage and other items carefully ⇒page 77 .
– Make sure that no objects can interfere with the pedals.
– Adjust the front seat, head restraint and mirrors correctly.
– Make sure that the head restraints for all passengers are adjusted to the correct position.
– Make sure that children are protected with suitable safety seats and properly worn seat belts ⇒ page 185.
– Sit in the correct position in your seat and make sure that
your passengers do the same. ⇒page 70 .
– Fasten your seat belt correctly. Make sure that your passengers do the same ⇒page 170.What affects driving safety?
Safety on the road is directly related to how you drive, and
can also be affected by the passengers in the vehicle.The driver is responsible for th e safety of the vehicle and all
its occupants. If your ability to drive is impaired in any way,
you endanger yourself and other road users ⇒. There-
fore:
– Do not let yourself be distracted by passengers or by using a mobile phone, etc. – Never drive when your driving ability is impaired (by
medication, alcohol, drugs, etc.).
– Obey all traffic regulations and speed limits and always maintain a safe distance to the vehicle in front.
– Always adjust your speed to suit the road, traffic and weather conditions.
– Take frequent breaks on long trips. Do not drive for more than two hours without a stop.
– If possible, avoid driving when you are tired or stressed.
WARNING
•
Distractions while driving or any kind of impairment to your
driving ability increase the risk of accident and injury.
•
Do not store loose objects on the dashboard. These objects
could fly around the interior when the vehicle is moving (under
acceleration or whilst cornering) and distract the driver – this
could lead to an accident.
document_0900452a8179700c.book Seite 163 Donnerstag, 22. März 2007 10:19 10
--4 -
-T
-+
•
+-
•
Page 169 of 313
Safe driving167
Controls
Safety
Driving tips
General maintenance
Self-help
Technical data
Examples of incorrect sitting positions
Occupants can suffer severe or fatal injuries injuries if
they sit in an incorrect position while the vehicle is
moving.Seat belts can only provide maximum protection if the belt
webbing is positioned correctl y. Sitting out of position
greatly reduces the effectiveness of the seat belts and
increases the risk of injury since the belt webbing is not
worn in the position for which it is designed. The driver is
responsible for the safety of all vehicle occupants, espe-
cially for children.
– Never allow anyone to sit out of position while the vehicle is moving ⇒.The following list shows just some examples of incorrect sitting
positions which can be dangerous to all occupants. The list is not
complete, but will help to make you aware of possible dangers
which can be avoided.
Therefore, whenever the vehicle is moving:•
never stand up in the vehicle,
•
never stand on the seats,
•
never kneel on the seats,
•
never travel with the backrest reclined too far,
•
never lean against the dash panel,
•
never lie down on the rear seat,
•
never sit on the front edge of a seat,
•
never sit sideways,
•
never lean out of the window,
•
never put your feet out of the window,
•
never put your feet on the dash panel,
•
never put your feet on the seat cushion,
•
never ride in the footwell,
•
never travel on a seat with out wearing the seat belt,
•
never climb into the luggage compartment.
WARNING
Sitting out of position increases the risk of severe injuries.•
Sitting out of position exposes the occupants to potentially
fatal injuries: if the airbags inflate they can strike any occupant
who is not in one of th e designed seat positions.
•
Before starting a trip, sit in the correct position and stay in this
position as long as the vehicle is moving. Before every trip, make
sure all passengers are sitting in the correct positions and remain
correctly seated at all times ⇒page 70, “Seats and storage”.
Pedal are aPedal s
The pedals must always be free to move and must never
be obstructed by floor mats or any objects in the footwell.– Make sure that the accelerator, brake and clutch pedals
are not obstructed and can be pressed all the way down
to the floor.
– Make sure that all pedals are able to return freely to their original positions.Only use floor mats which leave the pedal area free and can be
securely fastened in the footwell.
If one of the brake circuits should fail, increased brake pedal travel
will be required to bring the vehicle safely to a stop.
document_0900452a8179700c.book Seite 167 Donnerstag, 22. März 2007 10:19 10
--4 -
-T
•
-+ +-
Page 171 of 313
Safe driving169
Controls
Safety
Driving tips
General maintenance
Self-help
Technical data
inside. In this case the child wo
uld be unable to get out of the
vehicle without help. This could have fatal consequences.
•
Never allow children to play in or around the vehicle. Always
close and lock the boot lid and all the doors when you leave the
vehicle.
•
Never let passengers ride in the luggage compartment. All
occupants must be properly restrained by the seat belts at all
times ⇒page 170 .Note
•
Air circulation in the vehicle helps reduce fogging of the
windows. Used air escapes through ventilation slots in the rear of
the vehicle. Make sure that these ventilation slots are not
obstructed.
•
Suitable belts for securing loads to the fastening rings* are
commercially available.
Applies to vehicles: with fastening ringsFastening rings
Unsecured loads are a hazard to all vehicle occupants.There are fastening rings in the luggage compartment
which can be used to secure luggage and other objects
⇒ page 78 .
– Use the fastening rings to secure items safely in the luggage compartment ⇒ in “Loading the luggage
compartment” on page 77.During a collision or an accident, even small and light objects can
possess so much energy that they can cause very severe injuries.
The amount of this “kinetic energy” depends on the speed of the vehicle and the weight of the object. The most significant factor,
however, is the speed of the vehicle.
An example: An object weighing 4.5 kg is lying unsecured in the
vehicle. During a frontal collision at a speed of 50 km/h, this object
generates a force corresponding to 20 times its weight. That means
that the effective weight of the object increases to about 90 kg. You
can imagine the severity of the injuries which might be sustained if
this “projectile” strikes an occupant as it flies through the
passenger compartment.
WARNING
If items of luggage or other obje
cts are secured to the fastening
rings with inappropriate or da maged retaining cords, injuries
could result in the event of sudden braking or a collision.•
To prevent pieces of luggage or other objects from flying
forward, always use appropriate retaining cords which are prop-
erly secured to the fastening rings.
•
Never secure a child seat on the fastening rings.
WARNING (continued)
document_0900452a8179700c.book Seite 169 Donnerstag, 22. März 2007 10:19 10
--4 -
-T
[I]
-+
•
•
+-
Page 173 of 313
Seat belts171
Controls
Safety
Driving tips
General maintenance
Self-help
Technical data
Important safety instructions for using seat belts
There are a number of safety points concerning the seat
belts which you should remember. This will help to reduce
the risk of injury in an accident.
WARNING
•
The seat belts can only provi de maximum protection if the
seats are adjusted properly ⇒page 70, “Seats and storage”.
•
To ensure proper protection, it is important to wear the seat
belts in the co rrect position ⇒page 173, “How to wear seat belts
properly”. Ensure that the seat belts are worn exactly as recom-
mended in this chapter. Belts wh ich are not worn properly can
increase the risk of injury in accidents considerably.
•
Do not allow the seat belt to be come twisted or jammed, or to
rub on any sharp edges.
•
Never allow two passengers (even children) to share the same
seat belt. It is especially dangerou s to place a seat belt over a child
sitting on your lap.
•
Do not wear the belt over hard or fragile objects (such as
glasses or pens, etc. ) because this can cause injuries.
•
Loose, bulky clothing (such as an overcoat over a jacket)
impairs the proper fit an d function of the belts.
•
The belts must be kept clean, otherwise the retractors may not
work properly ⇒page 226, “Seat belts”.
•
The slot in the seat belt buckle must not be blocked with paper
or other objects, as this can prev ent the latch plate from engaging
properly.
•
The latch plate of the belt mu st always be engaged in the
correct buckle for that seat, ot herwise the belt will not be fully
effective.
•
Check the condition of the seat bel ts at regular intervals. If you
notice that the belt webbing, fi ttings, retractor mechanism or buckle of any of the belts is da
maged, the belt must be replaced
by a qualified workshop.
•
The seat belts must not be remov ed or modified in any way. Do
not attempt to repair a damaged belt yourself.
•
Seat belts which have been worn in an accident and stretched
must be replaced by a qualified workshop. The belt anchorages
should also be checked.
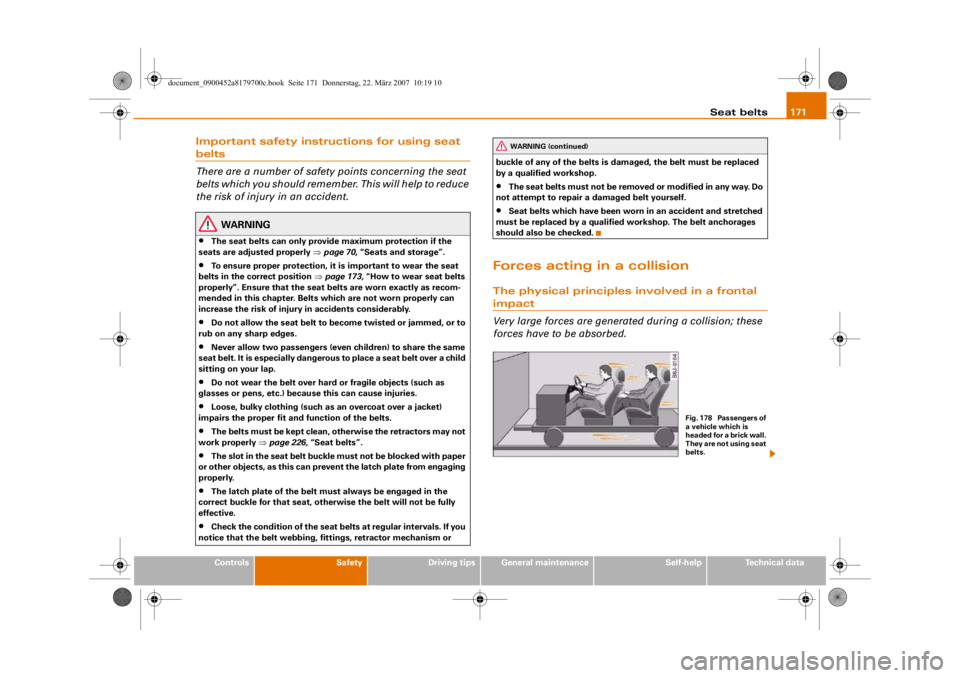
Forces acting in a collisionThe physical principles involved in a frontal impact
Very large forces are generat ed during a collision; these
forces have to be absorbed.
WARNING (continued)
Fig. 178 Passengers of
a vehicle which is
headed for a brick wall.
They are not using seat
belts.
document_0900452a8179700c.book Seite 171 Donnerstag, 22. März 2007 10:19 10
--4 -
-T
•
-+ +-
Page 176 of 313
Seat belts
174The height of the front seat on your vehicle can be adjusted in order
to match the position of the seat belt to your height.
WARNING
•
The diagonal part of the belt s hould never be positioned across
the neck, but roughly over the centre of the shoulder; it should fit
closely against the upper part of the body. The lap part of the belt
must be worn tightly across the hips, and not over the abdomen
⇒ page 173, fig. 184. Pull the belt tight if necessary to take up any
slack.
•
Always make sure that belt is positioned properly. Incorrectly
worn seat belts can give rise to injuries even in a minor collision.
•
Seat belts worn too loose can re sult in injuries because they
allow excessive forward movement in a crash; the occupant will
be brought to a sudden stop by the belt webbing.
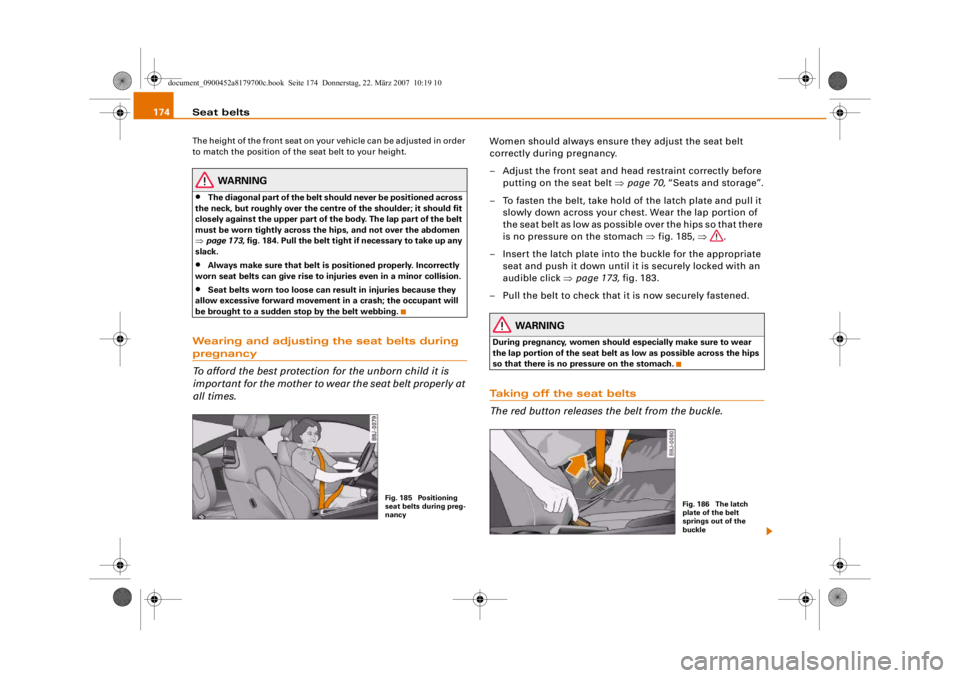
Wearing and adjusting the seat belts during pregnancy
To afford the best protection for the unborn child it is
important for the mother to wear the seat belt properly at
all times.
Women should always ensure they adjust the seat belt
correctly during pregnancy.
– Adjust the front seat and head restraint correctly before putting on the seat belt ⇒page 70, “Seats and storage”.
– To fasten the belt, take hold of the latch plate and pull it slowly down across your chest. Wear the lap portion of
the seat belt as low as possible over the hips so that there
is no pressure on the stomach ⇒fig. 185, ⇒.
– Insert the latch plate into the buckle for the appropriate seat and push it down until it is securely locked with an
audible click ⇒page 173, fig. 183.
– Pull the belt to check that it is now securely fastened.
WARNING
During pregnancy, women should especially make sure to wear
the lap portion of the seat belt as low as possible across the hips
so that there is no pressure on the stomach.Taking off the seat belts
The red button releases the belt from the buckle.
Fig. 185 Positioning
seat belts during preg-
nancy
Fig. 186 The latch
plate of the belt
springs out of the
buckle
document_0900452a8179700c.book Seite 174 Donnerstag, 22. März 2007 10:19 10
--4 -
-T
-+
•
--- ~I& __ ·~
+-