radiator AUDI A5 COUPE 2010 Owners Manual
[x] Cancel search | Manufacturer: AUDI, Model Year: 2010, Model line: A5 COUPE, Model: AUDI A5 COUPE 2010Pages: 360, PDF Size: 84.39 MB
Page 11 of 360
Warning light in the instrument cluster display -L
If the _L wa rn ing l ight in the ins trument cluste r display flashes, this
can mean one of two things : either the coolant temperature is too
h igh, or the coolan t level is too low ~ page 30.
If t he needle is we ll in the upper area of the gauge, the coolant
temperature is too high.
Stop the vehicle , swit ch the engine off , and
allow it to cool.
If the war ning light comes on again a fter d riv ing a
short distance, contact an authorized Audi dea ler or other qualified
w orksh op.
& WARNING
• Alway s observe the warning in ~ page 263 , "Engine compart
ment ", before open ing the hood and che cking the engine coolant
level.
• Never open the engine hood if you see or hear steam , or if you
s ee engine coolant dripping from the engine compartment. You
could burn yourself . Let the engine cool off first so that you cannot
hear or see any steam or engine coolant .
0 Note
• Mo unting add itiona l lights or accesso rie s in front o f the ai r inlets
reduces the cooling effect of the radiator . At high outside tempera
t ures or high engi ne load, the engine coul d overheat .
• T he front spoiler has been designed to properly distribute the
cooling air wh en the vehic le is m oving. If the spoi ler is dam age d,
this could reduce the coo ling effect and the engine could then over
heat . Ask your a uth oriz e d Audi deale r for assis tance .•
Con tro ls and eq uip
ment
Instruments and warning /indicator lights
Tachometer (engine rev counter)
T h e ta chometer in dicat es th e engine RPM (r e vo lutio ns per
m in ute s).
If engine RPM drops be low 1,500, you should downshift to the next
low er g ear. The red area at t he end o f the scale indicates ma xim um
permissible engine RPM after the break -in period. Before reaching
this ar ea, move the se lecto r lever to pos ition
D (Drive) or ease y our
foot off the acce lerator peda l.
0 Note
The tachometer needle@~ page 8, fig. 2 should only briefly be in
t he red zone : you c oul d da mage y our engine! The beginning of the
red zone varies depending on the engine .
~ For the sake of the environment
Upshiftin g ear ly saves fu el and reduces engine noise .•
[ S ET ) button
Y o u c an pe rform diffe re n t fu nctio ns w ith this but ton.
Fig . 3 SET button in
the in strument clu ster
The [S ET ] b utto n perfor ms the fo llowi ng fu nc tio ns:
Vehicle care I I irechnical data
Page 32 of 360
Driver information display
Parking brake Please get to a repair shop
-If this symbol appears when the vehicle is stationary or
after the ignition is turned on, check to see if the parking
brake can be released. Drive to an authorized Audi dealer
or other qualified workshop as soon as possible and have
the malfunction corrected. If the parking brake cannot be opened, then take it to an expert at an authorized Audi
dealer.
- If the symbol appears while you are driving, it is possible
that the traction control or the emergency brake has
malfunctioned. It is possible that the parking brake
cannot be applied. It is also possible that the parking
brake cannot be released after it has been applied. Drive
to an authorized Audi dealer or other qualified workshop
to have the malfunction corrected.
If the ABS system malfunctions, the ABS warning/indicator light illu
minates together with the brake system malfunction warning/indi
cator light=>& .
& WARNING
• Always observe the warnings in => page 263, "Engine compart
ment ", before opening the hood and checking the brake fluid.
• Driving with low brake fluid is a safety hazard. Stop the car and
get professional assistance.
• USA models: If the
BRAKE warning light and the warning
light come on together, the rear wheels could lock up first under
hard braking . Rear wheel lock-up can cause loss of vehicle control
and an accident. Have your vehicle repaired immediately by your
authorized Audi dealer or a qualified workshop. Drive slowly and
avoid sudden, hard brake applications.
• Canada models: If the brake warning light (Ci] and the ABS
warning light come on together, the rear wheels could lock up
& WARNING (continued)
first under hard braking. Rear wheel lock-up can cause loss of
vehicle control and an accident. Have your vehicle repaired imme
diately by your authorized Audi dealer or a qualified workshop.
Drive slowly and avoid sudden, hard brake applications. •
Engine cooling system malfunction _}_
A malfunction in the engine cooling system must be
repaired as soon as possible.
If the _p_ symbol flashes in the display, either the engine
coolant
temperature is too high or the engine coolant level
is too low. A driver message appears as well to explain the
malfunction in more detail. The driver warning goes out
after about 5 seconds, but it can be brought up at any time
by pressing the [ SET] button again.
Switch off engine and check coolant level
- Pull off the road.
- Stop the vehicle.
- Turn off the engine.
- Check coolant level~
page 278.
- Add coolant if necessary ~ page 279.
Continue driving only after the engine coolant
warning/indicator light goes out.
- Contact your authorized Audi dealer for assistance if
necessary.
If the engine coolant level is correct, then the radiator fan may be
the cause of the malfunction. ...
Page 114 of 360
-On th
e ro ad
..___ ______________ _
& WARN ING (c ontinued )
• For safety rea son s, you sh ould alway s park y our v ehicle with
t he sele ctor le ver in P . Othe rwis e , the vehi cle cou ld in adve rtent ly
roll aw ay .
• Afte r the e ngine h as been s witched off , the radiator f an ca n
c ontinue to run for up to 10 minutes -even w ith the ignition
s wit ched off . It can also swit ch on again after some t im e i f the
c oolant temperatur e rises a s the re sult of a he at buildup or if th e
engin e is hot and the engine compartm ent i s addition ally heated
by the sun's rays .
0 Note
If the engine has been under heavy load for an extended period ,
heat bui lds up in the engine compartment after the engine is
switched off - there is a risk of damaging the engine. Allow the
engine to run a t idle for about 2 minutes before switching it off .•
Electromechanical parking brake
Operation
The electromechanical parking brake replaces the hand
brake .
Fig . 119 Cen ter
c onsol e: Park in g br ake
P ull on the sw it c h @ ~fig. 119 to app ly the parking
brake . The indi ca to r light in th e sw itch illum inates.
- Step on t he b rake peda l or the accele rator pedal and
press the switch at the same time to release t he pa rking
brake . The indicato r light in the sw itch goes out .
Your vehicle is equipped with an electromechanical parking brake.
The parking brake is designed to prevent the vehicle from roll ing
unintentionally and replaces the hand brake.
In addition to the normal functions of a traditional hand brake, the
elec tromechanica l pa rk ing brake provides various convenie nce and
safety functions.
When starting from rest
• T he integral starting assist he lps you when driving by automati
cally re leasing the parking brake~ page 113, "Starting from rest" .
• When starting on inclin es, the star ting assist prevents the
vehic le fro m unintentionally rolling back . The braking force of the
parking brake is not released until sufficient driving force has been
built up at the whee ls .
Em erg en cy b rake f uncti on
An emergency brake ensures that the vehic le can be slowed down
even if the normal brakes fail~ page 114, "Emergency braking".
Indicator light s
• If the parking brake is closed with the ignition switched on the
indicator lights come on:!, (USA models)/ ®) (Canada models) in
the instrument cluster and the switch.
• If the parking brake is closed w ith the ignition
s witched off the
indicator lights com e on =:, (USA models) /® ) (Canada models) in
the instrument clus ter and the switch for about 20 seconds. ._
Page 167 of 360
___________________________________________________ H_ o_m _ e_ L_ i_ n _k_ @_R _ __.1111
Applies to vehicles: with Homelin k® un iversal remote contro l
Programming the Homelink ® transmitter
The transmitter is programmed in two phases. For rolling
code transmitters, a third phase is also necessary.
,,,,, r, o: o "'' '''"
Fig . 177 Overhead
console: HomeLink ®
keypad
Fig . 178 Radiator grille
Phase 1: programming the overhead keypad
1. Make sure your vehicle is within operating range of the
remote controlled garage door opener.
2. Set the parking brake==>
& in "General information" on
page 764.
3. Turn the ignition on. Do not start the engine!
Contro ls and eq uip
ment
4. Press and hold the two outside Homelink® buttons 0
and @for approximately 20 seconds until indicator
light@==> fig. 177 begins to flash. Then release both
buttons. Do not hold the buttons for longer than
30
seconds.
- This procedure only needs to be performed
once . It
erases the factory-set default codes and does not have to
be repeated to program additional remote controls.
5. Press and hold the Homelink® button
0,@ or@ until
the indicator light @starts flashing slowly. Release the
button.
- The system will remain in programming mode for 5
minutes.
Go to the front of the vehicle and proceed with
phase 2.
Phase 2: at the radiator grille
6. Point the
original remote control to the middle of the
radiator grille of your vehicle==> fig. 178.
7. Hold the original remote control at a distance between
0-
5 in. (0-13 cm) (use the shortest distance possible).
8. Press and hold the activation button on the remote control.
- May be different in Canada . If so, press and re -press
(cycle) the activation button on your remote control every
two seconds.
9. The emergency flashers will flash
three times (after
about
15 -60 seconds) when the programming is
successful. Release the button on the remote control.
- To program more devices, repeat steps 4 to 9.
Vehicle care I I irechnical data
Page 169 of 360
___________________________________________________ H_ o_m_ e_ L_ i_ n _ k_ @_ R __ !II
Ap plies to vehi cles : w ith Hom elin k® un iversal re mote con tro l
Reprogramming a single button
A Homelink® button can be reprogrammed individually without affecting the other button allocations.
Programming the overhead keypad
Press the appropriate Homelink® button until the indi
cator light begins flashing slowly.
At the radiator grille
1. Point the original remote control to the middle of the
radiator grille of your vehicle~
page 165, fig. 178.
2. Hold the
original remote control at a distance between 0-
5 in. (0-13 cm) (use the shortest distance possible) .
3. Press and hold the activation button on the remote
control.
4. The emergency flashers will flash three times (after
about
15-60 seconds) when the programming is
successful. Now release the button on the remote
control.
- If the device utilizes a rolling code, please follow phase 3
of ~
page 165, "Programming the Homelink® trans
mitter" for rolling code programming.
This procedure will cause the existing programming on the
Homelink ® button to be erased!•
Controls and equip
ment
Ap plies to ve hicles: wit h Hom el ink ® universal re mote co ntro l
Erasing the programming of the Homelink ®
transmitter
When you erase the programming , the programming on
all three of the transmitter channels with be lost!
- Perform steps 1 to 4 as described on~ page 165, "Phase
1: programming the overhead keypad".
When completed, the Homelink ® system will be in the program
ming mode and is then ready to learn the codes for remo te
controlled devices.
[ i ] Tips
• Programmed buttons cannot be erased individual ly .
• For secu rity reasons you are advised to erase the programming
of the HomeLink ® system before you sell your vehicle. •
I • •
Page 266 of 360
___ C_ le_ a _ n_i_n ~g _ a_ n_ d __ p_r _o _t _e _c_ t_ i_o _n ___________________________________________ _
entire engine compartment and plenum panel should be thor
oughly cleaned at t he end of winter and retreated to prevent sal t
damage . At the same time, the underside of the vehicle shou ld be
washed as we ll.
If the eng ine compartment is cleaned at any t ime with grease
removing solutions
2 l, or if you have the engine washed, the anti
corrosion treat ment is al most a lways removed as wel l. It is there fore
essential to hav e a long- las ting corrosion protection r eapplied to al l
sur faces, sea ms, joints a nd co mponents in the engine compar t
ment.
& WARNING
Be awa re: The engine compartment of any motor vehi cle is a
potentially hazardou s area.
• Before working in the engine compartment , be sure to read the
information
::::> page 26 3.
• Before reaching into the front p lenum panel, always remove the
ignition key . Otherwise , the w ind shield wiper sy stem cou ld unin
tentionally be sw itched on, pos sibly causing personal in jury from
the moving wiper linkage .
• Never reach into the area around or touch the radiator fan . The
a uxil iary f an i s temperature controlled and can switch on suddenly
- even when the ignition is off.
• Do not wash , wa x or dry the eng ine with the e ngine running .
Moving or hot part s could injure you .
• Do not clean the underside of the chassis , fenders , wheel
c overs , or other hard to reach parts without protecting your hands
a nd arms . You may cut yourself on sharp-edged met al parts .
• Always read and heed all WARNINGS and other informat ion
=> page 2 52 . •
21 Us e on ly th e correct c lean ing solut ions. N ev er use gasolin e or di esel fuel.
Page 273 of 360
Checking and filling IJI
--------------~-
•
Closing the engine hood
-Pull the hood down until the pressure from the struts is
reduced .
- Let the hood
drop down and latch in place. Do not try to
push it shut;
it may fail to engage => &.
& WARNING
A hood that is not completely latched could fly up and block your
view while driving.
• When you close the engine hood, check it to make sure the
safety catch has properly engaged. The hood should be flush with
the surrounding vehicle body parts.
• If you notice while driving that the hood is not secured prop
erly, stop at once and close it. •
Working in the engine compartment
Be especially careful whenever you work in the engine
compartment.
Whenever you must perform any work in the engine compartment,
for example checking and filling different fluids, there is a risk of injury, burns and accidents. To prevent personal injury always
observe the following WARNINGS. The engine compartment of any
vehicle is a hazardous area
~ & .
& WARNING
To help avoid injury, before you check anything under the hood :
• Turn off the engine.
• Remove the ignition key.
• Apply the parking brake .
& WARNING (continued)
• Move selector lever of automatic transmission to "P" (Park);
put manual transmission in Neutral .
• Always let the engine cool down. Hot components will burn
skin on contact.
• To reduce the risk of being burned, never open the hood if you
see or hear steam or coolant escaping from the engine compart
ment. Wait until no steam or coolant can be seen or heard before
carefully opening the hood .
• Keep children away from the engine compartment.
• Never spill fluids on hot engine components . They can cause a
fire.
• Never touch the radiator fan. The auxiliary electric fan is
temperature controlled and can switch on suddenly.
• Never open the coolant reservoir cap when the engine is still
warm. The coolant system is pressurized and hot coolant could
spray out.
• Protect your face, hands and arm from steam or hot engine
coolant by placing a thick rag over the cap when you open the
coolant reservoir.
• If work on the fuel system or the electrical system is necessary:
- Always disconnect the battery.
- Never smoke or work near heaters or open flames. Fluids in
the engine compartment could start a fire .
- Keep an approved fire extinguisher immediately available.
• To avoid electrical shock and personal injury while the engine
is running or being started, never touch :
- Ignition cables
- Other components of the high voltage electronic ignition
system.
• If you must perform a check or repair with the engine running: ..,
Vehicle care
I t •
Page 274 of 360
-Checking and filling
---=---------------
& W
ARNING (continued )
-First, fully apply the park ing brake, move selector lever of
automatic transmission to "P " (Park ); put manual transmission
in Neutral.
- Alway s use extreme c aution to prevent clothing , jewel ry , or
long hair from gettin g caught in the radiator fan , V-belts or
other moving parts , or from contacting hot parts. Tie back hair
before starting , and do not wear clothing that will hang or
droop into the engine .
• Minimize exposure to emission and chemi cal hazard s
=> &.
& WARNING
Californ ia Proposition 65 Warning :
• Engine exhaust , some of its constituents , and certa in vehicle
component s contain or emit chemicals known to the State of Cali
fornia to cause cancer and birth defe cts and reproductive h arm . In
addition, certain fluid s contained in vehicles and certain products
of component wear contain or emit chem icals known to the State
of California to cause cancer and birth defects or other reproduc
tive harm.
• Battery posts , terminals and related ac cessories contain lead
and lead compounds , chem icals known to the State of California
to cause cancer and reproductive harms. Wash hand s after
handling .
0 Note
When adding fluids, always make sure that the y are poured into the
proper container or filler opening, otherwise serious damage to
vehicle systems will occur .
<£' For the sake of the environment
To detect leaks in t ime, inspect th e ve hicle floor pan from unde r
neath regularly. If you see spots from oil or other vehic le fluids, have
you r ve hicle i nsp ected by a n authori zed Audi dealer .•
Engine compartment
Engine compartment
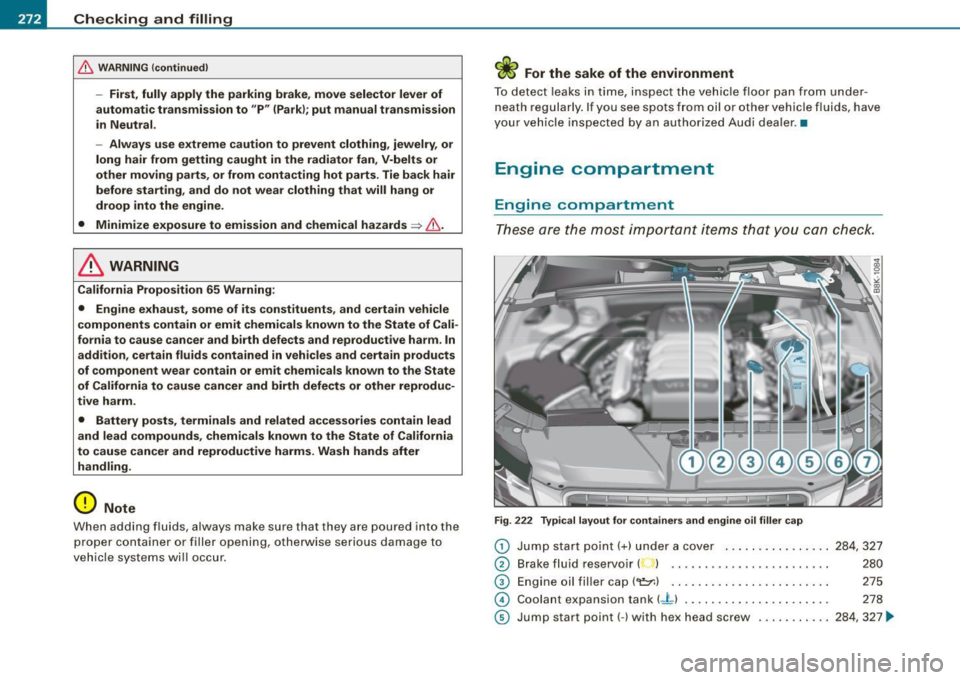
Thes e are the most impor tant items tha t yo u can check .
Fig. 22 2 Typic al l ayout for containe rs and engine oil filler cap
G) Jump start poin t(+ ) under a cover ..... .... .... ... 28 4, 327
® Brake fluid reservoir I l . . . . . . . . . . . . . . . . . . . . . . . . 280
© E ngine oil fi ller cap ("1:::r.l . . . . . . . . . . . . . . . . . . . . . . . . 275
0 Coolant expansion tank (-L l . . . . . . . . . . . . . . . . . . . . . . 278
© Jump sta rt point( -) with hex head screw ........ ... 28 4, 327 ~
Page 280 of 360

___ C_h_ e_ c_k _in --== g'-- a_n _d_ f_il _li _n ..:::g:::..- ___________________________________________ _
0 Note
• Before winter sets in, have the coolant checked to see if the
coolant additive in your vehicle is sufficient to meet the climate
conditions. This is especia lly important if you live in a region where
the winter is extremely cold. If necessary, increase the proportion of
coo lant additive to 60%.
• When adding coolant additive to your coo ling system,
reme mber:
- We recommend using only coolant additive G12+ + (check the
label) for your vehicle. This coolant addit ive is ava ilable at autho
rized Audi dealers . Other types of antifreeze can significantly
reduce corrosion protection . The resulting corrosion can cause a
loss of coolant and serious engine damage.
• Do not add any type of radiator leak sealant to your vehicle's
engine coolant . Adding radiator repair fluid may adverse ly affect the
function and performance o f your cooling system and cou ld result
in damage not covered by your New Vehicle Limited Warranty. •
Checking the engine coolant level
The engine coolant level can be checke d with a quick
glance.
Fig . 2 25 Engine
c omp artmen t: Coo la n t
e xpan sion tank
Be fo re y ou c heck anything in the e ngine compar tm en t,
always read and heed all WARNINGS==> & in "Working in
the eng ine compartment" on
page 271.
Tur n off the ignitio n.
- Let the engine coo l down.
P lace a th ick rag ove r the coola nt expans io n tank
==> fig. 225 and carefully twist th e cap counter-c lockwise
==> & .
Read t he e ngin e coola nt level i n the open coo la nt expan
sion tank==> fig. 225. W ith a cold eng ine, the coolant leve l
sho uld be bet ween the "m in" and "max" markings. W hen
t h e eng ine is warm, the level may be slightly above the
"max" marking .
The location of the coolant expansion tank can be seen in the
engine compartment illustration=>
page 272.
To obtain an accurate read ing, the engine must be switched off .
The expansion tank in your vehicle is equipped with an e lectric
coo lant leve l sensor.
When the coolant leve l is too low, the warning light in the Auto
Check System =>
page 30will blink until you add coolant and the
level has been restored to normal. Even though there is an electric
coo lant level sensor, we still recommend you check the co olant level
from t ime to time.
C oolant loss
Coolant loss may indicate a le ak in the cooling system . In the event
of coo lant loss, the co oling system should be inspec ted i mmedi
ately by your authorized Audi dealer. It is not enough mere ly to add
coo lant.
In a
s ealed system, losses can occur on ly if the boi ling point of the
coo lant is exceeded as a result of overheating. ...
Page 281 of 360

___________________________________________ C_ h_e _c_ k_ i_n _g _ a_n _d_ f_il _li _n _g __ ll'I
•
& WARNING
The cooling sy stem i s under pre ssure and can get very hot . Redu ce
the risk of scalding from hot coolant by following these steps.
• Turn off the engine and allow it to cool down .
• Protect your face, hands and arms from escaping fluid and
ste am by cover ing the cap with a large , thick rag .
• Turn the cap slowly and very carefully
in a counter -clockwise
dire ction while applying light , downward pressure on the top of
the cap .
• To avoid being burned, do not spill antifreeze or coolant on the
e x haust system or hot engine parts . Under certain conditions, the
ethylene glycol in engine coolant can catch fire .
0 Note
Do not add any type of radiator leak sea lant to your vehicle's engine
coolant. Adding radia to r repa ir flu id may advers ely affect the fu nc
tion and performance of your coo ling system and could res ult in
damage not covered by y our New Vehic le Lim ited War ra nty .•
Adding coolant
B e very care ful when ad ding e ngine cool ant.
Be for e you check a nything in the engine com partmen t,
always read and heed all WARNINGS~ & in "Work ing in
t h e eng ine compa rtment" on
page 271 .
-Tur n o ff th e en gine.
- Let the e ng in e cool d own.
- Plac e a thi ck rag over the coo la nt expansion tank
~ page 2 78 , fig. 2 25 and carefully tur n t he cap coun te r
cl ockwi se
~ &.
Add coo lan t.
- Twist the cap on aga in
tightly.
Replacement engine coolant must conform to exact specifications
~ page 2 77, "C oolant". Even in an eme rgency, if co olant addi tive
G12+ +, G12 + or G12 is not availab le, do not use a different additive.
U se pla in water ins tead until you can ge t the c orrect add itive and
can res tore the correc t rat io. Th is shou ld be done as soon as
p os sible.
I f y ou hav e los t a co ns ide rab le amou nt of coo la nt, then y ou should
add cold antifreeze and cold water only when the engine is cold .
A lways use
new e ngine c oolant w he n r efil ling .
D o not fill coolant a bove the " MAX" mark. Excess coola nt w il l be
forced out through the pressure relief va lve in the cap when the
eng ine becomes hot.
& WARNING
• The cooling system is under pressure and can get very hot .
Reduce the risk of scalding from hot coolant by following these
steps.
-Turn off the engine and allow it to cool down .
- Protect your face , hands and arms from escaping fluid and
steam by covering the cap with a large , thick rag .
- Turn the cap slowly and very carefully in a counter -clockwise
direction while applying light, downward pressure on the top
of the cap.
- To avoid being burned, do not spill antifreeze or coolant on
the exhau st system or hot engine parts. Under certain condi
tions, the ethylene glycol in eng ine coolant can catch fire .
• Antifreeze is poisonous. Always store antifreeze in its original
container and well out of the reach of children .
• If you dra in the coolant , it must be caught and safely stored in
a proper container clearly marked "poison ".
~
Vehicle care I t •