stop start AUDI A5 COUPE 2010 Owners Manual
[x] Cancel search | Manufacturer: AUDI, Model Year: 2010, Model line: A5 COUPE, Model: AUDI A5 COUPE 2010Pages: 360, PDF Size: 84.39 MB
Page 4 of 360
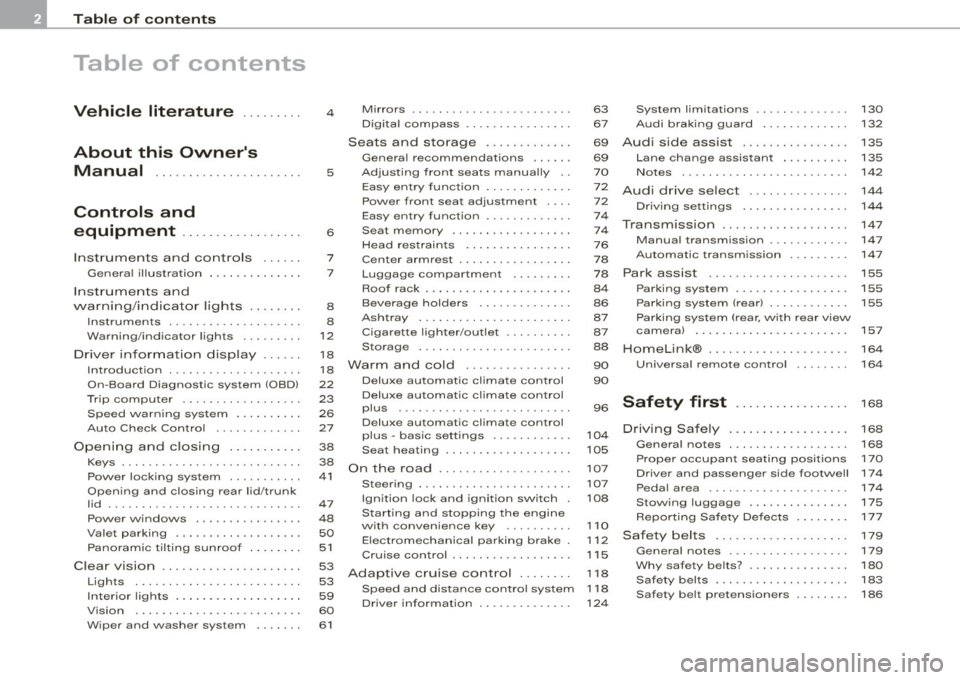
Table of contents
Table of contents
Vehicle literature ........ .
About this Owner's Manual ..... . .. ...... ....... .
Controls and
equipment ................. .
Instrumen ts and con trols ..... .
Genera l ill ustration ............. .
Ins trumen ts and
warning/indicat or lig hts ....... .
Instruments ... .... ........... . .
Warning/indicator lights ........ .
Driver in fo rma tion disp lay ... .. .
Introduction ... .......... ... ... .
On-Board Diagnostic system (OBD)
Trip compute r ................. .
Speed war ning system .... ..... .
Auto Chec k Control ... ... ...... .
Opening a nd closing ..... .... . .
Keys ..................... ..... .
Power loc king system .......... .
Opening and closing rear lid/trunk
lid ... ... ... ... ...... ......... . .
Power windows ... .... ... •.....
Valet pa rking .................. .
Pa no ramic t ilt in g sunroof ... ... . .
C lear v ision ............... ..... .
Lights ............. ........... .
Inter io r ligh ts .. ....... ....... .. .
V is ion ........................ .
Wiper and washer system ... ... .
4
5
6
7
7
8
8
12
1 8
1 8
22
23
26
27
38
38
41
47
48
50
51
53 53
59
60
61
Mirrors ... . ...... ...... ...... . .
Digital compass ............... .
Seats and storage ............ .
Genera l recommendations ..... .
Ad just ing fro nt sea ts manua lly ..
E asy entry funct ion ............ .
Power front seat ad justment ... .
Easy entry function ........ ... . .
Seat memory ................. .
Head res train ts ... ..... .. ... .. .
Center armrest ................ .
Luggage compartment . ... ... . .
Roof rack ................ ..... .
Beverage holders . .... ........ .
As htray ................ ...... .
Cigarette lighter/outlet .. .• .... ..
Storage ......... ......... ... . .
War m and cold ........... ... . .
Deluxe automat ic climate contro l
Deluxe automatic c limate control
plus ... ... ............ .... .. . .
Deluxe automatic c limate control
plus -basic settings ........... .
Seat heating ........... .. .. ... .
On the road .... ........... ... . .
Steering ... ... ......... ... ... . .
Ignition lock and ignition switch .
Starting and stopping the engine
with convenience key .. ...... . .
Elect romec hanical parking brake .
Cr uise control ................. .
Adaptive cruise control ....... .
Speed and distance con trol system
Drive r information ............. .
63
67
69
69
7 0
7 2
72
74
7 4
7 6
78
78
84
86
87
87
88
90
90
96
10 4
105
107
107
108
1 10
1 12
1 15
1 18
1 18
124
System limitations .. .... ... •....
Audi brak ing guard .. .......... .
Audi side assist ............... .
Lane change assistant ......... .
No tes ........................ .
Audi drive select ..... ..... .... .
Driv ing settings ............... .
Transmission .............. ... . .
Manua l transmission ........... .
Automatic transm ission ........ .
Park assist .................... .
Parking system .. ... ... ... ... .. .
Parking system (r ear) ........... .
Parking system (rear, w ith rear view
camera) ...................... .
HomeLink® .................... .
Universal remote control
Safety first ...... ...... .... .
Driving Safe ly . ....... ..... .... .
General notes ................ . .
Prope r occupan t seating pos it ions
Driver and passenger side footwe ll
Peda l area ...... ... ........... .
Stow ing luggage .......... .... .
Report ing Safety Defects ... .... .
Safety belts ................... .
General notes ....... ...... .... .
Why safe ty be lts? .......... .... .
Safety belts ............... .... .
Safety belt pretensioners ....... .
130
132
135
135
142
144
144
147
147
147
155
155
155
157
164
164
168
168
168
170
174
17 4
175
17 7
179
1 7 9
180
183
186
Page 9 of 360
Instruments and controls
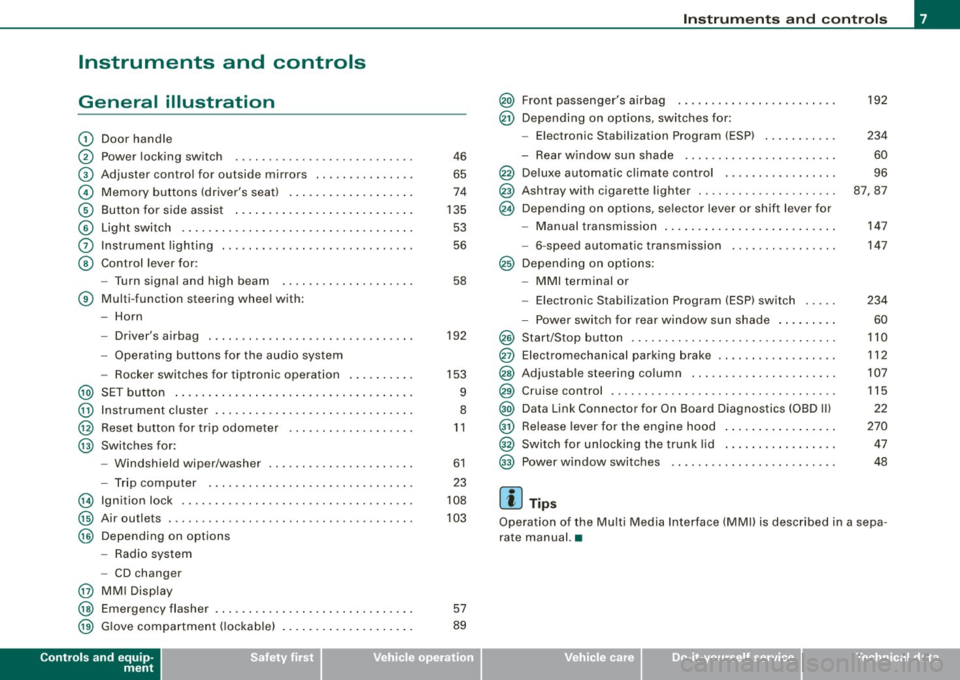
General illustration
G)
0
©
©
©
©
0
©
Door handle
Power locking switch
Adjuster contro l for outside mi rrors .. ...... ...... .
Memory buttons (driver's seat) .. ....... ...... ... .
Button for side assist ..... .... ... .. ...... ... ... .
Light switch .. ...... ....... ... ... .. .... ....... .
Instrument lighting ...... ..... .. .... .... ...... . .
Control lever for :
- Turn signal and high b eam
® Multi -function steering wheel with:
- Horn
-Driver's airbag .... ..... .. .... .... .... .... ... .
- Operating buttons for the audio system
- Rocker swi tches for tiptronic operation ...... ... .
@ SET button ..................... .... .......... .
@ Instrument cluster . ...... ........ .............. .
@ Reset button for trip odometer ... ...... ...... ... .
@ Swi tches for:
@
@
@
@
@
@
- Windshield wip er/washer ............. ... .. ... .
- Trip computer ..... .. .... .... ...... .... ... .. .
Ign ition lock .... .... .... ...... .... ... ... ... ... .
Air ou tlets ........... .... ..... ........... ... .. .
Depend ing on options
- Radio system
- CD changer
MM I Display
Emergency flasher
G love compartment ( lockab le)
Controls and equip
ment
46
65
74
135 53
56
58
192
153
9
8
11
61
23
108
103
57
89
Instruments and controls
@ Front passenger's airbag ......... ... .... .... ... .
@ Depending on options, switches for:
@
@
@
@
@
@
@
@
@
@
@
@
- Elect ron ic Stabilization Program (ESP) ..... .. .. . .
- Rear window sun shade ..... ... ... ... ... .. ... .
Deluxe automatic climate control . .... .... .... ... .
Ashtray with cigare tte lighter ..... ...... .. .... ... .
Depending on options, selector lever or shift l ever for
- Manual transmission ........ .... ....... .. . ... .
- 6-speed automatic transmission
Depending on options:
- MMI terminal or
- Electronic Stabil ization Program (ESP) switch
- Power switch for rear window sun shade ........ .
Start/Stop button .... .... ... .... .... .... .... ... .
Elect romechanical parking brake ... .... .... ...... .
Adjus tab le ste ering column .. ...... ...... ..... .. .
Cruise control .... ... .... .... .... .... .... ... ... .
Data Link Connector for On Board Diagnostics (OBD Ill
Release lever for the engine hood ........ ........ .
Switch for unlocking the trunk lid ...... .... .. .. .. .
Power window switches
[ i ] Tips
192
234
60
96
87,87
147
147
234
60
110
112
107
115
22
270 47
48
Operation of the Mu lti Media Interface (MMll is described in a sepa
rate manual. •
I • •
Page 15 of 360
& WARNING
• Failure to heed warning lights and other important vehicle
information may result in serious personal injury or vehicle
damage .
• Whenever stalled or stopped for repair, move the vehicle a safe
distance off the road, stop the engine, and turn on the emergency
flasher =>
page 57.
• The engine compartment of any motor vehicle is a potentially
hazardous area. Before you check anything in the engine compart
ment, stop the engine and let it cool down . Always exercise
extreme caution when working under the hood =>
page 263,
"Engine compartment ".
[ i] Tips
Many functions are monitored by the Auto-Check system
=>
page 27. Malfunctions or faults will be identified either with a red
symbol (priority 1 -Danger!) or with a yellow symbol (priority 2 -
Warning). •
Applies to vehic les: with Audi dr ive select
Dynamic steering c
If the indicator light illuminates when switching on the ignition
and goes out when the engine starts, dynamic steering is activated.
If the indicator light '.,,; illuminates after the engine starts, a system
malfunction has occurred. You can continue to drive carefully at a
reduced speed to a qualified workshop. Steering can be more diffi
cult or sensitive than usual. The steering wheel may also be at an
angle when driving straight.
Controls and equip
ment
Instruments and warning/indicator lights
& WARNING
Have the dynamic steering system malfunction repaired as soon
as possible by an authorized Audi dealer or any qualified work
shop -risk of accident!
[ i] Tips
• If the indicator light 6 flashes, dynamic steering is being re
initialized. The driver information system display shows the words
"Dynamic steering: initialization"=>
page 33.
• The dynamic steering stability systems are not available in the
event of a system malfunction. •
Electronic power control r.
This warning/indicator light monitors the electronic
power control.
The warning/indicator light (Electronic Power Control) illumi-
nates when you turn on the ignition as a function check.
[ i] Tips
If this warning/indicator light illuminates while you are driving, then
there is a malfunction in the engine electronics . Have the malfunc
tion corrected as soon as possible by your authorized Audi dealer or
qualified workshop. •
Electronic stabilization program (ESP)
If the ~ indicator lamp blinks while driving, the ESP or ASR (Anti
Slip Regulation) is actively regulating.
If the indicator lamp illuminates, the system has switched the
ESP off. In this case, you can switch the ignition off and then on to .,_
I • •
Page 18 of 360
Instruments and warning/indicator lights
Malfun cti on in the ele ctronic differ ential lo ck (EDL )
The
ED L works t oget her with the ABS. T he ABS warning light w ill
come on if there is a ma lfunction in the
ED L system=> page 235 . See
your au thorized A ud i dea ler as soon a s possible.
& WARNING
• If the ,..,1 (USA models )/;:_,,. (Canada models) warning light
does not go out , or if it comes on while driving , the ABS system is
not working properly. The vehicle can then be stopped only with
the standard b rake s (w ithout ABS ). You will not have the p rotec
tion ABS provides. Contact your authorized Audi dealer as soon as
po ssible .
• USA model s: If the BRAKE warning light and the l:i warning
light come on together, the rear wheel s could lock up first under
hard braking . Rear wheel lock-up can cause lo ss of vehicle control
and an ac cident. Have your vehicle repaired immediately by your
authori zed Audi dealer or a qualified workshop . Dr ive slowly and
avoid sudden , hard brake applications .
• Canada models : If the brake warning light «I» and the ABS
warning light
~ come on together , the rear wheels could lock up
first under hard braking . Rear wheel lock-up can cause loss of
vehicle control and an accident. Have your vehicle repaired imme
d iately by your authorized Audi dealer or a qualified workshop .
Drive slowly and avoid sudden , hard brake applications. •
Electromechanical parking brake
~[ (USA models) /(®) (Canada models)
The wa rning/in dic at or l ight m oni tors the elec tromechan
i c a l p arkin g bra ke.
With the parking brake applied and the ignit ion turned on, the
war ning/ ind icator lig ht illu min a te s. After the ig nition has been
turned off, the warning/indicator light continues to i llum inate for
abo ut 3 0 seconds. If the parking bra ke is applied with the ignition turned off, the warning/indicator light i
lluminates for about 30
s e co nd s.
Th e warning/ind icator light wi ll go out when the parking brake is
r eleased .
I f the warn ing/indica tor l ight flas hes con tinuously
after applying the
par king brake, bra king force is not sufficient to prevent the vehicle
from rol lin g uninten tiona lly . Please n ote the fo llowing:
• I f the slope of the ground is too steep to park the vehicle, the
additiona l drive message a ppea rs
Caution: Vehicle parked too
steep .
• In the event of a pa rking brake ma lfunction, the yel low symbol
appears in the instrument c luster display and the driver message
Parking brake malfunction! is displayed . Have the malfunction
r epaired as soon as possib le by an aut hor ized Audi dea ler or any
other qua lified workshop. •
Brake system BRAKE (USA models) /((D) (Canada
models)
The warning/indicator light fl ashes if bra ke fluid level is
low, if there is an A BS sys tem mal function or a parking
brake malfun ctio n.
T he li ght illu minates w hen t he ignitio n is tur ned on. It goes out afte r
the engine has been started . T his indicates that the brake warning
li ght is fu nctioni ng prope rly.
l9 If the brake warning l ight does not lig ht up when the eng ine is
cranking , there may be a malfunction in the electrical system. In this
case , contact an authori zed Audi dealer .
If the brake system warning/indicator light flashes, there is a brake
system ma lfunc tion . By press ing t he
[SE T) button, you ca n brin g up
a driver message which explains the ma lfunction in more detai l
=>
p age 29. ~
Page 33 of 360
& WARNING
• If your vehicle should break down for mechanical or other
reasons, park at a safe distance from moving traffic, turn off the
engine and turn on the hazard warning lights
=> page 57, "Emer
gency flashers
A".
• Never open the hood if you see or hear steam or coolant
escaping from the engine compartment -you risk being scalded.
Wait until you can no longer see or hear steam or coolant
escaping.
• The engine compartment of any vehicle is a dangerous area .
Before you perform any work in the engine compartment, turn of
the engine and allow it to cool . Follow the warning stickers
=> page 263, "Engine compartment".
0 Note
Do not continue driving if the -F-symbol illuminates. There is a
malfunction in the engine cooling system -you could damage your
engine .•
Engine oil pressure malfunction 9=::7-
The red engine oil pressure warning symbol requires
immediate service or repair. Driving with a low oil pres
sure indication is likely to cause severe engine damage.
If the ~ symbol on the display flashes, the engine oil pres
sure is too low. A driver message appears as well to explain
the malfunction in more detail. The driver warning goes out
after about 5 seconds, but it can be brought up at any time
by pressing the [SET] button again.
Switch off engine and check oil level
- Stop the vehicle.
Controls and equip
ment
Driver information display
Turn the engine off.
- Check the brake fluid level=>
page 275.
Seek professional assistance if necessary.
Engine oil level too low
If the engine oil level is too low, add engine oil=> page 275.
Engine oil level correct
If the symbol "t::7-flashes even though the engine oil level is correct,
please seek professional assistance. Do not continue driving . Do not
leave the engine running
idle, either.
[ i] Tips
• The engine oil pressure symbol "t::7-is not an indicator for a low
engine oil level. Do not rely on it. Instead, check the oil level in your
engine at regular intervals, preferably each time you refuel, and
always before going on a long trip .
• The yellow oil level warning indication .,... requires oil refill or
workshop service without delay. Do not wait until the red oil pres
sure warning
"t::7-starts to flash before you respond to the low oil
level warning . By then, your engine may already have suffered
serious damage. •
Fill engine oil now ~ ..
~-Please replenish oil now
If the ~ symbol lights up, then the oil has to be replenished right
now =>
page 275. •
I • •
Page 34 of 360

Driver information display
Steering malfunction ~-
If there is a malfunction in the electronic steering column
lock, the steering cannot be unlocked.
If the @- symbol in the display blinks, there is a malfunc
tion in the electronic steering column lock. A driver
message appears as well to explain the malfunction in more
detail. The driver warning goes out after about 5 seconds, but it can be brought up at any time by pres sing the [SET]
button again.
Stop the vehicle and turn off the engine. Steering
defective
- Obtain professiona l assistance.
- Do
not tow your vehicle .
& WARNING
Your vehicle must not be towed in the event of a malfunction in the
electronic steering column lock because it cannot be steered due
to the locked steering. If it is towed with the steering locked , there
is the risk of an accident.
[ i ] Tips
The symbol's appearance might be different in some models.•
Ignition lock malfunction ©-
A malfunction in the ignition lock must be repaired imme
diately.
If the ©- symbol in the display blinks, there is a malfunction
in the electronic ignition lock. A driver message appears as
well to explain the malfunction in more detail. The driver warning goes out after about 5 seconds,
but it can be
brought up at any time by pressing the (SET] button again
Defective ignition switch Get it serviced!
-Do not turn the engine off.
- Drive immediately to an authorized service facility to
have the malfunction corrected.
If there is a malfunction in the electronic ignition lock, the ignition
cannot be turned off . Drive immediately to an authorized service
facility to have the cause of the ma lfunction corrected.
On vehicles with convenience key*, the engine should not be
switched off using the start/stop button because the engine cannot
be started again after the ignition has been switched off.
[ i ] Tips
The symbol's appearance might be different in some models. •
Yellow symbols
A yellow symbol means WARNING.
-en
9 a: gi
Fig. 27 Display: Yellow
warning symbol
Yellow symbols indicate a priority 2 malfunction -Warning!
Page 36 of 360
Driver information display
more difficult or sensitive than usual. The steering wheel can also
be at an angle when driving straight.
Dynamic steering: initialization
If this driver message appears and the indicator light is flashing
on the instrument panel, dynamic steering is being reinitialized.
Once you start the engine after this is finished, the steering wheel
wi ll be easy to move. Re-initialization might be necessary if the
steering whee l was moved hard to the left and right while the
vehicle was not moving. The display goes out as soon as initializa
tion is complete .
& WARNING
Have the dynamic steering system malfunction repaired as soon
as possible by an authorized Audi dealer or any qualified work
shop -risk of accident!
[ i ] Tips
The dynamic steering stability systems are not available in the event
of a system malfunction. •
Applies to vehi cles: wit h conven ienc e key
Key not in vehicle
Key not in vehicle
This reminder appears along with the symbol if the master key is
removed from the vehicle with the engine running. It is intended to
remind you (e .g. when changing drivers) not to continue the journey
without the master key.
If the master key is no longer in the vehicle, you cannot switch off
the ignition after stopping the engine and you also cannot start the
engine again . You also cannot lock the vehicle from the outside .•
Ap plies to vehi cles : w it h li ght/ ra in sensor
Light /rain sensor defective C../1
...i-Automatic headlights /automatic wipers defective
If the symbo l il luminates, the light sensor has failed . For safety
reasons the low beams are turned on permanently with the switch
in
AUTO . However, you can continue to turn the lights on and off
using the light switch. In the case of a defect in the rain sensor, the
windshie ld wiper lever functions are still available. Have the
light/rain sensor checked as soon as possible by an authorized Audi
dea ler. •
Worn brake pads
Brake pads!
If the warning light illuminates, immediately contact your autho
rized Audi dealer or qualified workshop to have all brake pads
inspected . On USA models the warning light 't comes on together
with the warning light
BRAKE . Both sets of brake pads on an axle must
a lways be replaced at the same time .
& WARNING
Driving with bad brakes can cause a collision and serious personal
injury.
• If the warning light and the warning lig ht
BRAKE1
l with the
message Brake pads! comes on in the instrument cluster display ,
immediately contact your authorized Audi dealer or qualified
workshop to have all brake pads checked or replaced if
necessary .•
1 1 BRAK£ : USA models only
Page 76 of 360
Seats and storage
Applies to vehicles: with power adjustable seats
Easy entry function
The easy entry function makes it easier for the rear
passengers to enter and leave the vehicle.
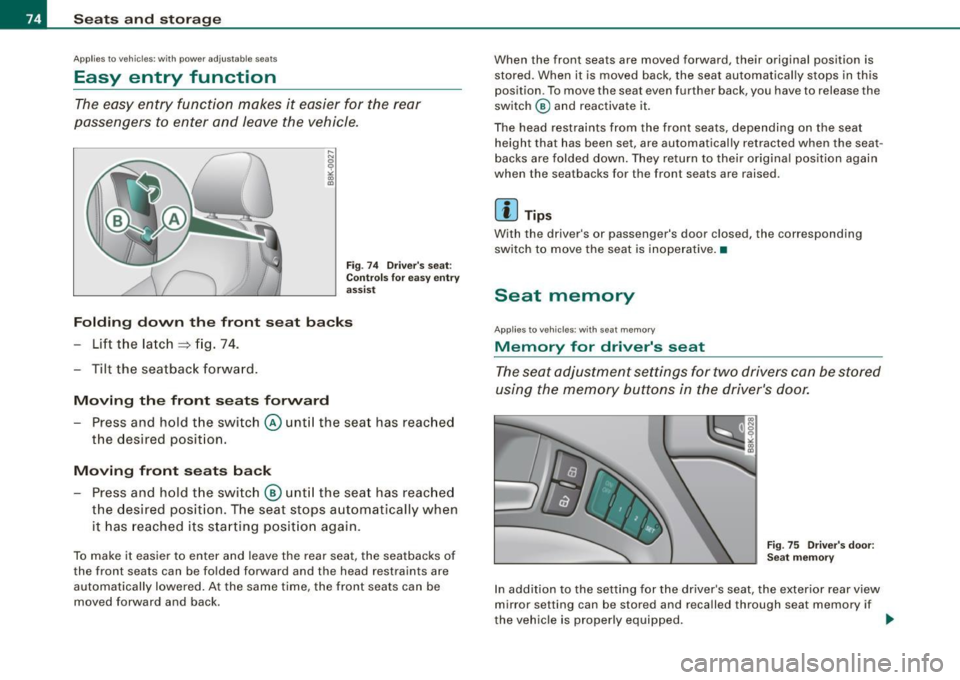
Fig. 74 Driver's seat:
Controls for easy entry
assist
Folding down the front seat backs
- Lift the latch
~ fig. 74.
- Tilt the seatback forward.
Moving the front seats forward Press and hold the switch
© until the seat has reached
the desired position.
Moving front seats back
- Press and hold the switch
@ until the seat has reached
the desired position. The seat stops automatically when
it has reached its starting position again.
To make it easier to enter and leave the rear seat, the seatbacks of
the front seats can be folded forward and the head restraints are
automatically lowered. At the same time, the front seats can be
moved forward and back. When
the front seats are moved forward, their original position is
stored. When it is moved back, the seat automatically stops in this
position . To move the seat even further back, you have to release the
switch
@ and reactivate it.
The head restraints from the front seats, depending on the seat height that has been set, are automatically retracted when the seat
backs are folded down. They return to their original position again
when the seatbacks for the front seats are raised.
[ i ] Tips
With the driver's or passenger's door closed, the corresponding
switch to move the seat is inoperative. •
Seat memory
Applies to vehicles: with seat memo ry
Memory for driver's seat
The seat adjustment settings for two drivers can be stored
using the memory buttons in the driver's door.
Fig. 75 Driver 's door:
Seat memory
In addition to the setting for the driver's seat, the exterior rear view
mirror setting can be stored and recalled through seat memory if
the vehicle is properly equipped. .,
Page 91 of 360

Glove compartment
The glove compa rtmen t is illumin ated an d can be Jocke d.
To open glove compartment
Fig . 97 Glov e comp art
m ent
- Pull t he handle i n th e direc tion o f the arrow =:> fig. 97 and
swing t he cover down to open .
To close glove compartment
-Push the glove compartment lid upward unt il the loc k
engages.
T here are holders for a pen and a pad of paper in the glove compart
ment l id .
On the right side in the glove compartment is a holder with the key
b ody into which the emergency key must be clipped to be a ble to
start the vehicle .
& WARNING
To reduce the risk of personal inju ry in an a ccident or sudde n stop ,
alway s keep the glove compartment closed while driving . •
Con tro ls and eq uip
ment
Seats and storag e
Storage compartment in the roof
,.,,,O;E\ 11111
fl([]') G)
o .. o
!.---~\.;;;;;;;;. ] Fig. 98 Storage p ocket
in th e roof
- T o open t he li d yo u have to tou ch the bar =:> fig. 98
(Ar row). T he lid opens a utom atic ally.
- To close the lid, push i t up un til it enga ges.
& WARNING
Alway s keep the lid closed while driving to reduce the risk of injury
during a sudden braking maneuver or in the event of an a ccident. •
Coat hooks
The coat hooks are lo cated on the side on t he pillar in the
rear.
& WARNING
• Make sure that hanging clothing doe s not obscure the view to
the rear .
• Hang only lightweight clothing and be sure that there are no
heavy or sharp -edged object s in the po cket s.
• Do not u se co at hanger s to han g the clothing otherwi se the effi
c a cy of the head a ir b ags* is compromi sed. •
Vehicle care
I I irechnical data
Page 110 of 360

• ..__O_ n_ t_h _ e_ r_ o_ a_ d ____________________________________________________ _
Ignition lock and ignition switch
Starting engine with the key
The ignition is switched on and the engine started with
the ignition key.
Fi g. 11 7 Ignit ion key
Insert the key into the ignit ion lock .
Manual transmission : Fully depress the clutch pedal a nd
move t he shi ft lever to the neutra l posi tion .
Automatic transmission*: Step on the brake peda l and
move the selector lever to the
P or N posit ion.
Press the key=::> fig . 117 -the eng ine will sta rt.
By pressing the key w ithout stepping on the clutch or the brake, the
ign ition is switched on and off. With the ignition on, the steering
whee l is unlocked.
You can only remove the key with the ignition switched off. To do
this, you have to press on the key again. With an automatic trans mission, the selector lever m ust be in the
P position.
When starting the engine, major electrical loads are switched off
temporarily. After starting a cold engine
, there may be a brief period of increased
noise because the o il pressure must first build up in the hydraulic
valve adjusters . This is normal and not a cause for concern .
I f the engine should not start immediately, the starting process is
automatically stopped a fter a short t ime . Repeat starting procedure.
Driv er me ssage in the instrument clust er di spl ay
Pre ss b rake ped al to s ta rt engine
This message appears if you do not step on the brake pedal to start
the engine on a vehicle with an automatic transmission .
Press clut ch pedal to sta rt engine
T his message appears if you do not step on the c lutch peda l to start
the engine on a vehicle with a manua l transmission .
Engage N or P to start engine
This message appea rs when attempting to start the engine if the
selector lever for the automatic transmission is not in the
P or N
position . The engine can only be started with the selec tor in these
positions.
S hift to P, othe rwis e veh icle can roll away. Doors do not lock if le ver
is not in
P.
This message appears for safety reasons along with a warning
signal. It appears if the selector lever for the automatic transmiss ion
is not in the
P p o sition after the ign it ion is switched off. Move the
selector lever to the
P position, otherwise the vehicle is not secured
aga inst ro lling away. You a lso cannot l ock the vehicle using the
locking bu tton on the door handle or using the remote key .
& WARNING
• Always take the key with you wheneve r you leave yo ur vehi cle .
Otherwi se , the engine could be start ed or electr ical equipment
s u ch as the po wer windows could be oper ated . Th is ca n lead to
seri ous injury.