jump cable AUDI A5 COUPE 2011 Owners Manual
[x] Cancel search | Manufacturer: AUDI, Model Year: 2011, Model line: A5 COUPE, Model: AUDI A5 COUPE 2011Pages: 362, PDF Size: 84.88 MB
Page 5 of 362
Stowing Luggage ........... ... 177
Repor ting Safe ty Defects . . . . . . . 179
Safety be lts . . . . . . . . . . . . . . . . . . . 181
General no tes ........ ......... 181
Why safety belts? . . . . . . . . . . . . . 182
Safety belts . . . . . . . . . . . . . . . . . . 185
Safety belt pretensioners . . . . . . . 188
Airbag system ................ 190
Important th ings to know ...... 190
Front airbags ................. 194
Mon ito ring the Advanced A irbag
System ...................... 201
Knee ai rbags . . . . . . . . . . . . . . . . . . 206
Side airbags . . . . . . . . . . . . . . . . . . 209
Side curtain airbags ......... ... 212
Chil d Safe ty ................... 215
I mportant things to know ...... 215
Child safety seats ............. 221
Installing a child safety seat . . . . 225
LATCH Lowe r ancho rages and
tether for children . . . . . . . . . . . . . 229
Add it ional Informat ion
234
Vehicle operation ...... 236
Intelligent technology . . . . . . . . 236
Notice abo ut data recorded by
vehicle contro l modu les . . . . . . . . 236
E lect ronic s tab iliza tion Program
(ESP) . . . . . . . . . . . . . . . . . . . . . . . . 236
Braking ...................... 239
Servotronic ® -advanced power
steer ing sys tem . . . . . . . . . . . . . . . 242
Dr iving with your quattro ® . . . . . . 242
Energy management . . . . . . . . . . . 243
Controls and equip
ment Safety first
Driving
and environment ..... 246
The first 1,000 miles (1,500 km)
and afterwards . . . . . . . . . . . . . . . 246
Avoid damaging the vehicle 247
Dr iving through water on roads . 247
Ca talytic conve rter . . . . . . . . . . . . 247
Operate your veh icle economica lly
and m inimize po llution . . . . . . . . 24 8
Trailer towing . . . . . . . . . . . . . . . . 251
Dr iving wi th a trailer . . . . . . . . . . . 251
T railer tow ing tips . . . . . . . . . . . . . 253
Vehicle care .............. 2s6
Clea nin g and protect ion ...... 256
General information . . . . . . . . . . . 256
Care of exterior . . . . . . . . . . . . . . . 256
Care of interior . . . . . . . . . . . . . . . 263
Fuel supply and filling your fuel
tank .......................... 269
Gasol ine . . . . . . . . . . . . . . . . . . . . . 269
F u el tank .................... . 270
Checking and filling . . . . . . . . . . . 274
Eng ine hood . . . . . . . . . . . . . . . . . . 274
Engine compartment . . . . . . . . . . 276
Engine oil . . . . . . . . . . . . . . . . . . . . 277
Engine cooling system . . . . . . . . . 281
Brake fluid . . . . . . . . . . . . . . . . . . . 284
Bat tery . . . . . . . . . . . . . . . . . . . . . . 285
W indshield/headlight* washer
container . . . . . . . . . . . . . . . . . . . . 290
Tires and wheels .............. 291
Tires 291
T ir e pressure monitor ing system 310
Table of contents
Do-it-yourself service
What do I do now? .......... .
Vehic le tool k it ........ ...... .
Space -saving spare tire (compact
spare tire)* ....... ........ ... .
Cha nging a whee l ........... . .
Fuses and bulbs ......... .... .
Fu ses ... ......... .......... .
Bulbs ...................... .
Emergency situations ....... .
General . ........... ......... .
Starti ng by pushing or towi ng ..
Starting with jumper cables ... .
Use of jumper cables ......... .
Emergency towing w ith
commercial tow truck ........ .
Lif ting vehicle ............... .
Technical data
General information
Explana tion of technica l da ta .. .
Vehicle ident ification ......... .
Weights .................... .
Dimensions ................. .
Data ................ ... ...... .
211 hp, 2.0 Liter 4-cyl. engine .. .
Consumer Information ...... .
Warranty coverages .......... .
Operating your vehicle outside the
U.S.A . or Canada ............. .
Audi Service Repair Manuals and
Literature ................... .
Maintenance ............... . . 314
314
314
314
316
323
323
327
328
328
328
328
329
331
333
336
336
336
336
337
337
339
339
340
340
340
340
340
Vehicle operation
Vehicle care Do-it-yourself service Technical data
Page 290 of 362
___ C_h_ e_c _k _i_n -=g :a,__ a_n_ d_ f_ i_ l _li _n _,g;._ __________________________________________ _
& WARNING
California Proposition 65 Warning:
• Battery post s, terminal s and related ac cess orie s co ntain lead
and lead compounds, chemicals known to the State of California
to caus e cancer and reprodu ctive pr oblem s. Wa sh hand s after
handling .
0 Note
• Do not disconnect the vehicle battery when the ignition is
switched on or when the engine is running, otherwise, you wi ll
damage electro nic components in t he e lectr ical system .
• If your ve hicle is go ing to st and for a long per iod of time witho ut
being d riven, protect the battery from "freezing", ot herw ise it will be
damaged and will then have to be replaced. •
Battery charging
Starting the engine requires a well charged battery .
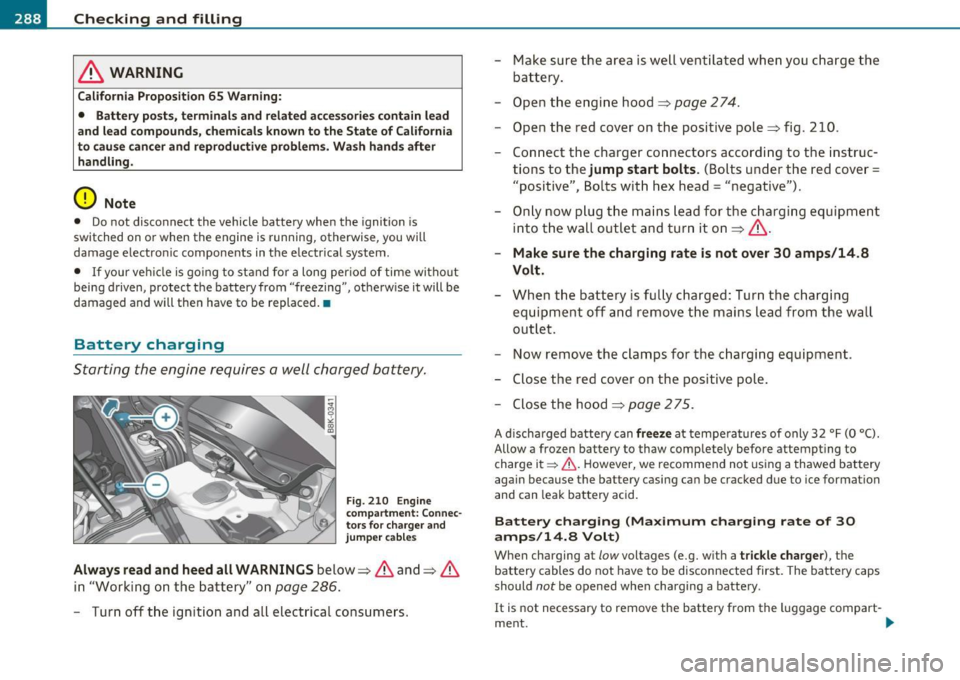
Fig. 21 0 En gine
c om partme nt: C on nec
t or s fo r ch arge r and
jump er ca bles
Always read and heed all WARNINGS below ~ & and ~ &
i n "Work ing o n the batte ry" on
page 286 .
-Turn o ff t he ign it ion and all electrica l cons umers. -
Make sure the area is well vent ilate d wh en you c harge the
ba ttery .
- Open t he e ngi ne hood =?
page 274.
- O pen the red cover on the positive pole =? fig. 21 0.
- Con nect the charger con nectors accordi ng to the instruc-
tions to the
jump start bolts . (B olts un der the red cover =
"positive" , Bo lts w it h hex head = "negative") .
- Only now p lug t he ma ins lead for t he c har ging equipme nt
i n to t he wall outlet and tu rn it on ~ & .
-Make sure the charging rate is not over 30 amps /14 .8
Volt.
- When t he batte ry is fu lly c harged: Tu rn the cha rg ing
eq uipment o ff an d
remov e the main s le ad from the wa ll
out let.
- Now remove the clamps for the charging equipment.
- Close the re d cover on the positive pole .
Cl ose the hood ~
page 2 75.
A d ischa rged b atte ry can freeze at t empe ra tures of only 3 2 °F (0 °( ).
Allow a fro zen ba ttery to thaw comp letely before attempt ing to
c harge it =:, & . H owever, we recomme nd not using a thawed b attery
again because the battery casing ca n be cracked due to ice formation
and can leak b attery a cid.
Battery charging (Ma ximum charging rate of 30
amp s/14.8 Volt)
When charging at low vol tages (e.g. w ith a trickle charger ), the
b attery cables do not have to be disconnected first. The batte ry caps
should
not be opened when charging a batte ry .
It is not necessary to remove the battery from the luggage compart-
ment.
~
Page 330 of 362
lffll.___E_ m_ e_ r-' g=- e_n_ c=-y _ s_it _ u _ a_t_ i_ o _ n_ s ______________________________________________ _
Emergency situations
General
This chapter is intended for trained emergency crew s and working
pe rsonnel who have the necessary tool s and equipment to perform
the se operation s. •
Starting by pushing or towing
0 Note
Veh icles with an automatic transmission cannot be started by
pushing or towing .•
Starting with jumper cables
If necess ary, the engine can be started b y connectin g it to
t he bat tery of another vehicle.
If the e ng ine shou ld fa il to start because of a discharged or weak
battery, the batte ry can be connected to t he battery of
another
veh icle, us ing a pair of jump er cables to start t he eng ine .
Jumper cables
Use only jumper cables of suffic iently large cross section to carry the
sta rter cur rent s afely . Refer to the m an ufa ct ur er's specificat ions.
Use only j umpe r cab les with
insulated te rmi nal clamps wh ich are
distinct ly marked :
plu s(+) cable i n most cases colored red
minus (-) cable i n most cases colored black .
& WARNING
Batterie s contain el ectricity, acid, and gas . Any of the se can cause
very serious or fatal injury. Follow the inst ructions below for safe
handling of your vehicle 's battery.
• Always shield your eyes and avoid leaning over the battery
whenev er po ssible .
• A discharged battery can freeze at temperatures just below
32 °F (0 °C ). Before connecting a jumper cable, you must thaw the
frozen battery completely, otherwise it could explode.
• Do not allow battery acid to contact eyes or sk in . Flush any
contacted area with water immedi ately .
• Improper use of a booste r battery to start a vehicle may cause
an explosion .
• Vehicle batteries generate e xplosive gases. Keep sparks, flame
and lighted cigarettes away from batterie s.
• Do not try to jump start any vehicle with a low acid level in the
battery.
• The voltage of the booster battery must also have a 12-Volt
rating. The capacity (Ah) of the booster battery should not be
lower than that of the discharged battery . Use of batteries of
different voltage or substantially different "Ah " rating may cau se
an e xplosion and personal injury.
• Never charge a frozen battery . Gas trapped in the ice may cause
an explosion.
• Never charge or use a battery that has been frozen. The battery
case may have be weakened .
• Use of batteries of different voltage or substantially different
capacity (Ah) rating may cause an explosion and injury . The
capacity (Ah) of the booster battery should not be lower than that
of the discharged battery. .,_
Page 331 of 362
_____________________________________________ E_ m___;, e_r-=g ~ e_ n_c,_:!y:.__: s_i:..:t ..:..u :..:a;;,. t.:.; i...: o :..: n...:..:. s _ __,J_
& WA RNING (co ntinued )
• Before you che ck anything in the engine compartment , always
read and heed all WARNINGS~
page 267, "Engine compart
ment ".
0 Note
• App lying a higher vo ltage booster battery will cause expensive
damage to sens itive e lec tron ic components, such as contro l units,
re lays, rad io, etc.
• Th ere must be no electrical contac t between the vehicles as othe r
wise current could a lready start to flow as soon as the posit ive(+)
t erm inals are con nected.
[I] Tips
• Th e discharged ba tte ry mus t be properly co nnecte d to the
vehicle's electrical system . When jump starting or charging the
bat tery, never connec t the negat ive ground cable to the batte ry nega
tive post because the battery manager system must be able to detect
t he battery's state of charge . Always connect the negative ground
cable to the negative ground post of the battery manage r contro l
unit. •
Vehicle OP-eration
Use of jumper cables
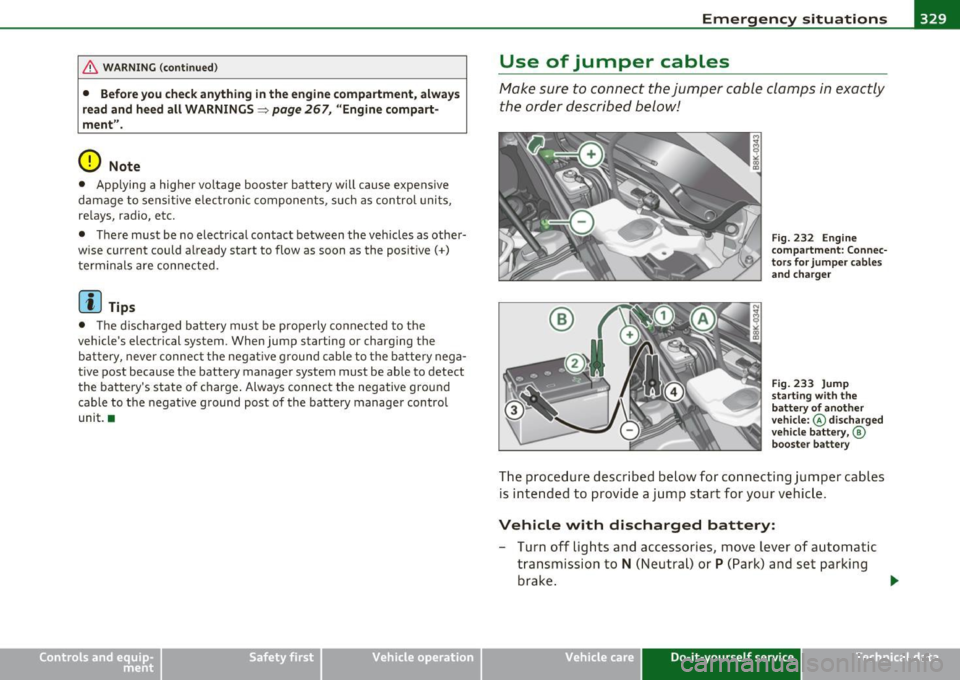
Make sure to conne ct the jumper c able clamps in e xactly
the order described bel ow!
Fig. 232 Engine
c omp artment : C on nec
t o rs for jum per cable s
a nd ch arger
Fi g. 233 J ump
st arti ng with th e
battery of anot her
ve hicl e:@ disc harged
v ehi cle batt ery ,©
bo oste r batte ry
T he p roced ure descr ib ed below for co nnecting jumper cables
is intended to provide a j ump start for yo ur veh icle.
Vehicle with discharged battery:
- Turn o ff ligh ts an d accessories, move lever o f au tomatic
t ra nsmission to
N (Ne utral) o r P (P ark) and s et parking
brake .
~
Vehicle care Do-it-yourself service iTechnical data
Page 332 of 362
lffl!I.___E_ m_ e_r -=g =- e_ n_c -=y ;..._ s_i_t _u _a _ t_ i_ o _ n_ s ____________________________________________ _
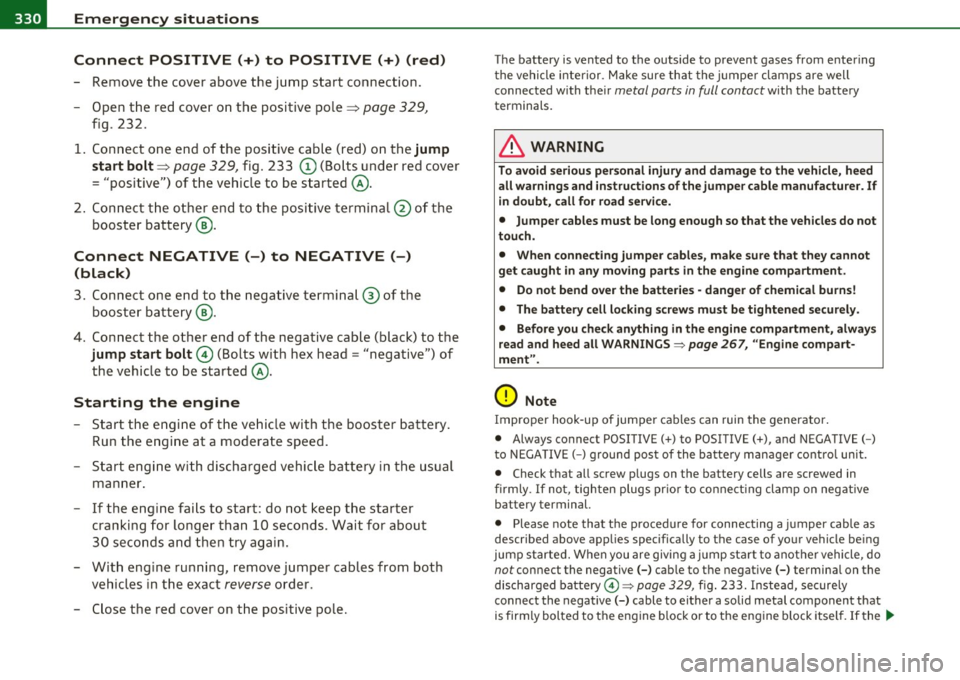
Connect POSITIVE(+) to POSITIVE(+) (red)
- Remove the cover above the jump start connection .
- Open t he red cover on the positive pole~
page 329,
fig. 232.
1. Connect one end of the positive cable (red) on the
jump
start bolt~
page 329, fig. 233 (D (Bolts under red cover
= "positive") of the vehicle to be started @.
2. Connect the other end to the positive terminal @of the
booster battery ®·
Connect NEGATIVE(-) to NEGATIVE(-)
(black)
3. Connect one end to the negative terminal ® of the
booster battery @.
4. Connect the other end of the negative cable (black) to the
jump start bolt© (Bolts with hex head = "negative") of
the vehicle to be started @.
Starting the engine
- Start the engine of the vehicle with the booster battery.
Run the engine at a moderate speed.
- Start engine with discharged vehicle battery in the usual
manner.
- If the engine fails to start: do not keep the starter cranking for longer than 10 seconds. Wait for about
30 seconds and then try again.
- With engine running, remove jumper cables from both
vehicles in the exact
reverse order .
- Close the red cover on the positive pole.
The battery is vented to the outside to prevent gases from entering
the vehicle interior . Make sure that the jumper clamps are well
connected with their
metal parts in full contact with the battery
terminals.
& WARNING
To avoid serious personal injury and damage to the vehicle, heed
all warnings and instructions of the jumper cable manufacturer. If
in doubt, call for road service.
• Jumper cables must be long enough so that the vehicles do not
touch.
• When connecting jumper cables, make sure that they cannot
get caught in any moving parts in the engine compartment.
• Do not bend over the batteries· danger of chemical burns!
• The battery cell locking screws must be tightened securely.
• Before you check anything in the engine compartment, always
read and heed all WARNINGS~
page 267, ''Engine compart
ment".
0 Note
Improper hook-up of jumper cables can ruin the generator.
• Always connect POSITIVE(+) to POSITIVE(+), and NEGATIVE( -)
to NEGATIVE(-) ground post of the battery manager control unit.
• Check that all screw plugs on the battery cells are screwed in
firmly . If not, tighten plugs prior to connecting clamp on negative
battery terminal.
• Please note that the procedure for connecting a jumper cable as
described
above app lies specifically to the case of your vehicle be ing
jump started. When you are giving a jump start to another vehicle, do
not connect the negative (-) cab le to the negative(-) terminal on the
discharged battery©~
page 329, fig. 233. Instead, securely
connect the negative(-) cable to either a solid metal component that
is firmly bolted to the engine block or to the engine block itself.
If the _,,,
Page 354 of 362
-Alphabetical inde x lffi'f ___,__ ______________ _
Heating
Deluxe automatic climate control plus
101
Heavy clothing and safety belts . ... ... . 184
High beam ................ ...... .. . 62
Warning/indicator lights . .......... 17
H igh vo ltage warning labe l ......... .. 336
HomeL ink® un iversal remote control . .. 166
Hood
Opening ................ ...... ..
274
Release lever ............ .. .... .. 2 7 4
Horn ................. .. .. .. .. .... .. 9
How are child restraint system anchors related to chi ld safety ..... .............
229
How many a irbags does my vehicle have? .. ..
197
How often should I check my tire pressures? .
298
How safety belt pretensioners work ... . 188
Indicator lights ... .......... ..... .. .. 14
Airbag system .......... .. ... 201, 202
PASSENGER AIR BAG OFF .......... 202
Infant seats ....... ... .. .... ....... 221
Ins ide rear view mirror ........ .. .. .. .. 68
Installing child safety seats
Safety belts ............... ... .. .
225
Installing the upper tether strap on the
anchorage ... .... ... ..... .... ..
233
Instrument lighting .......... .. .. .. .. 61
Instruments and controls ..... .. .... .. 10
General illustration .............. ... 9
Interior lights Dimming . .... ... .. .. .. .. .. .. .. ..
63
Front .. ................. .. .. .. .. 63
Rear ... ................. .. .. .. .. 64
Interval wiping . .. .. ............... .. 65
Rain sensor ......................
65
Hydroplaning . .. ............ ....... 302 J
I Jumper cables .. .. .................. 329
Jump-sta rting ................ .... .. 328
Ignition key ........ ............. ... 112
Emergency unlocking .. ....... ..... 44 K
Ignition lock .. .... .. .. .... ......... 112
Malfunction ............. ...... 36, 40 Key ........ ...... ... .. .... ........ 42
Immobilizer . ... ..... ............... 42 Battery replacement ............... 43
Important things to do before driving .. 171
Improperly worn safety belts ......... 188
Indicato r light
Dynamic steer ing .......... ....
15, 37
Key replacement ..... ............. 42
Master key with remote control .. .. .. 42
Mechanica l key ................. .. 44
Kick-down tiptronic ....... .............. ...
154
Knee airbags .. .... .... ...... ... .. .. 206
Description .. .. .. ............... 206
How they work .............. ... . 207
Important safety instructions ...... 208
L
LATCH 229
Description .. ...... ............. 230
Insta lling a child restraint ....... .. 231
Location . ........... .. .... .... .. 230
Mounting and releasing the anchorage
hook .. ...... .. .. ..... .. .. .. ..
231
Leather .................... ... .. .. 264
Cleaning ........... .. .... .... .. 265
Lifting jack .......... ... . .. .... .. .. 319
Lifting vehicle ...................... 333
Light
Coming home ............ ... ... ..
60
Daytime running lights ............. 60
Driving light control ............... 58
Exterior lighting .. .. .... ......... . 60
Leaving home ....... .. .. .. .... .. . 60
Switching on and off ....... ... .. .. . 58
Light sensor ................ ... .. .. . 58
Light sensor defective ...... .. .. ... ... 38
Lighting ..... .. .. .... .............. 58
Lights
Emergency flashers . . . . . . . . . . . . . . .
62
High beam ...... . .. .............. 62
High beam warning/indicator light ... 17
Turn signals .................... .. 62
Xenon headlights . .. .... .......... 61
Page 359 of 362
_________________________________________ ..!.A~ lp~ h~a ~b~ e~ t~ i~c ~a ~l ...!_i~n ~d ~e~ x~ _ffllll
Tires and vehicle load limits .. .. .... 299 Trunk pass-through .... .. .. .. ... ..... 88 W
Wheel bolts ..................... 308 Turn s ignals ... .. ... .... ..... .. .. .. .. 62
W inter t ires ............. ... ... .. 307 Warning/indicator lights ... ..... .. . 16 Warning lights . .. ................... 14
T ires/Wheels
Low aspect ratio tires ............. 309
Tire pressure mo nitoring system 16,310
T ool kit .. ................... .. .. .. . 314
T orn or frayed safety be lts ............ 184
T ouch -up paint ....... .. .. .. ... .. .. . 260
T ow ing
Fro nt eye let ..................... 331
Rea r eye let ...................... 332
T ow tr uck procedu res . .. .......... 3 31
TP MS
Ti re pressure monito ring system . .. . 3 11
Trailer towing ................... .. . 251
Operating instructions ... ...... .. .
251
Tech nica l requirements ..... .. 251,252
Tips .................... ... .. .. . 253
T .. ransm1ss1on ... ..... .... ... ... .. .. . 150
6-speed manual transmission . .. . ... 150
tiptronic . ... .. .. ... ..... .... . .. . 150
Tr ansport Canada . .................. 180
Tread Wear Indicator (TWI) ........... 301
T rip comp uter
Fuel consumption ... .. .. .. .... .. .. 24
Mileage ......... .. .. ... .... .. .. .. 24
Single-trip memory ............ .. .. 25
Total-trip memory ................. 25
Tr ip odometer .... .. ... . ..... .. .. .. .. 13
T runk escape handle .................. 52
T ru nk lid
See Luggage compartment .......... 51
Controls and equip
ment Safety first
Warning/indicator lights .
... .... .. .. .. 10
u Adaptive cruise control ............ 129
Airbag system ...... ...... .. .... .. 16
Undercoating ... .. ... ... .. .. .. .. ... 2 62
Anti-lock brake system (ABS) ........ 17
Unfasteni ng safety be lts .. ... ........ 188
Brake system .. ..... ..... ... . ... .. 18
Unidirect ional tires .. ... .. .. .. .. ..... 291 Cru
ise con trol . ................... 17
Uniform t ire quali ty g r.ad ing . ......... 306 Electromechanical
parking brake ..... 18
Unlocking Lu ggage compartment lid ....... .... 51
Powe r locking switch ... ........ ... . SO
Remote cont rol key ................ 47
Us ing the me chanical key ........ .. . 4 9 E
lectron ic power cont rol . ........... 15
E lectron ic stabi liz ation prog ram ( ESP) 15
Hi gh beam ........ ............. .. 17
Ma lf u n ction Indi cato r L amp ( MIL) .... 17
Sa fety belt . ... ... ... .... .. .. ... .. 16
Use of jumper cables ... .. .. .. .. .. ... 329 T
ir e pressure mon itoring system ... .. 16
T urn signals ... ... ... ... .. ... ... .. 16
V Warra nty cove rages . .. ..... ......... 340
Washer reservo ir ............. .. .. .. . 290
Valet parking .................... ... . 55
w h'
a s ing .... .. ... .... .. .. .. .... .. . 2 56
Vani ty mir ror . ... ...... .. .. ... .... .. . 64 Automatic car wash ... ... .... .. .. . 257
Vehicle Ide ntificat io n Numbe r (VIN) .. .. 336 by hand ......
... .. .. .. .. .... .. . 257
Vehicle jac k ................ .. ...... 319 Genera
l informat ion ...... ... .. .. . 256
Vehicle lite rat ure ... ............ .... .. S with
a power washer ............. . 258
Vehicle tool kit ..................... 314 Waxing .
.. .... ....... ...... .. .... . 2 59
Vehicle-care products ... .... ... ... .. . 256 Wea r indicator ... ... ...... ... .... .. 301
Ventilation Deluxe au tomatic climate control .... 95
Delu xe au tomati c clim ate cont rol p lu s
101 Weatherstrips .
... .. .. ...... .. .. ... . 26 1
w' h e1g ts ... ..... ....... ....... . ... . 337
What happens if you wear your safety belt too
loose? ........... .. .... .... .. . 186
What happens to u nbelted occupants? .. 183
What impairs driving safety? . .... . .. .. 171
Vehicle operation Vehicle care Do-it-yourself service Technical data