spare tire location AUDI A5 COUPE 2011 Owners Manual
[x] Cancel search | Manufacturer: AUDI, Model Year: 2011, Model line: A5 COUPE, Model: AUDI A5 COUPE 2011Pages: 362, PDF Size: 84.88 MB
Page 298 of 362

-~_T_ ir_e_ s_ a_ n_ d_ w_ h_e_ e_ ls _______________________________________________ _
vehicle at its maximum capacity weight and tires that were on your
vehicle at the tim e it was manufactured.
If you wish to improve comfort when operating the vehicle at
normal load (up to 3 occupants) , you can adjust tire pressures to
those specified for normal vehicle load. Before operating the
vehicle at maximum load, you must increase the tire pressures to
those specified for maximum vehicle load
=> &.
Bear in mind that the tire pressure monitoring system* ca n only
monitor the tire pressures you have stored. The system does not
recogn ize the load condit ion of your vehicle.
The effectiveness of the tire pressure monitoring system* wi ll be
impaired if you store normal load pressures but then operate the
vehicle at its maximum load
=> &.
See the illustration => page 295, fig. 212 for the locat ion of the label
either on driver's side B-pillar or inside the fuel filler flap (color of the
actual label and exact location on the vehicle will vary slightly).
Note that the following tab le is accurate at the time of going to press
and is subject to change. In the event of discrepancies, the tire pres
sure label (On USA vehicles, the tire pressure label is located on the
dr iver's side B-pillar. On Canada vehicles, the tire pressure label is
located e ither on the driver's s ide B-pillar or inside the fuel filler flap)
always takes precedence.
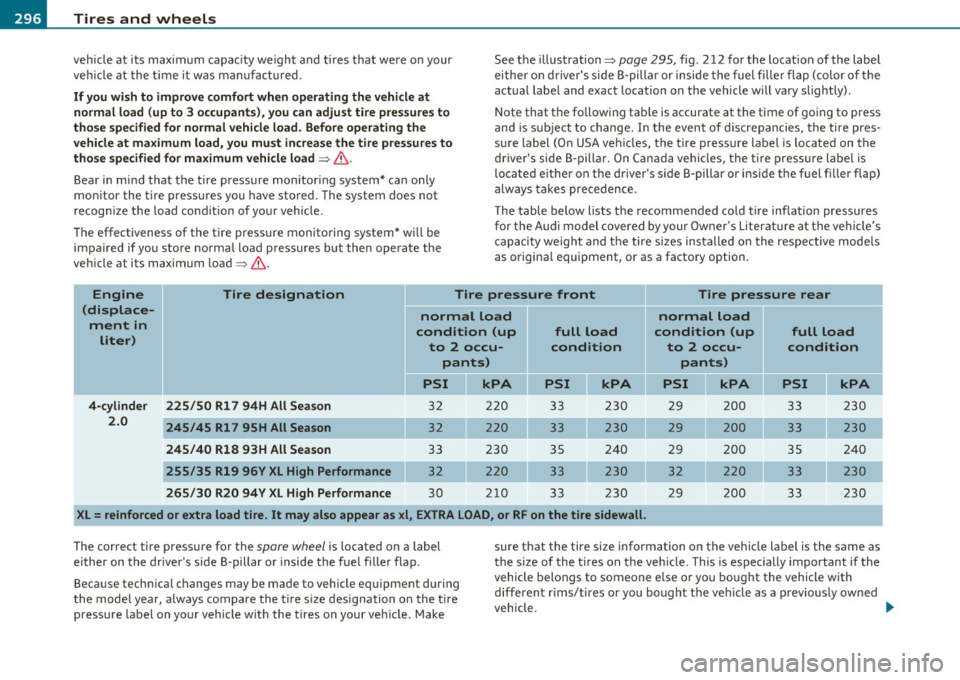
The table below lists the recommended cold tire inflation pressures
for the Audi model covered by your Owner's Literature at the vehicle's
capacity weight and the tire sizes installed on the respective models
as origina l equipment, or as a factory option.
Engine
(displace ment in liter) Tire designation
Tire pressure front Tire pressure rear
normal load normal load
condition (up full load condition
(up
full load
to 2 occu- condition to 2 occu- condition pants) pants)
PSI Jl kPA PSI kPA PSI kPA PSI II kPA
4-cylinder 225/50 Rl 7 94H All Season 32 220 33 230 29 200 33 230
2.0
245/45 Rl 7 95H All Season 32 220 33 230 29
200 33 230
245/40 R18
93H All Season 33 230 35 240 29 200 35 240
255/35 R19 96V XL High Performance 32 220 33 230 32 220 33 230
265/30 R20 94Y XL High Performance 30 210
33 230 29 200
33 230
XL=
reinforced or extra load tire. It may also appear as xi, EXTRA LOAD, or RF on the tire sidewall.
The correct tire pressure for the spare wheel is located on a label
either on the driver's s ide B-pillar or inside the fuel filler flap.
Beca use technica l changes may be made to vehicle equipment during
the model year, always compare the tir e s ize designation on the tir e
pressure label on your vehicle with the tires on your vehicle. Make sure that the tire size information on the vehicle label is the same as
the
size of the tires on the vehicle. This is especially important if the
vehicle belongs to someone e lse or you bought the vehicle with
different rims/tires or you bought the veh icle as a previous ly ow ned
vehicle. _.,,
Page 318 of 362

lffll.___W __ h_a_ t_ d_ o_ I_ d_o_ n_ o_w _ ? _____________________________________________ _
Changing a wheel
Before changing a wheel
Observe the following precautions for your own and your
passenger's safety when changing a wheel.
- After you experience a tire failure, pull the car well away
from moving traffic and try to reach
level ground before
you stop
~ & .
- All passengers should
leave the car and move to a safe
location (for instance, behind the guardrail)~& .
- Engage the
parking brake to prevent your vehicle from
rolling unintentionally~ &.
- Shift into
1st gear on vehicles with manual transmission,
or move the
selector lever to the P position on vehicles
with automatic transmission*.
- If you are towing a trailer: unhitch the trailer from your vehicle.
- Take the
jack~ page 314 and the spare tire~ page 314
out of the luggage compartment.
& WARNING
You or your passengers could be injured while changing a wheel if
you do not follow these safety precautions:
• If you have a flat tire, move a safe distance off the road. Turn
off the engine, turn the emergency flashers on and use other
warning devices to alert other motorists.
• Make sure that passengers wait in a safe place away from the
vehicle and well away from the road and traffic.
& WARNING (continued)
• To help prevent the vehicle from moving suddenly and possibly
slipping off the jack, always fully set the parking brake and block
the wheel diagonally opposite the wheel being changed with the
folding chocks or other objects. When one front wheel is lifted off
the ground, placing the Automatic Transmission in "P" (Park) will
not prevent the vehicle from moving.
• Before you change a wheel, be sure the ground is level and
firm. If necessary, use a sturdy board under the jack.
• After installing the inflatable spare tire, make sure that you
replace the flat tire/wheel in its storage area properly and tighten
the knurled retaining screw securely.
0 Note
If you are changing the wheel on a steep incline, use a rock or simila r
object to block the opposite wheel to prevent the vehicle from
moving.
[ i] Tips
Obey all laws. •
Changing a wheel
When you change a wheel, follow the sequence described
below step-by-step and in exactly that order.
1. Remove the decorative wheel cover* or the wheel bolt
caps* .
For more details see also~ page 317, "Decorative
wheel covers" or~
page 318, "Wheels with wheel bolt
caps".
2. Loosen the
wheel bolts~ page 318. .,_
Page 319 of 362

_____________________________________________ W __ h_a _ t_ d_o_ I_ d _ o_ n_o_ w_ ? _ ___.ffl'I
3. Locate the proper mounting point for the jack and align
the jack below that point=>
page 319.
4. Lift the car with the jack=> page 319.
5. Remove the wheel with the flat tire and then install the
spare tire => page 320 .
6. Tighten all wheel bolts lightly.
7.
Lower the vehicle with the jack.
8. Use the wheel bolt wrench and
firmly tighten all wheel
bolts in a crisscross pattern=>
page 318.
9. Replace the decorative wheel cover* or the wheel bolt
caps*.
& WARNING
Always read and follow all WARNINGS and information=> & in
"Raising the vehicle" on
page 319 and => page 322. •
After changing a wheel
A wheel change is not complete without the doing the
following.
- Store and secure the wheel you replaced in the spare
wheel well .
Replace the tools and the jack in their proper location.
- Check the
tire pressure of the spare tire as soon as
possible.
- As soon as possible , have the
tightening torques on all
wheel bolts checked with a torque wrench. The correct
tightening torque is 90 ft lbs. (120 Nm).
Vehicle OP-eration
-Have the flat tire replaced as soon as possible.
[ i] Tips
• If you notice that the wheel bolts are corroded and difficult to turn
while changing a tire, they should be replaced before you check the tightening torque.
• Drive at reduced speed until you have the tightening torques
checked. •
Applies to ve hicles : w ith deco rative wheel cove rs
Decorative wheel covers
The decorative wheel covers must be removed first to
access the wheel bolts.
Removing
Fig. 221 Changing a
wheel: removing the
wheel cover
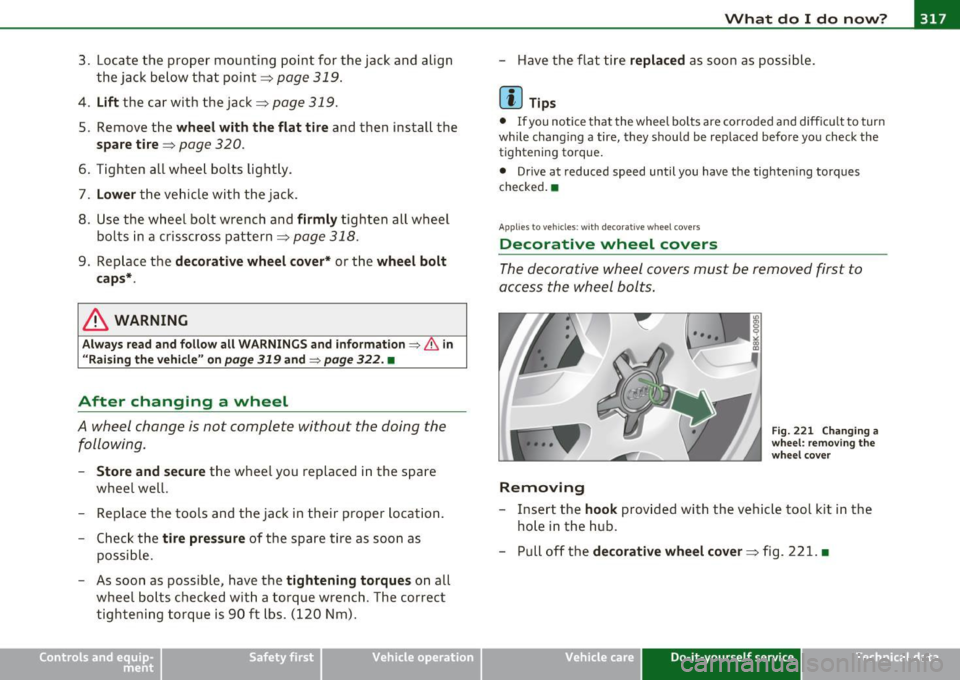
- Insert the hook provided with the vehicle tool kit in the
hole in the hub.
- Pull off the
decorative wheel cover=> fig. 221. •
Vehicle care Do-it-yourself service iTechnical data
Page 322 of 362

lffl!l.,___W __ h_a_ t_ d_ o_ I_ d_o_ n_ o_w _ ? _____________________________________________ _
Only position the veh icle jack at the designated points=> page 319,
fig . 224 . Th ere i s ex act ly
one loc ation for each whee l. Do not position
the jac k in any othe r locations .
Soft ground under the jack can cause the vehicle to slip
off the jack.
Alw ays p lac e the j ack on firm ground . U se a fla t, stab le s uppor t if
necessary. Use a non -s li p surface s uch as a ru bber mat on a slippery
surface such as ti le.
& WARNING
• You or your passengers could be injured while changing a
wheel if you do not follow these safety precautions :
- Positioning the jack under the vehicle at any other place than
those indicated above may damage the vehicle or may result in personal injuries.
- A soft or unstable surface under the jack may cause the
vehicle to slip
off the jack. Always provide a firm base for the
jack on the ground.
If necessary, use a sturdy board under the
jack.
- On hard, slippery surface (such as tiles) use a rubber mat or
similar to prevent the jack from slipping.
• To help prevent injury to yourself and your passengers: -Do not raise the vehicle until you are sure the jack is securely
engaged.
- Passengers must not remain in the vehicle when it is jacked
up .
- Make sure that passengers wait in a safe place away from the
vehicle and well away from the road and traffic.
- Make sure jack position is correct, adjust as necessary and
then continue to raise the jack. •
Taking the wheel off/installing the spare
tire
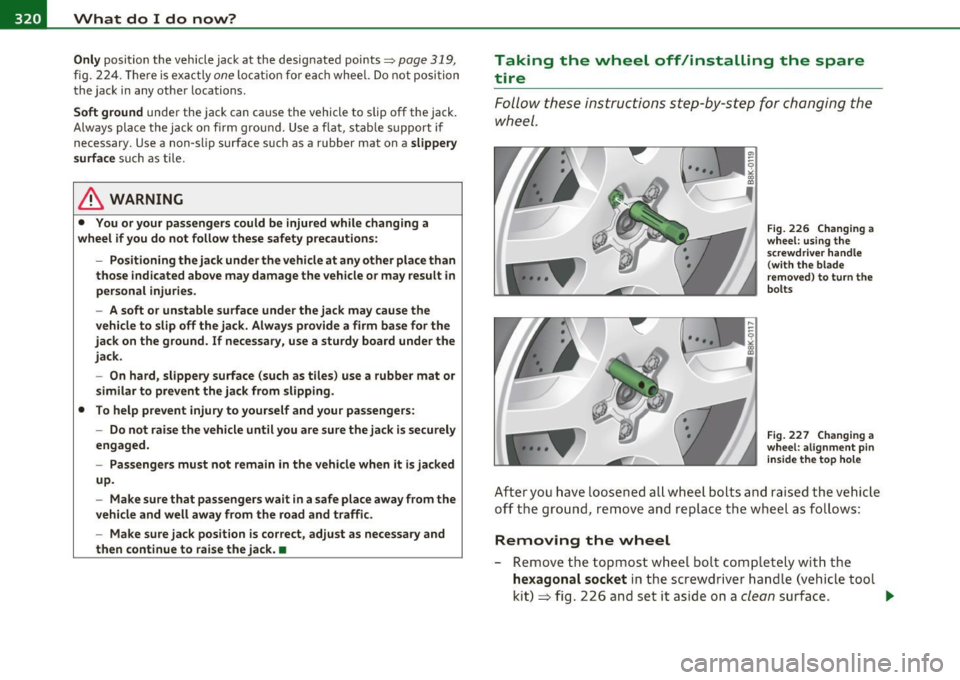
Follow these instr u ction s step- by -s tep for chan ging th e
w heel .
Fig. 226 Changing a
wheel : using the
s crewdriver handle
( with the blade
removed ) to turn the
bolts
Fig. 227 Changing a
whee l: alignment pin
in side the top hole
Aft er yo u have L oosened a ll w hee l bolts and r aise d the v ehicle
off th e ground, remo ve and rep lace t he whe el as fo llows :
Removing the wheel
- Remove the top most w hee l b olt comp letely with the
hexagonal socket in the screwd river handl e (vehicle too l
kit )
~ fig. 2 26 and set i t aside on a clean surf ace . .._