child lock AUDI A5 COUPE 2013 Owners Manual
[x] Cancel search | Manufacturer: AUDI, Model Year: 2013, Model line: A5 COUPE, Model: AUDI A5 COUPE 2013Pages: 294, PDF Size: 73.84 MB
Page 36 of 294
34 Openin g and clo sing
keys. Unguarded access to the keys pro
vides children the opportunity to start the engine and/or act ivate vehicle sys
tems such as the power w indows etc . Un
supervised operation of any veh icle sys
tem by ch ildren can res ult in serious in
Jury.
- Do not remove the key from the ignition
lock until the vehicle has come to a com
plete stop. Otherwise the steering col
um n loc k co uld suddenly e ngage -caus
ing the risk of an accident.
@ Tips
- The operation of the remote contro l key
c a n be tempo rarily disrupted by in terfer
ence from tran smi tters in t he v ici nity of
the veh icle work ing in the same frequen
cy ra nge (e.g . a ce ll phone, radio equip
ment).
- Fo r security reasons, replacement keys
are on ly available from Aud i dea le rs .
- Fo r De clarat ion o f Compliance to United
States FCC and Industry Canada regu la
tions ¢
page 2 76.
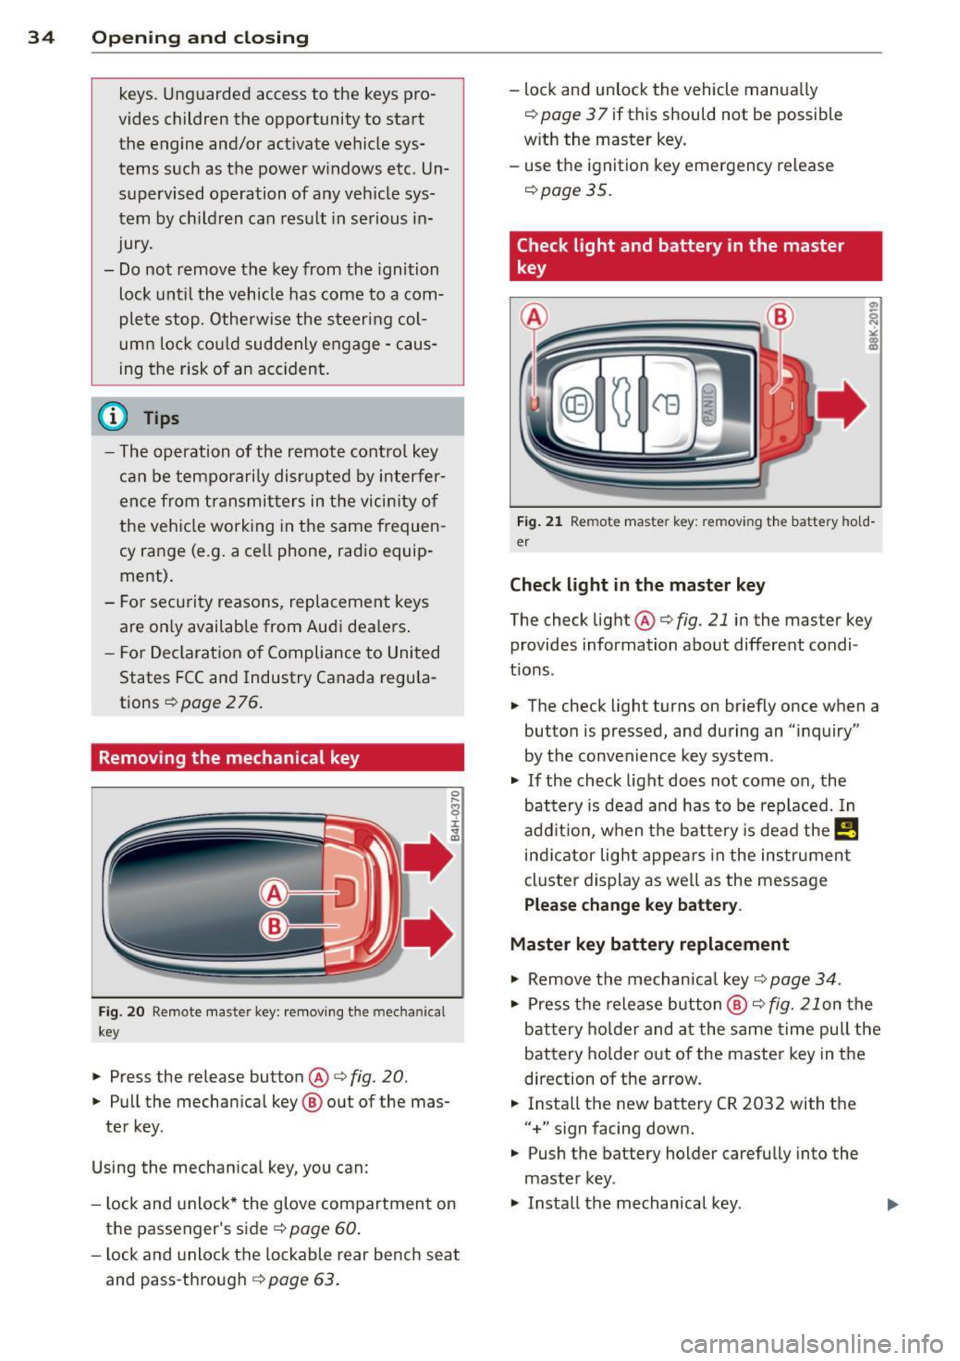
Remov ing the mechanic al key
Fig . 20 Remot e mas ter key: re mov ing the mec hanic al
key
.. Press the release button@¢ fig. 20.
.. Pu ll the mecha nical key @ out of the mas
te r key .
Using the mechan ica l key, you can :
- l ock and unlock* the glove compartmen t on
the passenger's side ¢
page 60.
-lock and unlock t he lockable rear bench seat
and pass -th ro ugh ¢
page 63.
-lock and unlock the vehicle manua lly
¢
page 3 7 if this should not be possible
w ith the master key.
- use the ignition key emergency release
¢ page 35.
Check light and battery in the master
key
•
Fig. 21 Re mote mas ter key: re m ov ing th e bat te ry h old
er
Check light in the master key
The check light@¢ fig. 21 in the mas ter key
provides information about different condi
t ions .
.. The check light turns on br iefly once when a
button is pressed , and during an " inquiry"
by the convenience key system .
.. If the check light does not come on , the
battery is dead and has to be replaced. In
add it ion, when the battery is dead the
!,I
ind icator light appe ars in the instrument
cl uster display as we ll as the message
Plea se change key battery.
Master key battery replacement
.. Remove the mechan ica l key ¢ page 34 .
.. Press t he re lease button @¢ fig. 21on the
bat tery ho lde r and at the same time pu ll the
battery ho lder out of the maste r key in the
d irection of the ar row .
.. Insta ll the new battery CR
2032 with the
"+ " sign facing down .
.. Push the battery holder carefully into the
master key.
.,. Install the mechanical key .
Page 39 of 294
- You cannot open the doors or the rear lid
from the outside (increased security, for ex
amp le when you are stopped at a red light).
- The diodes in the power locking switc h illu
minate when all the doors are closed and
locked.
- You can unlock and open the doors from the
i nside by pul ling on the door hand le .
- If you have a crash and the airbag is activat
ed , the doors automatically un lock .
_& WARNING
- The power locking switch works with the
ignition off and automatically locks the
entire vehicle when it is actuated .
- On a vehicle locked from the outside the
power locking system switch is inopera
t ive.
- locked doors make it more difficult for
emergency workers to get into the vehi
cle, which puts lives at risk . Do not leave
anyone behind in the veh icle, especially
children .
@ Tips
Your vehicle is locked automatically at a
speed of 9 mph (15 km/h) (Auto lock)
Qpage 32. You can un lock the vehicle
aga in using the opening function in the
powe r locking system switch~-
Setting power locking
In the radio/MM!*, you can set which doors
the centrol locking system will unlock .
~ Select : ICARI funct ion button > Central lock
ing .
Or
~ Select: ~ IC_A_R~I funct ion button > Car system s
control button > Vehicle settings > (C entral
locking )* .
Sin gle door unlocki ng /Unl ock door s* -
you
can specify which doors u nlock when you open
the vehicle .
- Se lecting
off / All and pressing the Ii button
on the remote control key unlocks the entire
vehicle.
Opening and clo sin g 3 7
- Select ing o n/Dri ver and pressing the~ but
ton on the remote control key once u nlocks
only the driver's door . In vehicles w ith a con
ven ience key*, only the door whose handle
you pull w ill unlock . If you press the @! but
ton tw ice, the entire vehicle will u nlock . If
you press the [@] button, t he e ntire ve hicle
w ill always lock .
Luggage comp. lock /Lock e xterio r trunk han
dl e -
If you select On , you can no longer open
the luggage compartment us ing the rear lid
hand le
Q page 39, fig. 28 . In this case, the
r ear lid can be opened with the
l""I bu tton on
the maste r key
Q poge 35, fig. 22 or with the
I"" I* button in the driver's door .
Tone when locking -if you select On, a tone
will sound when yo u loc k the vehicle .
Auto Lock /Lock when driv ing -if you select
On, the entire vehicle w ill lock automatically
when the speed reaches 9 mph (15 km/h) .
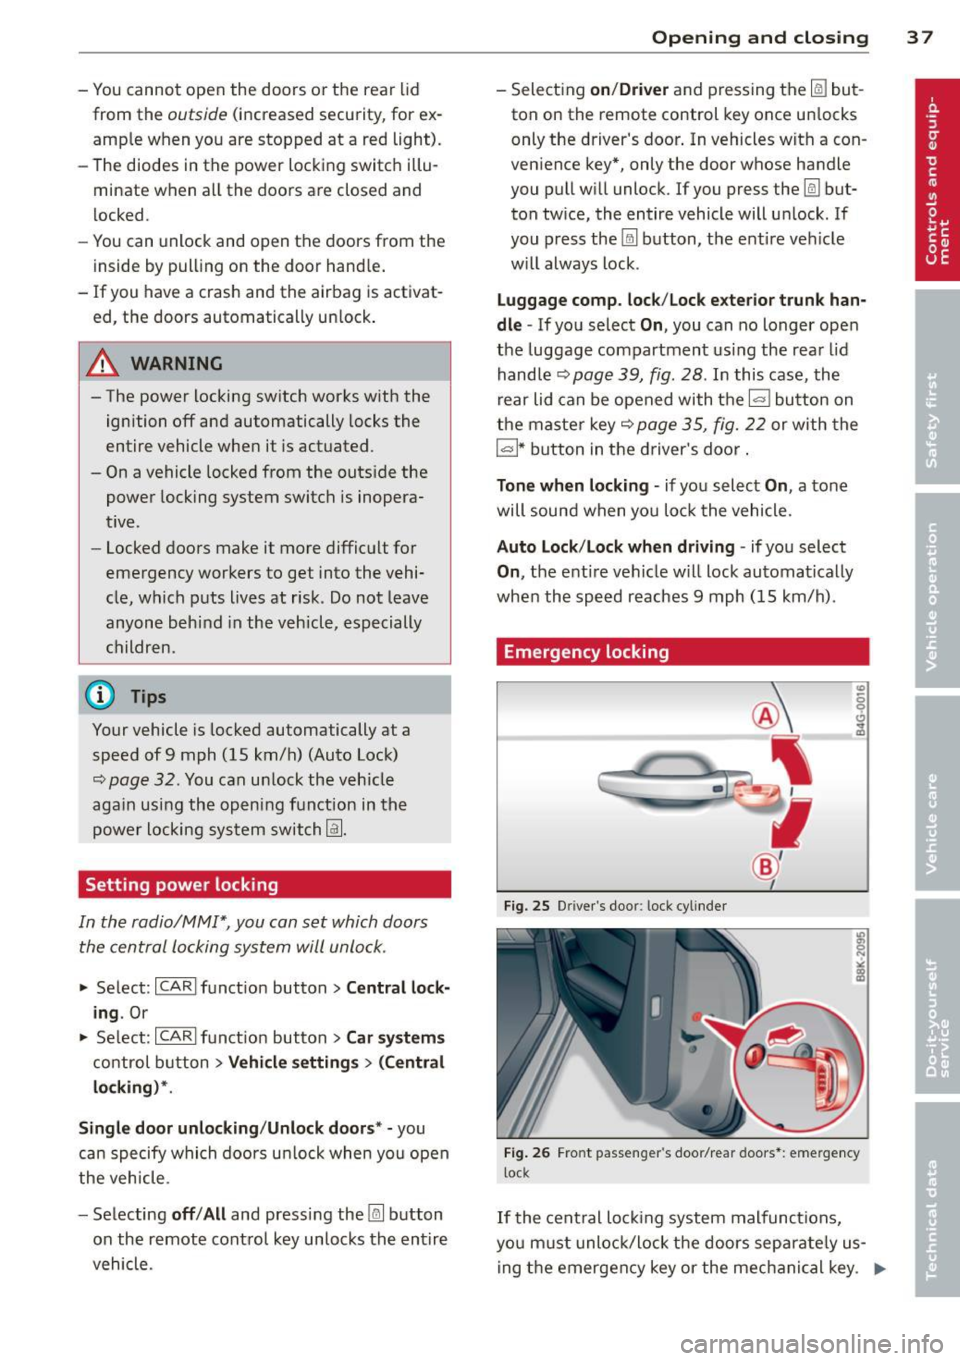
Emergency locking
Fig. 25 D rive r's doo r: lock cylinder
Fig . 26 Fro nt p assen ger 's doo r/rear doors*: eme rgency
lock
If the cent ral locking system malfunct ions,
yo u m ust unlock/lock the doors separate ly us
ing the emergency key or the mec hanical key . .,,.
Page 41 of 294
Rear lid
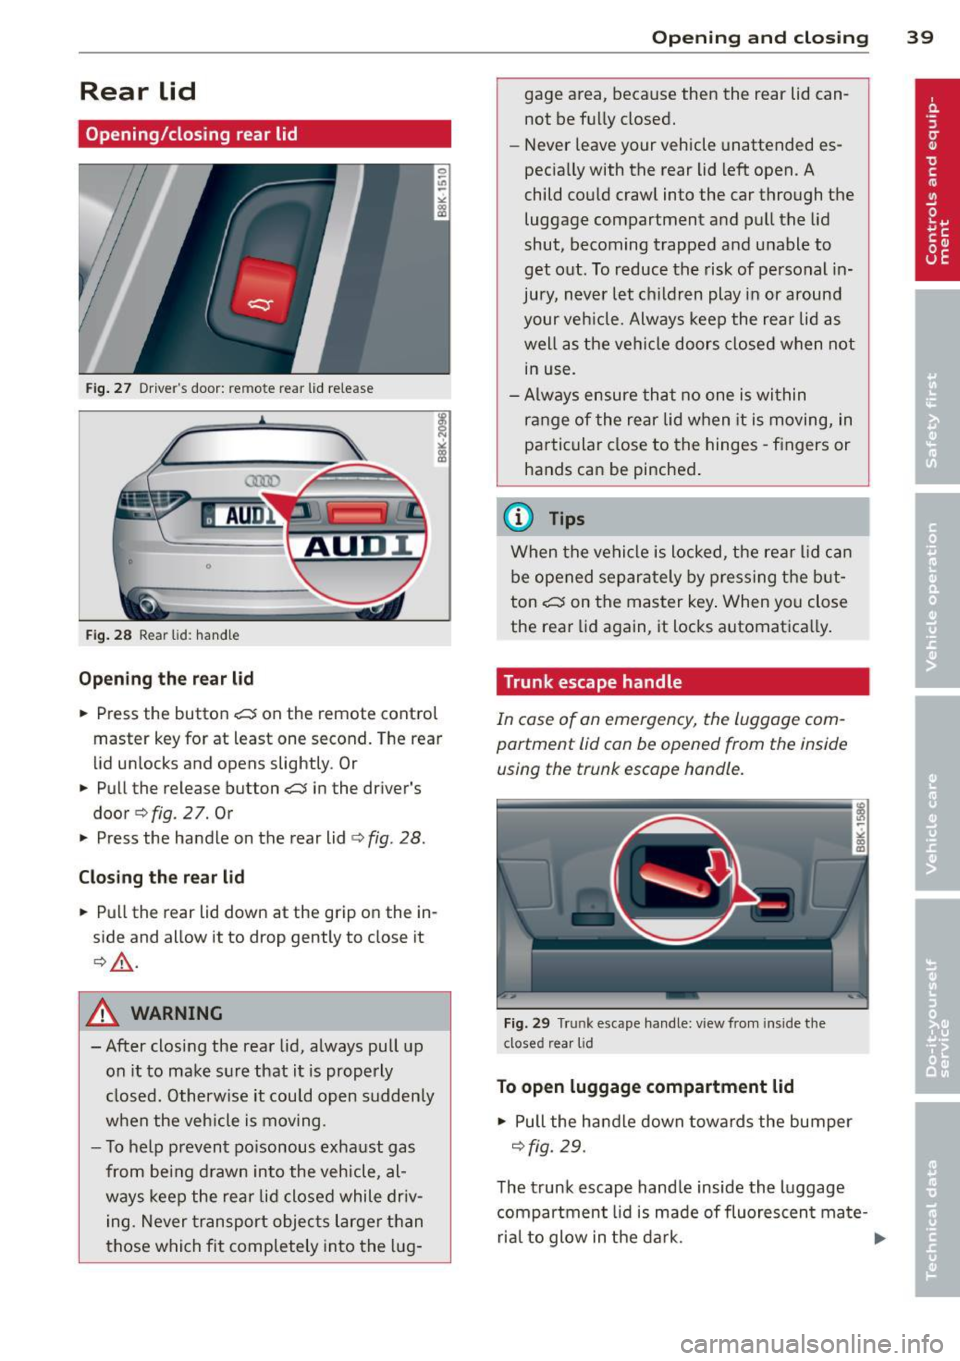
Opening/closing rear lid
Fig. 27 Drive r"s door: re m ote rear lid rele ase
Fig. 28 Rear lid: handle
Opening the rear lid
.,. Press the button .c::5 on the remote control
master key for at least one second. The rear
lid unlocks and opens slightly . Or
.,. Pull the release button
.c::5 in the driver's
door
q fig. 2 7. Or
.,. Press the handle on the rear lid
¢fig . 28.
Closing the rear lid
.,. Pull the rear lid down at the grip on the in
side and allow it to drop gently to close it
¢ ,&. .
A WARNING
-After closing the rear lid, always pull up
on it to make sure that it is properly
closed. Otherwise it could open sudden ly
when the veh icle is moving .
- To help prevent poisonous exhaust gas
from being drawn into the vehicle, al
ways keep the rear lid closed while driv
ing. Never transport objects larger than
those which fit comp letely into the lug-
Opening and closing 39
gage area, because then the rear lid can
not be fully closed.
- Never leave your vehicle unattended es
pecia lly with the rear lid left open. A
child could craw l into the car through the
luggage compartment and pull the lid
shut, becoming trapped and unable to
get out. To reduce the risk of personal in
jury, never let childre n play in or around
your vehicle. Always keep the rear lid as
well as the vehicle doors closed when not
in use.
- Always ensure that no one is within
range of the rear lid when it is moving, in
particular close to the hinges -fingers or
hands can be pinched .
@ Tips
When the vehicle is locked, the rear lid can
be opened separately by pressing the but
ton
.c::5 on the master key . When you close
the rear lid aga in, it locks automat ica lly.
Trunk escape handle
In case of an emergency, the luggag e com
partment lid can be opened from the inside using the trunk escape handle .
Fig . 29 T run k escape handle: view fr om ins ide the
closed rear lid
To open luggage compartment lid
.,. Pull the handle down towards the bumper
¢fig. 29.
The trunk escape handle inside the luggage
compartment lid is made of fluorescen t ma te-
rial to glow in the dark. .,..
Page 59 of 294
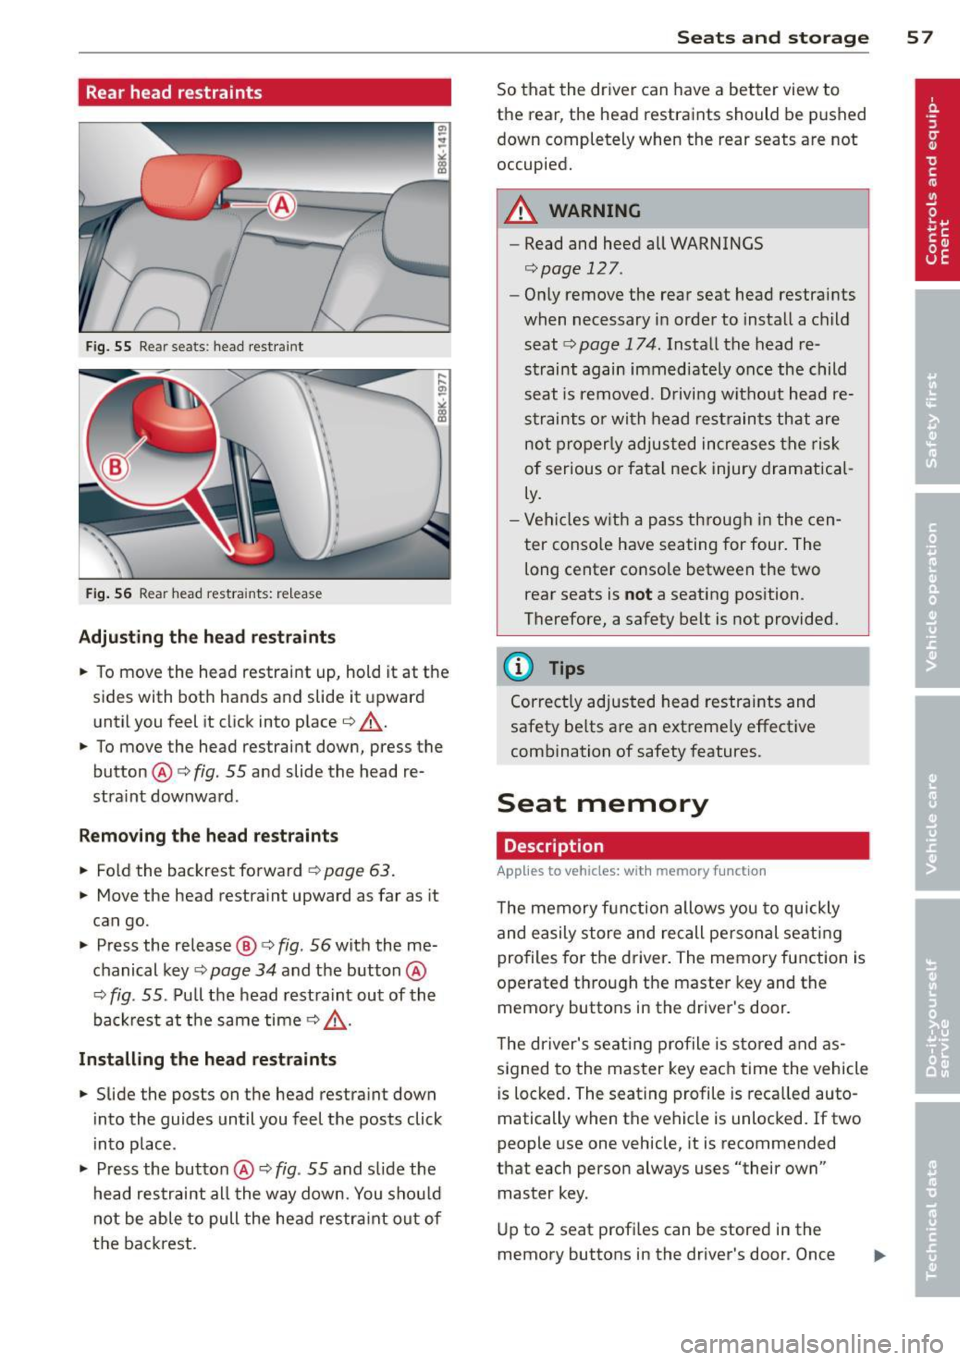
Rear head restraints
Fig. 55 Rear seats : head restraint
Fig. 56 Rear head restra ints: re lease
Adjusting the head restraints
• To move the head restraint up, hold it at the
s ides with both hands and slide it upward
until you feel it click into place¢.,&.
• To move the head restraint down , press the
button @¢
fig. 55 and slide the head re
stra int downward .
Removing the head restraints
• Fo ld the backrest forward ¢ page 63.
• Move the head restraint upward as far as it
can go.
• Press the release@¢
fig. 56 with the me
chanical key¢
page 34 and the button @
¢
fig . 55 . Pull the head restraint out of the
backrest at the same time¢.,& .
Installing the head restraints
• Slide the posts on the head restra int down
into the guides until you feel the posts click
into place .
• Press the button @ ¢
fig. 55 and slide the
head restraint al l the way down. You shou ld
not be able to pull the head restra int o ut of
the backrest.
Seats and storage 57
So that the driver can have a better view to
the rear, the head restraints should be pushed
down completely when the rear seats are not
occupied.
A WARNING
- Read and heed all WARNINGS
¢page 127.
-On ly remove the rear seat head restraints
when necessary in order to install a child
seat ¢
page 174. Install the head re
straint again immediately once the child
seat is removed. Driving without head re
straints or with head restraints that are
not properly adjusted increases the risk
of serious or fatal neck injury dramatical
ly.
- Vehicles with a pass through in the cen
ter conso le have seating for four. The
long center conso le between the two
rear seats is
not a seating position .
Therefore, a safety belt is not provided.
@ Tips
Correctly adjusted head restraints and
safety be lts are an extreme ly effective
combination of safety features.
Seat memory
Description
Applies to vehicles : with memory fun ctio n
The memory function allows you to quickly
and easily store and recall personal seati ng
profiles for the driver. The memory function is
operated through the master key and the
memory buttons in the driver's door.
The driver's seating profile is stored and as
signed to the master key each time the vehicle
is locked. The seating profile is recalled auto
matically when the vehicle is unlocked.
If two
people use one vehicle, it is recommended
that each person always uses "their own" master key.
Up to 2 seat profi les can be stored in the
memory buttons in the driver's door. Once
Page 67 of 294
_& WARNING
Weak, damaged or improper straps used
to secure items to tie-downs can fa il dur
ing hard brak ing or in a collision and cause
ser ious personal injury .
- Always use suitable retaining straps and properly secure items to the tie-downs in
the luggage compartment to help pre
vent items from shifting or flying for
wa rd.
- Never attach a child seat tether strap to
a tie-down .
- For strength-related reasons, the mount
ing hooks can only be used to secure ob
jects we ighing up to 10 lb. (5 kg). Heavi
er objects will not be adequately secured
- there is a risk of injury .
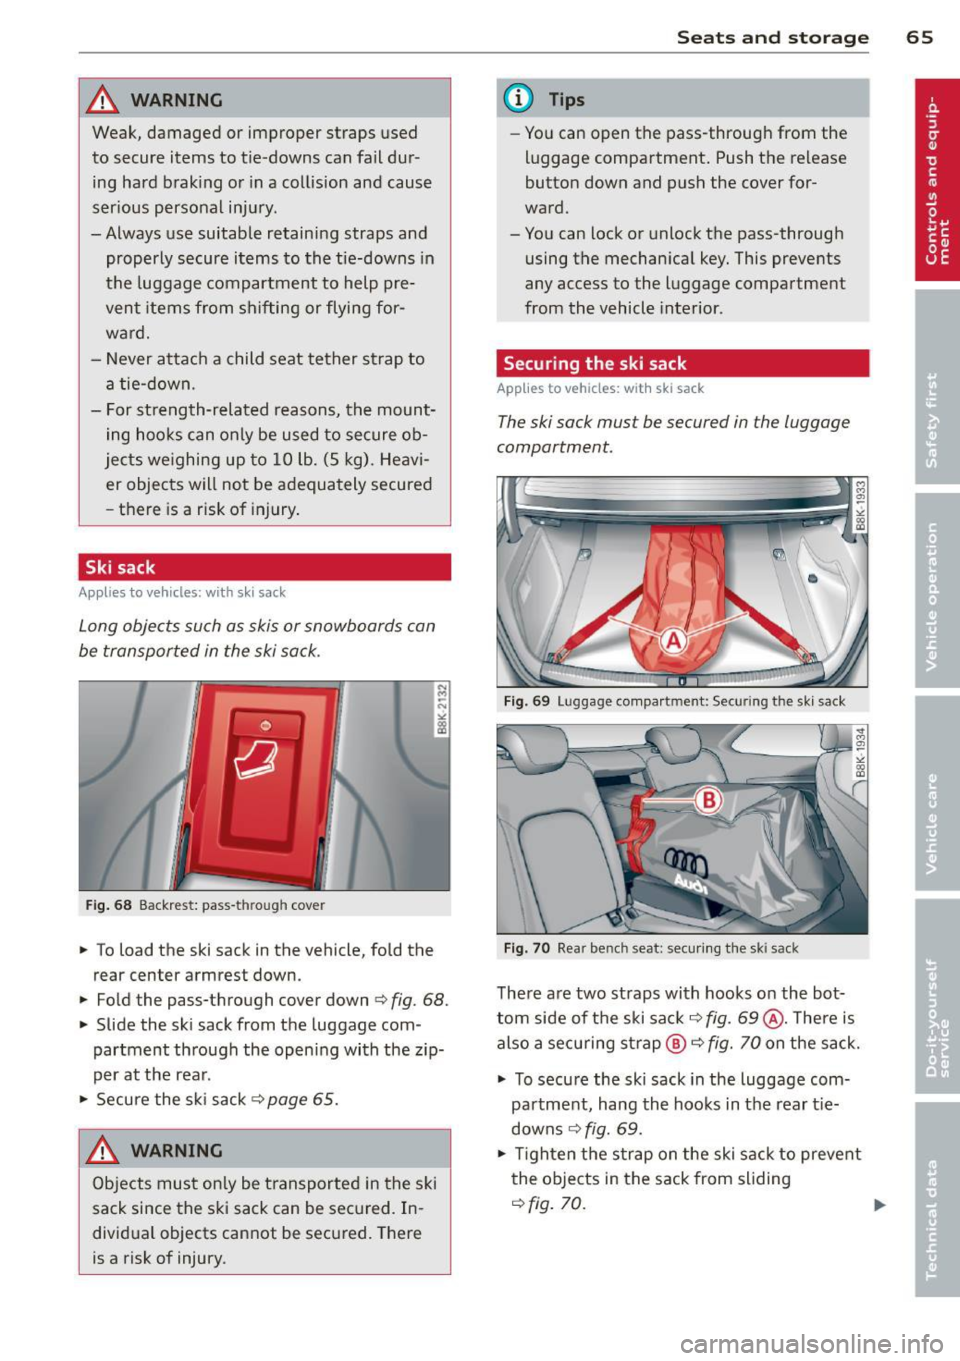
Ski sack
Applies to vehicles: with ski sack
Long objects such as skis or snowboards can
be transported in the ski sack .
Fig . 68 B ackr est: pass-thr ough cover
.. To load the sk i sa ck in the veh icle, fold the
rea r cente r arm res t down.
.. Fo ld the pass- through cover down
Q fig . 68.
.. Slide the sk i sa ck from the luggage com
partment through the opening with the zip
per at the rear .
.. Secure the sk i sack
Q page 65.
_& WARNING ,..__
Objects must on ly be transported in the ski
sack since the ski sack can be sec ured . In
dividual objects cannot be secured. There
is a risk of injury .
Sea ts a nd s to rage 65
@ Tips
-You can open the pass-through from the
luggage compartment. Push the release
button down and push the cover for
ward.
- You can lock or unlock the pass-through
using the mechanical key. This preven ts
any access to the luggage compar tment
from the vehicle interior .
Securing the ski sack
Applies to vehicles: w ith ski sack
The ski sa ck mu st be secured in the luggage
compartment.
F ig. 69 Luggage compar tment: Se curing the s ki s ack
F ig. 70 Rea r ben ch s eat: secur ing the sk i sack
There are two straps with hooks on the bot
tom side of the ski sac k
q fig. 69@. There is
also a secu ring strap ®
q fig. 70 on the sack.
.. To secu re the ski sack in the luggage com-
pa rtment, hang the hooks in the rear t ie
downs
q fig. 69 .
.. Tighten the strap on the ski sack to prevent
the objects in the sack from sliding
q fig. 70. ...
Page 74 of 294
72 On the road
• Automatic transmission: Step on the brake
pedal and move th e se lector lever to the P
or
N position.
• Press the key c::>
fig. 74 -the eng ine will
start.
Sw itching the i gni tion on /off
If you wou ld like to switch the ignition on
without starting the engine, follow these
steps :
• Inse rt the key into the ignition lock .
• Press the key briefly
wi thout pressing the
c lutch pedal (for man ual transmissions) or
the brake peda l (for automatic transmis
s ions) .
• To sw itch the igni tion off, press the key
again.
When starting the engine, major e lectr ical
loads are swi tched off temporarily .
You can on ly remove the key with the ignition
switched off.
I f the engine should not sta rt immediately,
the starting process is automatically stopped
after a short time. Repeat starting procedure .
A WARNING
-Never allow the engine to run in confined
spaces -danger of asphyxiation .
- Never remove the ign ition key from the
ignition look whi le the vehicle is moving.
Otherw ise, the steering lock cou ld sud
denly engage and you would not be able
to steer the vehicle.
- Always take the key with you whenever
you leave your vehicle . Otherwise, the
engine could be started or electr ica l
equipment such as the power w indows
c ou ld be operated. This can lead to seri
o us inj ury.
- Never leave children or persons requiring
assistance u nattended in the vehicle . The
doors c an be locked using the remo te
transmitter, preventing people from es
caping from the vehicle on their own in
the event of an eme rgency. Depending
on the time of year, people inside the ve- h
icle can be exposed to very high or very
low temperatu res.
@ Note
Avoid high eng ine rpm, f ull throttle and
heavy engine loads unti l the engine has
r eached operating tempe rat ure -other
wise you risk eng ine damage.
@ For the sake of the environment
Do not let the engine run w hile parked to
warm up. Begin driving immediately. This
reduces unnecessary emissions.
(D Tips
- If the key cannot be removed from the
ignition lock, you have to pull the me
chanical key out of the master key in or
der to be able to lock the vehi-
cle c::>
page 35 .
-After starting a cold engine, there may
be a brief period of increased noise be
cause the oil pressure must first bu ild up
in the hydraulic valve ad justers. This is
normal and not a cause for concern.
- If you leave the veh icle with the ignition
switched on, the ignit ion w ill switch off
afte r a certain per iod of t ime . P lease
no te that electrical eq uipment such as
exterior ligh ts will sw itch off as well
when that happens .
Page 75 of 294
Starting the vehicle with the emergency
key
Applies to vehicles: with ignition lock
You can use the emergency key as an ignition
key in an emergency.
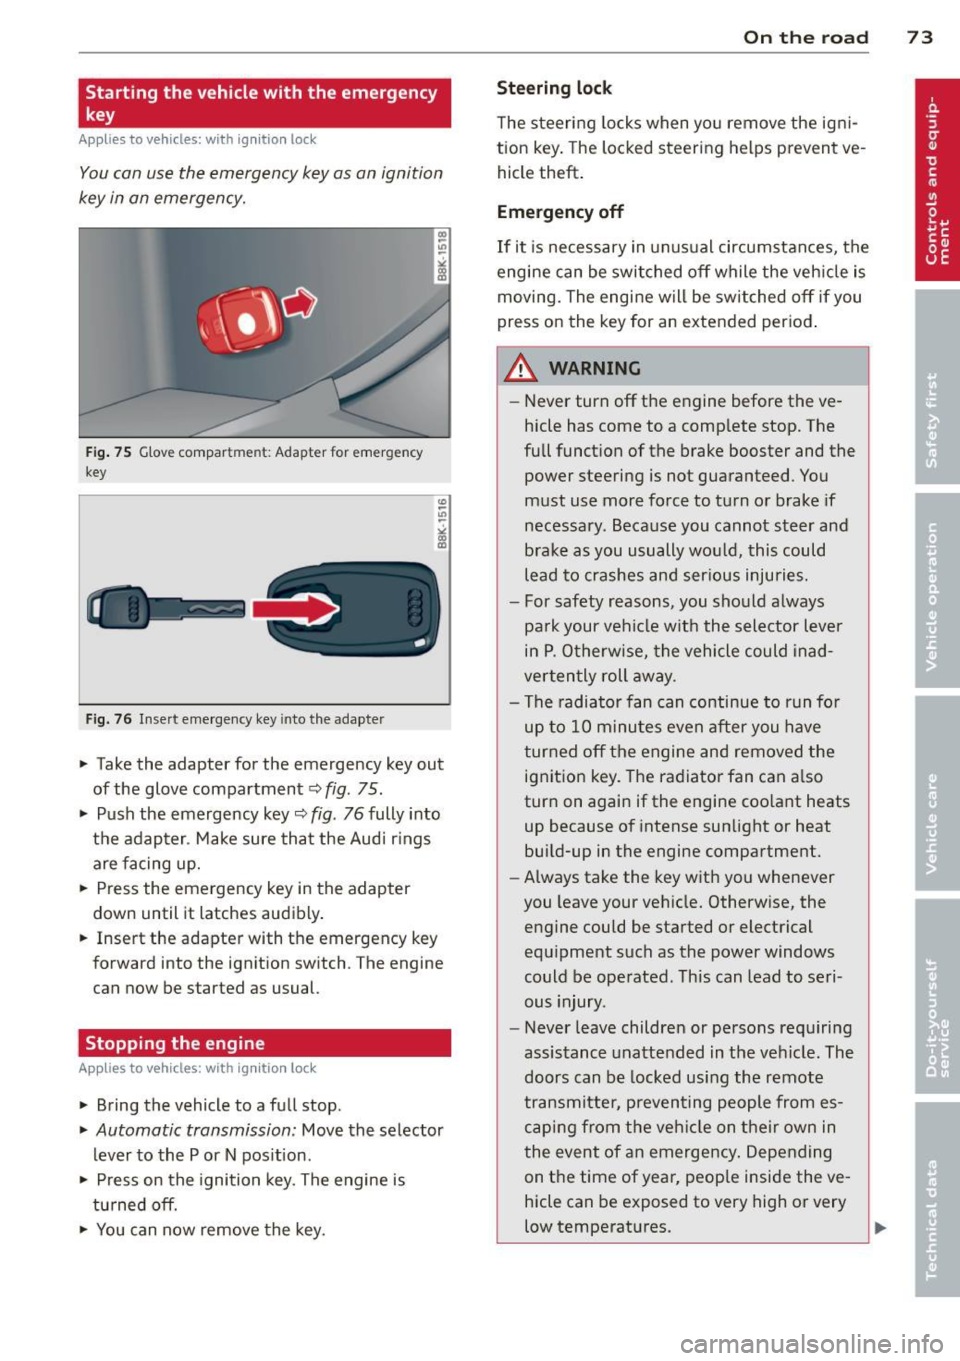
Fig . 75 G love compar tmen t: Adapter for emergency
key
Fig. 76 Insert emergency key into the adapter
.,.. Take the adapter for the emergency key out
of the glove compartment
<=:> fig . 75 .
.,.. Push the emergency key~
fig. 76 fully into
the adap ter . Make sure that the Audi r ings
are facing up.
.,.. Press the emergency key in the adapter
down until it latches audibly .
.,.. Insert the adapter with the emergency key
forward into the ignition switch . The engine
can now be started as usual.
Stopping the engine
App lies to vehicles: with ig ni tion loc k
.,.. Bring the vehicle to a full stop.
.,.. Automatic transmission: Move the selector
lever to the P or N pos ition .
.,.. Press on the ignition key. The engine is
tu rned off.
.,.. You can now remove the key.
On th e road 73
Ste ering lock
The steering locks when yo u remove the ig ni
tion key . The lo cked steering helps prevent ve
hicle theft .
Emergency off
If it is necessary in unus ual circumstances, the
engine can be switched off while the veh icle is
moving. The engine will be switched off if you
press on the key for an extended period .
A WARNING
-Never turn off the engine before the ve
hicle has come to a comp lete stop. The
full funct ion of the brake booster and the
power steering is not guaranteed . You
must use more force to turn or brake if
necessary. Because you cannot steer and
brake as you usually wo uld, this could
lead to crashes and ser ious injuries.
- For safety reasons , you should always
pa rk your vehicle w ith the selector lever
in P . Otherwise, the vehicle could inad
verten tly roll away .
- The radiator fan can continue to run fo r
up to 10 minutes even after you have
turned off the engine and removed the ignition key. The radiator fan can a lso
turn on again if the engine coo lant heats
up because of intense sunlight or heat
build-up in the engine compartment.
- Always take the key with you whenever
you leave your vehicle. Otherw ise, the
engine could be started or electrical
equipment such as the power windows
could be operated . This can lead to seri
ous injury.
- Never leave children or persons requiring
assistance unattended in the vehicle. The
doors can be locked using the remote
transmitter, preven ting people from es
caping from the veh icle on their own in
the event of an emergency. Depending
on the time of year, peop le inside the ve
hicle can be exposed to very high or very
low temperatures .
Page 76 of 294
7 4 On the road
(D Note
If the engine has been under heavy load
for an extended period, heat builds up in
the engine compartment after the engine
is switched off -there is a risk of damaging
the engine . Allow the engine to run at idle
for about two minutes before switching it
off.
Convenience key
Starting the engine
Applies to vehicles: with co nve nience key
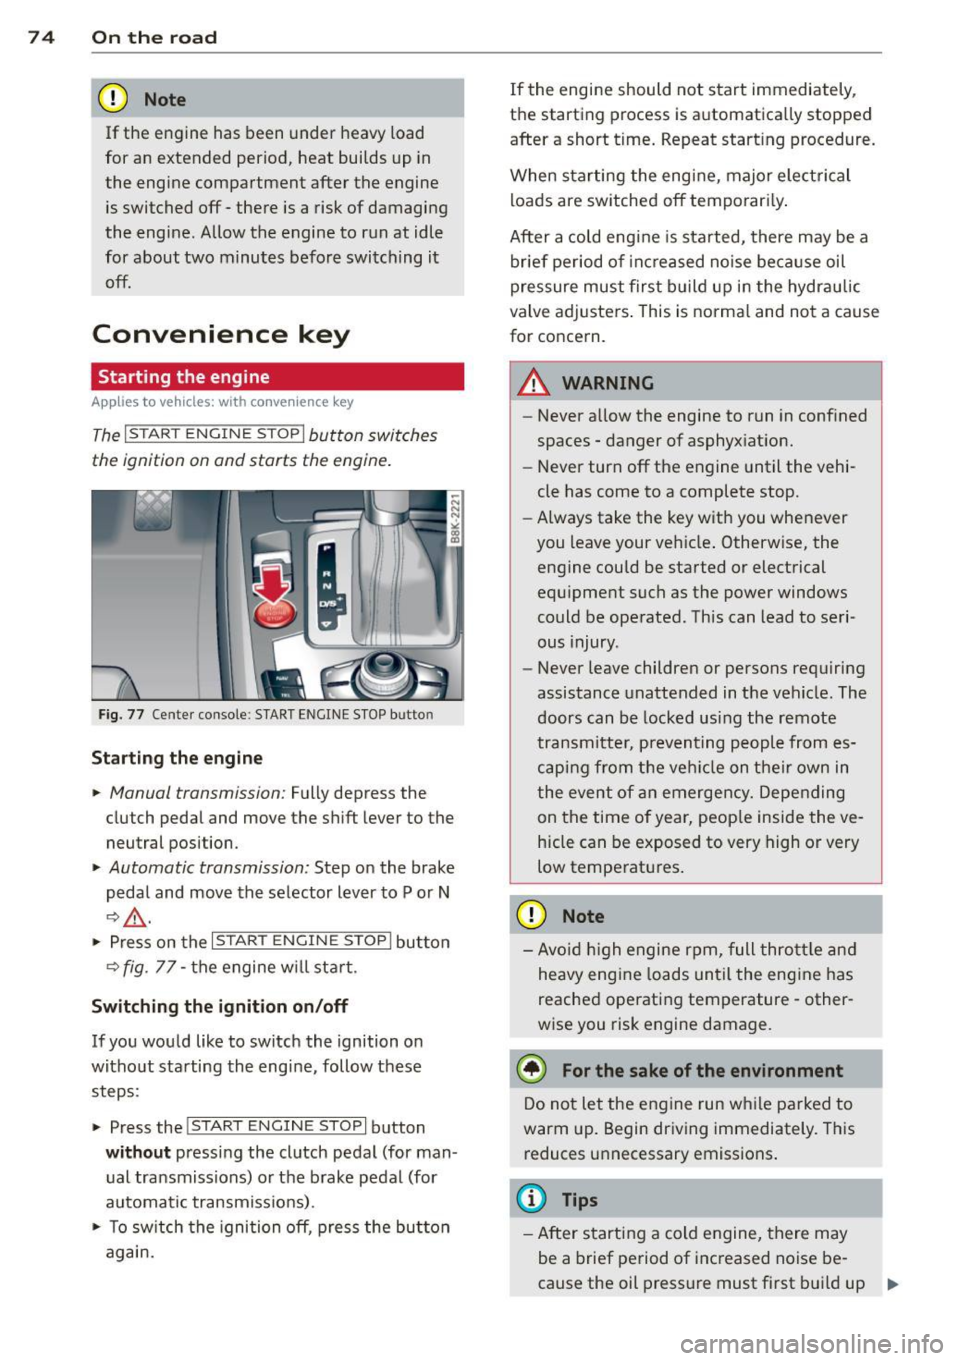
The I S TA RT EN GINE ST OP ! button switches
the ignition on and starts the engine .
Fig. 77 Center console : S TART ENGINE STOP bu tto n
Starting the engine
.. Manual transmission: Fully depress the
clutch pedal and move the shift lever to the
neutral posi tion .
.. Automatic transmission: Step on the brake
pedal and move the selector lever to P or N
I:?&_ .
.. Press on the I STAR T ENG IN E ST OP I bu tton
<=? fig . 77 -the engine w ill sta rt .
Switching the ignition on/off
If you would like to switch the ignition on
without starting the engine, follow these
steps :
.. Press the
!START ENGIN E STOP! button
without pressing the clutch pedal (for man
ual transmissions) or the brake pedal (for
automatic transmiss ions) .
.. To switch the ignition off, press the but ton
again. If
the engine should not start immediately,
the sta rting process is automatically stopped
afte r a short t ime. Repeat start ing procedure.
When sta rting the engine, major elect rical
loads are switched off temporar ily .
After a cold engine is started, there may be a
brief period of increased noise because oil
pressure must first build up in the hydrau lic
valve adjusters . This is norma l and not a cause
for concern .
.&_ WARNING
-
-Never allow the engine to run in confined
spaces -danger of asphyxiation.
- Never turn off the engine until the vehi
cle has come to a complete stop.
- Always take the key with you whenever
you leave your veh icle . Otherw ise, the
engine could be started or electrical
equ ipment such as the power windows
could be operated . This can lead to seri
ous injury .
- Never leave children or persons requiring
assistance unattended in the vehicle . The
doors can be locked using the remote
tr an smitter, preventing people from es
caping from the veh icle on their own in
the event of an emergency. Depending
on the time of year, peop le inside the ve
hicle can be exposed to very high or very
low temperatures .
(D Note
-Avo id high engine rpm, full throttle and
heavy eng ine loads until the engine has
reached operating temperature -other
wise you risk engine damage.
@ For the sake of the environment
Do not let the engine run while parked to
warm up. Begin driving immediately. This
reduces unnecessary emissions .
(D Tips
-After starting a cold engine, there may
be a brief period of increased noise be-
cause the oil pressure must first build up .,.
Page 79 of 294
Emergency brake fun ction
An emergency brake ensures that the vehicle
can be slowed down even if the
normal b rakes
fail
c::> page 78, Emergency broking.
Ind icat or light s
-If the par king b rake is closed w ith the igni
t ion
s wit ched on the . (USA models)/
• (Canada models) indicato r lights come
on in the instrument cluster and the switch .
-If the par king brake is closed w ith the igni
tion
s witc hed off the . (USA models)/
• (Canada mode ls) indicator lights come
on in the instrument cluster and the switc h
for about 20 seconds.
A WARNING
If a gear or a drive range (automat ic trans
m ission) is engaged with the vehicle sta
tionary and the engine runn ing, you must
in no instance accelerate or release the
clutch carelessly. Othe rwise the vehicle
w ill sta rt to move immediately- r isk of an
accident.
(D Note
If the . symbol in the display or the
.. (USA models) . (Canada models)
ind icator light in the instr ument cluster
flashes, there is a ma lfunction in the b rake
system. By press ing the
!SETI button, you
can bring up a driver message which ex
plains the malfunction in more detail. If
the driver message
Pa rking brake! ap
pears, there is an operating malfunction in
the parking brake which you should have
repaired immediately by an authorized
Aud i dealer or other q ual ified workshop
c::> poge 15.
(j) Tips
- You can apply the parking brake at any
time -even w ith the ignition switched
off . T he ignit io n must be tu rned on in o r
der to release the parking b rake.
On th e ro ad 77
-Occasional noises when the parking
brake is app lied and released are normal
and are not a cause for concern.
- When the vehicle is pa rked, the park ing
brake goes through a self -test cycle at
regu lar interva ls. Any associated noises
are normal.
Parking
Parking
.,. Press the brake pedal to stop the veh icle .
.,. Pull the button
@ c::> page 76, fig. 78 to set
the parking brake .
.,. Automatic transmission: Move the selector
lever to P.
.,. Tur n the engine off
c::> &_ .
.,. Manual transmiss ion: Shift into 1s t gear.
In addition on inclines and grades
.,. Turn the steering wheel so that your vehicle
w ill roll aga inst the curb in case it shou ld
start to move.
_&. WARNING
- When you leave you r vehicle -even i f on
ly briefly -always remove the ignition
key. This app lies particularly when chil
dren remain in the vehicle. Otherwise the
children could start the eng ine, release
the parking brake or operate electrical
equ ipment (e .g . power windows) . There
is the risk of an acc ident .
- When the veh icle is locked, no one -par
ticularly not childre n should rema in in
the vehicle . Locked doors make it mo re
difficult for emergency wo rke rs to get in
to the vehicle -put ting lives at risk .
Starting from rest
The starting assist function ensures that the
parking broke is released automatically upon starting.
Stopping and applying p arking brake
.,. Pull the switch @ c::> page 76, fig. 78 to ap-
ply the parking brake .
Ill>-
Page 128 of 294
126 Driving Safely
• Always keep both feet in the footwell so
that you are in control of the vehicle at all
times.
For detailed information on how to adjust the
driver's seat, see
¢ page 54 .
A WARNING
Drivers who are unbelted, out of position
or too close to the airbag can be seriously
injured by an airbag as it unfolds. To help
reduce the risk of serious personal injury:
- Always adjust the driver's seat and the
steering wheel so that there are at least
10 inches (25 cm) between your breast
bone and the steering wheel.
- Always hold the steering wheel on the
outside of the steering wheel rim with
your hands at the 9 o'clock and 3 o'clock positions to help reduce the risk of per
sonal injury if the driver's airbag inflates.
- Never hold the steering wheel at the
12 o'clock position or with your hands at
other positions inside the steering wheel
rim or on the steering wheel hub. Hold
ing the steering wheel the wrong way
can cause serious injuries to the hands,
arms and head if the driver's airbag de
ploys.
- Pointing the steering wheel toward your
face decreases the ability of the supple
mental driver 's airbag to protect you in a
collision .
- Always sit in an upright position and nev
er lean against or place any part of your
body too close to the area where the air
bags are located.
- Before driving, always adjust the front
seats and head restraints properly and
make sure that all passengers are prop
erly restrained.
- Never adjust the seats while the vehicle
is moving . Your seat may move unexpect
edly and you could lose control of the ve
hicle.
- Never drive with the backrest reclined or
tilted far back! The farther the backrests
are tilted back, the greater the risk of in- jury due to incorrect positioning of the
safety belt and improper seating posi
tion.
- Children must always ride in child safety
seats ¢
page 166. Special precautions
apply when installing a child safety seat
on the front passenger seat¢
page 142 .
Proper seating position for the front
passenger
The proper front passenger seating position
is important for safe, relaxed driving .
For your own safety and to reduce the risk of
injury in the event of an accident, we recom
mend that you adjust the seat for the front
passenger to the following position :
• Move the front passenger seat back as far
as possible . There must be a minimum of
10 inches (25 cm) between the breastbone
and the instrument panel¢,&. .
• Adjust the angle of the seatback so that it is
in an upright position and your back comes
in full contact with it whenever the vehicle is
moving.
• Applies to vehicles with adjustable head re
straints: Adjust the head restraint so the up
per edge is as even as possible with the top
of your head. If tha t is not possible, try to
adjust the head restraint so that it is as
close to this position as possible.
• Keep both feet flat on the floor in front of
the front passenger seat.
• Fasten and wear safety belts correctly
¢page 137.
For detailed information on how to adjust the
front passenger's seat, see
¢ page 53.
A WARNING
-
Front seat passengers who are unbelted,
out of position or too close to the airbag
can be seriously injured or killed by the air
bag as it unfolds. To help reduce the risk of
serious personal injury: