wheel AUDI A5 COUPE 2014 User Guide
[x] Cancel search | Manufacturer: AUDI, Model Year: 2014, Model line: A5 COUPE, Model: AUDI A5 COUPE 2014Pages: 286, PDF Size: 70.99 MB
Page 87 of 286
~ Press and hold the release button in these
lector lever handle, se lect the desired se lec
tor lever position such as D/S and re lease
the button.
~ Wait br iefly until the transmission has shift
ed (you will feel a slight movement).
~ Remove your foot from the brake pedal and
acce lerate.
Stopp ing temporaril y
~ Keep the vehicle stationary us ing the brak
ing pedal, for example at traffic lights.
~ Do not press the accelerator pedal when do
i ng this.
~ To p revent the veh icle from rolling when you
sta rt driving, set the pa rking brake whe n
stopp ing on steep inclines ¢
&-
~ The parking brake will re lease automatically
and the vehicle will start moving once yo u
press the accelerator peda l.
Stopping /pa rking
If the selecto r lever is not in the P position
when yo u ope n the dr iver's door, the vehicle
could ro ll. The message
Transmis sion: Car
m ay ro ll! Shift to pa rk!
appears.
~ Press and ho ld the brake pedal unt il the ve-
hicle has come to a comple te stop.
~ Apply the parking brake ¢ page 77, Parking.
~ Select the P selector lever position c::, & -
Stopping on an incline
~ Always press t he b rake pedal to hold the ve
hicle i n place and preven t it from " rolling
back" ¢
& -Do not try to prevent the vehi
cle from "rolling back" when a gear is en
gaged by increasing the engine speed ¢(D .
Starting on an incline
~ Activate the par kin g b rake.
~ Wi th the driving gea r se lected, press the ac
ce lerato r pedal ca re fully . The parking brake
will release a utomatically i f yo ur seat belt is
fastened.
Under certain circumstances, s uch as driv ing
in the mountains, it may be useful to switch
temporari ly to the manua l shift program in or-
Tran sm iss ion 85
der to ad just the gears to the driv ing cond i
tions by hand
c::, page 86.
On s lopes, activ ate the parki ng b rake first and
then move the selec to r l ever to the P posi tion.
T his prevents too much st ress from being
placed on the locking mechanism .
A WARNING
-The vehicle can also roll when the engine
is stopped.
- Unintended vehicle movement can cause
serio us injury.
- Never leave your vehicle with the engine
ru nning while in gear. If yo u must leave
your veh icle when the engine is running,
activate the parking brake and move the
selector lever to P.
- Power is still transm itted to the wheels
when the engine is runn ing at idle. To
prevent the vehicle from "creeping", you
must keep your foot on the brake when
the eng ine is ru nning and the se lector
leve r is in D/S o r R or "t ipt ron ic" mode is
selec ted .
-Do not press the accelerator pedal when
changing t he se lector lever posi tion
while the veh icle is s ta tionary and the
engine is running .
- Never sh ift into R o r P wh ile d rivi ng.
- Before driving dow n a steep slope, re-
duce your speed and shift into a lowe r
gear wi th "tiptronic".
- Do not ride the bra kes o r press the bra ke
pe dal too ofte n or too long whe n driving
down a hi ll. Constant braking causes the
brakes to over heat and substantially re
duces braking performance, increases
brak ing distance or causes complete fa il
ure of t he brake system.
- To prevent the vehicle from ro lling back
when stopp ing o n inclines, always ho ld it
in place with the brake pedal or parking
brake.
- Never hold the vehicle on an incline with
a slipping clutch. The clutch opens auto mat ically when it becomes too hot from
the overload. An indicato r lamp
mJ
Page 89 of 286
"To upshift, push the selector lever fo rward
to the plus position
0 ~ fig. 86.
" To downshift, push the lever to the minus
pos it ion
Q .
Gea r se lection with paddle lever s*
The shift buttons are act ivated when these
l ector lever is in D/S or the tiptronic manual
shift program .
"T o upsh ift, touch the button on the right
0
~ fig. 87.
"To downshift, touch the button on the left
Q .
"If you do not press a shift button within a
short time while in the D/S position, the
transmission will return to automatic mode .
To keep shifting using the shift buttons, move the selector lever to the right out of
the D/S position .
T he transmission automatically shifts up or
down before critical engine speed is reached .
The transmission only a llows manua l shifting
when the engine speed is within the permit ted range .
(D Tips
-When yo u sh ift into the next lower gear,
the transmiss ion will downshift only
when there is no possibility of over-rev
v ing the engine .
- When the kick-down comes on, the
transmission will sh ift down to a lower
gear, depending on vehicle and engine
speeds.
- Tiptronic is inoperat ive when the trans
mission is in the fail-safe mode .
Kick-down
Appl ies to vehicles: with S tro nic/t iptronic
Kick -down enables maximum acceleration .
When you depress the accelerator pedal be
yond the resistance po int, the automat ic
transmission downshifts into a lower gear, de pending on vehicle speed and engine speed .
The upshift into the next higher gear takes
Tran sm iss ion 87
place once the max imum specified engine
speed is reached.
A WARNING
P lease note that the drive wheels can spin
if kick-down is used on a smooth slippery
road - there is a risk of skidd ing .
Launch Control Program
App lies to vehicles : wi th S tronic
The Launch Control Program provides the
best acceleration possible when starting from
a stop.
Req uirement: The engine must be at operat
ing temperature and the steering whee l must
not be t urned.
" Press the
I~ O FF ! button r::!:> page 182 whi le
the engine is running. The
II indicator light
ill uminates in the instrument cl uster and
Stabili zat ion control (ESC): Sport. Warn ·
ing! Restricted stability
appears in the driv
er information system display .
" Move the selector lever to the D/S posit ion
to select sport mode (S) or se lect the
d y
nami c driv ing mode in dr ive se lect*
r::!:> page 105.
"Press the brake pedal s trongly with yo ur left
foot and hold it down for at least 1 second .
" At the same time, press the acce lerator ped
al down completely with your right foot un
til the eng ine reaches and maintains a high
RPM.
" Remove your foot from the brake pedal
w ith in 5 seconds
r::!:> & .
A WARNING
-Always adapt your dr iving to the traffic
f low.
- On ly us e th e Launch Cont ro l Program
when road and t raff ic condi tions a llow i t
an d other d rivers w il l not be e ndangered
or annoyed by your driving and the vehi
cle's acceleration.
- Please no te that t he drivin g wheels c an
spin and the vehicle can break away
-
Page 103 of 286
General information
Applies to vehicles: with Audi side assist
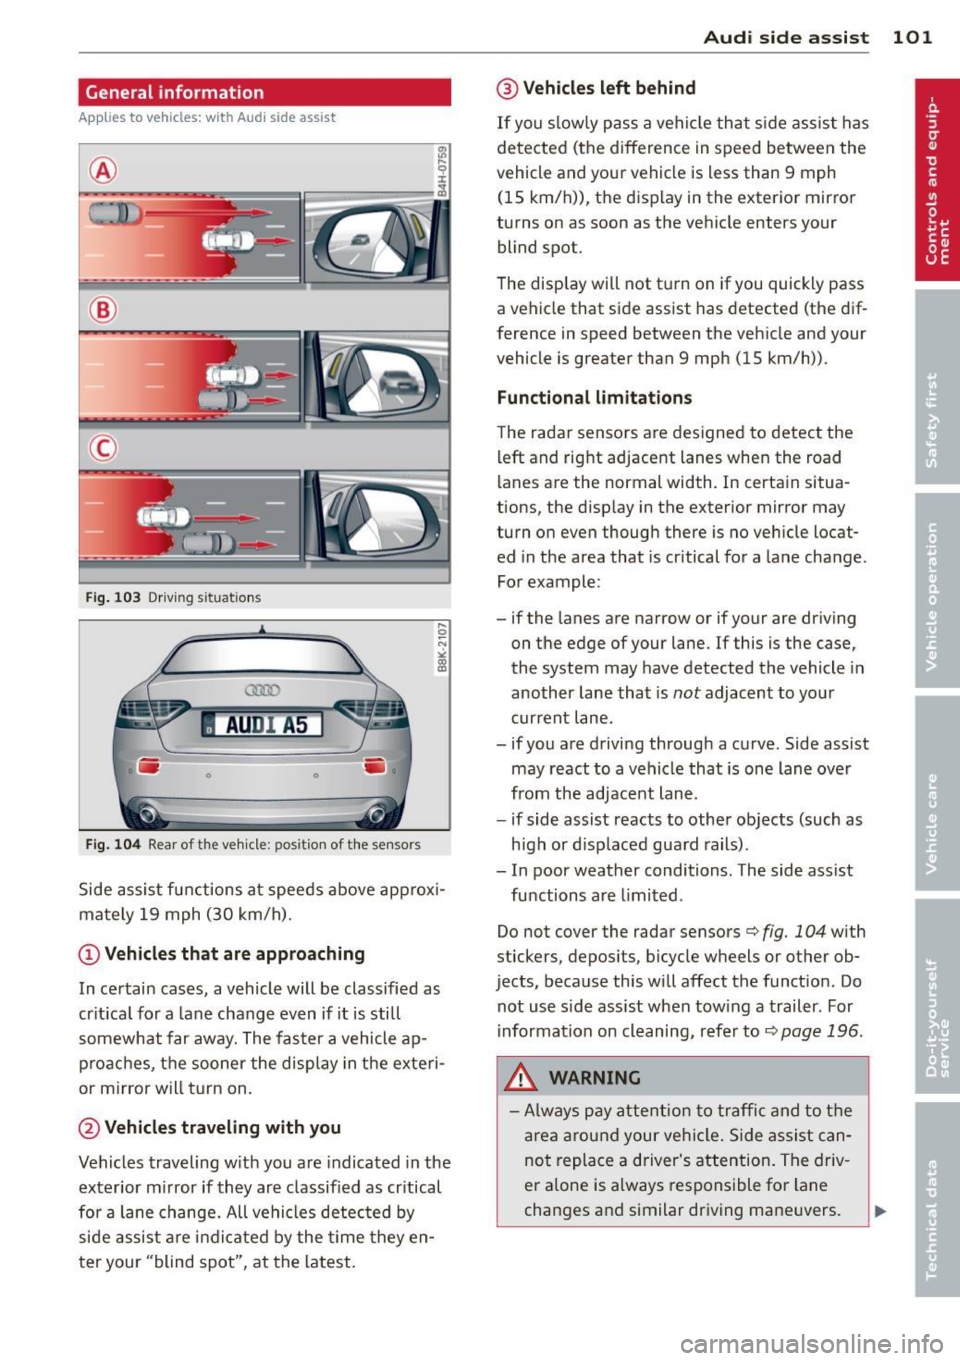
®
©
Fig . 103 Dr iving situations
AUDI A5
•
Fi g. 104 Rear of t he ve hicle: positio n of t he se nsors
Side assist functions at speeds above approx i
mately 19 mph (30 km/h).
@ Vehicl es th at ar e approaching
In certain cases, a vehicle will be classified as
cr itical for a lane change even if it is still
somewhat far away. The faster a vehicle ap
p roaches, the sooner the display in the exteri
or m irror will t urn on.
@ Vehicles traveling with you
Vehicles traveling w ith you are indicated in the
exterior m irror if they are classified as cr itical
for a lane change. All vehicles detec ted by
side assist are indicated by the time they en
ter your "blind spot", at the latest.
Audi side assist 101
@ Veh icle s left behind
If you s low ly pass a vehicle that s ide assist has
detected (the difference in speed between the
vehicle and your vehicle is less than 9 mph (15 km/h)), the display in the exterior mirror
turns on as soon as the vehicle enters your blind spot.
The disp lay will not t urn on if you quickly pass
a vehicle that side assist has detected (the dif
ference in speed between the vehicle and your
vehicle is greater than 9 mph (15 km/h)).
Functional limitation s
The radar senso rs are designed to detect the
left and right adjacent lanes when the road
lanes are the normal width. In certain situa
tions, the disp lay in the exterior mirror may
turn on even though there is no vehicle locat
ed in the area that is cr itical for a la ne change.
For example:
- if the lanes are narrow or if your are dr iving
on the edge of your lane.
If this is the case,
the system may have detected the vehicle in
another lane that is
not adjacent to your
current lane .
- if you a re driving through a curve. Side assist
may react to a vehicle that is one lane ove r
from the adjacent lane.
- if side assist reacts to other objects (such as
high or d isp laced guard rails) .
- In poor weather conditions. The side assist
functions are l imited .
Do not cover the radar sensors <=>
fig. 104 with
stickers, depos its, bicycle wheels or other ob
jects, because this will affect the funct ion. Do
not use s ide ass ist when towing a trailer. For
i nformation on cleaning, refer to<=>
page 196.
_&. WARNING
- Always pay attention to traffic and to t he
area around your ve hicl e. S ide assist can
not replace a driver's attention. The driv
er a lone is always responsible for lane
changes and similar driving mane uvers.
Page 104 of 286
102 Audi side assist
-Improper reliance on the side assist sys
tem can cause collisions and serious
personal injury:
- Never rely only on side assist when
changing lanes.
- Always check rear view mirrors to make
sure that it is safe to change lanes.
- Side assist cannot detect all vehicles un
der all conditions- danger of accident!
- Please note that side assist indicates
there are approaching vehicles, or
vehicles in your blind spot, only after
your vehicle has reached a driving speed
of at least 19 mph (30 km/h).
- In certain situations, the system may not
function or its function may be limited.
For example:
- if vehicles are approaching or being left
behind very quickly . The display may
not turn on in time.
- in poor weather conditions such as
heavy rain, snow or heavy mist .
- on very wide lanes, in tight curves or if
there is a rise in the road surface.
Vehicles in the adjacent lane may not
be detected because they are outside
of the sensor range.
(D Note
The sensors can be displaced by impacts or
damage to the bumper, wheel housing and
underbody. This can affect the system.
Have your authorized Audi dealer or au
thorized Audi Service Facility check their
function.
@ Tips
- If the window glass in the driver's door
or front passenger's door has been tint
ed, the display in the exterior mirror may
be misinterpreted.
- For Declaration of Compliance to United
States FCC and Industry Canada regula
tions¢
page 267.
Activating and deactivating
A pp lies to vehic les : wi th Audi s ide ass ist
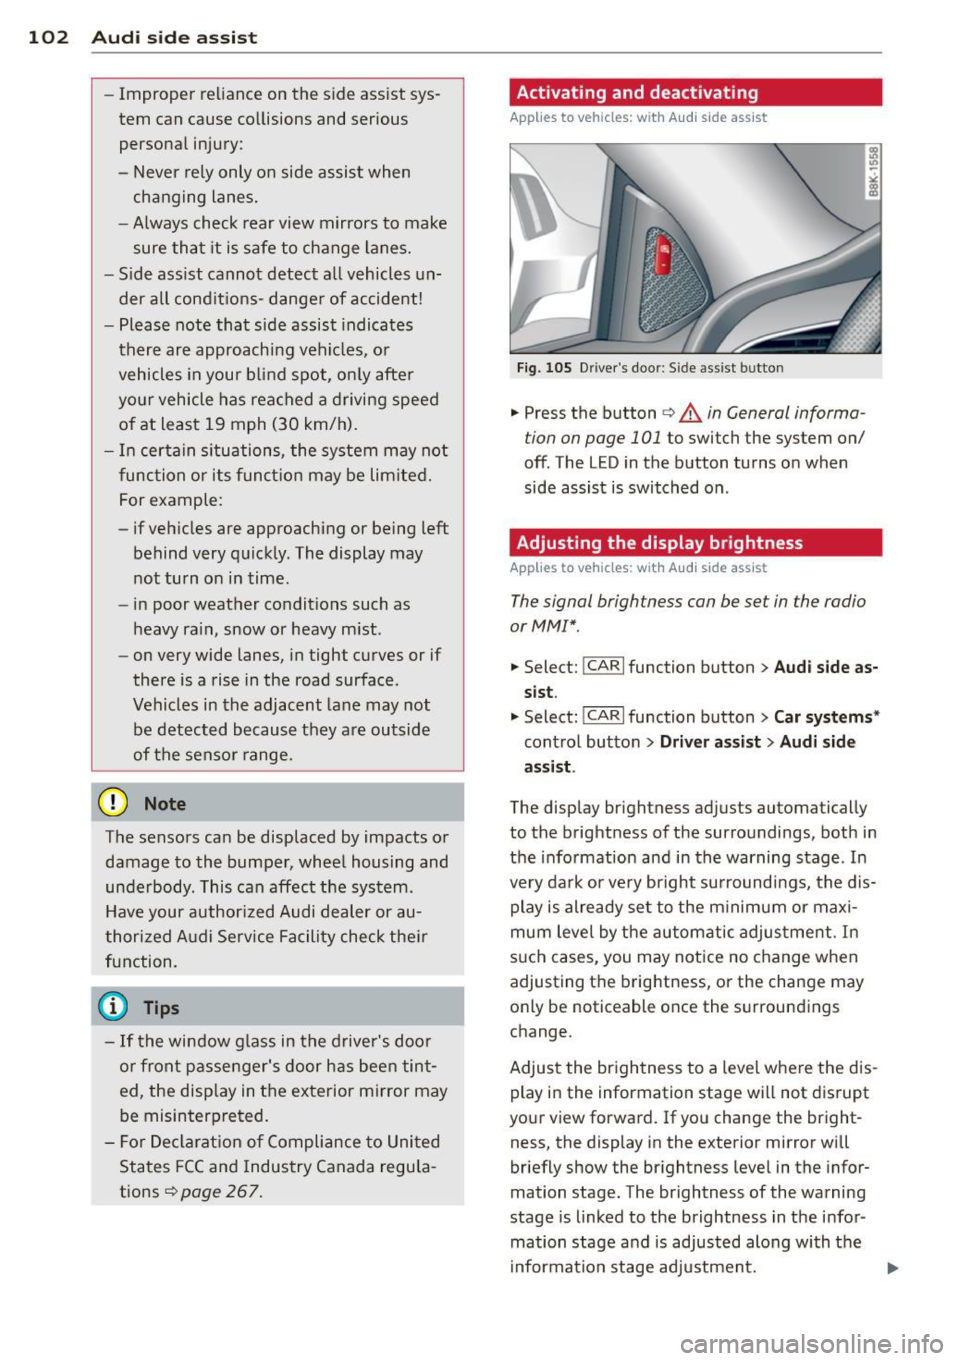
Fig. 105 D river's door: Side ass ist butto n
.. Press the button c> A in General informa
tion on page 101
to switch the system on/
off. The LED in the button turns on when
side assist is switched on .
Adjusting the display brightness
Applies to vehicles: wit h Audi side ass ist
The signal brightness con be set in the radio
or MM!*.
.. Select: I CAR I function button > Audi side as
sist.
.. Select: !CARI function button> Car systems*
control button > Driver assist> Audi side
assist .
The display brightness adjusts automatically
to the brightness of the surroundings, both in
the information and in the warning stage . In
very dark or very bright surroundings, the dis play is already set to the minimum or maxi
mum level by the automatic adjustment. In
such cases, you may notice no change when
adjusting the brightness, or the change may
only be noticeable once the surroundings
change.
Adjust the brightness to a level where the dis
play in the information stage will not disrupt
your view forward. If you change the bright
ness, the display in the exterior mirror will
briefly show the brightness level in the infor
mation stage. The brightness of the warning
stage is linked to the brightness in the infor
mation stage and is adjusted along with the
information stage adjustment.
Page 105 of 286
@ Tips
-Side assist is not active whi le you are
making the adjustment.
- Your settings are automatica lly stored
and assigned to the remote control key
being used.
Driver messages
Applies to vehicles: with Audi side assist
If s ide ass ist switches off by itself, the LED in
the button turns off and a message will ap
pear in the instrument cluster display:
Audi side assist unavailable: Sensors blocked
The radar sensors' vision is affected. Do not
cover the area in front of the sensors with bike
wheels, stickers, dirt or other objects. Clean
the area in front of the sensors, if necessary
c;.page 101, fig. 104.
Audi side assist: Currently unavailable
Side assist cannot be switched on temporarily
because there is a malfunc tion (for example,
the battery charge leve l may be too low) .
Audi side assist: System fault!
The system cannot guara ntee that it will de
tect veh icles correctly and it is switched off .
The sensors have been displaced or are faulty.
H ave the system checked by an authorized
Aud i dealer or authorized Aud i Service Facility
soon.
Audi side assist: Unavailable when towing
Side assist sw itches off automatically when a
factory- insta lled trailer h itch is connected to
the electrical connector on the trailer. There is
no guarantee the system will switch off when
usi ng a retrofitted trailer hitch. Do not use
side assist when towing a trailer .
Audi side assist 103
Page 113 of 286
Switching off
• Drive faster than 9 mph (15 km/h), or
• take the vehicle out of reverse gear. The
acoustic parking system is immediately de
activated, and the rear view camera picture is deactivated automatically after a period
of about 15 seconds, or
• switch off the ignition.
The delay in deactivating the camera provides
an uninterrupted view behind the vehicle es
pecially when maneuvering in tight parking
spaces and prevents the picture from turning
off the every time you sh ift out of reverse .
If the warning message appears in the display but not the rear view camera picture, read and
confirm the warning message . The acoustic
d istance signal is always active.
If you press a function button on the MMI
control console, the rear view camera picture
disappears . The rear view camera picture reap
pears the next time you park.
Further information on the warning message
and the MMI control console can be found in
the MMI instruction booklet.
A WARNING
- Only use the rearview camera to assist
you if it shows a good, clear picture. For
example, the image may be affected by
the sun shining into the lens, dirt on the
lens or if there is a defect.
- Use the rearview camera only with the
rear lid completely closed. Make sure any
objects you may have mounted on the
rear lid do not block the rearview cam
era.
(D Tips
- The rear v iew camera picture is available
as soon as the MMI Display or the MMI is
switched on, or the start-up phase is
completed.
- The sensors must be kept clean and free
of snow and ice for the park assist to op
erate.
Park assist 111
- You can change the vo lume and pitch of
the signals as we ll as the disp lay
~page 113.
-What appears in the display is time-de
layed.
Reverse Parking
App lies to vehicles: wit h parking system (rear, with rear
v iew camera}
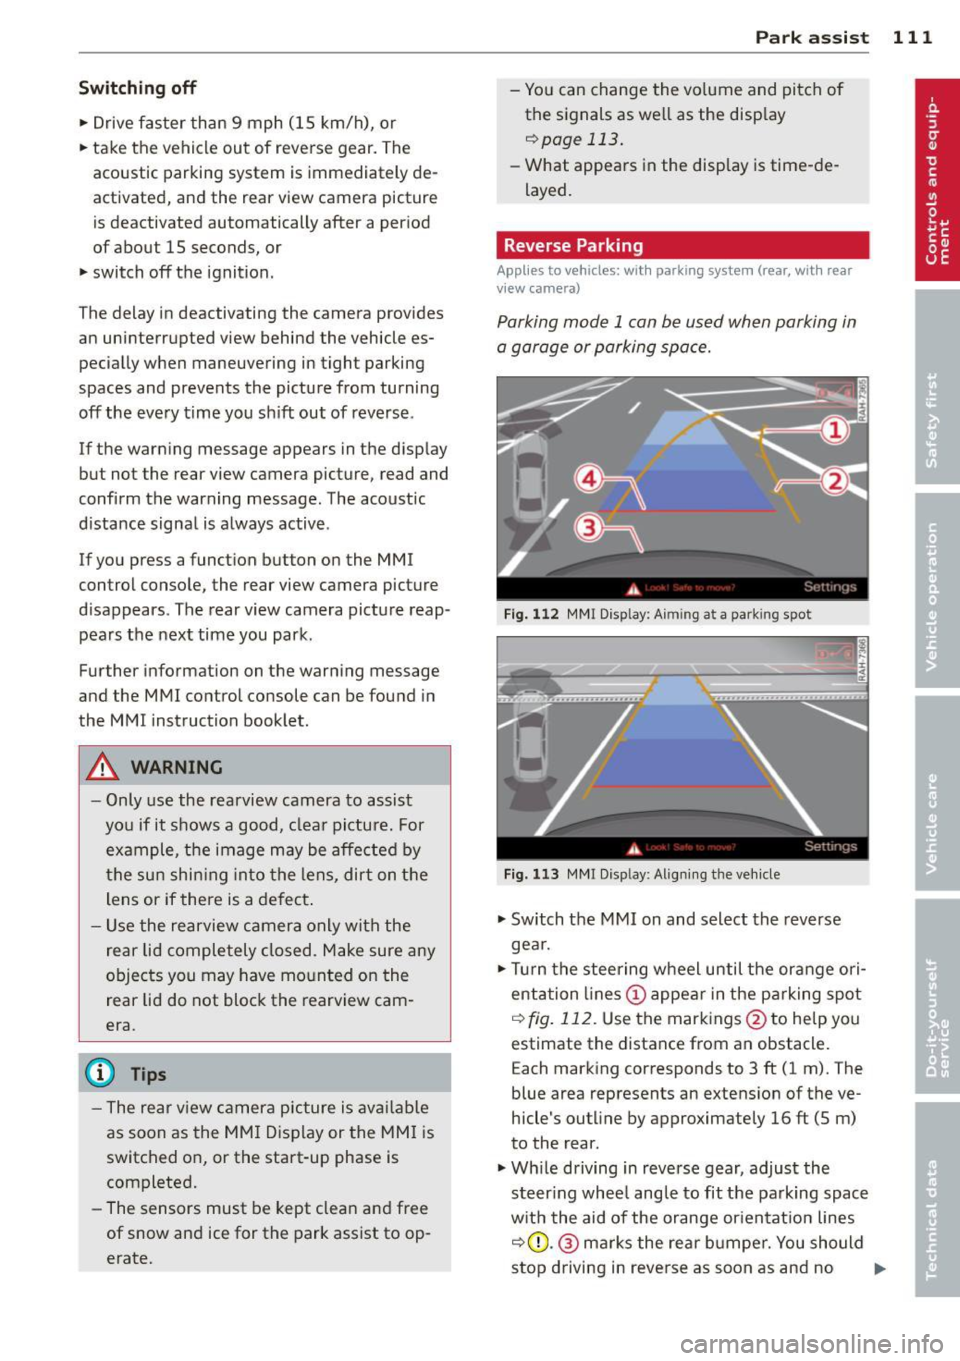
Parking mode 1 can be used when parking in
a garage or parking space.
Fig. 112 MMI Display: Aim ing at a park ing spot
Fig. 113 MMI Disp lay : Al ign ing the veh icle
• Switch the MMI on and select the reverse
gea r.
• Turn the steering wheel until the orange ori
entation lines (!) appear in the parking spot
i=> fig. 112. Use the markings @to help you
estimate the distance from an obstacle.
Each marking corresponds to 3 ft (1 m). The
blue area represents an extens ion of the ve
hicle's outline by approximately 16 ft (5 m)
to the rear.
• Wh ile driving in reverse gear, adjust the
steer ing whee l angle to fit the parking space
with the aid of the orange orientation lines
i::>0 .@ marks the rear bumper. You should
stop driving in reve rse as soon as and no
Ill>-
Page 115 of 286
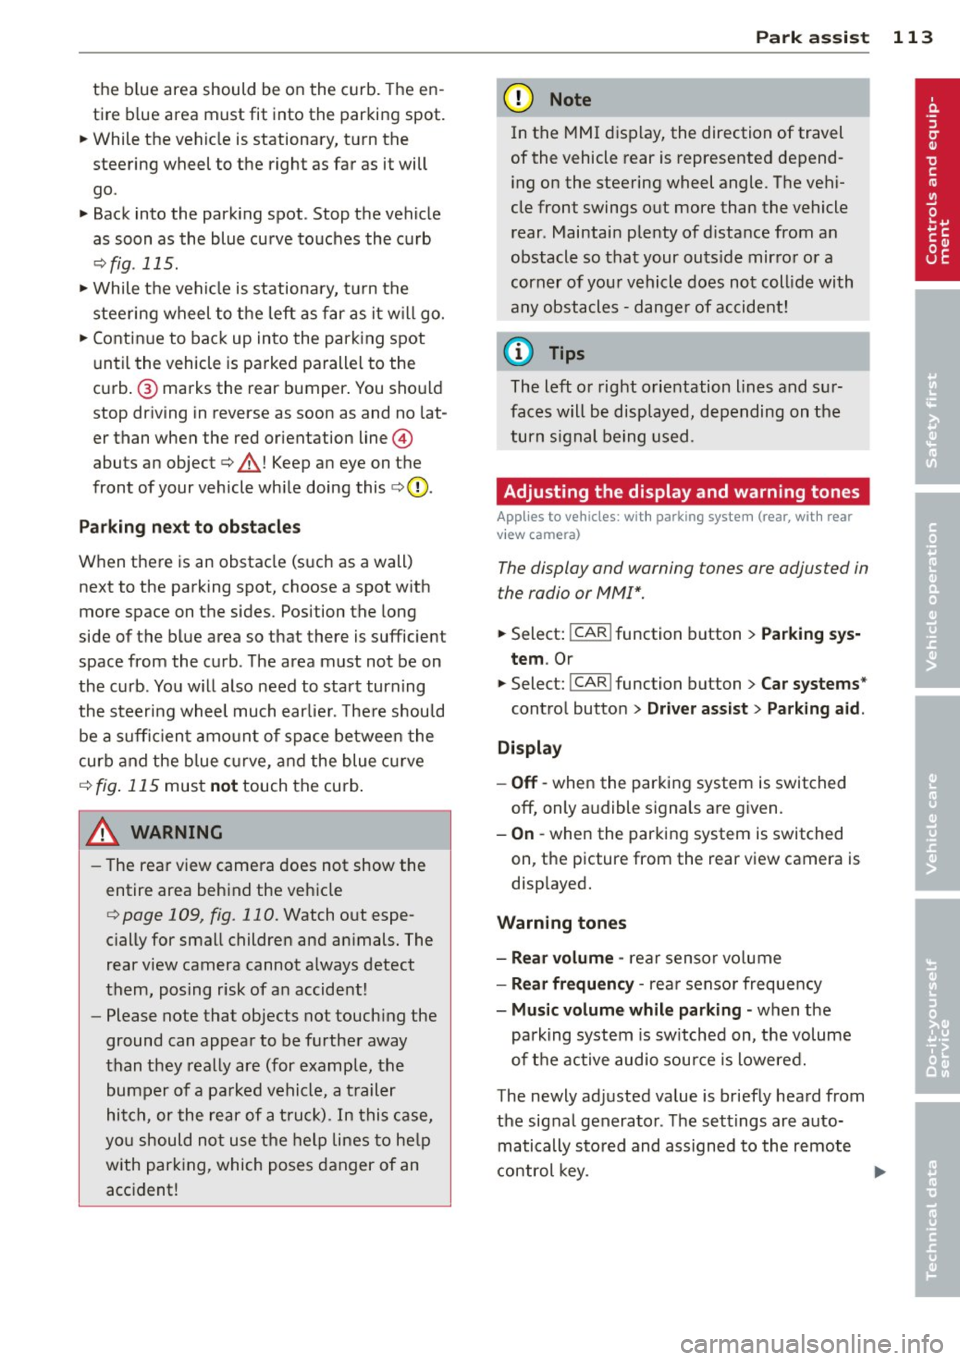
the blue area should be o n the curb. The en
tire b lue area must fit into the parking spot.
~ While the vehicle is stationary, t urn the
steering wheel to the right as far as it will go.
~ Back into the park ing spot . Stop the vehicle
as soon a s the blue curve touches the curb
¢ fig . 115.
~ While the vehicle is stationary, tu rn the
steering wheel to the left as far as it w ill go.
~ Continue to back up into the park ing spot
until the vehicle is parked paralle l to the
curb .@ marks the rear bumper . You should
stop dr iving in reverse as soon as and no lat
er than when the red orientation line@
abuts an object¢,& ! Keep an eye on the
front of your vehicle wh ile doing this ¢(D .
Par kin g ne xt to obst acles
When there is an obstacle (such as a wall)
next to the parking spot, choose a spot with
more space on the sides. Position the long
side of the blue area so that there i s sufficien t
space from the curb . The area must not be on
the curb . You w ill also need to start turning
the steeri ng whee l much ear lie r. T he re should
be a suffic ien t amo unt of space between the
curb and the b lue curve, and the blue c urve
¢
fig . 115 mus t not touch the curb .
&_ WARNING
-The rear view came ra does not show the
entire area behind the vehicle
¢ page 109, fig. 110. Watch out espe
c ially for small children and an imals. The
rear view camera cannot a lways detect
them, posing risk of an accident!
- Please note that objects not touch ing the
ground can appear to be further away
than they really are (for example, the bumper of a pa rked vehicle, a t railer
hi tc h, or the rear of a tru ck) . In this case,
yo u should not use the help lines to he lp
with park ing, which poses danger of an
accident!
P ark a ssis t 113
@ Note
In the MMI display, the direction of travel
of the vehicle rear is represented depend
i ng on the steering wheel angle . The vehi
cle front swings out more than the vehicle
rear. Maintain p lenty of d istance from an
obstacle so that your outs ide mirror or a
corner of you r vehicle does not coll ide with
any obstacles - dange r of accident!
(D Tips
The left o r right orie ntation lines and su r
faces will be displayed, depending on the
turn s ignal being used .
Adjusting the display and warning tones
Applies to vehicles: with parking system (rear, with rear
view camera)
The display and warning tones are adjus ted in
the radio or MM!*.
~ Select: !CAR ! function button > Par king sys
tem .
Or
--~ Select: !C AR ! function but ton> Car systems *
contro l butto n > Driver ass ist > Parking aid .
Di splay
- Off -when the parking system is switched
off, only a udible s ignals a re g iv en .
- On -when the parking system is switched
on, the picture from the rear view camera is
disp layed.
Warning tones
- Rear volum e -
rear sensor vo lume
- Rear frequency -rear senso r frequency
- Music volume while parking -when the
park ing system is sw itched on, the volume
of t he active audio sour ce is lowered.
The newly adjusted value is briefly heard from
the sig nal generato r. Th e settings are auto
matically stored and assigned to the remote
control key. ..,.
Page 122 of 286
120 Driving Safel y
• Sit properly in your seat and make sure that
yo ur passengers do the same¢
page 53,
Seats and storage.
• Fasten your safety belt and wear it properly.
Also instruct your passenge rs to fasten their
safety belts properly¢
page 129 .
What impairs driving safety?
Safe driving is directly related to the condi
tion of the vehicle, the driver as well as the
driver's ability to concentrate on the road
without being distracted .
The driver is responsible for the safety of the
vehicle and all of its occupants . If your ability
to drive is impa ired, safety r isks for everybody
in the vehicle increase and you also become a
hazard to everyone else on the road
9 .&,.
Therefore:
• Do not let yourself be distracted by passen
gers or by us ing a cellular telephone.
• NEV ER dr ive when your dr iv in g ability is im
paired (by medicat ions, alcohol, drugs, etc.).
• Observe all traffic laws, rules of the road
and speed limits and plain common sense.
• ALWAYS adjust your speed to road, traffic
and weather conditions .
• Take frequent breaks on long trips. Do not
drive for more than two hours at a stretch.
> Do NOT drive when you are t ired, under
pressure or when you are stressed .
A WARNING
Impaired driving safety increases the risk
of serious personal injury and death when
ever a veh icle is being used.
Proper occupant
seating positions
Proper seating position for the driver
The proper driver seating position is impor
tant for safe, relaxed driving.
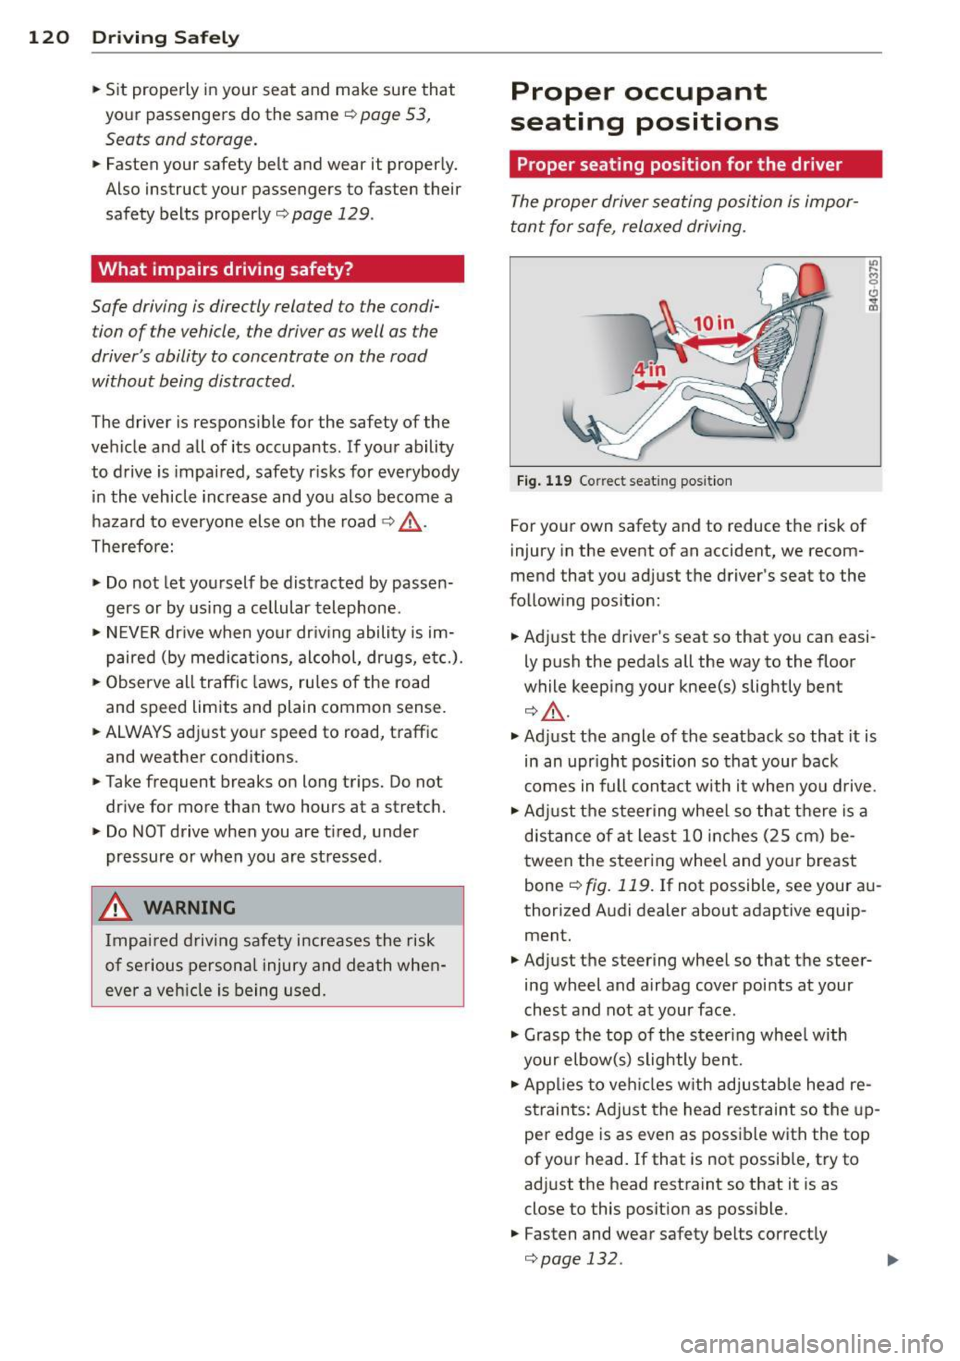
Fig. 119 Correc t seat ing posit ion
For your own safety and to reduce the risk of
injury in the event of an accident, we recom
mend that you adjust the driver's seat to the
following position:
• Adjust the driver's seat so that you can easi
ly push the pedals all the way to the floor
while keeping your knee(s) slightly bent
¢.&_ .
• Adjust the angle of the seatback so that it is
in an upr ight position so that your back
comes in full contact with it when you drive.
• Adj ust the steering wheel so that there is a
distance of at least 10 inches (25 cm) be
tween the steering wheel and your breast
bone ¢
fig. 119. If not possible, see your au
thorized Audi dealer about adaptive equip ment.
• Adjust the steering wheel so that the steer
ing wheel and airbag cover points at your
chest and not at your face .
• Grasp the top of the steer ing wheel with
your elbow(s) slightly bent.
• Applies to veh icles w ith adjustab le head re
straints: Adjust the head restraint so the up
per edge is as even as possible with the top
of your head. If that is not possible, try to
adjust the head restraint so that it is as
close to this posit ion as possible.
• Fasten and wear safety belts correctly
¢page 132.
Page 123 of 286
~ Always keep both feet in the footwell so
that you are in control of the vehicle at all
times.
F or de tai led information on how to adjust the
driver's seat, see
c:;, page 54.
A WARNING
Drivers who are unbelted, out of position
or too close to the airbag can be ser iously
injured by an airbag as it unfolds. To help
reduce the risk of serious personal injury :
- Always adjust the dr iver's seat and the
steering wheel so that there are at least 10 inches (25 cm) between your breast
bone and the steering wheel.
- Always hold the steering wheel on the
outside of the steering wheel rim with
your hands at the 9 o'clock and 3 o'clock posit ions to he lp red uce the risk of pe r
sonal in jury if the drive r's airbag inflates.
- Never hold the steer ing whee l at the
12 o 'clock posit ion or w it h your hands at
other pos it ions inside the steering wheel
rim or on the stee ring wheel h ub. Hold
ing the steering wheel the wrong way
can cause serious injuries to the hands,
arms and head i f the driver 's airbag de
ploys.
- Pointing the steering whee l toward your
face decreases the ab ility o f the supp le
menta l dr iver's airbag to protect you in a
co llision .
- Always s it in an upright position and nev
er lean against or place any part of your
body too close to the a rea where the air
bags are located.
- Before driv ing, a lways ad just the front
seats and head restra ints properly and
make s ure that all passengers are prop
er ly restrained.
- Never adjust the seats while the vehicle
is moving . Your seat may move unexpect
edly and you could lose control of the ve
hicle.
- Never drive with the backrest recl ined o r
t il ted far ba ck! T he farther the ba ck rests
are t ilted back, the greate r the ris k of in-
Dr iving S afel y 121
jury due to incorrect pos itioning of the
safety belt and improper seating posi
tion .
- Ch ildren must a lways ride in ch ild safety
seats
c:;, page 161. Special precaut ions
apply when installing a child safety seat
on the front passenger seat
c:;, page 137 .
Proper seating position for the front
passenger
The proper front passenger seating position
is important for safe, relaxed driving .
For your own safety and to reduce the risk of
injury in the event of an accident, we recom
mend that you adjust the seat for the front
passenger to the following position :
~ Move the front passenger seat back as far as
possible . There must be a m inimum of
1 0 inches (25 cm) between the breastbone
and the ins trument panel
c:;, &, .
~ Adjust the a ngle of the seatbac k so that it is
in an upr igh t position and yo ur back comes
in full contact wit h it whenever the vehicle is
moving.
~ Applies to vehicles with adjustab le head re
stra ints: Adjust the head restraint so the up
per edge is as even as possible wit h the top
of your head. If that is not possib le, try to
adjust the head restraint so that it is as
close to this pos it ion as poss ible .
~ Keep both feet flat on the floor in front of
t he fron t passenger seat .
~ Fasten and we ar safe ty be lts cor re ctly
c:;, page 132.
Fo r detailed information on how to adj ust the
fron t passenger's seat, see
c:;, page 53.
A WARNING
-
Front seat passengers w ho are unbelted,
out of posi tion or too close to the airbag
can be ser iously injured or killed by the air
bag as it unfolds. To help reduce the risk of
serious personal injury:
•
•
Page 139 of 286
Airbag system Important things to know
Importance of wearing safety belts and
sitting properly
Airbags are only supplemental restraints. For
airbags to do their job , occupants must al
ways properly wear their safety belts and be
in a proper seating position.
For your safety and the safety of your passen
gers, before driving off, always:
"" Adjust the driver's seat and steering wheel
properly ¢
page 120,
"" Adjust the front passenger's seat properly
¢page 54,
""Wear safety be lts properly ¢ page 132,
"" Always properly use the proper child re-
straint to protect chi ldren
r::::> page 161.
In a collision airbags must inflate within th e
blink of an eye and with considerable force.
The supplemental airbags can cause injuries if
the driver or the front seat passenger is not
seated properly . Th erefore in order to help the
a ir bag to do its job, it is important, both as a
driver and as a passenge r to s it properly at all
times.
By keeping room between your body and the
steer ing whee l and the front of the passenger
compartment, the airbag can inflate fully and
comp lete ly and provide supplemental protec
tion in certain frontal collisions
r::::> page 120,
Proper occupant seating positions.
F or details
on the operation of the seat adjustment con
trols
¢ page 54.
It's especially important that children are
properly restrained
r::::> page 161.
There is a lot that the driver and the passen
gers can and must do to help the individua l
safety features installed in your Aud i work to
gether as a system.
Proper seating pos ition is important so that
the front airbag on the driver side can do its
job. If you have a physical impairment or con-
Airbag system 137
dition that prevents you from sitting properly
on the driver seat with the safety belt properly
fastened and reaching the pedals, spec ial
modifications to yo ur vehicle may be necessa
ry.
Contact your authorized Audi dea ler, or call
Audi Customer Re lations at 1-800-822-2834.
When the airbag system dep loys, a gas gener
ator will fi ll the airbags, break open the pad
ded covers, and inf late between the steering
whee l and the driver and between the instru
ment panel and the front passenger. The air
bags will deflate immediately after deploy
ment so that the front occupants can see
through the windshield aga in without inter
ruption .
All of th is takes place in the blink of an eye, so
fast that many people don't even realize that
the air bags have deployed . The airbags also
inflate with a great deal of force and noth ing
shou ld be in their way when they deploy.
Front airbags in combination with properly
worn safety belts slow down and limit the oc
cupant's forward movement. Together they
help to prevent the driver and front seat pas
senge r from hitting parts of the inside the ve
hicle while reducing the forces acting on the
occupant dur ing the crash. In this way they
help to reduce t he risk of injury to the head
and upper body in the crash . A irbags do not
protect the arms or the lower parts of the
body .
Both front air bags w ill not inflate in all frontal
collisions . The triggering of the airbag system
depends on the vehicle deceleration rate
caused by the collision and registered by the
electron ic control unit. If this rate is below
the reference value programmed into the con
trol unit, the airbags will not be triggered,
ev en though the car may be bad ly damaged as
a resu lt of the co llision . Vehicle damage, re
pair costs or even the lack of ve hicle damage
is no t necessarily an indication of whether an
airbag should inflate o r not .
It is not possib le to define a range of vehicle
speeds that w ill cover every possible kind and ..,.
•
•