headlights AUDI A5 COUPE 2014 Owners Manual
[x] Cancel search | Manufacturer: AUDI, Model Year: 2014, Model line: A5 COUPE, Model: AUDI A5 COUPE 2014Pages: 286, PDF Size: 70.99 MB
Page 12 of 286
10 Instruments and warning/indicator lights
Instruments and warning/indicator Lights
Instruments
Instrument cluster and controls
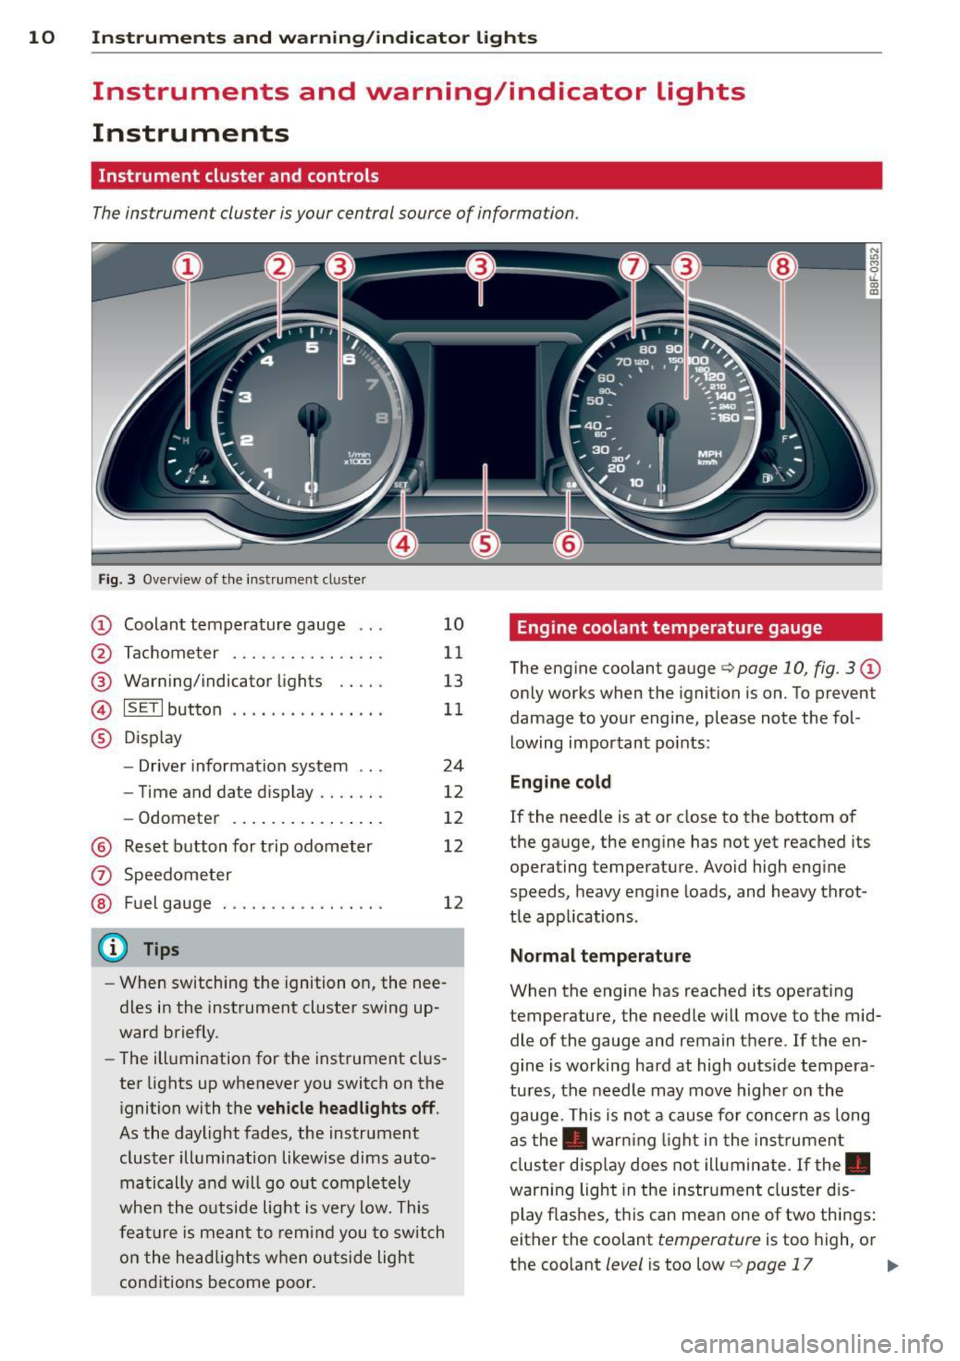
The instrument cluster is your central source of information.
Fig. 3 Ove rv iew of the instrument cluster
CD Coolant temperature gauge .. .
@ Tachometer ........... .. .. .
@ Warning/indicator lights .. .. .
© ISETlbutton .... .... .. .... . .
® Display
- Driver information system .. .
- Time and date d isplay .. .. .. .
- Odometer .......... ... .. .
@ Reset button for trip odometer
(z) Speedometer
@ Fuel gauge . .... ..... .. .. .. .
(D Tips
10
11
13
11
24
12
12
12
12
- When switching the ignition on, the nee
dles in the instrument cluster swing up
ward briefly.
- The illumination for the instrument clus
ter lights up whenever you switch on the
i gnition with the
vehicle headlights off .
As the daylight fades, the instrument
cluster illumination likewise dims auto
matically a nd will go out completely
when the outside light is
very low. This
feature is meant to remind you to switch
on the headlights when outside light
conditions become poor .
Engine coolant temperature gauge
The engine coolant gauge q page 10, fig. 3 CD
only works when the ignition is on. To prevent
damage to your engine, please note the fol
lowing important points:
Engine cold
If the needle is at or close to the bottom of
the gauge, the engine has not yet reached its
operating temperature. Avoid high engine
speeds, heavy engine loads, and heavy throt
tle app lications.
Normal temperature
When the engine has reached its operating
temperature, the needle will
move to the mid
dle of the gauge and remain there . If the en
gine is working hard at high outs ide tempera
tures, the needle may
move higher on the
gauge. This is not a cause for concern as long
as the . warn ing light in the instrument
cluster display does not illuminate. If the.
warning light in the instrument cluster dis
play flashes, this can mean one of two things:
either the coolant
temperature is too high, or
the coolant
level is too low¢ page 17 Ill-
Page 23 of 286
Instruments and warning/indicator lights 21
speed. This ind icates that the MIL is working
properly.
The warning light illuminates when there is a
mal funct ion in the engine e lectronic system.
Contact your authorized Audi dealer and have
the ma lfunction corrected .
An improperly closed fuel filler cap may also
cause the MIL light to illum inate
r:!,> page 204.
For more informat ion r:!,> page 30 .
!?) Engine speed limitation
App lies to vehicles: wit h eng ine speed lim itat ion
Ill Do not exceed max. engine speed of
XXXX rpm
The Ill symbol illuminates when there is an
engine control malfunction . The
'3i indicator
l ight in the instrument cluster also illumi
nates. The engine speed is lim ited to the
speed displayed in the driver information sys
tem . Keep in mind that the engine speed will
not exceed the va lue disp layed in the driver in
formation system, for example when down
shifting.
Drive to your authorized Audi dea ler immedi
ately to have the malfunction corrected .
'.!2:;,.,, Engine oil sensor
• Oil level! Sensor defective
If the symbol illuminates, contact your au
thorized Audi dealer and have the oil sensor
inspected. Until you have this done, check the
oil level each time you refuel just to be on the
safe side
r:!,> page 211 .
Bil Tank system
(iD Please refuel
If the indicator light turns on for the f irst
time and the message appears, there are
about 2.1- 2 .4 gallons (7 -9 liters) of fuel left
in the tank. Time to refuel
r:!,> page 203.
DD Fuel tank system malfunction! Contact
dealer
If the indicator light turns on and this mes
sage appears, there is a malfunction in the
tank system.
Drive to your authorized Audi dealer immedi
ate ly to have the malfunction corrected.
C> Windshield washer fluid level
II Please refill washer fluid
If the symbol illum inates, add windshield
washer fluid to the washer system and also to
the headlight washer system*
r:!,> page 220.
~ Windshield wipers
El Windshield wiper defective
The re is a malfunc tion with the windshie ld
wipers .
Drive to your author ized Audi dealer immedi
ate ly to have the malfunction corrected .
~/ }D /0$ Defective light bulb warning
If the S:$ indicator light turns on, a bulb has
failed. The message indicates the location of
the bu lb.
- If the
El indicato r light also turns on, then
a fo g lig ht has failed. The position of the in
dicator light corresponds with the location
on the vehicle .
- If the
II indicato r light also turns on, then
a rear fog * light has failed. The position of
the indicator light corresponds with the lo
cation on the vehicle .
T his wa rning can also occur if the light switch
is in an unengaged position between two sym
bols.
Vehicle lights: System fault!
If the message appears, there is a malfunc
tion in the headlights or light sw itch .
Drive to your authori zed Audi dealer immedi-
ately to have the malfunction corrected .
IJJ,,
Page 24 of 286
22 Instruments and warning/indicator lights
&_ WARNING
-light bulbs are pressurized and could ex
plode while they are being changed caus
ing serious personal injury.
- Work with due care when handling the
high-voltage section of gas discharge
(xenon) lights*. Failure to do so could re
sult in death or serious injury.
(D Tips
Have the bulb replaced or the connection
repaired by your authorized Audi Service
department.
~(D Headlight range control
Appl ies to vehicles: with headlig ht range co ntrol
II Headlight range control defective !
If the symbol II illuminates, the dynamic
headlight range control is no longer working
properly . Have the system checked and re
paired at your authorized Audi dealer.
§0 Adaptive Light
Appl ies to vehicles: with adaptive light
r!l Audi adaptive light: defective
If the indicator light turns on and this mes
sage appears, there is a malfunction in the
adaptive light system. The headlights still
function.
Go to an authorized dealership to have the
headlights or the control unit for the adaptive
light repaired .
@..D light/rain sensor
Applies to vehicles: with light/rain sensor
II Automatic headlights/ automatic wipers
defective
If the indicator light turns on and this mes
sage appears, the light/rain sensor is not
functioning correctly.
For safety reasons the low beams are turned
on permanently with the switch in
AUTO.
However, you can continue to turn the lights on and off
using the light switch . You can still
control all functions that are independent of
the rain sensor through the windshield wiper lever .
Contact your authorized Audi dealer as soon
as possible to have the problem corrected.
Q Adaptive dampers
Applies to vehicles: with Aud i drive select and adaptive
dampers
II Suspension: System fault!
If the II symbol in the display comes on,
there is a malfunction in the adaptive damp
ers. Please go to an authorized Audi dealer or
qualified workshop to have the malfunction
repaired.
H Sport differential
Appl ies to vehicles: with Aud i drive select and spo rt dif
ferential
Sport differential: System fault!
There is a malfunction with the sport differen
tial.
Drive to your authorized Audi dealer immedi
ately to have the malfunction corrected .
Sport differential: Overheating
The transmission temperature has increased
significantly due to the sporty driving manner.
Drive in a less sporty manner until the tem
perature returns to the normal range and the
indicator light switches of.
&_ WARNING
-
Contact your authorized Audi dealer or
qualified workshop if the sport differential is faulty or malfunctioning . The repair
must be performed by trained personnel
using the correct oil in order to ensure
safety.
~ Ignition lock
l3 Ignition lock defective
Page 45 of 286
Clear vision Lights
Switching the lights on and off
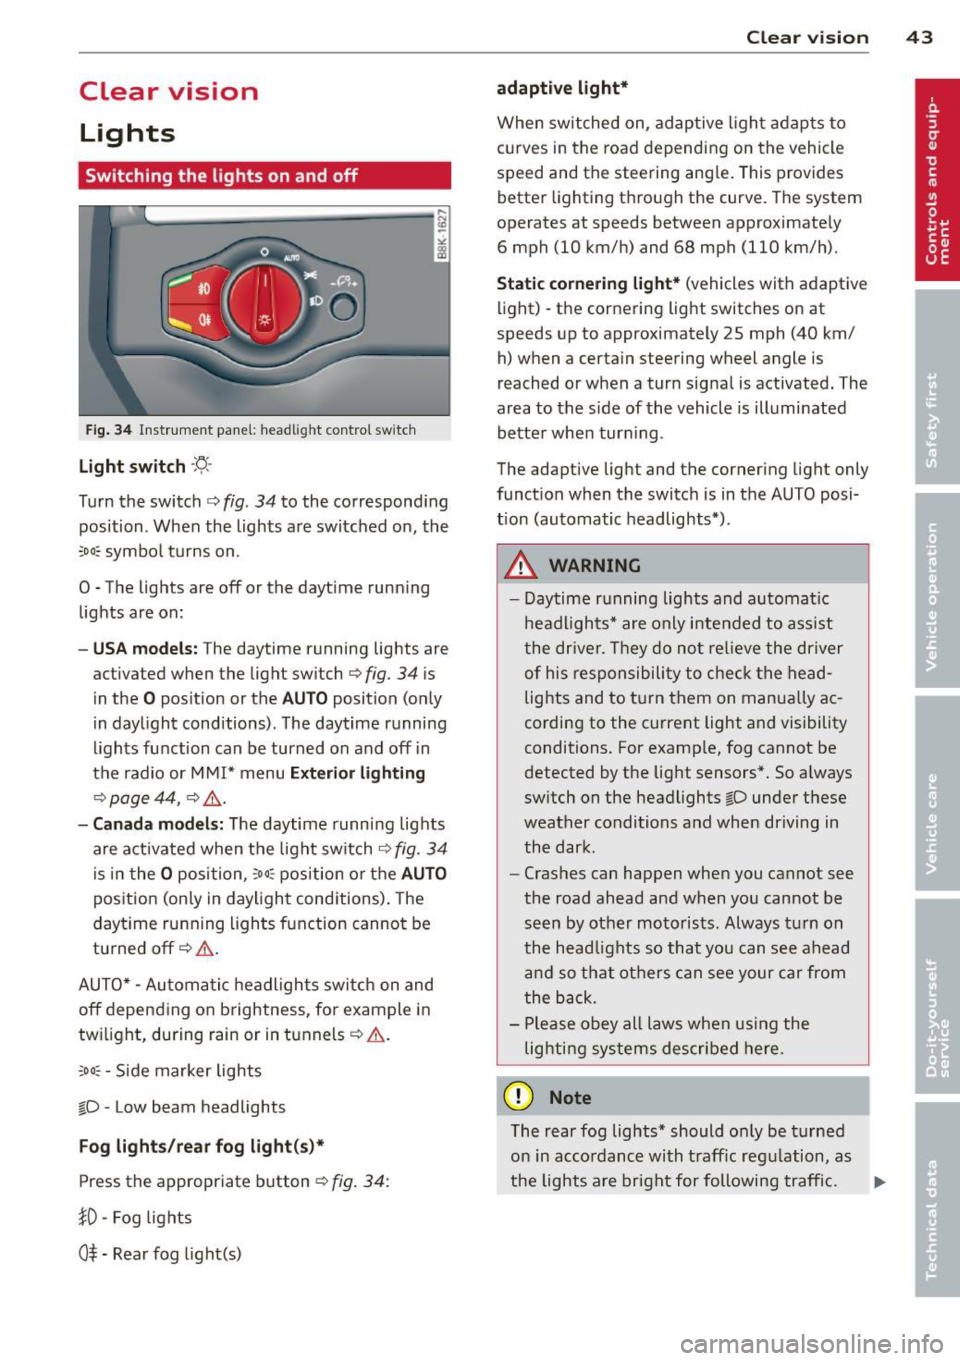
F ig . 34 Instrument pane l: headlight control switch
Light switch ·'t/,·
Turn the switch c> fig. 34 to the correspond ing
position . When the lights are switched on, the
:oo: symbol turns on.
0 • The lights are off or the daytime running
lights are on:
-USA mod els : The daytime running lights are
activated when the light switch
c> fig . 34 is
in the
O position or the AUTO position (only
in daylight conditions) . The daytime running
lights function can be turned on and off in
the radio or MMI* menu
E xterior li ghtin g
¢ page 44 , c> &_.
-Ca nada mod els: The daytime runn ing lights
are activated when the light switch
¢ fig . 34
is i n the O position, :oo : position or the AUTO
posit ion (on ly in daylight cond itions). The
daytime running lights function cannot be
turned off¢&. .
AUTO* -Automatic headlights switch on and
off depending on b rightness, for example in
tw ilight, during rain or in tunnels ¢,& .
:oo: -Side marker lights
~D -Low beam headlights
Fog light s/rear fog ligh t(s)*
Press the appropriate button c> fig. 34:
1D -Fog lights
0$ -Rear fog light(s)
Clear vi sion 43
adaptive light*
When switched on, adaptive ligh t adap ts to
curves in the road depend ing on the vehicle
speed and the steering angle. This provides
better lighting through the curve. The system
operates at speeds between approximately
6 mph (10 km/h) and 68 mph (110 km/h).
Static corner ing light * (vehicles with adaptive
light) -the cornering light switches on at
speeds up to approximately 25 mph (40 km/
h) when a certain steering wheel angle is
reached or when a turn signal is activated. The
area to the s ide of the vehicle is illuminated
better whe n turn ing .
The adaptive light and the cornering light only
function when the switch is in the AUTO posi
tion (automatic headlights*) .
A WARNING
-Daytime running lights and automatic
headlights* are only intended to ass ist
the driver . T hey do no t re lieve the driver
of his responsibility to chec k the head
lights and to t urn them on manua lly ac
cording to the current light and visibility
conditions. For example, fog cannot be
detected by the light sensors*. So a lways
switch on the headlights
~D under these
weather conditions and when driving in
the dark .
- Cras hes can happen when you cannot see
the road ahead and when yo u cannot be
seen by other motorists. Always turn on
the head lights so that you can see ahead
and so that others can see your car from
the b ack.
- Please obey all laws when using the
lig hting sys tems described here.
(D Note
The rear fog lights* should on ly be turned
on in accordance with t raff ic regulation, as
the lights are bright for following traffic. ..,.
Page 46 of 286
44 Clear vis ion
@ Tips
- The light sensor* for headlight control is
located in the rear view m irror mount.
You should therefore not apply any st ick
ers to the windsh ield in this area in order
to prevent malfunctions or failures.
- Some exterior lighting functions can be
adjusted
c> page 44.
- When you remove your key from the igni
tion while the vehicle's lights are turned
on, a buzzer sounds as long as the driv
er's door is open .
- In cool or damp weather, the ins ide of
the headlights, turn signals and tail lights can fog over due to the tempera
ture difference between the inside and
outside. They will clea r shor tly after
switching them on. This does not affect
the service life of the lighting.
- In the even t of a light sensor malfunc
tion, the driver is no tified in the instru
ment cluster disp lay¢
page 22.
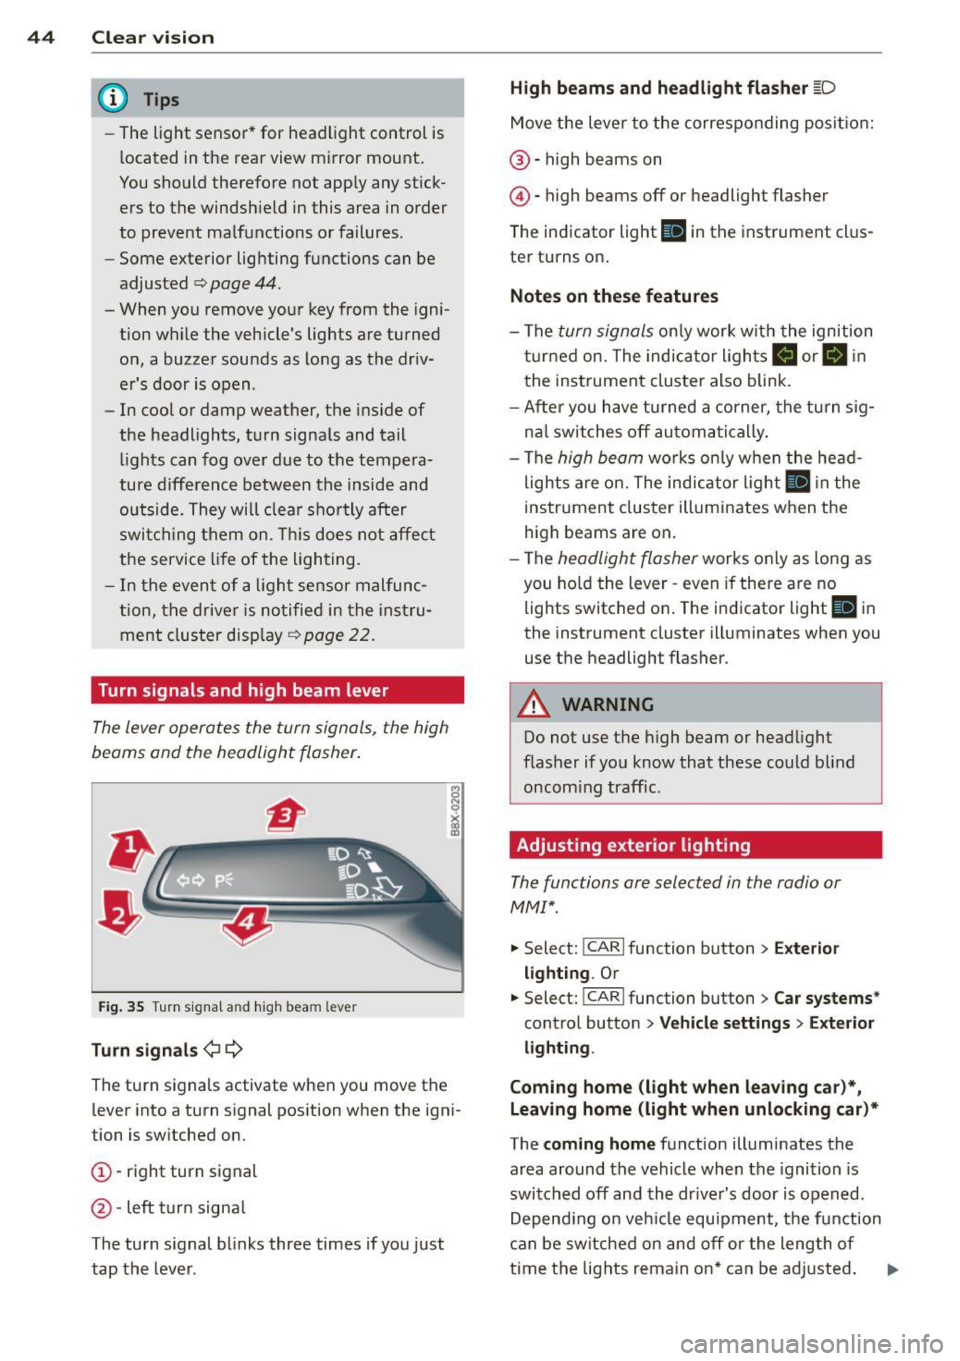
Turn signals and high beam lever
The lever operates the turn signals, the high
beams and the headlight flasher .
Fig. 35 T u rn s ig na l and hig h beam lever
Turn sign als ¢i ¢
The turn signals activate when you move the
l ever into a turn s ignal pos ition when the ign i
tion is switched on.
(D -right turn signal
@-left tur n signa l
The turn s ignal blinks three times if you just
tap the lever .
High be ams and headlight flasher [D
Move the lever to the correspon ding posit io n:
@ -high beams on
@ -high beams off or headlight flasher
The indicator light
ii in the instrument cl us
te r turns on .
Notes on thes e features
-The turn signals on ly wor k w ith the ignition
t ur ned on. The indicator ligh ts
Ct or a in
the instrument cluster also blink.
- After you have turned a co rner, the turn s ig
na l switches off au toma tically .
- The
high beam works on ly w hen the head
lights a re on. The ind icator ligh t
II in the
instrument cluster illuminates when the
high beams are on .
- The
headlight flasher works o nly as long as
you ho ld the lever -even if there a re no
lights switched on . The indicator light
II in
the instrument cluster illuminates when you
use the headlight flasher.
A WARNING
--
Do not use the h igh beam or headlight
flasher if you know that these could blind
oncom ing traffic.
Adjusting exterior lighting
The functions ore selected in the radio or
MMI" .
.,. Select: !CARI function button> Exte rior
light ing .
Or
.,. Select: !CARI function button > Car systems *
control button > Vehicle s etting s> Exterior
lighting .
Coming home (light when leav ing car }*,
Leav ing home (light when unlocking car )*
The coming home function illuminates the
area around the vehicle when the ignition is
switched off and th e dr ive r's door is open ed.
Depend ing on veh icle equ ipment, the function
can be switched on and off or the length of
time the lig hts remain on* can be ad justed . ..,.
Page 47 of 286
The leavin g home function il luminates the
area around the vehicle when unlocking it.
This function can be switched on and off.
The
c o ming h om e and lea ving home func
tions on ly operate when it is dark and the
light switch is in the AUTO position
¢ page 43, fig. 34.
Auto headlight s*
When the light switch is in the A UTO
¢ page 43 position, the switch-on po int of the
lights can be changed in the automatic driving
light function.
Daytime running lights
USA m odel s:
You can switch the dayt ime run
ni ng lights
on and o ff .
Canada mod els:
The function cannot be
turned off .
It is activated a utomat ica lly each
time the ignition is switched on.
Travel mode*
The headlight beam is asymmetrical. This pro
v ides stronger illum ination on the side of the
road on wh ich you are driving .
If you are driv
i ng in a count ry that d rives on the opposite
side of the road from your own country, th is
will cau se glare for on coming dr ivers. To pre
vent glare:
- Trave l mode must be selected in vehicles
with Xenon headlights*.
- In veh icles with halogen headlights, ce rtain
areas of the head light lenses must be cov
ered w ith wate rproof adhesive covers that
prevent light from passing thro ugh. Fo r
more information, please see your author
ized Audi dea ler or author ized repa ir faci lity .
(D Tips
When trave l mode is activated, a display in
the dr iver information system indicates
this each time you switch the ignit io n on.
Clear vi sion 45
Emergency flashers
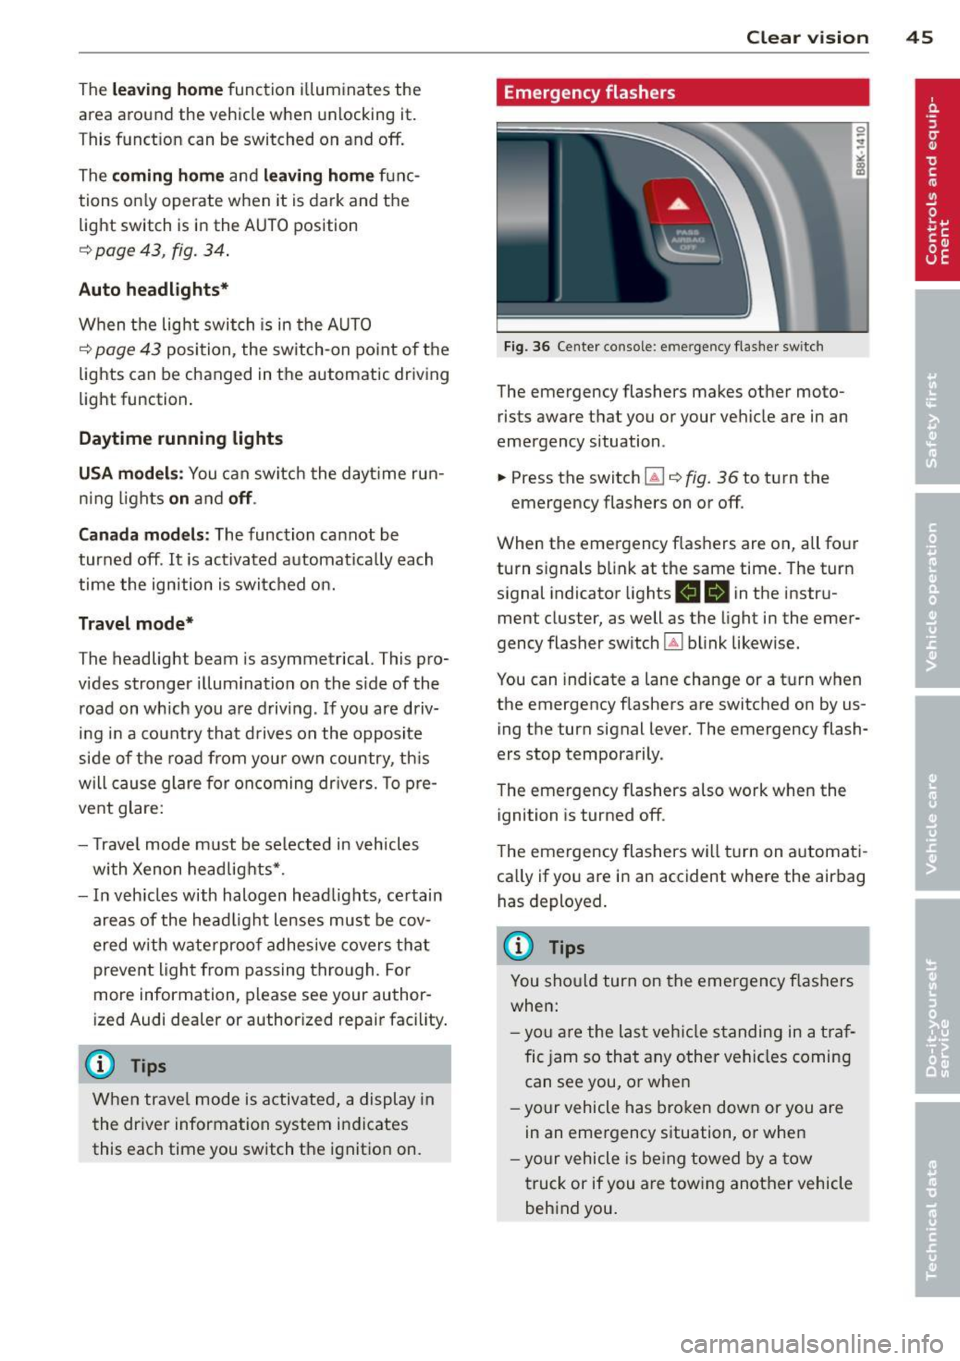
F ig. 36 Center console: emergency flasher switch
The emergency flashers makes other moto
rists aware that you or your vehicle are in an
emergency situation .
.. Press the switch
Gil¢ fig. 36 to turn the
emergency flashers on or off.
When the emergency flas hers are on, all four
turn signals b link at the same time. The turn
s ignal indicator lights .
1B in the instru
ment cluster, as well as the light in the emer
gency flasher switch ~ blink likewise.
You can indicate a lane change or a tu rn w hen
the emergency flashers are switched on by us
ing the turn signal lever. The emergency flash
ers stop temporarily.
T he emergency flashers also work when the
ignition is turned off.
T he emergency flashers w ill turn on a utomat i
ca lly if yo u are in an accident where the airbag
has deployed.
(D Tips
You sho uld turn on the emergency f las hers
when:
- yo u are the last veh icle standing in a t raf
fic jam so that any other vehi cles coming
can see you, or whe n
- yo ur vehicle has bro ken down or you are
in an eme rgency s ituation, or when
- yo ur vehicle is be ing towed by a tow
truck or if you are tow ing another vehicle
beh ind you.
Page 48 of 286
46 Clear vis ion
Interior lights
Front /rear interior lights
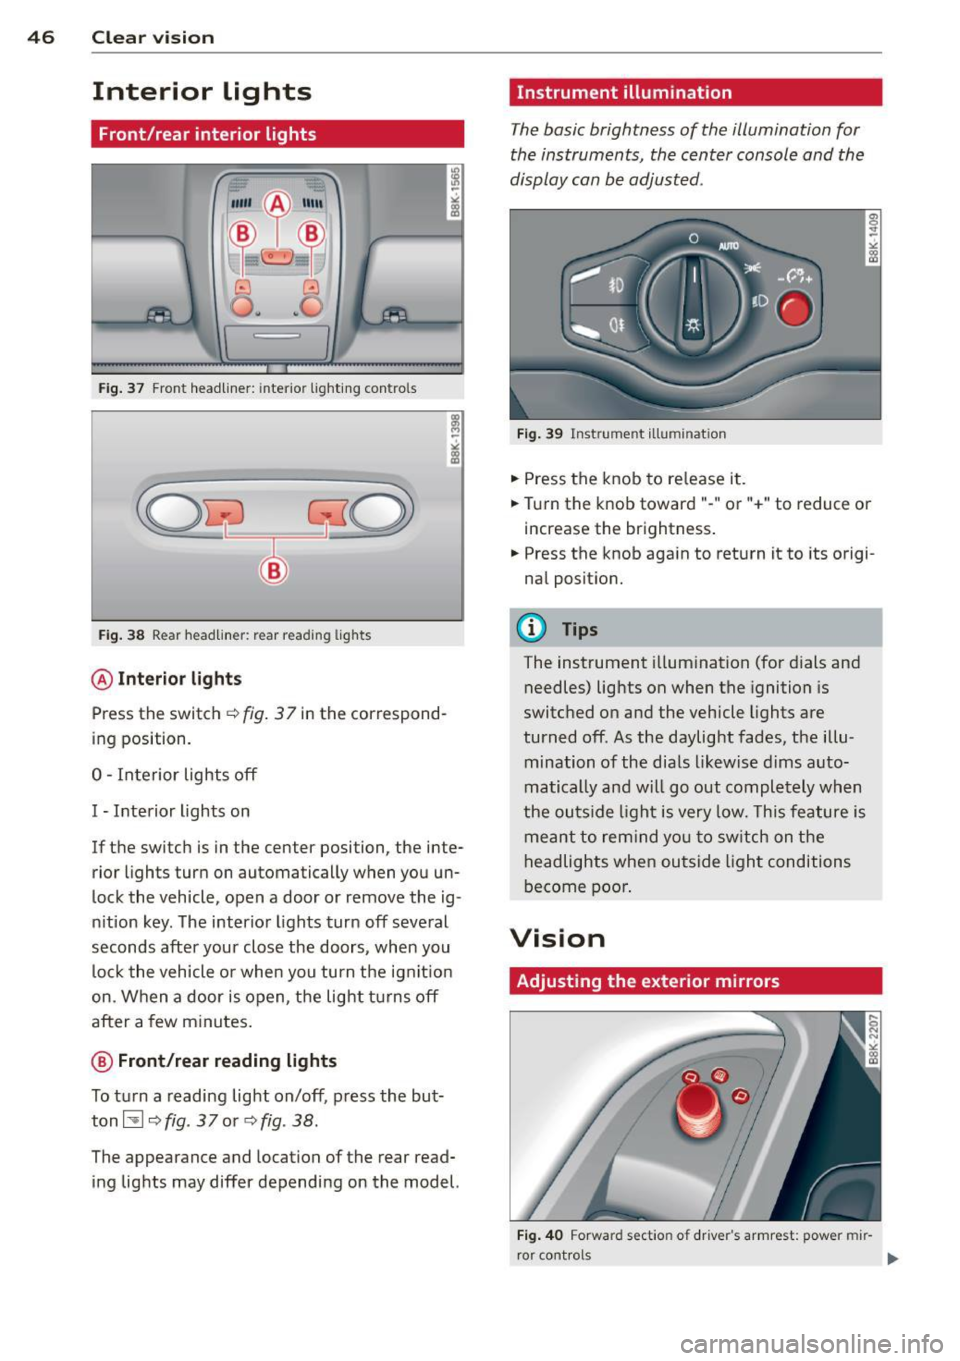
Fig . 37 Front headliner: inte rior lighting controls
Fig. 38 Rear headliner: rear reading lights
@Interio r ligh ts
Press the switch ~ fig. 3 7 in the correspond
ing position.
0 -Interior lights off
I -Interior lights on
If the switch is in the center position, the inte
rior l ights turn on automatically when you un
lock the vehicle, open a door or remove the ig
n ition key. The interior lights turn off several
seconds after your close the doors , when you
lock the vehicle or when you turn the ign it ion
on. When a door is open, the light tu rns off
after a few minutes.
@ Front /rear r eading lights
To turn a reading light on/off, press the but
ton~
~ fig. 37 or ~fig. 38.
The appearance and location of the rear read
ing lights may differ depending on the model.
Instrument illumination
The basic brightness of the illumination for
the instruments, the center console and the
display can be adjusted .
Fig . 39 Inst rume nt illu mination
.,. Press the knob to release it .
.,. Turn the knob toward"-" or"+" to reduce or
increase the brightness .
.,. Press the knob again to return it to its origi
nal posit ion.
(!') Tips
The instrument i llum ination (for dials and
needles) lights on when the ignition is
switched on and the vehicle lights are
turned off . As the daylight fades, the illu
mination of the dia ls likewise dims auto
matically and wi ll go out completely when
the ou tside light is very low. This feature is
meant to rem ind you to sw itch on the
headlights when ou tside light conditions
become poor .
Vision
Adjusting the exterior mirrors
Fig . 4 0 Forward section of driver's armrest: power mir
r or controls
Page 49 of 286
Turn the knob to the desired position:
Q/ P -In th is position , you can adjust the
d river's and front passenger's ex ter io r mir ro rs
by turning the knob in the des ired direc tion.
(ijjl -The mirrors are heated depending on the
ou tside temperature.
P assenger exter ior mirro r tilt function*
To help yo u see the curb when backing into a
parking space, the surface of the mi rror tilts
slightly . The knob must be in the P posit ion
for this to happen .
You can adjus t the tilted mirror sur face by
turn ing the knob in the des ired direction .
When you move out of reverse and into anoth
e r gear, the new mirror posit ion is stored a nd
assig ned to t he key you are using.
T he mirror goes back into its origina l posit io n
once yo u drive forward faster than 9 mph
(15 km/h) or switch the ignition off .
_& WARNING
Curved mirror sur faces (convex or sp he ri
c al *) in cre ase yo ur field o f view. Remem
ber that vehicles or o ther objects will ap
pear smaller and farther away than when
seen in a flat m irror. If you use this mirror
to estimate distances of following veh icles
w hen changing lanes, you co uld estimate
incorrectly and cause an accide nt.
(D Note
- If yo u wash t he ve hicle in an automatic
car wash, yo u m ust fold the exterior m ir
rors in to reduce the r isk of damage to
the mirrors.
{!) Tips
- The exterior mirror settings are stored
with the memory funct ion*
r=> page S 7.
- If there sho uld be a ma lf u nction in the
electr ical system, yo u can st ill adjust the
exter ior mirrors by press ing the edge of
the mirror .
.
Clear vision 4 7
Dimming the mirrors
N
~
><
~===~=======~ ~
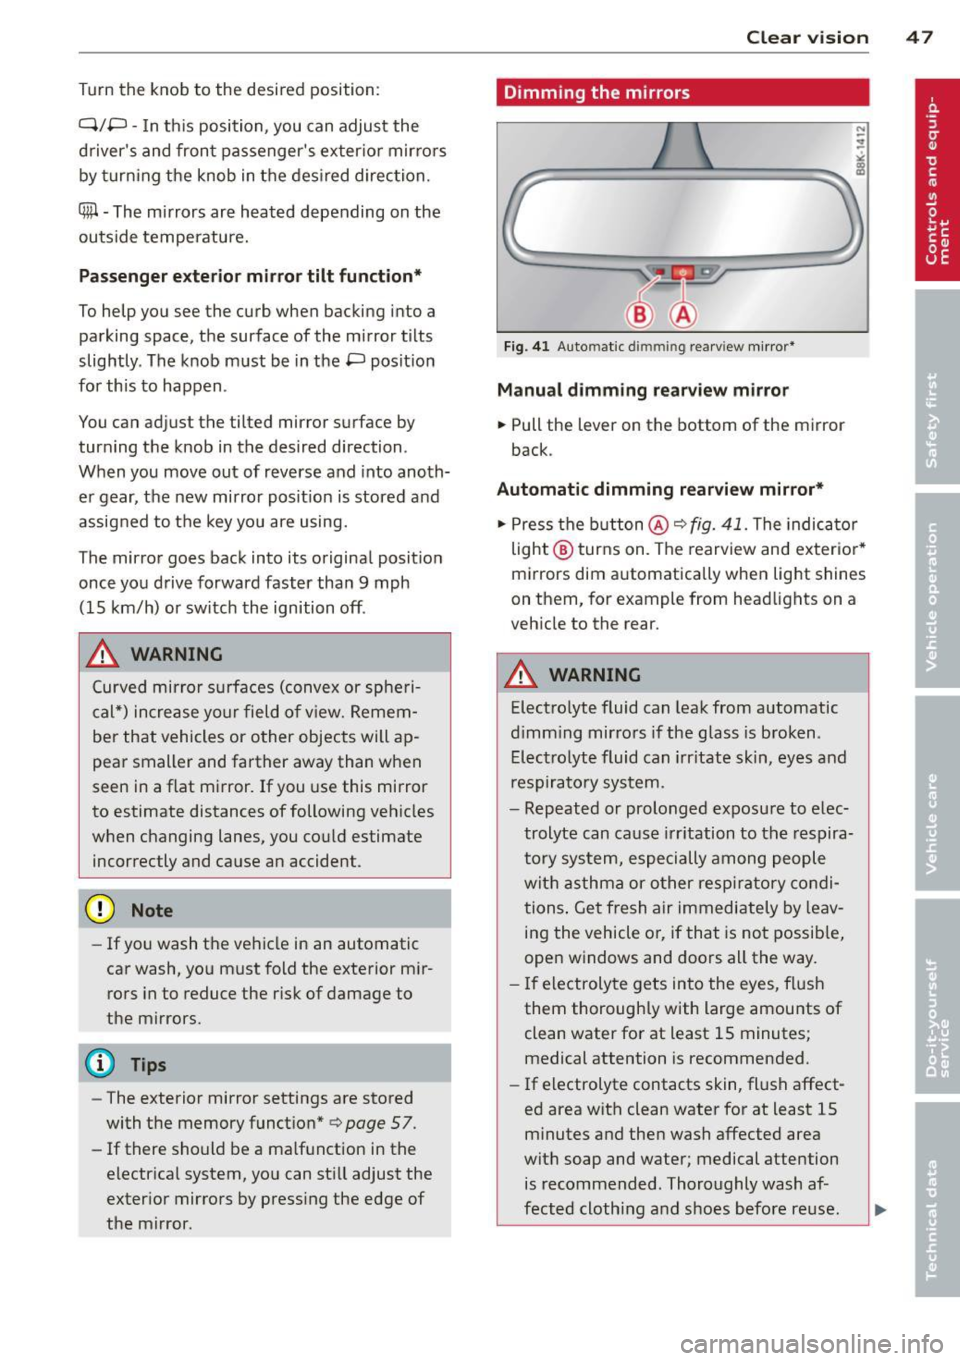
Fig. 41 Auto matic dimmin g rearv iew mirro r*
Manual d imming rearview mir ror
.,. Pull the lever on the bottom of the mirror
back .
Automat ic dimming rearview mirror*
.,. Press the b utton @'*
fig. 41. The indica to r
light @ turns on . The rearview and ex terio r*
mi rrors dim a utomatically when light shines
on them, for example from headlights on a
veh icle to the rear .
_& WARNING
-
Electrolyte fluid can leak from aut omatic
d imm ing mirrors if the glass is broken .
E lec trolyt e fluid can irritate skin , eyes and
res pirato ry system.
- Repeated or prolonged exposu re to elec
trolyte can ca use i rritation to the respira
to ry sy stem, especially among people
wit h asthma or o ther resp iratory co ndi
tions . Ge t fresh a ir immediately by leav
ing the vehicle o r, if tha t is no t possib le,
open w indows and doors all the way.
- If electroly te gets in to the eyes, f lush
them thorough ly with large amounts of
clean water for at least 15 minutes;
medical attention is recommended.
- If electrolyte contacts skin, fl ush affect
ed area with clean water for at least 15
minutes a nd the n wash affected area
wit h soap and water; medical attention
is recommended. Thoroughly wash af
fected cloth ing and shoes before re use .
.
Page 51 of 286
@ Tips
-Pressing the button~ several times
consecutively can trigger the overload protection. The sun shade can only be ex
tended/retracted again after a brief wa it
i ng per iod.
- The rear window sun shade only func
tions when the veh icle inter ior is warmer
than 14°F (-10°C).
Wiper and washer system
Switching the windshield wipers on
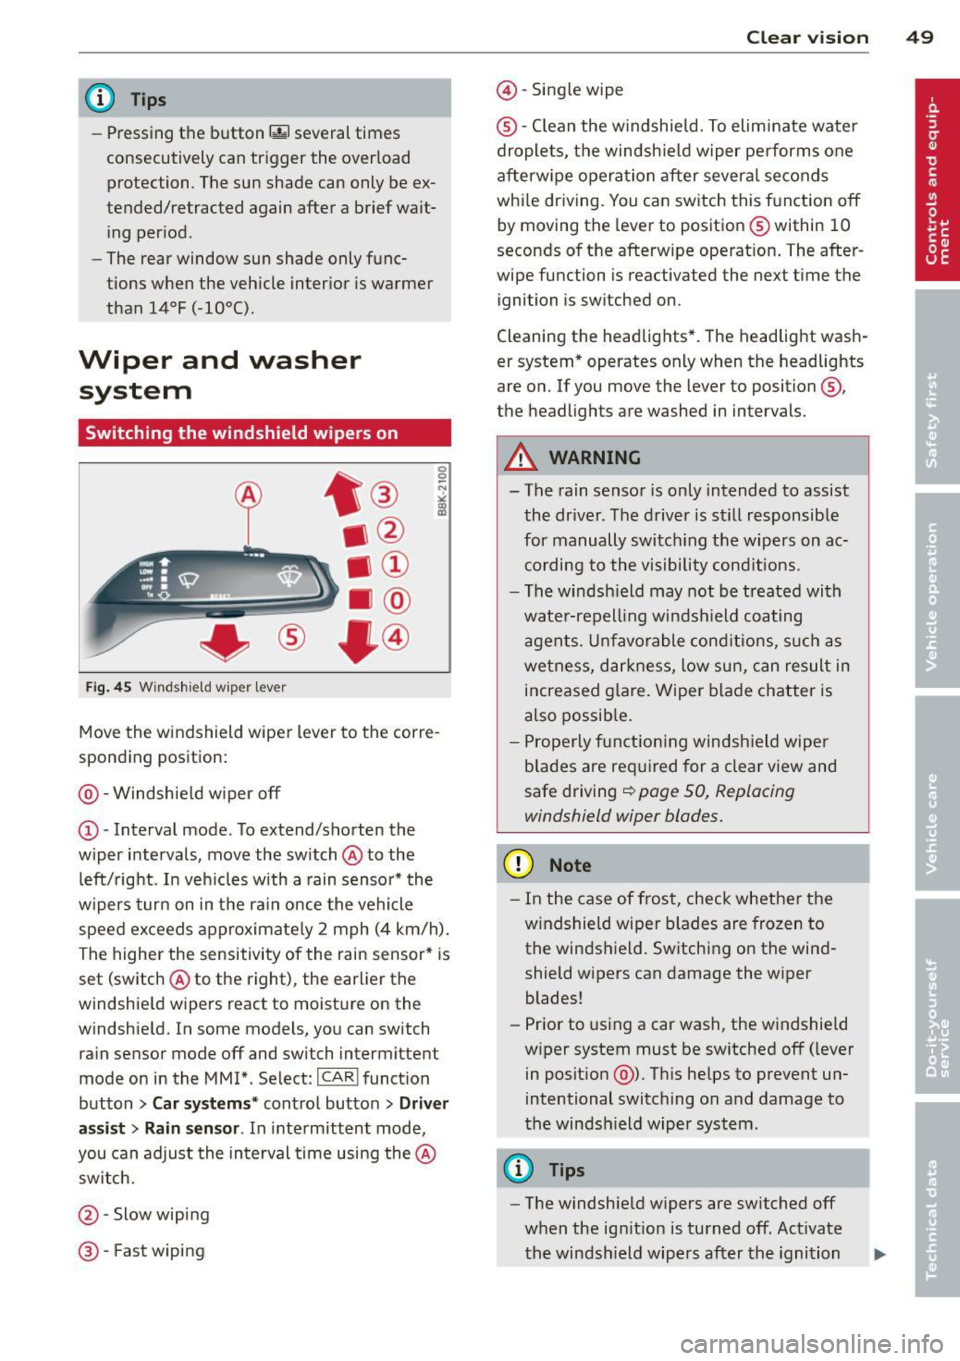
Fi g. 45 Windshield wiper lever
Move the windshield wiper lever to the corre
spond ing position:
@ -Windshie ld w iper
off
CD -Interval mode. To extend/shorten the
wiper intervals, move the switch @to the
l eft/right. I n veh icles with a rain sensor* the
wipers turn on in the ra in once the vehicle
speed exceeds approximate ly 2 mph (4 km/h).
The highe r the sensitivity of the rain sensor* is
set (switch @to the right), the earlier the
windshie ld w ipers react to moistu re on the
windshie ld. In some models, you can switch
rain sensor mode
off and switch intermittent
mode on in the MMI*. Select:
ICAR I funct ion
button
> Car sy stem s* contro l butto n > Driver
as sist > Rain s en sor .
In inte rmittent mode '
you can adjust the interval time using the @
sw itch.
@ -Slow wip ing
® -Fast wiping
Clear vi sion 49
@ -Single wipe
® -C lean the w indshie ld. To elim ina te wate r
drople ts, the windsh ield w iper pe rform s one
afterw ipe operation after severa l se conds
whi le dr iving. You can sw itch this f unction
off
by moving the leve r to positio n® within 10
seconds of the afterwipe operat ion . The after
wipe function is reactivated the next t ime the
ignition is switched on .
Cleaning the headlig hts* . The headlight wash
er system * operates only when the headlights
are o n. If you move the lever to position @,
the headlights are washed in intervals.
A WARNING
- The rain senso r is only intended to assist
the dr iver. The d river is st ill responsib le
for manually switc hing the wipers on ac
cording to the vi sibility cond itions.
- The windsh ield may not b e treated with
wate r-repell ing windsh ield coating
agen ts. Un fa vo rable cond iti ons, s uch as
we tnes s, d arkn ess, low sun, can result in
increased g lare. Wiper blade c hatter is
a lso possib le .
- P rope rly f unct io ni ng win dsh ield wipe r
b lades are re quired for a clear view and
safe driving
~ page 50, Replacing
windshield wiper blades.
(D Note
- I n the case of frost, check whethe r the
w indshield wiper blades are frozen to
the winds hield. Switchi ng on the wind
shield wipers can damage the wiper
blades!
- Pr ior to using a car wash, the windshield
w iper system must be sw itched
off ( lever
in posit ion @). T his he lps to prevent un
intentional switching on and damage to
t he windsh ield wiper system.
@ Tips
- The windshiel d w ipers are switched off
when the ig nition is tu rned off. Act ivate
t he windsh ield wipers after the ignition
Page 201 of 286
Vehicle care and cleaning 199
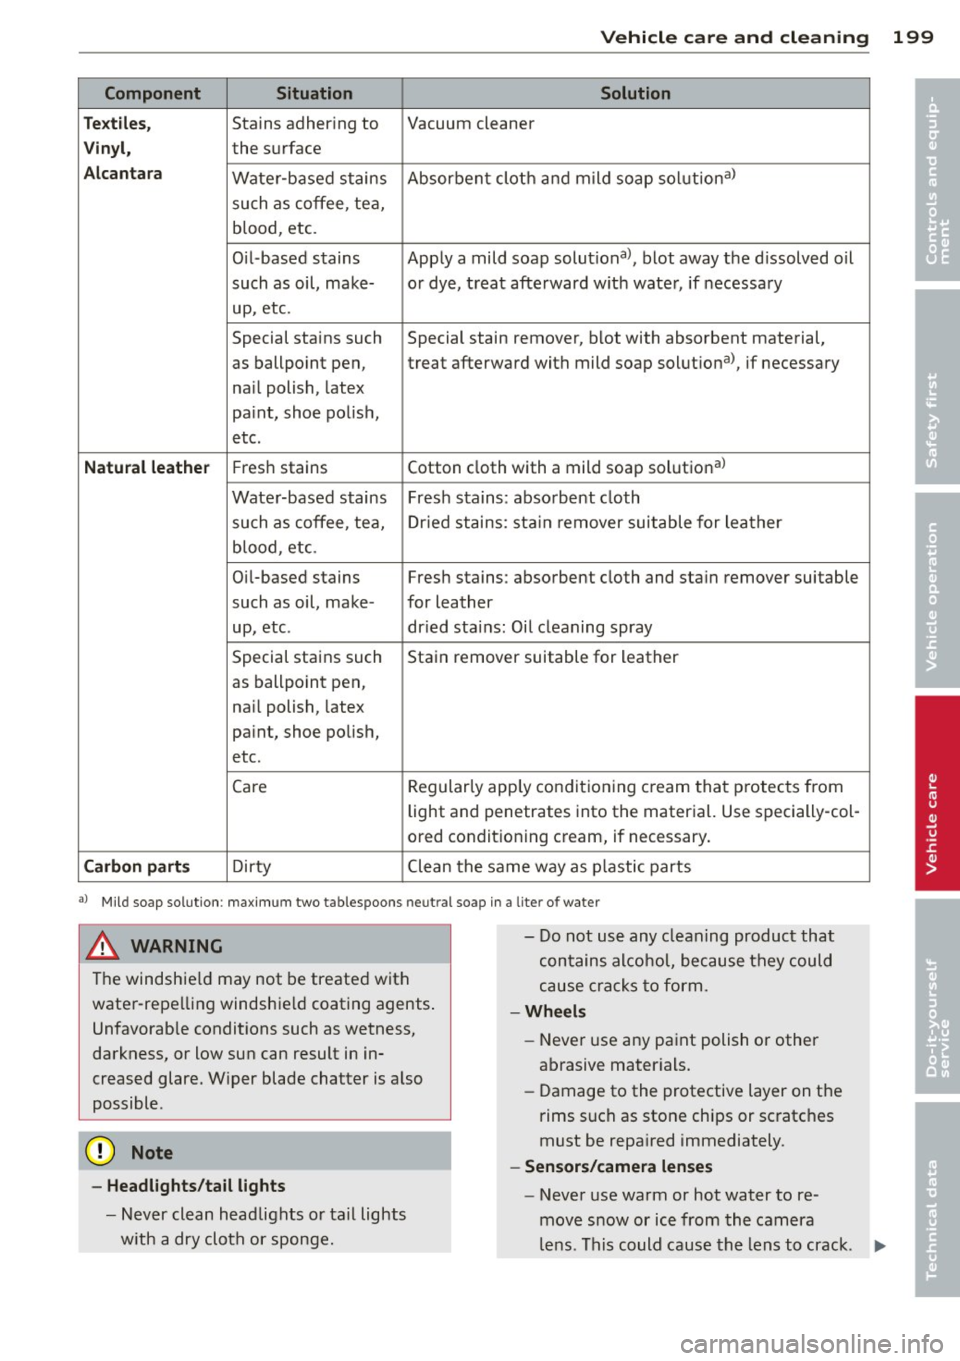
Component Situation Solution
Te xtile s,
Stains adhering to Vacuum cleaner
Vinyl, the surface
Alcantara Water-based stains Absorbent cloth and mild soap solutiona>
such as coffee, tea, blood, etc.
Oil-based stains Apply a mild soap solutiona>, blot away the d issolved oil
such as oil, make- or dye, treat afterward w ith water, if necessary
up, etc.
Special stains such Special stain remover, blot with absorbent material,
as ballpoint pen, treat afterward with mild soap solutiona>, if necessary
na il polish, latex
pa int, shoe polish,
etc.
Natural leather Fr es h stains Cotton cloth with a mild soap solutiona)
Water-based stains Fresh sta ins: absorbent cloth
such as coffee, tea, Dr ied stains: sta in remover suitable for leather
blood, etc.
Oil-based stains Fresh sta ins: absorbent cloth and stain remover suitable
such as oil, make- for leather
up, etc . dried sta ins: Oil cleaning spray
Special stains such Stain remover suitable for leather
as ballpo int pen,
na il polish, latex
pa int, shoe polish,
etc .
Care Regularly
apply conditioning cream that protects from
light and penetrates into the material. Use specially-col-
ored conditioning cream, if necessary.
Carbon parts Dirty Clean the same way as plastic parts
al Mild soap solution: maximum two tablespoons neut ral soap in a liter of water
& WARNING
The windshie ld may not be treated with
water-repelling windshie ld coating agents .
Unfavorab le conditions such as wetness,
darkness, or low sun can result in in
creased glare. W iper blade chatter is also
possible.
- Headlights/tail lights
- Never clean headlights or tail lights
w ith a dry cloth or sponge. -
Do not use any cleaning product that
contains alcohol, because they could
cause cracks to form .
-Wheels
-Never use any paint polish or other
abrasive mater ials.
- Damage to the protective layer on the
rims such as stone chips or scratches
must be repaired immediately.
- Sensors/camera lenses
- Never use warm or hot water to re-
move snow or ice from the camera
len s. This could cause the lens to crack .
IJII>
•
•