AUDI A5 COUPE 2015 Owners Manual
Manufacturer: AUDI, Model Year: 2015, Model line: A5 COUPE, Model: AUDI A5 COUPE 2015Pages: 264, PDF Size: 66.83 MB
Page 111 of 264
M N
0 loo
rl I.O
"' N
"' rl
-You can change the volume and pitch of the
signals as well as the display ¢
page 111.
-What appears in the display is time-delayed.
Reverse Parking
Applies to vehicles: with parking system (rear, with rear view
camera)
Parking mode 1 can be used when parking in a
garage or parking space.
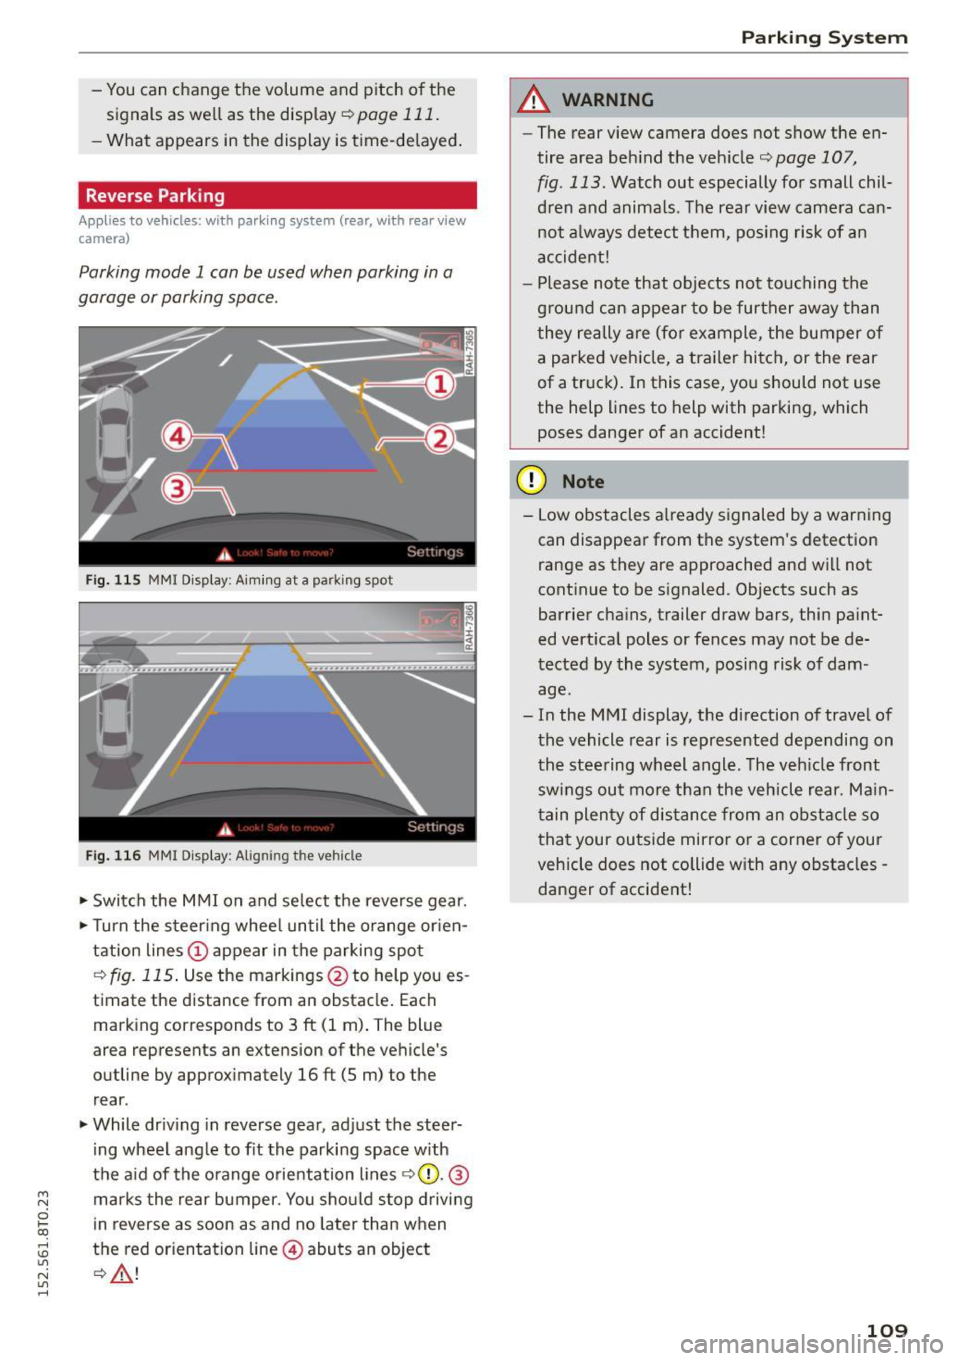
Fig. 11S MMI Disp lay: A imin g at a parking spot
Fig. 116 MMI Display: Aligning the vehicle
.,. Switch the MMI on and select the reverse gear .
.,. Turn the steering wheel until the orange orien
tation lines
(D appear in the parking spot
¢fig. 115. Use the markings @to help you es
timate the distance from an obstacle. Each
marking corresponds to 3
ft (1 m). The blue
area represents an extension of the vehicle's
outline by approximately
16 ft (5 m) to the
rear .
.,. While driving in reverse gear, adjust the steer
ing wheel angle to fit the parking space with
the aid of the orange orientation lines ¢0 .@
marks the rear bumper. You should stop driving
in reverse as soon as and no later than when
the red orientation line@) abuts an object
¢ ,&. !
Parking System
A WARNING
--The rear view camera does not show the en-
tire area behind the vehicle¢
page 107,
fig . 113.
Watch out especially for small chil
dren and animals. The rear view camera can not always detect them, posing risk of an
accident !
- Please note that objects not touching the
ground can appear to be further away than
they really are (for example, the bumper of a parked vehicle, a trailer hitch, or the rear
of a truck). In this case, you should not use
the help lines to help with parking, which
poses danger of an accident!
(D Note
- Low obstacles already signaled by a warning
can disappear from the system's detection
range as they are approached and will not
continue to be signaled. Objects such as
barrier chains, trailer draw bars, thin paint
ed vertical poles or fences may not be de
tected by the system, posing risk of dam age.
- In the MMI display, the direction of travel of
the vehicle rear is represented depending on
the steering wheel angle. The vehicle front
swings out more than the vehicle rear. Main
tain plenty of distance from an obstacle so
that your outside mirror or a corner of your
vehicle does not collide with any obstacles -
danger of accident!
109
Page 112 of 264
Parking Sy stem
Parallel Parking
App lies to vehicles: with parking system (rear, with rear view
camera)
Use parking mode 2 to help you park on the edge
of a street.
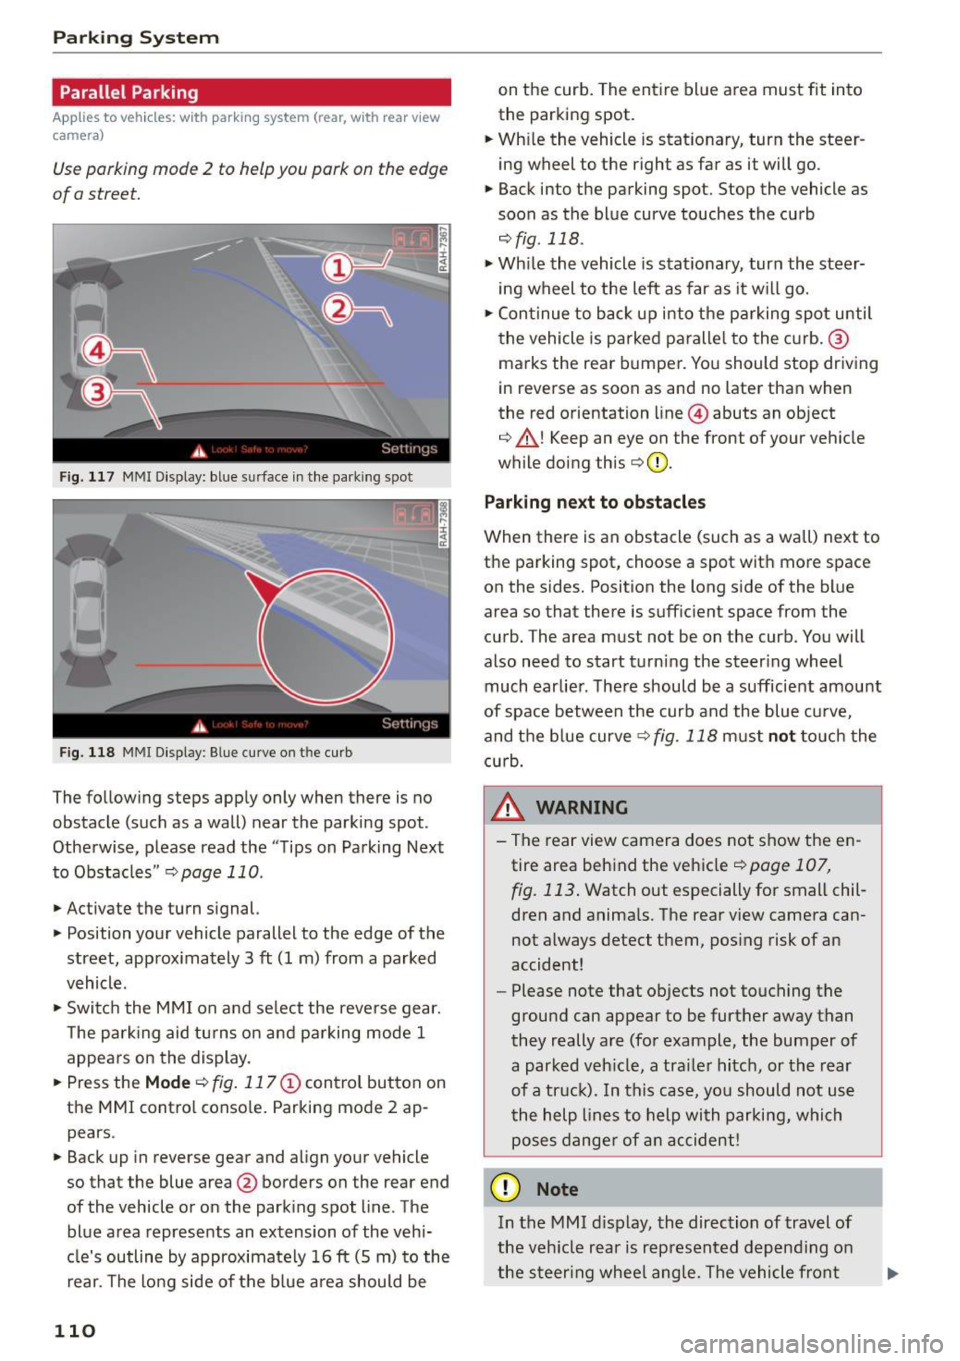
F ig. 117 MMI Display: bl ue s urface in the park ing spot
F ig. 118 MMI Display : B lue curve o n th e curb
The following steps apply only when there is no
obstacle (such as a wall) near the parking spot.
Otherwise, please read the "Tips on Parking Next
to Obstacles "
r::;, page 110.
.,. Activate the turn signal.
.,. Position your vehicle parallel to the edge of the
street, approx imately 3
ft (1 m) from a parked
vehicle .
.,. Swi tch the MMI on and se lect the reverse gear.
T he park ing aid tu rns on and parking mode 1
appears on the display.
... Press the
Mode r::;, fig. 117 © control button on
the MMI contro l conso le . Parking mode 2 ap
pears .
... Back up in reverse gear and align your vehicle
so that the blue area@ borders on the rear end
of the vehicle or on the park ing spot line . The
blue a rea represents an extension of the vehi
cle's outline by approximately 16
ft (5 m) to the
rear. The lo ng side of the b lue area should be
110
on the curb. The ent ire blue area must fit into
the parking spot.
... Wh ile the vehicle is stat ionary, turn the steer
ing wheel to the right as far as it will go.
.,. Back into the parking spot. Stop the vehicle as
soon as the blue curve touches the curb
,:;;, fig . 118 .
.,. Wh ile the vehicle is stationary, turn the steer
ing wheel to the left as far as it w ill go .
.,. Con tinue to back up into the p arking spot until
the vehicle is parked paralle l to the curb. ®
ma rks the rea r bumper. You should stop driving
in reverse as soon as and no later than when
the red orientation line @) abuts an object
r::;, _&! Keep an eye on the front of your veh icle
while doing this
r::;, Q) _
Parking ne xt to ob stacles
When there is an obstacle (such as a wall) next to
the parking spot, choose a spot wit h more space
on the sides. Position the long s ide of the blue
area so that there is sufficient space from the
curb. The area must not be on the curb . You will
also need to start turning the steer ing wheel
much earlie r. The re should be a sufficient amount
of space between the curb and the blue c urve,
and the blue curve
r::;, fig. 118 must not touch the
c u rb.
&_ WARNING
- T he rear view camera does not show the en
tire area beh ind the vehicle
r::;, page 107,
fig. 113 . Watch out especially for small chil
dren and anima ls . The rear view camera can
not a lways detect them, pos ing risk of an
accident!
- Please n ote that objects not touching the
ground can appear to be further away than
they really a re (for example, the bumper of
a parked veh icle, a tra iler hitch, or the rear
of a tr uck). In this ca se, yo u sh ould not us e
t he help lines to help with parki ng, which
poses dange r of an accident!
(D Note
In the MMI d isplay, the direction of travel of
the veh icle rear is rep resented depend ing on
the steer ing whee l ang le. The vehicle fron t
Page 113 of 264
M N
i? co ,...., \!) 1.1"1
N 1.1"1 ,....,
swings out more than the vehicle rear. Main
tain plenty of distance from an obstacle so
that your outside mirror or a corner of your
vehicle does not co llide w ith any obstacles -
danger of accident!
The left or right orientation lines and surfaces
will be displayed, depending on the turn sig
na l being used.
Adjusting the display and warning tones
Applies to vehicles: with parking system (rear, with rear view
camera)
The display and warning tones are adjusted in
the radio or MMI*.
~ Select: ICARI funct ion button> Parking system.
Or
~ Select: I CARI function button > Car systems*
control button > Driver assist> Parking aid.
Display
- Off -when the parking system is switched on,
only audible signals are g iven.
- On -when the pa rking system is switched on,
the p icture from the rear v iew camera is dis
played.
Warning tones
- Rear volume -
rear sensor volume
-Rear frequency -rear sensor frequency
-Music volume while parking -when the park-
ing system is switched on, the volume of the
active audio source is lowered .
The new ly adjusted value is briefly heard from
the signa l generator. The settings are automati
cally stored and assigned to the remote control
key .
A WARNING
- Always make sure that the volume and fre
quency of the wa rning tones is adjusted so
that you can eas ily hear the acoust ic dis
tance signal even if the radio is playing, the
air-conditioner blower is on High or there is
a high level of outside noise .
Parking System
-Check the settings whenever someone e lse
has driven the vehicle before you.
(D Tips
- The warn ing tones can also be adjus ted di
rectly from the rear view camera image.
Simp ly press the Settings* contro l button .
- Changed settings are activated when park ing assist is switched on again.
Error messages
Applies to vehicles: with parking system (rear, with rear view
camera)
If a warning tone is audible for about five sec
onds when you turn on the ignition , there is a
malfunction in the system. Have the problem cor
rected by your authorized Audi dealer.
Keep the sensors in the rear bumper clean and
free from ice so that the acoustic park assist sys
tem can function properly .
111
Page 114 of 264
Driving safety
Driving safety
Basics
Safe driving habits
Please remember -safe ty first!
This chapter contains important information,
tips, instructions and warnings that you need to
read and observe for your own safety, the safety
of your passengers and others. We have summar ized here what you need to know about safety
belts, airbags, child restraints as well as child
safety. Your safety is for us
priority number 1. Al
ways observe the information and warnings in
this section - for your own safety as well as that
of your passengers .
The information in this section applies to all
model versions of your vehicle . Some of the fea
tures described in this sections may be standard
equipment on some models, or may be optional
equipment on others. If you are not sure, ask
your authorized Audi dealer.
A WARNING
- Always make sure that you follow the in
structions and heed the WARNINGS in this
Manual.
It is in your interest and in the in
terest of your passengers.
- Always keep the complete Owner's Litera
ture in your Audi when you lend or sell your
vehicle so that this important information
will always be available to the driver and
passengers.
-
- Always keep the Owner's literature handy so
that you can find it easily if you have ques
tions .
Safety equipment
The safety features are part of the occupant re
straint system and work together to help reduce
the risk of injury in a wide variety of occident sit
uations.
Your safety and the safety of your passengers
should not be left to chance. Advances in tech
nology have made a variety of features available
to help reduce the risk of injury in an accident.
112
The following is a list of just a few of the safety
features in your Audi:
-sophisticated safety belts for driver and all pas-
senger seating positions,
- belt force limiters for the front seats,
- belt pretensioners for the seats,
- head restraints for each seating position,
- front airbags,
- side airbags in the front seats,
- side curtain airbags,
- special LATCH anchorages for child restraints,
- adjustable steering column.
T hese individual safety features, can work to
gether as a system to help protect you and your
passengers in a wide range of accidents . These
features cannot work as a system if they are not
always correctly adjusted and correctly used.
Safety is everybody's responsibility!
Important things to do before driving
Safety is everybody's job! Vehicle and occupant
safety always depends on the informed and care
ful driver.
For your safety and the safety of your passen
gers,
before driving always:
.,. Make sure that all lights and signals are operat
ing correctly .
.,. Make sure that the tire pressure is correct.
.,. Make sure that all windows are clean and afford
good visibility to the outside .
.,. Secure all luggage and other items carefully
Q page 60.
.,. Make sure that nothing can interfere with the
pedals .
.,. Adjust front seat, head restraint and mirrors
correctly for your height.
.,. Instruct rear seat passengers to adjust the
head restraints according to their height.
.,. Make sure to use the right child restraint cor
rectly to protect ch ildren
c> page 151 , Child
safety .
.,. Sit properly in your seat and make sure that
your passengers do the same
Q page 54, Seats
and storage.
Page 115 of 264
M N
0 loo
rl I.O
"' N
"' rl
.. Fasten your safety belt and wear it properly. Al
so instruct your passengers to fasten their safe
ty belts properly
¢ page 121.
What impairs driving safety?
Safe driving is directly related to the condition of
the vehicle, the driver as well as the driver's abili
ty to concentrate on the road without being dis
tracted .
The driver is responsible for the safety of the ve
hicle and all of its occupants. If your ability to
drive is impaired, safety risks for everybody in the
veh icle increase and you also become a hazard to
everyone else on the road ¢.&, .Therefore:
.. Do not let yourself be distracted by passengers
or by using a cellular te lephone .
.. NEVER drive when your driv ing ability is im
paired (by medicat ions, alcohol, drugs, etc.).
.. Observe all traffic laws, rules of the road and
speed limits and plain common sense .
.. ALWAYS adjust you r speed to road, traff ic and
weather cond itions .
.. Take frequent breaks on long trips. Do not drive
for more than two hours at a stretch .
.. Do NOT drive when you are tired , under pres
sure or when you are stressed.
A WARNING
Impaired driving safety increases the risk of
ser ious personal injury and death whenever a
vehicle is being used.
Driving safety
Correct passenger
seating positions
Proper seating position for the driver
The proper driver seating position is important
for safe, relaxed driving.
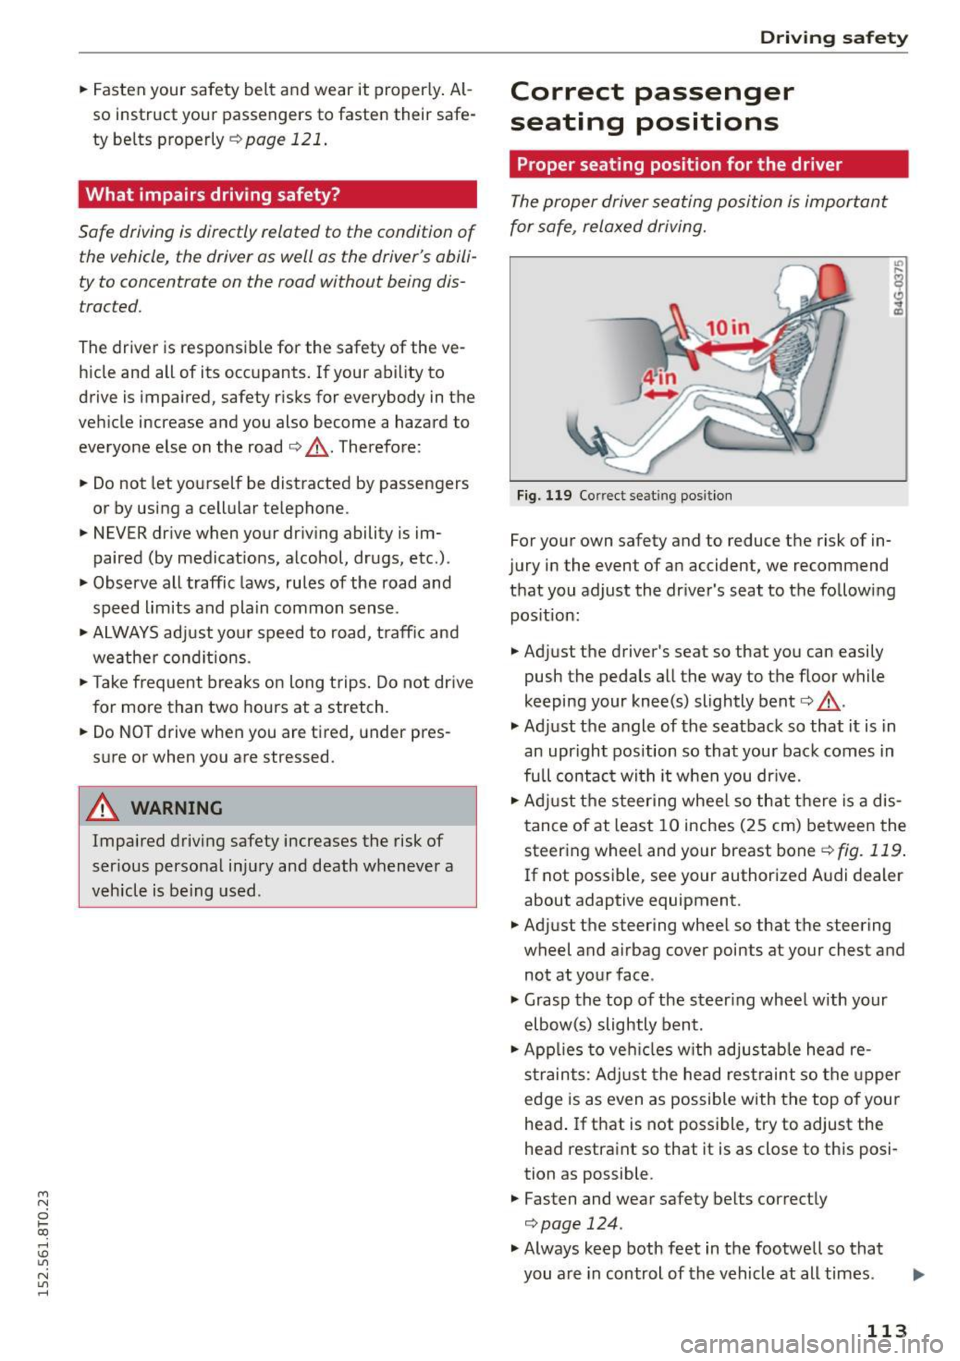
Fig. 119 Correct se ating position
For your own safety and to reduce the risk of in
jury in the event of an accident, we recommend
that you adjust the driver's seat to the following pos ition:
.. Adjust the driver's seat so that you can easily
push the pedals all the way to the floor while
keeping your knee(s) slightly bent¢.&, .
.,. Adjust the angle of the seatback so that it is in
an upright position so that your back comes in
fu ll contact wi th it when you dr ive.
.. Adjust the steer ing wheel so that there is a dis
tance of at least 10 inches (25 cm) between the
steering whee l and your breast bone
¢fig. 119 .
If not possible, see your authorized A udi dealer
about adaptive equipment.
.. Adjust the steering wheel so that the steering
wheel and airbag cover points at your chest and
not at your face .
.,. Grasp the top of the steer ing wheel with your
elbow(s) slightly bent.
.. App lies to veh icles w ith adjustable head re
s tra ints: Adjust the head restraint so the upper
edge is as even as possible with the top of your
head . If that is not possible , try to adjust the
head restraint so that it is as close to this posi
tion as possible.
.. Fasten and wear safety belts correctly
¢page 124.
.,. Always keep both feet in the footwell so that
you are in control of the vehicle at all times.
113
Page 116 of 264
Driving safety
For detailed information on how to adjust the
driver's seat, see
¢ page 55.
A WARNING
Drivers who are unbelted, out of position or
too close to the airbag can be seriously in
jured by an airbag as it unfolds. To help re duce the risk of serious personal injury:
- Always adjust the driver's seat and the
steering wheel so that there are at least
10 inches (25 cm) between your breastbone
and the steering wheel.
- Always hold the steering wheel on the out
side of the steering wheel rim with your
hands at the 9 o'clock and 3 o'clock posi
tions to help reduce the risk of personal in
jury if the driver's airbag inflates .
- Never hold the steering wheel at the
12 o'clock position or with your hands at
other positions inside the steering wheel
rim or on the steering wheel hub . Holding
the steering wheel the wrong way can cause
serious injuries to the hands, arms and head
if the driver's airbag deploys.
- Pointing the steering wheel toward your
face decreases the ability of the supplemen
tal driver's airbag to protect you in a colli
sion.
- Always sit in an upright position and never
lean against or place any part of your body
too close to the area where the airbags are located .
- Before driving, always adjust the front seats
and head restraints properly and make sure
that all passengers are properly restrained.
- Never adjust the seats while the vehicle is
moving . Your seat may move unexpectedly
and you could lose control of the vehicle.
- Never drive with the backrest reclined or
tilted far back! The farther the backrests are
tilted back, the greater the risk of injury due
to incorrect positioning of the safety belt and improper seating position.
- Children must always ride in child safety
seats
¢page 151. Special precautions ap
ply when installing a child safety seat on the
front passenger seat¢
page 129 .
114
-
Proper seating position for the front
passenger
The proper front passenger seating position is
important for safe, relaxed driving.
For your own safety and to reduce the risk of in
jury in the event of an accident, we recommend
that you adjust the seat for the front passenger
to the following position :
.,. Move the front passenger seat back as far as
possible . There must be a minimum of 10 in
ches (25 cm) between the breastbone and the
instrument panel¢,&. .
.,. Adjust the angle of the seatback so that it is in
an upright position and your back comes in full
contact with it whenever the vehicle is moving.
.,. Applies to vehicles with adjustable head re
straints: Adjust the head restraint so the upper
edge is as even as possible with the top of your head. If that is not possible, try to adjust the
head restraint so that it is as close to this posi
tion as possible .
.,. Keep both feet flat on the floor in front of the
front passenger seat.
.,. Fasten and wear safety belts correctly
¢ page 124.
For detailed information on how to adjust the
front passenger's seat, see ¢
page 54.
A WARNING
Front seat passengers who are unbelted, out
of position or too close to the airbag can be
seriously injured or killed by the airbag as it
unfolds . To help reduce the risk of serious per
sonal injury :
- Passengers must always sit in an upright po sition and never lean against or place any
pa rt of their body too close to the area
where the airbags are located.
- Passengers who are unbelted, out of posi
tion or too close to the airbag can be seri
ously injured by an airbag as it unfolds with
great force in the blink of an eye .
-Always make sure that there are at least 10
inches (25 cm) between the front passen
ger's breastbone and the instrument panel.
Page 117 of 264
M N
i? co ,...., \!) 1.1'1
N 1.1'1 ,....,
-Each passenger must always sit on a seat of
their own and properly fasten and wear the
safety belt belonging to that seat.
- Before driving, a lways ad just the front pas
senger seat and head restraint properly.
- Always keep your feet on the f loor in front
of the seat. Never rest them on the seat, in
strument panel, out of the window, etc. The
airbag system and safety belt will not be able to protect you properly and can even in
crease the risk of injury in a crash .
- Never drive with the backrest recl ined or
t ilted far back! The farther the backrests are
t il ted back, the greater the risk of injury due
to incorrect pos ition ing of the safety belt
and improper seating posit ion.
- Children must always ride in child safety
seats¢
page 151. Spe cial preca utions ap
ply when installing a ch ild safety sea t on the
front passenger seat¢
page 129.
Proper seating positions for passengers in
rear seats
Rear seat passengers must sit upright with both
feet on the floor consistent with their physical
size and be properly restrained whenever the ve hicle is in use.
To reduce the risk of injury caused by an incorrect
seating position in the event of a sudden braking
maneuver or an accident, yo ur passengers on the
rear bench seat must always observe the follow
in g:
~ Make sure that the seatback is securely latched
in the upright pos ition ¢
page 64.
~ Keep both feet flat in the footwell in front of
the rear seat.
~ Fasten and wear safety belts properly
¢ page 124.
~ Make su re that c hildren are always proper ly re
stra ined in a chi ld restraint that is appropriate
for their size and age¢
page 151 .
A WARNING
Passengers who are improperly seated on the
rear seat can be seriously in jured in a crash .
Drivin g s afet y
-Each passenger must always sit on a seat of
their own and proper ly fasten and wear the
safety belt be long ing to that seat.
- Safety belts only offer maximum protection
when the seatback is secure ly latched in the
upright pos ition and the safety belts are
properly pos itioned on the body . By not sit
ting upright, a rear seat passenger increases
the risk of personal injury from improperly
positioned safety belts!
- Always adjust the head restraint p roperly so
that it can give maximum p rotection.
Proper adjustment of head restraints
Applies to veh icles: w it h adjustable head restraints
Correctly adjusted head restraints are an impor
tant part of your vehicle's occupant restraint sys
tem and can help to reduce the risk of injuries in
accident situations.
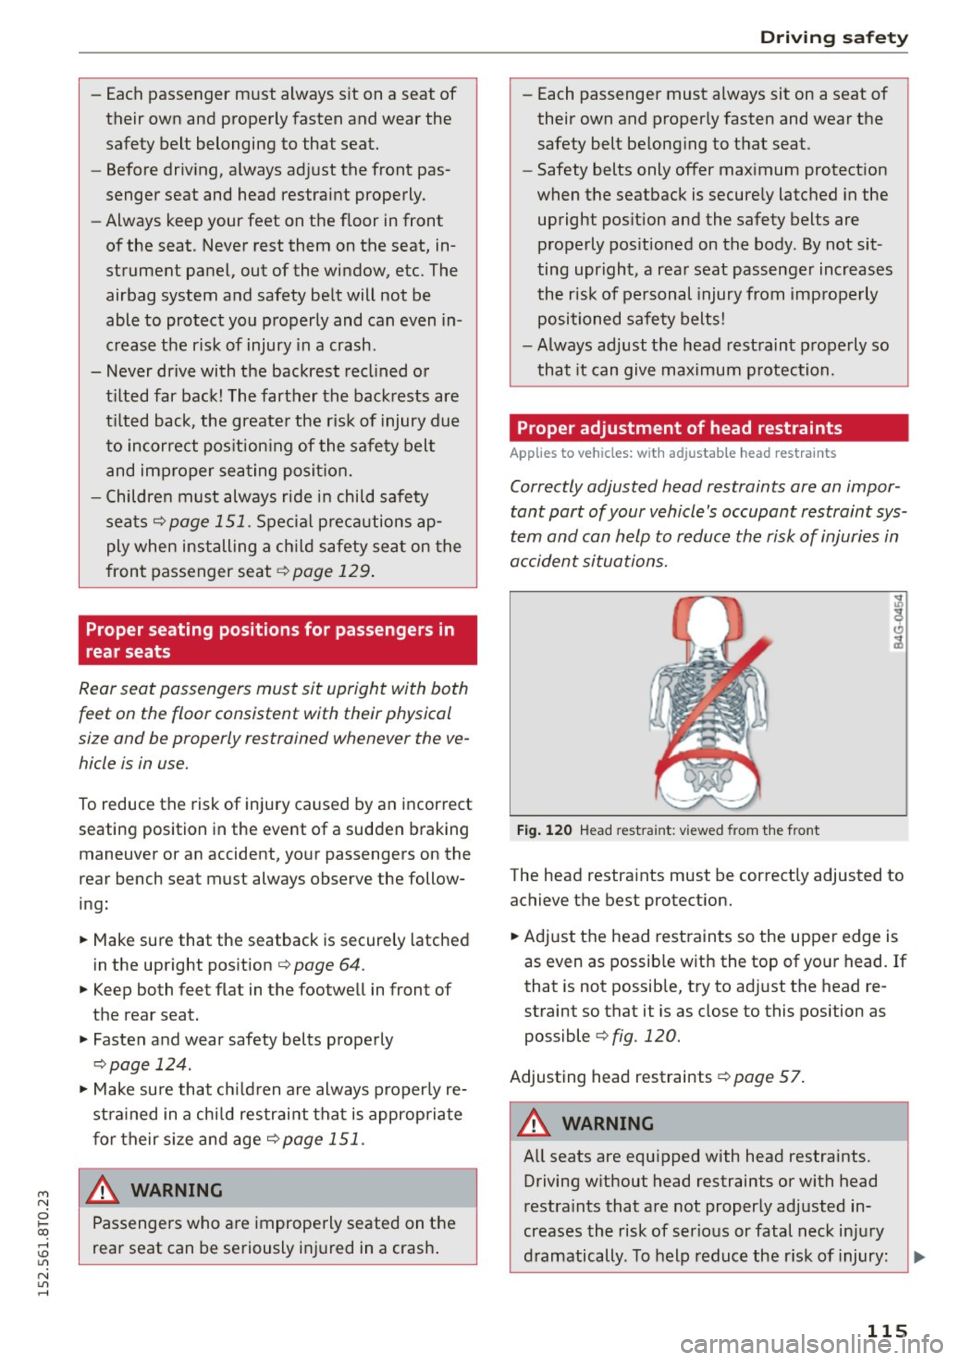
F ig . 1 20 Head restra int: v iewed from t he front
The head restra ints must be cor rectly adjusted to
achieve the best protect ion.
~ Adj ust the head restraints so the upper edge is
as even as possib le w ith the top of your head. If
that is not possible, t ry to ad just the head re
straint so that it is as close to this position as
possible ¢
fig. 120.
Adjusting head restraints ¢page 57.
A WARNING
--
All seats are equ ipped with head restraints.
Driving w ithout head restraints or with head
restra ints that a re not properly adjusted in
creases the risk of serious or fatal neck in ju ry
d ramatically. To help reduce the r isk of injury: ..,.
115
Page 118 of 264
Driving safety
-Always drive with the head restraints in
place and properly adjusted.
- Every person in the vehicle must have a
properly adjusted head restraint.
- Always make sure each person in the vehicle
properly adjusts their head restraint. Adjust
the head restraints so the upper edge is as
even as possible with the top of your head.
If that is not possible, try to adjust the head
restraint so that it is as close to this position
as possib le .
- Never attempt to adjust head restraint wh ile driving .
If you have driven off and
must adjust the driver headrest for any rea
son, first stop the vehicle safely before at
tempting to adjust the head restraint.
- Children must always be properly restrained
in a chi ld restraint that is appropriate for
their age and size ~
page 151 .
Examples of improper seat ing positions
The occupant restraint system can only reduce
the risk of injury if vehicle occupants are properly
seated.
Improper seating positions can cause serious in
jury or death . Safety be lts can only work when
they are properly positioned on the body. Im
proper seat ing pos itions reduce the effectiveness
of safety belts and wi ll even increase the risk of
injury and death by moving the safety belt to crit
ical areas of the body. Improper seating positions
also increase the risk of serious injury and death
when an airbag deploys and strikes an occupant
who is not in the proper seating position. A driver
is responsible for the safety of all vehicle occu
pants and especially for children . Therefore:
~ Never allow anyone to assume an incorrect
seating position when the vehicle is being used
~ .&. -
The following bulletins list only some sample po
si tions that will increase the risk of serious injury
and death . Our hope is that these examples will
make you more aware of seating positions that
are dangerous.
116
Therefore, whenever the vehicle is moving:
-never stand up in the vehicle
- never stand on the seats
- never kneel on the seats
- never ride with the seatback reclined
- never lie down on the rear seat
- never lean up against the instrument panel
- never sit on the edge of the seat
- never s it sideways
- never lean out the window
- never put your feet out the window
- never put your feet on the instrument panel
- never rest your feet on the seat cushion or back
of the seat
- never ride in the footwell
- never ride in the cargo area
A WARNING
Improper seating positions increase the risk
of serious personal injury and death whenever
a vehicle is being used.
- Always make sure that all vehicle occupants stay in a proper seating position and are
properly restrained whenever the vehicle is
being used .
Driver's and front
passenger's footwell
' Important safety instructions
Applies to vehicles : wit h knee airbags
A WARNING
Always make sure that the knee airbag can in
flate without interference. Objects between
yourself and the airbag can increase the risk
of injury in an accident by interfering with the
way the airbag deploys or by being pushed in
to you as the airbag deploys.
- No persons (children) or animals should ride
in the footwell in front of the passenger
seat .
If the airbag deploys, this can result in
serious or fatal injuries.
- No objects of any kind should be carried in
the footwell area in front of the driver's or
passenger's seat. Bulky objects (shopping bags, for example) can hamper or prevent
Page 119 of 264
M N
i? co ,...., \!) ..,.,
N ..,., ,....,
proper deployment of the airbag. Small ob
jects can be thrown through the veh icle if
the a irbag deploys and injure you or your
passengers .
Pedal area
Pedals
The pedals must always be free to move and
must never be interfered with by a floor mat or
any other object.
Make sure that all pedals move freely without in
terference and that noth ing prevents them from
returning to their original pos it ions .
Only use floor mats that leave the peda l area free
and can be secured with floor mat fasteners .
If a brake circuit fails, increased brake pedal trav
el is required to bring the vehicle to a full stop.
A WARNING
Pedals that cannot move freely can cause loss
of vehicle control and increase the r is k of seri
ous lnJUry.
- Never place any objects in the driver's foot
we ll. An object could get into the peda l area
and interfere with peda l function . In case of
s udden br aking or an accident, you wou ld
not be able to brake o r acce lerate!
- Always make sure that noth ing can fa ll or
move into the dr iver's foo twe ll.
Floor mats on the driver side
Always use floor mats that can be securely at
tached to the floor mat fasteners and do not in
terfere with the free movement of the pedals.
• Make sure that the floor mats are properly se
cu red and cannot move and i nterfere wit h the
peda ls ~
& -
Use only floor mats that leave the pedal area un
obstructed and that are firm ly secured so that
they cannot slip out of pos it ion. You can obtain
suitab le floo r mats from you r authorized Audi
dealer.
Dr ivin g s afet y
Floor mat fasteners are insta lled in your Audi.
Floor mats used in your vehicle must be attached
to these fasteners. P roperly securing the floor
mats will preven t them from sl iding into posi
t ions that could interfere with the pedals or im
pair safe operation of your vehicle in other ways.
A WARNING
-Pedals that cannot move free ly can result in a
loss of vehicle control and increase the risk of
serious personal injury.
- Always make sure that floor mats are prop
erly secured.
- Never p lace or install floor mats or other
f loor coverings in the vehicle that cannot be
properly secured in p lace to prevent them
from slipp ing and interfering with the ped
als or the ab ility to control the vehicle .
- Never p lace or install floor mats or other
f loor coverings on top of already installed
floor mats . Addit ional floor mats and other
cover ings will red uce the size of the pedal
area and interfe re with the pedals .
- Always prope rly reinstall and secure floo r
mats that have been taken out for cleaning.
- Always make sure that objects cannot fall
into the driver footwell while the vehicle is
mov ing. Objects can become trapped under
the brake pedal and acce lerator pedal caus
ing a loss of vehicle control.
117
Page 120 of 264
Driving safet y
Storing cargo correctly
Loading the luggage compartment
All Luggage and other objects mus t be properly
stowed and secured in the Luggage compart
ment.
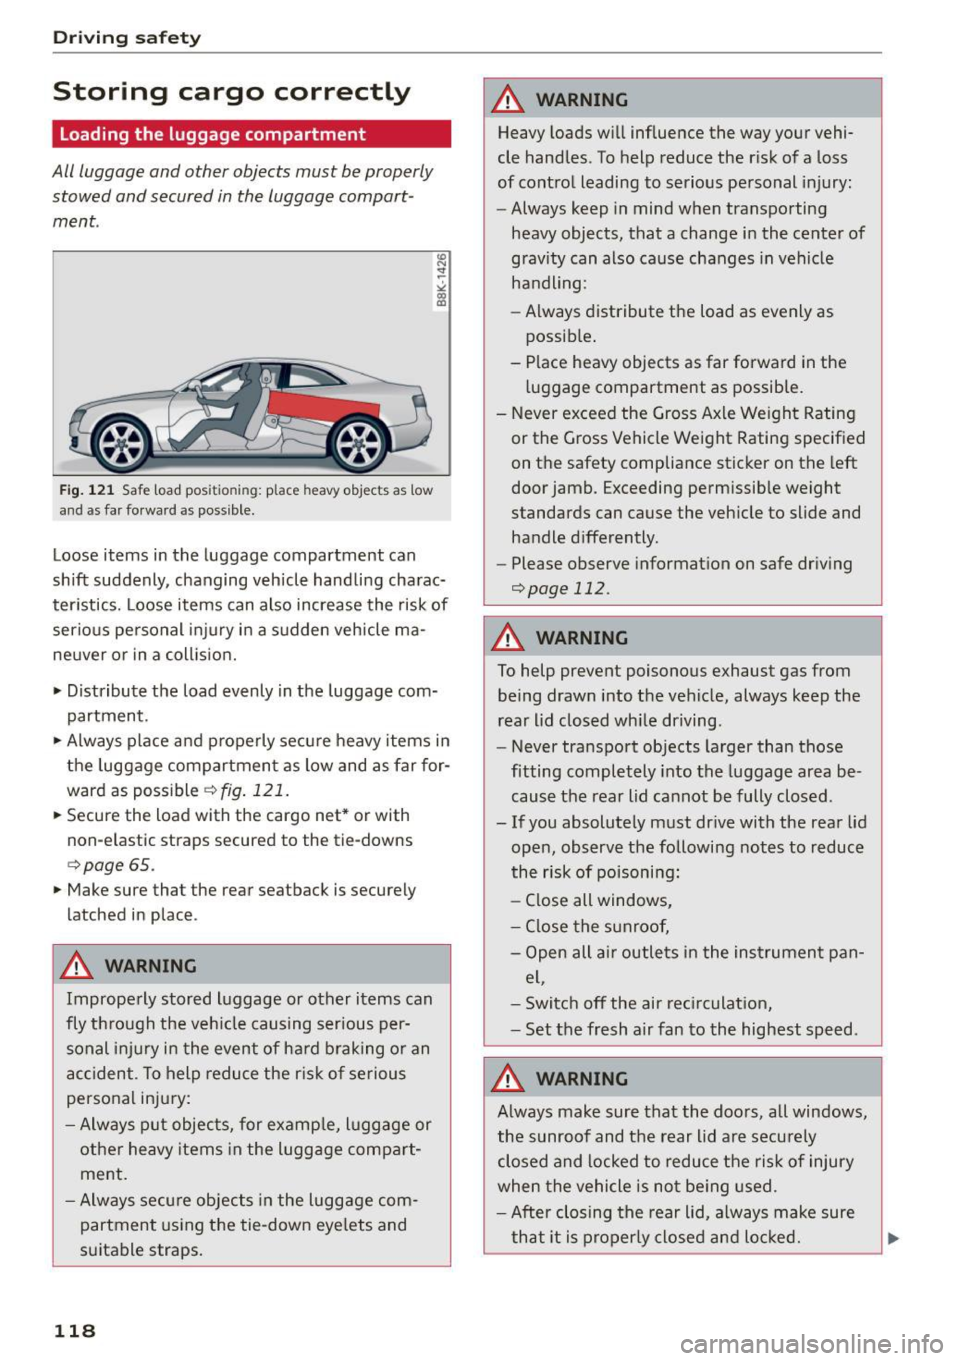
F ig. 121 Saf e load pos itio ning : place heavy objec ts as low
an d a s far forwa rd as possible.
Loose items in the luggage compartment can
shift suddenly, changing vehicle handli ng charac
ter istics. Loose items can also increase the risk of
serious pe rsonal i njury in a s udden vehicle ma
neuver or in a coll is ion.
• Distribute the load evenly in the luggage com
partment.
• Always place and p roperly secu re heavy items in
the luggage compartment as low and as far for
ward as poss ible
c> fig . 121.
• Secure the load with the cargo net* or with
non-e lastic straps secured to the tie-downs
c>page 65.
• Make sure that the rear seatback is securely
latched in place .
A WARNING
Improperly stored luggage or other items can
fly th rough the veh icle caus ing serious per
sonal i njury in the event of ha rd braking o r an
ac cident . To help redu ce the r is k of serious
personal inju ry:
- Always put objec ts, for examp le, l uggage or
other heavy items in the luggage compa rt
ment.
- Always secu re objects in the luggage com
partment using the tie-down eye lets and
s u itable straps.
118
A WARNING
H eavy loads w ill influence the way your vehi
cle handles . To help reduce the r isk of a loss
of control leading to serious personal injury:
- Always keep in mind when transpo rting
heavy objects, that a change i n the center of
grav ity can also cause changes in vehicle
handling:
- Always distribute the load as evenly as
possib le .
- Place heavy objects as far forward in the
luggage compartment as possible.
- Never exceed the Gross Ax le Wei ght Rating
or the Gross Vehicle Weight Rating specified
on the safety compliance sticker on the left
do or jamb. Exceeding permissible weight
standards can cause the vehicle to slide and
handle d ifferently.
- Please observe informat ion on safe driv ing
c>page 112 .
A WARNING
To help prevent poisonous exhaust gas from
being drawn into t he vehicle, always keep the
rear lid closed wh ile driving.
- Never transport objects larger than those
fitting completely into the luggage area be
cause the rear lid cannot be fully closed .
- If you absolutely must dr ive with the rear lid
ope n, observe the following notes to reduce
the risk of poisoni ng :
- Close all windows,
- Close the sunroof,
- Open all air outle ts in the ins trument pan-
el,
- Switch off the air rec irculat ion,
- Set the fresh air fan to the highest speed .
A WARNING
Always make sure that the doo rs, all windows,
the sunroof and the rear lid are secu rely
closed a nd locked to reduce the ris k of injury
whe n the vehicle is no t be ing used.
- After closing the rear lid, always make sure
th at it is p rope rly closed and lo cked.