tow AUDI A5 COUPE 2015 User Guide
[x] Cancel search | Manufacturer: AUDI, Model Year: 2015, Model line: A5 COUPE, Model: AUDI A5 COUPE 2015Pages: 264, PDF Size: 66.83 MB
Page 83 of 264
M N
i? co
-For reas ons of safety, cruise contro l should
not be used in the city, in stop-and-go traf
fic, on twisting roads and when road condi
t ions are poor (such as ice, fog, gravel,
heavy rain and hydrop laning) -risk of acci
dent .
- Turn off the cruise control temporari ly when
enter ing turn lanes, highway exit lanes or in
construction zones.
- Please note that inadvertent ly "rest ing"
yo ur foot on the accelerator peda l causes
the cruise control not to brake. This is be
c a use the cruise co ntro l is ove rri dden by the
dr iver's acceleration .
-If a brake system malfunc tion such as ove r
he ating occu rs when the c ruise control sys
tem is switche d on, the braking func tion in
the system may be switche d off . The other
c ruise control functions remain active as
long as the indicator light
[lj;(i)~i~ (US mod
els)
! Iii (Canadian mode ls) is on.
(D Tips
- Vehicles with manua l t ransmission: You can
attain the set speed only if the gear t hat is
currently engaged will allow it, or if it does
not tax t he engine and allows it to run
smooth ly. Therefore shift i nto a higher or
l ower gear in a time ly ma nner.
- The brake lights illuminate as soon as the
brakes app ly automatically .
Changing speed
.,. To increase/dec rease the speed in increments,
tap the lever i n the
010 dir ection ¢ page 80,
fig. 83.
.,. To inc rease/de crease the s peed q uickly, hol d
the leve r in the
010 direction until the de
sired speed is displayed.
You c an a lso press the acceler ator peda l down to
increase your spee d, e .g . if you want to pass
someone . The speed you saved ea rlier will re
sume as soo n as yo u let off of the accelerator
pedal.
~ If , however, yo u exceed your saved speed by 1.1'1
~ 6 mph (1 0 km/h) for longe r than 5 mi nutes, the
......
Dri ving
cruise control will be turned off tempora rily. The
green symbo l in the d isp lay turns wh ite . The
saved speed rema ins the same .
Presetting your speed
You can preset your desired speed while the vehi
cle is not moving.
.,. Switch on the ign ition.
.,. Pull leve r into position
(D ¢ page 80, fig . 83 .
.,. Press the leve r in t he 0 o r O direction to in -
crease or decrease your speed .
.,. Release the lever t o save that speed .
This function makes it possib le, for examp le, to
save the speed you want before dr iving on the
highway. Once on the highway, activate the cru ise
control by p ulling the lever toward
(D .
Switching off
Temporary deactivation
.,. Press the brake pedal, or
.,. Manual transmission: Keep the clutch pedal
pressed down
longer, o r
.,. Press the leve r into posit ion @ (not clicked into
p lace) ¢
page 80, fig. 83, or
.,. Dr ive fo r longer t han 5 mi nutes a t more t han
6 mph (1 0 km/h) above the s tore d speed.
Switching off completely
.,. Press lever into position @ (clicked into place),
or
.,. Sw itch t he ignit ion off .
T he speed you saved will be retai ned if the cru ise
co ntrol has been switched off tempora rily . T o re
s u me the saved speed, let up on the brake or
cl utch pedal and pull the lever to position
(D .
Swi tch ing the ignition off erases the saved speed .
A WARNING
--
You should only re turn to the saved speed if it
i s not too f ast for the curren t traff ic condi
ti ons -ris k of an accident!
81
Page 90 of 264
Automatic transmission
Press the brake pedal a nd se lect the desi red se
lector le ver positio n again. You can then continue
driving .
rm Transmi ssion overheating : Please drive con·
s ervatively .
The transmission temperature has increased sig
n ifi cant ly due to the s porty dr iv ing m anne r. D rive
i n a less sporty manner u ntil t he tempera ture re
tur ns to the normal range and the indica to r li ght
switches of .
rm Transmission malfunction: You can continue
driving
There is a system ma lfunction in the tra nsmis
sion . You may continue driving. Drive to your au
thor ized A udi de aler or qu alified repair f acility
soon to have the ma lfunct io n corrected.
[O] Transmission malfunction: Limited driv ing
functionality
There is a system ma lf u nction in the tra nsmis
sion . The transmission is sw itch ing to emergency
mo de . T his mode only shifts into certa in gears o r
w ill no longer s hift a t all. The engi ne may stall.
D rive t o your author ized Aud i de aler o r q ualified
re pai r facili ty immedia tely to have the m alfu n c
tion correcte d.
l'§J l:t Transmission malfunction : No reverse
You c an continue driving
S tron ic tr ansm ission : There is a sys tem ma lf u nc
tion in the transmiss io n. The transm iss ion is
sw itching to emergency mode . Thi s mode on ly
shi fts i nto ce rtain ge ars or w ill no longer shi ft at
a ll . T he engine may s tal l. You canno t engage the
reve rse gear . Dr ive to your authorized Audi dea ler
or qualified repair faci lity immediately to have
the ma lfunction corrected .
rm Transmission malfunction: Stop vehicle and
s hift to park.
D o not cont inue d riving. Select the P se le ctor lev
er position and see yo ur auth orize d Aud i de aler
or qualified rep air f acili ty for assist ance.
(D Note
If the trans mission s witc hes to e mergen cy
m od e, y ou s hould ta ke the vehicle to an au-
88
thorized Audi dea lership as soon as possible
to have the condition correcte d.
Selector lever emergency release
Applies to vehicles: with S tronic/tiptro nic
If the vehicle's power supply fails, the sele ctor
lever can be released in an emergency .
Fig. 91 Fro nt ce nte r co nsole : Rem oving t he as htray i nse rt
Fig. 92 Selec to r leve r em erge ncy re lease
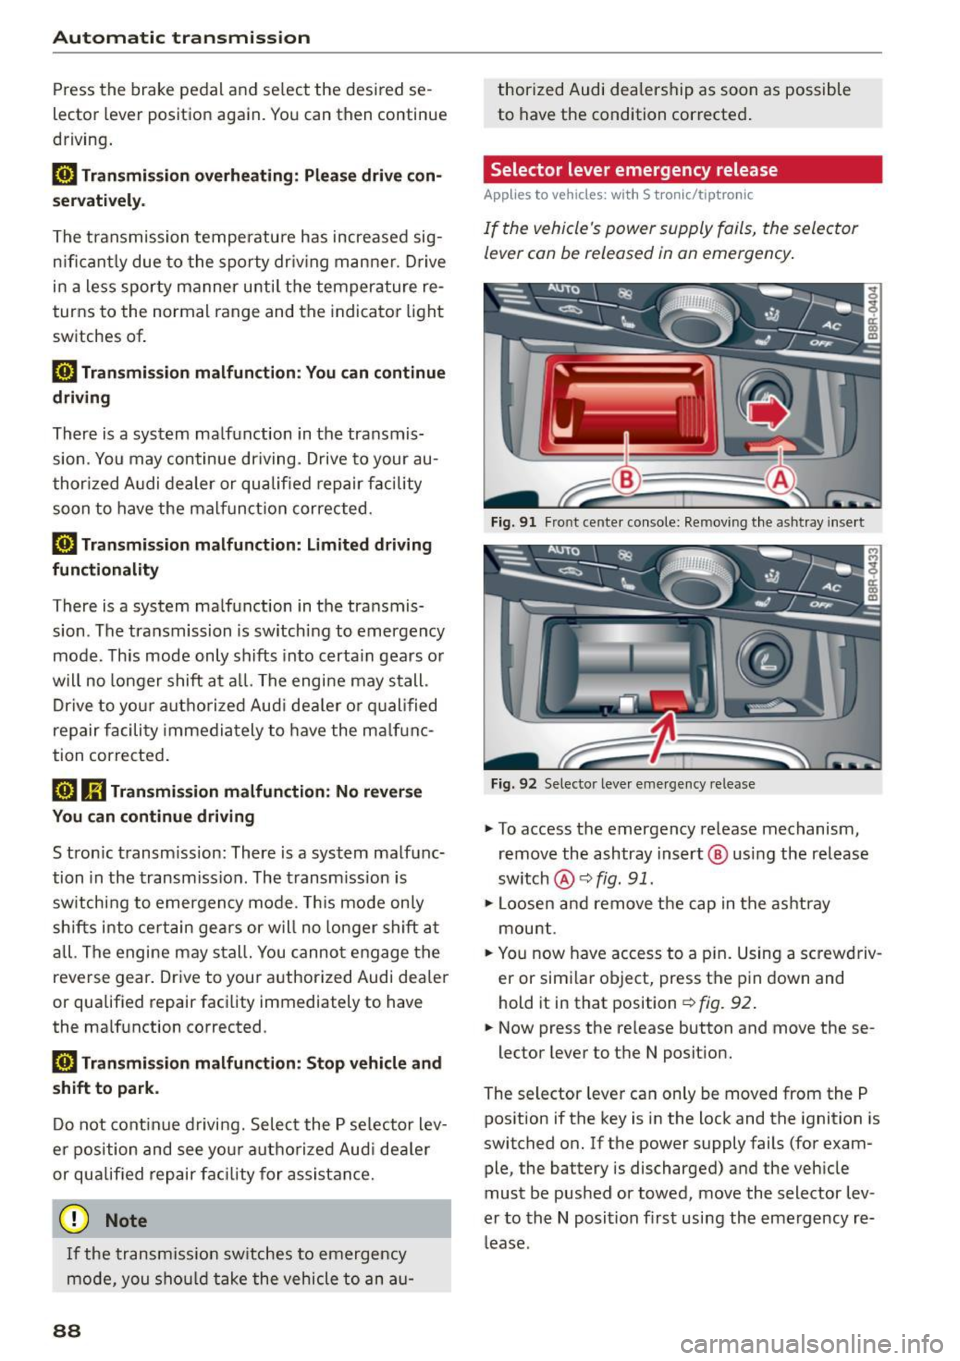
.,. To access the emergency re lease mechanism,
remove the ashtray insert @ using the release
sw itch
@ ¢fig. 91.
.,. Loosen a nd remove t he cap in t he as htray
mou nt.
.,. Yo u now have access to a p in. Using a sc rewdriv
er or sim ila r o bject, press t he pi n down and
hold it in that position
¢ fig. 92 .
.,. Now press the re lease button and move these -
lector lever to t he N posit ion.
The selector leve r ca n only be moved from the P
pos ition if the key is in the lock and the ignition is
switc hed on . If the power supply fails (for exam
ple, the battery is discharged) and the veh icle
must be pus hed or towed, move the selector lev
er to th e N position fi rst usi ng the emerg ency re
l ease .
Page 91 of 264
M N
0 loo
rl I.O
"' N
"' rl
Audi adapt ive crui se cont rol and bra king gu ard
Audi adaptive cruise
control and braking
guard
Introduction
App lies to vehicles: with Audi adaptive cruise co ntrol
The adaptive cruise control system assists the
driver by regu lating vehi cle speed and helping to
maintain a set distance to the vehicle ahead,
within the limits of the system.
If the system de
tects a moving vehicle up ahead, adaptive cruise
control can brake and then accelerate your vehi
cle. This helps to make driving more comfortable
on long highway stretches.
The braking guard system can warn you about an impend ing collision and initiate braking maneu
vers
¢ page 95.
Adaptive cruise control and braking guard have
technical limitations that you must know, so
p lease read this section carefu lly, understand
how the system works and use them properly at
all times.
General information
General information
A pp lies to vehicles: with Audi adaptive cruise co ntrol
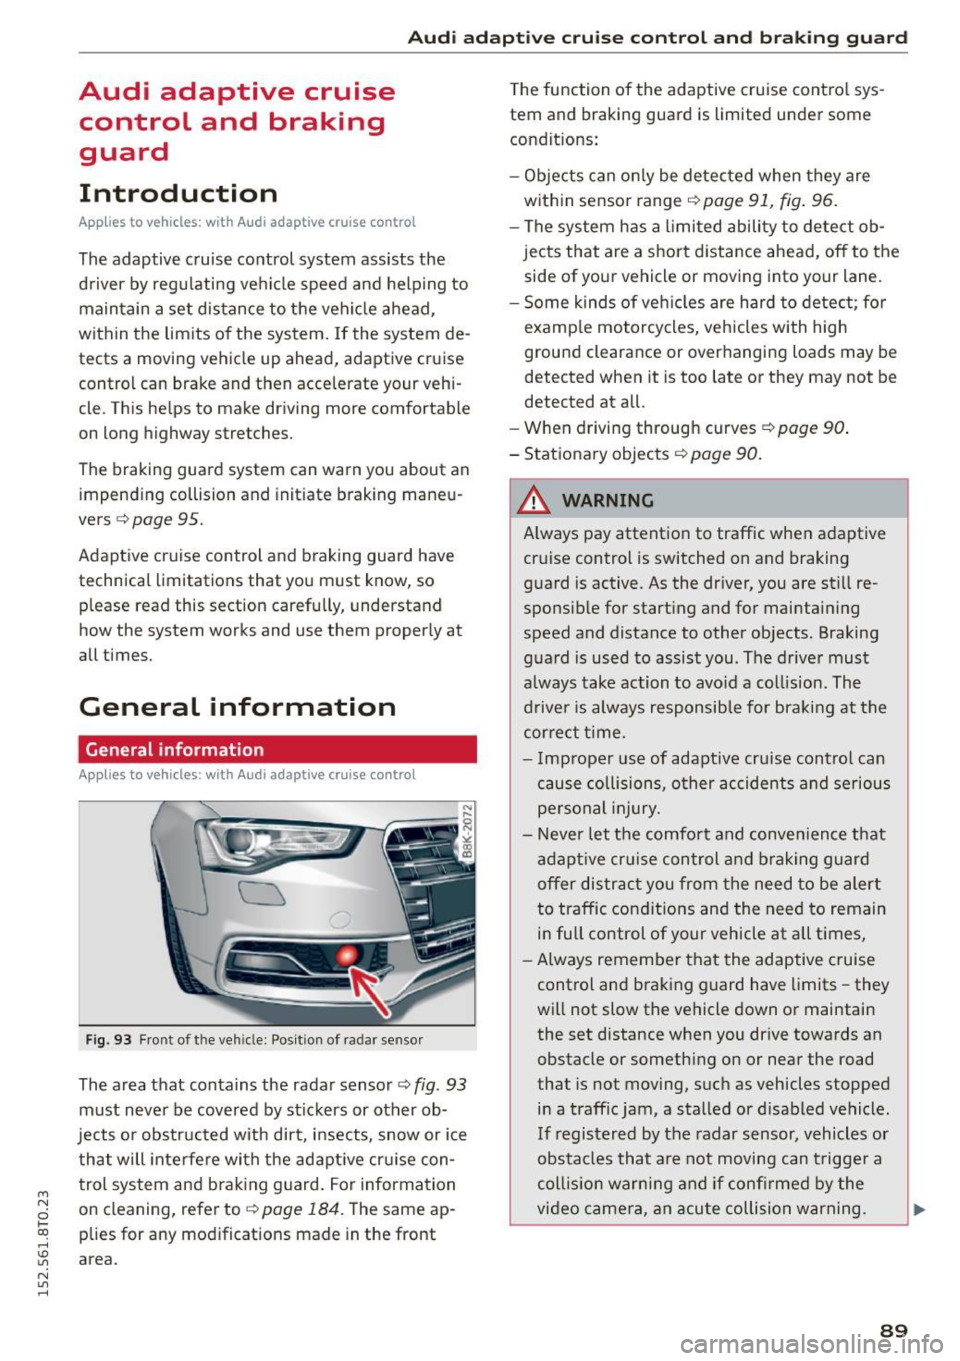
Fig. 93 Fr ont of th e veh icle : Posit ion of radar sensor
The area that contains the radar sensor¢ fig. 93
must never be covered by stickers or other ob
jects or obstructed with dirt, insects, snow or ice
that will inte rfe re with the adapt ive cr uise con
trol system and brak ing guard. For information
on cleaning, refer to ¢
page 184. The same ap
p lies for any mod ificat ions made in the front
area. T
he function of the adaptive cruise cont ro l sys
tem and braking guard is limited under some
condit ions:
- Ob jects can on ly be de tected when they are
with in sensor range¢
page 91, fig. 96.
-The system has a limited ability to de tect ob
jects that are a short distance ahead, off to the
side of your vehicle or moving into your lane .
- Some kinds of veh icles are hard to detect; for
examp le motorcycles, vehicles with high
ground clearance or overhanging loads may be
detected when it is too late or they may not be
detected at all.
- When driving through curves
¢page 90 .
-Stationa ry objects ¢ page 90.
,&_ WARNING
-= -Always pay attention to traffic when adaptive
cruise control is switched on and braking
g uard is active. As the driver, you are still re
sponsib le for start ing and for maintai ning
speed and distance to other objects. Braking
g uard is used to assist you . The drive r must
a lways take action to avo id a col lision . The
d river is always responsible for bra kin g at the
cor re ct t ime.
- I mp roper use of adaptive cruise control can
cau se collisions, o ther accidents and serious
pe rsonal injury.
- Never let the comfort and conve nience that
adapt ive cr uise control and braking guard
offer distrac t you from the need to be alert
to traffic con dit ions and the need to remain
i n full control of your vehicle at all times,
- Always remember that the adaptive cruise
control and braking guard have limits -they
will not slow the vehicle down or maintain
the set distance when you dr ive towards an
obstacle or somethi ng on or near the road
that is not moving, such as vehicles stopped
in a traff ic jam, a sta lled or d isabled vehicle.
If registered by the radar sensor, vehicles or
obstacles that a re not moving can t rigger a
coll is io n warning and if confi rmed by the
video came ra, an acute collision war ning.
~
89
Page 94 of 264
Audi adaptive cruise control and braking guard
You can set any speed between 20 mph and 95
mph (30 and 150 km/h).
I ndicator lamps and messages i n the instrument
cluster display inform you about the current sys
tem status and settings .
Switching Audi adaptive cruise control on
11-Pull the lever toward you into posit ion (D
¢ fig. 97. ACC standby appears in the instru
ment cluster display.
Setting the speed and activating regulation
.,.. To set the current speed, press the !SET ! button
¢ page 11, fig. 4. The set speed is shown in the
tachometer @ and is also shown b rief ly in the
display @¢
fig. 98.
Switching Audi adaptive cruise control off
.,.. Push the lever away from you into position @
until it clicks into place. The message
ACC off
appears.
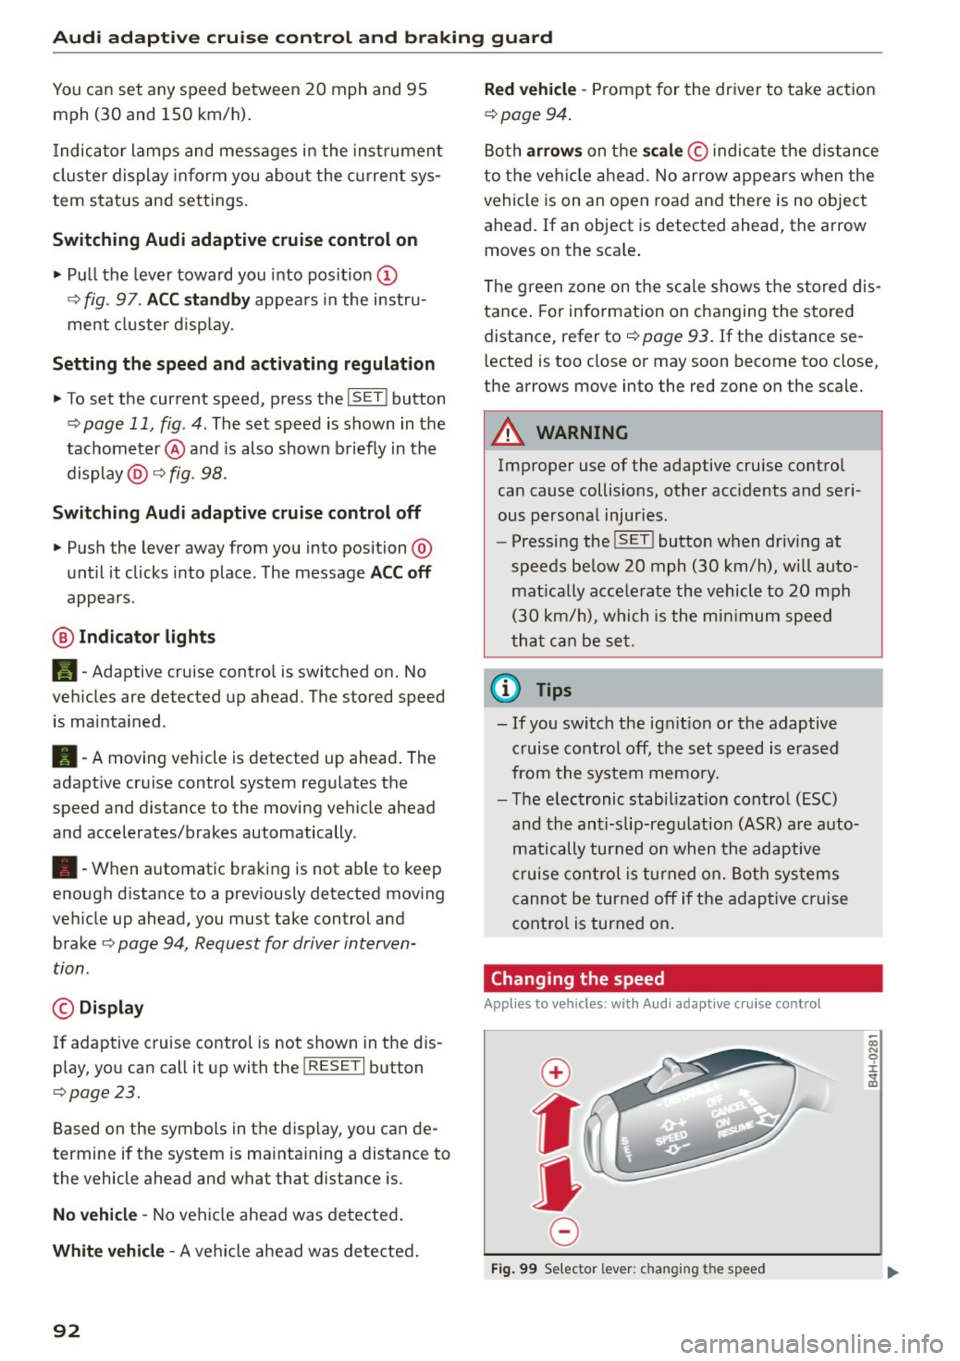
@ Indicator lights
Ill-Adaptive cruise contro l is switched on. No
veh icles are detected up ahead . The stored speed
is mainta ined .
•- A moving vehicle is detected up ahead. The
adaptive cruise control system regu lates the
speed and distance to the moving vehicle ahead
and accelerates/brakes automatically .
•- When automatic braking is not able to keep
enough distance to a previously detected moving
veh icle up ahead, you must take control and
brake ¢
page 94, Request for driver interven
tion .
© Display
If adaptive cruise control is not shown in the d is
play, you can call it up with the
!RESET! button
¢page 23.
Based on the symbo ls in the display, you can de
termine if the system is mainta ining a distance to
the vehicle ahead and what that distance is.
No vehicle -No vehicle ahead was detected .
White vehicle -A vehicle ahead was detected.
92
Red vehicle -Prompt for the driver to take action
¢page 94.
Both arrows on the scale © indicate the d istance
to the vehicle ahead. No arrow appears when the
vehicle is on an open road and there is no object
ahead. If an object is detected ahead, the arrow
moves on the scale .
The green zone on the scale shows the stored dis
tance . For info rmation on changing the stored
distance, refer to¢
page 93. If the distance se
l ected is too close or may soon become too close,
the arrows move into the red zone on the scale .
A WARNING
Improper use of the adaptive cruise contro l
can cause collisions, other acc idents and seri
ous persona l injuries.
- Pressing the
!SET ! button when driving at
speeds below 20 mph (30 km/h), will auto
matically accelerate the vehicle to 20 mph
(30 km/h), which is the minimum speed
that can be set.
@ Tips
-If you switch the ign it ion or the adaptive
cruise control off, the set speed is erased
from the system memory.
- The electronic stabilizat ion control (ESC)
and the anti-slip-regulation (ASR) are auto
matically turned on when the adaptive
cruise control is turned on. Both systems
cannot be turned off if the adaptive cruise
control is turned on .
Changing the speed
Applies to veh icles: with Aud i adapt ive cru ise control
0
f
•
0
Fig. 99 Selector lever: ch ang ing th e speed
Page 100 of 264
Audi side assist
Audi side assist
Side assist
Description
Applies to vehicles: with Aud i side ass ist
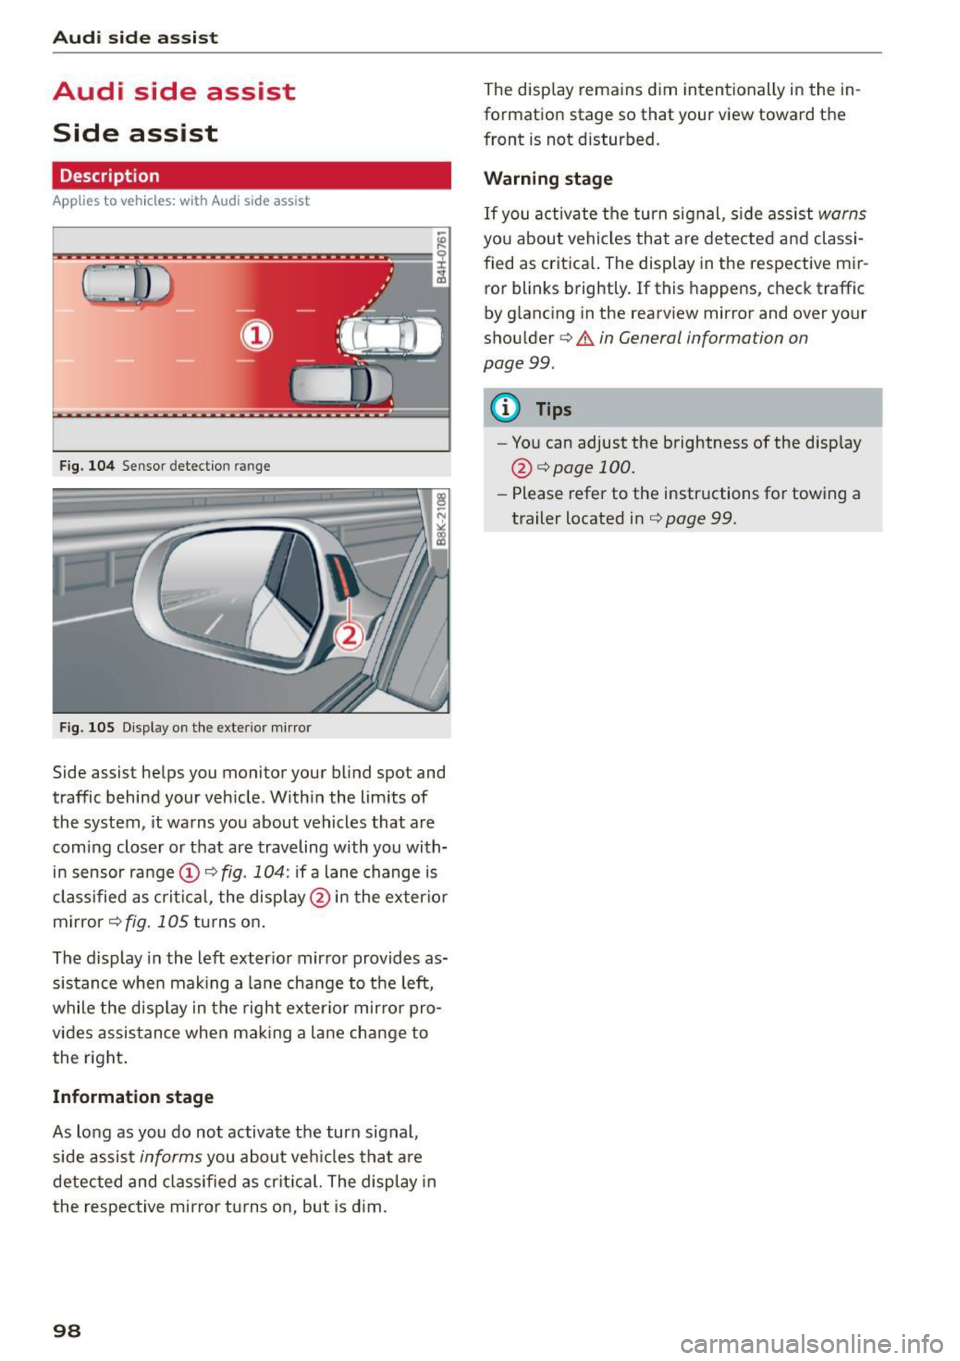
Fig. 104 Sensor detec tion range
F ig . 105 Displa y on the exte rior mirro r
Side assis t helps you monitor your blind spot and
traffic behind your vehicle . Within the limits of
the system , it warns you about vehicles that are
coming closer or that are traveling with you with
in sensor range(!)
c:> fig. 104: if a lane change is
classified as critical, the display @ in the exterior
mirror
c:> fig. 105 turns on.
The display in the left exterior mirror provides as
sistance when mak ing a lane change to the left,
while the disp lay in the right exter ior mirror pro
vides assistance when mak ing a lane change to
the right .
Information stage
As long as you do not activate the turn signal,
side assist
informs you about veh icles that are
detected and classified as critica l. The display in
the respective mirror turns on, but is dim.
98
The display rema ins dim intentionally in the in
formation stage so that your view toward the
front is not distu rbed .
Warning stage
If you activate the turn signal, s ide assist warns
you about vehicles that are detected and classi
fied as critical. The display in the respective mir ror blinks brightly . If this happens , check traffic
by g lancing in the rearview mi rror and over your
shoulder
c:> .&. in General informa tion on
page 99.
{!) Tips
- You can adjust the brightness of the display
@ i=>pagel00.
-Please refer to the instructions for towing a
trailer located in
i=>page 99.
Page 101 of 264
M N
0 loo
rl I.O
"' N
"' rl
General information
Applies to vehicles: with Audi side assist
®
®
©
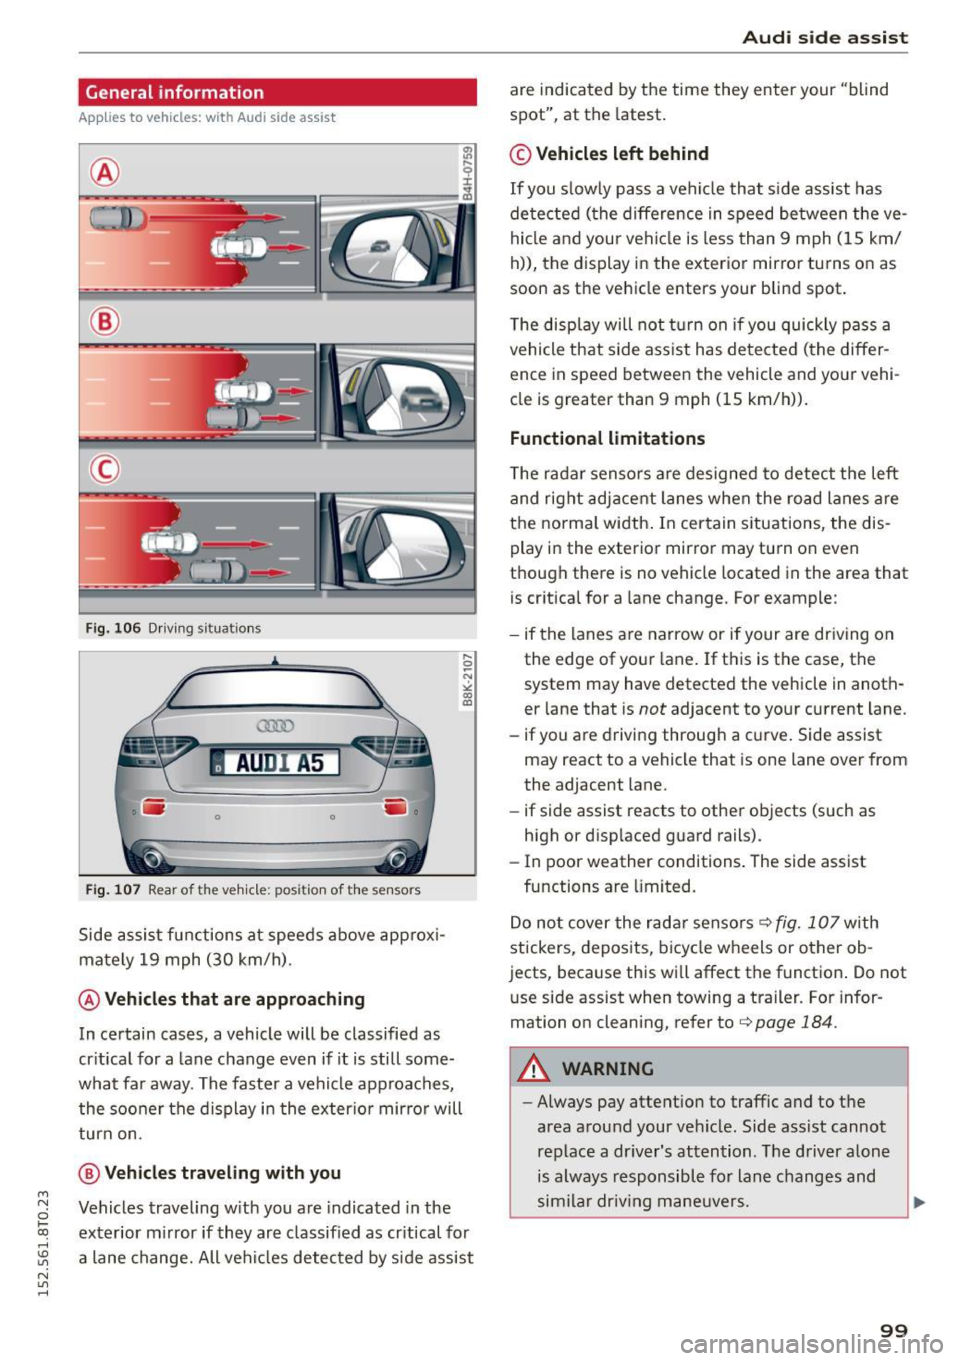
Fig. 106 Driving situat ions
AU DI A5
. .-0 0 iii .
Fig. 107 Rear of the vehicle: positio n of the sensors
Side assist functions at speeds above approxi
mately 19 mph (30 km/h).
@ Vehicles that are approaching
In certain cases, a vehicle will be classified as
critical for a lane change even if it is still some
what far away. The faster a vehicle approaches, the sooner the display in the exterior mirror will
turn on.
@ Vehicles traveling with you
Vehicles traveling with you are indicated in the
exterior mirror if they are classified as critical for
a lane change. All vehicles detected by side assist
Audi side assist
are indicated by the time they enter your "blind
spot", at the latest.
© Vehicles left behind
If you slowly pass a vehicle that side assist has
detected (the difference in speed between the ve
hicle and your vehicle is less than 9 mph (15 km/
h)), the display in the exterior mirror turns on as
soon as the vehicle enters your blind spot.
The display will not turn on if you quickly pass a
vehicle that side assist has detected (the differ
ence in speed between the vehicle and your vehi
cle is greater than 9 mph (15 km/h)).
Functional limitations
The radar sensors are designed to detect the left
and right adjacent lanes when the road lanes are
the normal width. In certain situations, the dis
play in the exterior mirror may turn on even
though there is no vehicle located in the area that is critical for a lane change. For example:
- if the lanes are narrow or if your are driving on
the edge of your lane. If this is the case, the
system may have detected the vehicle in anoth
er lane that is
not adjacent to your current lane.
- if you are driving through a curve. Side assist
may react to a vehicle that is one lane over from
the adjacent lane.
- if side assist reacts to other objects (such as
high or displaced guard rails).
- In poor weather conditions. The side assist
functions are limited.
Do not cover the rada r senso rs¢
fig. 107 with
stickers, deposits, bicycle wheels or other ob
jects, because this will affect the function. Do not
u se side assist when towing a trailer. For infor
mation on cleaning, refer to¢
page 184.
A WARNING
-Always pay attention to traffic and to the
area around your vehicle . Side assist cannot
replace a driver's attention. The driver alone
is always responsible for lane changes and
similar driving maneuvers.
99
Page 103 of 264
M N
i? co ,...., \!) 1.1'1
N 1.1'1 ,....,
@ Tips
-Side assist is not active wh ile you are mak
i ng the ad justment .
- Your settings are automatically stored and
ass igned to the remote control key being
u sed.
Driver messages
App lies to vehicles: with Audi side assist
If s ide ass ist switches off by itse lf, the LED in the
button turns off and a message wi ll appea r in the
in str ument cluster d is pl ay:
Audi side assist unavailable: Sensors blocked
The radar sensors' vision is a ffected. Do not cover
the area in front of the senso rs with bike wheels ,
stickers, dirt or other objects . Clean t he a rea in
front o f the sensors, i f necessa ry ¢
page 99,
fig. 107.
Audi side assist: Currently unavailable
Side assis t can not be swi tched on t emporarily be
c a use there is a m alfuncti on (for examp le, the
b attery c harge level may be too low).
Audi side assist: System fault!
The system ca nnot guara ntee that it wi ll detect
ve hicles co rrec tly a nd it is sw itched off . Th e sen
sors have bee n disp lace d or are fau lty. H ave t he
sys te m checked by an author ized A udi dealer or
a uthor ized Audi Se rv ic e Facili ty so on .
Audi side assist : Unavailable when towing
Side assist sw itches off aut omatically when a fac
tory- insta lled trailer hitch is c onnected to the
e lectrical co nnector on the tra ile r. The re is no
g ua ran tee the sys tem w ill switch off when usi ng
a retrofitted tra ile r hi tch . D o not use s ide assist
when towing a t ra ile r.
Aud i side assist
101
Page 109 of 264
M N
0 loo
rl I.O
"' N
"' rl
The rear acoust ic park assist system is integrated
in the rear of th e vehicle and the rear vi ew cam
era is integ rated in the rear lid¢
pag e 108.
.&_ WARNING
-
- The rear view camera has blind spots, in
which objects cannot be detected. Be espe
c ially carefu l to check for small children and
animals before backing up . Small children
and animals wi ll not a lways be detected by
the sensors.
General Information
Applies to vehicles: with parking system (rear, with rear view
camera)
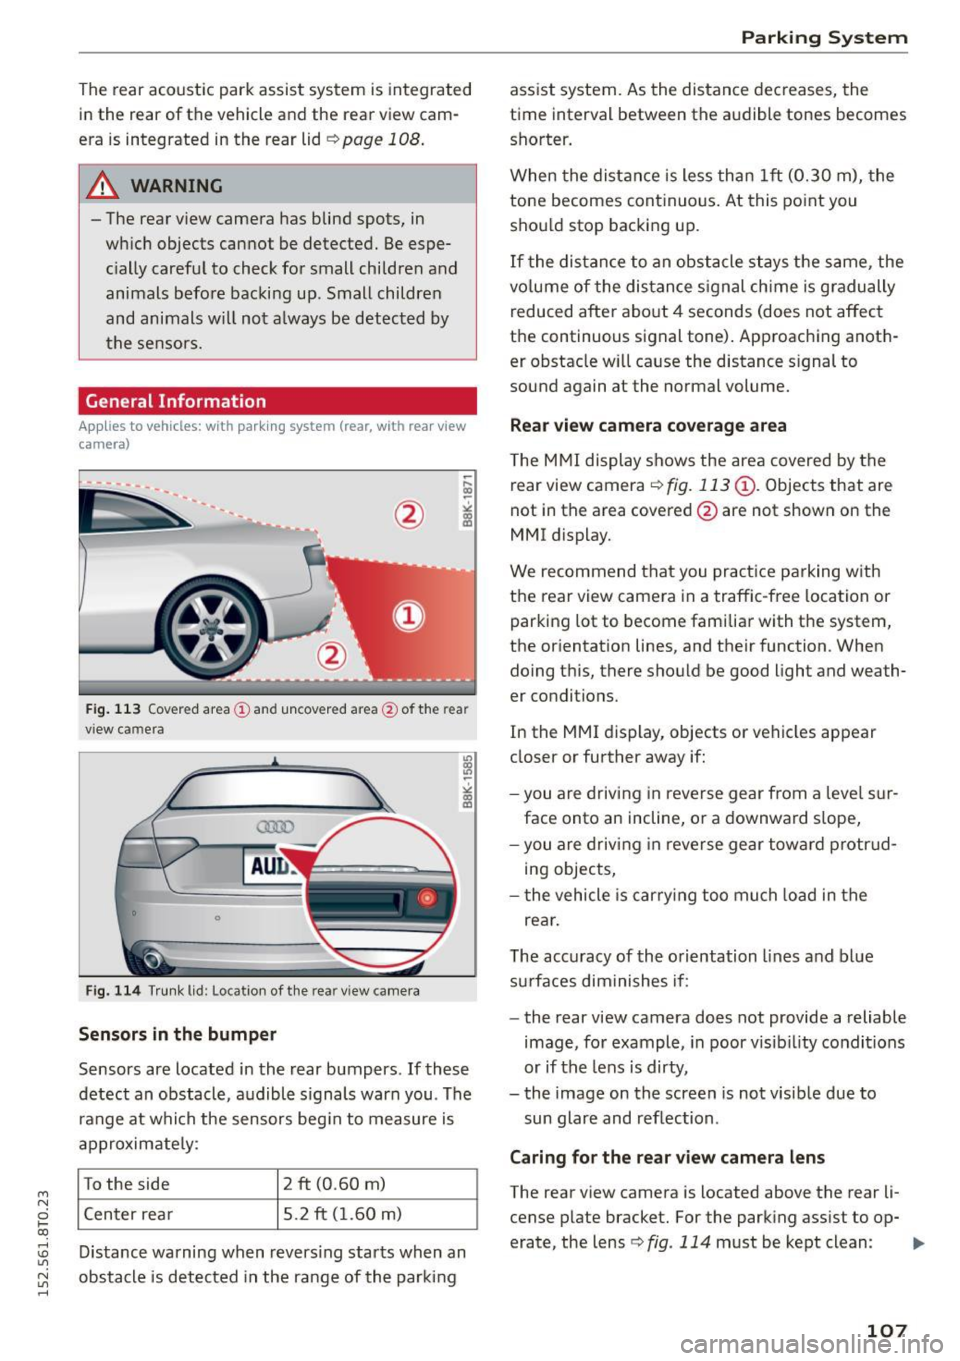
F ig . 113 Cove red area (!) and uncov ere d ar ea @ of the r ear
v iew ca mera
0
0
Fig. 114 Trunk lid : Location of the rea r view camera
Sensors in th e bumper
Sensors are located in the rear bumpers . If these
detect an obstacle, audible s ignals war n you . The
r ange at whi ch the sensors beg in to measure is
a pproxim ate ly :
To the side
2 ft (0 .60 m)
Center rea r 5.2 ft (1.60 m)
D istance warning when revers ing starts when an
obstacle is detected in the ra nge of the parking
Parking Sy stem
ass ist system. As the distance decreases, the
time int erval be tween the audible tones becomes
shorter.
When the distan ce is less than 1ft (0.30 m), the
tone becomes cont inuous. At this point you
shou ld stop backing up .
If the distance to an obst acle stays the same, the
vo lume of the dis tance s ignal ch ime is gradually
reduced afte r abo ut 4 seconds (does not affect
t h e continuous signal tone) . Approaching anoth
er obstacle w ill cause the distance s ignal to
sound again at the normal volume.
R ea r v iew cam era cov erage area
The M MI display shows the area covered by the
rear view camera ¢
fig. 113 (D. Objects that are
not in the area covered @are not shown on the
MMI display.
We recommend that you pract ice pa rking w ith
the rear view camera in a traffic -free location or
parking lot to become fami liar with the system,
the o rientat ion lines , and their function . When
doing t his, there should be good light and weath
er conditions.
In the MMI display, objects or vehicles appear
close r or furthe r away if:
- you a re d riving in reverse gear from a leve l su r
face onto an incline, o r a downward s lope,
- you are driving in reverse gear tow ard p rotr ud
ing objects,
- the vehicle is car ry ing too mu ch load in the
rea r.
T he acc uracy of the o rientation lines and b lue
su rfaces diminishes if :
- the rear view camera does not provide a reliable
image, fo r example , in poor visib ility condi tions
or if the lens is dirty ,
- the image on the screen is not vis ib le due to
sun glare and reflection .
Caring for the rear view camera len s
The rear v iew camera is located above the rear li
cense p late bracket. For the parking ass ist to op-
erate, the lens ¢
fig. 114 mu st be kept clean : 1111>
107
Page 116 of 264
Driving safety
For detailed information on how to adjust the
driver's seat, see
¢ page 55.
A WARNING
Drivers who are unbelted, out of position or
too close to the airbag can be seriously in
jured by an airbag as it unfolds. To help re duce the risk of serious personal injury:
- Always adjust the driver's seat and the
steering wheel so that there are at least
10 inches (25 cm) between your breastbone
and the steering wheel.
- Always hold the steering wheel on the out
side of the steering wheel rim with your
hands at the 9 o'clock and 3 o'clock posi
tions to help reduce the risk of personal in
jury if the driver's airbag inflates .
- Never hold the steering wheel at the
12 o'clock position or with your hands at
other positions inside the steering wheel
rim or on the steering wheel hub . Holding
the steering wheel the wrong way can cause
serious injuries to the hands, arms and head
if the driver's airbag deploys.
- Pointing the steering wheel toward your
face decreases the ability of the supplemen
tal driver's airbag to protect you in a colli
sion.
- Always sit in an upright position and never
lean against or place any part of your body
too close to the area where the airbags are located .
- Before driving, always adjust the front seats
and head restraints properly and make sure
that all passengers are properly restrained.
- Never adjust the seats while the vehicle is
moving . Your seat may move unexpectedly
and you could lose control of the vehicle.
- Never drive with the backrest reclined or
tilted far back! The farther the backrests are
tilted back, the greater the risk of injury due
to incorrect positioning of the safety belt and improper seating position.
- Children must always ride in child safety
seats
¢page 151. Special precautions ap
ply when installing a child safety seat on the
front passenger seat¢
page 129 .
114
-
Proper seating position for the front
passenger
The proper front passenger seating position is
important for safe, relaxed driving.
For your own safety and to reduce the risk of in
jury in the event of an accident, we recommend
that you adjust the seat for the front passenger
to the following position :
.,. Move the front passenger seat back as far as
possible . There must be a minimum of 10 in
ches (25 cm) between the breastbone and the
instrument panel¢,&. .
.,. Adjust the angle of the seatback so that it is in
an upright position and your back comes in full
contact with it whenever the vehicle is moving.
.,. Applies to vehicles with adjustable head re
straints: Adjust the head restraint so the upper
edge is as even as possible with the top of your head. If that is not possible, try to adjust the
head restraint so that it is as close to this posi
tion as possible .
.,. Keep both feet flat on the floor in front of the
front passenger seat.
.,. Fasten and wear safety belts correctly
¢ page 124.
For detailed information on how to adjust the
front passenger's seat, see ¢
page 54.
A WARNING
Front seat passengers who are unbelted, out
of position or too close to the airbag can be
seriously injured or killed by the airbag as it
unfolds . To help reduce the risk of serious per
sonal injury :
- Passengers must always sit in an upright po sition and never lean against or place any
pa rt of their body too close to the area
where the airbags are located.
- Passengers who are unbelted, out of posi
tion or too close to the airbag can be seri
ously injured by an airbag as it unfolds with
great force in the blink of an eye .
-Always make sure that there are at least 10
inches (25 cm) between the front passen
ger's breastbone and the instrument panel.
Page 120 of 264
Driving safet y
Storing cargo correctly
Loading the luggage compartment
All Luggage and other objects mus t be properly
stowed and secured in the Luggage compart
ment.
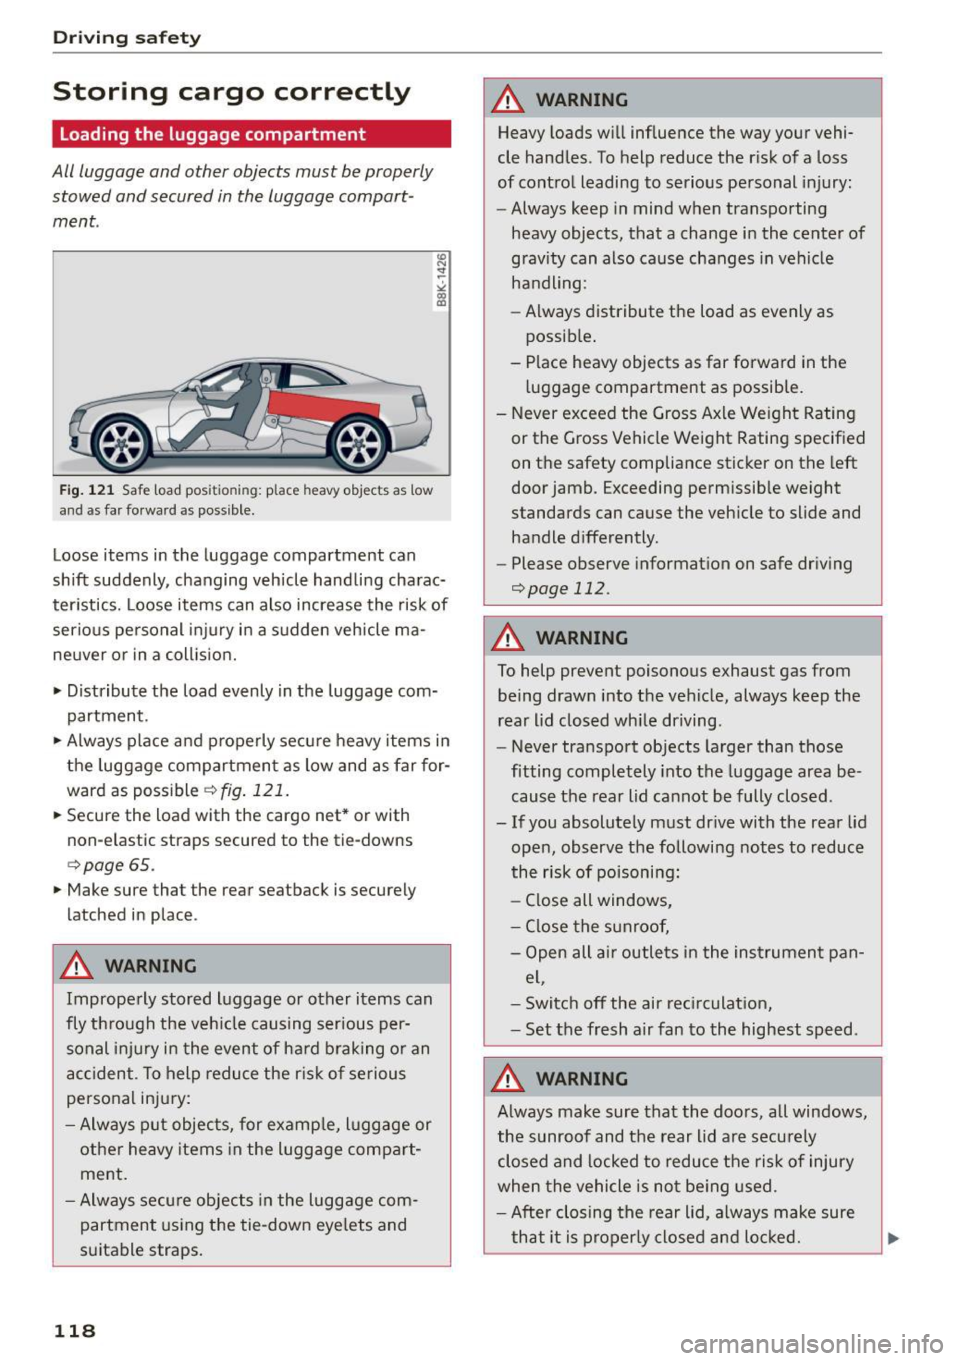
F ig. 121 Saf e load pos itio ning : place heavy objec ts as low
an d a s far forwa rd as possible.
Loose items in the luggage compartment can
shift suddenly, changing vehicle handli ng charac
ter istics. Loose items can also increase the risk of
serious pe rsonal i njury in a s udden vehicle ma
neuver or in a coll is ion.
• Distribute the load evenly in the luggage com
partment.
• Always place and p roperly secu re heavy items in
the luggage compartment as low and as far for
ward as poss ible
c> fig . 121.
• Secure the load with the cargo net* or with
non-e lastic straps secured to the tie-downs
c>page 65.
• Make sure that the rear seatback is securely
latched in place .
A WARNING
Improperly stored luggage or other items can
fly th rough the veh icle caus ing serious per
sonal i njury in the event of ha rd braking o r an
ac cident . To help redu ce the r is k of serious
personal inju ry:
- Always put objec ts, for examp le, l uggage or
other heavy items in the luggage compa rt
ment.
- Always secu re objects in the luggage com
partment using the tie-down eye lets and
s u itable straps.
118
A WARNING
H eavy loads w ill influence the way your vehi
cle handles . To help reduce the r isk of a loss
of control leading to serious personal injury:
- Always keep in mind when transpo rting
heavy objects, that a change i n the center of
grav ity can also cause changes in vehicle
handling:
- Always distribute the load as evenly as
possib le .
- Place heavy objects as far forward in the
luggage compartment as possible.
- Never exceed the Gross Ax le Wei ght Rating
or the Gross Vehicle Weight Rating specified
on the safety compliance sticker on the left
do or jamb. Exceeding permissible weight
standards can cause the vehicle to slide and
handle d ifferently.
- Please observe informat ion on safe driv ing
c>page 112 .
A WARNING
To help prevent poisonous exhaust gas from
being drawn into t he vehicle, always keep the
rear lid closed wh ile driving.
- Never transport objects larger than those
fitting completely into the luggage area be
cause the rear lid cannot be fully closed .
- If you absolutely must dr ive with the rear lid
ope n, observe the following notes to reduce
the risk of poisoni ng :
- Close all windows,
- Close the sunroof,
- Open all air outle ts in the ins trument pan-
el,
- Switch off the air rec irculat ion,
- Set the fresh air fan to the highest speed .
A WARNING
Always make sure that the doo rs, all windows,
the sunroof and the rear lid are secu rely
closed a nd locked to reduce the ris k of injury
whe n the vehicle is no t be ing used.
- After closing the rear lid, always make sure
th at it is p rope rly closed and lo cked.