lumbar support AUDI A5 COUPE 2018 Owners Manual
[x] Cancel search | Manufacturer: AUDI, Model Year: 2018, Model line: A5 COUPE, Model: AUDI A5 COUPE 2018Pages: 409, PDF Size: 67.63 MB
Page 73 of 409

Seats and storage
General information
A WARNING
See ¢ page 258, Driving safety for important
information, tips, suggestions and warnings
that you should read and follow for your own
safety and the safety of your passengers.
Front seats
Power seat adjustment
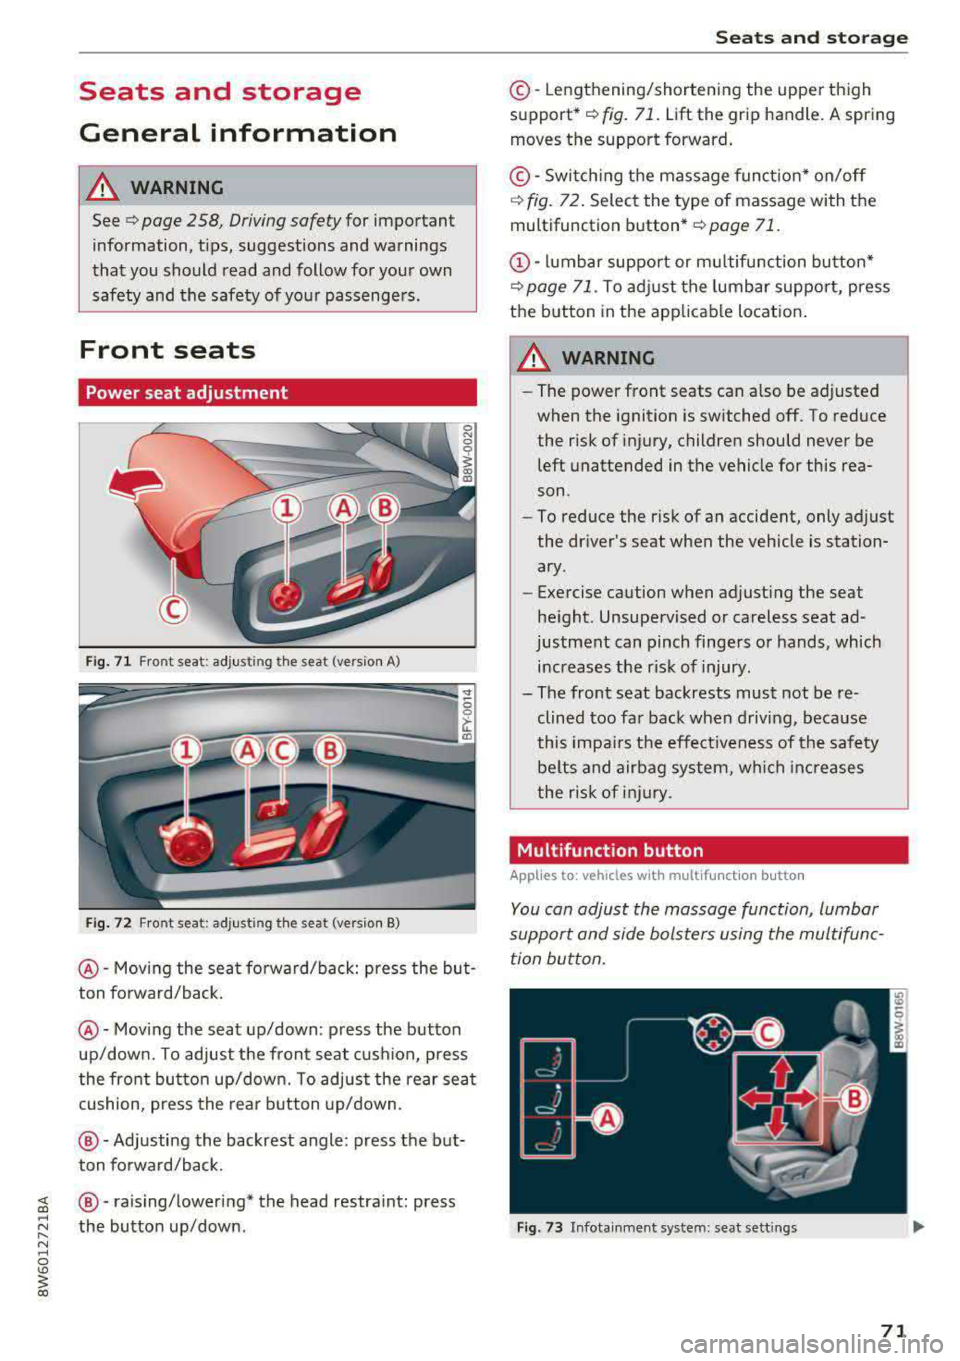
Fig. 71 Fro nt seat: adjus ting the seat (version A)
Fig. 72 Fro nt seat: adjust ing the sea t (version B)
@ -Moving the seat fo rward/back: press the but
ton forward/back.
@ -Moving the seat up/down: press the button
up/down. To adjust the front seat cush ion, press
the front button up/down. To adjust the rear seat
cushion, press the rear button up/down.
@-Adjusting the backrest angle: press the but
ton forward/back.
~ @ -raising/lowering* the head restra int: press
~ ~ the button up/down .
N ~ 0
'° ~ co
Seats and storage
©-Lengthening/shortening the upper thigh
support•¢ fig. 71. Lift the grip handle. A spring
moves the support forward.
© -Switching the massage function* on/off
¢ fig. 72. Select the type of massage with the
multifunction
button* ¢ page 71.
(D-lumbar support or multifunction button*
¢ page 71. To adjust the lumbar support, press
the button in the applicable location.
A WARNING
- The power front seats can also be adjusted
when the ignition is switched off. To reduce
the risk of injury, children should never be left unattended in the vehicle for this rea
son .
- To reduce the risk of an accident, only adjust
the driver 's seat when the vehicle is station
ary .
- Exercise caution when adjusting the seat
height. Unsupervised or careless seat ad
justment can pinch fingers or hands, which increases the risk of injury.
- The front seat backrests must not be re
clined too far back when driving, because
this impairs the effectiveness of the safety
be lts and airbag system, which increases
the risk of injury.
, Multifunction button
Applies to: vehicles with multifunction button
You can adjust the massage function, lumbar
support and side bolsters using the multifunc tion button.
Fig . 73 Infotainment sys te m : s eat sett in gs
71
Page 74 of 409

Sea ts and stor age
Operating
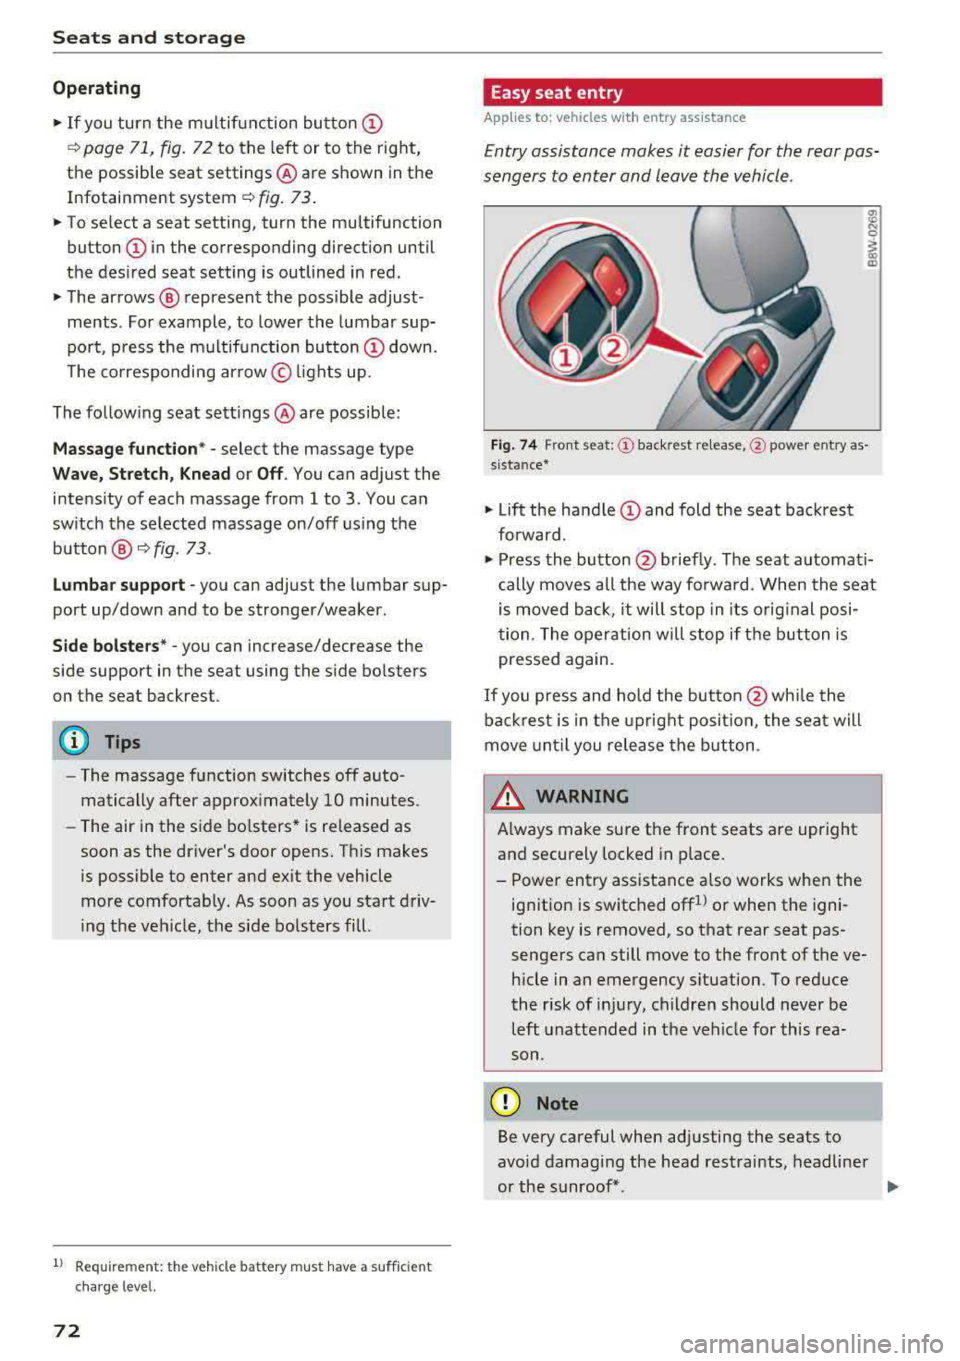
.. If you turn the m ultif unction bu tton CD
¢ page 71, fig . 72 to the left or to the right,
the possible seat settings @ are shown in the
Infotainment system
~ fig . 73 .
.. To se lect a seat setting, turn the multifunction
button
CD in the corresponding direction until
the des ired seat setting is outlined in red.
• The arrows @ represent the possible adjust
ments . Fo r example, to lower the lumbar sup
po rt, p ress the m ultifunction bu tton
CD down.
T he co rresponding arrow © lights up.
The fo llowing seat sett ings @ are possible :
Massage func tion * -select the massage type
Wave, St retch , Knead or Off . You can adjust the
i n tens ity of each massage from 1 to 3 . You can
sw itch the selected massage on/off using the
button @~ fig. 73 .
Lumb ar support -you can adjust t he lumbar sup
port up/down and to be stronger/weaker .
Side bolsters * -you can increase/decrease the
side support in the seat using the side bo lsters
on the seat backrest .
(I) Tips
-The massage function switches off a uto
matically after approx imately 10 minutes.
- The air in the side bo lsters* is released as
soon as the driver's door opens. This makes
i s possible to enter and exit the vehicle
mo re comfortab ly. As soon as you sta rt driv
i ng the veh icle, the s ide bo lsters fill.
1l Requ irem en t: the ve hicl e battery m ust have a suff icien t
c ha rge le v e l.
72
Easy seat entry
App lies to: vehicles with entry ass istance
Entry assistance makes it easier for the rear pas
sengers to enter and leave the vehicle .
Fig . 7 4 Fro nt seat: © backrest re lease, @powe r entry as
s ista nce*
• Lift the hand le CD and fold the seat backrest
forward .
• Press the button@ briefly . T he seat automati
cally moves a ll the way fo rwa rd . When the seat
is moved back, it will stop in its o rig inal posi
tion . The operation will stop if t he b utton is
pressed again.
If you p ress and hold the butto n
@while the
bac kres t is in the upright posi tion, the sea t will
move unt il you release the b utton .
& WARNING
Always make su re the front seats are upright
and securely locked in p lace .
- Power entry assistance also works when the
ignit ion is switched off
1
) or when the igni
tion key is removed , so t hat rear seat pas
sengers can still move to the front of the ve
hicle in an emergency s ituation. To red uce
the risk of inj ury, childre n should never be
left unattended in the vehicle for this rea
son .
(D Note
Be very careful when adjusting the seats to
avo id damaging the head restraints, headline r
or the sunroof*.
Page 379 of 409

Fuses a nd bul bs
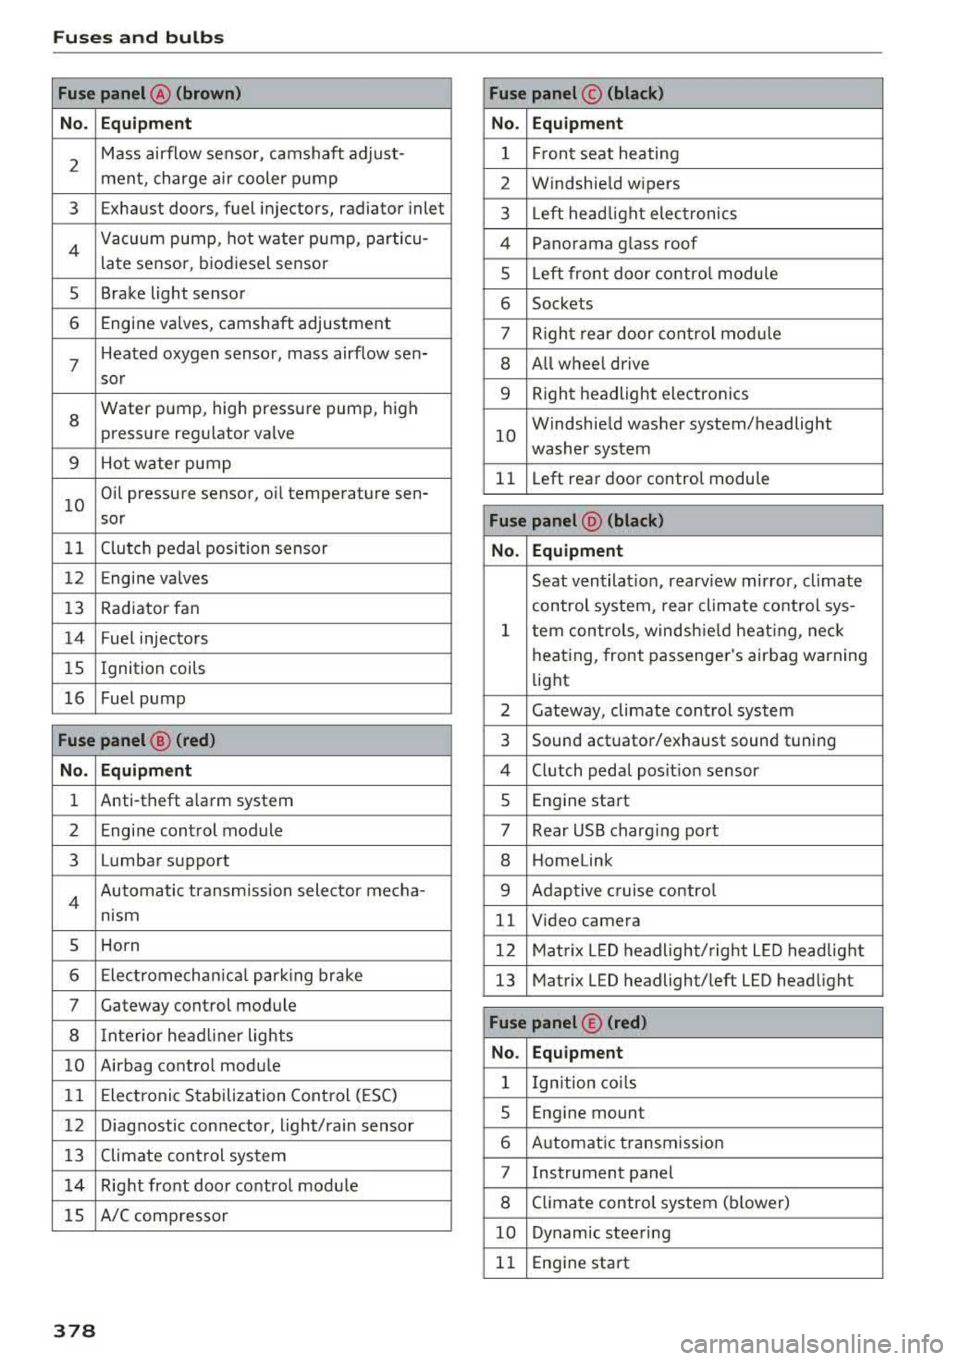
Fuse panel @ (brown) Fuse panel© (blac k)
No. Equip ment No. Equipm ent
2
Mass airflow sensor, camshaft adjust-
ment, charge air cooler pump 1 F ront seat heating
2 Windshield wipers
3 Exhaust doors, fuel injectors, radiator inlet 3 Left head light electronics
4 Vacuum pump , hot water pump, particu-
late sensor, biodiesel sensor 4 Panorama glass roof
s Left front door contro l module
5 Brake light sensor 6 Sockets
6 Engine valves, camshaft adjustment 7 Right rear door control mod ule
7
Heated oxygen sensor, mass airflow sen-8 All wheel drive
sor
8
Water pump, high pressure pump, high
pressure regulator valve
9 Hot water pump
9 Right headlight electronics
10
Windshield washer system/headlight
washer system
11 L eft rear door control module
10
Oil pressure sensor, oil temperature sen-
sor
Fu se panel @ (blac k)
11 Clutch pedal position sensor No. Equipmen t
12 Engine valves
Seat ventilation, rearv iew mirror, climate
13 Rad iator fan control system, rear climate control sys-
14 Fuel injectors
15 Ignition
coils
16 Fuel pump
1 tern controls , windsh ie ld heat ing , neck
heating, front passenger 's airbag warning
light
2 Gateway, climate control system
Fuse panel@ (red ) 3 Sound actuator/exhaust sound tuning
No. Equ ip me nt 4 Clutch pedal posit ion sensor
1 Anti-theft alarm system 5 Engine start
2 Engine control module 7 Rear USB charg ing port
3 Lumbar support 8 Homelink
4 Automatic transmission selector mecha-
nism 9 Adaptive cruise contro l
11 Video camera
5 Horn 12 Matrix LED headlight/right L ED headlight
6 Electromechan ica l park ing brake 13 Matrix LED headlight/left LED headlight
7 Gateway control module
8 Interior headl iner lights
10 Airbag control module
11 Electronic Stabilization Control (ESC)
Fuse panel © (red )
N o. Equ ipmen t
1 Ign ition co ils
12 Diagnostic connector, light/rain sensor
13 Climate control system
14 Right front door control module
lS A/C compressor
5 Engine mount
6 Automatic transmission
7 Instrument panel
8 Climate control system (blower)
10 Dynamic steering
11 Engine start
378
Page 381 of 409

Fuses a nd bul bs
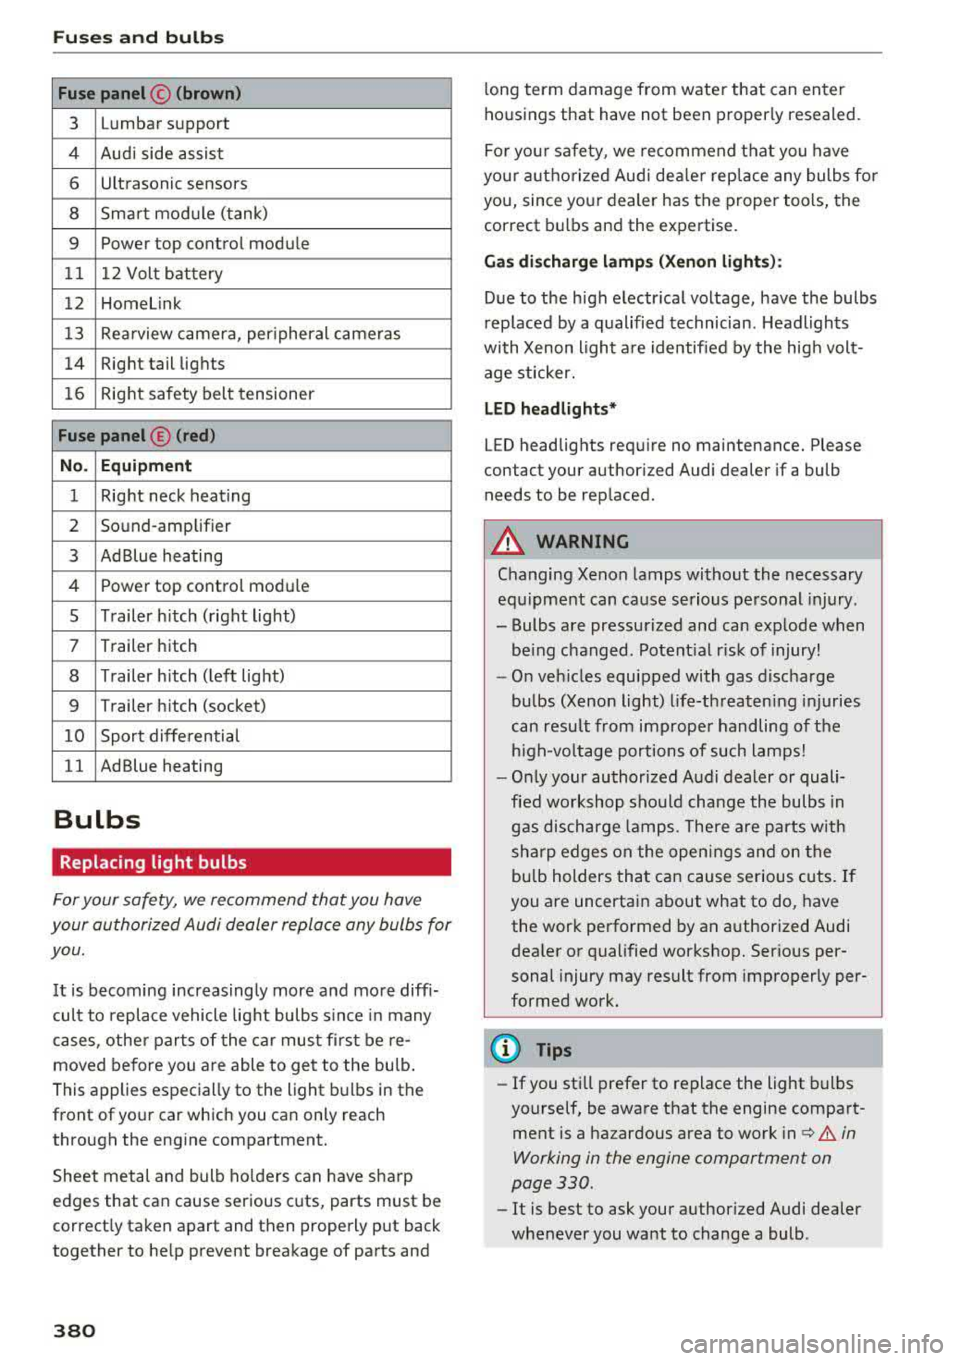
Fuse panel © (brown)
3 Lumbar support
4 Audi side assist 6 Ultrasonic sensors
8 Smart module (tank)
9 Power top control modu
le
11 12 Volt battery
12 Homelink
13 Rea rview camera, per ipheral cameras
14 Right tail lights
16 Right safety belt tensioner
Fu se panel © (red )
N o. Equipm ent
1 Right neck heating
2 Sound-amplifier
3 AdBlue heating
4 Power top control modu
le
5 Trailer h itch (right light)
7 Trailer hitch
8 Trailer h itch (left light)
9 Trailer hitch (socket)
10 Sport differential
11 AdBlue heating
Bulbs
Replacing light bulbs
For your safety, we recommend that you have
your authorized Audi dealer replace any bulbs for
you.
It is becoming increasing ly more and more diff i
cult to replace vehicle light bulbs s ince in many
cases, othe r parts of the car must fi rst be re
moved before you are able to get to the bu lb .
This applies especially to the light bulbs in the
front of your car which you can only reach
through the engine compartment.
Sheet metal and bulb ho lders can have sharp
edges that can cause serious cuts, parts must be
correct ly taken apart and then properly put back
together to he lp prevent breakage of parts and
380
long term damage from water that can enter
housings that have not been properly resealed.
Fo r you r safety, we recommend that you have
you r autho rized Audi dea ler replace any bulbs for
you, since your dealer has the proper tools, the
correct bu lbs and the expertise.
Ga s di sc harg e la mp s (Xe non ligh ts):
Due to the h igh electr ical voltage, have the bulbs
rep laced by a qualified technician . Headlights
with Xenon light a re identified by the high volt
age sticker.
L ED headlight s*
LED headlights require no maintenance. Please
contact your authorized Audi dealer if a bulb
needs to be replaced.
A WARNING
Changing Xenon lamps without the necessary
equipment can cause serious personal injury.
-Bulbs are pressurized and can explode when
be ing changed. Potent ial r isk of injury!
- On veh icles equipped with gas discharge
bulbs (Xenon light) life-threatening injuries
can result from improper handling of the
high-vo ltage portions of such lamps!
-Only your authorized Audi dealer or quali
fied workshop shou ld change the bulbs in
gas discharge lamps . There are parts with
sharp edges on the openings and on the bulb holders that can cause serious cuts. If
you are uncerta in about what to do, have
the work performed by an authorized Audi
dea ler or qualified workshop. Serious per
sonal injury may result from improperly per
formed work.
(D Tips
-If you still prefer to replace the light bulbs
yourself, be aware that the engine compart
ment is a hazardous area to work
i n c:> & in
Working in the engine compartment on
page 330 .
-It is best to ask your authorized Audi dealer
whenever you want to change a bulb .