light AUDI A6 2012 Owners Manual
[x] Cancel search | Manufacturer: AUDI, Model Year: 2012, Model line: A6, Model: AUDI A6 2012Pages: 298, PDF Size: 74.43 MB
Page 241 of 298
Tires and wheels 239
Cold tire inflation pressure
Tire pressure affects the overall handling, performance and safety of a vehicle .
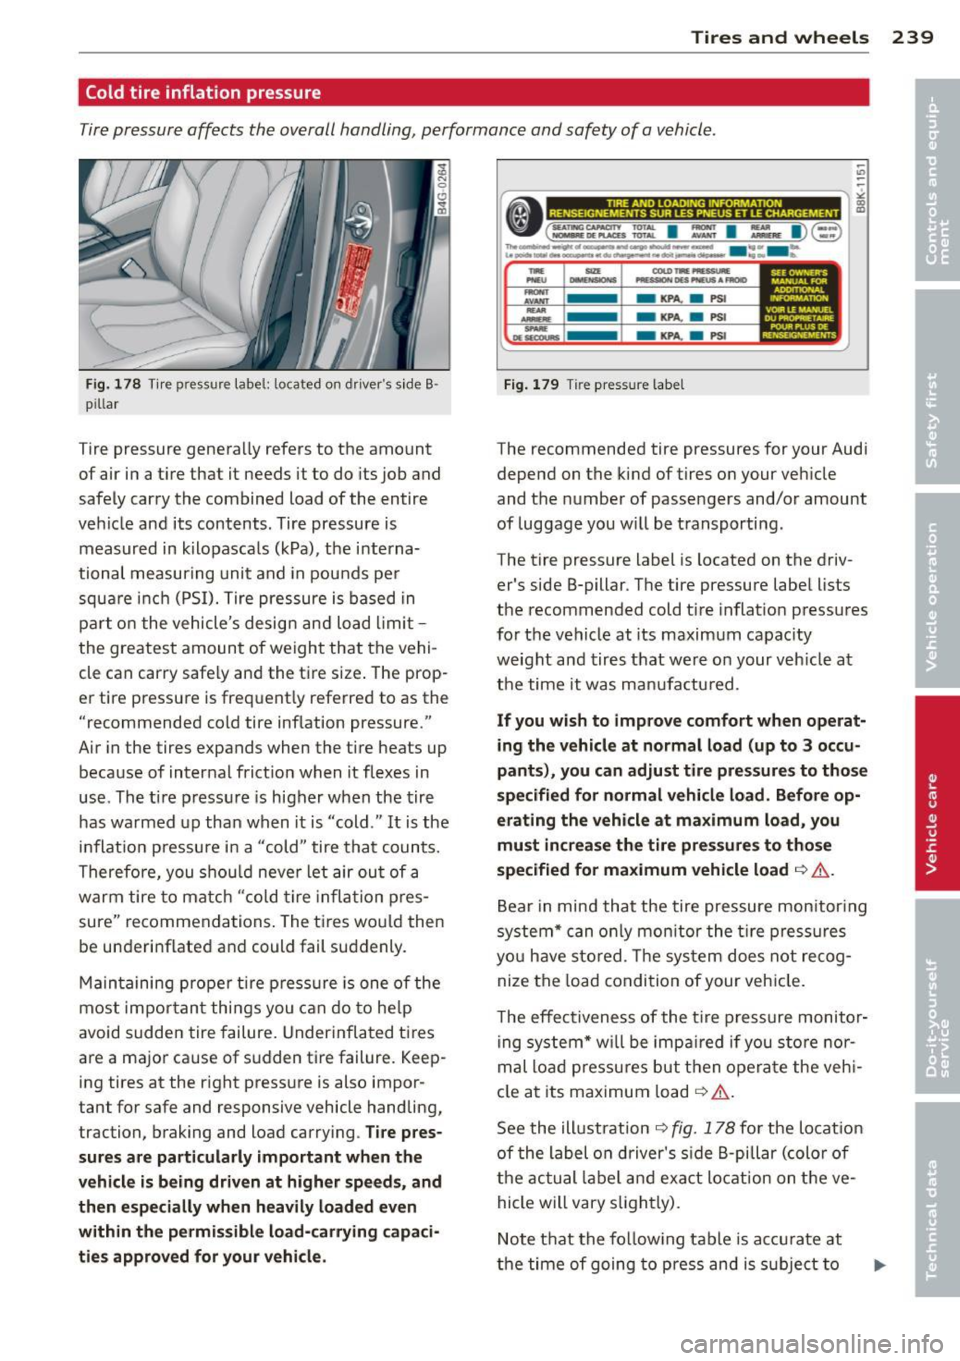
Fig . 1 78 Tir e pr essur e labe l: located on drive r's s ide B ·
p ill ar
Tire pressu re genera lly refers to the amount
of air in a t ire tha t it needs it to do its job and
safely carry the combined load of the entire
vehicle and its contents . Tire pressure is
measured in kilopasca ls (kPa), the i nterna
tional measuring unit and in pounds pe r
square inc h (PSI). Tire pressure is based in
pa rt o n the vehicle's desig n an d load limit
the greatest amount of weight that the vehi
cle can carry safe ly and the ti re size . The prop
er tire pressure is freq uent ly referred to as the
"recommended cold tire inf lation pressure ."
Air in the tires expands when the tire heats up
because of interna l frict io n when it flexes in
use . The ti re p ressu re is higher when the tire
has warmed up than when it is "cold ." It is the
i nflat io n pressure i n a "cold" tire that counts.
Therefo re, you s ho ul d never let air ou t of a
warm tire to match " cold tire infla tion p res
sure" recommendations . The tires wo uld then
be underinf lated a nd could fail suddenly.
M ain taining proper t ire press ure is one of the
most impor tan t thi ngs you c an do to he lp
avoid sudden tire failure. Underinfla ted tires
are a major cause of s udden tire failure . Keep
ing tires at the r ight pressure is also impor
tant for safe and responsive vehicle handling,
traction, b rak ing and load carrying .
Tire pres
sures are part icularly important wh en th e
vehicle is being driven at higher speeds , and
then especially when h eavily loaded even
within the permi ssible load -carrying capaci
tie s approved for your vehi cle.
~
"' ~
,.------------------- ~
•(=~: I := I ~ I )§ :ll
,.,,. ........................ ...., .... ~----.... _ ... t.._.. .... _..,.. .... ......,... .. ~--......... ·- ..
- KPA. . PSI
- KPA. . PSI
- KPA. . PSI
Fig. 17 9 Tir e pressu re labe l
The recommended tire pressures for your Audi
depe nd on the kind of tires on your ve hicle
and t he number of passe ngers and/or amount
of luggage you w ill be t ransporting .
The tire pressure label is located on the driv
er's side 8-pillar . The tire pressure labe l lists
the recommended cold t ire inflat io n pressures
for the veh icle at its maximum capac ity
weight and tires that we re o n your veh icle at
t h e time it was manufactu red.
If you wish to improve comfort when op erat
ing the ve hicle at normal load (up to 3 occu
pant s), you can adju st tire pres sures to those
spe cified for normal vehi cle load . Before op
erating the vehicle at maximum load, you
must increase the tire pressure s to those
speci fied for maximum vehicle load
¢ .&.
Bear in mind that the tire pressure mon itor ing
system* can on ly mon itor the tire p ress ures
yo u have sto red. The sys tem does not recog
nize the load condi tion of your veh icle.
T he effectiveness of the t ire p ress ure monitor
ing system * w ill be impa ired i f you s to re no r
m al load pressures but t hen opera te the veh i
cle a t its maximum load
¢ .& .
See the ill ustration 9 fig. 178 fo r the lo cat ion
of the label o n driver's s ide B-pillar (color of
the actu al label a nd exact lo cat ion on the ve
hicle will vary s light ly).
Note t hat the follow ing table is accu rate at
the time of going to press and is s ubject to
Page 244 of 298
24 2 T ire s and wheel s
If the pressure in any tire is too low, note the
difference between the pressure in the cold
tire and the pressure you need and add the air
that you need to reach the correct pressure for
the vehicle load (passengers and luggage) for
the tires on your veh icle as listed on the on
your veh icle and in this manual and the k ind
of dr iving you p lan to do.
Ne ver exceed the m aximum inflat ion pres
s ur e liste d on th e tir e si dewall for any r ea
son.
Remember that the vehicle manufacturer, not
the tire manufacturer, determ ines the correct
tire pressure for the tires on your vehicle .
It is important to check the tire pressure when
the tires are cold.
- Read the required ti re p ressure from the tire
pressure label. The tire pressure labe l is lo
cated on the driver's side 8-p illar.
- Turn the valve stem cap counter-clockwise
to remove it from the tire valve.
- Place the air pressu re ga uge on the valve.
- T he tire pressures sho uld on ly be chec ked
and adjusted when the tires are cold. The
slightly raised pressures of warm tires must
not be reduced .
- Adjust the tire pressure to the load you are
carrying .
- Reinsta ll the va lve stem cap on the valve.
When should I ch eck the tire pressur e?
The correct tire pressure is especially impor
tant at high speeds. The pressure should
therefo re be checked at least once a month
and a lways befo re start ing a journey. Do no t
forget to check the tire pressure for the spare
wheel
¢ page 257 .
When should I adju st the tire p res sures?
Adjust the tire p ressu re to the load you are
carry ing. After changing a wheel
or replacing
wheels you have to adjust the tire pressures
on all wheels . In addition, you must then
store the new tire pressures in the tire pres
sure monitoring system*¢
page 253.
_& WARNING
Incorrect tire pressures and/or underinfla
tion can lead sudden tire fa ilure, loss of
control, collision, serious personal injury
or even death.
- When the warn ing symbol
[I) appears in
the instrument cluster, stop and inspect
the t ires.
- Inco rrect tire pressure and/or underinfla
tion can cause increased tire wear and
can affect the hand ling of the vehicle and
s topping abi lity.
- I nco rrect tire pressures and/or unde rin
f lation can a lso lead to sudden t ire fail
ure, including a blowou t and sudden de
flation, ca us ing loss of veh icle contro l.
- The drive r is responsible for the co rrec t
tire pressures for all tires on the veh icle.
The applicable pressure values are loca t
ed on a sticker on the driver's s ide 8 -pil
lar.
- On ly when all tires on the vehicle are fil
led to the correct pressure, the tire pres
sure mon itoring* system can work cor
rectly.
- The use of incorrect tire pressure va lues
can lead to acc idents or other damage.
Therefore it is essential that the driver
observe the spec ified t ire pressure values
for the tires and the correct pressures for
the function of the t i re p ress ure monito r
ing system*.
- Always inflate tires to the recommended
and correct t ire pressure before dr iv ing
off.
- Driving with underinf lated tires bend
mo re, letting them get too hot resulting
in tread separation, s udde n tire f ailure
and loss of cont ro l.
- Excessive speed and/overloading can
cause heat build- up, sudden tire failure
and loss of cont ro l.
- I f the tire pressure is too low or too high,
the t ires will wear prema turely and the
vehicle wi ll not handle well. ..,
Page 256 of 298

254 Tires and wheels
When the malfunction indicator is illuminat
ed, the system may not be able to detect or
signal low tire pressure as intended . TPMS
malfunctions may occur for a variety of rea
sons, including the installation of replace ment or alternate tires or wheels on the vehi
cle that prevent the TPMS from funct ioning
properly . Always check the TPMS malfunction
telltale after replacing one or more t ires or
wheels on your veh icle to ensure that the re
placement or alternate tires and wheels allow
the TPMS to continue to function properly.
Tire pressure indicator appears
Applies to vehicles: with tire p ressure mo nitoring syste m
The tire pressure indicator in the instrument
cluster informs you if the tire pressure is too
low or if there is a system malfunction.
Fig. 183 Display : underinflatio n warning
Fig. 184 Display : Syste m mal functio n
Using the ABS sensors, the tire pressure moni
toring system compares the tire tread circum
ference and vibration characteristics of the in
d ividual tires. If the pressure decreases in one
or more tires, th is is indicated in the instru
ment cluster with a warning symbol
'9] and a
message
<=>fig . 183.
The tire pressure monitoring system must be
reset via MMI each time the pressures are ad- justed
(e.g. when switching between partial
and full load pressure) or after changing or re
placing a tire on your vehicle <=>
page 255. You
can find the recommended tire pressures for
your vehicle on the label on driver' s side B-pil
lar
<=> page 239 .
Tire tread circumference and vibration charac
teristics can change and cause a tire pressure
warning if:
- the tire pressure in one or more tires is too
low,
- the tire has structural damage,
- the tire pressure was changed, wheels rotat -
ed or replaced but the TPMS was not reset
<=> page 255.
Warning symbols
'9] Loss of pressu re in at least one t ire r=> & .
Check the tire or tires and replace or repa ir if
necessary. The indicator light
'9] in the instru
ment cluster also illuminates
<=>page 12 .
Check/correct the pressures of all four tires
and reset TPMS via MMI.
••MIS, ( Ti re Pressure Monitoring System) Tire
pressure! System malfunction .
If IIMIS, appears after switching the ignition
on or while driving
r::!> fig. 184 and the indica
tor light
'9] in the instrument cluster blinks
f or approximately one minute and then stays
on, there is a system malfunction . See your
authorized Audi dealer as soon as possible .
A WARNING
--If the tire pressure indicator appears in
the instrument cluster display, one or more of your tires is significant ly under
inflated. Reduce your speed immediately
and avoid any hard steer ing or braking
maneuvers. Stop as soon as possible and
check the tires and their pressures. In
flate the tire pressure to the proper pres
sure as indicated on the vehicle's tire
pressure label
<=>page 239. Driving on a
significantly under- inflated tire causes
the tire to overheat and can lead to tire
failure. Under-inflation also is likely to
Page 261 of 298
• Move select or lever to p osition P q ,& .
• If you are towing a trailer, unhitch the trail
er from your veh icle.
• Take the
jack and the spare t ir e out of the
luggage compartment
q page 257,
q page 257.
A WARNING
You or your passengers cou ld be injured
while changing a whee l if you do not fol
low these safety precautions:
- If you have a f lat t ire, move a safe dis
tance off the road. Turn off the eng ine,
turn the emergency f lashers on and use
other warning devices to alert o ther mo
torists.
- Make su re that passengers wait in a safe
pla ce away from the ve hicle and well
away from the road and traffic.
- T o help preven t the veh icle from mov ing
sudden ly and possibly slipping off the
jack, always fully set the parking brake
and block the whee l diagonally opposite
the wheel being changed . When one
front wheel is lifted off the ground, plac
ing the Automat ic Transm iss ion in "P"
(Park) will
not prevent the vehicle from
moving.
- Before you change a wheel, be sure the ground is level and fi rm. If necessa ry,
use a sturdy board under the jack.
- After installing the spa re wheel, make
sure that you replace the flat tire/whee l
in its sto rage area properly and tighten
the kn u rled re taining screw securely.
Changing a wheel
When you change a wheel, follow the se
quence described below step-by-step and in
exa ctly that order .
-
1. Remove the decorati ve wheel cov er* . For
mo re deta ils see also
Q page 260, Deco
rative wheel covers
o r q page 260,
Wheels with wheel bolt caps.
2 . Loosen the wheel b olts q page 260.
What do I do now? 259
3. Locate the proper mounting point for the
4.
5.
6.
7.
8.
9 .
jack and align the jack below that point
q page 261.
Raise the car with the jack q page 261.
Remove the wheel with the flat tire and
then insta ll
th e spare c> page 262.
Tighte n all wheel bolts lightly.
Lower the vehicle wi th the jack.
U se the wheel bolt w rench and
firmly
t ighten a ll wheel bolts q page 260 .
Replace the decora tive wheel co ver*.
A WARNING
A lways read and fo llow all WARNINGS and
informat ion¢
& in Raising the vehicle on
page 261
and r::> page 263.
After changing a wheel
A wheel change is not complete without the
doing the following .
• Replace the too ls and the jac k in their prop
er locat ion .
• The fault whee l wi ll not fit inside the spare
wheel well. Store it in the luggage compart
ment and secure it so that it does not slide
r::>page 59.
• Check the tire pressure on the spare wheel
immed iate ly after mounting it.
• As soon as possib le, have the
tightening
torqu es
on all wheel bolts c hec ked with a
t o rque wrenc h. The co rrec t tighte ning tor
que is
90 ft lb (120 Nm).
• Have the flat tire
replaced as soon as possi
b le.
(D Tips
- I f you not ice that the wheel bo lts a re
corroded and difficult to turn while
changing a tire, they should be rep laced
before you check the tightening torque.
- Drive at reduced speed until you have the
tightening torques checked. ..,_
•
•
Page 264 of 298
262 What do I do now ?
-Make sure that passengers wait in a
safe p lace away from the vehicle and
well away from the road and traffic.
- Make sure jack position is correct, ad
just as necessary and then continue to ra ise the jack.
- Changes in temperature or load can af
fect the height of the vehicle.
Taking the wheel off/installing the spare
Follow th es e ins truc tions st ep-by-st ep for
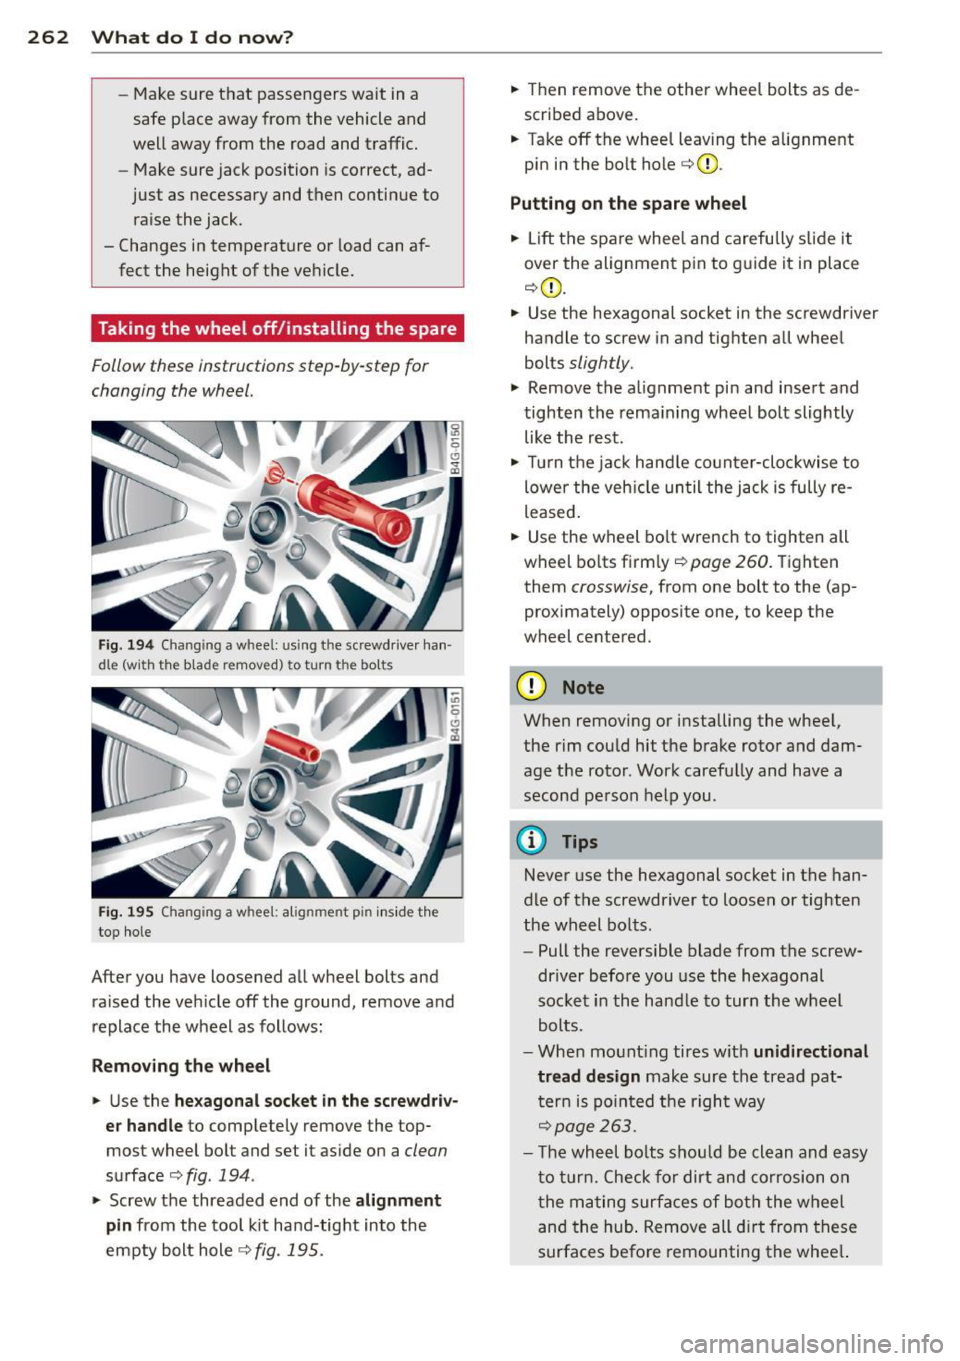
changing the wheel.
F ig . 194 Chan gin g a w hee l: us ing t he sc rew drive r han ·
die (w ith t he bla de re moved) t o tu rn the b olts
Fig. 195 Chang ing a w hee l: alignm en t pin insid e t he
to p hole
Aft er you h ave loosened all wheel bol ts and
ra is ed the veh icle off the ground, remove and
replace the wheel as follows:
Removing the wheel
.. Use the hexagonal socket in the screwd riv ·
er handle to comp lete ly remove the top
mos t wheel bo lt and set it as ide on a
clean
surface ¢ fig . 194 .
.. Screw the threaded end of the alignment
pin from the too l kit hand-tig ht into the
empty bolt hole
r::;, fig. 195.
.. Then remove the other whee l bolts as de
scrib ed above.
.. Take off the whee l leaving the a lignment
pin in the bolt hole
¢ 0) .
Putting on th e spar e wheel
.. Lift the spare wheel and carefully s lide it
over the alignment pin to g uide it in place
¢ (D .
.. Use the hexagonal socket in the sc rewd river
handle to screw in and tig hten all whee l
bolts
slightly .
.. Remove the a lignment pi n and insert and
tighten the rema in ing wheel bolt slightly
like the rest .
.. Turn t he jack hand le co unter -cloc kwise to
lowe r the veh icle un til the jack is fully re
leased .
.. Use the wheel bo lt wrench to tighten all
wheel bo lts firm ly
r::;, page 260 . Tighten
them
crosswise, from one bolt to the (ap
proximately) opposi te one, to keep the
wheel cen tered.
(D Note
When remov ing or installing the whee l,
the rim cou ld hit the brake rotor and dam·
age the rotor . Work carefu lly and have a
second pe rson help you .
@ Tips
Never use the hexagonal socket in the han
d le of the screwdriver to loosen or tighten
the wheel bolts.
- Pull the revers ible blade from the screw·
dr iver before you use the hexagonal
sock et in the hand le to turn the w heel
bolts.
- Whe n mount ing tires w ith unidirectional
tread design make sure the tread pat·
t er n is po inted the right way
r::;, page 2 63.
- T he wh eel bolts s hou ld be cl ean and easy
t o tu rn . Chec k for dirt and corrosion on
t he m ating surfaces of bot h the wheel
an d t he hub . Remove all d irt from these
surfaces befo re remounting the whee l.
Page 267 of 298
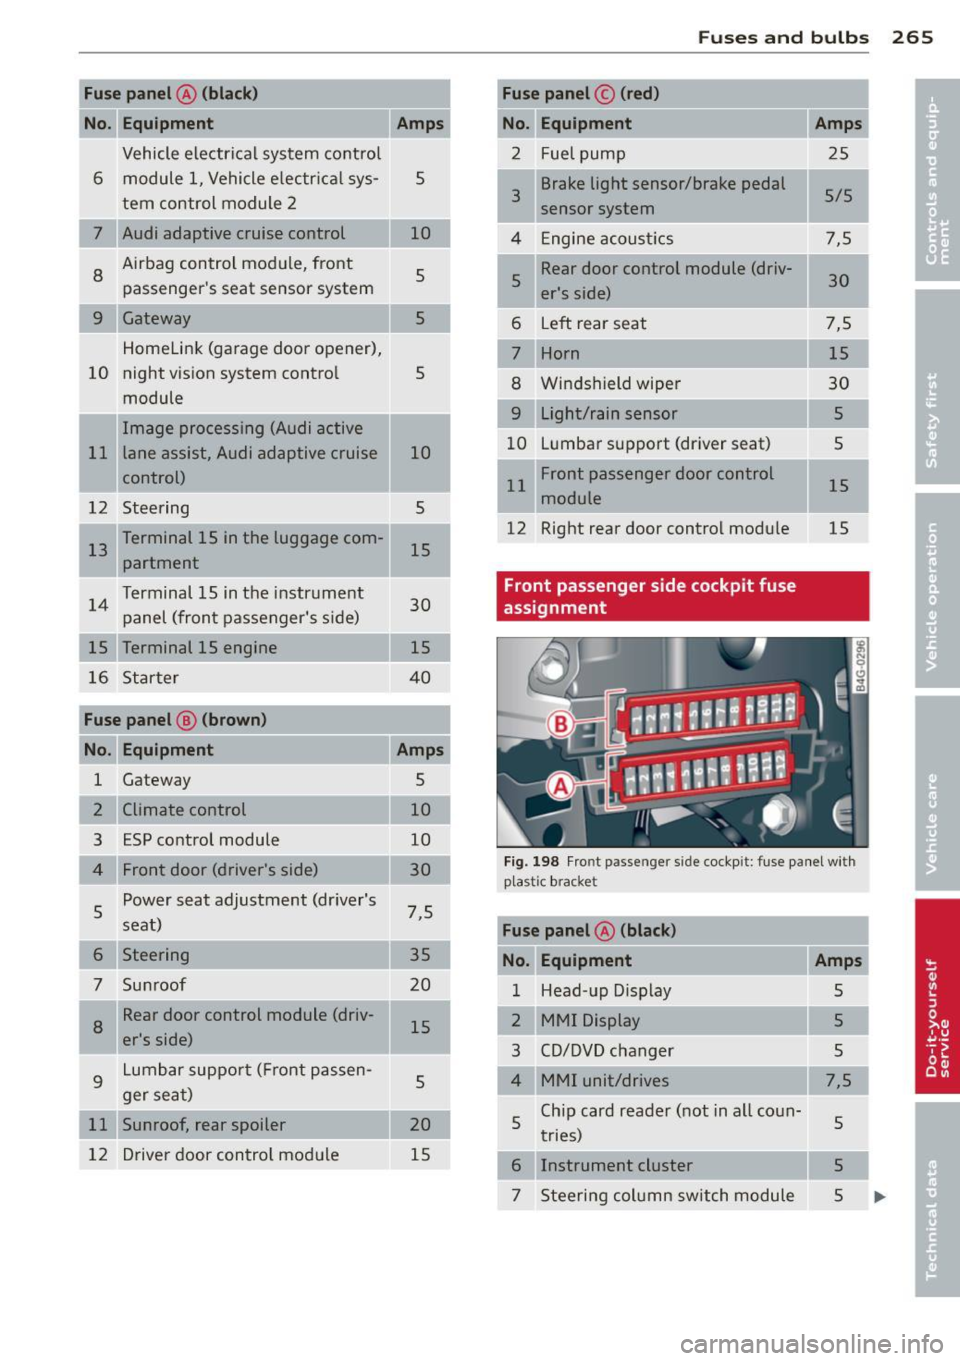
Fuse panel@ (bl ack )
No. Equipment
Vehicle electrical system control
6 module 1, Vehicle e lectr ica l sys-
tern control module 2
7 Audi adaptive cruise control
8
Airbag control module, front
passenger 's seat sensor system
9 Gateway
Homelink (garage door opener),
10 night vision system contro
l
module
Image processing (Audi active
11 lane assist , Audi adaptive cruise
control)
12 Steering
13 Terminal 15 in the luggage com-
partment
14 Terminal 15 in the
instrument
panel (front passenger's s ide)
15 Terminal 15 engine
16 Starter
Fuse panel e (brown)
No . Equipment
1 Gateway
2 Climate control
3 ESP co ntrol module
Front door (driver's side)
5
Power seat adjustment (dr iver's
seat)
6
Steering
7 Sunroof
8
Rear door control module (driv-
er's side)
9
Lumbar suppor t (Fro nt p assen-
ger seat)
11 Sunroof, rear spoiler
12 Driver door control mod ule
Amps
5
10
5
5
5
10
5
15
30 15
4 0
Amps
5
10
10
30
7,5 35
20 1 5
5
20
15
Fu se s and bulb s 265
Fuse panel © (red )
No. Equipment
2 Fue l pump
3 Brake light sensor/brake pedal
sensor system
4 Engine acoust ics
5 Rear door control module (driv-
er's side)
6 Left rear seat
7 Horn
8 Win dsh ield wipe r
9 Light/rain sensor
10 L
u mbar support (dr iver seat)
11 Front passenge
r door control
module
12 Right rear door control mod
ule
Front passenger side cockpit fuse
assignment Amps
2
5
5/5
7,5 30
7,5 15
30
5
5
15 15
Fi g. 198 Fro nt passe nge r side cock pit : fu se pa nel with
p last ic bracket
Fuse panel A (black )
No. Equipment
1 Head-up D isplay
2 MMI Display
3 CD/DVD changer
Chip card reader (not in all coun-
5 tr ies)
6 Instrument cluster
Amps
5
5
5
7,5
5
5
7 Steeri ng col umn switch module 5
Page 268 of 298
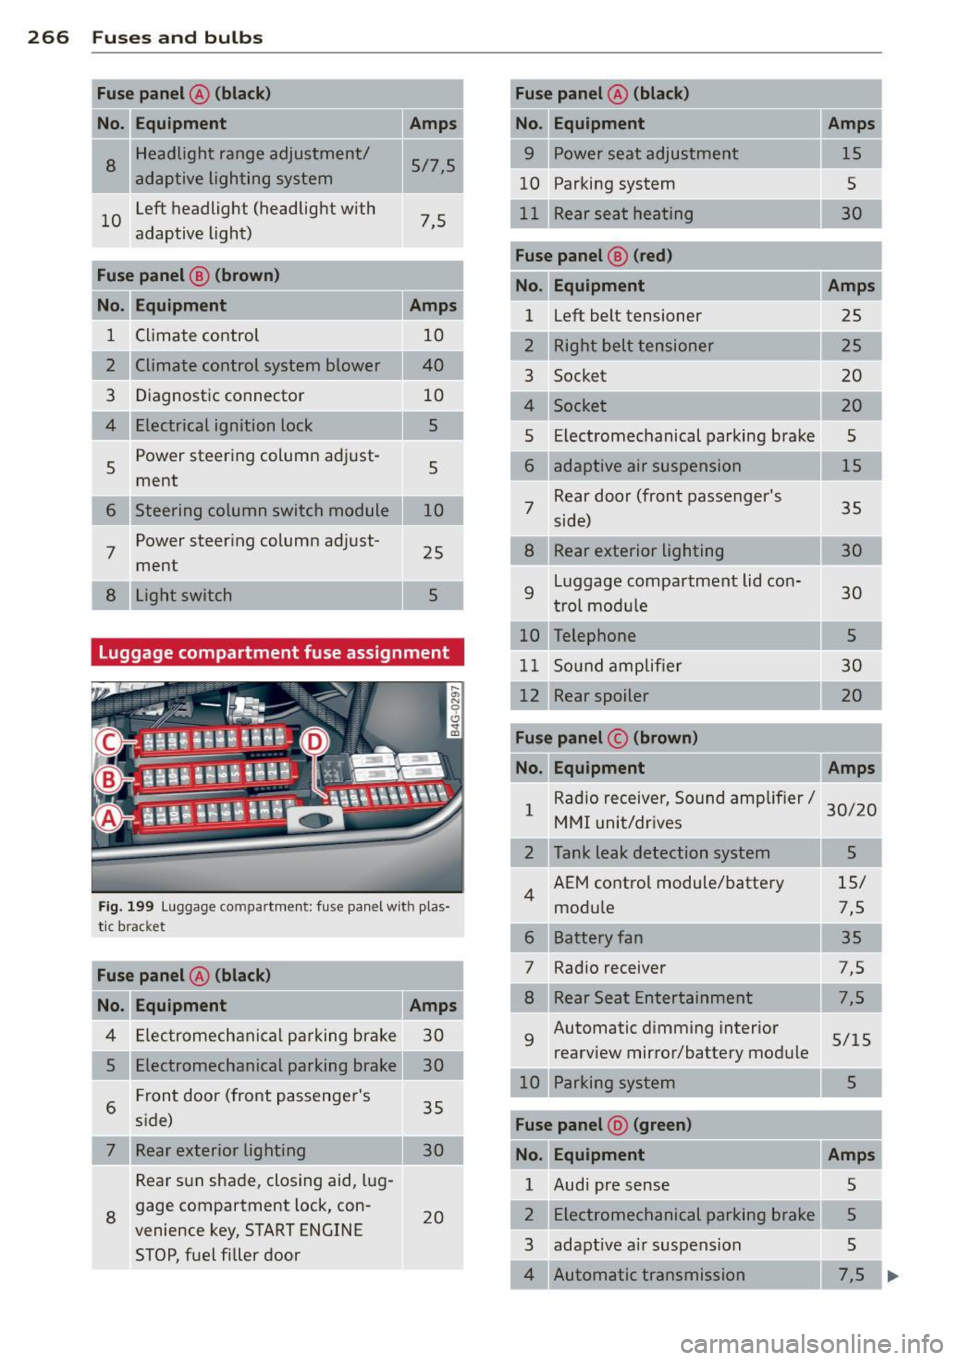
266 Fuses a nd bulb s
Fuse panel @ (black )
No . Equ ipment Amps
=
8
Headlight range adjustment/
5/7,5
adaptive lighting system
10 Left headlight (headlight with
7,5
adaptive light)
Fuse p anel
@ (brown )
No .II Equ ipm ent
II Amp s
1 Climate control 10
2 Climate control system blower 40
3 Diagnostic connector 10
4 Electrical ignition lock 5
5 Power steering column adjust-
ment
5
Steering column switch module 10
7 Power steer
ing column adjust-
ment 25
8 Light switch
Luggage compartment fuse assignment
Fig. 199 Luggage compartment: fuse panel with plas·
tic bracket
Fuse panel @ (bl ack )
No. II Equipment
I[ Amp s
4 E lectromechanical parking brake 30
5 Electromechanical parking brake 30
6 Front door (front passenger's
35
side)
7 Rear exterior lighting Rear sun shade, closing aid, lug
s gage compartment lock, con
venience key, START ENGINE
STOP, fuel filler door 30
20
-Fuse pane
l@ (blac k) I
No. Equipm ent Amps
=· 9 Power seat adjustment 15
10 Parking system
s
30
Fus e pane l
B (red)
No . Equipment Amps
1 Left belt tensioner
25
Right belt tensioner 25
3 Socket 20
20
Electromechanical parking brake
5
adaptive air suspension 15
7 Rear door (front passenger's
35
side)
Rear exterior lighting 30
9
Luggage compartment lid con-
30
t rol module
10 Telephone 5
11 Sound amp lifier 30
12 Rear spoiler 20
Fuse pane l c (b rown )
No. Equipment Amps
1 Rad
io receiver, Sound amplif ier/
30/20
MMI unit/dr ives
2 Tank leak detection system 5
AEM control module/battery 15/
4
module 7,5
6 Battery fan 35
Rad io receiver
7,5
7,5
9
Automatic dimming interior
5/15
rearview mirror/battery module
Parking system 5
Fu se pan el o (gre en)
No. Equipment Amps
1 Audi pre sense 5
2 Electromechanical parking brake 5
3 adaptive a
ir suspension
5
Automatic transmission 7,5
...
Page 269 of 298
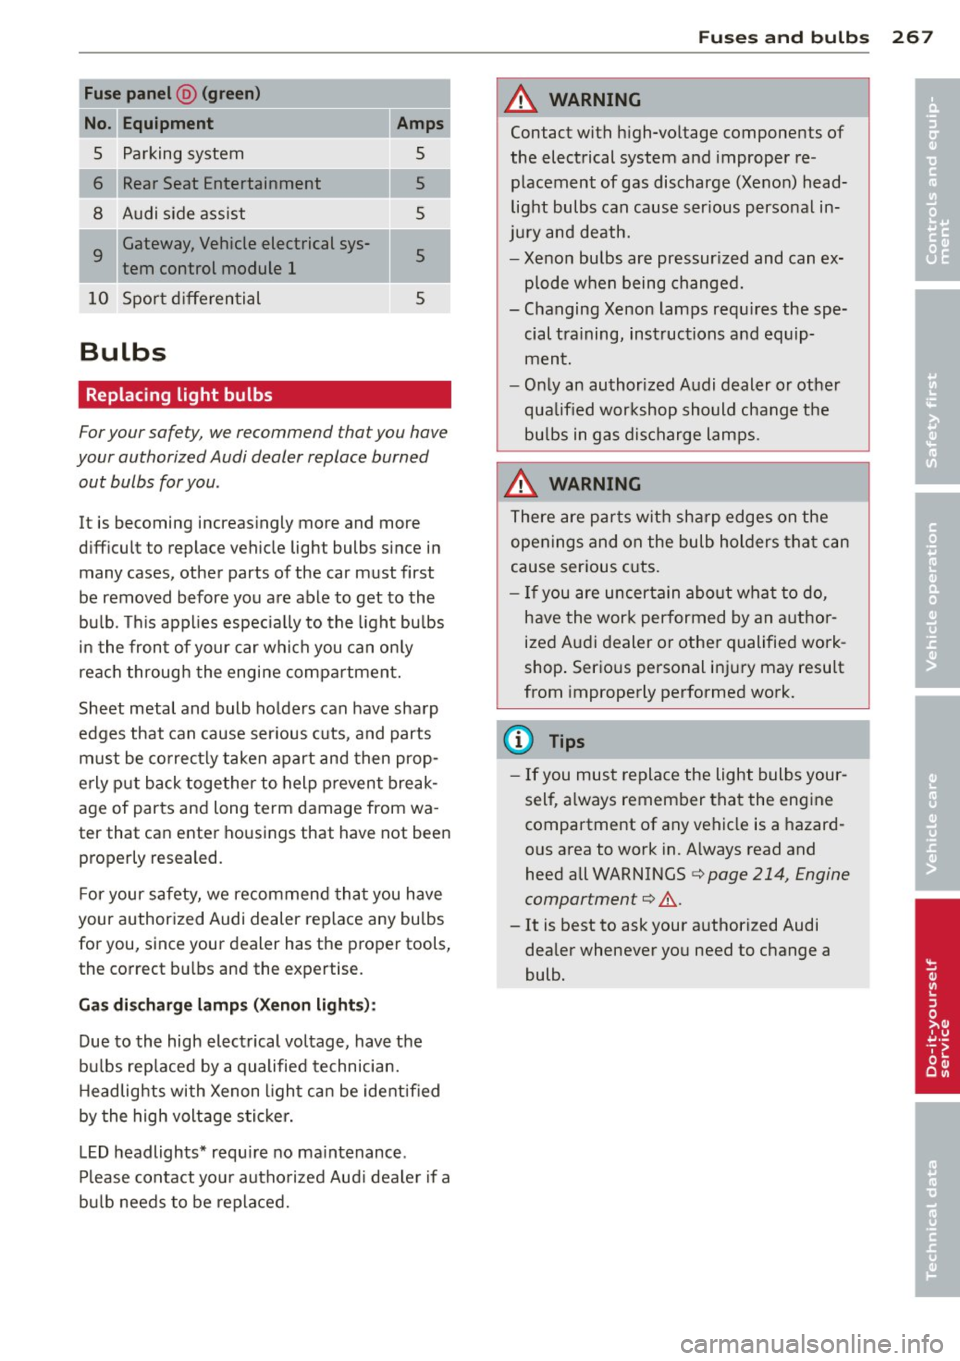
Fuse panel @ (green )
Equipment Amps
Parking system 5
Rear Seat Entertainment s
8 Audi side ass ist 5
9
Gateway, Vehicle electrical sys-
5 tern control module 1
10 Sport d ifferential 5
Bulbs
Replacing light bulbs
For your safety, we recommend that you have
your authorized Audi dealer replace burned
out bulbs for you .
It is becoming increasingly more and more
difficult to replace vehicle light bulbs since in
many cases, other parts of the car must first
be removed before you are able to get to the
bu lb. Th is applies especia lly to the light bu lbs
i n the front of your car which you can only
reach through the engine compartment ,
Sheet metal and bulb holders can have sharp
edges that can cause ser ious cuts, and parts
must be correctly taken apart and then prop
e rly p ut back together to help prevent break
age of parts and long term damage from wa
ter that can enter housings that have not been properly resealed.
F or your safety, we recommend that you have
your authorized Audi dealer replace any bu lbs
for you, since your dealer has the proper tools, the correct b ulbs and the expertise.
Gas disc harge la mp s (X enon li ght s):
Due to the high electrical voltage, have the
bu lbs rep laced by a qualified technician.
H eadlights with Xenon l ight can be identified
by the high voltage stic ke r.
LED headlights* requ ire no ma intenance .
Please contact your autho rized Aud i deale r if a
bu lb needs to be replaced.
Fu ses and bulb s
A WARNING
Contact with h igh-vo ltage components of
the electrical system and improper re
placement of gas discharge (Xenon) head
light bulbs can cause ser ious personal in
jury and death.
- Xenon bulbs are pressur ized and can ex
plode when being changed.
- Changing Xenon lamps requ ires the spe
cial tra ining, instructions and equip
ment.
- On ly an authorized Audi dealer or other
qualified wor kshop should change the
bu lbs in gas discharge lamps .
A WARNING
There are parts with sharp edges on the
openings and on the bulb holders tha t can
cause serious c uts.
- If you are uncertain abo ut what to do,
have the work performed by an author
ized Audi dealer or other qualified work
shop . Ser ious personal inj ury may result
from improperly performed work.
(D Tips
- If you must replace the light bulbs your
sel f, a lways remember that the engine
compartment of any vehicle is a hazard
ous area to work in. A lways read and
heed all WARNINGS
¢ page 214, Engine
compartment¢ ,&..
- It is best to ask your authorized Audi
dealer whenever yo u need to change a
bulb.
-
267
•
•
Page 270 of 298

268 Emergency situations
Emergency situations
General
This chapter is intended for trained emer
gency crews and working personnel who
have the necessary tools and equipment to
perform these ope rations.
Starting by pushing or
towing
Q;) Note
Vehicles w ith an automatic transmission
cannot be started by pus hing o r tow ing.
Starting with jumper
cables
If necessary, the engine can be started by
connecting it to the battery of another vehi
cle.
If the engine should fail to start because of a
discharged or weak battery, the battery can be
connected to the battery of
another vehicle,
using a
pair of jumpe r cables to start the en
g ine .
Jumper cables
Use only jumper cables of sufficiently large
cross section to carry the starter current safe
ly. Refer to the manufacturer's specif ications.
Use only jumper cables with
insulated termi
na l clamps which are distinctly marked:
plus(+) cable in most cases colored red
minu s(-) cable
in most cases colored black .
A WARNING
Batteries contain electricity, acid, and gas.
Any of these can cause very serious or fatal
inju ry. Follow the instructions below for
safe handling of your veh icle's battery.
- Always shield you r eyes and avoid lean
ing over the battery whenever possible.
- A discharged battery can freeze at tem
peratures just be low 32 °F (0 °C). Before connecting a
jumper cable, you must
thaw the frozen battery complete ly, oth
erwise it could explode.
- Do not allow battery acid to contact eyes
or skin. Flush any contacted area with
water immediately.
- Improper use of a booster battery to start a vehicle may cause an explosion.
- Vehicle batteries generate explosive gas
es. Keep sparks, flame and lighted ciga
rettes away from batteries.
- Do not try to jump start any vehicle with a low acid level in the battery.
- The vo ltage of the booster battery must
also have a 12-Volt rating. The capacity
(Ah) of the booster battery should not be
lower than that of the discharged bat
tery . Use of batteries of d ifferent voltage
or substantially different "Ah" rating
may cause an exp losion and personal in
jury.
- Never charge a frozen batte ry. Gas trap
ped in the ice may cause an explosion.
- Never charge or use a battery that has
been frozen. The battery case may have
be weakened.
- Use of batter ies of different voltage or
substantially different capacity (Ah) rat
ing may cause an exp losion and injury.
The capacity (Ah) of the booster battery
should not be lower than that of the dis
charged battery.
- Before you check anything in the engine
compartment, always read and heed a ll
WARNINGS¢
page 214, Engine com
partment.
«I) Note
-Applying a higher voltage booster bat
tery will cause expensive damage to sen
sitive electronic components, such as
contro l units, relays, rad io, etc.
- There must be no electrical contact be
tween the vehicles as otherwise current
could already start to flow as soon as the
positive(+) terminals are connected. ..,_
Page 278 of 298

276 Data
Data
211 hp, 2.0 liter 4-cylinder engine
Applies to vehicles: with 2.0 liter 4-cylinder engine and front-wheel drive
Engine data Maximum output SAE net
Maximum torque SAE net
No . of cylinders
Displacement
Stroke
Bore
Compression ratio
Fuel
Dimen sion s (appro x.)
Leng th (with license pla te bracket)
Width (across mirrors) He igh t (unloaded) hp@rpm
lb-ft@ rpm
CID (cm
3 )
in (mm)
in (mm)
211 @4300 -6000
4
121 (1984)
3.65 (92 .8)
3 .25 (82.5)
9.6: 1
Premium unleaded (91 AKI) Recommended for maxi
mum engine performance. Further details
¢ page 215,
Gasoline
in (mm) 1 93.9 (4925)
in (mm) 82.l (2086)
in (mm) 57.8 (1468)
Turning circle diameter (curb to curb) ft . (m) 39.0 (11.9)
Capacities (appro x.)
Fuel tank
- Total capacity
- Reserve (o f to tal capacity)
Windshield fluid container
Wind shield and headlight wa sher
fluid containe r*
Engine oil with filter c hange gal (liters)
19
.8 (75 .0)
gal (liters) 2 .6 (10.0)
quarts (liters) 3 .7 (3 .5)
q uarts ( li1ters) 5 .2 (4 .9)
quarts (liters) 4 .9 (4 .6)