AUDI A6 2013 Service Manual
Manufacturer: AUDI, Model Year: 2013, Model line: A6, Model: AUDI A6 2013Pages: 306, PDF Size: 76.92 MB
Page 41 of 306
Pow er w ind ow switche s
@ Driver's door
® Passenger's door
© Le ft rea r door
@ Ri ght rear door
~ WARNING
- When you leave your veh icle -even if on
ly briefly -always take the ignition key
with you. This applies particularly when
children remain in the vehicle. Otherw ise
the ch ildren could start the engine or op
erate electrical eq uipment (e.g. power
windows). The power windows are func
t io nal until the d river's doo r or passeng
er's door has been opened.
- Be careful when closing the windows.
Check to see that no one is in the way, or
serious injury could result!
- When lo cking the veh icle from ou tside,
t he ve hicle must be unocc upied s in ce the
windows can no longer be opened in an eme rgency.
(D Tips
After the ig nition has been switched off,
t he wi ndows can still be opened or closed
for about 10 minutes. The power w indows
are not switched off until the dr iver's door
or passenger's door has been opened .
What to do after a malfunction
The one-touch open and close function must
be reactivated if the battery has been discon
nected .
.,. Pull and hold t he power w indow switch un
ti l the window is fully closed .
.,. Re lease the switch and then p ull it again for
at least one second.
Opening and clo sin g 39
Valet parking
The valet parking feature protects the lug
gage compartment from unauthorized ac
cess.
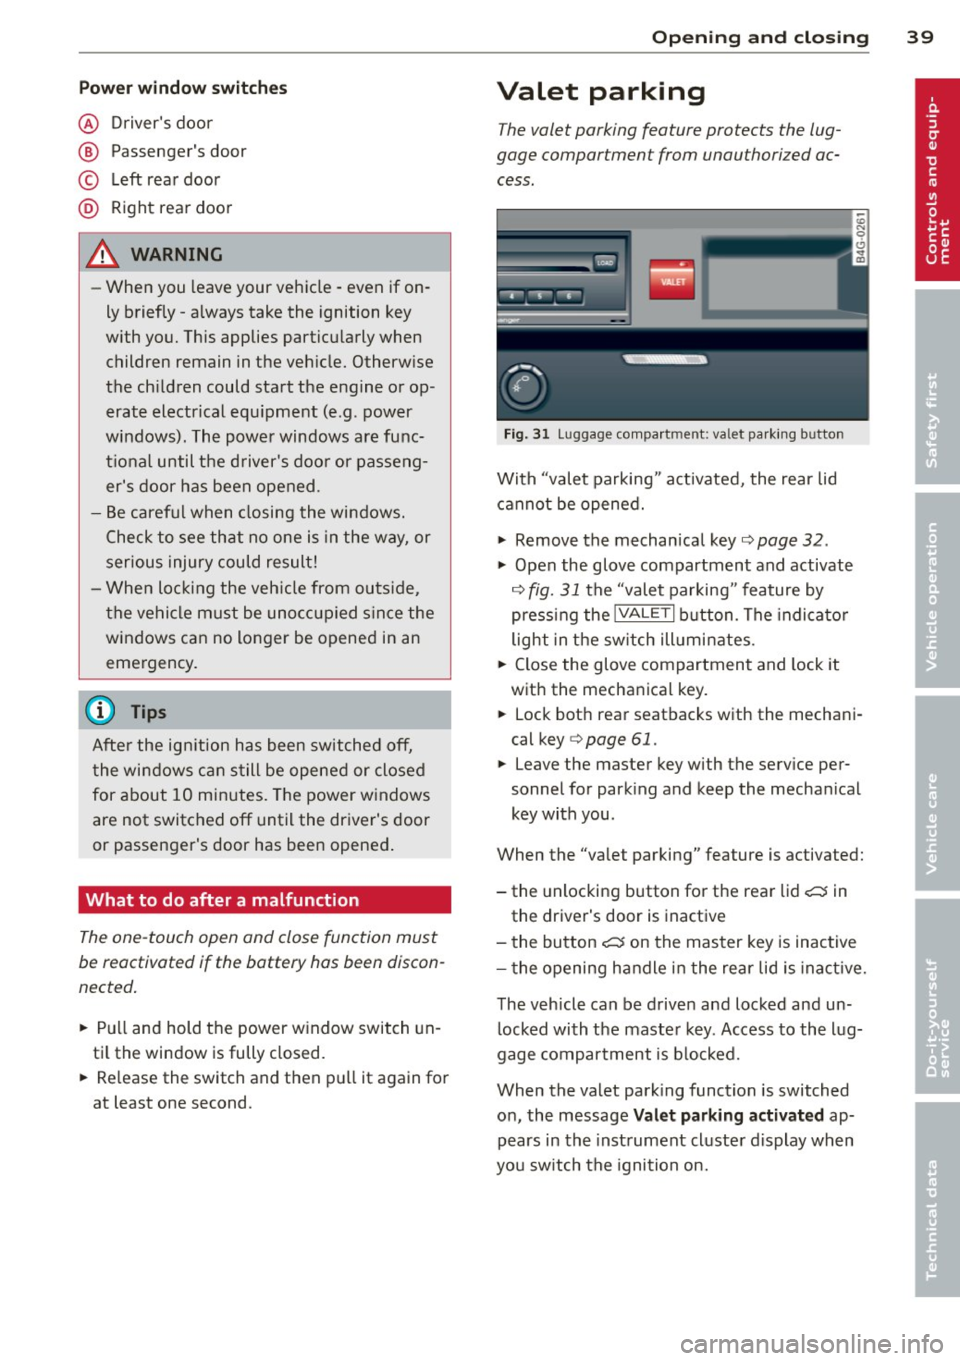
F ig. 31 Luggage compartment: valet parking button
With "valet parking" act ivated, the rear lid
cannot be opened.
.,. Remove the mechan ical key¢
page 32 .
.,. Open the glove compartment and activate
¢
fig. 31 the "valet parking" feature by
p ressi ng the
!VALET I b utton. The indica to r
light in the sw itch ill umi nates .
.,. Close the glove compartment and lock it
with the mechanical key.
.,. Lock bot h rea r seatbacks with the mechani
cal key ¢
page 61.
.,. Leave the master key with the service per
sonnel for park ing and keep the mecha nical
key with you.
When the "valet parking" feature is activated:
- the unlocking button for the rear lid
c:::; in
the driver's door is inact ive
- the bu tton
c:::; on the mas ter key is inactive
- the opening h andle i n the rear lid is inac tive.
The vehicle can be drive n and locked and un
l ocked with the maste r key. Access to the lug
gage co mpar tment is b locked.
When the valet park ing function is switched
o n, the message
Valet parking activat ed ap
pears in the inst rument cl uste r display when
you sw itch the igni tion on.
Page 42 of 306
40 Opening and clo sing
Sliding/tilting sunroof
Operation
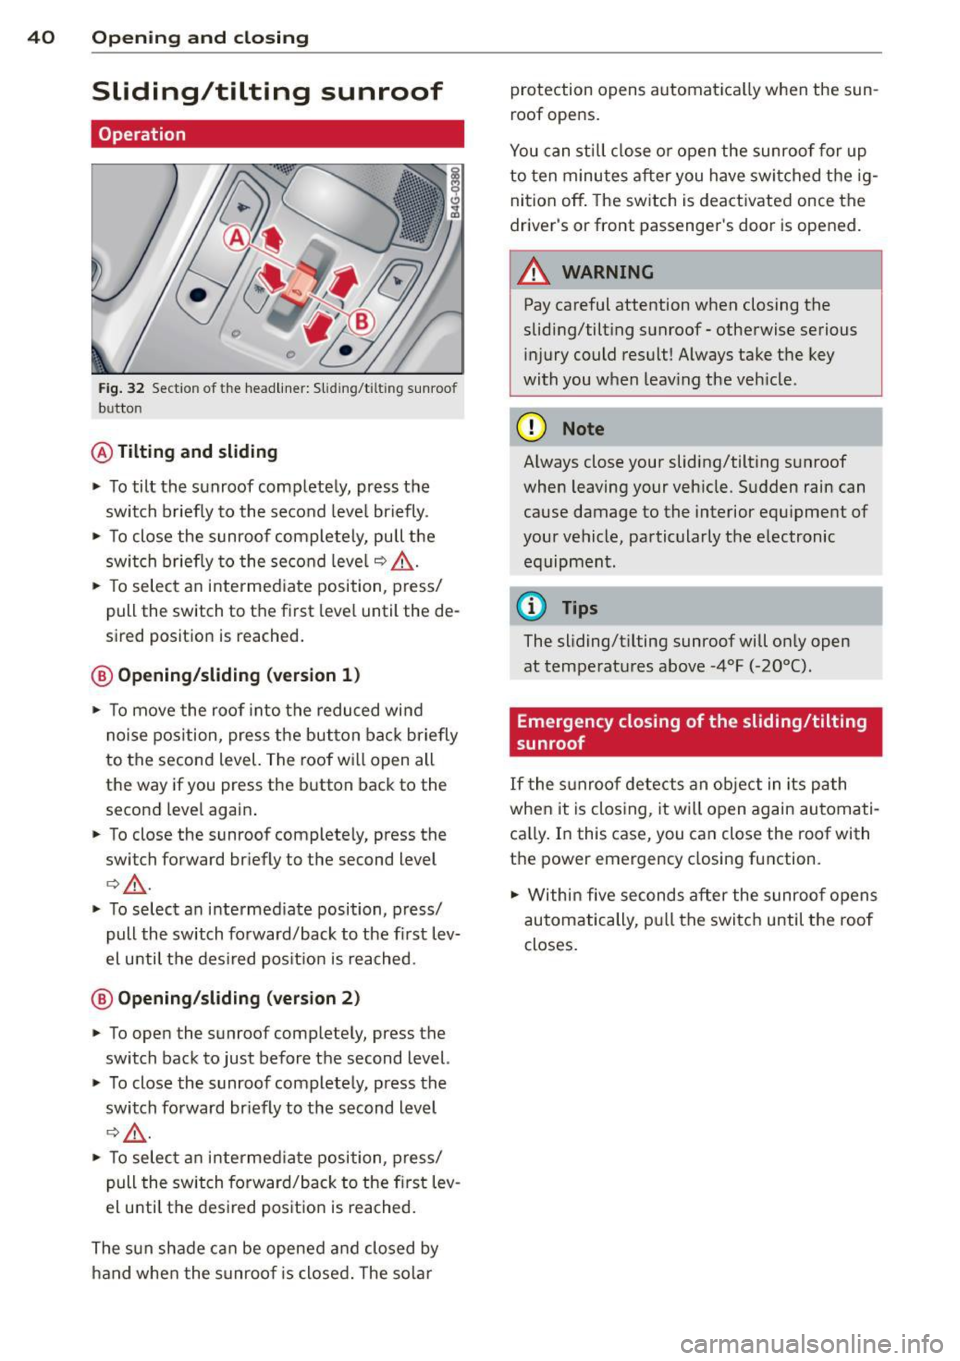
Fig . 32 Sectio n of th e he adliner: Slid ing/t iltin g sunroo f
b u tto n
@ Tiltin g and sliding
.,. To tilt the sunroof completely, press the
switch briefly to the second leve l briefly .
.,. To close the sunroof complete ly, pull the
switch briefly to the second leve l
c::> &,..
.,. To select an intermed iate position, press/
pull the switch to the first leve l until the de
sired position is reached.
® Opening /sliding (version 1 )
.,. To move the roof into the reduced wind
no ise position, press the button bac k briefly
to the second level. The roof w ill open all
the way if you press the button back to the
second leve l again .
.,. To close the sunroof completely, press the
switch forward briefly to the second level
r::> &,. .
.,. To select an i ntermed iate position, press/
pull the switch forward/back to the fi rst lev
el unti l the des ired pos it ion is reached .
@ Opening/sliding (version 2)
.,. To open the sunroof completely, press the
switch back to just before the second level.
.,. To close the sunroof completely, press the
switch fo rward br iefly to the second level
c::> .,&. .
.,. To selec t an intermed iate position, press/
pull the switch forward/back to the f irst lev
el u ntil the des ired pos ition is reached.
The sun shade can be opened an d closed by
h a nd when the s unroo f is closed . The solar protection opens automat
ica lly when the sun
roof opens.
You can still close or open the sunroof for up
to ten minutes a fter you have swi tched the ig
nition off . The sw itch is deactivated once the
driver 's or front passenger's door is opened.
A WARNING
-
Pay careful attention when closing the
sliding/tilting sunroof - otherwise serious in jury c ould result! Always take t he key
with you w hen leav ing the ve hicle.
(D Note
-
Always close your sliding/tilting sunroof
when leaving your veh icle. S udden rain can
cause damage to the interior equ ipment of
your vehicle, pa rticularly the e lectronic
equipment .
(D Tips
The sliding/t ilting sunroof will on ly open
at tempe ratu res above -4°F (-20°().
Emergency closing of the sliding/tilting
sunroof
If the s unroof detects an object in its path
when it is clos ing, it w ill open again automati
ca lly. I n this case, you can close the roof with
t h e power emergency closing function.
.,. Within five seconds after the sunroo f opens
automatically, p ull the switc h until the roof
closes.
Page 43 of 306
Clear vision Lights
Switching the headlights on and off
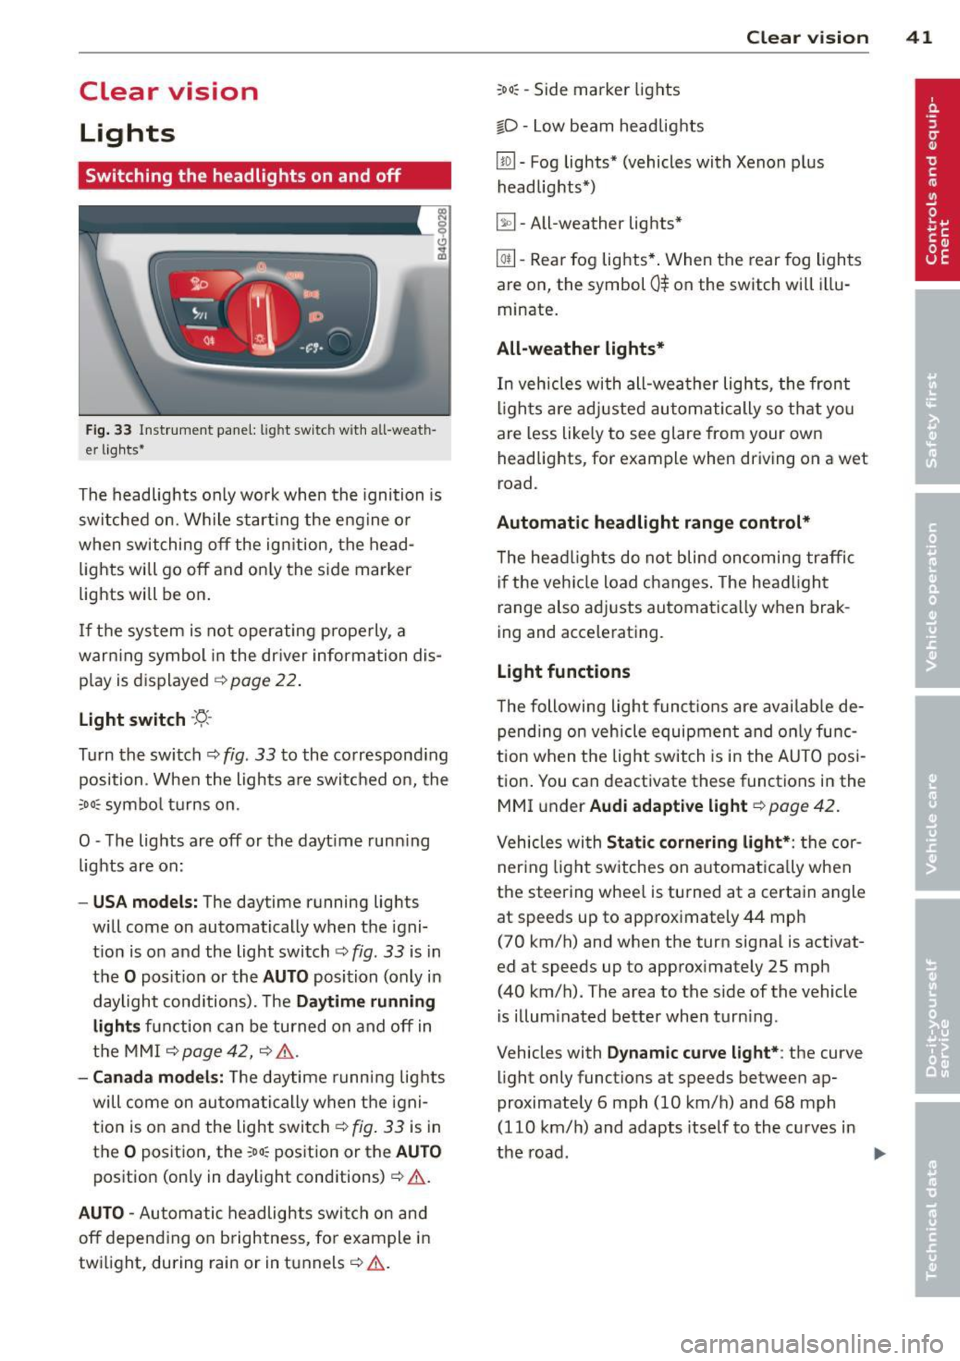
Fig . 33 Instrument pane l: lig ht sw itc h wit h all -weath
er lights•
The headlights only wo rk when the ignition is
switched on. Wh ile start ing the eng ine o r
when switching off the ign ition, the head
lights will go off and on ly the side marker
lights will be on .
If the system is not operating p rope rly, a
war ning symbol in the dr iver information dis
p lay is d isplayed
c::> page 22 .
Light switch -'tj_ -
Tu rn the switch c::> fig . 33 to the correspond ing
position . When the lights a re switched on, the
oD o: symbo l tu rns on .
0 -The lig hts are off or the dayt ime runn ing
lights are on:
- USA models: The day time running lights
will come on automatically when the igni
t ion is on and the light switch
c::> fig . 33 is in
the
O posit ion or the AUTO position (only in
daylight cond itions). The
Daytime running
light s
function can be turned on and off in
the MMI
c::> page42, c::>A .
-Ca nada model s: The daytime running lig hts
will come on automa tically when the igni
t ion is on and the light switch
c::> fig . 33 is in
the
O position, the : Do: pos ition or the AUTO
position (only in daylight conditions) c::> A .
AUTO -Automatic headlights swi tch on and
off depend ing o n brightness, for example i n
tw ilight, during rain or in tunnels
c::> &. .
:Do: -Side marker lights
io -Low beam headlights
Clear vi sion 41
lm -Fog lights* (vehicles with Xenon p lus
headlights *)
~ -All-weather lights *
@il-Rear fog lights* . When the rear fog lights
are on, the symbol
0$ on the switch will i llu
minate.
All-weather lights*
In vehicles with all-wea ther lights , the front
ligh ts are ad justed au tomatically so that yo u
are less like ly to see glare from your own
head lights , for example when driving on a wet
road.
Automatic h eadl ight range control*
T he head lights do not blind oncoming traffic
i f the veh icle load changes . The headligh t
range also adj usts automatically when brak
ing and accelerating .
Light functions
The following light funct io ns are availab le de
pend ing on vehicle equipment and o nly func
tion when t he lig ht switch is in the AUTO posi
tion . You can deactivate these functions in the
MMI under
Audi adaptive light c::> page 42.
Vehicles with St atic corn ering light* : the cor
ner ing ligh t sw itches on a utomat ically when
the steering whee l is turned at a certain angle
at speeds up to approximately 44 mph
( 7 0 km/h) and when the turn signa l is activat
ed at speeds up to approximately 25 mph
(40 km/h) . The area to the side of the vehicle
is illum inated better when turn ing .
Vehicles with
Dynamic cu rve light* : the curve
light only functions at speeds between ap
proximately 6 mph (10 km/h) and 68 mph
(110 km/h) and adapts itself to the curves in
the road .
~
Page 44 of 306
42 Clear vision
& WARNING
-Automatic headlights are only intended
to assist the driver . They do not relieve
the driver of his responsibility to check
the headlights and to turn them on man
ually according to the current light and
visibility conditions. For example, fog
cannot be detected by the light sensors.
So always switch on the headlights
io
under these weather conditions and
when driving in the dark.
- Crashes can happen when you cannot see
the road ahead and when you cannot be
seen by other motorists. Always turn on
theheadlightssothatyoucanseeahead and so that others can see your car from
the back .
- Please observe legal regulations when
using the lighting systems described .
(D Note
The rear fog lights should only be turned
on in accordance with traffic regulation, as
the lights are bright for following traffic.
{D) Tips
- The light sensor* for automatic head
light range control* is located in the rear
view mirror mount . You should therefore
not apply any stickers to the windshield
in this area in order to prevent malfunc
tions or failures .
- In the event of a light sensor malfunc
tion, the driver is notified in the instru
ment cluster display ~
page 22 .
-You will hear a warning tone if you open
the driver door when the exterior lights
are switched on.
- In cool or damp weather, the inside of
the headlights, turn signals and tail lights can fog over due to the tempera
ture difference between the inside and
outside. They will clear shortly after
switching them on. This does not affect
the service life of the lighting.
Emergency flasher
The emergency flasher makes other motorists
aware that you or your vehicle are in an emer
gency situation .
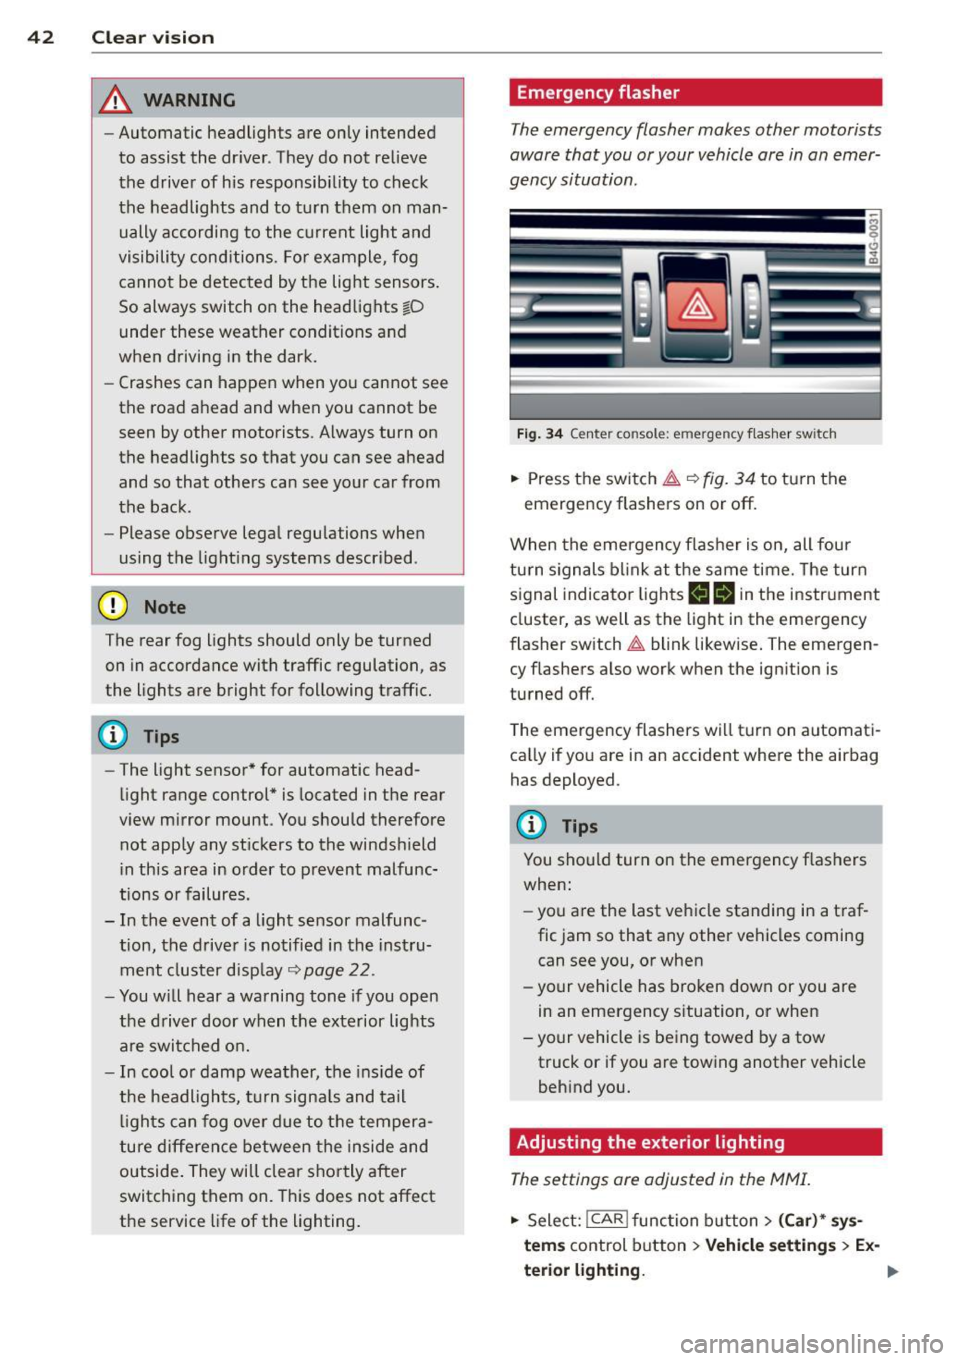
Fig. 34 Ce nte r co nso le: em erg en cy flash er sw itc h
.. Press the switch I:;,,. ~fig. 34 to turn the
emergency flashers on or off.
When the emergency flasher is on, all four
turn signals blink at the same time. The turn
signal indicator lights
B Nin the instrument
cluster, as well as the light in the emergency
flasher switch
I:;,,. blink likewise. The emergen
cy flashers also work when the ignition is
turned off.
The emergency flashers will turn on automati
cally if you are in an accident where the airbag
has deployed.
@ Tips
You should turn on the emergency flashers
when:
- you are the last vehicle standing in a traf
fic jam so that any other vehicles coming
can see you, or when
- your vehicle has broken down or you are
in an emergency situation, or when
-your vehicle is being towed by a tow
truck or if you are towing another vehicle
behind you.
Adjusting the exterior lighting
The settings ore adjusted in the MMI.
.. Select: !CAR ! function button> (Car)* sys
tems
control button > Vehicle settings > Ex-
terior lighting.
Ill>
Page 45 of 306
Automatic headlights
You can adjust the following settings in the
Automatic headlights menu:
Headlights activation time -You can adjust if
the headlights switch on
Early, Med . or Late
according to the sensitivity of the ligh t sensor.
Audi adaptive light* -You can switch adaptive
light
On and Off.
Daytime running lights
USA models:
You can switch the dayt ime run
n ing lights
on and off .
Canada models :
The function cannot be
turned off . It is activated automatically each
time the ignition is switched on. This menu
item is shown "greyed out" .
Coming home, Leaving home
The coming home function illuminates the
area outside the vehicle when you switch the
ignition off and open the driver's door. To turn
the function on, select
Lights when leaving
car > On .
The leaving home function illuminates the
area outside the vehicle when you un lock the
vehicle. To turn the funct ion on, select
Lights
when unlocking car > On .
The coming home and leaving home functions
only operate when it is dark and the light
switch is in the
AUTO position.
Clear vision 43
Turn signals and high beam lever
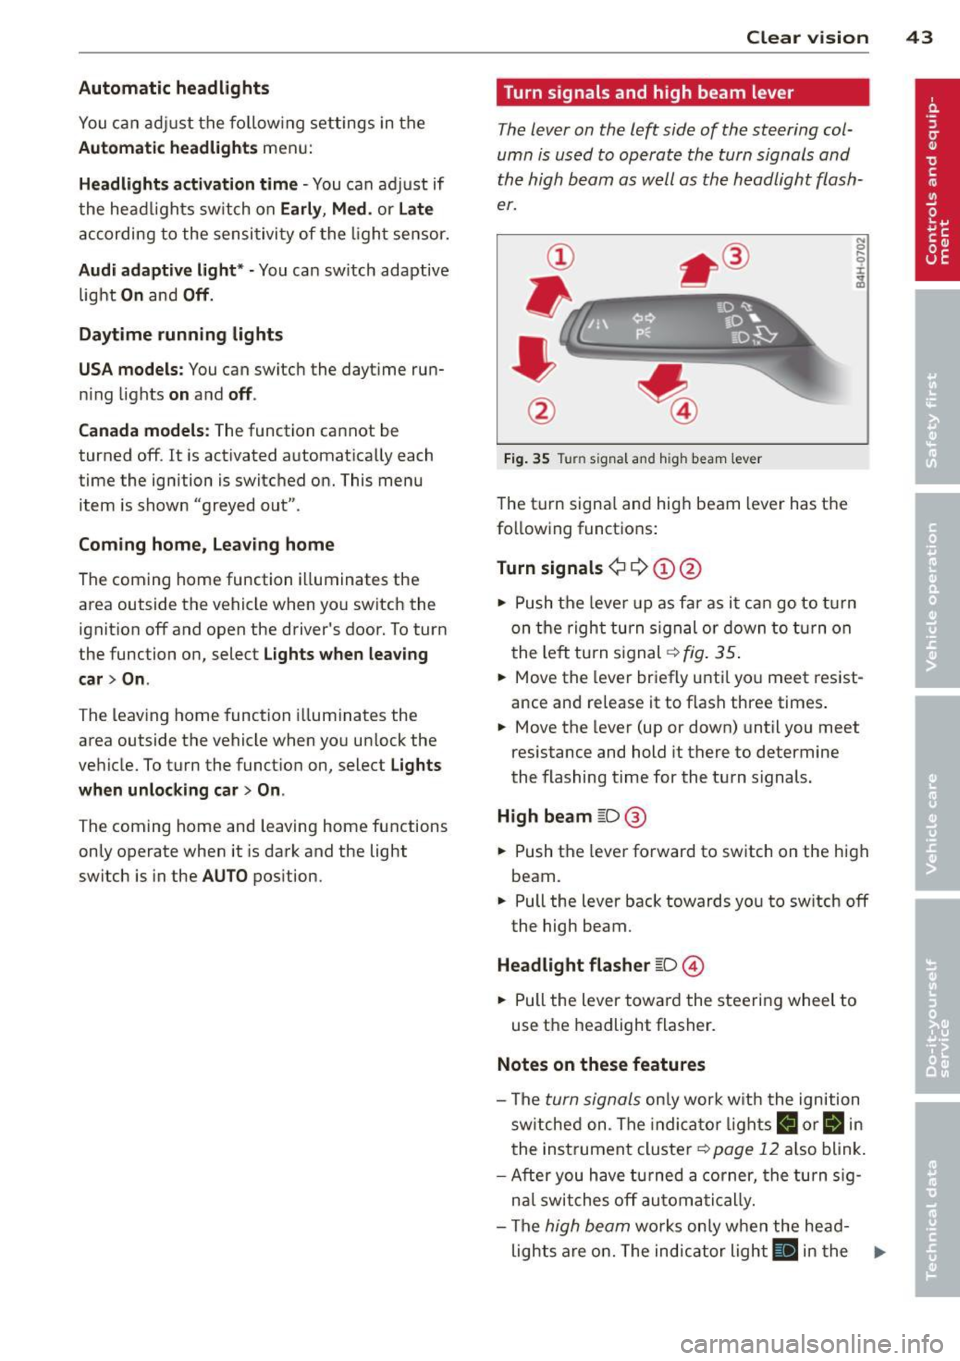
The lever on the left side of the steering col
umn is used to operate the turn signals and
the high beam as well as the headlight flash
er.
Fig. 35 Tu rn signal and high beam lever
The turn signal and high beam lever has the
following functions:
Turn signals ¢ 9 ©@
.. 0 ....
~
.,. Push the leve r up as far as it can go to turn
on the right turn signa l or down to turn on
the left tu rn s ignal ¢
fig. 35.
... Move the lever briefly until you meet resist
ance and re lease it to flash three times.
.,. Move the lever (up or down) until you meet
resistance and hold it there to determine
the flashing time for the turn signals.
High beam ~D @
... Push the lever forward to switch on the high
beam .
.,. Pull the lever back towards you to sw itch
off
the high beam.
Headlight flasher ~D ©
... Pull the lever toward the steering wheel to
use the headlight flasher.
Notes on these features
-The turn signals on ly work w ith the ignition
sw itched on. The indicator l ights
B or Bin
the instrument cluster¢ page 12 also blink.
-After you have turned a corner, the turn sig-
n al switches
off automatically.
- The
high beam works only when the head-
lights are on. The indicator light
El in the .,.
Page 46 of 306
44 Clear vis ion
instrument cluste r illuminates when the
high beams are on.
- T he
headlight flash er works only as long as
yo u hold the lever - even if there are no
l ights turned on. The indicator light
II in
the instrument cluster il luminates when you
use the headlight flasher.
A WARNING
Do not use the high beam or headlight
flasher if you know that these could blind
oncoming traffic.
Interior lights
Front and rear interior lighting
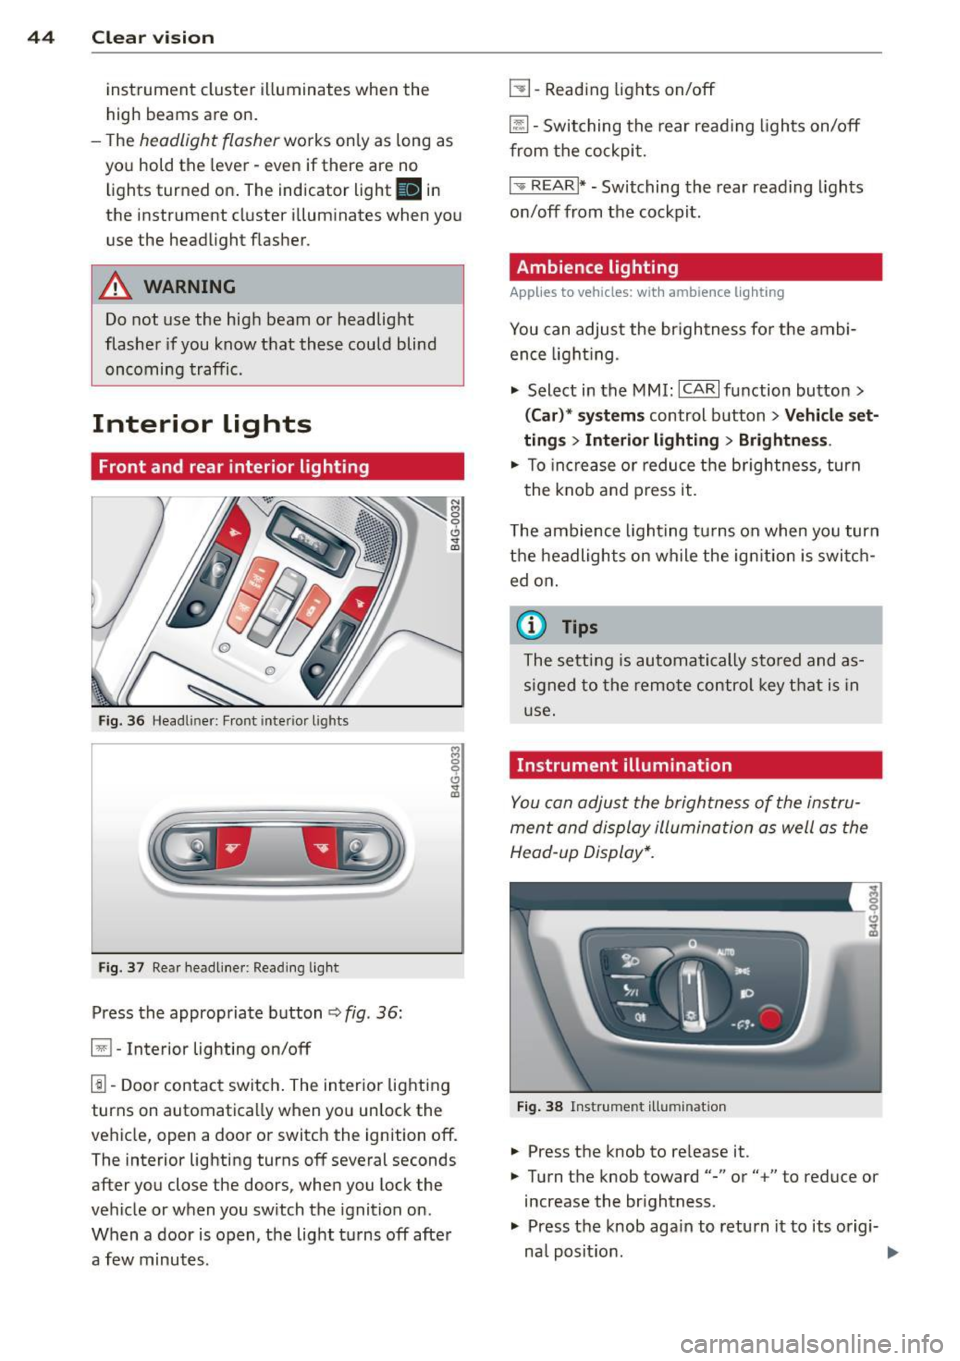
Fi g. 36 Headliner: Front interior ligh ts
Fig . 37 Re ar headli ne r: Readi ng light
Press the appropriate button q fig . 36:
El-Interior lighting on/off
I]]-Door contac t sw itch . The inter ior lighting
turns on automatica lly when you unlock the
vehicle, open a door or switch the ignition off.
The interior lighting turns off several seconds
after you close the doors, when you lock the
vehicle or when you sw itch the ignition on.
When a door is open, the light t urns off afte r
a few minutes.
L:!l -Read ing lights on/off
~ - Switching the rear read ing lights on/off
from the cockpi t.
I" REARI * - Switching the rear reading lights
o n/off from the cockpit.
Ambience lighting
Applies to vehicles: with ambience lighting
You can adjust the br ightness for the ambi
ence ligh tin g.
.. Select in the MMI: ICARlfunction butto n>
(Car )* sys tem s control button > Vehicle set
ting s
> Interi or lighting > Brightne ss.
.. To increase or reduce the b rightness , turn
t he knob and press it .
T he ambience light ing tu rns on when you turn
t h e headlights on wh ile the ig nition is swi tc h
ed on.
(D Tips
The setti ng is automati cally sto red and as
s igned to the remo te contr ol key t hat i s in
u se .
Instrument illumination
You can adjust the brightness of the instru
men t and di splay illumination a s well as the
Head-up Display*.
Fi g. 38 Instrume nt illumina tion
... Press the knob to re lease it.
.. Turn the knob toward"-" or"+" to reduce or
increase the br ightness .
.. Press the knob aga in to return it to its origi-
na l posit ion . ...
Page 47 of 306
@ Tips
The instrument illumination (for dials and
needles) lights on when the ign it ion is
sw itched on and the vehicle lig hts are
turned off. As the daylight fades, the illu
m ination of the dials likewise dims auto
mat ically and w ill go ou t comp lete ly when
the o utside lig ht is ve ry low. This fea ture is
meant to remi nd you t o swit ch o n the
head ligh ts when o utside light condi tions
become poor.
Vision
Sun visors
( J
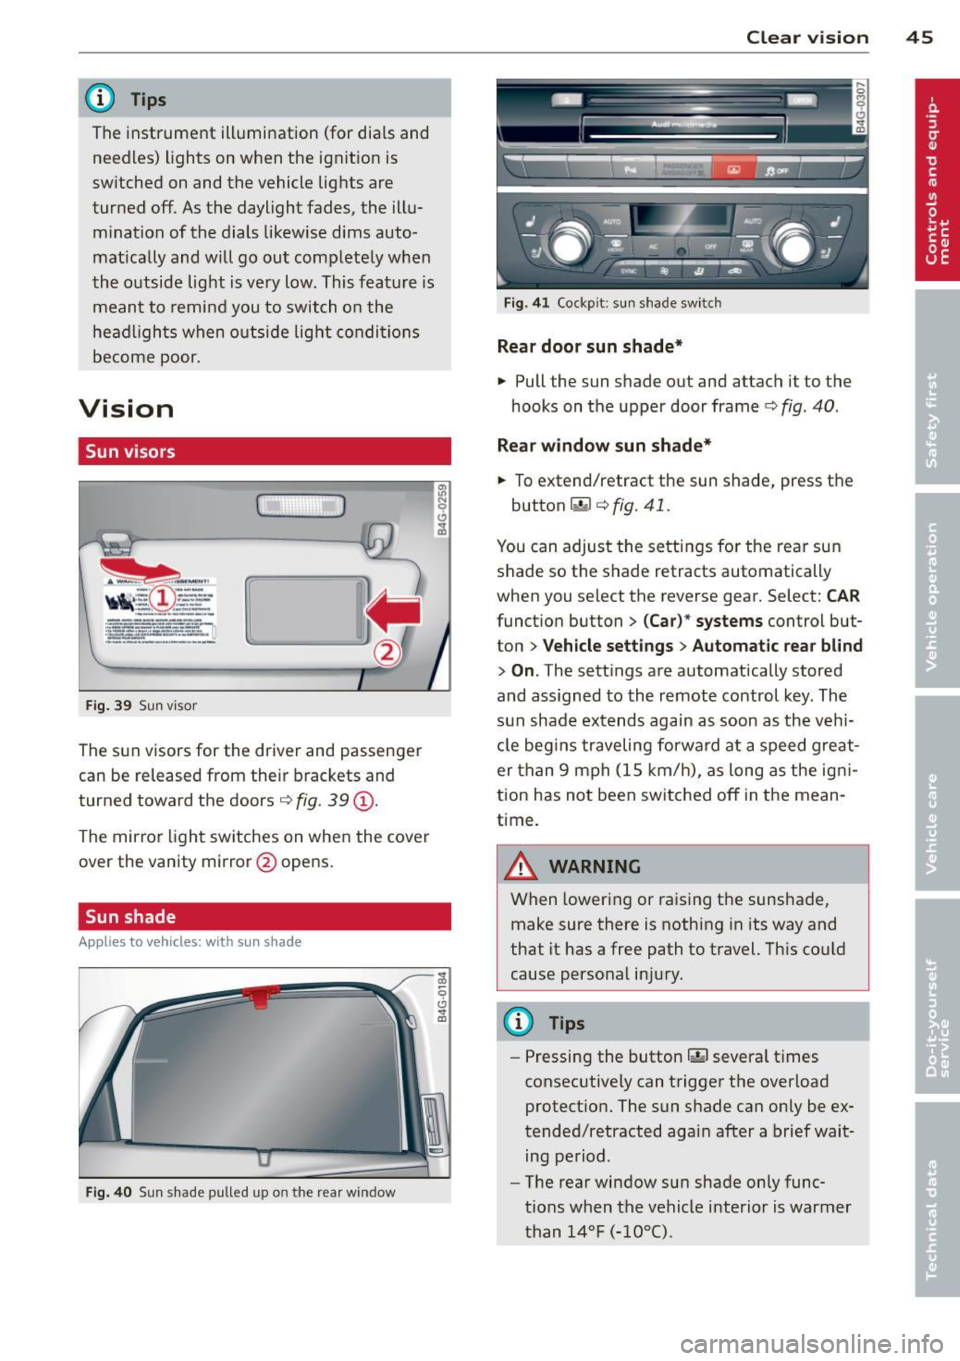
F ig. 39 Sun visor
The sun visors for the driver and passenger
can be released from their brackets and
turned toward the doors¢
fig. 39@.
The mirror light switches on when the cover
over the vanity mirror @ope ns.
Sun shade
Applies to vehicles: with sun shade
F ig . 40 Sun shade pulled up on the rea r window
Clear vi sion 45
Fig . 4 1 Cockp it: sun shade switch
Rear door sunshade*
"' Pull the sun shade out and attach it to the
hooks on the upper door frame¢
fig. 40 .
Re ar window sun shade*
... To extend/retract the sun shade, press the
button~ ¢
fig. 41.
You can adjust the settings for the rea r sun
shade so the shade retracts automatically
when you select the reverse gear. Select:
CAR
function button > (Car )* systems control but
ton >
Vehicle settings > Automatic rea r bl ind
> On .The sett ings are automatically stored
and ass igned to the remote control key . The
s u n shade ex tends again as soon as the v ehi
cle beg ins traveling forwa rd at a speed gre at
er than 9 mph (1S km/h), as long as the ig ni
tion has not been switched off in the mean
time.
A WARNING
When loweri ng or raising the sunshade,
make sure there is nothing in its way and
that it has a free path to t ravel. Th is cou ld
cause perso nal inju ry.
@ Tips
-
- Pressing the button rn severa l t imes
consec utive ly can trigger the overload
protect ion. The sun s hade can only be ex
tended/retracted again after a brief wait ing period.
- The rear window sun shade only func
t ions when the vehicle i nterior is warmer
t han
1 4°F ( -10°() .
Page 48 of 306
46 Clear vision
Wiper and washer
system
Switching the windshield wipers on
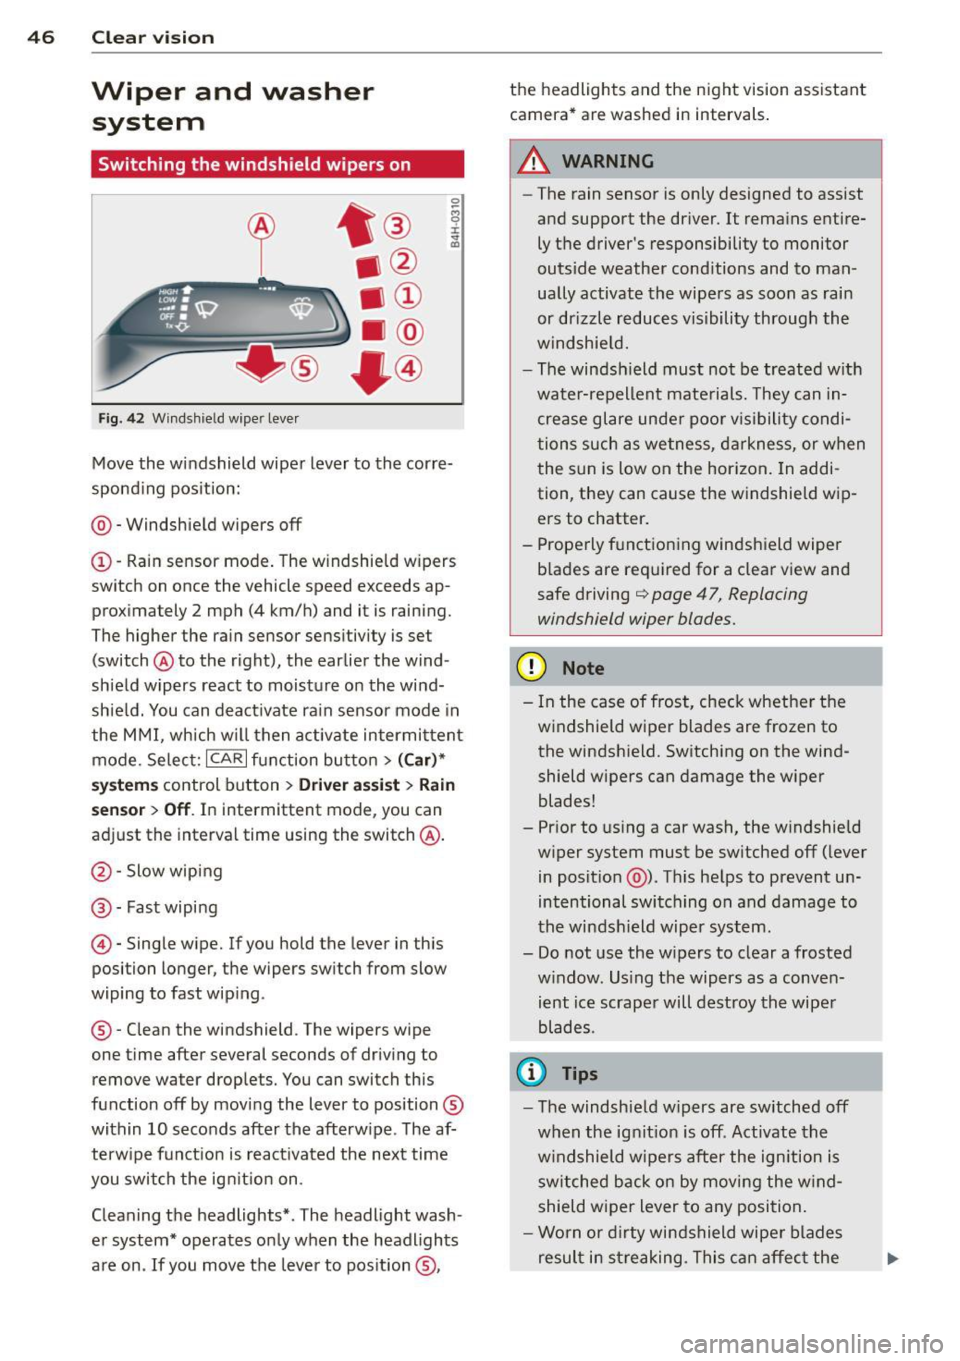
Fig. 42 Wind shie ld wipe r lever
Move the windshield wiper lever to the corre
sponding position:
@ - Windshield wipers off
(I) -Rain sensor mode. The windshield wipers
switch on once the vehicle speed exceeds ap
proximately 2 mph (4 km/h) and it is raining.
The higher the rain sensor sensitivity is se t
(switch @to the right), the earlier the wind
shield wipers react to moisture on the wind
shield. You can deactivate rain sensor mode in
the MMI, which will then activate intermittent
mode. Select:
ICARI function button > (Car)*
systems control button > Driver assist> Rain
sensor
> Off. In intermittent mode, you can
adjust the interval time using the switch @.
@-Slow wiping
@-Fast wiping
© -Single wipe. If you hold the lever in this
posi tion longer, the wipers switch from slow
wiping to fast wiping .
® - Clean the windshield . The wipers wipe
one time after several seconds of driving to remove water drople ts. You can switch this
function off by moving the lever to position ®
within 10 seconds after the afterwipe . The af
terwipe function is reactivated the next time
you switch the ignition on.
Cleaning the headlights*. The headlight wash
er system* operates only when the headlights
are on . If you move the lever to position ®, the headlights and the night vision assistant
camera* are washed in intervals.
.&_ WARNING
-
- The rain sensor is only designed to assist
and support the driver.
It remains entire
ly the driver's responsibility to monitor
outside weather conditions and to man
ually activate the wipers as soon as rain
or drizzle reduces visibility through the
windshield.
- The windsh ield must not be treated with
water-repellent materials. They can in
crease glare under poor visibility condi
tions such as wetness, darkness, or when
the sun is low on the horizon. In addi
tion, they can cause the windshield wip
ers to chatter.
- Properly functioning windshield wiper
blades are required for a clear view and
safe driving
q page 47, Replacing
windshield wiper blades.
(D Note
- In the case of frost, check whether the
windshield wiper blades are frozen to
the windshield. Switching on the wind
shield wipers can damage the wiper
blades!
- Prior to using a car wash, the windshield
wiper system must be switched off (lever
in position @). This helps to prevent un
intentional switching on and damage to
the windshield wiper system.
- Do not use the wipers to clear a frosted
window . Using the wipers as a conven
ient ice scraper will destroy the wiper
blades .
(D Tips
-The windshield wipers are switched off
when the ignition is off . Activate the
windshield wipers after the ignition is
switched back on by moving the wind
shield wiper lever to any position.
- Worn or dirty windshield wiper blades
result in streaking. This can affect the
Page 49 of 306
rain sensor function. Check your
windshield wiper blades regularly.
- The washer fluid nozzles of the wind
shield washer system are heated at low
temperatures when the ignition is on.
- When stopping temporarily, e.g. at a traffic light , the set speed of the wind
shield wipers is automatically reduced by
one speed.
Replacing windshield wiper blades
Wip er blad es in good condition h elp keep the
windshield clear.
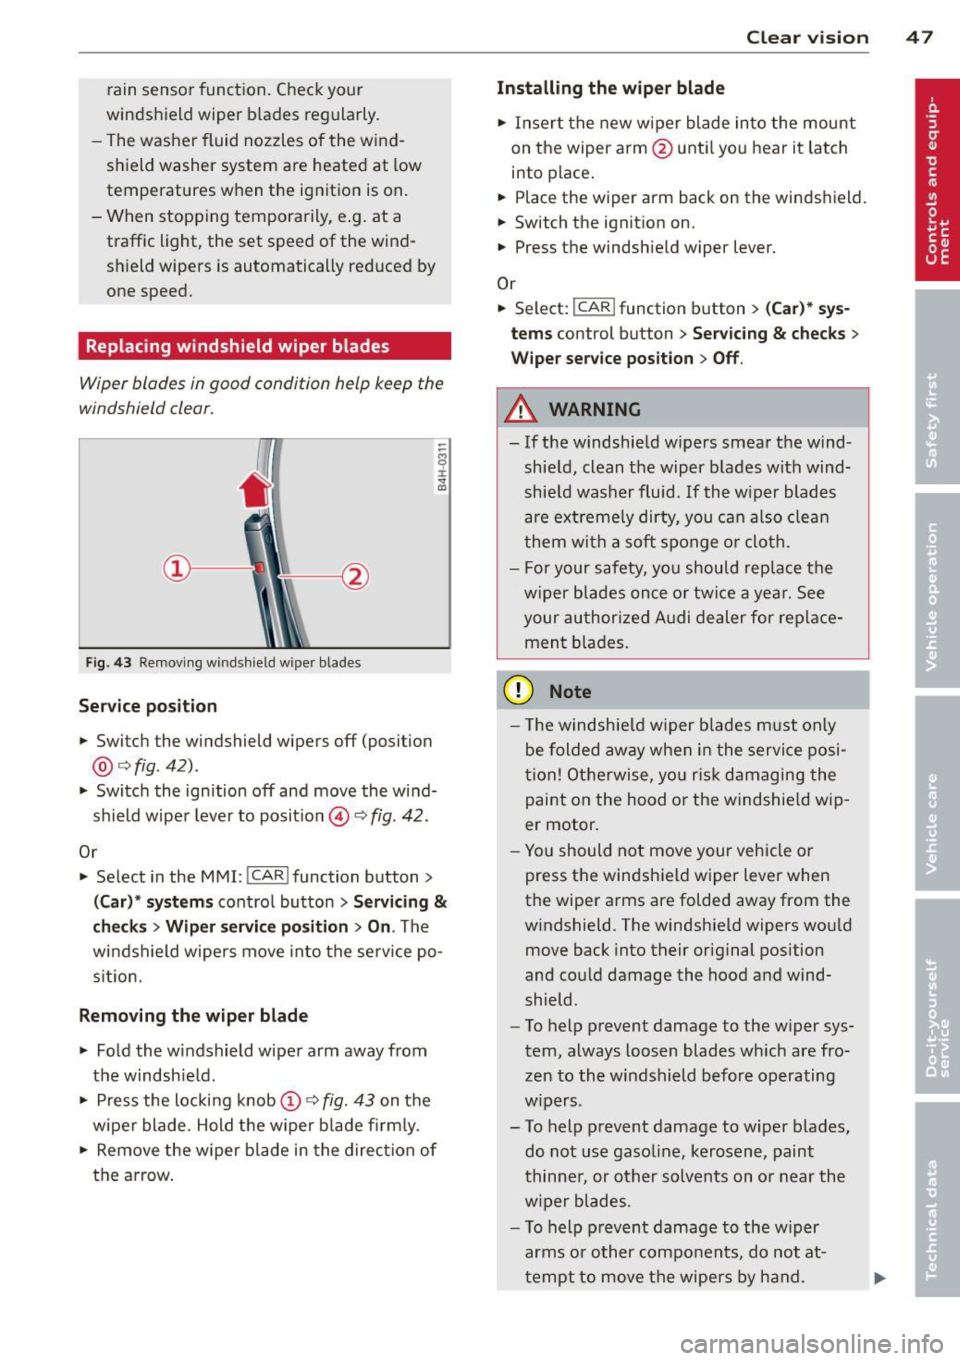
Fig. 43 Removing winds hield w iper bla des
Service position
.. Switch the windshield wipers off (position
@ ¢fig . 42) .
.. Switch the ignition off and move the wind
shield wiper lever to position @¢
fig. 42 .
Or
.. Select in the MMI:
!CAR ! function button>
(Car)* systems control button > Servicing &
checks > Wiper service position > On . The
windshield wipers move into the service po
sition.
Removing the wiper blade
.,. Fold the windshield wiper arm away from
the windshield .
.,. Press the locking knob@¢
fig. 43 on the
wiper blade . Hold the wiper blade firmly.
.. Remove the wiper blade in the direction of
the arrow.
Clear vision 4 7
Installing the wiper blade
.. Insert the new wiper blade into the mount
on the wiper arm @until you hear it latch
i nto place.
.. Place the wiper arm back on the windshield.
.. Switch the ignition on.
.. Press the windshield wiper lever.
Or .. Select:
I CAR ! function button > (Car)* sys
tems
control button > Servicing & checks >
Wiper service position > Off.
.&_ WARNING
- If the windshield wipers smear the wind
shield, clean the wiper blades with wind
shield washer fluid. If the wiper blades
are extremely dirty, you can also clean
them with a soft sponge or cloth.
- For your safety, you should replace the
wiper blades once or twice a year. See
your authorized Audi dealer for replace
ment blades.
(D Note
- The windshield wiper blades must only
be folded away when in the service posi
tion! Otherwise, you risk damaging the
paint on the hood or the windshield wip
er motor.
- You should not move your vehicle or
press the windshield wiper lever when
the wiper arms are folded away from the
windshield. The windshield wipers would move back into their original position
and could damage the hood and wind
shield .
- To help prevent damage to the wiper sys
tem, always loosen blades which are fro
zen to the windshield before operating
wipers .
- To help prevent damage to wiper blades, do not use gasoline, kerosene, paint
thinner, or other solvents on or near the
wiper blades .
- To help prevent damage to the wiper
arms or other components, do not at
tempt to move the wipers by hand.
Page 50 of 306
48 Clear vis ion
@ Tips
- Commercial hot waxes applied by auto
matic car washes affect the cleanability
of the windshield.
- You can also use the service position, for
example, if you want to protect the
winds hield from icing by using a cover.
- You cannot activate the service position
when the hood is open.
Mirrors
Adjusting the exterior mirrors
Fig. 44 Forwa rd section of drive r's arm rest: power m ir
ro r cont ro ls
T urn the knob to the desired position :
Q/P -In th is position, you can adjust the
d river's and front passenger's exter io r mirrors
by tur ning the knob in t he des ired direction.
® -The m irrors are heated depending on t he
outside temperature .
8 -The exterior mirrors fo ld in. In the MMI,
you can se lect if the m irrors fold in automat i
cally when you lock the vehicle ¢ page
34 .
Tilt funct ion for the pa ssenger' s mi rro r
To help yo u see the c urb when bac king into a
parking space, the surface of the mirror tilts
slightly . The knob must be in the P posit ion
for this to happen .
You can ad just the ti lted mirror s urface by
turning the knob in the desired direction .
When you move out of reverse and into anoth
er gear, the new mirror posit ion is stored and
assigned to the key yo u are using. T
he mi rror goes back i nto its orig inal position
o nce you drive forward faster than 9 mph (15
km/h) or switch the ign ition off .
A WARNING
--
- Curved (i.e. conve x) mirror surfaces in
crease your fie ld of view. Remember that
veh icles o r ot he r objects will appea r
smalle r and farther away t han when seen
in a flat mirror. If you use th is m irror to
estimate distances of followi ng ve hicles
when c hang ing lanes, y ou could estimate
i n correct ly and cause an accide nt.
(D Note
- If the m irror housing is moved uninten
ti onally (for examp le, w hile pa rking your
veh icle), then yo u must first fold t he mir
ror electrically. Do not re adj ust the mir
ror housing man ually . You co uld damage
the motor which controls the mirror .
-If you wash the vehicle in an automatic
car was h, you must fo ld the exter ior mir
rors in to reduce the risk of damage to
the mirro rs. Never fold power folding ex
terior mirrors* by hand. Only fo ld them
in and out using the power controls.
{I) Tips
- The exterior m irror settings are stored
w ith the memory function*
¢ page 54.
- If there is a malfunction in the electrical
system, you can sti ll adjust the exterior
m irrors by pressing the edge of the mir
ror.
Dimming the mirrors
Fi g. 4 5 Auto matic d immin g rearv iew mirro r*