key battery AUDI A6 2013 Owners Manual
[x] Cancel search | Manufacturer: AUDI, Model Year: 2013, Model line: A6, Model: AUDI A6 2013Pages: 306, PDF Size: 76.92 MB
Page 16 of 306
![AUDI A6 2013 Owners Manual 14 Instrum ent s and w arn ing /indic ato r light s
Canada models:
[I]
Anti-lock braking system (ABS)
defective ./
¢ page20
•
Worn brake pads
¢ page20
:rm
Electromechanical par AUDI A6 2013 Owners Manual 14 Instrum ent s and w arn ing /indic ato r light s
Canada models:
[I]
Anti-lock braking system (ABS)
defective ./
¢ page20
•
Worn brake pads
¢ page20
:rm
Electromechanical par](/img/6/57588/w960_57588-15.png)
14 Instrum ent s and w arn ing /indic ato r light s
Canada models:
[I]
Anti-lock braking system (ABS)
defective ./
¢ page20
•
Worn brake pads
¢ page20
:rm
Electromechanical parking brake
¢ page 74
g
Tire pressure monitoring system
./
¢page258
Tire pressure monitoring system
••w;~, ¢ page258
Im
Electronic power control ./
¢ page 21
I Malfunction indicator Lamp (MIL)
111!
./
¢ page21
.,
Engine speed limitation
¢ page 21
I.
Engine oil level
¢ page 18
•
Engine oil sensor
¢ page 21
&1
Battery
¢ pagel7
Ill
Tank system
¢page 21
•
Windshield washer fluid level
¢page22
m
Windshie ld wipers
¢ page22
!I
Remote control key
¢page 71
m
Remote control key
¢ page 74
I!
Battery in remote control key
¢ page32
-.
l:J
Defective ligh t bulb warn ing
¢ page22
II
Rear fog light(s)
¢page22
II
Headlight range control
¢page22
- -
Ill
adaptive light *
¢page22
m
Light -/rain sensor faulty
¢ page 22
- -
•
Audi active lane assist *
¢page92
Im
T ransmission
¢ page 110
Im
Transmission
¢page 110
R1
Transmission
- S t ron ic ® ¢ page 110
•
Electronic steering column lock
¢page 18
- -
.,
Engine start system
¢page 18
£1.p
Electromechanical steering
¢page 196
•
Air suspens ion*
¢ page 18
Ill
Sport differential *
¢page22
Other indicator lights
II
II
I : I -._ I• 11
Turn signals ¢ page 23
USA model s: Cruise control *
¢page
79
,,_
...
Page 34 of 306
32 Opening and closing
Removing the mechanical key
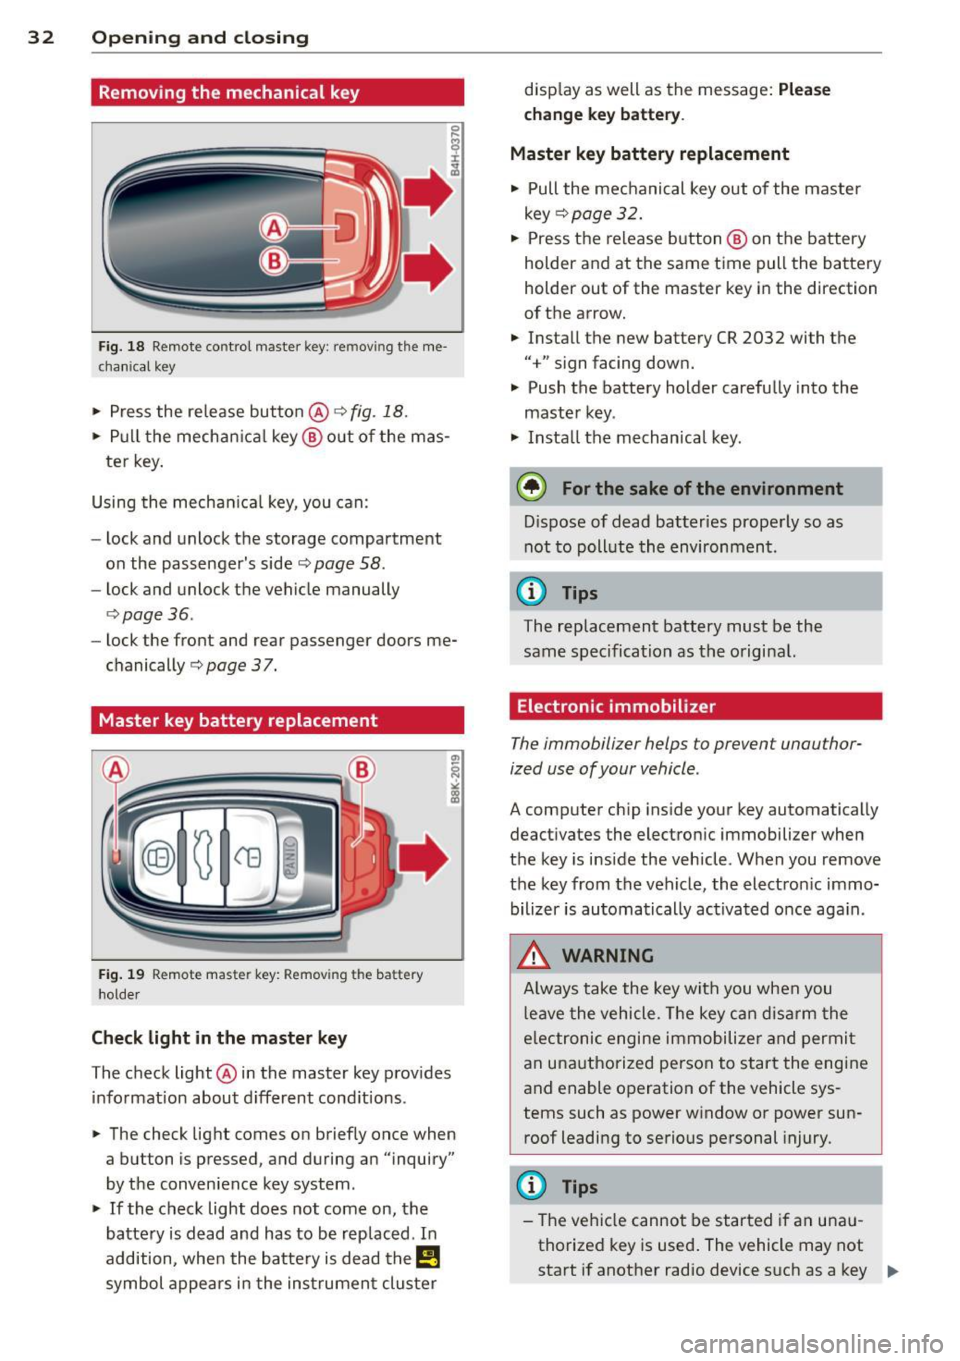
Fig. 18 Remote control master key : re m ov ing the me
c hani cal key
> Press the release button @ c:> fig. 18.
.. Pull the mechanical key@out of the mas
te r key.
Using the mechanical key, you can:
- lock and unlock the storage compartment
on the passenger's side
c:> page 58.
- lock and unlock the vehicle manually
<=>page 36.
-lock the front and rear passenger doors me
chanically
c:> page 37.
Master key battery replacement
Fig. 19 Remote master key: Remov ing th e ba tte ry
ho lder
Check light in the master key
The check light @in the master key provides
information about different conditions .
.. The check light comes on briefly once when
a button is pressed , and during an "inquiry"
by the convenience key system .
> If the check light does not come on, the
battery is dead and has to be replaced . In
addition, when the battery is dead
them
symbol appears in the instrument cluster disp
lay as well as the message:
Please
change key battery.
Master key battery replacement
• Pull the mechanical key out of the master
key
<=> page 32.
"' Press the release button @ on the battery
holder and at the same time pull the battery
holder out of the master key in the direction
of the arrow .
.. Install the new battery CR 2032 with the
"+" sign facing down.
• Push the battery holder carefully into the
maste r key .
• Insta ll the mechanical key.
@ For the sake of the environment
Dispose of dead batteries properly so as
not to pollute the environment.
(D Tips
The replacement battery must be the
same specification as the original.
Electronic immobilizer
The immobilizer helps to prevent unauthor
ized use of your vehicle .
A computer chip ins ide your key automatically
deactivates the electronic immobilizer when
the key is inside the vehicle . When you remove
the key from the vehicle, the electron ic immo
bilizer is automatically activated once aga in.
_& WARNING
-
Always take the key with you when you
l eave the vehicle. The key can disarm the
e lectronic engine immobilize r and permit
an unauthorized person to start the engine
and enable operation of the vehicle sys
tems such as power window or power sun
roof leadi ng to serious personal injury.
(D Tips
- The vehicle cannot be started if an unau
thorized key is used. The vehicle may not
start if another radio device such as a key ""
Page 37 of 306
If the vehicle is unlocked and no door, the rear
lid or the hood is opened within 60 seconds ,
the vehicle locks itself aga in automatically.
This feat ure prevents the ve hicle from be ing
accidentally left unlocked over
a long period
of t ime.
It depends on the settings in the MMI wheth
er the entire veh icle is unlocked or on ly cer
t ain doors
Q page 34.
A WARNING
Read and follow all WARNINGS¢.&. in
General description on page 33 .
- In order to make sure the locking func
tion is working, you shou ld always keep
your eye on the vehicle to make sure it is
properly locked .
-
-Do not use the remote control if you are
i nside the car, otherwise you may unin
tentiona lly lock the vehicle, and then you
would set off the anti-t heft ala rm when
you try to start the engi ne or open a
door. In c ase this happe ns anyhow, push
the un lo ck button
m .
- The vehicle can only be locked when the
se lector lever is in the P posit ion .
- Use the panic funct ion only if you are in
an emergency situ ation .
Locking and unlocking with convenience
key
App lies to vehicles: wit h co nve nien ce key
The doors and the rear lid can be unlocked
and locked without operating the master key.
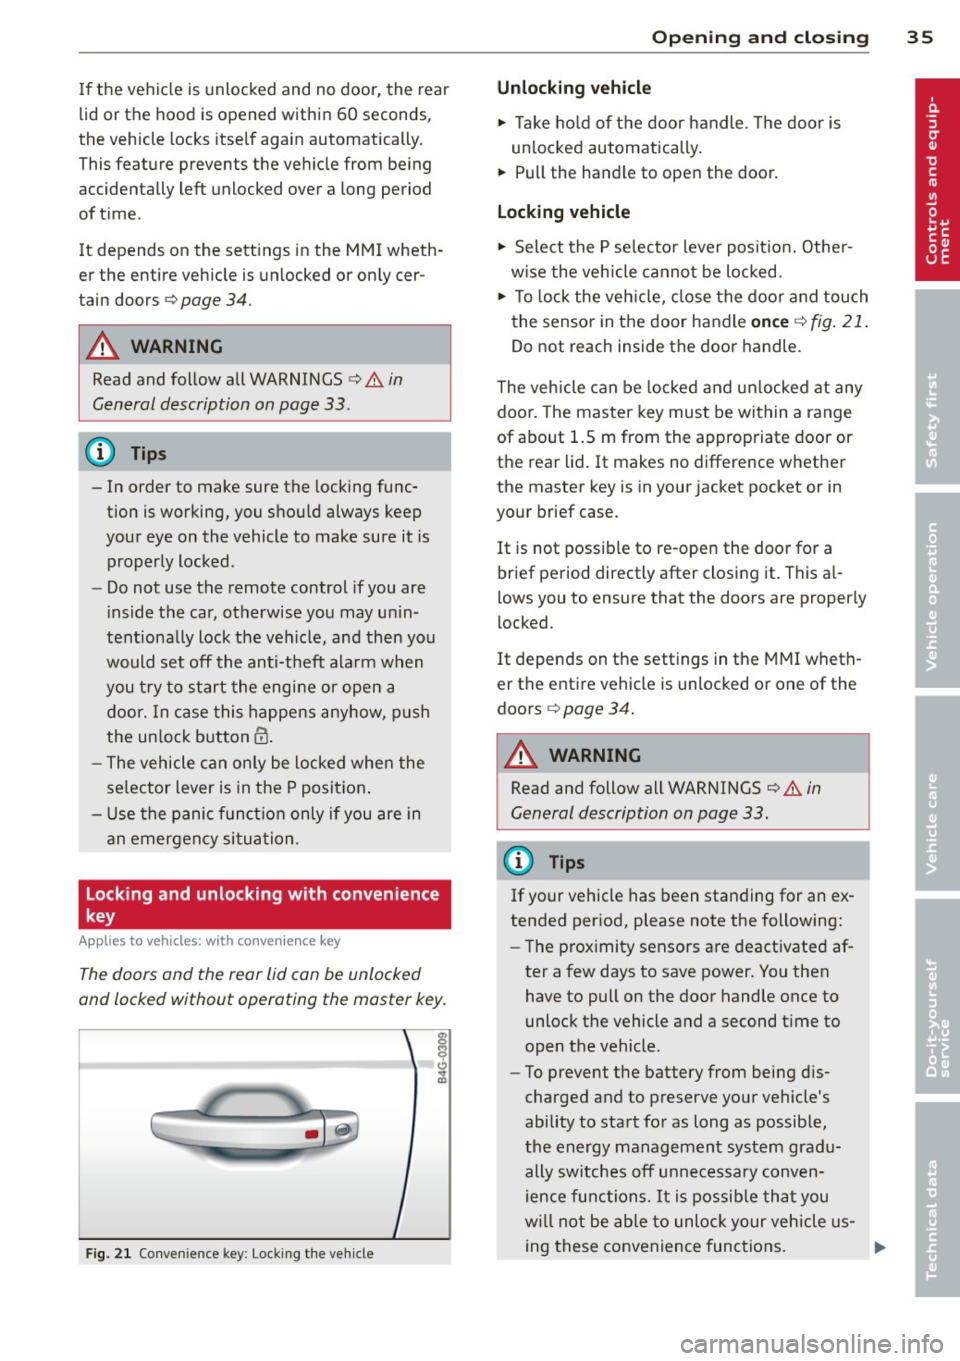
F ig. 2 1 Conve nien ce key : Lock ing t he ve hicle
Opening and clo sin g 35
Unlocking vehicle
.,. Take ho ld of t he door handle. The door is
un lo cked automatically.
.,. Pull the handle to open the door.
Locking vehicle
.,. Select the P selecto r lever pos it io n. Othe r
w ise the veh icle canno t be lo cked.
.,. To lock the veh icle, close the door and touch
the sensor in the door handle
once Q fig . 21 .
Do not reach inside the door handle.
T he veh icle can be locke d and unl ocke d at any
doo r. The master key mus t be within a range
of about 1.5 m from the appropriate door or
the rear lid. It makes no difference whether
the master key is in your jacket pocket or in
your brief case .
It is not possib le to re -ope n the doo r for a
brief period directly after closi ng it. This a l
l ows you to ensure that the doors are proper ly
locked.
It depends on the settings in the MMI wheth
er the enti re vehi cle is unloc ked or one of the
doors
Q page 34.
A WARNING
Read and follow all WARNINGS Q .&. in
General description on page 33 .
(D Tips
If your vehicle has been standing for an ex
tended period, please note the following:
- The p rox imity sensors a re deactivate d af-
ter a few days to save power. You then
have to pull on the door handle once to
unlock the vehicle and a second t ime to
open the vehicle.
- To prevent the battery from being d is
charged and to preserve your vehicle 's
ability to start for as long as possib le,
the energy management sys tem grad u
ally switc hes off unnecessary conven
ie nce func tions. It is possib le th at you
w ill not be able to unlo ck you r ve hicle us
ing these convenience func tions.
Page 41 of 306
Pow er w ind ow switche s
@ Driver's door
® Passenger's door
© Le ft rea r door
@ Ri ght rear door
~ WARNING
- When you leave your veh icle -even if on
ly briefly -always take the ignition key
with you. This applies particularly when
children remain in the vehicle. Otherw ise
the ch ildren could start the engine or op
erate electrical eq uipment (e.g. power
windows). The power windows are func
t io nal until the d river's doo r or passeng
er's door has been opened.
- Be careful when closing the windows.
Check to see that no one is in the way, or
serious injury could result!
- When lo cking the veh icle from ou tside,
t he ve hicle must be unocc upied s in ce the
windows can no longer be opened in an eme rgency.
(D Tips
After the ig nition has been switched off,
t he wi ndows can still be opened or closed
for about 10 minutes. The power w indows
are not switched off until the dr iver's door
or passenger's door has been opened .
What to do after a malfunction
The one-touch open and close function must
be reactivated if the battery has been discon
nected .
.,. Pull and hold t he power w indow switch un
ti l the window is fully closed .
.,. Re lease the switch and then p ull it again for
at least one second.
Opening and clo sin g 39
Valet parking
The valet parking feature protects the lug
gage compartment from unauthorized ac
cess.
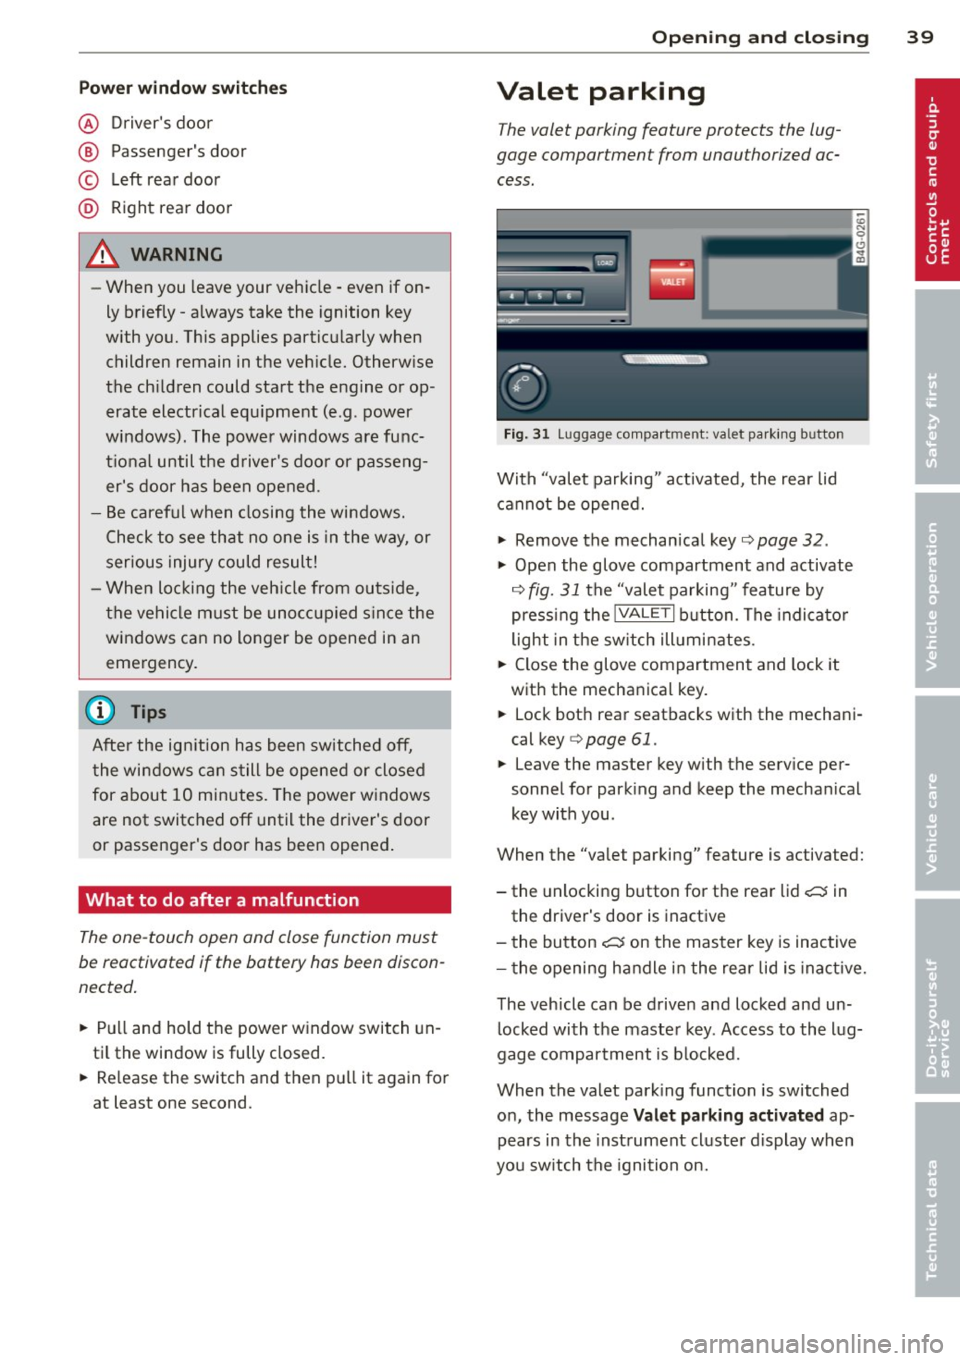
F ig. 31 Luggage compartment: valet parking button
With "valet parking" act ivated, the rear lid
cannot be opened.
.,. Remove the mechan ical key¢
page 32 .
.,. Open the glove compartment and activate
¢
fig. 31 the "valet parking" feature by
p ressi ng the
!VALET I b utton. The indica to r
light in the sw itch ill umi nates .
.,. Close the glove compartment and lock it
with the mechanical key.
.,. Lock bot h rea r seatbacks with the mechani
cal key ¢
page 61.
.,. Leave the master key with the service per
sonnel for park ing and keep the mecha nical
key with you.
When the "valet parking" feature is activated:
- the unlocking button for the rear lid
c:::; in
the driver's door is inact ive
- the bu tton
c:::; on the mas ter key is inactive
- the opening h andle i n the rear lid is inac tive.
The vehicle can be drive n and locked and un
l ocked with the maste r key. Access to the lug
gage co mpar tment is b locked.
When the valet park ing function is switched
o n, the message
Valet parking activat ed ap
pears in the inst rument cl uste r display when
you sw itch the igni tion on.
Page 59 of 306
.. To reach the 12-volt socket in the luggage
compartment , press the net down
~ fig. 56 .
There is an additional 12-volt socket in the
front and rear cente r console ¢
fig. 57.
The 12-volt sockets can be used for electr ical
accessories . Th e power input must not exceed
120 watts.
Before you purchase any accessories, always
read and follow the information in
¢ page 287, Additional accessories and ports
replacement.
& WARNING
The sockets and the electrica l accessories
connected to them operate only when the
ignition is switched on . Incorrect usage
can lead to serious injuries or burns. To re
duce the risk of injuries, never leave chil
dren unattended in the vehicle with the ve
hicle key.
(D Note
To avoid damaging the socket, only use
plugs that fit properly.
- Never connect equipment that generates
electrical current, such as a so lar panel
or battery charger, to the 12-volt socket.
This could damage the vehicle's electri
cal system .
- The 12-volt socket should only be used
for a short period of time as a power
source for electr ical equipment . Please
use the electrical sockets in the vehicle
when connecting equipment for longer
periods .
- To avoid damaging the socket, only use
plugs that fit p roperly .
(D Tips
When the engine is off and accessor ies are
still plugged in and are on, the vehicle bat
tery can still be drained .
Seats and storage 57
Storage
(upholder
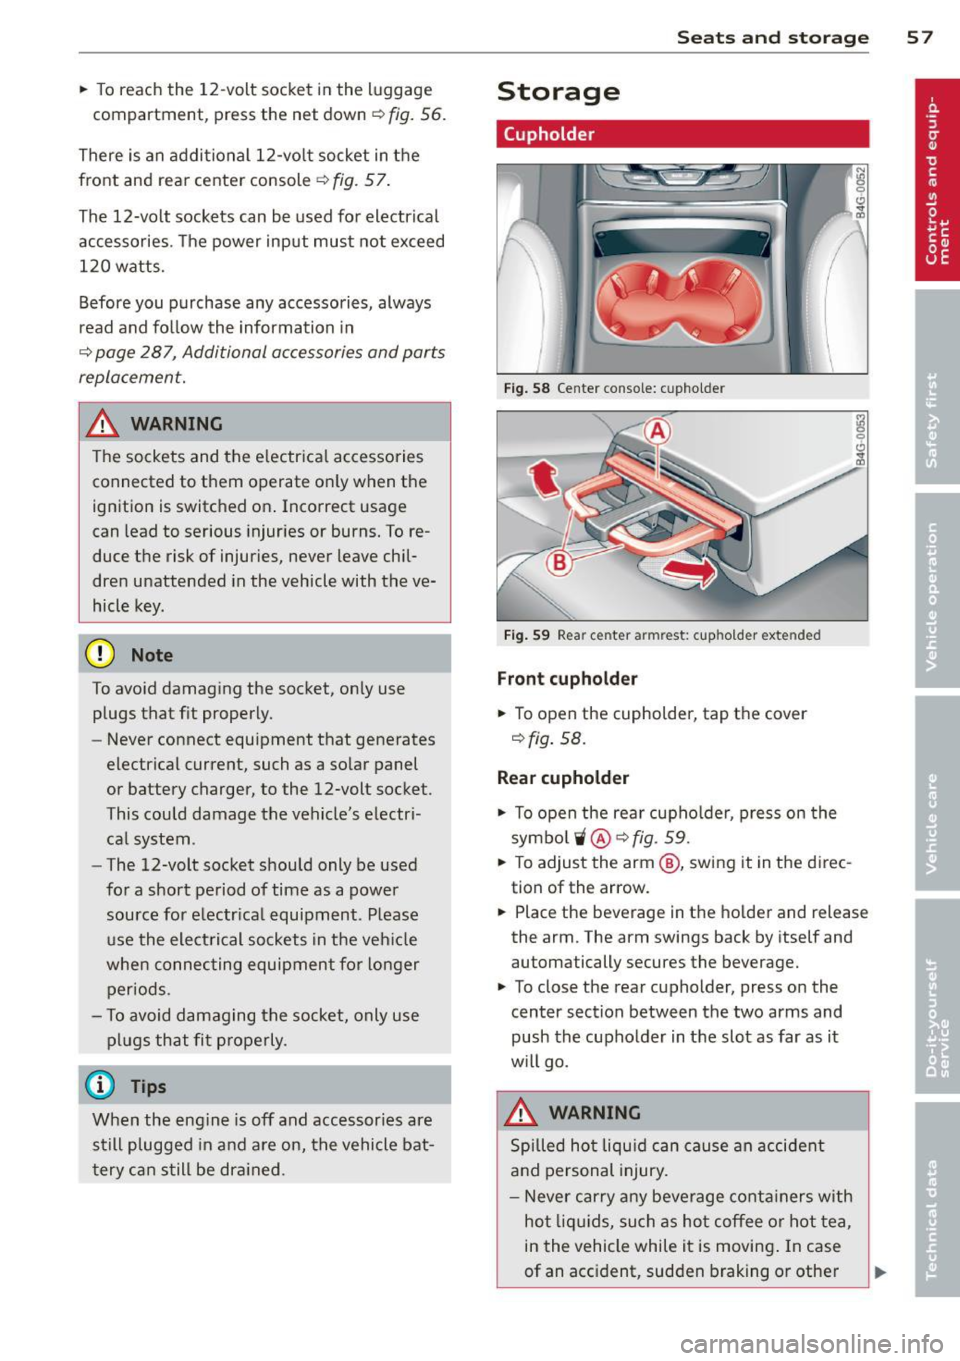
Fig. 58 Center co n sole: c uphold er
Fig. 59 Rea r cen ter armre st: c uphold er ext en ded
Front cupholder
.. To open the cupholder, tap the cover
~fig. 58.
Rear cupholder
(
.. To open the rear cupholder, press on the
symbolii @¢fig.
59 .
.. To adjust the arm @, swing it in the direc
tion of the arrow.
.. Place the beverage in the holder and release
the arm. The arm swings back by itself and
au toma tically secures the beverage.
.. To close the rear cupholder, press on the
center section between the two arms and
push the cupholder in the slot as far as it
w ill go.
& WARNING
Spilled hot liqu id can cause an accident
and personal injury.
- Never carry any beverage containers with
hot liquids, such as hot coffee or hot tea,
in the vehicle while it is moving . In case
of an acc ident , sudden braking or other
Ill-
Page 74 of 306
72 On the road
By pressing the I STAR T ENGINE ST OP I button
without depressing the brake peda l, the igni
tion is on and switched
off by pressing it
again .
After a cold engine is started, the re may be a
brief period of increased noise because oil
pressure must first bu ild up in the hydraulic
va lve adjusters. This is normal and not a cause
f or concern.
If the engine should not start immediately,
the starting process is automatically stopped
after a short time . Repeat starting procedure.
Start-Stop-S ystem *:
When you stop and the Start-Stop-System*
turns
off the engine, the ignition still remains
switched on.
- If you press the I STAR T ENGINE STOPI but
ton now, the ignition wi ll be switched
off.
T he engine will not start ¢ page 78 .
-Make sure tha t th e ig nit ion is swi tched off
before ex iting the vehicle.
Sw itching the ignition /engine off
automat icall y*
The fo llow ing applies to vehicles with Start
Stop -System*: to prevent the battery from
draining, the ignition and the engine wi ll
switch
off automatically under the following
conditions :
- T he vehicle has already been dr iven.
- T he d river's door is opened.
- T he driver's seat be lt is removed.
- The brake pedal is not pressed down .
- The veh icle is sta tionary.
In t his case, the activated low beam w ill be re
p laced by the side marker lights. The side
marker lights will switch
off after a certain pe
riod of time or when you lock the vehicle.
Driver m essage in the in strument clu ster
di spl ay
P ress b rake pedal to start engine
This message appears i f you press the
I S TAR T ENGINE STOP ! button to start the en
gine and do not depress the brake peda l. The engine can only be started if the brake pedal
is depressed.
!I C
o nveni ence key: I s ke y not in th e vehi
cle?
T h is message appears along with the !I sym
bol if the master key is removed from the ve
hicle with the eng ine runn ing.
It is in tended
to rem ind yo u (e.g . when chang ing dr ivers)
not to continue the journey without the mas
ter key.
If the master key is no longe r in t he ve hicl e,
yo u canno t swi tch on the igni tion after stop
ping the engine and you also cannot start the
engine again. Moreover, you cannot lock the
vehicle from the outside with the key.
Tu rn off ignition before leav ing car
This message appears if the drive r's door is
opened wh ile the ign ition is switched on. Al
ways swi tch off the ignit io n if you a re leav ing
the vehi cle. See also
¢ page 72 .
Shift to P, otherwi se vehicle can roll away.
Doors do not lock if lever is not in P .
This message appears for safety reasons
along with an audible warning tone if the P
selector lever position is not engaged when
stopp ing the eng ine with t he
I S TAR T ENGI NE ST OP I but ton. Select the P se
l ector lever posi tion. Otherwise the vehicle
could roll and it cannot be locked.
Ke y not r ecogni sed . Hold back of ke y again st
marked ar ea . See owner' s manual.
If the indicato r light turns on and this mes
sage appears, there is a malfunct ion
Q page 74.
Turn off ignition b efore leaving car
This message appears if the driver's door is
opened wh ile the ignition is switched on. Al
ways switch off the ignit ion if you a re leav ing
the vehicle. See also
¢ page 72 .
Shift to P and turn off ignition before leav-
ing car, otherwise vehicle can roll awa y
This message appears if the drive r's door is
opened while the ignition is switched on and
jll,,
Page 76 of 306
7 4 On the road
running for approximately two minutes to
prevent excessive heat build-up .
Starting the engine if there is a
malfunction
It may not b e possible to start the engine un
der cer tain circumstances , for example if the
battery in the vehicle key is drained , if inter
ference is affected the key or if there is a sys
tem malfunction.
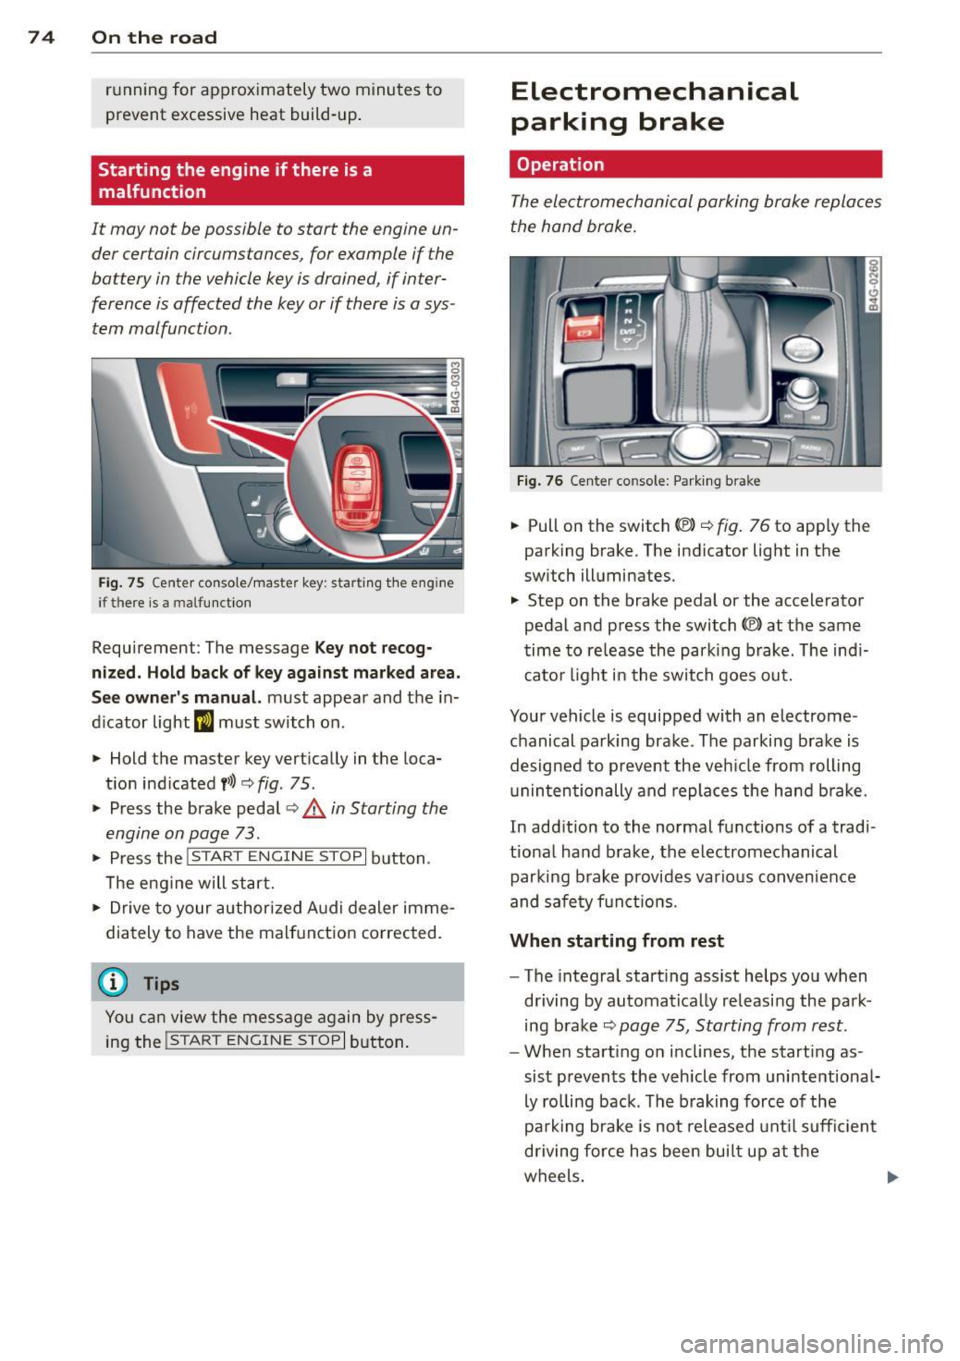
Fig. 75 C en ter conso le/ma ster key: startin g th e eng ine
if th ere is a mal function
Requirement : The message Key not recog
nized. Hold back of key against marked area.
See owner's manual.
must appear and the in
dicator light
II must switch on .
.,. Hold the master key vertically in the loca
t ion ind icated
f >l) ¢ fig . 75 .
.,. Press the brake pedal~.& in Starting the
engine on page 73.
.. Press the !~ S_ T_A_R_ T_E _N_G_I_N_ E_S_ T_O_P~I button.
T he eng ine will start.
"' Drive to your authorized Audi dealer imme
dia tely to have the malfunction corrected.
{D) Tips
You can view the message again by press
ing the
!S TAR T ENGINE STOP I button.
Electromechanical
parking brake
Operation
The electromechanical parking brake replaces
the hand brake.
Fig. 76 Center co nsole: Park ing b ra ke
.,. Pull on the switch (V) ¢ fig. 76 to app ly the
parking brake . The indicator light in the
sw itch ill uminates.
.,. Step on the brake pedal or the accelerator
pedal and p ress the switch
© at the same
time to release the park ing brake . The ind i
cato r light in the swit ch goes out.
Your vehicle is equipped with an electrome
chanical parking brake . The parking brake is
designed to p revent the veh icle from rolling
un intentionally and replaces the hand brake .
In addition to the no rmal functions of a tradi
tional hand brake, the electromechanical
parki ng brake provides vario us convenience
and safety functi ons.
When starting from rest
-The integral starting ass ist helps you when
driving by automat ically releasi ng the park
ing brake
~ page 75 , Starting from rest .
-When start ing on inclines, the start ing as
sist prevents the vehicle from unintentional
ly rolling back. The braking force of the
pa rking brake is not released until sufficient
driving force has been bui lt up at the
wheels . .,,.
Page 99 of 306
@ Tips
-Side assist is not active while you are
making the adjustment.
- Your settings are automatically stored
and assigned to the remote control key
being used.
Driver messages
Applies to vehicles: with side assist
If side assist switches off by itself, the LED in
the button turns off and a message will ap
pear in the instrument cluster display:
Audi side assist: Currently unavailable. No
sensor vision
The radar sensors' vision is affected. Do not
cover the area in front of the sensors with bike
wheels, stickers, dirt or other objects. Clean
the area in front of the sensors, if necessary
c>fig. 100.
Audi side assist: Currently unavailable
Side assist cannot be switched on temporarily
because there is a malfunction (for example,
the battery charge level may be too low).
Audi side assist: System fault!
The system cannot guarantee that it will de
tect vehicles correctly and it is switched off .
The sensors have been displaced or are faulty.
Have the system checked by an authorized
Audi dealer or authorized Audi Service Facility
soon.
Audi side assist: Unavailable when towing.
Side assist switches off automatically when a
factory-installed trailer hitch is connected to
the electrical connector on the trailer. There is
no guarantee the system will switch off when
using a retrofitted trailer hitch. Do not use
side assist when towing a trailer.
Audi side assist 97
Page 274 of 306
272 Fuses and bulbs
Fuse panel @ (brown)
No. Equ ipment Amps
Climate control 10
Climate control system blower 40
3
D iagnost ic connec tor 10
4 Electrical ignition lock 5
5
Power s teer ing column adju st-
ment
5
6 Steering column switch module 10
7
Power steering column ad just -
ment
25
8 Light switch 5
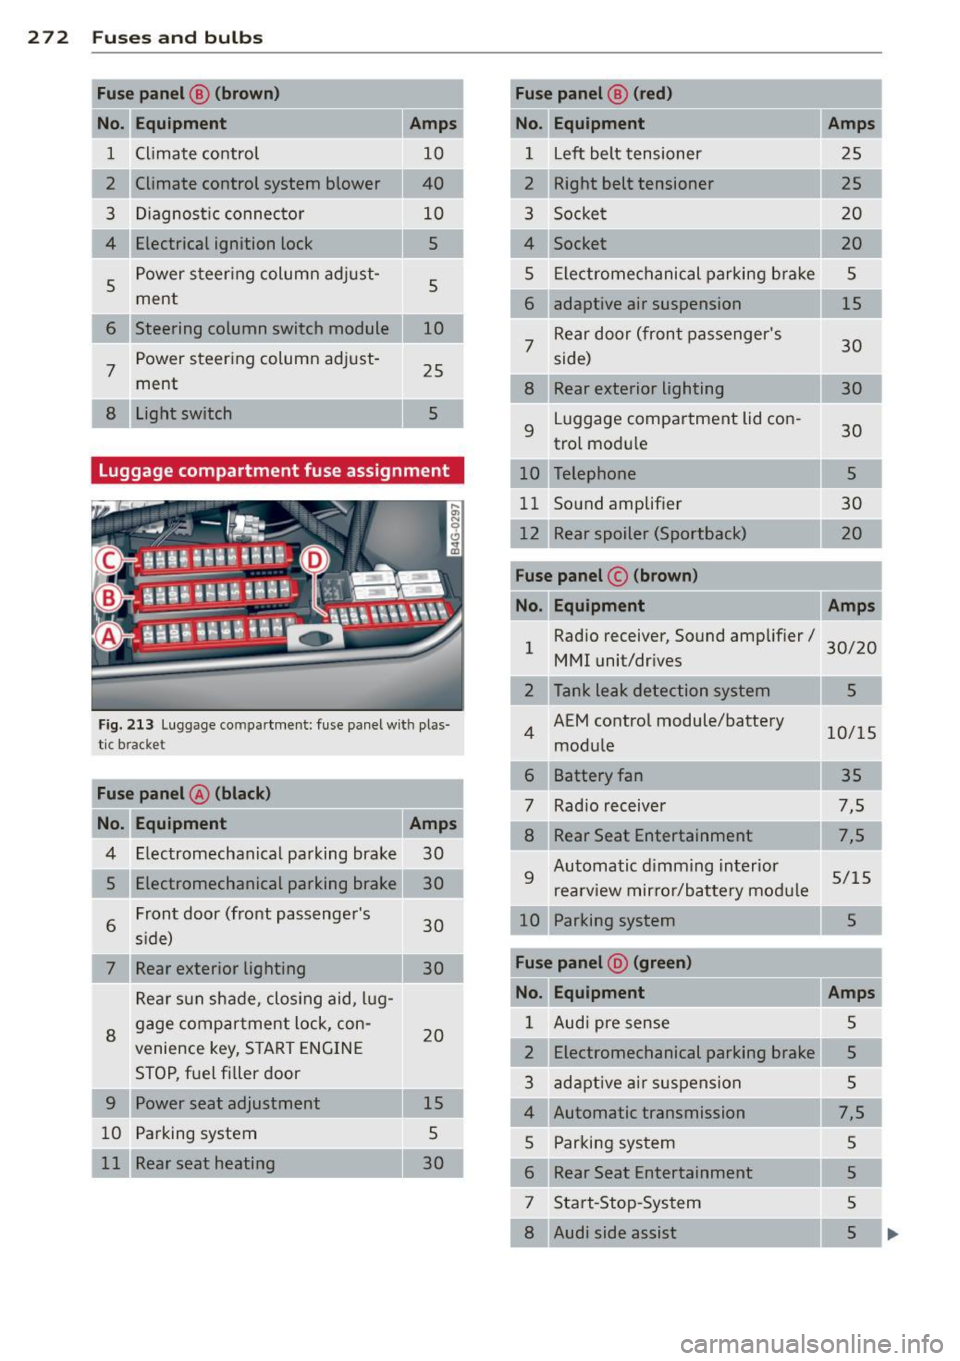
Luggage compartment fuse assignment
F
ig . 2 13 Lu ggage compar tment: fuse pa nel w ith plas
t ic bracket
Fu se panel A (black )
No. Equipment Amps
Electromechanical pa rking brake 30
Electraomechanical parking brake 30
6
Front door (front passenge r's
30 s ide)
7 Rear exterior lighting 30
Rea r su n shade, closing aid, lug-
8 gage
comp artment lock, con-
20
venience key, S TA RT E NGIN E
STOP, fuel fi ller door
9 Power seat adjustment 15
1 0
Pa rking system 5
11
Rear seat heating 30
Fuse panel @ (red )
No. Equipment Amps
1 Left belt tensioner 2 5
2 25
3
Socke t 20
4
Socket 20
5
Ele ctrome chanic al p arking b ra ke 5
6 adaptive air suspension 15
7
Rear door (fron t passenger's
30 side)
8 Rear exterior lighting
30
9
L
u ggage compartment lid con-
30 trol mod ule
Telephone
5
11
So und amplif ier 30
12
Rear spoiler (Sportback) 20
Fuse panel © (brown)
No . Equipment Amps
1 Radio receiver, Sound amplifier/ 3 0/ 20
MMI unit/dr ives
Tank lea k detec tion sys tem
5
4 AEM co ntrol module/battery 10/15
mo dule
Battery fan
35
Rad io rec eiver 7,5
7 ,5
9
Automatic dimm ing in terior 5/15
rea rv iew mirror /ba ttery m od ule
10 Parking system 5
Fuse panel @ (green)
No. Equipment Amps
1 Audi pre sense 5
2
Electromechanical parking brake 5
3 ad a pt ive air suspen sio n 5
4
Automatic transmission 7,5
5
Parki ng sys tem 5
6 Rear Seat Entertainment 5
7
Start -Stop-System 5
8 Audi side assist 5
Page 298 of 306
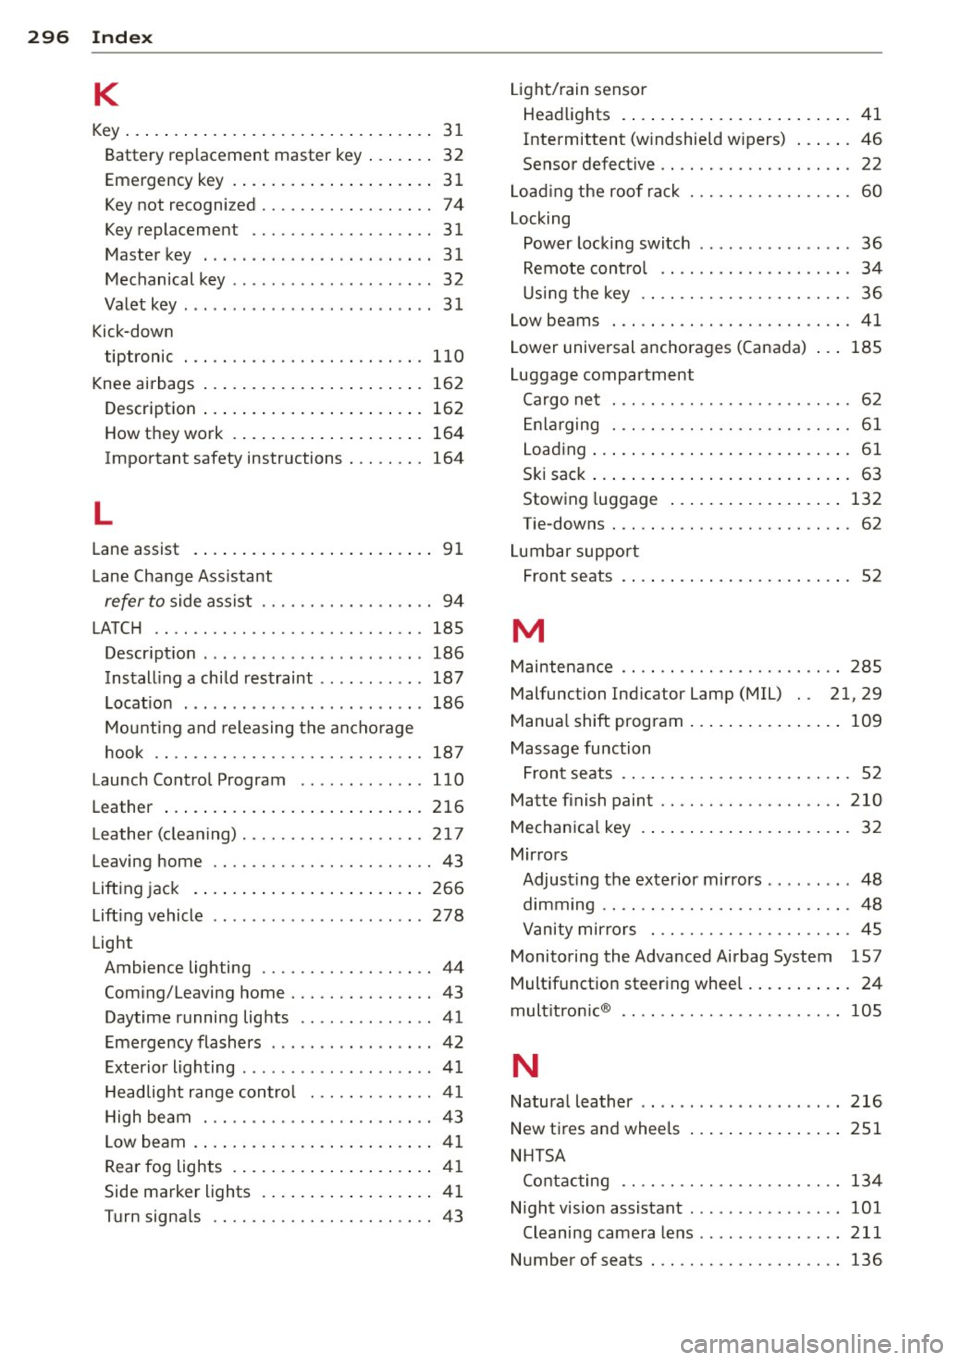
296 Index
K
Key ... . ... ... .. .. ..... ... .. .. .... .. 3 1
Battery rep lacement master key ... .. . . 32
Emergency key . . . . . . . . . . . . . . . . . . . . .
3 1
Key not recognized ............ .. .. .. 74
Key replacement . . . . . . . . . . . . . . . . . . . 31
Master key . . . . . . . . . . . . . . . . . . . . . . . . 31
M echanical key .............. ... ... . 32
Valet key . . . . . . . . . . . . . . . . . . . . . . . . . .
31
K ick-down
tiptronic
110
K nee airbags .... .. ..... ... .. .. .... . 162
Descr ipt ion .... . ...... ... .. .. .... . 162
How they work . .. ..... ... .. .. .... . 164
Important safety instructions . . . . . . . . 164
L
Lane assist . . . . . . . . . . . . . . . . . . . . . . . . . 9 1
Lane Change Ass istant
refer to side ass is t ...... .. .. .. .. .. . .
LATC H
.. .. .. ............. .... .. ...
D . t· escnp ion .... .... .... .. .. .. .. .. .
Install ing a child restraint ...... .. .. .
L ocat ion .. .... ............. ... ' . .
M ount ing and releasing the an cho rage
hook
. . .. .. ............. .... .. .. .
94
185 186
187
186
187
Launch Contro l Program . ... .. .. .. .. . 110
Leather ...... .. .. ..... ... .. .. .... . 216
Leather (clea ning) .......... .. .. .. .. . 2 17
Leaving home ............. .. .. .. .. .. 43
Lift ing jack . .. .. .. ..... ... .. .. .... .
266
Lift ing vehicle
Light 278
Ambience lighting .......... .. .... .. 44
Com ing/Leaving home ..... .. .. ...... 43
Daytime running lights .. ... ... .. .. ..
41
Emergency flashers . . . . . . . . . . . . . . . . . 42
E t . l' h . x enor 1g ting .. .. .. .. .. .. .. .. .. .. 41
H ead lig ht range con trol ... .. .. .. .. . . 41
H igh beam .............. ........ .. 43
L ow beam . ... . .. ..... ... .. .. .... ..
4 1
Rear fog lights . .. ..... ... .. .. .... .. 41
Side ma rker lights ... ... .. .. .. .... .. 4 1
Turn signa ls ............. .. .. .. .. .. 43 Li
ght/ rain sensor
Hea dlights . ..... .. ... ..... ... .. .. .
41
Intermittent (w indshie ld w ipers) ... .. . 46
Sensor defective . . . . . . . . . . . . . . . . . . . . 22
Loa ding the roof ra ck ................ . 60
Locking
Power loc king switch .............. ..
36
Remote cont ro l . . . . . . . . . . . . . . . . . . . . 34
U si ng the key ................. .....
36
Low beams . .... .. ... .......... .... . 41
Lower universal anchorages (Cana da) 185
Luggage compartment
Cargo ne t . . . . . . . . . . . . . . . . . . . . . . . . .
62
En larging . .... .. ... .......... .... . 61
Load ing ... .... .. ... .. ..... ... .. .. . 61
Ski sack ... .... .. ... .. ..... .... . .. . 63
Stowing luggage ... ... ..... ... .. .. 132
Tie -downs . . . . . . . . . . . . . . . . . . . . . . . . . 62
Lumbar suppo rt
F ron t seats . . . . . . . . . . . . . . . . . . . . . . . .
52
M
Maintenance .... .. ............. .... 2 85
Malfunction Ind icator Lamp (MIL) . . 21, 29
Manual shift program .... ..... ... .. .. 109
Massage function
Front seats . . . . . . . . . . . . . . . . . . . . . . . .
52
Matte finish paint .. ............. .... 210
Mechan ica l key .... ... .. ..... ... .. .. . 32
Mir ro rs
Adjusting the exter ior m irrors ....... ..
48
d' . 1mming .... .. .. ... .......... .... . 48
Vanity mir rors . .. ............. .. ... 45
Monito ring the Advanced Airbag System 157
Multif unction steering whee l .. .. .. .. .. . 24
mult itro nic® 105
N
Natura l leather .. .. ................ . 216
New tires and whee ls
N HT SA
Co nta cting 251
13 4
Night vis ion assistant .... .. ... ..... .. 101
Cleaning came ra le n s ........ ...... . 211
Number of seats . .. ... .......... .. .. 136