warning light AUDI A6 2014 Owners Manual
[x] Cancel search | Manufacturer: AUDI, Model Year: 2014, Model line: A6, Model: AUDI A6 2014Pages: 304, PDF Size: 76.32 MB
Page 198 of 304
196 Intelligent technology
@ Tips
-ABS and ASR on ly work correctly when
all four wheels are equipped with identi
ca l tires. Different tire sizes can lead to a
reduct ion in engine power.
- You may hear noises when the systems
described are working.
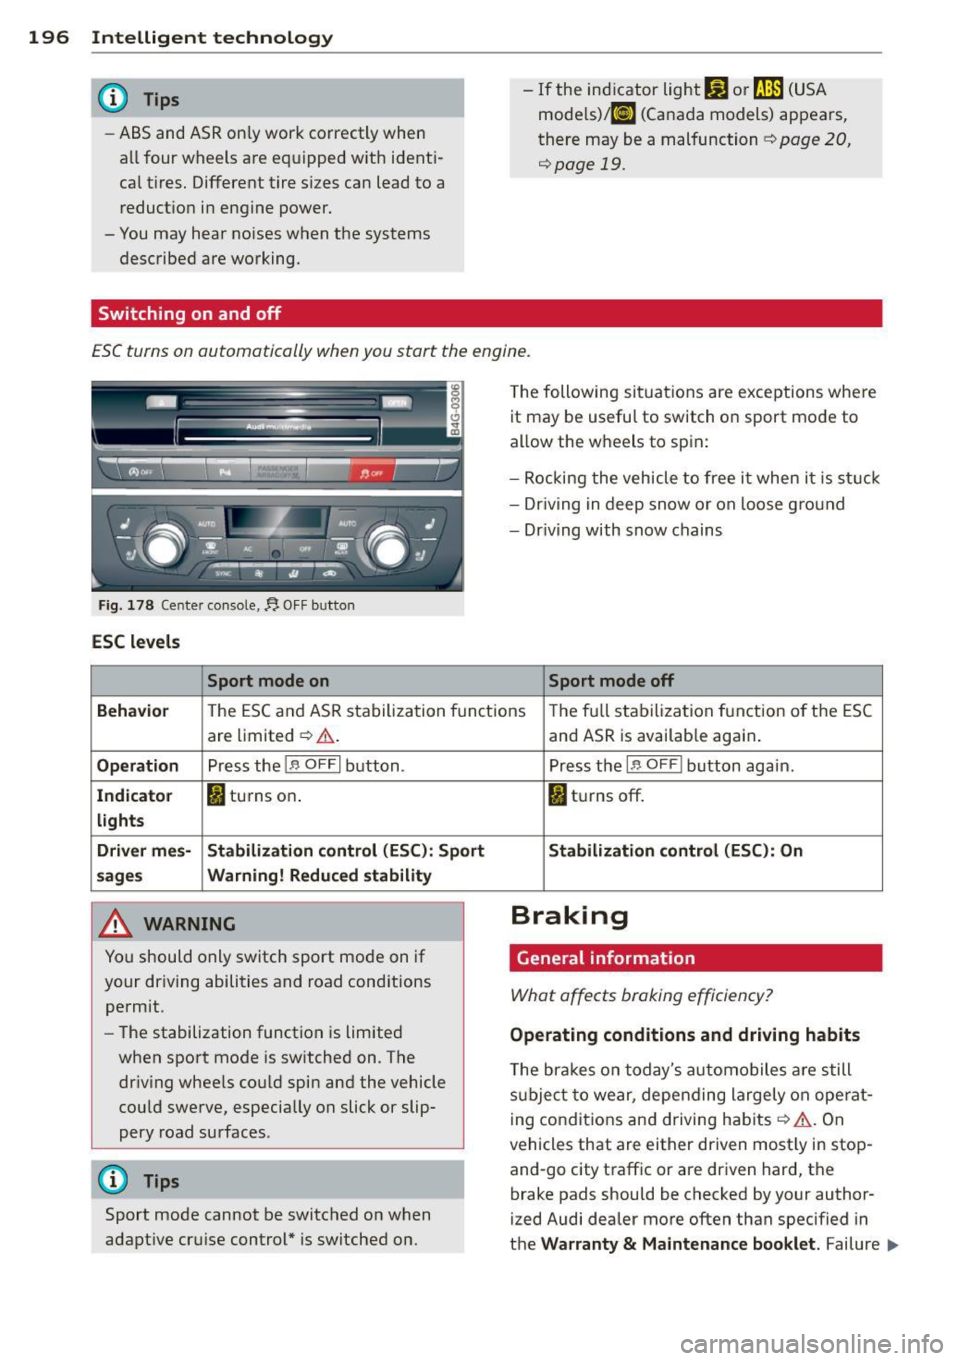
Switching on and off
- If the indicator light DJ or til] (USA
mode ls)/ [I] (Canada models) appears,
there may be a malfunction
¢ page 20 ,
¢ page 19.
ESC turns on automatically when you start the engine.
Fig. 178 Ce nter co ns ole, f). O FF bu tton
ESC levels
Sport mode on
The following situations are exceptions where
it may be usefu l to switch on sport mode to
allow the wheels to spin:
- Rocking the vehicle to free it when it i s st uck
- Dr iving in deep snow or on loose g round
- Driving with snow chains
Sport mode off
Beha vio r
The ESC a nd ASR stabilization fun ct ions The fu ll stabilization function o f the ESC
are limited ¢.&, .
Op eration Pr ess the 1.$ O FFI button .
Indicato r I) turns on.
lights
Driv er mes- Stabiliza tion control (ESC ): Sport
sage s Warning! R educed stability
,8. WARNING
You should only switch sport mode on if
your driving abilities and road cond itions
permit.
- The stabilization function is limited
when sport mode is sw itched on. The
dr iv ing whee ls could spin and the vehicle
cou ld swe rve, especially on slick or slip
pery road surfaces .
{D) Tips
Sport mode cannot be switched on when
adapt ive cr uise control* is switched on.
-
and ASR is availab le again .
Press the
1 .$ O FF I button again.
fl tu rns off.
Stabilization c ontrol (ESC ): On
Braking
General information
What affects braking efficiency?
Operating conditions and driving habits
The bra kes on today's automobiles a re still
s u bje ct to wear, depending largely on ope rat
i ng conditions and driving hab its
¢ A . On
vehicles that are either driven most ly in stop
and-go city traff ic or are driven hard, the
brake pads should be checked by your author
ized Audi dealer more often than specified in
the
Warranty & Maintenance booklet . Failure .,,_
Page 201 of 304
therefore best to avoid rough tracks and un
even terrain as much as possible . Also refer to
<=:> page 203.
A WARNING
Always adjust your driving to road and traf
fic conditions. Do not let the extra safety
afforded by all-wheel dr ive tempt you into
taking extra risks.
- Although the all-wheel dr ive is very ef
fective, a lways remember that braking
capacity is limited by t ire traction . Yo u
should therefore not dr ive at excessive
speeds on icy or slippery road su rfaces.
- On wet road su rfaces, be careful not to
dr ive too fast because t he fro nt wheels
c ou ld beg in to s lide on top of the wa ter
(aq uaplaning). If this sho uld occ ur, you
will have no warning from a sudden in
crease in engine speed as with a front
wheel drive vehicle. A lways drive at
speeds wh ich are suited to the road con
ditions -risk of crash.
Energy management
Starting ability is optimized
Energy management controls the distribution
of electrical energy and thus optimi zes the
availability of electrical energy for starting the engine .
If a veh icle wit h a conventional energy system
i s not d riven for a lo ng pe riod o f time, the bat
tery is discha rged by idling cu rrent co nsu mers
(e .g. immobilizer) . In ce rtain c ircumstances it
can result in there being insufficient ene rgy
avai lab le to start the engine .
I n tell igen t energy m anagemen t in your veh i
cle hand les the d istribu tion of electrical ener
gy . Starting ab ility is marked ly imp roved and
the life of the battery is extended.
B asically , energy management consists o f
battery diagnos is , idling current manage
ment
and dynamic ene rgy man agement.
Int ellig ent technolog y 199
Battery diagnosis
Battery diagnosis continuously de termines
the state of the battery . Sensors de termine
batte ry voltage, battery current and battery
temperature . This determines the current
state of charge and the power of the battery.
Idling current management
Idling curren t management reduces energy
consumption while the vehi cle is standing.
With the ignition switched off, it controls the
energy supply to the various electrica l compo
nents. Data from battery diagnos is is cons id
ered .
Depending on the battery's state of charge,
i ndivid ua l cons umers are g radually turned off
to prevent excessive discharge of the battery
and thus maintain starting capability .
Dynamic energy management
While the vehicle is being driven, dynamic en
ergy ma nagement distrib utes the energy ge n
erated accord ing to the needs of the individ u
al components . It regulates consum ption, so
that more electrical energy is not being used
than is being generated and ensures an opti
mal state of cha rge for the battery .
(D Tips
-But even ene rgy management cannot
negate the limits of physics. Consider
t hat the powe r and life of a battery are
limited .
- If start ing ability is threatened , the indi
cator light (•) appears
c::> page 17 .
What you should know
The highest priority is given to maintaining
starting capability.
The battery is severely taxed in short-distance
driv ing, in city traff ic and during the cold time
of year . Abundant electrical energy is re -
quired, but on ly a little is generated . It is also ..,. •
•
Page 202 of 304
200 Intelligent technology
critical if the engine is not running and electri
cal components are turned on. In this in
stance energy is being consumed but none is
being generated.
It is in precisely these situations that you wi ll
notice energy management actively regulat
ing the distribut ion of energy .
Vehicle stands for an extended period
If you do not drive your vehicle over a pe riod
of severa l days or weeks, electrical compo
nents are gradually cut back or switched off.
This reduces energy consumption and main
tains starting capab ility over a longer period.
Some of the conven ience functions may not
operate, such as the inter ior lights or the
power seat adjustment. The conven ience
functions will be available again when you
switch on the ignition and start the engine.
With the engine turned off
If you listen to the radio, for example, with
the eng ine turned off or use other MMI func
tions, the battery is being discharged .
If starting capability is jeopardized due to en
ergy consumption, the following warning ap
pears in the MMI display:
Please start the engine soon or the system
will be turned off.
The warning indicates that the system will be
turned off automatically after 3 minutes. If
you wish to continue using the functions, you
have to start the engine.
With the engine running
Although elect rical energy is generated when
the vehicle is being driven, the battery can be
come discharged. This happens most ly when
little energy is being generated and a great
dea l consumed and the battery 's state of
charge is not optimal.
To bring the energy balance back into equili
brium, consumers which require especia lly
large amounts of energy are temporarily cut
back or switched off. Heating systems in par
ticular requ ire a great deal of energy. If you notice,
for example, that the heated seats* or
the heated rear window are not heating, they
have been temporarily cut back or switched
off. These systems will be available again as
soon as the energy balance has been restored.
You will also notice that engine id le speed has
been increased slightly. Th is is normal and not
a cause for concern. By increasing engine idle
speed the additional energy required is gener
ated and the battery is charged.
Page 208 of 304
206 Trailer towing
Trailer towing
Driving with a trailer
General information
Your Audi was designed primarily for passen
ger transportation .
If you plan to tow a trailer, p lease remember
that the additional load will affect durability,
economy and performance .
Trailer towing not on ly places more stress on
the vehicle, it also calls for more concentra
tion from the driver.
For this reason, always follow the operating
and driving instructions provided and use
common sense.
@ Note
If you are going to tow a trai ler, you must
activate the trailer operation mode
c:::> page 206, Operating instructions.
Technical requirements
Trailer hitch
Use a weight-carrying hitch conforming to the
gross trailer weight. The hitch must be suita ble for your vehicle and trailer and must be
mounted securely on the vehicle's chassis at a
technically sound location . Use only a trailer
hitch with a removable ball mount. Always
check with the trailer hitch manufacturer to
make sure that you are using the cor rect
hitch.
Do not use a bumper hitch.
The hitch must be installed in such a way that
it does not interfere with the impact-absorb
ing bumper system. No modifications should
be made to the vehicle exhaust and brake sys
tems . From time to time, check that all hitch
mounting bolts remain securely fastened.
When you are not towing a trailer, remove the
trai ler hitch ball mount. This prevents the
hitch from causing damage should your vehi
cle be struck from behind
c:::> A.
Trailer brakes
If your trailer is equipped with a brakin g sys
tem, check to be sure that it conforms to all
regulations.
T he trailer hydraulic brake system must not be
directly connected to the vehicle's hydraulic
brake system .
Safety chains
Always use safety chains between your veh icle
and the trailer.
Trailer lights
Trailer lights must meet all regulations. Be
sure to check with your Audi dealer for correct
wiring, switches and relays.
Mirrors
If you are unable to see the traffic behind you
using the regular outside mirrors, then you
must install extended mirrors. It is important
that you
always have clear v is ion to the rear .
A WARNING
--
After removing the trailer hitch, do not
store it in your vehicle . In case of sudden
braking, the hitch could fly forward and in
jure you or your passengers.
Operating instructions
Maximum trailer weight
A trailer for your vehicle is limited to a typical
class 1 or class 2 trailer.
Trailer load distribution
Be sure the load in the trailer is held securely
in place to prevent it from shift ing forward,
backward or sideways.
Never allow a passenger to ride in a trailer
c:::> A in Driving instructions on page 208.
Engine cooling system
Towing a trailer makes the engine work hard
er . It is important that the cooling system 's
performance is up to the additional load.
Page 210 of 304
208 Trailer towing
Always apply brakes early. When driving
downhill, shift into a lower gear to use the en
g ine braking effect to slow the vehicle . Use of
the brakes alone can cause them to overheat
and fail.
Coolant temperature
The coolant temperature gauge¢ page 11
must be observed carefully. The coolant tem
perature can increase if you drive on long in
clines in a low gear at high engine speeds. Re
duce your speed immediately if the LEDs in
the top part of the display turn on .
For more information about indicator lights,
refer to.
¢ page 17 .
A WARNING
Anyone not properly restrained in a mov
ing vehicle is at a much greater risk in an
accident . Never let anyone r ide in your car
who is not properly wear ing the restraints
provided by Aud i.
Trailer towing tips
Important to know
Your vehicle handles differently when towing
a trailer because of the additional weight and
different weight distribution . Safety, perform
ance and economy w ill greatly depend on how
carefully you load your trailer and operate
your rig .
Before you actually tow your trailer, practice
turn ing, stopp ing and back ing up in an area
away from traffic. Keep practicing until you
have become comp lete ly familiar with the way
your ve hicle-trai ler comb ination behaves and
responds.
Backing up is difficult and requires practice .
Backing up with a tra iler generally requi res
steering act ion opposite to that when backing
up your vehicle without a trailer.
Maintain a greater distance between your ve
hicle and the one in front of you. You will need
more room to stop. To compensate for the trailer, you wi
ll need a larger than normal
turning radius.
When passing, remember that you cannot ac
celerate as fast as you norma lly would be
cause of the added load. Make sure you have
enough room to pass . After passing, a llow
plenty of room for your trailer before chang
ing lanes again.
Avoid jerky starts , sharp turns or rapid lane
changes.
(D Tips
- Do not tow a trailer during the break-in
period of your vehicle.
- If you tow a trailer, your Audi may re
quire more frequent maintenance due to
the extra load ¢
page 283.
Parking on a slope
Do not park on o slope with a trailer. If it can
not be avoided, do so only after doing the fol
lowing:
When parking:
.,. App ly the foot brake .
.. Have someone place chocks under both the
vehicle and the trailer wheels.
.. With chocks in place, slowly release the
brakes until the wheel chocks absorb the
load .
.. Turn the wheels towards the curb.
.. Apply the parking brake.
.. Select the P selector lever position .
When restarting after parking:
.. Apply the foot brake.
.. Start the engine.
.. Select the D/S selector lever position .
.. Release the parking brake and slowly pull
out and away from the wheel chocks .
.,. Stop and have someone retr ieve the wheel
chocks .
Ill-
Page 213 of 304
Vehicl e ca re a nd cl eanin g 211
A WARNING
-Only wash the vehicle when the ignition
is off and follow the instructions from
the car wash operator to reduce the risk of accidents .
- To reduce the r isk of cuts, protect your
self from sharp metal components when
wash ing the underbody or the inside of
the wheel housings.
- After washing the vehicle, the braking ef
fec t may be delayed due to mo isture on
the brake rotors or ice in the winter. The
brakes must be dried first with a few
careful brake applications.
Q) Note
- If you wash t he vehicle in an automatic
car wash, yo u must fold the exterior m ir
rors in to reduce the r is k of damage to
the mirrors. Power folding exterior mir
rors* must only be folded in and out us
ing the power folding function.
- To prevent paint damage, do not wash
the vehicle in direct sunlight . -
To reduce the risk of damage to the sur
face, do not use insect removing spong
es, kitchen sponges or similar items.
- Matte finish painted vehicle compo
nents:
- To reduce the risk of damage to the surface, do not use polishing agents or hard wax.
- Never use car wash cycles that apply protective wax.
It can destroy the
matte fi nish effect.
- Do not place any stickers or magnet ic
signs on vehicle parts painted w ith
matte fi nish paint. The paint cou ld be
damaged when the stickers o r magnets
are removed.
@ For the sake of the environment
Only wash the vehi cle in facilities spec ial ly
designed for that purpose . This will red uce
the risk of dirty water contam inated with
oil from entering the sewer system.
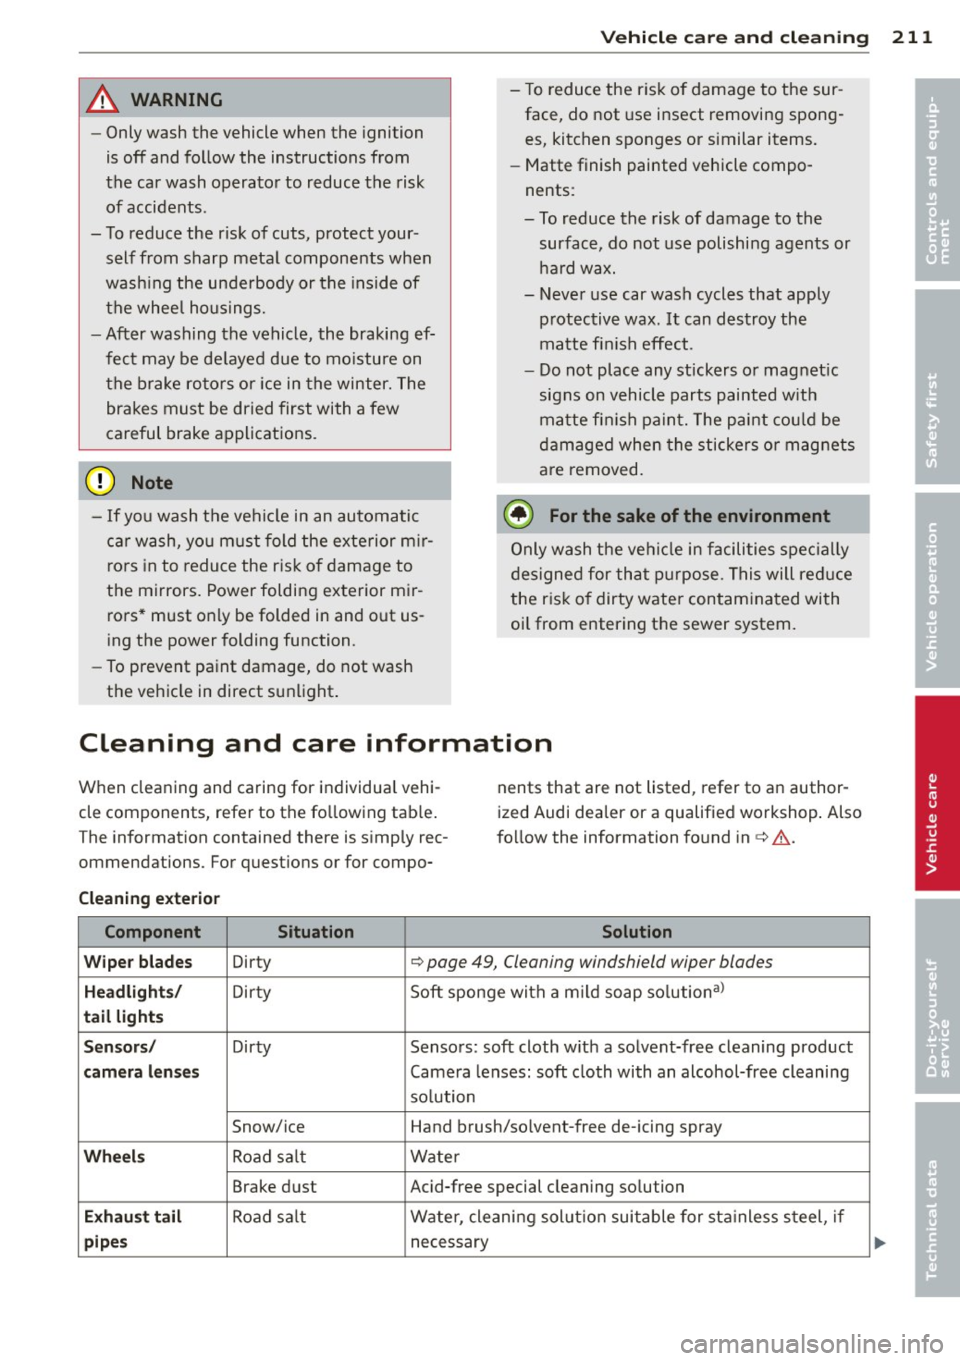
Cleaning and care information
When cleaning and caring for individua l vehi
cle components, refer to the fo llow ing tab le.
The information contained there is s imp ly rec
ommendations. For quest ions or for compo- nents
that are not listed, refer to an author
ized Audi dea ler or a qualified workshop . Also
fo llow the information found inc>,& .
Cle aning e xterior
Component Situation Solution
Wiper b lades
Dirty i=> page 49, Cleaning windshield wiper blades
Headligh ts / Dirty Soft
sponge with a m ild soap solutional
tail light s
S ensor s/
Dirty Sensors: soft cloth with a solvent-free cleaning product
camera l enses Camera lenses: soft cloth with an alcohol-free cleaning
solution
Snow/ice Hand brush/solvent-free de-icing spray
Wheels Road sa lt Water
Brake dust Acid-free special cleaning solution
Exhau st t ail Road sa lt Water, cleaning solut ion suitable for sta inless steel, if
pi pes necessary
•
•
Page 215 of 304
Vehicle care and cleaning 213
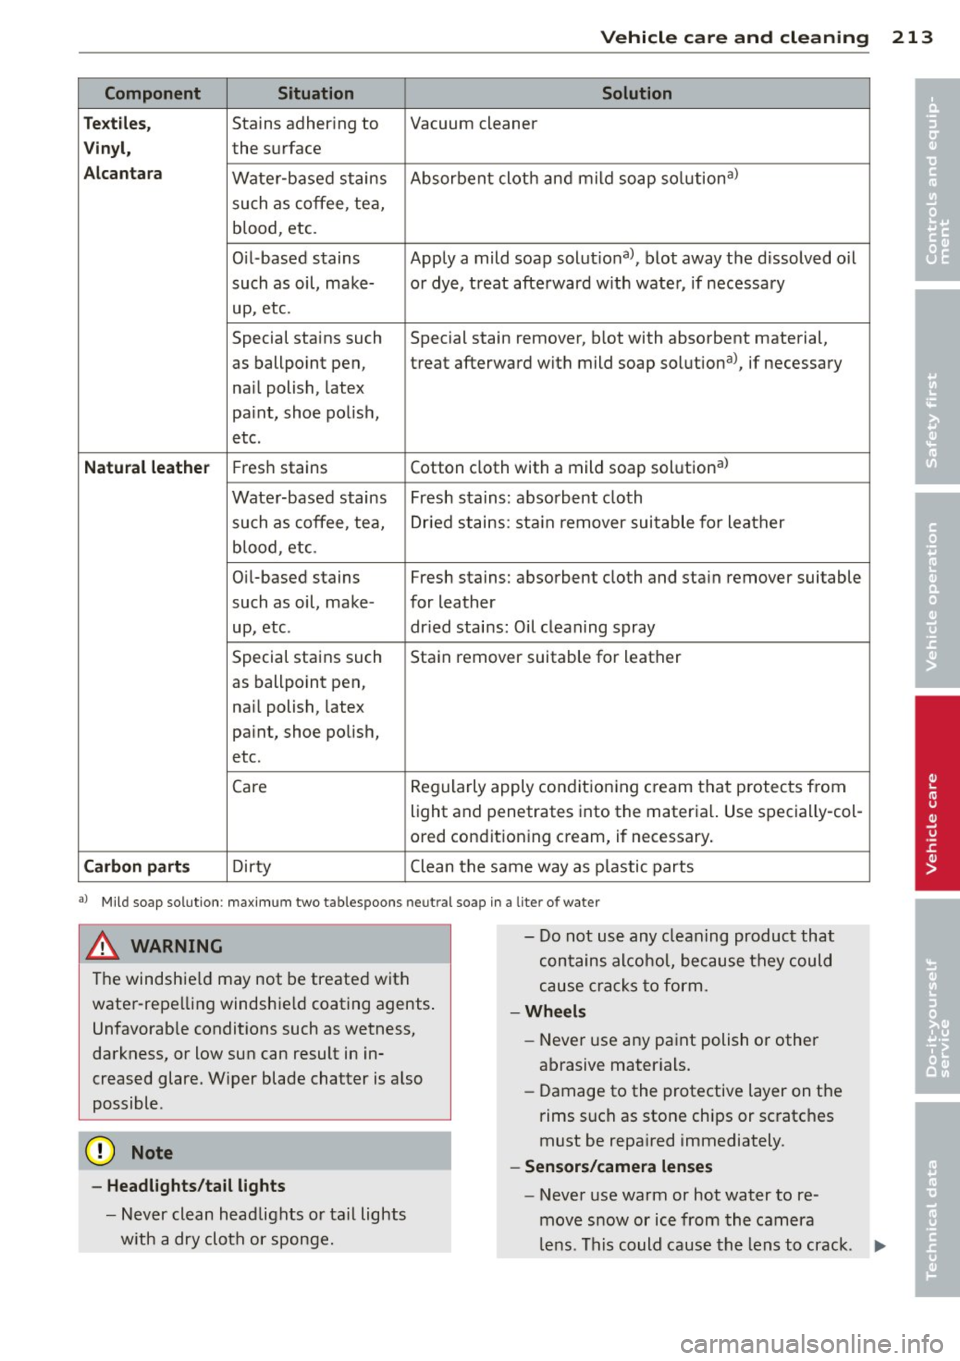
Component Situation Solution
Te xtile s,
Stains adhering to Vacuum cleaner
Vinyl, the surface
Alcantara Water-based stains Absorbent cloth and mild soap
solutional
such as coffee, tea, blood, etc.
Oil-based stains Apply a mild soap solutiona l, blot away the d issolved oil
such as oil, make- or dye, treat afterward w ith water, if necessary
up, etc.
Special stains such Special stain remover, b lot with absorbent material,
as ballpoint pen, treat afterward with mild soap solutiona l, if necessary
na il polish, latex
pa int, shoe polish,
etc.
Natural leather Fresh stains Cotton cloth with a mild soap solutiona l
Water-based stains Fresh sta ins: absorbent cloth
such as coffee, tea, Dried stains: stain remover suitable for leather
blood , etc .
Oil-based stains Fresh stains: absorbent cloth and stain remover suitable
such as oil, make- for leather
up , etc . dried sta ins: Oil cleaning spray
Special stains such Sta in remover suitable for leather
as ballpo int pen,
nai l polish, latex
paint, shoe polish,
etc.
Care Regularly apply conditioning cream that protects from
light and penetrates
into the material. Use specially-col-
ored conditioning cream, if necessary.
Carbon parts Dirty Clean the same way as plastic parts
al Mil d soap so lution: m axim um two ta bles poo ns neu tral soa p in a lite r of water
& WARNING
The windshie ld may not be treated with
water-repelling windshie ld coating agents .
Unfavorab le conditions such as wetness,
darkness, or low sun can result in in
creased glare. W iper blade chatter is also
possible.
- Headlights/tail lights
- Never clean headlights or tail lights
w ith a dry cloth or sponge. -
Do not use any cleaning product that
contains alcohol, because they could
cause cracks to form.
-Wheels
-Never use any paint polish or other
abrasive mater ials.
- Damage to the protective layer on the
rims such as stone chips or scratches
must be repaired immediately .
-Sensors/camera lenses
- Never use warm or hot water to re-
move snow or ice from the camera
len s. This could cause the lens to crack .
IJII>
•
•
Page 224 of 304
222 Fuel supply and filling your fuel tank
Filling AdBlue
Applies to vehicles: with diesel engine
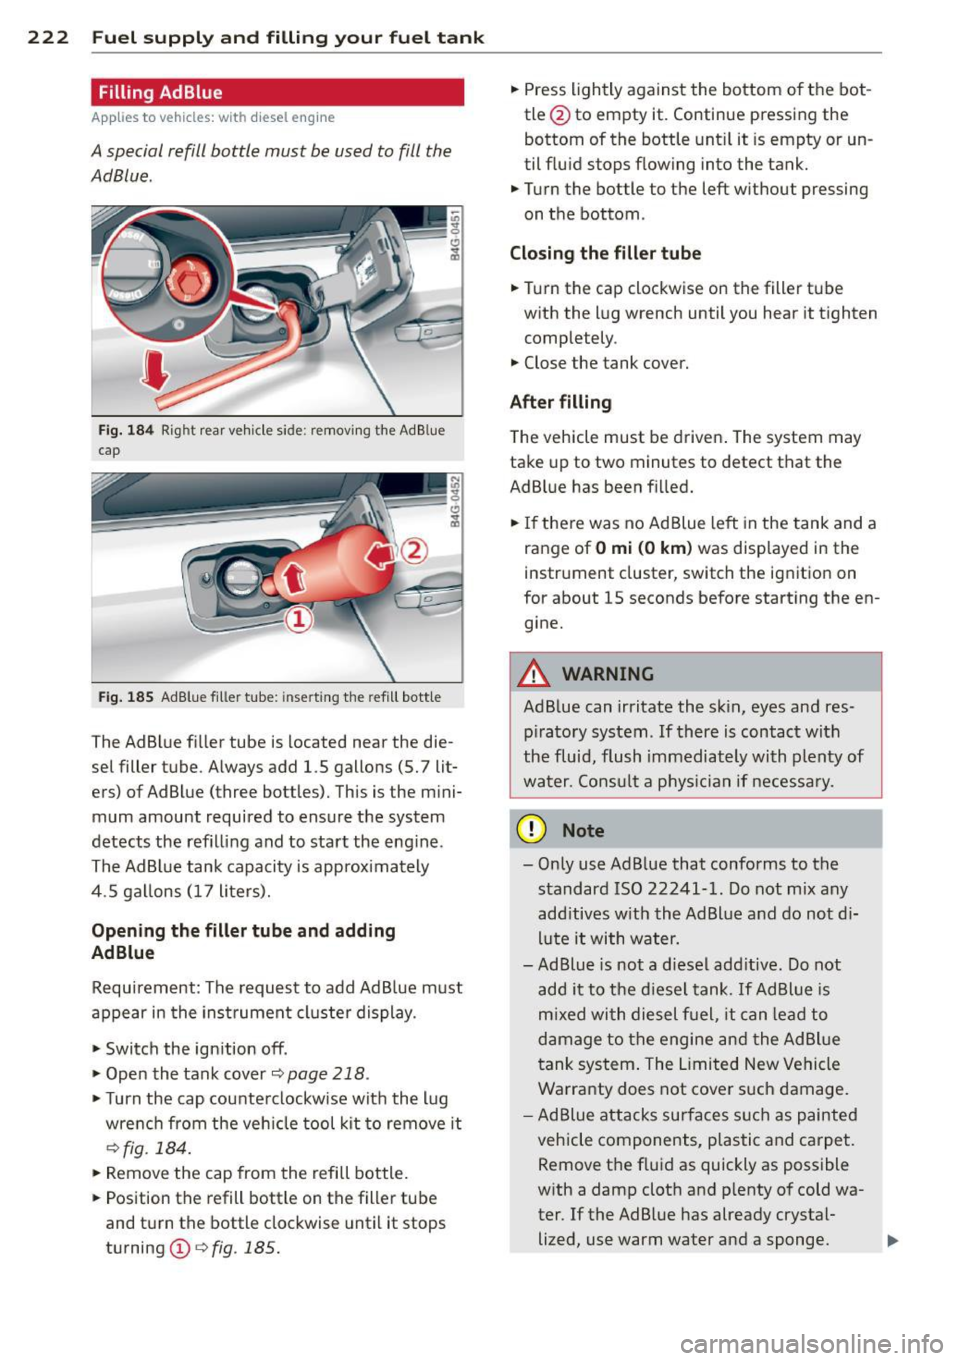
A special refill bottle must be used to fill the
AdBlue .
Fig. 184 Rig ht rear vehicle side: remov ing the Ad B lue
cap
Fig . 185 Ad Blue filler tube: inse rting the refill bottle
The AdBlue fi ller tube is located near the die
sel filler tube . Always add 1.5 gallons (5. 7 lit
ers) of AdBlue (three bottles). This is the mini
mum amount required to ensure the system
detects the refilling and to start the eng ine.
The AdBlue tank capacity is approximately
4 .5 gal lons (17 liters).
Opening the filler tube and adding
AdBlue
Requirement : The request to add Ad Blue must
appear in the instrument cluster display.
• Switch the ignition off .
• Open the tank cover
¢page 218.
• Turn the cap counterclockw ise with the lug
wrench from the vehicle tool kit to remove it
¢fig. 184.
• Remove the cap from the refill bottle.
• Position the refill bottle on the filler tube
and turn the bottle clockwise until it stops
turning
(D ¢ fig . 185.
• Press lightly against the bottom of the bot
tle @to empty it. Continue pressing the
bottom of the bottle until it is empty or un
til fluid stops flowing into the tank.
• Turn the bottle to the left without pressing
on the bottom .
Closing the filler tube
• Turn the cap clockwise on the filler tube
with the lug wrench until you hear it tighten
completely .
• Close the tank cover.
After filling
The vehicle must be driven. The system may
take up to two minutes to detect that the
AdBlue has been f illed.
• If there was no Ad Blue left in the tank and a
range of
O mi (0 km) was displayed in the
instrument cluster, switch the ignition on
for about 15 seconds before starting the en gine.
A WARNING
= Ad Blue can irritate the sk in, eyes and res-
piratory system. If there is contact with
the fluid, flush immediately with plenty of
water. Consult a physician if necessary.
(D Note
- Only use Ad Blue that conforms to the
standard ISO 22241-1. Do not mix any
additives with the AdBlue and do not d i
lute it with water.
-A d Blue is not a diesel add itive . Do not
add it to the diesel tank. If Ad Blue is
m ixed with diesel fuel, it can lead to
damage to the engine and the AdBlue
tank system . The Limited New Vehicle
Warranty does not cover such damage.
- Ad Blue attacks surfaces such as painted
vehicle components, plastic and carpet.
Remove the fluid as quickly as possible
w ith a damp cloth and p lenty of cold wa
ter. If the AdBlue has already crystal-
lized, use warm water and a sponge. .,..
Page 226 of 304
224 Checking and filling
Checking and filling Engine hood
Releasing the engine hood
The engine hood is released from inside the
vehicle .
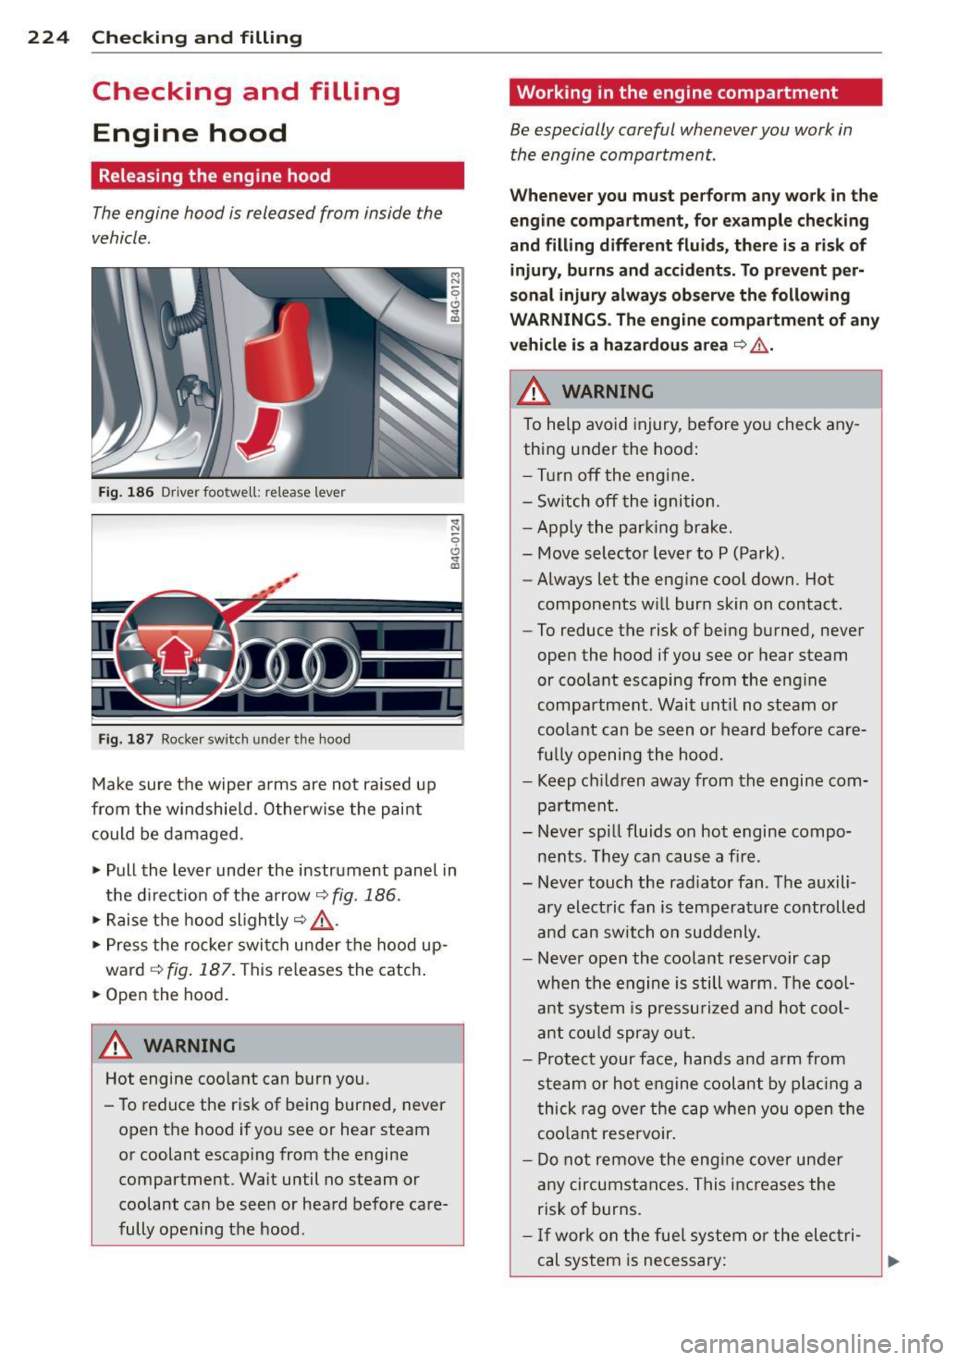
Fig. 186 Driver foo twell: release lever
Fig. 187 Rocker switch un der the hood
Make sure the wiper arms are not raised up
from the windshield. Otherwise the paint
could be damaged .
.,. Pull the lever under the instrument panel in
the direction of the arrow
¢ fig. 186.
.,. Raise the hood slightly¢,&. .
... Press the rocker switch under the hood up
ward
~ fig. 187. This releases the catch.
• Open the hood.
&_ WARNING
Hot engine coolant can burn you.
- To reduce the risk of being burned,
never
open the hood if you see or hear steam
or coolant escaping from the engine compartment . Wait until no steam or
coolant can be seen or heard before care
fully opening the hood .
'Working in the engine compartment
Be especially careful whenever you work in
the engine compartment.
Whenever you must perform any work in the
engine compartment, for example checking
and filling different fluids, there is a risk of injury, burns and accidents. To prevent per
sonal injury always observe the following
WARNINGS. The engine compartment of any
vehicle is a hazardous area
¢ ,&. .
A WARNING
To help avoid injury, before you check any
thing under the hood:
- Turn off the engine.
- Switch off the ignition .
- Apply the parking brake.
- Move selector lever to P (Park).
- Always let the engine cool down. Hot
components will burn skin on contact.
- To reduce the risk of being burned, never
open the hood if you see or hear steam
or coolant escaping from the engine
compartment. Wait until no steam or
coolant can be seen or heard before care
fully opening the hood.
- Keep children away from the engine com
partment.
- Never spill fluids on hot engine compo
nents . They can cause a fire .
- Never touch the radiator fan. The auxili
ary electric fan is temperature controlled
and can switch on suddenly .
- Never open the coolant reservoir cap
when the engine is still warm . The cool
ant system is pressurized and hot cool
ant could spray out.
- Protect your face, hands and arm from
steam or hot engine coolant by placing a
thick rag over the cap when you open the
coolant reservoir.
- Do not
remove the engine cover under
any circumstances. This increases the
risk of burns.
- If work on the fuel system or the electri
cal system is necessary:
Page 228 of 304
226 Checking and filling
Engine compartment
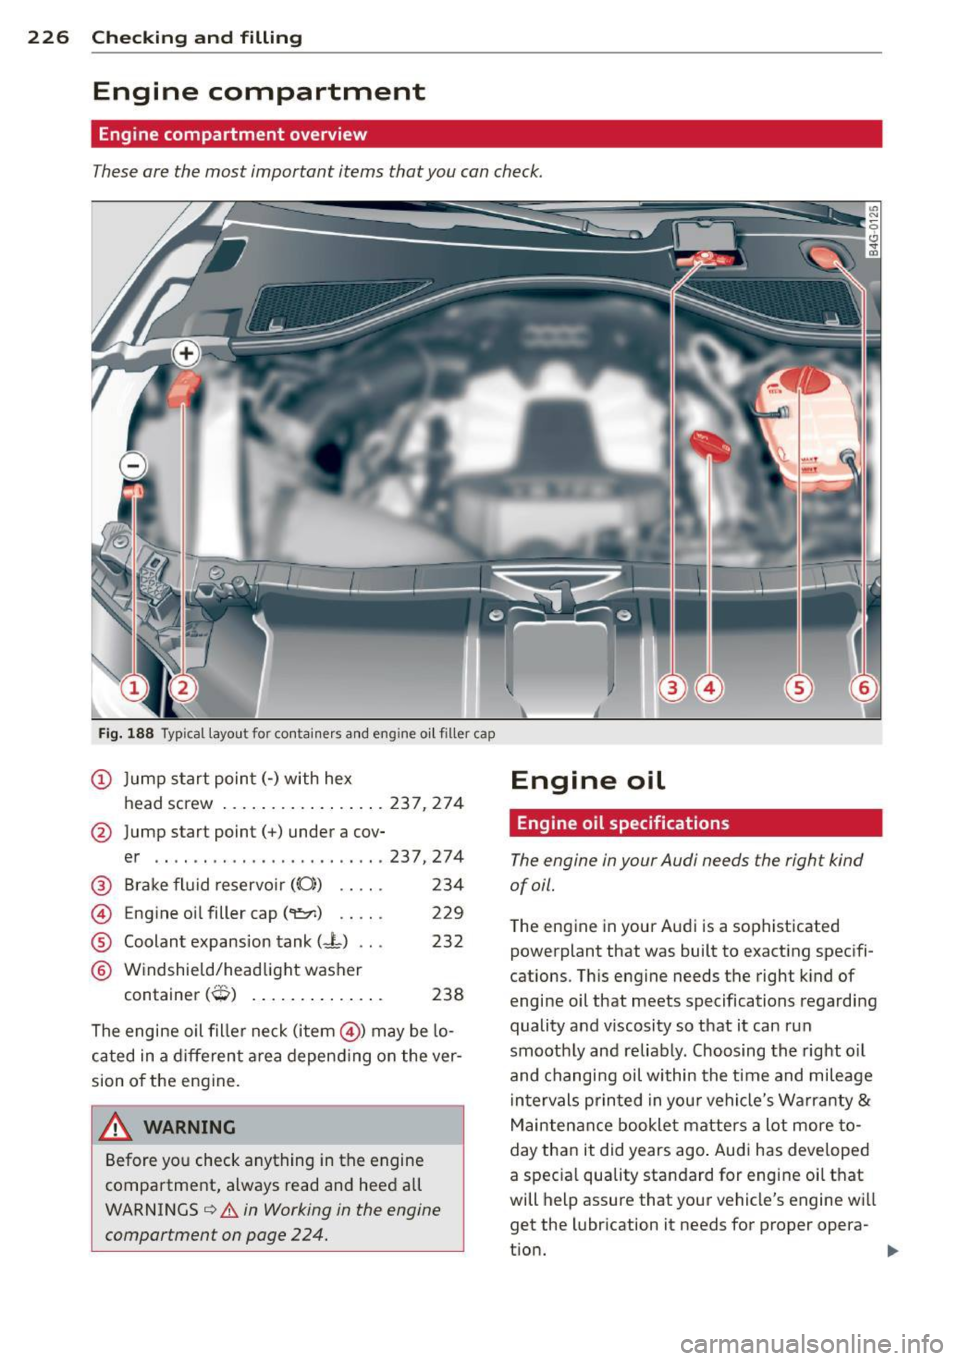
Engine compartment overview
These are the most important items that you can check .
Fig. 188 Typi cal layout for conta iner s and en gine o il filler cap
(D Jump start point(-) with hex
head screw .................
237,274
@ Jump start point(+) under a cov-
er .. .. .. .. ........ .. ..... .
237,274
®
©
®
®
Brake fluid reservoir ((0)) . . . . . 234
Engine oi l fille r cap (
Windshield/headlight washer
232
t . (.'R ) con ainer ,,.., ...... ....... . 238
The engine oil filler neck (item @) may be lo
cated in a different area depending on the ver
sion of the engine.
~ WARNING
Before yo u check anything in the engine
compartment, always read and heed all
WARNINGS
¢ &. in Working in the engine
compartment on page 224.
-
Engine oil
Engine oil specifications
The engine in your Audi needs the righ t kind
of oil.
The engin e in your Audi is a sophisticated
powerpl ant that was bu ilt to exacting spe cifi
cations . Thi s engine needs the righ t kind of
engine oil that meets specification s regarding
quality and v iscosity so that it can run
smoothly and reliably . Choosing the right oil
and changing oil within the tim e and mileage
intervals printed in you r vehicle's Warra nty
&
Maintenance booklet matters a lot more to
day than it did years ago . Audi has developed
a special quality standard for engine oil that
will h elp assur e that your vehicle's engine wi ll
get the lubr ication it need s for proper opera -
tion. ..,.