interior AUDI A6 2014 User Guide
[x] Cancel search | Manufacturer: AUDI, Model Year: 2014, Model line: A6, Model: AUDI A6 2014Pages: 304, PDF Size: 76.32 MB
Page 172 of 304
1 7 0 Airbag syst em
larger, unclosed openings in the door
panel.
- Never drive w ith inter ior door trim pan
e ls removed.
- Never drive when parts have been re moved from the ins ide doo r panel and
the openings they leave have not been p roperly closed.
- Never d rive when loudspeakers in the
doors have bee n removed unless the
spea ker holes have been properly
closed.
-Always ma ke certa in that openings are
covered or fi lled if additional speakers
or other equ ipment is installed in the
inside door panels.
- Always have work on the doors done by an authorized Audi dealer or qualified
workshop .
Side curtain airbags
Description of side curtain airbags
The side curtain airbag system can provide
supplemental protection to properly restrain
ed occupants.
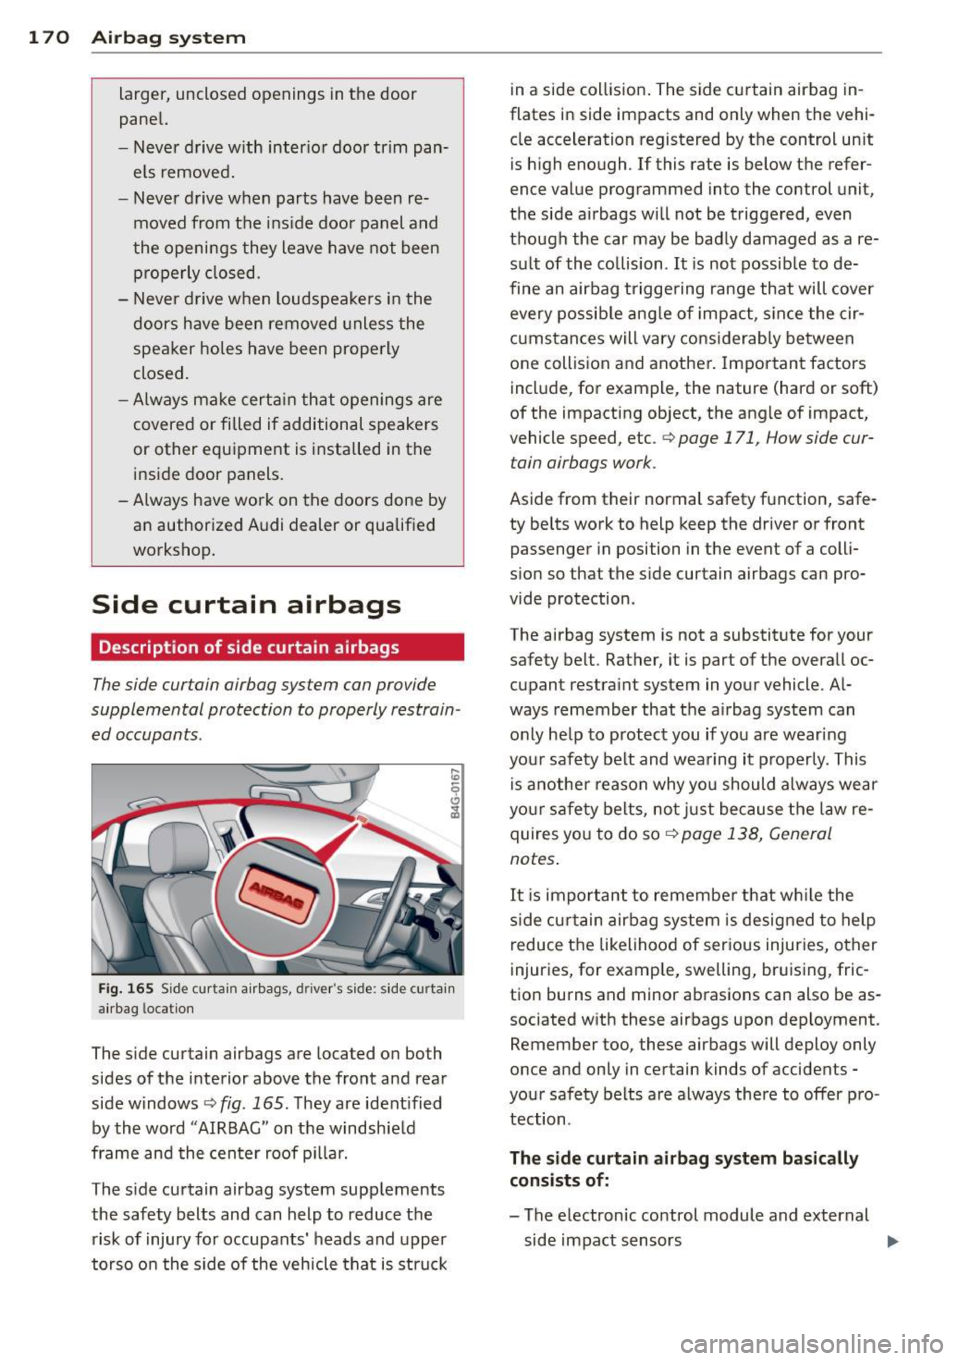
Fi g. 1 65 Side curtain a irbags, d river 's side: s ide curta in
a ir bag location
The s ide curtain airbags are located o n both
sides of the interior above the front and rea r
side windows
c:.> fig. 165 . They are ident ified
by the word "AIRBAG" on the windshield
frame and the center roof p illar.
The s ide curtain airbag system supp lements
the safety belts and can help to reduce the risk of injury for occupants' heads and upper
torso o n the side of the vehicle tha t is struc k in a side collision
. The side curtain airbag in
flates in side impacts and only when the vehi cle acceleration registered by the control un it
is h igh enough . If this rate is below the refer
ence value programmed into the control unit,
the side airbags will not be triggered, even
t h ough the car may be bad ly damaged as a re
su lt of the co llision .
It is not possib le to de
fine an airbag triggering range that will cover every possib le ang le of impact, s ince the cir
cumstances will vary cons iderably between
one collision and another. Important factors
include, for example, the nature (hard or soft)
of the impacting object, the angle of impact,
vehicle speed, etc .
c:,, page 171, How side cur
tain airbags work .
Aside from their normal safety function, safe
ty belts work to help keep the driver or front
passenger in position in the event of a colli
sion so that the side curtain airbags can pro
vide protection .
The airbag system is not a substit ute for your
safety belt . Rather, it is part of the overall oc
cupant restraint system in your vehicle. Al
ways remember that the a irbag system can
only help to protect you if you are wear ing
you r saf ety belt and wearing it properly . This
is anothe r reason why yo u should always wear
yo ur safe ty belts, no t just because the law re
quires yo u to do soc:.>
page 138, General
notes .
It is important to remember that w hile the
s ide cur tain airbag system is designed to help
reduce the likelihood of ser ious injur ies, other
injuries, for example, swelling, bruising, fric
tion burns and minor abrasions can also be as
sociated w ith these airbags upon dep loyment.
Remember too, these airbags will deploy only
once and only in certain kinds of accidents -
your safety belts are always there to offer pro
tection.
The side curtain airbag sy stem basic ally
cons ists of:
- The electronic control module and external
side impact sensors ..,..
Page 175 of 304
Child Safety
Important things to know
Introduction
The rear seat is generally the safest place in a
collision .
The physical principles of what happens when
your veh icle is in a crash app ly also to chi ldren
~ page 139, What happens to occupants not
wearing safety belts? .
But unlike adults and
teenagers, their muscles and bones are not
fu lly developed. In many respects children are
at greater risk of serious injury in crashes than
adu lts.
Because children's bod ies are not fully deve l
oped, they require restraint systems especial ly designed for their size, weight, and body
structure. Many countries and all states of the
United States and provinces of Canada have
laws requiring the use of approved child re
straint systems for infants and small children .
In a fronta l crash at a speed of 20 -35 mph
(30-56 km/h) the forces acting on a 13-pound
(6 kg) infant w ill be more than 20 t imes the
weight of the child . This means the weight of
the child would suddenly be more than
260 pounds (120 kg). Under these conditions,
on ly an appropriate chi ld restraint properly
used can reduce the risk of ser ious injury .
Child restraints, like adult safety belts, must
be used properly to be effective. Used improp
erly, they can increase the risk of serious in
jury in an accident.
Consult the child safety seat manufacturer's
instructions in order to be sure the seat is
right for your chi ld's size ~
page 177, Impor
tant safety instructions for using child safety
seats.
Please be sure to read and heed all of
the important information and WARNINGS
about ch ild safety, Advanced A irbags, and the
installation of child restraints in this chapter.
There is a lot you need to know about the Ad
vanced Airbags in your vehicle and how they work when infants and children in child re-
Child Sa fet y 173
straints are on the front passenger seat . Be
cause of the large amount of important infor
mation, we cannot repeat it a ll here . We urge
you to read the detailed information in this owner's manual about airbags and the Ad
vanced Airbag System in your vehicle and the
very important information about transport
ing children on the front passenger seat .
Please be sure to heed the WARNINGS -they
are extremely important for your safety and
the safety of your passengers, especially in
fants and small chi ldren .
.A, WARNING
-Accident statistics have shown that chil
dren are generally safer in the rear seat
area than in the front seating position.
Always restrain any child age 12 and un der in the rear.
- All vehicle occupants and especially chil
dren must be restrained properly when
ever riding in a vehicle . An unrestrained
or improperly restrained chi ld could be
injured by str ikin g the interior or by be
ing ejected from the vehicle during a
sudden maneuver or impact. An un re
strained or improper ly restrained chi ld is
also at greater risk of injury or death
through contact with an inflating airbag.
- A suitable chi ld restraint properly instal
led and used at one of the rear seating
positions provides the highest degree of
protection for infants and small children
in most accident situations.
A WARNING
Children on the front seat of any car even
with Advanced Airbags can be ser iously in
jured or even killed when an a irbag in
flates. A child in a rearward-fac ing ch ild
safety seat installed on the front passen
ger seat will be ser iously injured and can
be killed if the front airbag inflates .
- The inflating airbag will h it the child
safety seat or infant carrier with great
force and will smash the child safety seat
and child against the backrest, center
armrest, or door.
•
•
Page 186 of 304
184 Child Saf ety
- Childre n on the front seat of any car,
even w ith Advanced A irbags, can be seri
ous ly injured or even killed when an a ir
bag inflates .
- Never let a child stand or knee l on any
seat, for examp le the front seat.
- Never let a child ride in the cargo area of your vehicle .
- Always remember that a ch ild lean ing
forward, sitt ing s ideways or out of posi
t ion in any way during an acc ident can be
st ruck by a deploying airbag . This will re
sult in serious personal injury o r dea th .
- If you must install a booster seat on the
front passenger seat because of excep
t io nal circumstances the
PASSENGER
AIR BAG OFF
light must come on and
stay on, whenever the igni tion is sw itch
ed on.
- If the
PASSENGER AIR BAG OFF ligh t
doe s not come on and stay on, perform
the chec ks described ¢
page 159, Moni
toring the Advanced Airbag System.
- T ake the child rest rain t off th e fron t pas
senger seat and install it properly at one
of the rea r seat positions if the
PASSEN
GER AIR BAG OFF
light does not stay on
whenever the ignition is switched on.
- Always read and heed all WAR NIN GS
whenever using a child restrained in ave
hicle is being used¢
page 138, Safety
belts,¢ page 147, Airbag system
and
¢ page 173, Important things to know.
Installing a child safety
seat
Securing a child safety seat using a
safety belt
Safety bel ts for the rear sea ts and the front
passenger can be locked with the conver tible
locking retractor to properly secure child
safety seats .
The safety belts emergency locking retractors
for the rear seats safety belts and for the
front passenge r's seat safety belt have a co n
ve rtible locking retracto r fo r child restra ints . T
he safety belt m ust be locked so that be lt
web bing cannot unree l. The retractor can be
activated to lock the sa fety belt and prevent
the safety belt webbing from loosening up
duri ng norma l dr iving . A chi ld safety seat can
o n ly be prope rly insta lled when t he safety belt
i s loc ked so that the ch ild and child safety
sea t w ill stay in place .
Always remember: Even tho ugh your vehicle is
equipped with an Advanced Airbag system , all
c h ildren, especially thos e 12 years and young
er, sho uld alw ays r ide in the back seat prope r
l y restra ined fo r the ir age and size.
_& WARNING
Im prop erly ins talled ch ild safety sea ts in
crease the risk o f serious pe rsonal injury
and death in a co llision.
- Always make s ure that the sa fe ty bel t re
trac to r i s loc ked w hen insta lling a child
safety seat . An un locke d safety belt re
tracto r cannot hold the child safety seat
in place dur ing no rma l driving o r in a
crash.
- Always buckle the child sa fety seat firmly
in place even if a ch ild is not sitt ing in it .
A loose child safety seat can fly around du ring a s udden stop or in a collision .
- Always make sure that the rear seat
backrest to wh ic h the center rear safety
be lt* is attached is sec urely latched
wheneve r the rea r ce nter sa fety belt is
be ing used to secu re a child rest raint.
- If the backrest is not securely la tched,
the child and the child res traint will be
throw n forward togethe r with t he back
rest and will strike part s of t he vehi cle
interior. The child can be seriously in
jured or killed.
- Never insta ll re ar-f acing child s afety
seats or in fant ca rrie rs on the front pas
sen ger seat . A child will be serious ly in
jured and can be killed when the passen ge r airbag in flates.
- The inflating air bag will h it the c hild
safety seat or infant carrier with great
force and will smash the child safety seat ..,.
Page 191 of 304
proper installation of the child restraint
and proper use of the lower anchora ges
or safety belts in your vehicle.
- Never secure or attach any luggage or
other items to the LATCH lower ancho
rages.
- Always read and heed the important in
formation about child restraints in this
chapter and WARNINGS ¢
page 173,
Child Safety.
Installing a child restraint with LATCH
lower anchorages
Whenever you install a child restraint always
follow the child restraint manufacturer's in
structions.
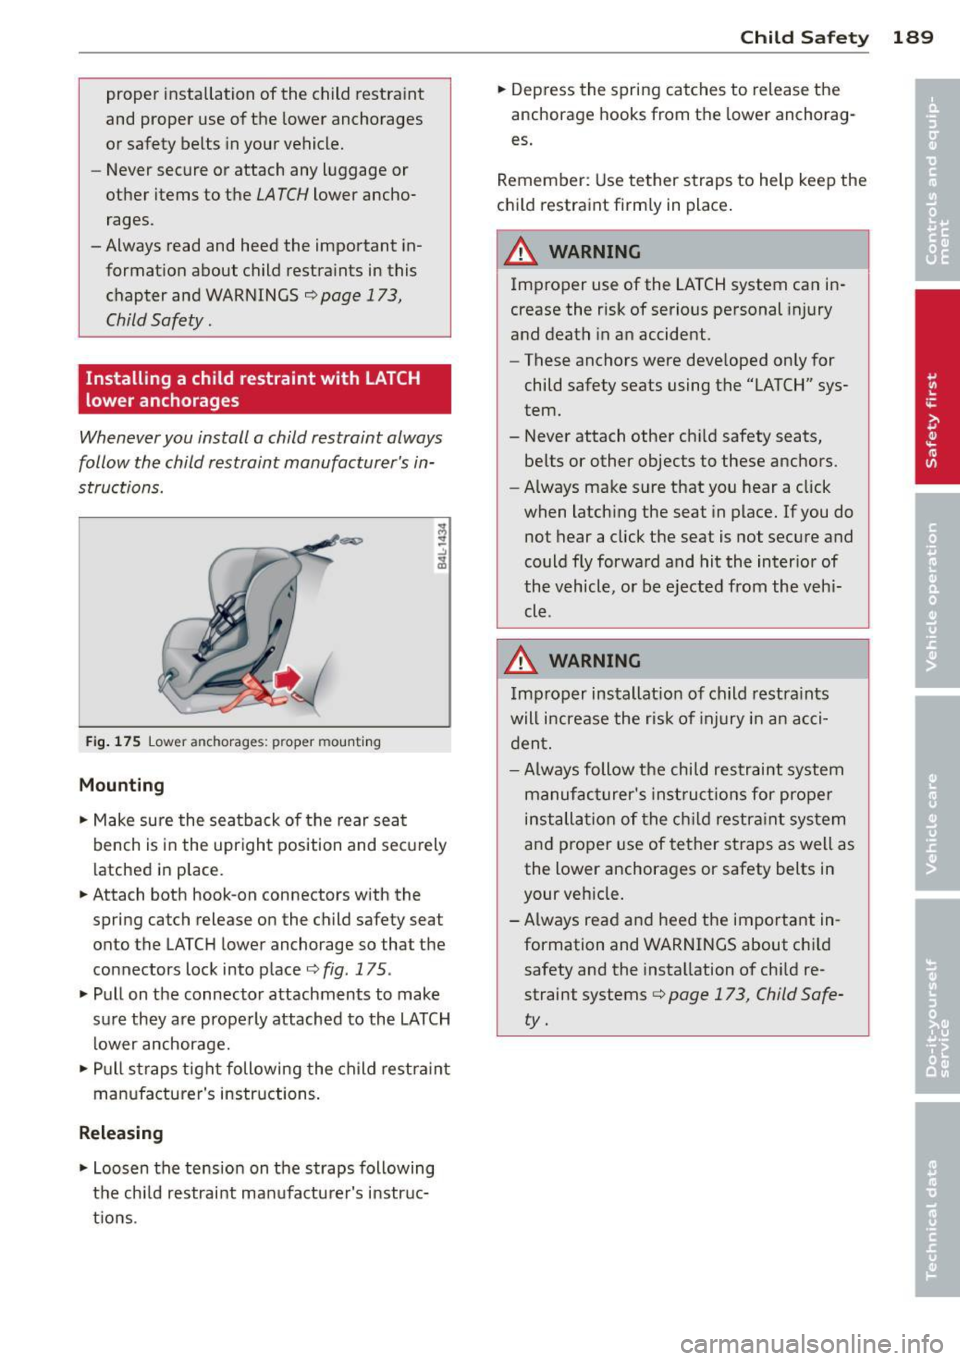
Fig. 175 Lower anchorages: p roper mo unting
Mounting
.. Make sure the seatback of the rear seat
bench is in the upright position and securely
latched in place.
.. Attach both hook-on connectors with the
spring catch release on the child safety seat
onto the LATCH lower anchorage so that the
connectors lock into place¢
fig. 175 .
.. Pull on the connector attachments to make
s ure they are properly attached to the LATCH
lower anchorage .
.. Pull straps tight following the child restra int
manufacturer's instructions.
Releasing
.. Loosen the tension on the straps following
the child restraint manufacturer's instruc
tions .
Child Safety 189
.. Depress the spring catches to release the
anchorage hooks from the lower anchorag
es.
Remember: Use tether straps to help keep the
child restraint firmly in place.
& WARNING ~
Improper use of the LATCH system can in-
crease the risk of serious personal injury
and death in an accident.
- These anchors were developed only for
child safety seats using the "LATCH" sys
tem.
- Never attach other child safety seats,
belts or other objects to these anchors.
- Always make sure that you hear a click
when latching the seat in place. If you do
not hear a click the seat
is not secure and
could fly forward and hit the interior of
the vehicle, or be ejected from the veh i
cle .
& WARNING
Improper installat ion of child restraints
will increase the risk of injury in an acci
dent.
- Always follow the child restraint system
manufacturer's instructions for proper
installation of the child restraint system
and proper use of tether straps as well as
the lower anchorages or safety belts in
your vehicle .
-Always read and heed the important in
formation and WARNINGS about child safety and the installation of child re
straint systems¢
page 173, Child Safe
ty.
-
Page 192 of 304
190 Child Safe ty
Tether anchors and tether straps
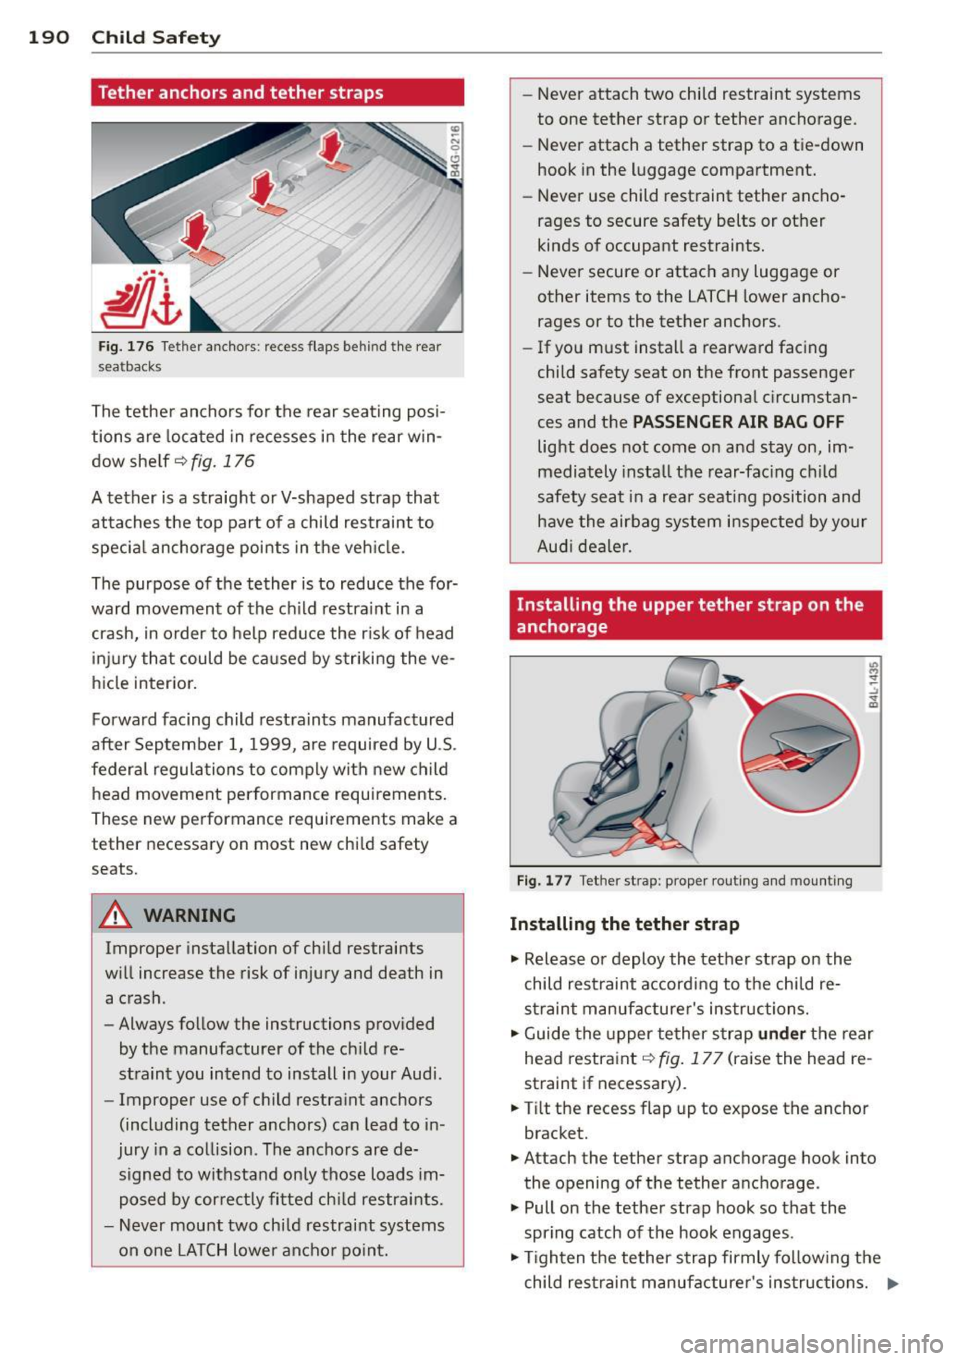
Fig. 176 Tethe r ancho rs: recess flaps behind the rear
seatbacks
The tether anchors for the rear seating posi
tions are located in recesses i n the rear win
dow shelf ~ fig.
176
A tether is a straight or V-shaped strap that
attaches the top part of a child restraint to
specia l anchorage points in the veh icle.
The purpose of the tether is to reduce the for·
ward movement of the ch ild restra int in a
crash, in order to help reduce the r isk of head
in ju ry that could be ca used by striking the ve
hicle interior.
Forward facing child restra ints manufactured
after September 1, 1999, are required by U .S .
federal regulations to comply with new child
head movement performance requirements.
These new performance requ irements make a
tether necessary on most new child safety
seats.
A WARNING
Improper insta llation of child restraints
w ill increase the risk of injury and death in
a crash.
- Always follow the instructions prov ided
by the manufacturer of the ch ild re
stra int you intend to install in your Audi.
- Improper use of child restra int anchors
(including tether anchors) can lead to in ·
jury in a co llision. Th e anchors are de·
sign ed to withstand only those loads im
posed by cor rect ly fi tted ch ild restraints.
- Never mou nt two chi ld restraint systems
on one LA TCH lower anchor po int. -
Never attach two child restraint systems
to one tether strap or tether anchorage.
- Never attach a tether strap to a tie-down
hook in the luggage compartment.
- Never use child restraint tether ancho
rages to secure safety belts or other
kinds of occupant restraints.
- Never secure or attac h any luggage or
other items to the LATCH lower ancho
rages or to the tether anchors.
- If you must install a rearwa rd facing
child safety seat on the front passenger
seat because of exceptional c ircumstan
ces and the
PASSENGER AIR BAG OFF
light does not come on and stay on, im
mediately insta ll the rear-fac ing ch ild
safety seat i n a rea r seating position and
have the airbag system inspe cted by your
Aud i dea ler.
Installing the upper tether strap on the
anchorage
F ig. 177 Tet her strap: proper rou ting and mounting
Installing the tether strap
.,. Release or deploy the tether strap on the
child restraint according to t he child re
s traint manufacturer's instructions.
.,. Guide the upper te ther s trap
under the rear
head restra int ~ fig.
177 (ra ise the head re
stra int if necessary) .
.,. Tilt the recess flap up to expose the anchor
bracket.
.,. Attach the tether strap anchorage hook into
the opening of the tether anchorage .
.,. Pull on the tethe r strap hook so that the
spring catch of the hook engages .
.,. Tighten the tether strap firmly fo llow ing the
child res traint manufa cturer's instructions. .,.
Page 214 of 304
212 Vehicle care and cleaning
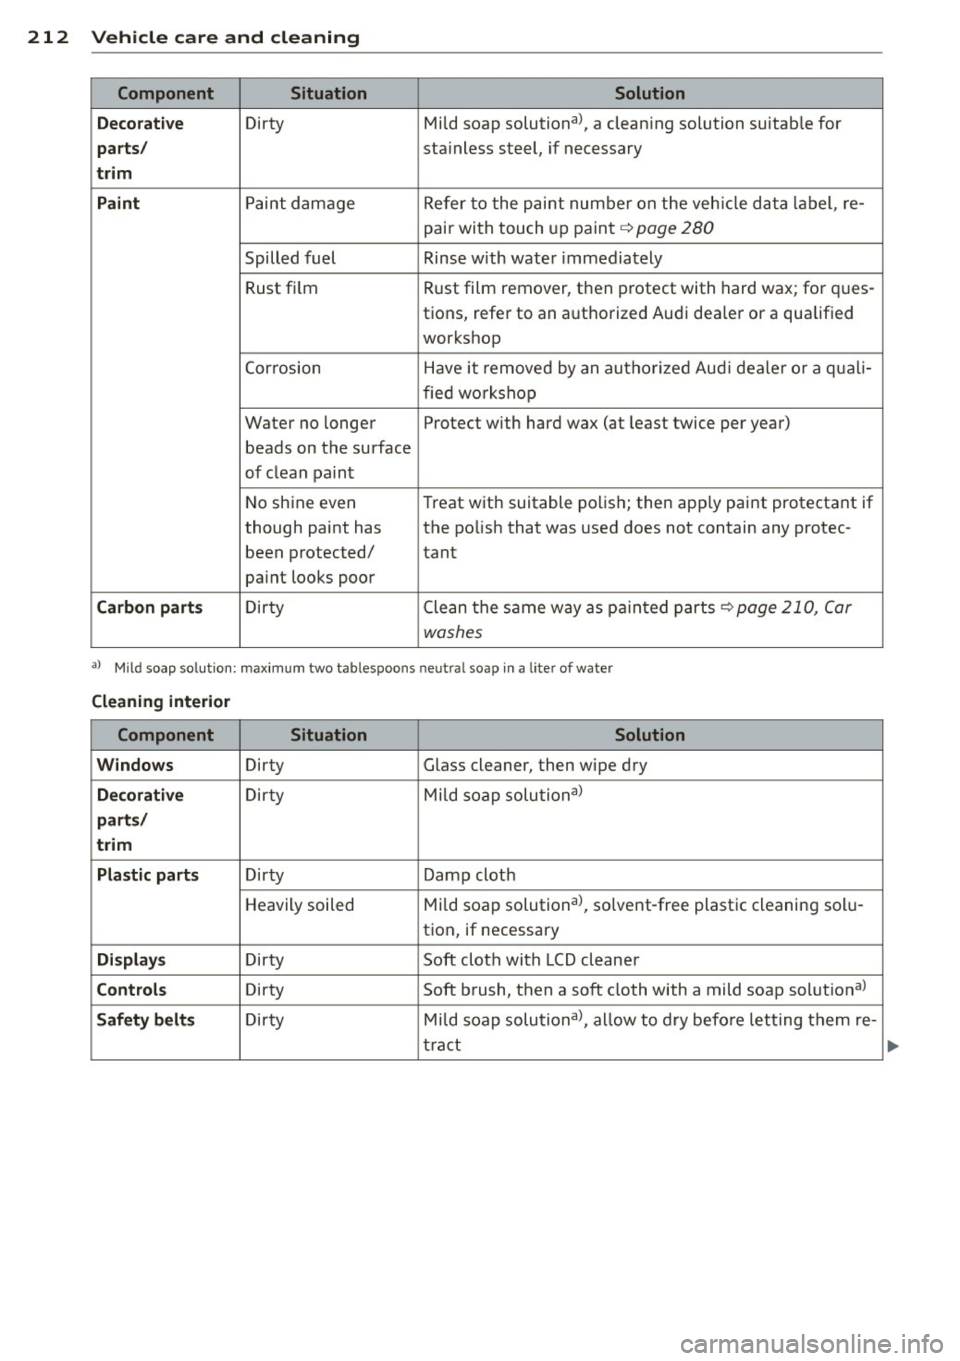
Component Situation Solution
Decorative
Dirty Mild soap solutional, a cleaning solution suitab le for
parts/ sta inless steel, if necessary
trim
Paint
Paint damage Refer to the paint number on the vehicle data label, re-
pair with touch up paint
q page 280
Spilled fuel Rinse with water immediately
Rust film Rust
film remover, then protect with hard wax; for ques-
tions, refer to an authorized Audi dea ler or a qualified
workshop
Corrosion Have it removed by an autho rized Aud i dealer or a quali-
fied workshop
Water no longer Protect with hard wax (at least twice per year)
beads on the surface
of clean paint
No shine even T
reat with suitable polish; then app ly paint protectant if
though paint has the polish that was used does not contain any protec-
been protected/
tant
pa int looks poor
Carbon parts Dirty Clean tlhe same way as painted parts qpage 210, Car
washes
a ) Mild soap so lution: maximum two tablespoons neut ra l soap in a lite r of water
Cleaning interior
Component Situation Solution
Windows
Dirty Glass cleaner, then wipe dry
Decorative Dirty Mild soap
solutional
parts/
trim
Plastic parts
Dirty Damp cloth
Heavily soiled Mild soap solutional, solvent-free plastic cleaning sol u-
tion, if necessary
Displays Dirty Soft cloth with LCD cleaner
Controls Dirty Soft brush, then a soft cloth with a mild soap solutional
Safety belts Dirty Mild soap solutional, allow to dry before letting them re-
tract
...
Page 225 of 304
AdBlue residue that is not removed will
crystallize and can damage the affected
surface.
- Do not store the refill bott le in the vehi
cle.
If it leaks, the escaping Ad Blue could
damage the vehicle interior.
- Do not allow AdBlue to come into con
tact with clothing. If there is contact
with the fluid, flush immediately with plenty of water.
(D Tips
- You can obtain refill bott les from any au
thorized Audi dealer or other qualified
workshop.
- Follow the AdBlue manufacturer's in
structions for usage and storage.
Fuel supply and filling your fuel tank 223
•
•
Page 274 of 304
272 Fu ses and bulb s
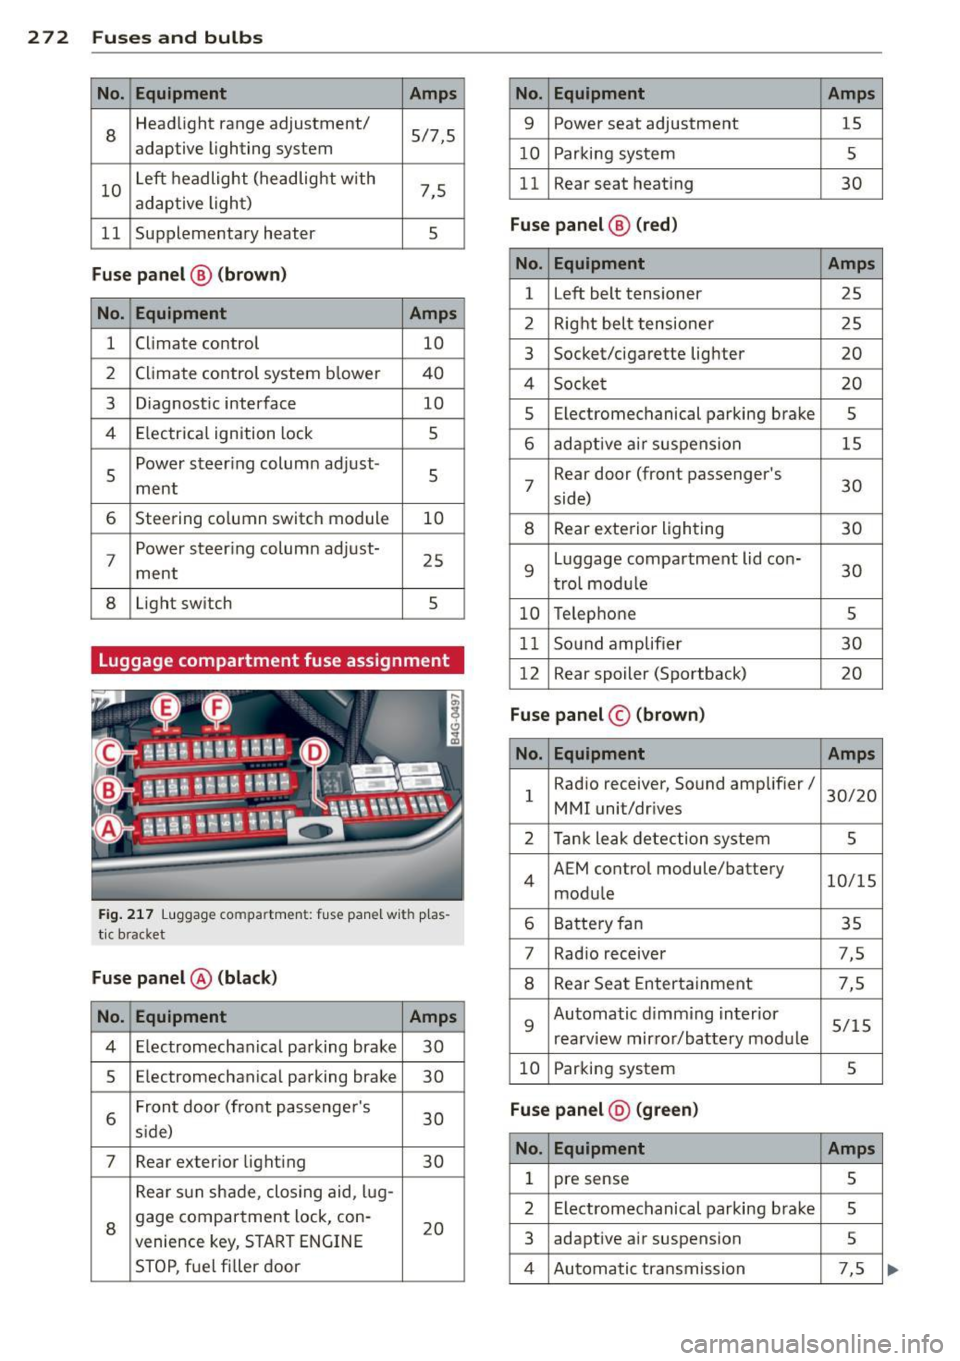
No. Equ ipment Amps
8
Headlight range adjustment/
5/7,S
adaptive lighting system
10 Left headlight
(headlight with
7,5
adaptive light)
11 Supplementary heater
s
Fu
se p ane l@ (b ro w n)
No . Equipment Amps
1 Climate control
10
2 Climate control system blower 40
3 Diagnostic interface
10
4 E lectrical ignition lock
s
s
Power steering column adjust-
s ment
6 Steering column switch module
10
7 Power
steering column adjust-
ment 25
8 Light switch
s
Luggage compartment fuse assignment
Fig
. 217 Luggage compartment: fuse panel with plas
tic bracket
Fuse p anel @ (b la ck )
No. Equipment Amps
4 E lectromechanical parking brake 30
s Electromechanical parking brake
30
6 Front door
(front passenger's
30
s ide)
7 Rear exter ior lighting
30
Rear sun shade, closing aid, lug-
8 gage compartment
lock, con-
20
venience key, START ENGINE
STOP, fuel filler door
No. Equipment Amps
9 Power seat adjustment
15
10 Parking system
s
11 Rear seat
heating
30
Fuse pan el@ (r e d )
No . Equipment Amps
l Left belt tensioner
25
2 Right belt tensioner 25
3 Socket/cigarette
lighter
20
4 Socket 20
5 Electromechanical
parking brake
5
6 adaptive ai r suspension 15
7 Rear door
(front passenger's
30
side)
8 Rear exterior lighting 30
9 Luggage compartment
lid con-
30
t rol modu le
10 Telephone 5
11 Sound amplifier 30
12 Rear
spoiler (Sportback)
20
Fuse pan el© (brown)
No . Equipment Amps
1 Radio receiver,
Sound amplifier/
30/20
MMI unit/drives
2 Tank leak detection system
s
4 AEM
control module/battery
10/15
module
6 Battery fan 35
7 Rad
io receiver 7,5
8 Rear Seat Entertainment 7,5
9 Automatic d
imming interior
5/15
rearview mirror/battery module
10 Parking system 5
Fuse pan el@ (gre en)
No . Equipment Amps
1 pre sense 5
2 Electromechanical parking brake
s
3 adaptive
air suspension
5
4 Automatic transmission 7,5
Page 295 of 304
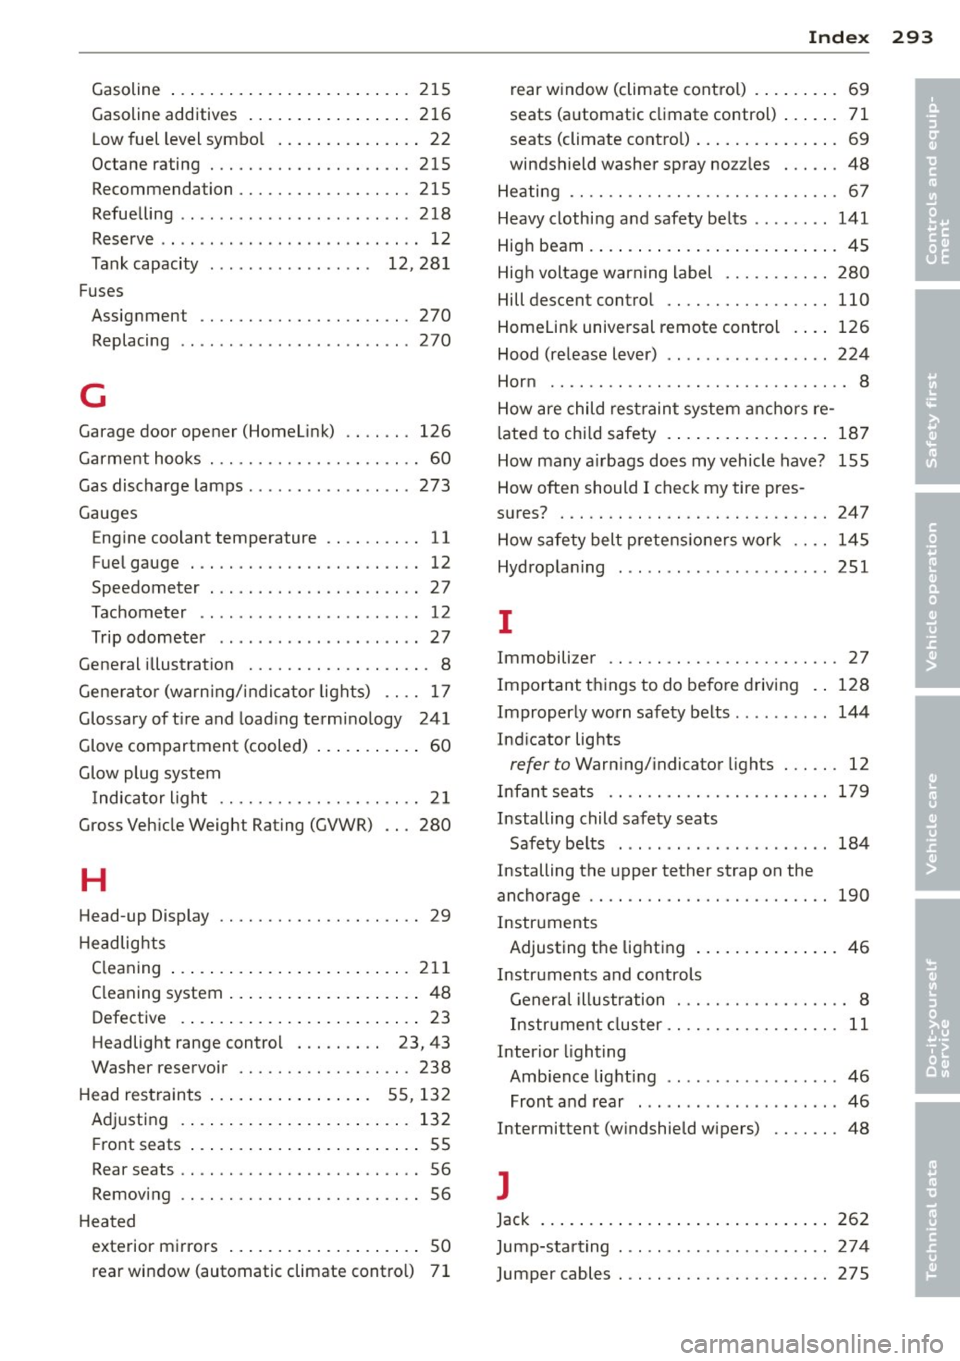
Gasoline ... .. .... .... ... .. .. .. ... 215
Gasoline additives ..... ... .. .. .. .. . 2 16
L ow fuel level symbo l .. ... .. .. .. .. .. 22
Octane rating ............ .... .. ... 215
Recommendation ......... .. .. .. .. . 215
Refue lling .. ................ ... ... 218
Reserve . ... ... .. .. ...... .. .. .. .. .. 12
Tank capacity . . . . . . . . . . . . . . . . . 12, 28 1
Fuses Assig nment ............. .... .. ... 270
Replacing ............ ...... .... .. 270
G
Garage door opener (Homel ink) .. .. .. . 126
Garment hoo ks . . . . . . . . . . . . . . . . . . . . . . 60
Gas discharge lamps ........... .... .. 273
Gauges Engine coolant temperature .. .. .. .. .. 11
F uel gauge . .. .. ......... .. .. .. .... 12
Speedometer ... .... ... .. .. .. .. .. .. 27
Tac hometer .. ........ ...... ... ... . 12
Trip odometer ........ .... ... ... ... 27
Gene ral illustration . . . . . . . . . . . . . . . . . . . 8
G ene ra to r (wa rn ing/ indic ator lights) .. .. 17
Glossary of t ire and load ing termi no logy 241
Glove com partment (cooled) . . . . . . . . . . . 60
G low plug system
Indicator ligh t . . . . . . . . . . . . . . . . . . . . . 21
Gross Veh icle Weight Rating (GVWR) .. . 280
H
Head -up Display . . . . . . . . . . . . . . . . . . . . . 29
H eadlights
C leaning ... .. ... ..... ... .. .. .. ... 211
C leaning system ... .... ... .. .. .. .. .. 48
Defective . ... .... .... ... .. .. .. .... 23
Headlig ht range contro l . . . . . . . . . 23, 43
Washer reservoir ......... .. .. .. .. . 238
H ead res train ts . . . . . . . . . . . . . . . . . 5 5, 13 2
A dju sting . ... .. ... . .. ... .. .. .. ... 132
Fr ont seats . . . . . . . . . . . . . . . . . . . . . . . . 55
Rear seats .. .. .. ......... .. .. .. .... 56
Removing .. ............. .... .. .. .. 56
H ea ted
exte rior m irrors ... .... ... .. .. .. .. .. 50
rear window (automatic climate cont ro l) 7 1
Index 293
rear w indow (climate cont rol) . ... .. .. . 69
seats (a utomatic climate control) ... .. . 71
seats (climate cont ro l) . . . . . . . . . . . . . . . 69
windshield washer spray no zzles ... .. .
48
He ating .... .. .. .. ................. . 67
Heavy clothi ng a nd safety be lts ... .... .
141
High beam . ... .. .... . ... ...... ... .. . 45
Hig h voltage warn ing label ....... .. .. 280
Hill descent contro l .... ............. 110
Homelin k unive rsal remote con trol . ... 126
Hood (re lease lever) .. .............. . 224
Hor n .......... .. .... ............. .. 8
How are child rest raint syste m anchors re-
lated to ch ild safety . .. .. .. ..... ... .. 18 7
How many a irbags does my vehicle have? 155
How ofte n should I check my tire pres -
s u res? ..... .. .. .. .. .. ........... .. 247
H ow safety belt pretens io ne rs wor k . . . . 1 45
Hydrop la ning ..... .. ..... .......... 251
I
Immobilize r . . . . . . . . . . . . . . . . . . . . . . . . 27
Impo rtant t hings to do be fore driving . . 128
Improperly worn safe ty belts .. ... ... .. 144
Ind icator lights
refer to Warn ing/ indicator lights . .. .. . 12
Infan t seats . . . . . . . . . . . . . . . . . . . . . . . 17 9
Installing child safety seats Safety be lts . . . . . . . . . . . . . . . . . . . . . . 184
Installing the upper tether strap on the
anchorage .... .. ...... ............. 190
Instruments Adjusting the light ing .. ..... ... .. .. . 46
Instrum ents and controls
Genera l illustration . . . . . . . . . . . . . . . . . . 8
Instr ument cluster . . . . . . . . . . . . . . . . . .
11
Interior lighting
Amb ience lighti ng .. .. .. ...... .... .. 46
Front and rear .... ................. 46
Intermittent (w indshie ld wipers) ...... . 48
J
Jack 262
Jump-starting . .. ................... 274
Jumper cables . .. ................... 275
•
•