warning light AUDI A6 2014 Owner's Manual
[x] Cancel search | Manufacturer: AUDI, Model Year: 2014, Model line: A6, Model: AUDI A6 2014Pages: 304, PDF Size: 76.32 MB
Page 33 of 304
malfunctions, which can increase the risk
of a coll is ion!
Electronic speed limiter
Instruments and warning/indicator lights 31
Your vehicle may be factory equipped with
tires that are rated for a maximum speed of
130 mph (210 km/h) . This is less than the
maximum speed of your vehicle. To reduce the
risk of sudden tire failure and loss of control if
the veh icle is ope rated at excessive speeds,
your veh icle also has an elect ronic speed limit
er. The electronic speed limiter prevents your
vehicle from going faster than the tire speed
rating . For more information
c:::> page 251.
If the engine control unit receives faulty vehi
cle road speed s ignals, the Malfunction Indi
cator Lamp (MIL)
¢,llij will illuminate . If this
occurs, contact the nearest authorized Audi
dealer for assistance.
S models
Your veh icle's top speed is electronically limit
ed to 155 mph (250 km/h).
I f the engine control unit receives faulty vehi
cle roadspeed signals, the Malfunction Indica
tor Lamp (MIU
¢,llij will illum inate. If this oc
curs, contact the nea rest authorized Audi
dealer for assistance.
8_ WARNING
Always observe the posted speed limits
and adjust your speed to suit prevailing
road, traffic and weather conditions. Never
drive your vehicle faster than the maxi
mum speed rating of the tires insta lled.
Page 34 of 304
32 Opening and clo sing
Opening and closing
Keys
Key set
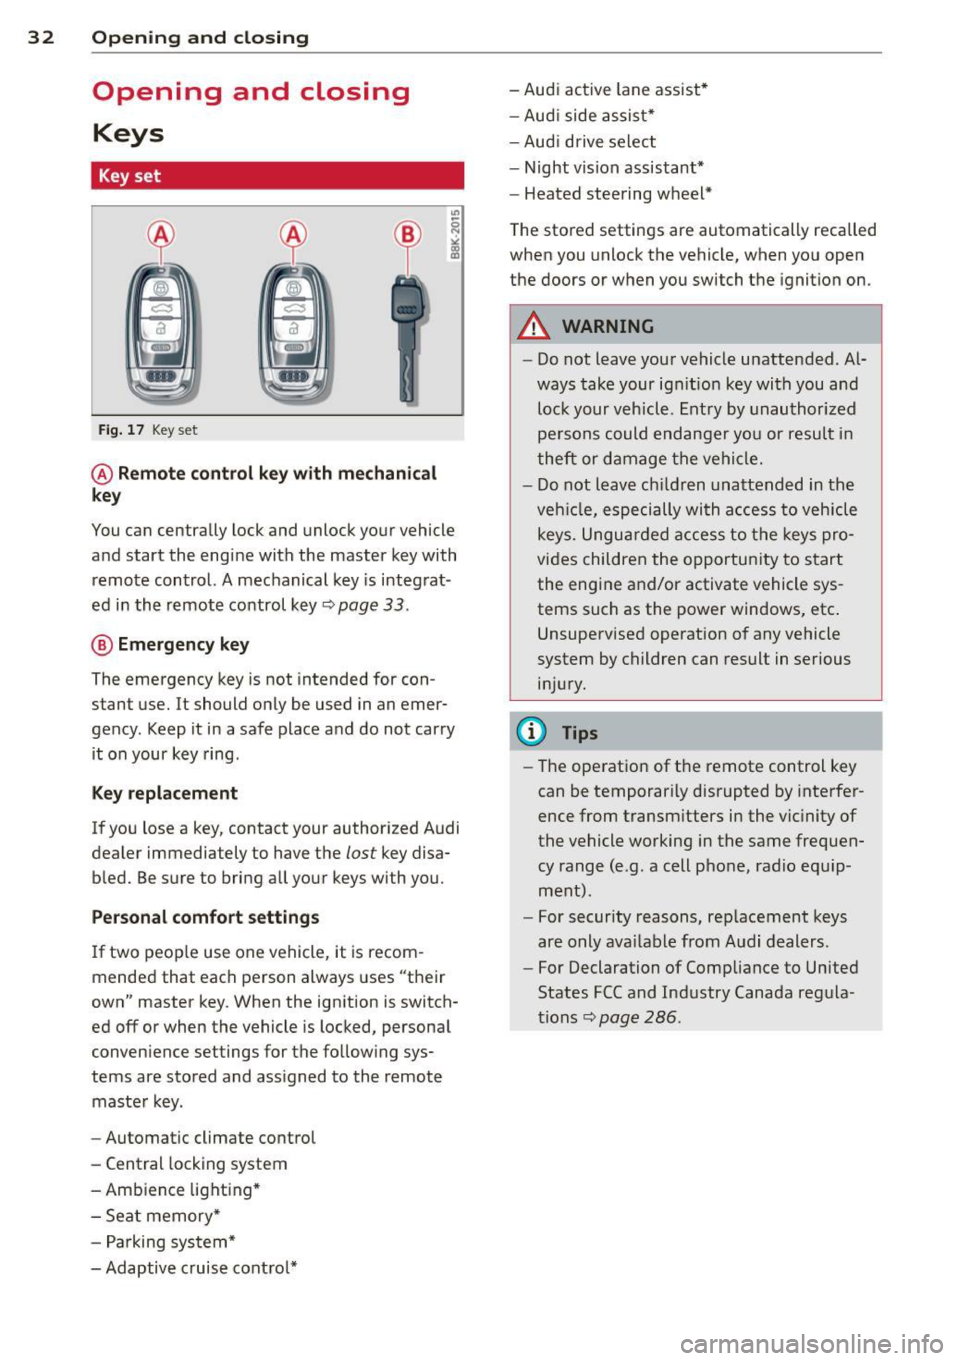
Fig . 17 Key set
@ Remot e control k ey w ith m echan ical
ke y
You can centrally lock and unlock your vehicle
and start the engine with the master key with
remote control. A mechanical key is integrat
ed in the remote control key
r:::;, page 33 .
@ Eme rgenc y ke y
The emergency key is not intended for con
stant use.
It should only be used in an emer
gency. Keep it in a safe place and do not carry it on your key ring .
Key replac em ent
If you lose a key, contact your authorized Audi
dealer immediately to have the
lost key disa
bled. Be sure to bring all your keys with you.
P er sonal c omfo rt se ttin gs
If two peop le use one vehicle, it is recom
mended that each person always uses "their
own" master key . When the ignition is switch
ed off or when the vehicle is locked, personal
convenience settings for the follow ing sys
tems are stored and assigned to the remote master key .
- Automatic climate control
- Central locking system
- Amb ience light ing*
- Seat memory*
- Parking system*
- Adaptive cruise control* - Audi active
lane assist *
- Aud i side assist*
- Aud i drive select
- Night vision assistant*
- Heated steering wheel*
The stored settings are automatically recalled
when you unlock the vehicle, when you open
the doors or when you switch the ignition on.
A WARNING
-- Do not leave your vehicle unattended . Al-
ways take your ignit ion key with you and
lock your vehicle . Entry by unauthorized
persons could endanger yo u or resu lt in
theft or damage the vehicle.
- Do not leave ch ildren unattended in the
veh icle, especially with access to vehicle
keys. Unguarded access to the keys pro
vides children the opportunity to start the engine and/or activate vehicle sys
tems such as the power windows, etc .
Unsupervised operation of any vehicle
system by children can result in serious
injury.
(1) Tips
- The operation of the remote control key
can be temporar ily disrupted by interfer
ence from transm itters in the vic inity of
the vehicle working in the same frequen
cy range (e.g. a cell phone, radio equip
ment).
- For security reasons, rep lacement keys
are only ava ilable from Audi dealers.
- For Declaration of Compliance to United
States FCC and Industry Canada regula
tions
r:::;, page 286.
Page 35 of 304
Removing the mechanical key
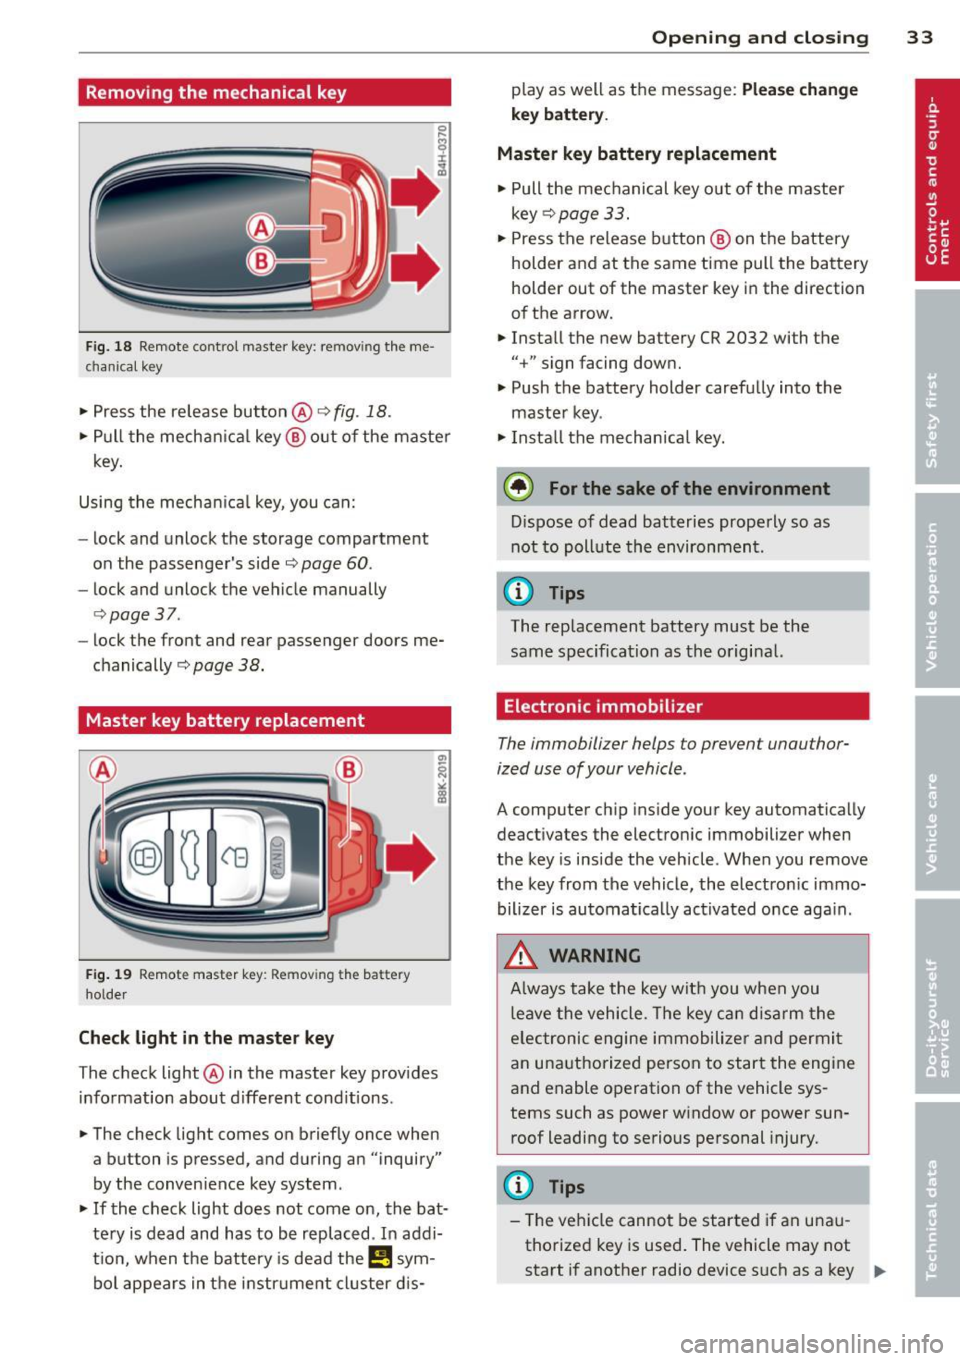
Fig. 18 R emo te contro l master key : remov ing the me
chanica l key
• Press the release button @ c:> fig. 18.
• Pull the mechanica l key @ out of the master
key.
Using the mechan ica l key, you can:
- lock and unlock the storage compartment
on the passenger's side
c::> page 60.
- lock and unlock the vehicle manually
c::>page 37 .
-lock the front and rear passenger doors me
chanically
c:> page 38.
Master key battery replacement
F ig . 19 Remote master key: Removing the battery
holde r
Check light in the master key
The check light @ in the master key provides
information about different cond itions .
• The check light comes on briefly once when
a button is pressed, and during an "inquiry"
by the conven ience key system .
• If the check light does not come on, the bat
tery is dead and has to be replaced. In addi
t ion, when the battery is dead the
I!! sym
bol appears in the instrument cluster dis-
Opening and closing 33
play as well as the message: Please change
key battery .
Master key battery replacement
• Pull the mechanical key out of the master
key
c::> page 33.
• Press the release button @ on the battery
holder and at the same time pull the battery
holder out of the master key in the direction
of the arrow.
• Install the new battery CR 2032 with the
"+" sign facing down.
• Push the battery holder carefully into the
master key .
• Install the mechanical key.
@ For the sake of the environment
Dispose of dead batteries properly so as
not to poll ute the environment.
(D Tips
The replacement battery must be the
same specification as the original.
, Electronic immobilizer
The immobilizer helps to prevent unauthor
ized use of your vehicle.
A comp uter chip inside your key automatica lly
deactivates the electronic immobilizer when
the key is inside the vehicle. When you remove
the key from the vehicle, the electronic immo
bilizer is automatically activated once again .
A WARNING
-
Always take the key with you when you
leave the vehicle. The key can disarm the
e lectronic engine immobilizer and permit
an unauthorized person to start the engine
and enable operation of the vehicle sys
tems such as power window or power sun
roof leading to serious personal injury.
(D Tips
- Th e vehicle cannot be started if an unau
thorized key is used. The vehicle may not
start if another radio device such as a key .,.
Page 36 of 304
34 Opening and closing
for another vehicle or a transponder is
located on the key ring.
- For Declaration of Compliance to United
States FCC and Industry Canada regula
tions ¢
page 286.
Power locking system
General description
The power locking system locks or unlocks all
doors and the rear lid simultaneously.
You can lock and unlock the vehicle centrally.
You have the following choices:
- Remote master key¢
page 35,
-Door handles with convenience key*
¢page 36,
-Lock cylinder at the driver's door
<=?page 37, or
- Power locking switch inside
<=? page 37.
Selective unlocking
When you lock the vehicle, the power locking
system w ill lock the doors and the rear lid .
When unlocking, you can set in the MMI
whether only the driver's door or the entire
vehicle should be unlocked <=?
page 35.
Automatic locking
The automat ic locking feature locks all the ve
h icle doors and the rear lid when you drive
faster tha n 9 mph (15 km/h).
The car is unlocked again, when the opening
function in the power locking system sw itch
or at one of the door levers is actuated .
Anti-theft alarm warning system
If the anti-theft alarm warning system de
tects a break- in into the vehicle, acoust ic and
visual warning signals are triggered .
The anti-theft warning system is activated au
tomatically when you lock the vehicle . It is de
activated when u nlocking using the remote
key, with the mechanical key, and when you
switch the ignition on.
The alarm also turns off when the alarm cycle has expired.
Turn signals
When you unlock the vehicle, the turn s ignals
flash twice. When you lock the vehicle the
turn signals flash once. If they do not flash ,
one of the doors, the rear lid or the hood is
not locked .
Unintentionally locking yourself out
In the follow ing cases there safeguards to
prevent you locking your remote master key in
the vehicle:
- The vehicle does not lock w ith the central
locking switch <=?
page 37 if the driver's
door is open.
- On veh icles with convenience key*, if the
most recently used master key is in the lug
gage compartment, the rear lid is automati
cally un locked again after it is closed.
Do not lock your veh icle w ith the
remote mas
ter key or convenience key*
unti l all doors
and the rear lid are closed. In this way you
avoid locking yourself out accidentally .
Power side door closer*
The veh icle doors are equipped with a power
s ide door closer . When closing a door, you on
ly have to let it fall light ly into the latch . The
door will then automatically close by itself
¢& .
A WARNING
-- When you lock your vehicle from outside,
nobody - especially children -should re
main inside the vehicle. Remember,
when you lock the vehicle from the out
side the windows cannot be opened from
the inside.
- When you leave the vehicle, always take
the ignition key with you . This will pre
vent passengers (children, for example)
from accidentally being locked in the ve
hicle should they accidentally press the
power locking switch in the doors.
- Do not leave children inside the vehicle
unsupervised. In an emergency it would
be impossible to open the doors from
the o utside without the key.
Page 39 of 304
-For Declaration of Compliance to United
States FCC and Industry Canada regula
tions ¢
page 286.
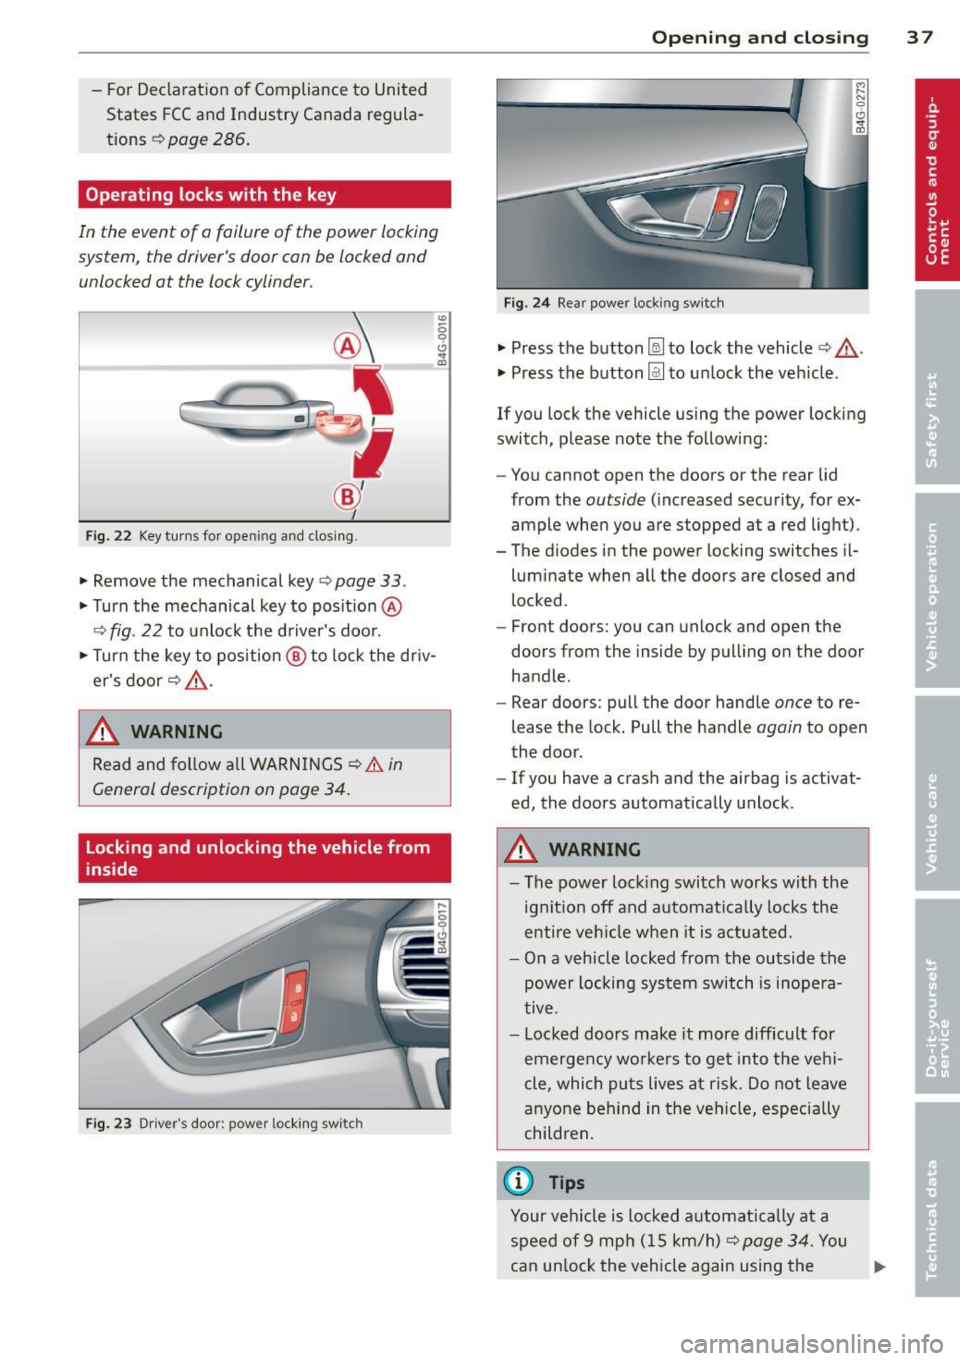
Operating locks with the key
In the event of a failure of the power locking
system, the driver's door can be locked and
unlocked at the lock cylinder.
Fig . 22 Key tur ns for open ing and dosing .
• Remove the mechanical key <::> page 33 .
• Turn the mechanical key to posit ion @
9fig . 22 to unlock the d river's door.
• Turn the key to position ® to lock the dr iv
er's door
r:::> .&_ .
A WARNING
"' :; 0 0 .., a,
-
Read and follow a ll WARNINGS ¢.& in
General description on poge 34.
Locking and unlocking the vehicle from
inside
Fig . 23 Driver' s door: power lockin g swi tc h
Op enin g an d clos ing 3 7
Fig . 24 Rea r powe r lock ing switch
• Press the button~ to lock the vehicle Q .&_ .
• Press the button Im to un lock the veh icle .
If you lock the vehicle using the power locking
switch, please note the following:
- You cannot open the doors or the rear lid
from the
outside (increased security, for ex
ample when you are stopped at a red light).
- The diodes in the power locking switches il- luminate when all the doors are closed and
locked .
- Front doors: you can unlock and open the
doors from the inside by pulling on the door
handle.
- Rear doors: pull the door handle
once to re
lease the lock. Pull the handle
again to open
the door .
- If you have a crash and the airbag is activat
ed, the doors automatically unlock .
A WARNING
-The power locking switch wo rks with the
ignition off and automat ica lly locks the
entire veh icle when it is actuated.
- On a vehicle locked from the outside the
power locking sys tem switch is inope ra
tive .
- Locked doors make it more difficult for
emergency wo rke rs to get into the veh i
cle, which puts lives at risk. Do not leave
anyone behind in the vehicle, especially
children .
(D Tips
Your vehicle is locked a utomat ica lly at a
speed of 9 mph ( 15 km/h)
r:::> page 34. You
can un lock the vehicle again using the .,..
Page 42 of 304
40 Opening and clo sing
Child safety lock for
the rear doors
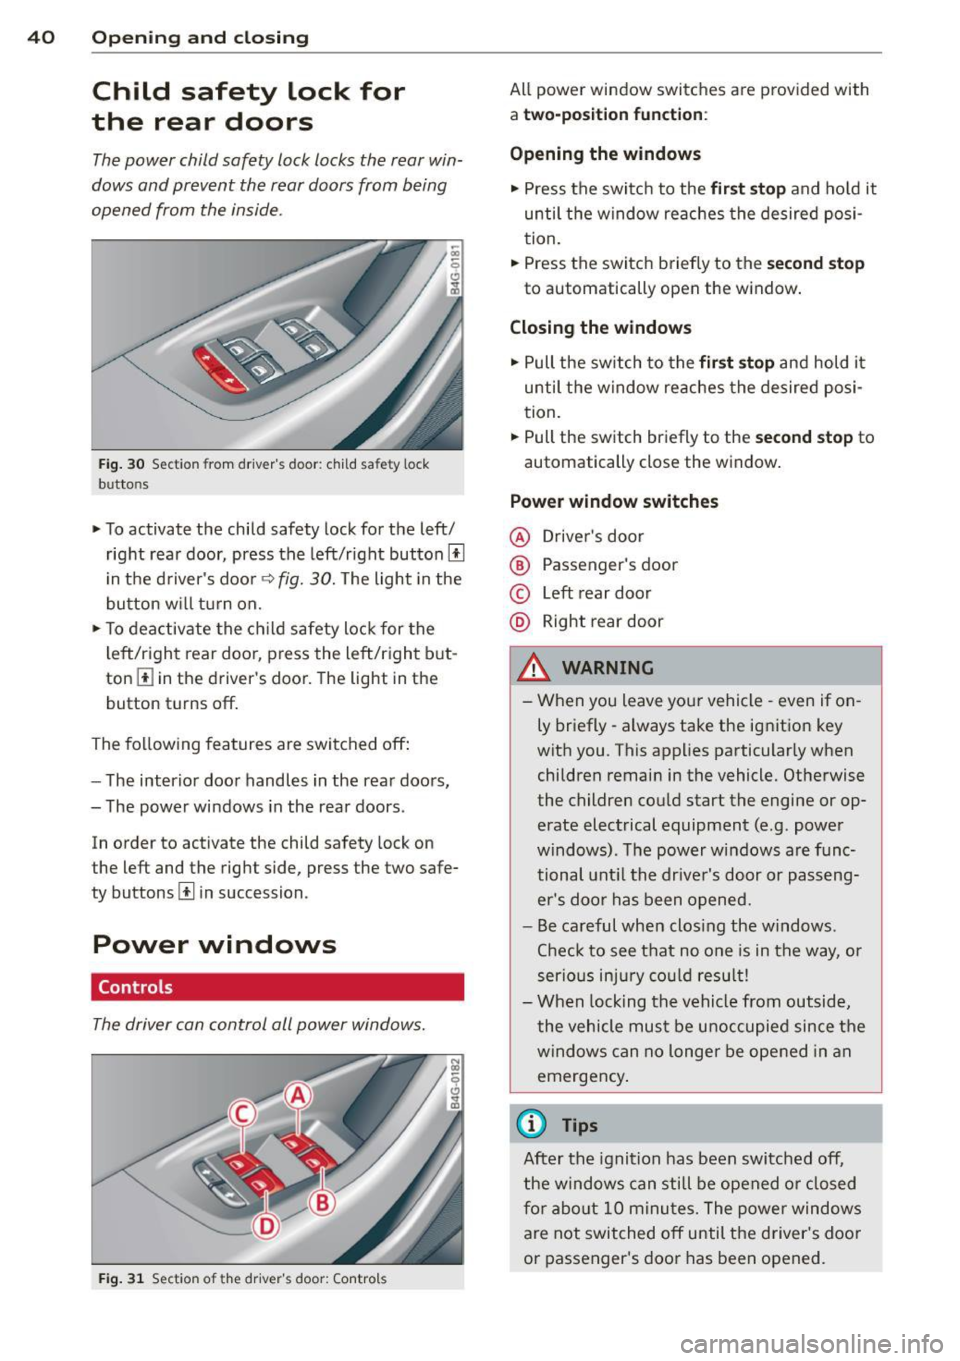
The power child safety lock locks the rear win
dows and prevent the rear doors from being
opened from the inside.
Fig. 30 Section from driver's door: child safety lock
buttons
• To activate the child safety lock for the left/
right rear door, press the left/right button[!]
i n the d river's door
q fig. 30. The light in the
button w ill turn on.
• To deactivate the ch ild safety lock for the
l eft/right rear door, press the left/right b ut
ton
III in the driver's door. The light in the
button turns off.
The following features are switched off:
- The interior door handles in the rear doors,
- The power windows in the rear doors .
In order to activate the child safety lock on
the left and the right side, press the two safe
ty buttons[!] in succession.
Power windows
Controls
The driver can control all power windows.
Fig . 31 Section of the driver's door: Controls
All power window switches are provided with
a two-po sition function :
Opening the windows
• Press the switc h to the fir st sto p and hold it
until the window re aches the desired posi
tion.
• Press the switch briefly to the
second stop
to automatically open the window .
Closing the windows
• Pull the sw itch to the fir st stop and hold it
until the window reaches the desired posi
tion .
.. Pull the switch br iefly to the
s e cond stop to
automatically close the window.
Power window switches
@ Drive r's door
® Passenger's door
© Left rear door
@ Right rear door
& WARNING
- When you leave you r vehicle -even if on
ly briefly -always take the ignition key
wit h you . This applies particularly when
children remain in the vehicle. Otherwise
the children could start the engine or op
erate electrical equipment (e.g. power
windows). The power windows are func
tional unt il the drive r's door or passeng
er 's doo r ha s been opened.
- Be careful when clos ing the w indows .
Chec k to see that no o ne is in the way, or
serio us inju ry co uld resu lt!
- When lock ing the vehicle from outside,
the vehicle mu st be u noccupied since the
windows can no longer be opened in an
emergency .
{1) Tips
After the ignition has been switched off,
the windows can still be opened o r closed
fo r a bout 10 m inu tes. The power windows
are not switched off until the driver 's doo r
or passenger 's door has been opened.
Page 46 of 304
44 Clear vision
& WARNING
-Automatic headlights are only intended
to assist the driver . They do not relieve
the driver of his responsibility to check
the headlights and to turn them on man
ually according to the current light and
visibility conditions. For example, fog
cannot be detected by the light sensors.
So always switch on the headlights
io
under these weather conditions and
when driving in the dark.
- Crashes can happen when you cannot see
the road ahead and when you cannot be
seen by other motorists. Always turn on
theheadlightssothatyoucanseeahead and so that others can see your car from
the back .
- Please observe legal regulations when
using the lighting systems described .
(D Note
The rear fog lights should only be turned
on in accordance with traffic regulation, as
the lights are bright for following traffic.
{D) Tips
- The light sensor* for automatic head
light range control* is located in the rear
view mirror mount . You should therefore
not apply any stickers to the windshield
in this area in order to prevent malfunc
tions or failures .
- In the event of a light sensor malfunc
tion, the driver is notified in the instru
ment cluster display ~
page 23 .
-You will hear a warning tone if you open
the driver door when the exterior lights
are switched on.
- In cool or damp weather, the inside of
the headlights, turn signals and tail lights can fog over due to the tempera
ture difference between the inside and
outside. They will clear shortly after
switching them on. This does not affect
the service life of the lighting.
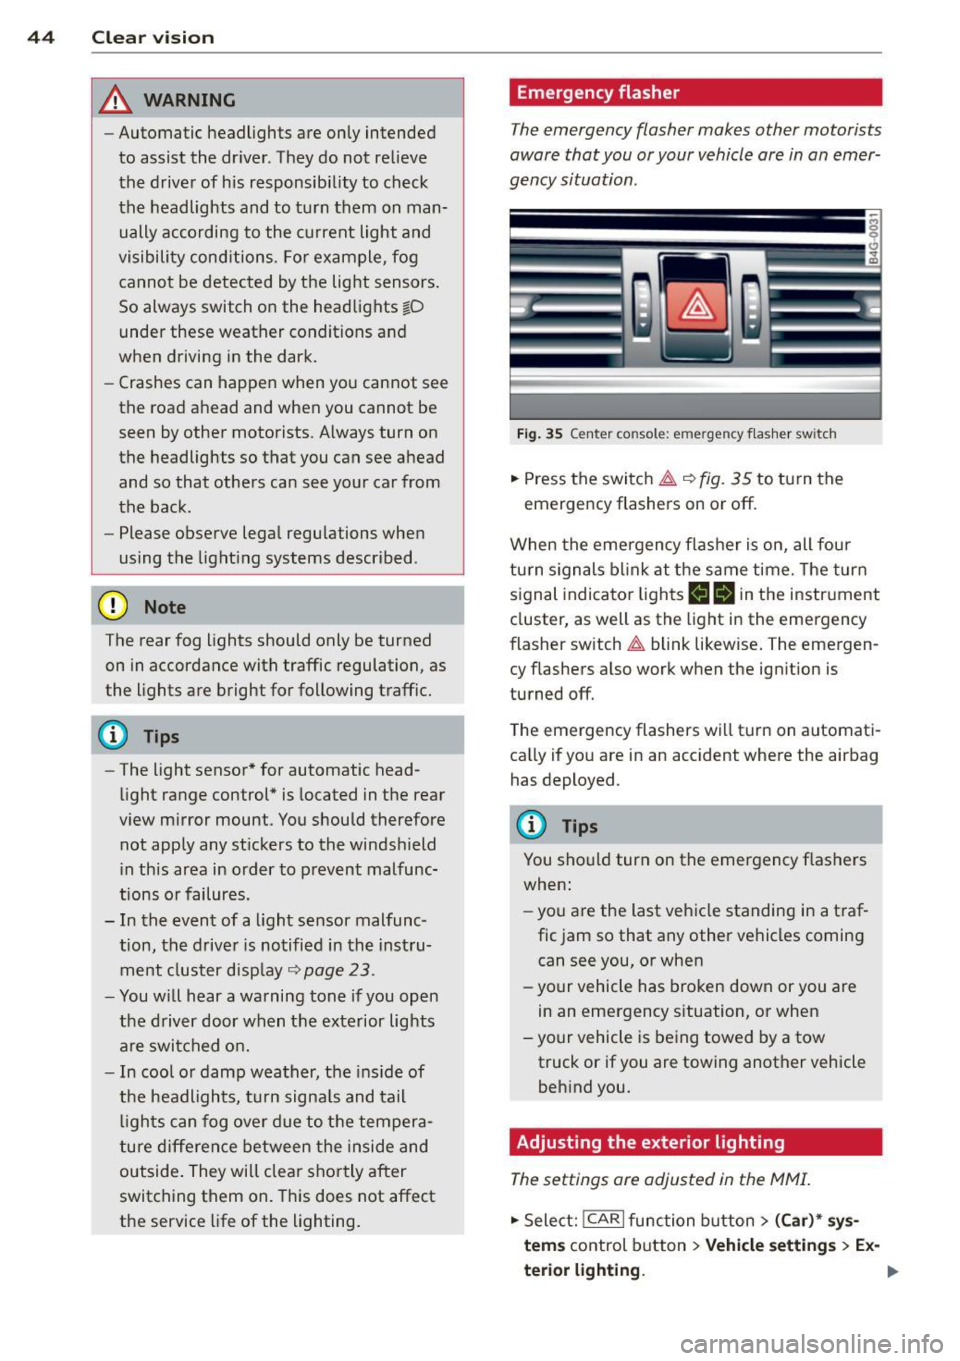
Emergency flasher
The emergency flasher makes other motorists
aware that you or your vehicle are in an emer
gency situation .
Fig. 35 Ce nte r co nso le: em erg en cy flash er sw itc h
.. Press the switch~~ fig. 35 to turn the
emergency flashers on or off.
When the emergency flasher is on, all four
turn signals blink at the same time. The turn
signal indicator lights
B Nin the instrument
cluster, as well as the light in the emergency
flasher switch
~ blink likewise. The emergen
cy flashers also work when the ignition is
turned off.
The emergency flashers will turn on automati
cally if you are in an accident where the airbag
has deployed.
@ Tips
You should turn on the emergency flashers
when:
- you are the last vehicle standing in a traf
fic jam so that any other vehicles coming
can see you, or when
- your vehicle has broken down or you are
in an emergency situation, or when
-your vehicle is being towed by a tow
truck or if you are towing another vehicle
behind you.
Adjusting the exterior lighting
The settings ore adjusted in the MMI.
.. Select: !CARI function button> (Car)* sys
tems
control button > Vehicle settings > Ex-
terior lighting.
Ill>
Page 48 of 304
46 Clear vis ion
instrument cluste r illuminates when the
high beams are on.
- T he
headlight flash er works only as long as
yo u hold the lever - even if there are no
l ights turned on. The indicator light
II in
the instrument cluster il luminates when you
use the headlight flasher.
A WARNING
Do not use the high beam or headlight
flasher if you know that these could blind
oncoming traffic.
Interior lights
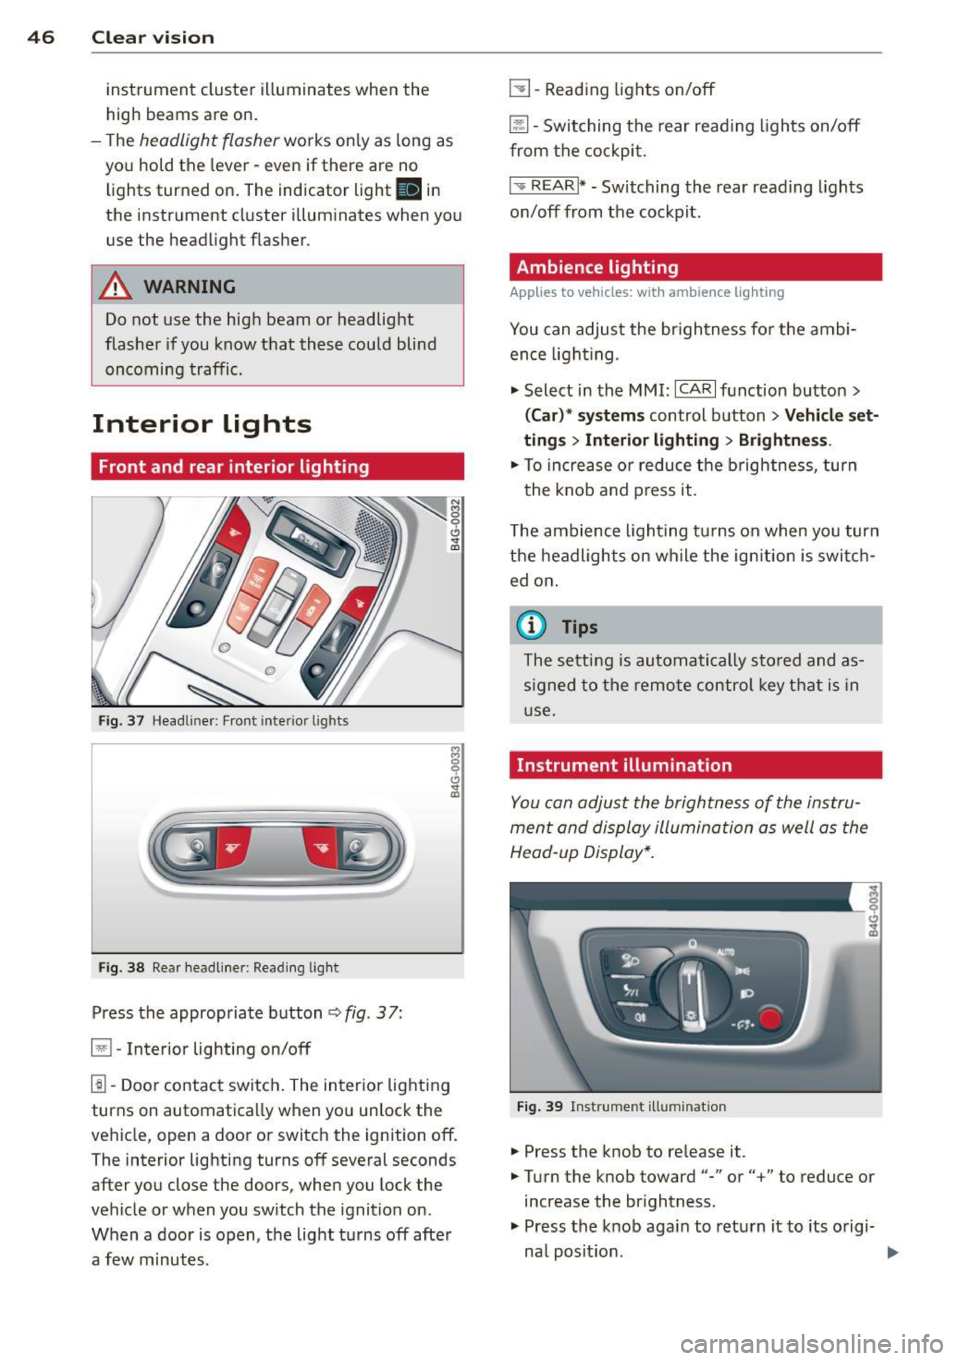
Front and rear interior lighting
Fi g. 37 Headliner: Front interior ligh ts
Fig . 38 Re ar headli ne r: Readi ng light
Press the appropriate button q fig . 3 7:
El -Interior lighting on/off
I]]-Door contac t sw itch . The inter ior lighting
turns on automatica lly when you unlock the
vehicle, open a door or switch the ignition off.
The interior lighting turns off several seconds
after you close the doors, when you lock the
vehicle or when you sw itch the ignition on.
When a door is open, the light t urns off afte r
a few minutes.
L:!l -Read ing lights on/off
~ - Switching the rear read ing lights on/off
from the cockpi t.
I" REARI * -Switching the rear reading lights
o n/off from the cockpit.
Ambience lighting
Applies to vehicles: w ith amb ience lighting
You can adjust the br ightness for the ambi
ence ligh tin g.
.. Select in the MMI:
ICA RI function button>
(Car )* sys tem s control button > Vehicle set
ting s
> Interi or lighting > Brightne ss.
.. To increase or reduce the b rightness, turn
t he knob and press it .
T he ambience light ing tu rns on when you turn
the headlights on wh ile the ign ition is swi tc h
ed on.
(D Tips
The setti ng is automati cally sto red and as
s igned to the remo te contr ol key t hat i s in
u se.
Instrument illumination
You can adjust the brightness of the instru
men t and di splay illumination a s well as the
Head-up Display*.
Fi g. 39 Instrume nt illumina tion
... Press the knob to release it.
.. Turn the knob toward"-" or"+" to reduce or
increase the br ightness .
.. Press the knob aga in to return it to its o rigi-
na l posit ion . ...
Page 49 of 304
@ Tips
The instrument illumination (for dials and
needles) lights on when the ign it ion is
sw itched on and the vehicle lig hts are
turned off. As the daylight fades, the illu
m ination of the dials likewise dims auto
mat ically and w ill go out comp lete ly when
the o utside lig ht is ve ry low. This fea ture is
meant to remi nd you t o swit ch on the
headl igh ts when o utside light condi tions
become poor.
Vision
Sun visors
( J
F ig . 40 Sun visor
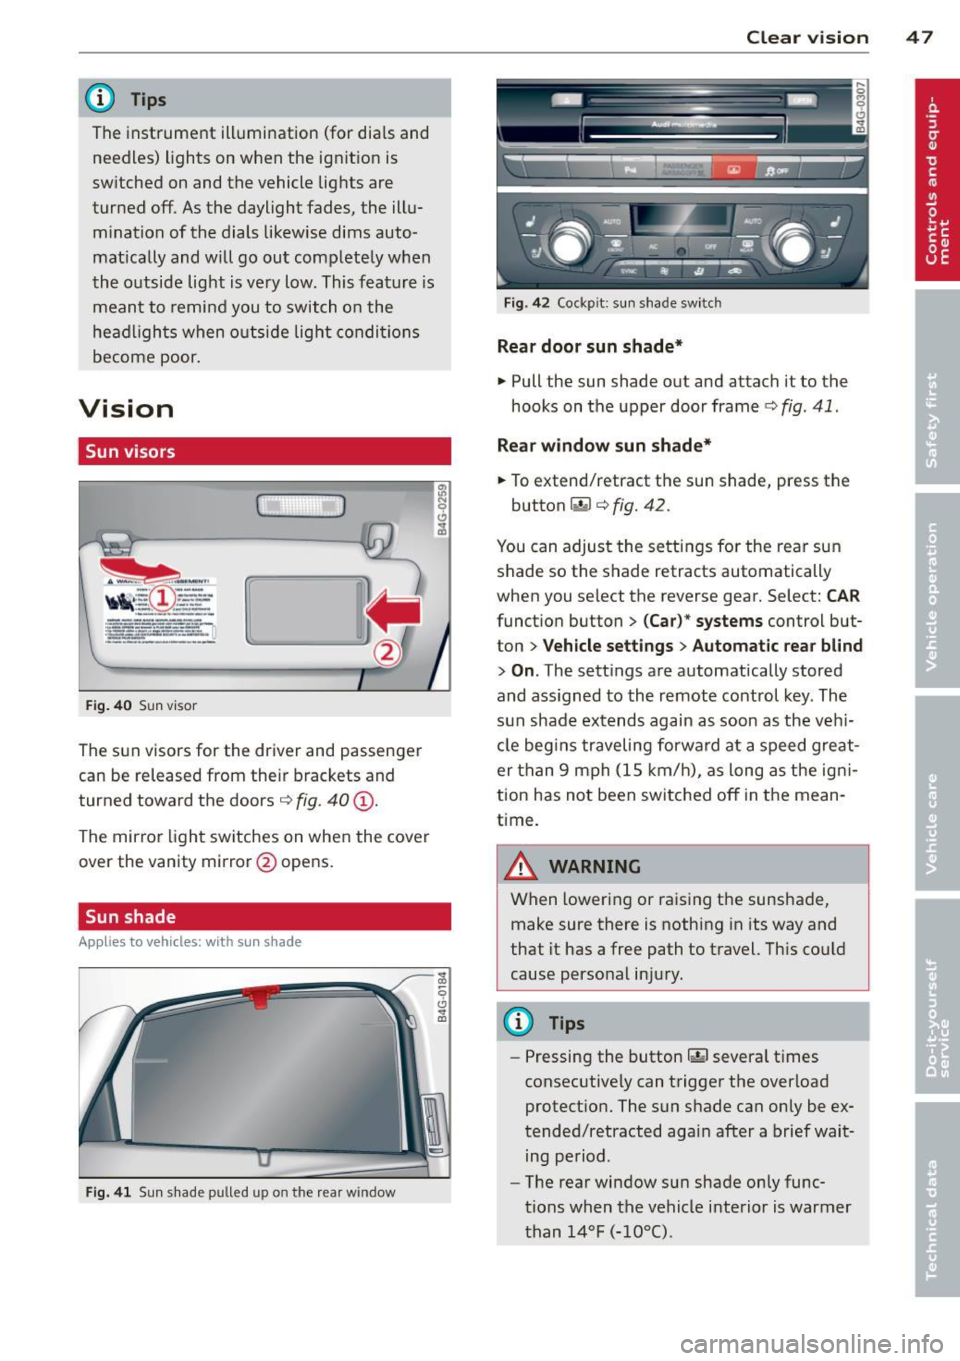
The sun visors for the driver and passenger
can be released from their brackets and
turned toward the doors¢
fig. 40@.
The mirror light switches on when the cover
over the vanity mirror @opens.
Sun shade
Applies to vehicles: with sun shade
F ig . 41 Sun shade pulled up on the rea r window
Clear vi sion 4 7
Fig . 4 2 Cockp it: sun shade switch
Rear door sunshade*
.. Pull the sun shade out and attach it to the
hooks on the upper door frame¢
fig. 41 .
Rear window sun shade*
.. To extend/retract the sun shade, press the
button~ ¢
fig. 42.
You can adjust the settings for the rear sun
shade so the shade retracts automatically
when you select the reverse gear. Select:
CAR
function button > (Car )* systems control but
ton >
V ehicle settings > Automatic rea r bl ind
> On .The sett ings are automatically stored
and ass igned to the remote control key . The
s u n shade extends again as soon as the v ehi
cle beg ins traveling forwa rd at a speed gre at
er than 9 mph (1S km/h), as long as the ig ni
tion has not been switched off in the mean
time.
A WARNING
When lowering or raising the sunshade, make sure there is nothing in its way and
that it has a free path to t ravel. Th is cou ld
cause perso nal inju ry.
@ Tips
-
- Pressing the button rn severa l t imes
consec utive ly can trigger the overload
protect ion. The sun s hade can only be ex
tended/retracted again after a brief wait ing period.
- The rear window sun shade only func
tions when the vehicle i nterior is warmer
than
1 4°F ( -10°() .
Page 50 of 304
48 Clear vis ion
Wiper and washer
system
Switching the windshield wipers on
F ig. 43 Wind sh ie ld wipe r lever
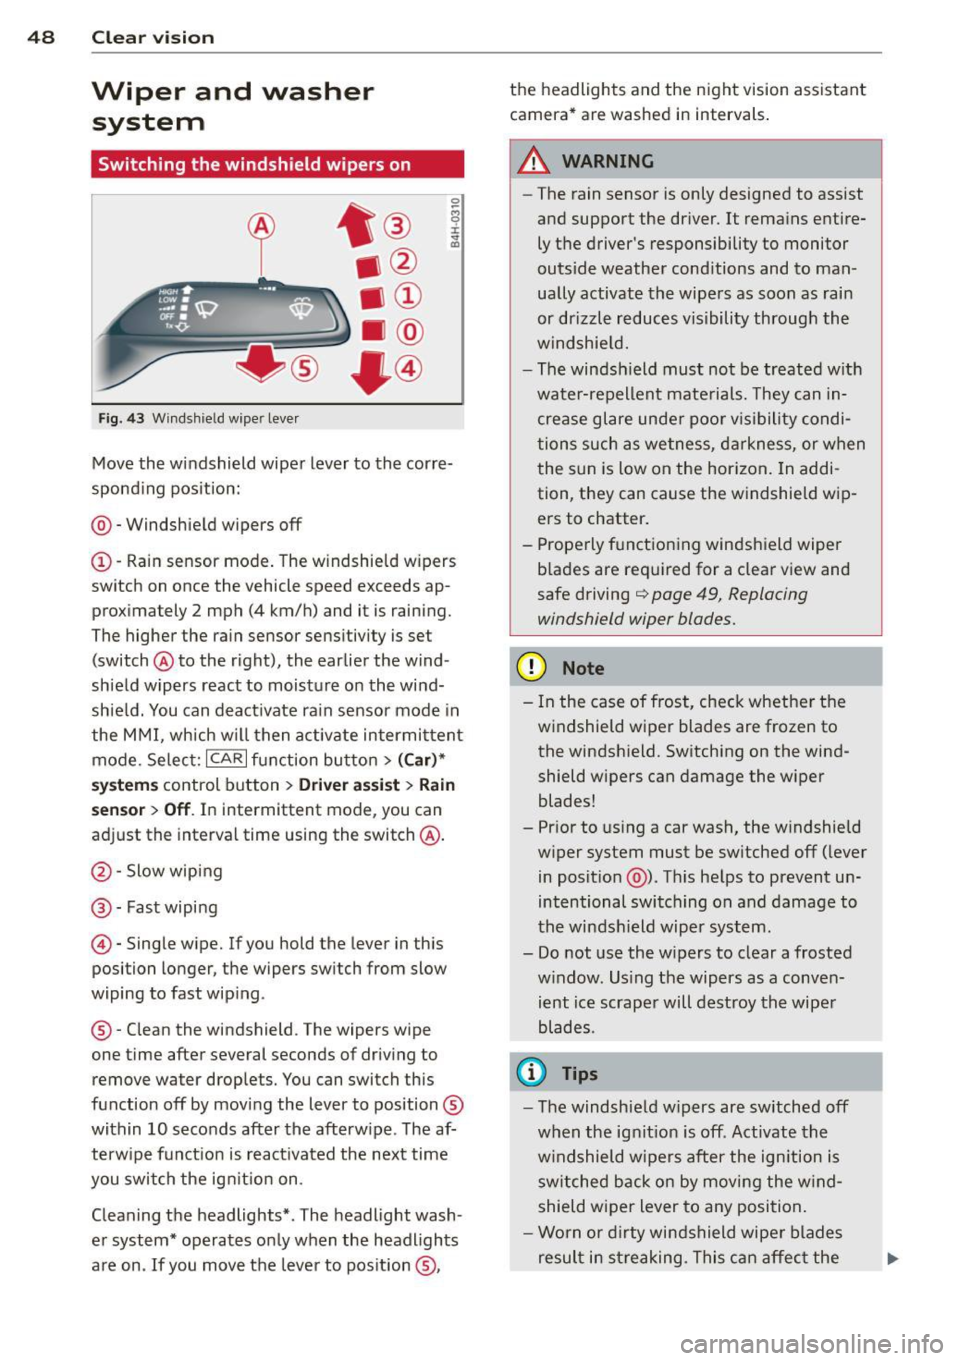
Move the windshield wiper lever to the corre
sponding pos ition:
@ - Windshie ld wipers off
(I) -Rain sensor mode . The windshield w ipers
switch on once the vehicle speed exceeds ap
proximately 2 mph (4 km/h) and it is raining.
The higher the rain sensor sens itivity is se t
(switch @to the right), the earlier the wind
shield wipers react to moisture on the wind
shie ld. You can deact ivate rain sensor mode in
the MMI, which w ill then activate intermi ttent
mode. Selec t:
ICAR I function bu tton > ( Car )*
system s control button > Driver ass is t > Rain
se nsor
> Off . In intermittent mode, you can
adjust the interval time using the switch @.
@-Slow wiping
@-Fast wiping
© -Single wipe. If you hold the lever in this
posi tion longer, the wipers sw itch from slow
wiping to fast wip ing .
® - Clean the windshield . The wipers wipe
one time after several seconds of driv ing to
remove water drop le ts. You can switch this
function off by mov ing the lever to position ®
within 10 seconds after the afterw ipe . The af
terw ipe fun ct ion is react ivated the next time
you swit ch the ig nition on .
Cleaning the headlights* . The headlight wash
e r system* operates only when the headlights
are on . If you move the lever to pos ition ®, the headlights and the night vision assistant
camera* are washed in intervals .
.&_ WARNING
-
-The rain sensor is only designed to assist
and support the driver.
It remains entire
ly t he driver's responsibility to monitor
outside weather cond itions and to man
ually activate the wipe rs as soon as rain
or drizzle reduces v isibility through the
windshie ld.
- The windsh ield must no t be treated w ith
wate r-repellent mate rials. They can in
crease glare unde r poo r vis ibility condi
tions such as wetness, d arkness, or when
the sun is low on the hor izon. In addi
tion, they can cause the w indshield w ip
ers to chatter .
- Prope rly f unctioning windshield wiper
b lades are required for a clear view and
safe driving
q page 49, Replacing
windshield wiper blades.
(D Note
- In the case of frost, check whethe r th e
windshield wiper blades are frozen to
the windsh ield. Switching on the wind
shield wipers can damage the wiper
blades!
- Pr ior to us ing a car wash, the w indshield
w iper system must be sw itched off ( lever
in posit ion @). Th is he lps to prevent un
intentional switching on and damage to
the winds hield wiper system.
- Do not use the w ipers to clear a frosted
w indow . Us ing the wipers as a conven
ient ice scrape r will destroy the wipe r
blades .
(D Tips
-The windshie ld w ipers are switched off
w hen the ignit ion is off . Activate the
w indshield wipers after the ign ition is
switched back on by moving the w ind
shield wiper lever to any position.
- Worn or dirty windshield wipe r blades
result in streaking. This can affect the