tow AUDI A6 2015 Owner's Manual
[x] Cancel search | Manufacturer: AUDI, Model Year: 2015, Model line: A6, Model: AUDI A6 2015Pages: 314, PDF Size: 77.57 MB
Page 115 of 314
M N
0 I.J "". rl I.O
"' rl
"' rl
There is a system malfunction in the transmis
sion. You may continue driving. Drive to your
authorized Audi dealer or qualified repair fa
cility soon to have the malfunction corrected.
rm Transmission malfunction: You can con
tinue driving with limited functionality
There is a system malfunction in the transmis
sion. The transmission is switching to emer
gency mode. This mode only shifts into cer
tain gears or will no longer shift at a ll. The en
g ine may stall. Drive to your authorized Audi
dealer or qualified repair facility immediately
to have the malfunction corrected .
rm ffl Transmission malfunction: No reverse
gear. You can continue driving
S tronic transmission: There is a system ma l
function in the transmission. The transmis
sion is switching to emergency mode. This mode on ly shifts into certain gears or will no
longer shift at all. The engine may sta ll. You
cannot engage the reverse gear. Drive to your
author ized Audi dealer or qualified repair fa
cility immed iately to have the malfunction
corrected .
rm Transmission malfunction: Stop vehicle
and shift to P
Do not cont inue driving. Select the P se lector
lever position and see your authorized Aud i
dealer or qualified repair facility for assis
tance.
(D Note
If the transmiss ion switches to emergency
mode, you should take the vehicle to an
author ized Audi dealersh ip as soon as pos
sible to have the cond ition corrected .
Automatic Transmission 113
Selector lever emergency release
If the vehicle 's power supply fails, the selec
tor lever can be released in an emergency.
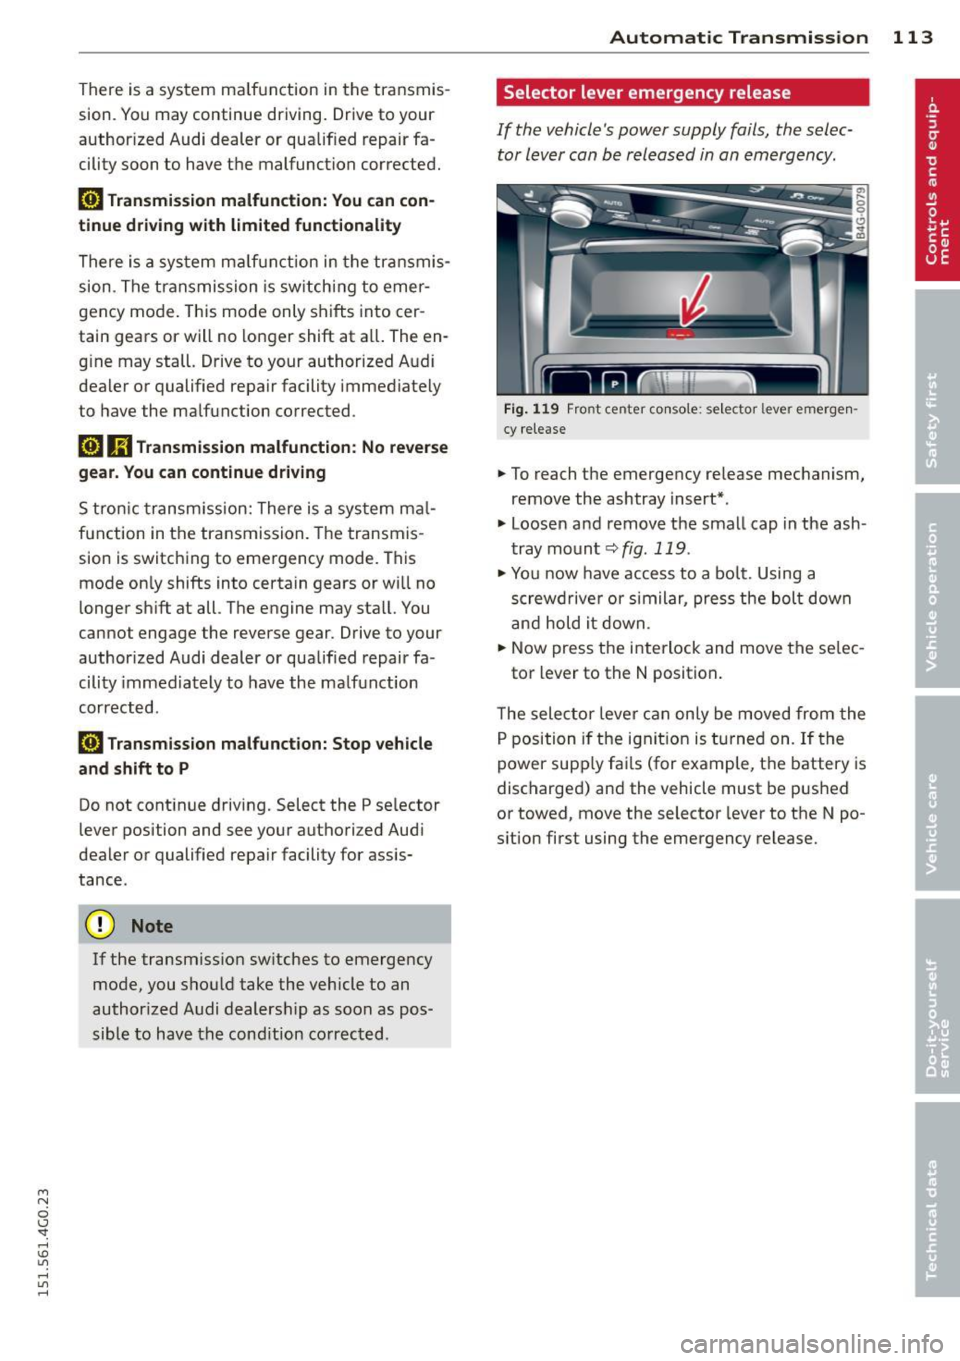
F ig . 1 19 Front center co nsole: selector lever emerge n
cy rele ase
.,. To reach the emergency release mechanism,
remove the ashtray insert*.
.,. Loosen and remove the small cap in the ash
tray mount
q fig. 119 .
.,. You now have access to a bolt. Using a
screwd river or similar, press the bolt down
and hold it down .
.,. Now press the interlock and move the se lec-
tor lever to the N position .
T he selector lever can only be moved from the
P position if the ignit ion is turned on. If the
power supply fai ls (for example, the battery is
discharged) and the vehicle must be pushed
or towed, move the selector lever to the N po
s ition first using the emergency release.
Page 116 of 314
114 Parking system s
Parking systems
General information
A ppl ies to vehicles: with parkin g system plus/rear view
camera/peripheral cameras
Depending on your vehicle's equ ipment, vari
ous parking a ids wi ll help you when pa rk ing
and maneuvering.
The
p ar king sy st e m plu s assists you when
pa rking by audib ly and visually indicat ing ob
jects detected
in front of and behind the vehi
cle
~ page 115.
The rear view ca m era shows the area behind
the vehicle in the Infotainment d isp lay. This
d isplay assists you when you are c ross o r par
allel parking
q page 116. In addit ion, you are
assisted by the functions from the parking
system plus
~ page 115 .
The peripher al cam era s ass ist you with park
ing and maneuvering. You are aided by var ious
cameras depending on the vehicle equipment leve l
¢page 119. In addition, you are assist
ed by the functions from the parking system
plus ¢ page 115.
A WARNING
- Always look for traff ic and check the area
around your vehicle by looking at it di
rectly as well . The parking system cannot
rep lace the d river's attent ion. The dr iver
is always respons ible for safety during
p arki ng and for all other maneuvers.
- Please note that some surfaces, such as
clothing, a re not detected by the system.
- Senso rs and cameras have blind spots in
wh ich peop le and objects ca nnot be de
te cted. Be especially cau tious of children
and animals.
- T he sensors can be displaced by impacts
or damage to the radia to r grille, bumpe r,
wheel housing and the unde rbody. The
par king systems may become impaired
as a resu lt . Have your authorized Audi
dealer or qualified workshop check their
function. -
Make s ure the sensors are not covered by
stickers, deposits or any other obstruc
tions as it may impair the sensor func
tion . For information on cleaning, refer
to
~ page 209.
(D Note
- Some objects are not detected by the system under certain c ircumstances:
- Obje cts su ch as ba rrie r chains, trailer
draw bars, vertical po les or fences
- Objects above t he senso rs such as wall
extensions
- Objects w ith specific surfaces or struc
tures su ch as chain link fences or pow
der snow.
- If you conti nue d riving closer to a low- ly
ing object, it may disappea r from the
sensor range. Note th at yo u w ill no lon
ger be warned abo ut this obstacle.
(j) Tips
- T he system may provide a wa rni ng even
t ho ugh the re are no obs ta cl es in the cov
erage a rea in some situa tions, such as:
- certain road surfaces or for long grass.
- externa l ultrasonic sources e.g. from
clean ing vehicles.
- heavy rain, snow or thick vehicle ex
ha ust.
- We recommend that you practice park
ing in a traff ic-free location or park ing
lot to become familiar w ith the system.
When doing this, there should be good light and weather cond itions .
- You can change the volume and pitch of
the s ignals as we ll as the disp lay
¢page 124.
- Please refer to the instructions for tow
ing a t railer
¢ page 125.
- What appears in the infotainment dis
play is somewhat time-delayed.
Page 119 of 314
M N
0 <.J 'SI: ,...., \!) 1.1'1 ,...., 1.1'1 ,....,
example, after a collision, do not contin
ue to use the system for safety reasons.
Have it checked by your authorized Audi
dealership or authorized repa ir facility .
- Only use the rear v iew camera to assist
you if it shows a good, clear picture. For
example, the image may be affected by
the sun shin ing into the lens, dirt on the
lens or if there is a system fau lt.
- Use the rear view camera only if the lug
gage compartment lid is comp letely
closed. Ma ke su re any objects you may
h ave mounted on the luggage compart
ment lid do not block the rear view cam
era.
- The camera lens en la rges and dis torts
the field of vision. The ob ject appears
both a ltered and inaccurate on the
screen .
- In certain s ituations, peop le or objects in
the display appear closer or f urther
away:
- objects that do not touch the ground,
such as the bumper of a parked vehicle ,
a trailer hitch o r the rear of a truck. Do
not use the help lines in this case.
- If driven from a leve l surface onto a n
incline, or a downward slope.
- If driven towa rd protruding objects .
- If the ve hicle is carrying too much load
in the rear.
({D Note
- Always read and follow the applicable
warnings
¢ (Din General information on
page 114 .
-The orange colored orientat ion lines in
the Infotainment disp lay show the vehi
cle path depending on the steering
whee l ang le. The front of the vehicle
front sw ings out more than t he rear of
the veh icle. Maint ain p lenty of distan ce
so that your ou ts ide mirror or a corner of
you r vehicle does not collide with any ob
stacles .
Parking sys tem s 117
Switching on/off
App lies to vehicles: wit h parking system plus w ith rear
v iew camera
Switching on
.. Shift in to reverse or
.. press the
PwA bu tton in the center console
¢ page 115, fig . 121 . A short confirmation
tone sounds and the LED in the button turns
on .
Swi tching between the re ar view camera
and optical displa y
.,. Press the Graphi c control button®
¢ page 118, fig. 12 7 to see the optical d is
play .
.. Press the
Rearview control b utton to see the
rear view camera image.
Switching off
.,. Dr ive forward faster than 6 mph (10 km/h),
or
.. Press the
P111A button, or
.,. Switch the ignit ion off.
(D Tips
The visual d isplay in the left part of the
display should help you detec t the critical
vehicle areas .
Page 126 of 314
124 Park in g s yste m s
Trailer view
Applies to vehicles: with par king system p lus and tra iler
hitch
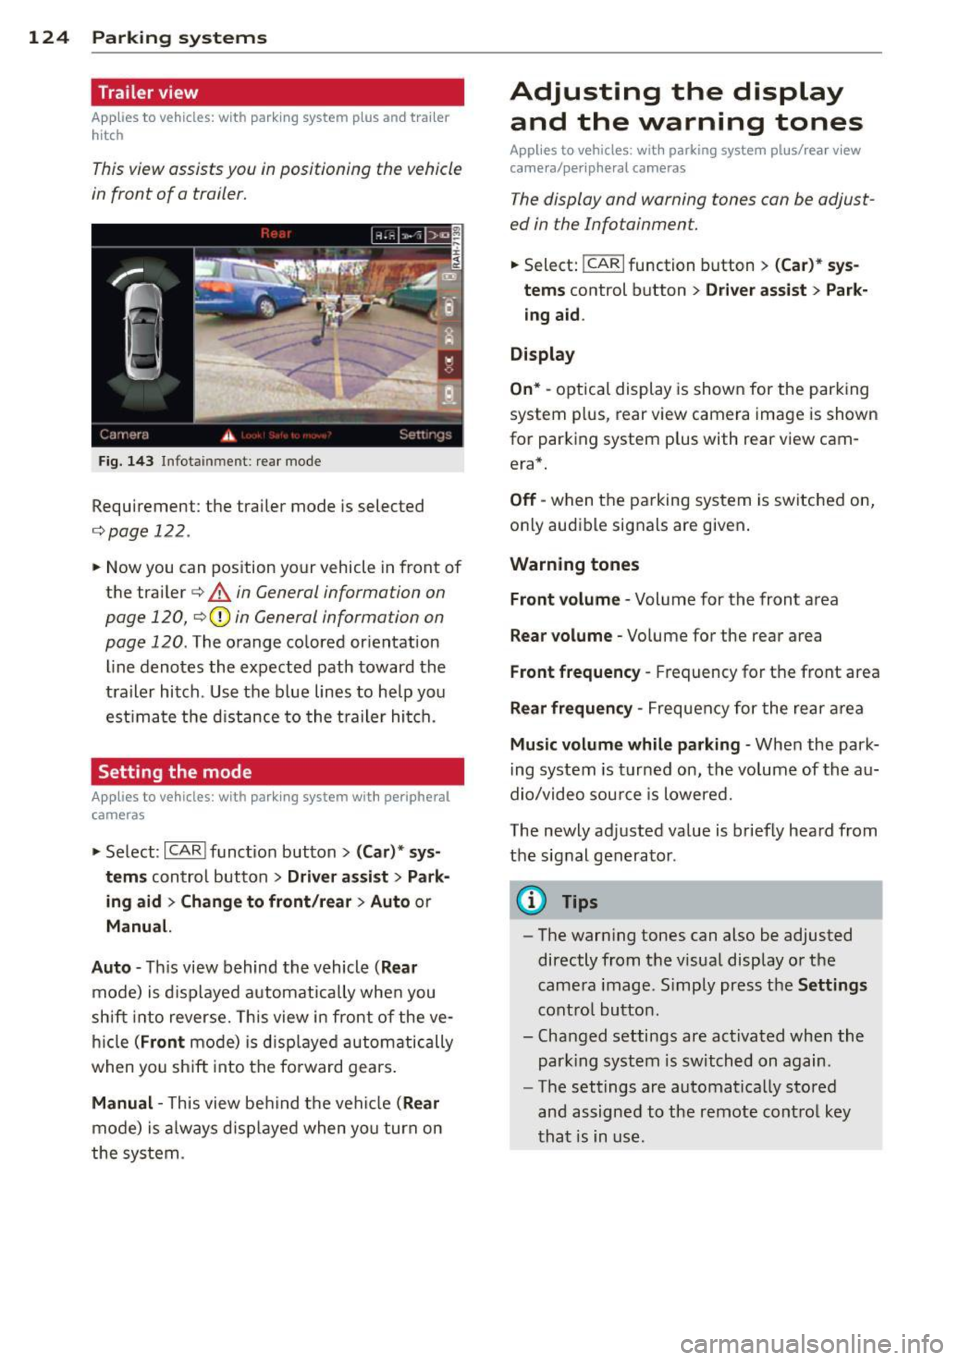
This view assists you in positioning the vehicle
in front of a trailer.
F ig. 1 43 Infotainment: rear mode
Requirement: the trailer mode is selected
c:;,page 122.
.. Now you can pos ition your vehicle in front of
the trailer
c:;, A in General information on
page 120,
c:;, (D in General information on
page 120.
The orange colored orientation
line denotes the expected path toward the
trailer hitch . Use the b lue lines to he lp you
est imate the d istance to the t railer hi tch.
Setting the mode
A ppl ies to vehicles: with park ing system wit h peripheral
cameras
.. Se lect : I CAR I func tion button> (Car )* sys
t e m s
control button > Dri ver as sis t > Park
ing aid > Ch ange to front /re ar > Aut o
or
Manua l.
A uto -
Th is view behind the vehicle ( Rea r
mode) is d isplayed automatically when you
shift into reverse. This view in front of the ve
h icle
( Fron t mode) is d isp layed automatically
when you sh ift into the fo rward gears .
Manual -This view behind t he vehicle (Rear
mode) is a lways d is p layed when you turn on
the system .
Adjusting the display
and the warning tones
Applies to vehicles: wit h parking system plus/ rea r vi ew
came ra/ peri pheral cameras
The display and warning tones can be adjust
ed in the Infotainment.
.. Select: !CARI function button > ( Car )* sys
tem s
control button > Drive r a ssist > Par k
in g a id .
Di splay
On * -
optical display is shown for the parking
system p lus, rear view camera image is shown
for parking system plus with rear view cam
era*.
Off -when the parking system is switched on,
only audible signals are given .
Warning tones
Fr ont volume -
Volume for the front area
Rear volume -Volume for the rear area
Front frequency -Frequency for the front area
Rear frequen cy -Frequency for the rear area
Mu sic v olum e wh ile parkin g -When the park
ing system is turned on, the volume of the au
dio/video sou rce is lowered.
The newly adjusted value is briefly heard from
the signal generator .
@ Tips
-The warn ing tones can also be adjusted
directly from the visual display o r the
camera image. S imply press the
Settin gs
contro l button .
- Changed settings are act ivated when the
park ing system is switched on again.
- The settings are automatica lly stored
and assigned to the remote control key
that is in use .
Page 127 of 314

M N
0 <.J 'SI: ,...., \!) 1.1'1 ,...., 1.1'1 ,....,
Error messages
Applies to vehicles: with parking system plus/rear view
camera/per ipheral cameras
There is an e rror in the system if the LED in
the
p, qA button is blinking and you hear a con
tinuous alarm for a few seconds afte r switch
ing on the parking system or when the park
ing system is already activated. If the error is
not corrected before you switch off the igni
tion, the LED in the
Pw.6. button will blink the
next time you switch on the parking system by
shifting into reverse.
Parking system plus
If a sensor is faulty, the~ symbol will appear
in front of/behind the vehicle in the Infotain
ment display. If a rear sensor is fau lty, only
obstacles that are in areas @ and @ are
shown ¢
page 115, fig. 120. If a front sensor
i s faulty, only obstacles that are in areas ©
and @are shown .
Peripheral cameras*
There is also a system error if:
- the
'(:8:)• • symbol appears in the display and
the corresponding display area is shown in
blue. The camera is not working in this area.
- all segments around the vehicles are red or
if no segments are displayed.
Drive to your authorized Aud i dea ler o r au
thorized repair fac ility immediately to have
the ma lfunction corrected.
Trailer hitch
Appl ies to vehicles: with parking system plus/rear view
camera/per ipheral cameras and trailer hitch
For vehicles using the tra iler socket, the park
ing system rear senso rs do not turn on when
you shift into reverse gear or when yo u press
the P
01A button. This results in the following re
strictions:
Parking system plus*
There is no distance wa rning for the rear. The
front sensors rema in activated. The visual dis
play switches to the traile r tow ing mode.
Parking systems 125
Parking system plus and rear view
camera* /Peripheral cameras*
There is no distance warning for the rear. The
front sensors remain activated. The visual dis
play sw itches to the trailer towing mode. The
rear view camera image will not show the ori
entation lines and the blue surfaces .
{D Tips
Trailer hitches that are not installed at the
factory may cause the park ing system to
malfunction or they may restr ict its func
tion.
Page 130 of 314
128 Driving Safely
• Fasten and wear safety belts correctly
9 page 139.
• Always keep both feet in the footwell so
that you are in control of the vehicle at all
t imes.
Fo r detailed information on how to adjust the
driver's seat, see
<=>page 53.
A WARNING
Drivers who are unbelted, out of position
or too close to the airbag can be seriously
injured by an airbag as it unfolds . To help
reduce the risk of serious personal injury:
- Always adjust the driver's seat and the
steering wheel so that there are at least
10 inches (25 cm) between your breast
bone and the steering wheel.
- Always adjust the driver's seat and the
steering wheel so that there are at least
4 inches (10 cm) between the knees and
the lower part of the instrument panel.
- Always hold the steering wheel on the
outside of the steering wheel rim with
your hands at the 9 o'clock and 3 o'clock
positions to help reduce the risk of per
sonal injury if the driver's airbag inflates.
- Never hold the steering wheel at the
12 o'clock position or with your hands at
other positions inside the steering wheel
rim or on the steering wheel hub. Hold
ing the steering wheel the wrong way
can cause serious injuries to the hands,
arms and head if the driver's airbag in
flates.
- Pointing the steering wheel toward your
face decreases the ability of the supple
mental driver's airbag to protect you in a
collision .
- Always sit in an upright position and nev
er lean against or place any part of your
body too close to the area where the air
bags are located.
- Before driving, always adjust the front
seats properly and make sure that all
passengers are properly restrained. -
For adjustable head restraints: before
driving, always also adjust the head re
straints properly.
- Never adjust the seats while the vehicle
is moving. Your seat may move unexpect
edly and you could lose control of the ve hicle .
- Never drive with the backrest reclined or
tilted far back! The farther the backrests
are tilted back, the greater the risk of in
jury due to incorrect positioning of the safety belt and improper seating posi
tion .
- Children must always ride in child seats
<=> page 171. Special precautions apply
when installing a child seat on the front
passenger seat <=>
page 145.
Proper seating position for the front
passenger
The proper front passenger seating position
is important for safe, relaxed driving.
For your own safety and to reduce the risk of
injury in the event of an accident, we recom
mend that you adjust the seat for the front
passenger to the following position:
• Adjust the angle of the seatback so that it is
in an upright position and your back comes
in full contact w ith it whenever the vehicle is
moving.
• For ad justab le head restra ints: adjust the
head restraint so the upper edge is as even
as possible with the top of your head. If that
is not possible, try to adjust the head re
straint so that it is as close to this position
as possible <=>
page 130. Move the head re
straint so that it is as close to the back of
the head as possible.
• Keep both feet flat on the floor in front of
the front passenger seat.
• Fasten and wear safety belts correctly
<=> page 139.
For detailed information on how to adjust the
front passenger's seat, see
<=> page 52. ...
Page 134 of 314
132 Driving Safel y
obtain suitable floor mats from your
authorized Audi Dealer.
Fl oor mat fasteners a re installed in you r Audi .
Floor mats used in your vehicle must be at
tached to these fasteners . Properly secur ing
the floo r mats will p revent them from s liding
i nto pos itions tha t could inte rfe re wi th t he
pedals or impair safe operation o f your vehi cle
in other ways.
A WARNING
Pedals t hat cannot move freely can resu lt
in a loss of veh icle contro l and increase the
r isk of serious personal injury .
- Always make sure that floor mats are
properly secured.
- Never place o r insta ll floo r mats or other
floor coverings in the vehicle that cannot
be properly secured in place to prevent
them from slipping and interfering w it h
the pedals or the ability to control the
vehicle .
- Never place or install floor mats or other
floor coverings on top of a lready insta l
led floor mats . Additional floor mats and
other cove rings w ill reduce the si ze of
the pedal area and in terfere with the
peda ls.
- Always properly rei nstall and se cu re floor
mats that h ave been take n out for clean
ing.
- Always make su re th at ob je cts canno t
fa ll into the driver fo otwe ll wh ile the ve
hicle is moving . Objects can become
t rapped under t he b rake pedal and accel
erator peda l causing a loss of veh icle
control.
Stowing luggage
Loading the luggage compartment
All luggage and other objects must be prop
erly stowed and secured in the luggage com
partment.
Loose items in the luggage compartment can
sh ift suddenly, changing veh icle hand ling characteristics. Loose items can a
lso inc rease
t h e risk of serious persona l injury in a sudden
vehicle maneuve r o r i n a co llision .
.. Dis trib ute the load even ly in the luggage
compa rtment .
.. Always place and properly secure heavy
items in the luggage compartment as fa r
forward as possible .
.. Secure luggage using the tie-downs prov id
ed
¢ page 63, Luggage compartment .
.. Make sure that the rear seatback is securely
latched in place.
A WARNING
Imp roperly stored luggage or other items
can fly t hro ugh the vehi cle causing ser ious
personal injury in the event of hard brak
i ng or an accident . To help reduce the risk
of ser ious personal in ju ry:
- Always put o bjects, fo r example, luggage
or other heavy items in t he luggage com
pa rtment.
- Always secure o bjects in the luggage
compa rtment using the tie-down hoo ks
and suitable straps.
A WARNING
-
Heavy loads w ill influence the way yo ur ve-
hi cle handles. To help reduce the risk of a
l oss of cont ro l leading to serious personal
in Jury :
- Always keep in mind when transporting
heavy objects , tha t a change in the cen
ter of gravity can also cause changes in
veh icle handling:
- Always distribute the load as evenly as
poss ible.
- Place heavy objects as far forward in the luggage compartment as possible.
- Never exceed the Gross Axle We igh t Rat
ing or the Gross Vehicle We ight Ratin g
specif ied on the safety compliance stick
er on the left door jamb. Exceeding per miss ible weight standards can cause the
veh icle to slide and hand le diffe rently.
- Please observe information on safe dr iv
ing
¢ page 126.
Page 143 of 314
M N
0 I.J "". rl I.O
"' rl
"' rl
Use the height adjustment to change the posi
tion of the shoulder belt of the front safety
belts .
.&_ WARNING
Improperly positioned safety belts can
cause serious personal injury in an acci
dent.
-
- The shoulder belt should lie as close to
the center of the collar bone as possible
and should fit well on the body. Hold the
belt above the latch tongue and pull it
even ly ac ross the chest so that it sits as
low as possible on the pelvis and there is
no pressure on the abdomen. The be lt
sho uld a lways f it snugly ¢
fig. 153. Pull
on the belt to tighten if necessary.
- A loose-fitt ing safety be lt can cause seri
o us injuries by shifting its position on
yo ur body from the strong bones to more
vulnerab le, soft tissue and cause serious
injury.
- Always read and heed all WARNINGS and
other important information
¢ page 139.
Pregnant women must also be correctly
restrained
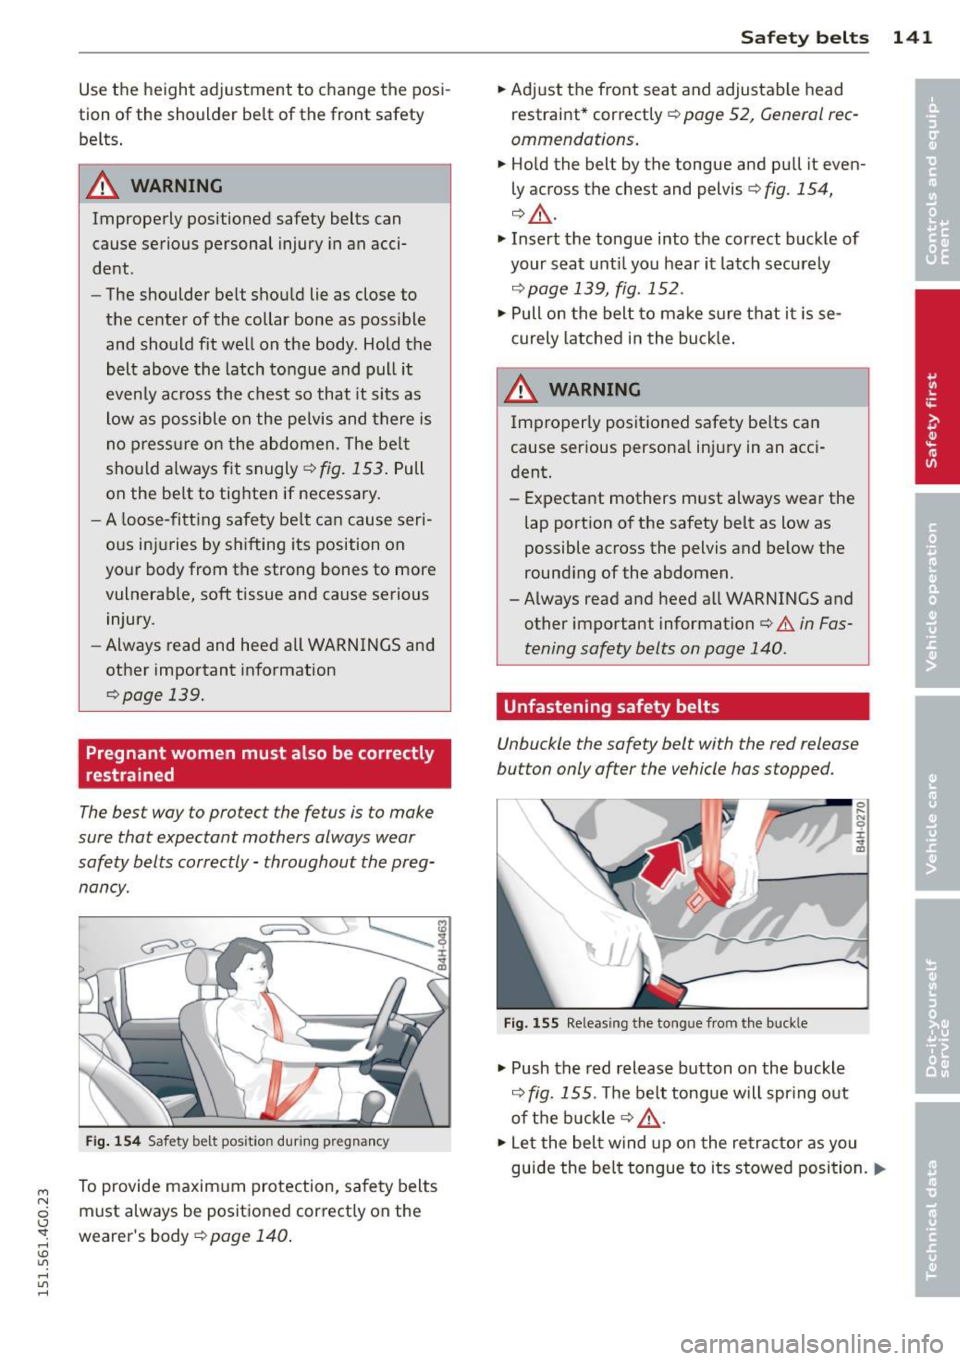
The best way to protect the fetus is to make
sure that expectant mothers always wear
safety belts correctly -throughout the preg
nancy.
Fi g. 154 Safety belt pos itio n during pr egnancy
To provide maxim um protection, safety belts
must always be posit ioned correctly on the
wearer's body¢
page 140.
Safety belts 141
.. Adjust the front seat and adjustable head
restraint* correctly ¢
page 52, General rec
ommendations .
.. Hold the belt by the tongue and pull it even
ly across the chest and pelvis ¢
fig. 154,
¢& .
.. Insert the tongue into t he correct buckle of
your seat until you hear it latch securely
r=;, page 139, fig. 152 .
.. Pull on the belt to make sure that it is se
curely latched in the buck le .
A WARNING
-
Improperly positioned safety be lts can
cause ser ious persona l injury in an acci
dent.
- Expectant mothers m ust always wear the
lap portion of the safety belt as low as
possible across the pelvis and below the
round ing of the abdomen.
-Always read and heed all WARNINGS and
other important information¢ &.
in Fas
tening safety belts on page
140.
Unfastening safety belts
Unbuckle the safety belt with the red release
button only after the vehicle has stopped.
,,,,,
Fig . 155 Re leas ing the tong ue from the buck le
.,. Push the red release button on the buckle
r=:;, fig. 155 . The be lt tongue will spr ing out
of the buckle
r=:;, .&, .
0 ...
"' 0 ±
~
.,. Let the belt wind up on the retractor as you
guide the be lt tongue to its stowed position.
Ill>
Page 156 of 314
154 Airbag system
-Never remove the front passenger or
driver seat from the vehicle.
- Never remove the upholstery from the
front passenger seat.
- Never disassemble or remove parts from
the seat or disconnect wires from it.
- Never carry sharp objects in your pockets
or put them on the seat. The capacitive
passenger detection mat in the front
passenger seat will not function properly
if it is punctured .
- Never carry things on your lap or carry objects on the front passenger seat.
Such objects can influence the capaci
tance registered by the capacitive pas
senger detection system, so that incor
rect information is provided to the airbag
control unit.
- Never store items under the front pas
senger seat. Parts of the Advanced Air
bag System under the passenger seat
could be damaged, preventing them and
the airbag system from working proper
ly.
- Never place seat covers or replacement upholstery that have not been specifical
ly approved by Audi on the front seats.
- Seat covers can prevent the Advanced Airbag System from recognizing child re
straints or occupants on the front pas
senger seat and prevent the side airbag
in the seat backrest from deploying prop
erly.
- If a seat heater has been retrofitted or
otherwise added to the front passenger
seat, never install any child restraint sys
tem on this seat .
- Never use cushions, pillows, blankets, or similar items on the front passenger
seat. The additional layers prevent the
capacitive passenger detection system
from accurately measuring the capaci
tance of the child safety seat and/or the
person on the seat and thus keep the Ad
vanced Airbag System from working properly.
- Never place or use any electrical device
(such as a laptop, CD player, electronic games device
, power inverter or seat
heater for child seats) on the front pas
senger seat if the device is connected to
the 12-volt socket or the cigarette light
er socket . Such devices can influence the
capacitance registered by the capacitive passenger detection system, so that in
correct information is provided to the air
bag control unit.
- If you must use a child restraint on the
front passenger seat and the child re
straint manufacturer's instructions re
quire the use of a towel, foam cushion or
something else to properly position the
child restraint, make certain that the
PASSENGER AIR BAG OFF light comes
on and stays on whenever the child re
straint is installed on the front passen
ger seat.
- If the
PASSENGER AIR BAG OFF light
does not come on and stay on, immedi
ately install child restraint in a rear seat
ing position and have the airbag system inspected by your Audi dealer.
,8. WARNING
If the front passenger seat gets wet, dry it
immediately.
- If liquid soaks into the front passenger
seat, this can keep the airbag system
from working properly and may, for in
stance, deactivate the passenger frontal
airbag. If this happens, the
PASSENGER
AIR BAG OFF
light will come on and stay
on together with the airbag indicator light
fl in the instrument cluster .
- If liquid is pooled on the seat, but has
not soaked in, this may also keep the air
bag system from working properly and
cause the passenger frontal airbag to be
enabled (turned on), even though there is a properly installed child restraint sys
tem on the seat . Wet towels or other wet
things on the seat cushion can have the
same effect. If the front passenger fron
tal airbag is turned on, the
PASSENGER
AIR BAG OFF
light light will go out.
Page 161 of 314
M N
0 <.J 'SI: ,...., \!) 1.1'1 ,...., 1.1'1 ,....,
-and if the e lectr ica l capacitance registered
on the front passenger seat is equal to or l ess than the combined capacitance of a typ
ical 1 year-old infant and one of the rear
ward-facing or forward-facing child re
stra ints listed in Federal Motor Veh icle Safe
ty Standard 208 w ith which the Advanced
Airbag System in your vehicle was certified.
If the front passenger seat is not occupied,
the front airbag will not deploy, and the
PA S
SENGER AIR B AG OFF
light w ill stay on . Nev
er insta ll a rearward-fac ing ch ild restra int on
the front passenger seat, the safest place for
a child in any kind of child restraint is at one
of the seating positions on the rear seat
¢ page 147, Child restraints on the front seat
- some important things to know
and
¢ page 171, Child Safety.
If the PASSENGER AIR BAG light com es
on ...
If the PASSENGER AIR BAG OFF light comes
on when one of the conditions listed above is met, be sure to check the light regularly to
make certa in that the
PA SSENGER AIR BAG
OFF
light stays on cont inuously whenever the
i gnit io n is on . If the
PASSENGER AIR B AG
OFF
light does not appear on and does not
stay on all the time, stop as soon as it is safe
to do so and
- react ivate the system by turning the ignition
off for more than 4 seconds and then turn
i ng it on again;
- remove and reinstall the child restraint .
Make su re that the child rest raint is prope rly
installed and that the safety be lt fo r the
fron t passenger seat has been corre ct ly
ro uted through the child restraint as descri
bed in the chi ld restraint man ufacturer's in
structions;
- make sure that the convertible locking re
tractor on the safety belt for the front pas
senger seat has been act ivated and that the
safety belt has been pulled tight.
- make sure that no electrica l device (such as
a laptop, CD player, electronic games device,
power inver ter or seat heater for child seats)
is p laced or used on the front passenger
A irbag system 159
seat if the device is connected to the 1 2-volt
socket or the cigarette lighter socket;
- make sure that no seat heater has been ret
rofitted o r otherwise added to the front pas
senger seat;
- make s ure that nothing can interfere with
the safety belt buck les and that they are not
obstructed ;
- make sure that there are no wet objects
(s uch as a wet towe l) and no water or other
liquids on the front passenger seat cushion .
If the PASSENGER AIR BAG light still
doe s not c ome on ...
If the PASSENGER AIR BAG OFF light still
does not come on and does not stay on con
tinuously (when the ignition is switched on),
- take the child rest raint off the front passen -
ger seat and install it proper ly at o ne of the
rear seat positions. Have the airbag system
inspected by your Audi dealer immed iate ly.
- move the child to a rear seat position and
make sure that the child is properly restra in
ed in a ch ild restra int that is appropriate for
its size and age.
Th e PASSENGER AIR BAG light should
NOT come on ...
The PASSENGER AIR BAG OFF light should
NOT come on when the ignit io n is on and an
adult is s itting in a proper seating position on
the front passenge r seat . If the
PASSENGER
AIR BAG OFF
light comes on and stays on o r
flashes fo r about S seconds wh ile d riving, un
der these circumstances, make sure that:
- the adult on the front passenger seat is
prope rly seated on the cente r of the seat
cushion with his o r her back up aga inst the
backrest and the backrest is no t recli ned,
- the adult i s not tak ing weight off the seat by
holding on to the passenger assist handle
above the fron t passenger door or s upport
ing their weight on the armrest,
- the sa fe ty belt is bei ng properly wo rn and
tha t the re is not a lot o f slack in the safety
be lt webbing,
- there are no aftermar ket seat covers or
cushions or other things (s uch as blankets)
IJI>
•
•