display AUDI A6 2015 Service Manual
[x] Cancel search | Manufacturer: AUDI, Model Year: 2015, Model line: A6, Model: AUDI A6 2015Pages: 314, PDF Size: 77.57 MB
Page 110 of 314
108 Automatic Transmission
N -N eutr al
The transmission is in neutral in this position.
Shift to this position for stand ing with the
brakes applied
q .&. in Driving the automatic
transmission on page 11 O.
When the ve hicle is stationary o r at speeds
be low 1 mph (2 km/h), you must always apply
the footbrake befo re and while moving the
l ever out of N.
D IS -Normal position for driving forward
In the D/S position, the transmiss io n can be
operated e ither in the normal mode Dor i n
the sport mode S. To select the sport mode S,
pu ll the se lector lever back briefly . Pulling the
lever back aga in will select the normal mode
D. The instrument cluster display shows the
selected driving mode.
In the normal mode D, the transmission a uto
mat ica lly selects the suitab le gea r ratio.
It de
pends on engine load, veh icle speed and driv
ing style.
Select the sport mode S for sporty driving .
The vehicle makes fu ll u se of the engine's
power. Shifting may become noticeable when
accelerating.
When the ve hicle is stationary o r at speeds
be low 1 mph (2 km/h), you must always apply
the foot brake before and while moving the lever to D/S out of N.
A WARNING
Read and follow all WARNINGS q .&. in
Driving the automatic transmission on
page 110.
(D Note
-
Coast ing downh ill with the transmission in
N and the e ngine not r unning w ill result in
damage to the automatic transm iss io n
and possib ly the catalyt ic converter.
@ Tips
- Audi drive select : you ca n adj ust the
sporty s hift c haracte ristics in th e
Dy-
namic driving mode.Swi ll appea r in the
instrument cluster display instead of D.
-If you a cc iden tally selec t N whi le driving,
take your foot off the accelerato r pedal
immediately and wa it for the engine to
slow down to idle before select ing D/S.
- If there is a power fai lure, the selector
lever w ill not move out of the P position.
The emergency release can be used if
this happens
qpage 113.
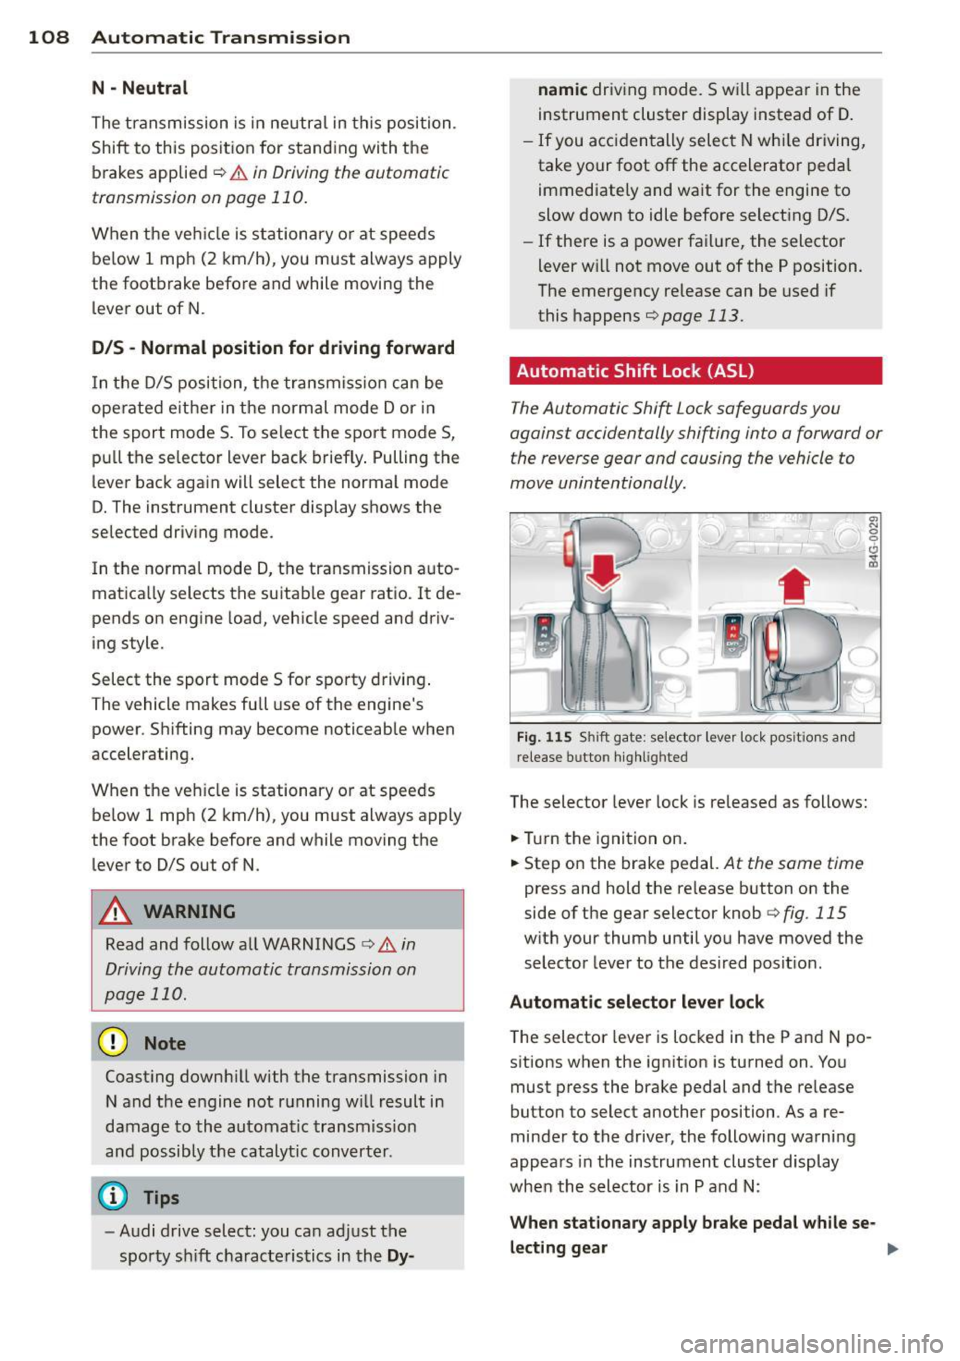
Automatic Shift Lock (ASL)
The Automatic Shift Lock safeguards you
against accidentally shifting into a forward or the reverse gear and causing the vehicle to
move unintentionally.
0, N ! ' g
i
) ( )
-
Fig. 1 15 Shift gate: selector leve r lock positions a nd
r e lease button highl ighted
The selector lever lock is released as follows:
... Tur n the igni tion on.
... Step o n the brake pedal.
At the same time
press and hold the re lease button on the
side of the gear selector knob
¢ fig. 115
with your thumb until yo u have moved the
selector lever to the desired posit ion.
Automat ic selector leve r lo ck
The selector lever is locked in the P and N po
sitions when the ignition is turned on. Yo u
must press the brake pedal and t he re lease
button to select another position . As a re
minder to the driver, the following warni ng
appears in the instrument cluster display
when the selector is in P and N:
When stationary apply brake pedal while se -
lecting gear
ll>
Page 113 of 314
M N
0 I.J "". rl I.O
"' rl
"' rl
Hill descent control switches off once the de
cline levels out or you press the accelerator pedal.
On vehicles with the cruise control system*
¢ page 82, hill descent control is also activat
ed when the speed is set.
A WARNING
Hill descent control cannot overcome
physical limitations, so it may not be able
to maintain a constant speed under all
conditions. Always be ready to apply the
brakes .
Manual shift program
Using the manual shift program you can
manually select gears.
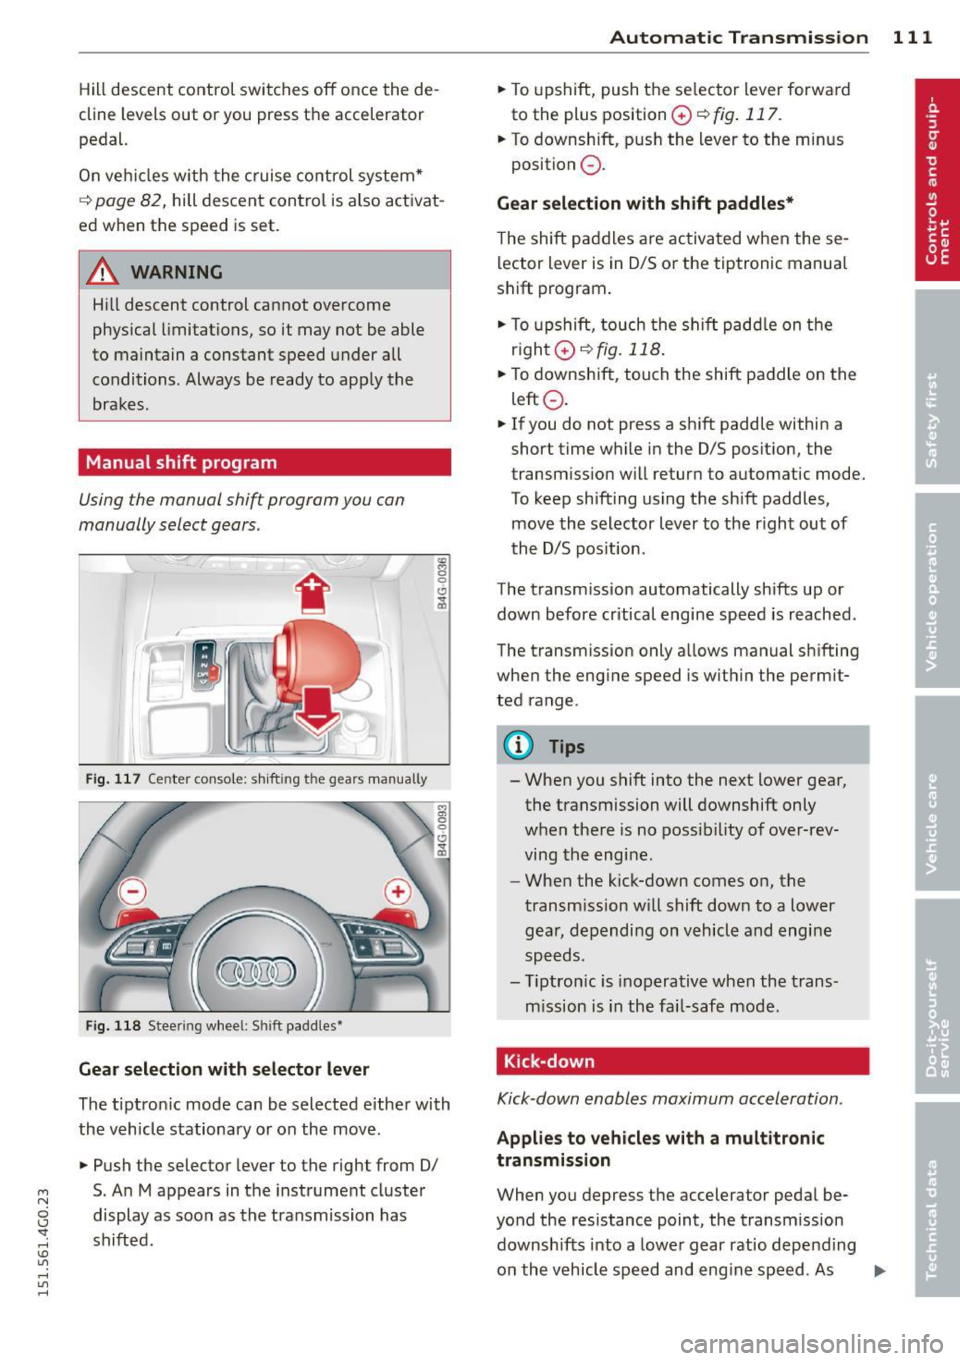
Fig. 117 Center console; shift ing the gears manually
Fig. 118 Steering wheel: Shift paddles•
Gear selection with selector lever
The tipt ron ic mode can be selected either with
the vehicle stationary or on the move.
.,. Push the selector lever to the right from 0/
5. An M appears in the instrument cluster
display as soon as the transmission has
shifted.
Automatic Transmission 111
.,. To upshift, push the se lector lever forwa rd
to the plus position
0 ¢ fig . 117.
.,. To downshift, push the lever to the minus
position
0 .
Gear selection with shift paddles*
The shift paddles are activated when these
lector lever is in 0/S or the tiptronic manual
shift program.
.,. To upshift, touch the shift paddle on the
right 0¢fig.118 .
.,. To downshift, touch the shift paddle on the
left
0 .
.,. If you do not press a shift paddle within a
short time while in the 0/S position, the
transm iss ion will return to automatic mode.
To keep shifting using the shift paddles,
move the selector lever to the r ight out of
the 0/S position.
The transmission automatically shifts up or
down before critical engine speed is reached.
The transm ission only allows manual sh ifting
when the engine speed is with in the permit
ted range.
@ Tips
- When you shift into the next lower gear,
the transmission will downshift only
when there is no possibility of over-rev
ving the engine.
- When the kick-down comes on, the
transmission will shift down to a lower
gear, depending on vehicle and engine
speeds.
- Tiptronic is inoperative when the trans
mission is in the fai l-safe mode.
, Kick-down
Kick-down enables maximum acceleration.
Applies to vehicles with a multitronic
transmission
When you depress the accelerator pedal be
yond the resistance point, the transmission
downshifts into a lower gear ratio depend ing
on the vehicle speed and engine speed. As .,.
Page 114 of 314
112 Automatic Tran sm iss ion
long as the accelerator peda l is depressed, the
engine speed is automatica lly regulated for
maximum acceleration.
Appli es to v ehicl es with a S tronic -/,
tip tronic t ransmis sion
When you depress the acce lerator pedal be
yond the resistance point, the automatic transmission downshifts into a lower gear, de
pending on vehicle speed and engine speed.
The upshift into the next higher gear takes
place once the maximum specified eng ine
speed is reached.
A WARNING
Please note that the d rive wheels can spin
if kick-down is used on a smooth slippery
road - there is a risk of skidding .
Launch Control Program
Applies to vehicles: with 5 tronic
The Launch Control Program provides the
best acceleration possible when starting from
a stop .
Requirement: The engine must be at operat
i ng temperature and the steering wheel must
not be tu rned.
,,. Press the
I" O FFI button ¢ page 195 while
the engine is running. The
II ind icator light
illuminates in the instrument cluster and
Sta bilizati on co ntrol (E SC): Off W arning!
Redu ced st a bilit y
appears in the driver in
f ormation system display.
,,. Move the selector lever to position D/S to
select sport mode (S) or select
Dynam ic
mode in Audi dr ive select ¢ page 101.
,,. Press the brake pedal strongly with your left
foot and hold it down for at least 1 second.
,,. At the same t ime, press the accelerator ped
al down complete ly w ith your r ight foot un
t il the engine reaches and maintains a h igh
RPM.
,,. Remove your foot from the brake pedal
within S seconds¢ .&_.
A WARNING
-Always adapt your driving to the traffic
flow .
- Only use the Launch Control Program
when road and traff ic conditions allow it
and other drivers w ill not be endangered
or annoyed by your driving and the vehi
cle's acceleration.
- Please note that the driving wheels can
spin and the vehicle can break away
when sport mode is switched on, espe
cially when the road is slippe ry.
- Once you have accelerated, you shou ld
sw itch sport mode off by pressing the
I J'J OFF I button.
(D Tips
'
-The tra nsmission temperature may in
crease significantly after using the
Launch Control P rogram. If that hap
pens, the p rogram may not be avai lab le
for a few minutes . It w ill be ava ilable
again after a cool-down period .
- When accelerating using the La unch
Contro l Program, a ll vehicle parts are
subject to heavy loads. This can result in
increased wear.
Transmission malfunction
ID T ransm ission: Pre ss bra ke pedal and se
l e ct ge ar a gai n
Press the brake peda l and select the desired
selector lever position again. You can then continue driving.
[O] Transmi ssion o verh eatin g: Plea se dri ve
con ser va tivel y
-
The transm iss ion temperat ure has inc reased
significantly due to the sporty driving manner .
Drive in a less sporty manner until the tem
perature returns to the normal range and the
indicator light switches of.
ID T ra nsmis sion malfun ction : Y o u can con-
tinue dri ving ..,
Page 117 of 314

M N
0 I.J "". rl I.O
"' rl
"' rl
Parking system plus
Description
Applies to vehicles: with parking system plus
Audi parking system plus provides audio and
visual signals when parking.
Fi g. 120 Dis p lay f ie ld
Sensors are located in the front and rear
bumpers.
If these detect an obs tacle, visual
and in some situations aud ible signals warn
you.
M ake sure t he sensors are not cove red by
s t icke rs, deposits or any o ther obs truc tions as
it may impair the sensor function. For infor
mation on cleaning, refer to
c::> page 209 .
The display field begins approximately at:
® 4 ft (1.20 m)
® 3 ft (0 .90 m)
© 5.2 ft (1.60 m)
@ 3 ft (0 .90 m)
The clos er you get to the obstacle, the sho rter
the interval between the audible signa ls. A
con tinuous tone sounds when the obstacle is
l ess than approximate ly 1 ft (0.30 m) away .
Do not continue driving farther¢
& in Gener
al information on page 114, ¢(Di n General
information on page 114 !
If the d istance to an obstacle remains con
stant, the volume of the d istance warning
gradually drops after about four seconds (this
does not apply in the continuous tone range).
P arking systems 115
Switching on/off
Applies to vehicles: with parking system plus
F ig. 121 Ce nter co nso le :
Pv! button
F ig . 1 22 Infota in m ent : v is u al d is ta n ce d isplay
Switching on
.,. Shift into reverse or
.,. Press the
p,;A button in the center console
c::> fig. 121 . A short confirmation tone
sounds and the LED in the button turns on .
Switching off
.,. Dr ive fo rward fas ter than 6 mph (10 km/ h),
or
.,. press the
P"IA button, or
.,. sw itch the ignit ion off.
Visual d isplay
U sing the segments, yo u can estimate the dis
tance to a n object in front of o r behind the ve
hicle ¢
fig. 12 2. The red lines mark the ex
pected d irect ion of travel according to the
steering ang le . A wh ite segment indicates an
identified obstacle that is outside of the vehi
cle's pat h. Red segments show identified ob
stacles that are in your vehicle's path . As your
vehicle comes close r to the obstacle, the seg
ments move closer to the vehicle . At the lat-
est th e collision area has been reached when ..,.
Page 118 of 314
116 Parking systems
the next to last segment is disp layed . Obsta
cles in the collision area, including those out
side of the vehicle 's path, are shown in red. Do
not continue driving farther forward or in re
verse
q .&. in General information on
page 114, q(f) in General information on
page 114 .
Rear view camera
Introduction
Applies to vehicles: with parking system plus with rear
view camera
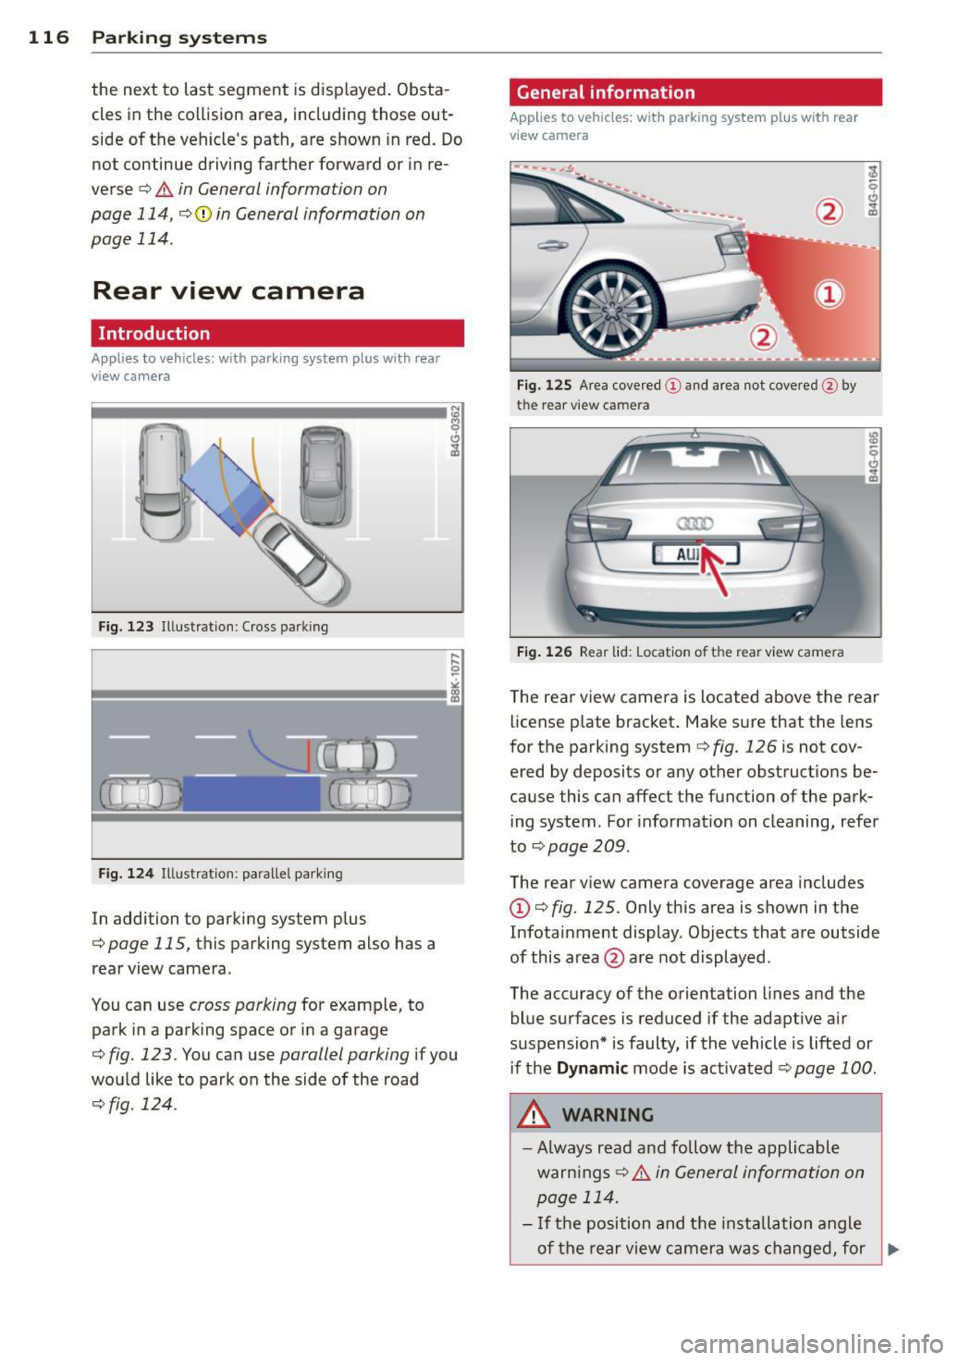
Fig. 123 Illustration: Cross parking
F ig. 124 Illustrat ion: paralle l parking
In addition to parking system p lus
q page 115, this parking system also has a
rear view camera .
You can use
cross parking for examp le, to
park in a parking space or in a garage
q fig. 123. You can use parallel parking if you
wou ld like to park on the side of the road
r::;, fig . 124.
General information
Applies to vehicles: with parking system plus with rear
view camera
F ig. 12S Area covered (D a nd area not covered @by
the rear v iew camera
Fig. 1 26 Rear lid: Locat ion of t he rear view camera
T he rea r view camera is located above the rear
license p late bracket . Make s ure that the lens
for the parking system
q fig. 126 is not cov
ered by deposits or any other obstruct ions be
cause this can affect the function of the park
ing system . For informat ion on cleaning, refer
to
q page 209.
The rear view camera coverage area includes
(D q fig. 125. Only this area is shown in the
Infotainment display . Objects that are outside
of this area @are not displayed.
The accuracy of the orientation lines and the
blue surfaces is reduced if the adapt ive air
suspension* is faulty, if the vehicle is lifted or if the
Dynamic mode is activated r::;, page 100 .
A WARNING
-
-Always read a nd follow the applicable
warn ings
r::;, .&. i n Ge neral information on
p age 114.
- If the position and the installation angle
-
of the rear view camer a was changed, for ~
Page 119 of 314
M N
0 <.J 'SI: ,...., \!) 1.1'1 ,...., 1.1'1 ,....,
example, after a collision, do not contin
ue to use the system for safety reasons.
Have it checked by your authorized Audi
dealership or authorized repa ir facility .
- Only use the rear v iew camera to assist
you if it shows a good, clear picture. For
example, the image may be affected by
the sun shin ing into the lens, dirt on the
lens or if there is a system fau lt.
- Use the rear view camera only if the lug
gage compartment lid is comp letely
closed. Ma ke su re any objects you may
h ave mounted on the luggage compart
ment lid do not block the rear view cam
era.
- The camera lens en la rges and dis torts
the field of vision. The ob ject appears
both a ltered and inaccurate on the
screen .
- In certain s ituations, peop le or objects in
the display appear closer or f urther
away:
- objects that do not touch the ground,
such as the bumper of a parked vehicle ,
a trailer hitch o r the rear of a truck. Do
not use the help lines in this case.
- If driven from a leve l surface onto a n
incline, or a downward slope.
- If driven towa rd protruding objects .
- If the ve hicle is carrying too much load
in the rear.
({D Note
- Always read and follow the applicable
warnings
¢ (Din General information on
page 114 .
-The orange colored orientat ion lines in
the Infotainment disp lay show the vehi
cle path depending on the steering
whee l ang le. The front of the vehicle
front sw ings out more than t he rear of
the veh icle. Maint ain p lenty of distan ce
so that your ou ts ide mirror or a corner of
you r vehicle does not collide with any ob
stacles .
Parking sys tem s 117
Switching on/off
App lies to vehicles: wit h parking system plus w ith rear
v iew camera
Switching on
.. Shift in to reverse or
.. press the
PwA bu tton in the center console
¢ page 115, fig . 121 . A short confirmation
tone sounds and the LED in the button turns
on .
Swi tching between the re ar view camera
and optical displa y
.,. Press the Graphi c control button®
¢ page 118, fig. 12 7 to see the optical d is
play .
.. Press the
Rearview control b utton to see the
rear view camera image.
Switching off
.,. Dr ive forward faster than 6 mph (10 km/h),
or
.. Press the
P111A button, or
.,. Switch the ignit ion off.
(D Tips
The visual d isplay in the left part of the
display should help you detec t the critical
vehicle areas .
Page 120 of 314
118 Parking systems
Cross parking
Applies to vehicles: with park ing system p lus w it h rear
view ca mera
This view may be used when parking in a ga
rage or in a parking space.
F ig. 127 Infotainment: aim ing at a parking space
Fig. 128 Infotainment : aligning the ve hicle
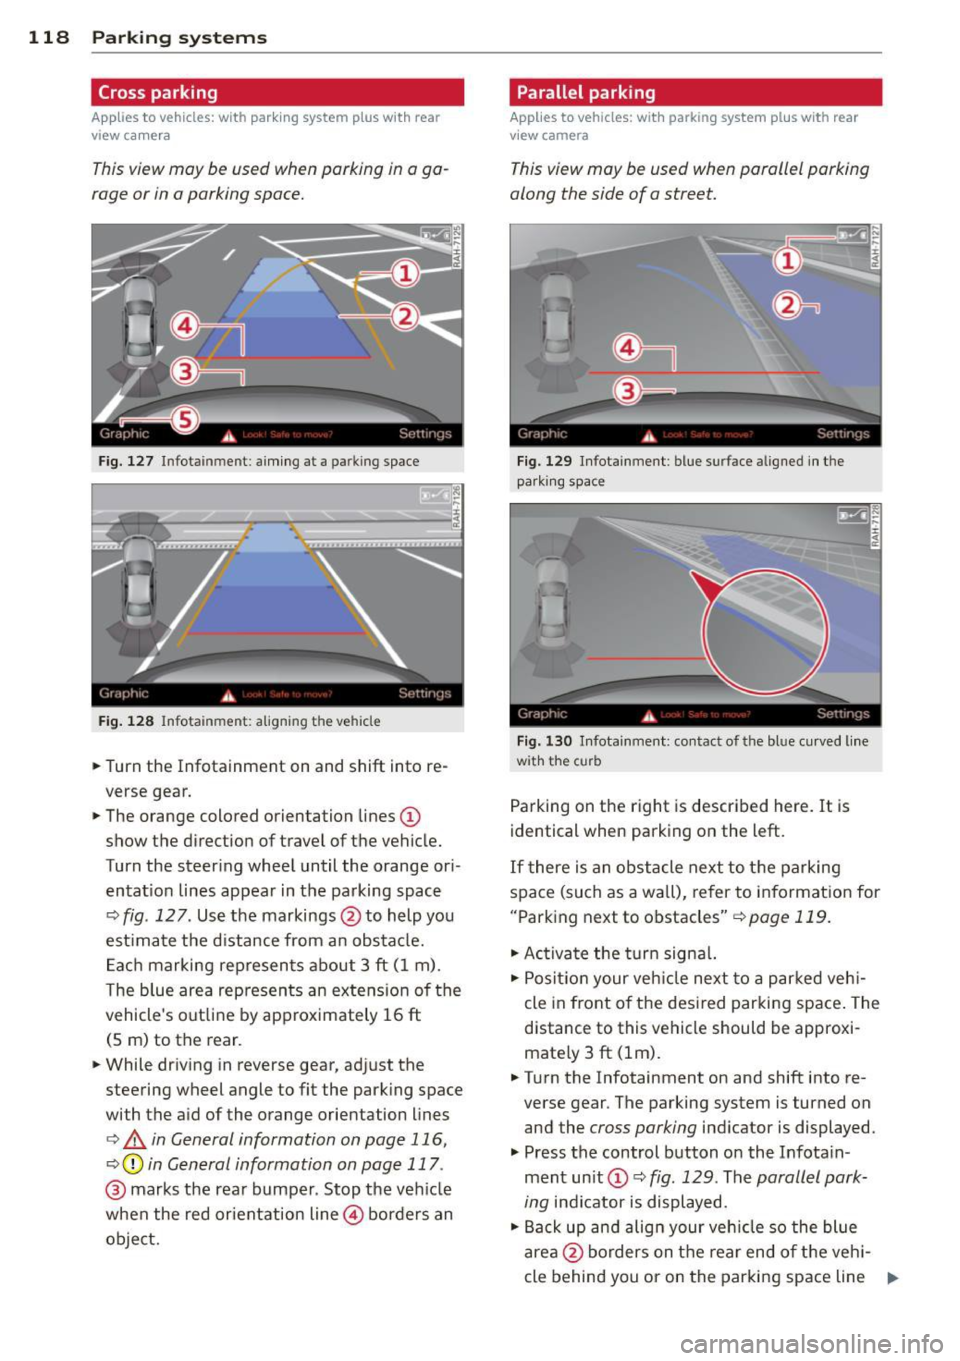
... Turn the Infotainment on and shift into re
verse gear.
... The orange colored orientation lines
(D
show the direction of travel of the vehicle.
Turn the steering wheel until the orange ori
entat ion lines appear in the parking space
¢ fig. 12 7. Use the markings @to help you
est imate the distance from an obstacle.
Each marking represents about 3 ft (1 m).
The blue area represents an extens ion of the
vehicle's out line by approximately 16 ft
(5 m) to the rear.
... While driving in reverse gear, adjust the
steering wheel angle to fit the parking space
with the aid of the orange orientation lines
¢ & in General information on page 116,
¢ @ in General information on page 117 .
@ marks the rear bumper . Stop the vehicle
when the red orientation line@ borders an
object.
Parallel parking
Applies to vehicles : wit h parking system pl us with rear
v iew camera
This view may be used when parallel parking
along the side of a street.
Fig . 129 Infotainment : blue surface aligned in the
par king space
Fig. 130 Infotainme nt: contact of the blue curved lin e
w ith the curb
Parking on the right is described here. It is
identical when parking on the left.
If there is an obstacle next to the parking
space (such as a wall), refer to information for
"Parking next to obstacles"¢
page 119.
"'Activate the turn signal.
"'P osit ion your veh icle next to a parked vehi
cle in front of the desired parking space. The
distance to this vehicle should be approxi
mate ly 3 ft (lm) .
... Turn the Infotainment on and shift into re
verse gear. The parking system is turned on
and the
cross parking indicator is displayed.
"' Press the control button on the Infota in
ment unit (!) ¢
fig. 129 . The parallel park
ing
indicator is displayed.
"' Back up and align your vehicle so the blue
area @borders on the rear end of the vehi-
cle behind you or on the parking space line ..,.
Page 121 of 314
M N
0 I.J "". rl I.O
"' rl
"' rl
r::> & in General information on page 116,
r::>(D in General information on page 117.
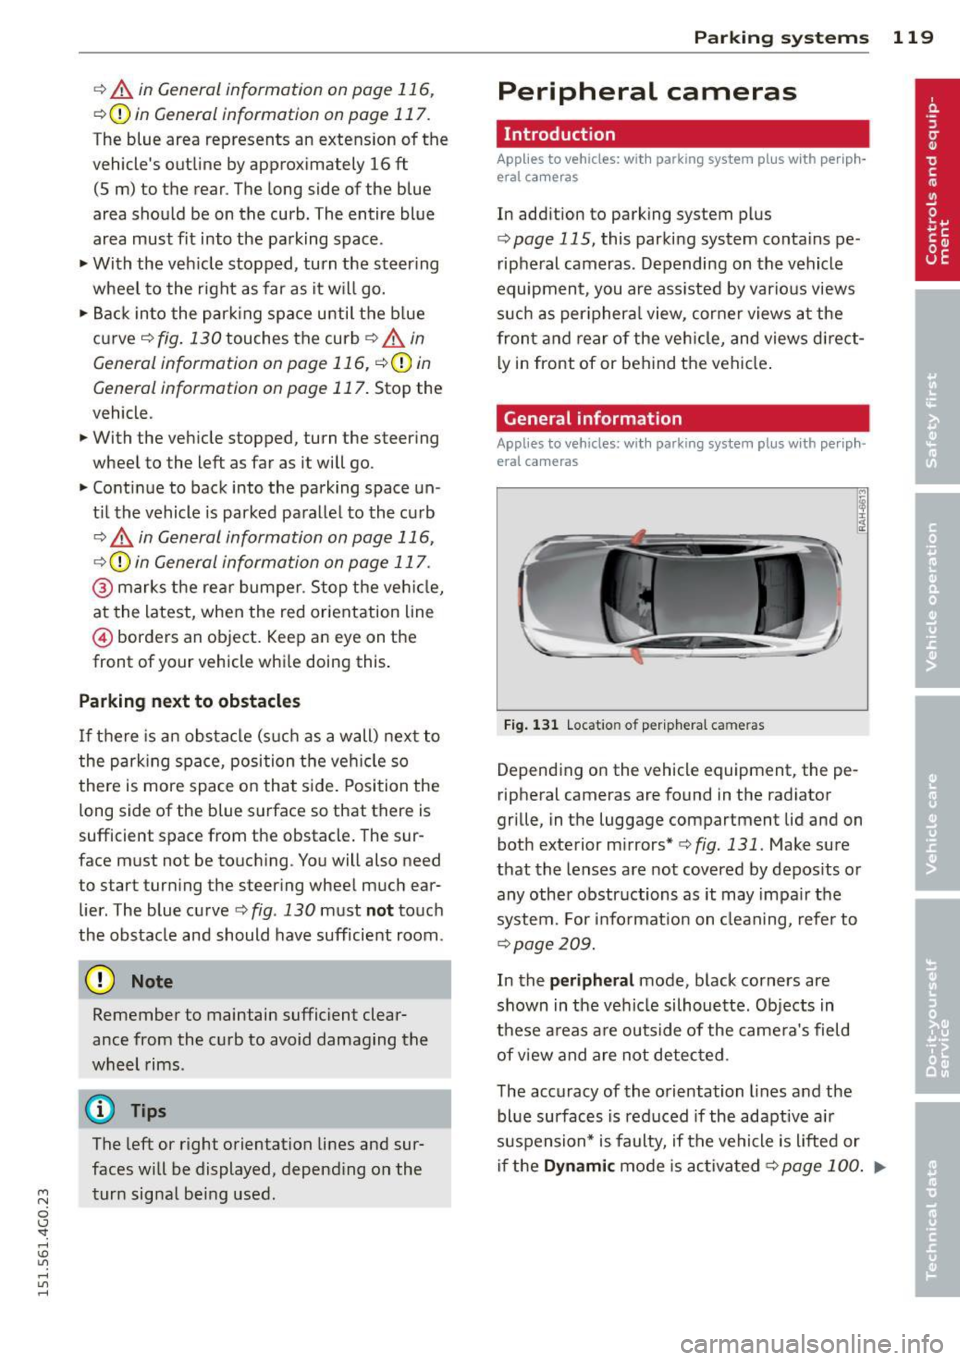
The blue area represents an extens ion of the
vehicle's outline by approximately 16 ft
(5 m) to the rear . The long side of the blue
area should be on the curb . The entire blue
area must fit into the parking space.
• With the veh icle stopped, turn the steering
wheel to the right as far as it w ill go.
• Back in to the park ing space u ntil the b lue
curve
r::> fig . 130 touches the curb r::> & in
General information on page 116,
r::> (D in
General information on page 117 .
Stop the
vehicle.
• With the veh icle stopped , turn the steer ing
whee l to the left as far as it will go .
• Continue to back into the parking space un
t il the vehicle is parked pa rallel to the cu rb
r::> & in General information on page 116,
r::> (D in General information on page 117.
@ marks the rear bumper . Stop the veh icle,
at the latest, when the red orientation line
@ borders an object. Keep an eye on the
front of your vehicle whi le do ing th is .
Pa rking next to obstacles
If there is an obstacle (s uc h a s a wall) next to
the par king space, position the veh icle so
there is more space o n that s ide. Position the
l ong side of the blue s urface so that there is
sufficient space from the obstacle . The sur
face must not be to uch ing . You will also need
to star t turning the steer ing wheel much ear
lier . The blue curve
r::> fig . 130 must not touch
the obstacle and should have sufficient room.
(D Note
Remember to maintain sufficient clear
ance from the curb to avoid damag ing the
wheel rims .
(D Tips
The left or right orientation lines and sur
faces will be displayed, depend ing on the
turn sig na l being used.
P arking systems 119
Peripheral cameras
Introduction
Applies to vehicles: with parking system plus with periph
eral cameras
In add ition to parking system plus
¢ page 115, this parking system conta ins pe
ripheral cameras . Depending on the vehicle
equipment , you are ass isted by vario us views
su ch a s p eriphera l view, corne r views a t the
fron t and rear of the veh icle, and views di rect
ly in front of or behind t he vehicle .
General information
Applies to vehicles: with parking system plus with periph
eral cameras
F ig . 1 31 Locat io n of per ip hera l ca meras
Depending on the vehicle equipment, the pe
ripheral cameras are found in the radiator
grille, in the luggage compartment lid and on
both exterior m irrors*
¢ fig. 131 . Make su re
that the lenses a re not covered by depos its o r
any other obstr uctions as it may impa ir t he
system. For info rmat io n on clean ing, refe r to
¢ page 209.
In the peripheral mode , b lack corners are
shown in the ve hicle silhouette . Objects in
these a reas a re outside of the came ra's field
of view and are not detec ted .
The accuracy of the orientation lines and the
bl ue surfaces is reduced if the adaptive a ir
suspension* is faulty, if the vehicle is l ifted or
if t he
D ynamic mode is activa ted ¢ page 100 . ..,.
Page 122 of 314
120 Park in g s ystems
& WARNING
- Always read and follow the applicable
warnings
r:!;> .&. in General information on
page 114.
- If the posit ion or the installation angle
of a camera was changed, after a colli
sion for example, do not continue to use
the system for safety reasons. Have it
checked by your authorized Audi dealer
ship.
- Keep in m ind that the image i n the dis
play is distorted if the ex ter ior mirro r
housing has been man ual ly adjusted.
- Use the
re ar mode and the corner vi ew
(re ar)
mode on ly when the luggage com
partment lid is fully closed. Otherwise
the image in the display will be distort
ed.
- The veh icle surroundings are shown us
ing the camera images. The vehicle im
age is shown by the system. Objects and
obstacles above the camera are not dis
played.
- Camera lenses en large and distort the
field of v is ion. The objects appear both
altered and inaccurate on the screen.
(D Note
-Always read and follow the applicab le
warnings
c:> (i) in General information on
page 114.
- The Infota inment display shows the di
rection in which the rear of the vehicle is
traveling based on the steering wheel
angle . The front of the veh icle front
swings out more than the rear of t he ve
hicle. Ma intain plenty of distance so that
you r outside m irror or a corner of you r
vehicle does not coll ide wi th any obsta
cles.
@ Tips
I f the 8/cr;iJ/r:;::::s symbol appea rs i n the
disp lay and the respec tive display area is
grayed out, then the power exter io r mir
rors were fo lded in or the driver's door/ front passenger's door/
luggage compart
ment lid was opened.
Switching on or off
Applies to vehicles: with parking system plus with periph
eral cameras
Fig . 1 32 Ce nte r console: f>• JI butto n
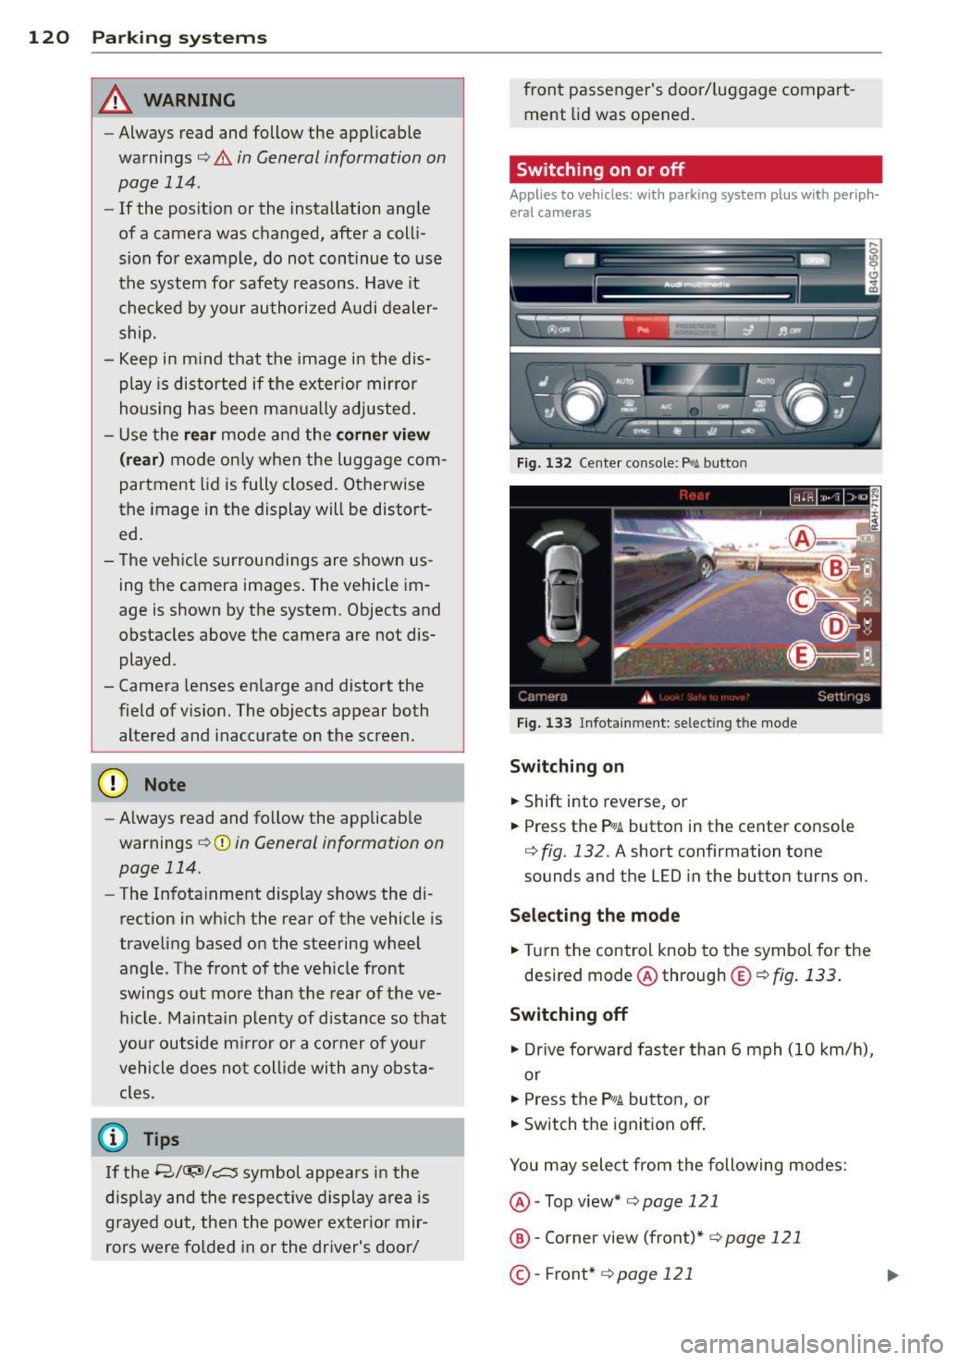
Fig . 1 33 Infota inment: selecting t he mode
Sw itching on
.. Shift into reverse, or
.. Press the P•QJ\. button in the center console
c:>fig. 132 . A short confirmation tone
sounds and the
LED in the button turns on.
Selecting the mode
.. Turn the control knob to the symbol fo r the
desired mode @through @
¢fig. 133 .
Switching off
.. Dr ive fo rward faster than 6 mph (10 km/ h),
or
.. Press the
P"li bu tton, or
.. Switch the ignition off .
You may sele ct from the following modes:
@ -Top view*
c:>page 121
@ -Corner view (front)* c:> page 121
©-Front *¢ page 121
Page 123 of 314
M N
0 I.J -
©- Corner view (rear)* ¢ page 121
Top view
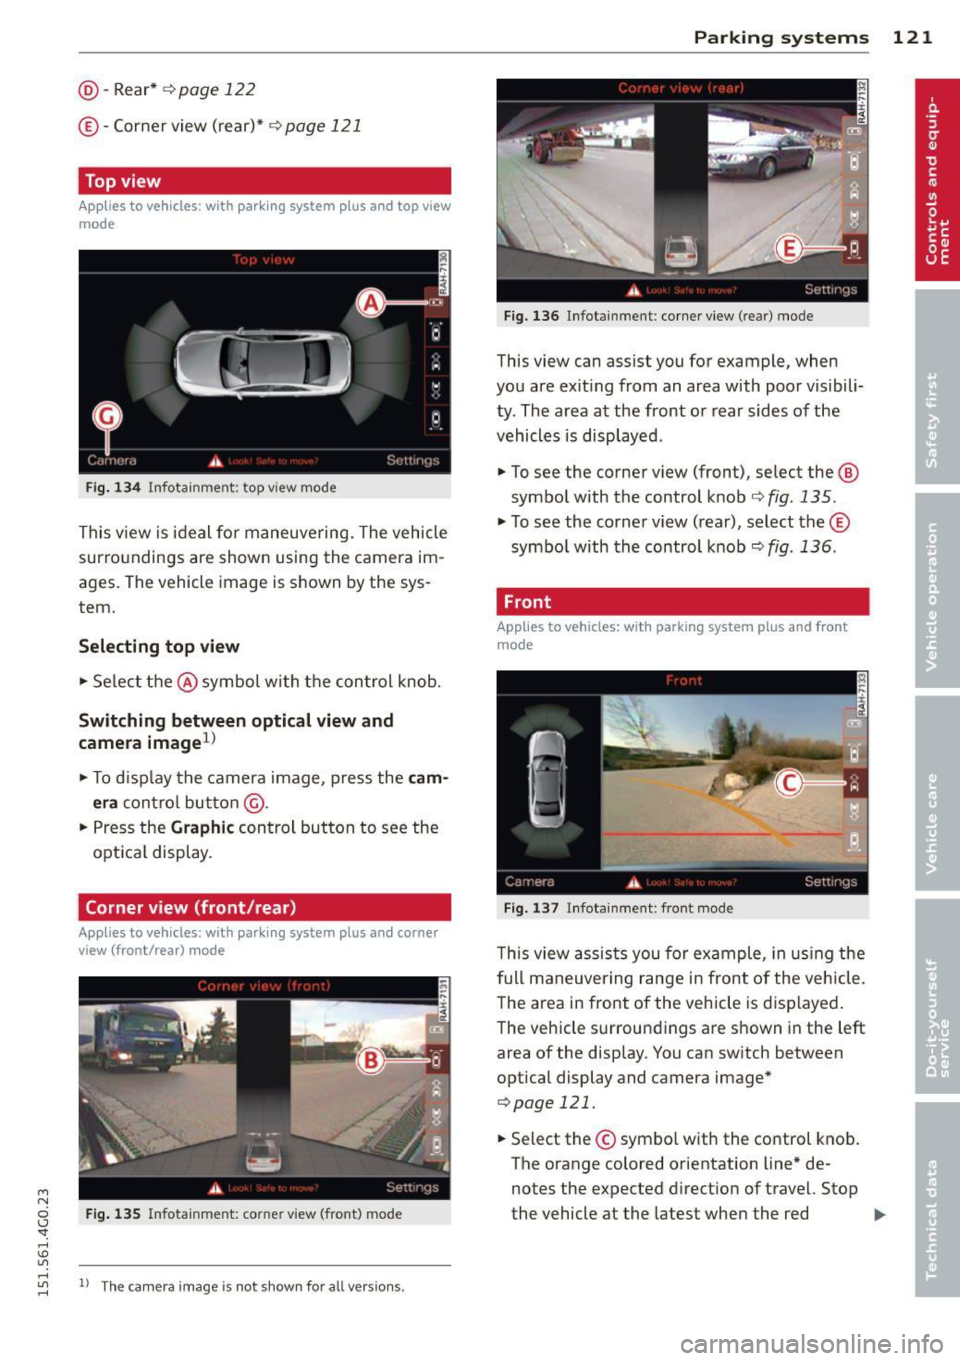
Applies to vehicles: with parking system plus and top view
mode
Fi g. 1 34 Info ta inm ent: top v iew mode
This v iew is ideal for maneuve ring. The vehicle
surro undings are shown using the camera im
ag es. The vehicle image is shown by the sys
tem.
Selecting top vi ew
~ Se lect the @symbol with the control knob.
Switching between optical view and
came ra image
1
)
~ To d isp lay the camera image, press the c am
era
contro l bu tton @ .
~ Press the Graph ic control button to see the
opt ica l display .
Corner view (front /rear )
Applies to vehicles: with parki ng system plus and corner
view (front/rear ) mode
Fig. 135 In fot ainm en t: co rn er view (fro nt} mode
"' rl
~ 11
Th e cam era im age is n ot s how n for al l ve rs ion s.
Parking systems 121
Fig . 1 36 Infot ainm en t: corne r vie w (r ea r) mode
This view can assist you for example, when
you are exit ing from an area with poor visibili
ty . The area at the front or rear sides of the
vehicles is displayed .
~ To see the corner view (fron t), select the @
symbol with the control knob ¢
fig. 135 .
~ To see the co rner v iew ( rear), select the ©
symbo l with the control knob
r=> fig . 136 .
, Front
Applies to vehicles: with parking system plus and front
mo de
Fig. 1 37 ln fota inment: front mode
T his view assis ts you for example, in us ing the
full maneuver ing range in front of the vehicle.
The area in front of the vehicle is displayed .
The vehicle s urround ings are shown in the left
area of the display . You can switch between
optical display and camera image*
<=> page 121.
~ Select the © symbo l with the control knob .
T he o range colored orientation line* de
notes the expected d irection of travel. Stop
the vehicle at the latest when the red
Iii>-