sensor AUDI A6 2015 Owners Manual
[x] Cancel search | Manufacturer: AUDI, Model Year: 2015, Model line: A6, Model: AUDI A6 2015Pages: 314, PDF Size: 77.57 MB
Page 16 of 314
14 Instruments and warning/indicator lights
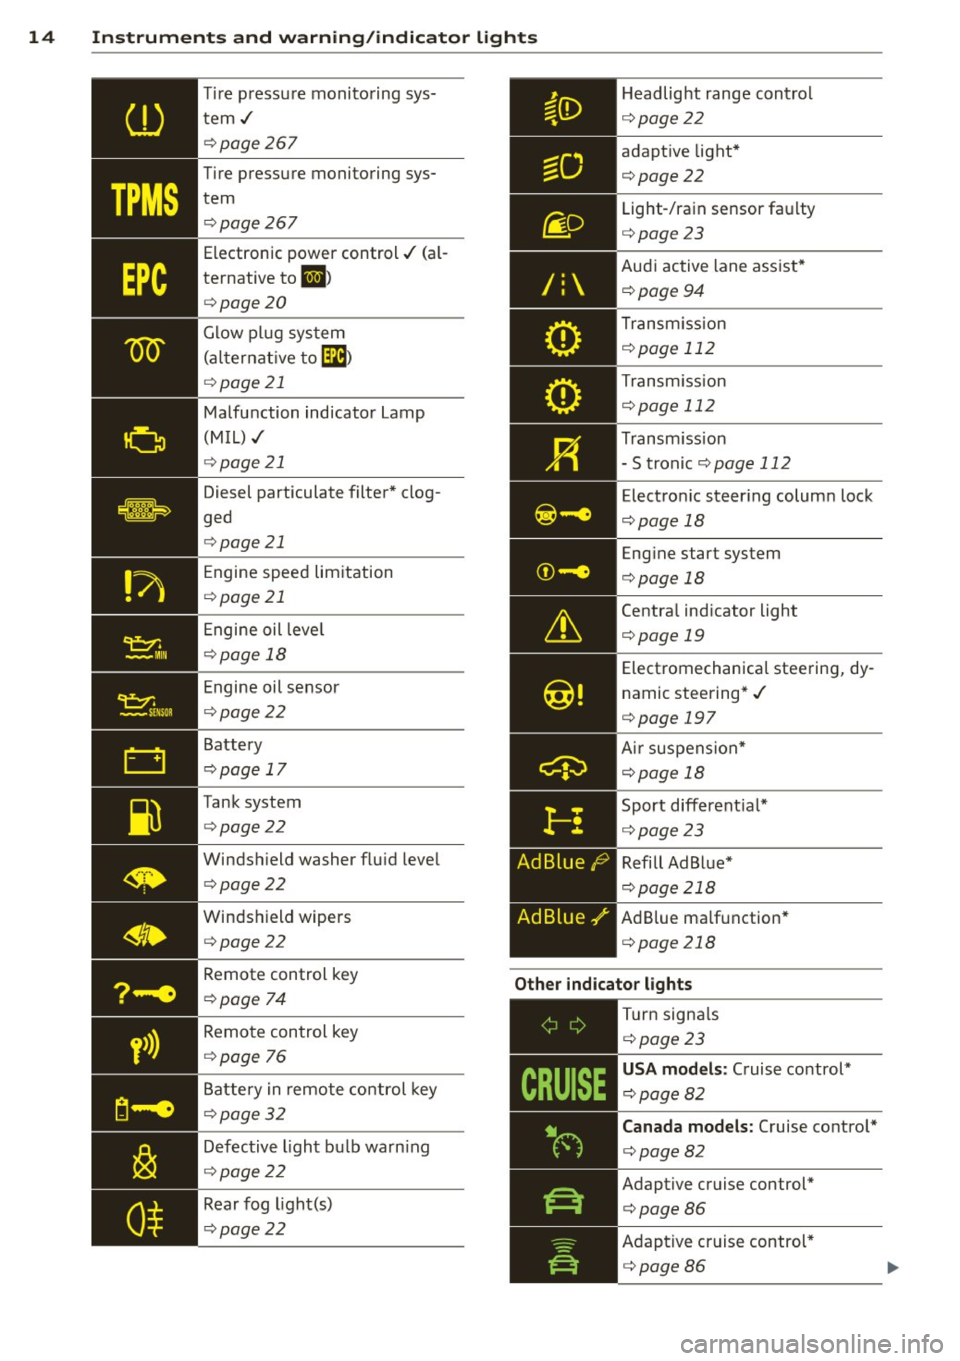
Tire pressure monitoring sys
tem./ ¢ page267
Tire pressure monitoring sys
tem q page 267
Electronic power control./ (a l
ternative to
1,1 )
qpage 20
Glow plug system
(alternat ive to
Ga)
qpage 21
Malfunction indicator Lamp
(MIL) ./
¢ page 21
Diesel particulate filter* clog
ged
q page 21
Engine speed limitation
q page 21
Engine oil leve l
qpage 18
Engine oil sensor
qpage22
Battery
q page 17
Tank system q page 22
Windshield washer fluid level q page22
Windshield wipers
q page 22
/:
Headlight range control
q page22
adaptive light*
qpage22 Light-/rain sensor faulty
q page23
Audi active lane assist*
¢ page94
Transm ission
¢ page 112
Transm ission
¢ page 112
Transm ission
- S tronic
¢ page 112
Electronic steering column lock
q page 18
Engine start system
q page 18
Central indicator light
qpage 19
Electromechanical steering, dy
namic steering*./
q page 197
Ai r suspension*
¢page 18
Sport different ial*
¢ page 23
Refill Ad Blue*
q page 218
AdBlue ma lfunction*
q page 218
Remote control key
q page 74
Other indicator lights
y>))
Remote control key
q page
76
Battery in remote control key
q page 32
Defective light bulb warn ing
q page 22
Rear fog light(s)
q page22
,-------------
Turn signa ls
¢ page23
USA models: Cruise control*
¢ page82
Canada models: Cruise control*
q page82
Adaptive cruise control*
qpage86
Adaptive cruise control*
q page86
Page 24 of 314
22 Instruments and warning/indicator lights
If the engine speed limitation was activated
by an engine control malfunction , the indica
tor light ~ also t urns on. Make sure that the
speed does not go above the speed displayed .
Drive to your authori zed Aud i dealer immedi
ately to have t he malfunction corrected .
If the symbol illuminates, contact your au
thor ized Audi dealer a nd have the o il sensor
i n spected . Until you have t his done , ch eck the
oil level each time you refuel just to be on the
safe side
c::> page 2 26 .
Bil Fuel level indicator
ID'J Plea se refuel
If the indicator light turns on fo r the fi rs t
time and the message app ears, ther e ar e
about 2.6 gallons (10 liters) of f ue l left in the
t an k. T ime to refue l
c::>page 216 .
Ill Tank system malfunction! Contact dealer
If the i ndicator light tu rns on and t his mes
sage appears, t here is a ma lfunction in the
tank system .
Drive to yo ur autho rized Aud i dea ler immedi
ately to have t he malfunction corrected.
~ Windshield washer fluid level
~ Please refill washer fluid
If the symbo l illuminates, add windshield
washer f luid to the washer system/headlight
washer system*
c::> page 235.
~• Windshield wipers
m Windshield wiper defective
There is a malfunct io n with the w indshield
wipers.
D rive to yo ur autho rize d Au di dea ler immedi
ate ly to have t he malfunction cor rected .
~/0$ Defective light bulb warning
S:j -If t he in dicato r light tu rn s on, a bu lb h as
f ailed. The message in dicates t he loca tio n of
t h e b ulb .
II-if a rea r fog lamp has fa iled , the ind icator
li gh t tur ns on to ind icate the loca tion on the
vehicle.
Vehicle lights : malfunction
If the message appears, there is a malfu nc
t ion in the headlights o r light sw itch.
Drive to your authorized A udi dealer immedi
ate ly to have the ma lfunction corrected.
.&_ WARNING
- Light bulbs a re pr ess urized and could ex
p lode w hile they are being changed ca us
i n g s erio us pe rsonal injury .
- Wo rk with due care when han dling the
h igh-vo ltage sect io n o f gas disc harge
(xe non) ligh ts. Failur e to do so could re
s ult in death or ser ious injury .
(D Tips
Have t he b ulb replaced or the co nnect ion
r epaired by y our auth orized A udi Se rvice
d epartment .
~{i) Headlight range control
II Headlight range control : defective!
If the symbol illuminates, the headlig ht range
control is no lo nger wor king properly . Have
t h e sys tem checked and repaired at yo ur Audi
d eal er.
:sO Adaptive Light
App lies to veh icles : w ith Adapt ive lig ht
r!J Audi adaptive light: sy stem fault
If the indicato r light turns on and this m es
sage appears, there is a malf unct io n in th e
adaptive ligh t syste m. The head lig ht s s till
funct ion.
Page 25 of 314
M N
0 <.J 'SI: ,...., \!) 1.1'1 ,...., 1.1'1 ,....,
Instruments and warning/indicator lights 23
Go to an authorized dea lership to have the
headlights or the contro l unit for the Adaptive
Light repaired.
fi.D Light/rain sensor
El Automatic headl ights/automatic wipers:
system fault
If the indicator light t urns on and this mes
sage appears, the light/rain sensor is not
functioning correctly .
F or safety reasons the low beams are turned
on permanent ly with the switch in
AUTO.
However, you can continue to turn the lights
on and off using the light switch. You can still
control all funct ions that are independent of
the rain sensor through the windsh ield wiper
lever .
Contact your author iz ed Audi dealer as soon
as possible to have the problem corrected.
I-: Sport differential
App lies to vehicles: with sport different ia l
IIJ Sport differential: system fault
There is a malfunct ion with the sport differen
tial.
Drive to your authorized Audi dea ler immedi
ately to have the malfunction corrected.
IIJ Sport differential : overheating
The transmission temperature has increased
sig nificantly due to the sporty dr iv ing manner .
Dri ve i n a less sporty manner until the tem
perature returns to the normal range and the
indicator light switches of .
A WARNING
Contact your authorized Audi dealer or a
qualif ied workshop if the sport differential
is faulty or ma lfunctioning. The repa ir
must be performed by trained personnel
using the correct oil in order to ensure
safety .
-
¢ Q Turn signals
The indicator light blinks when you use either
turn signal .
Whenever you use the left . or the right 1B
turn s ignal, the indicator light blinks. When
you use the emergency flashers, both indica
tor lights flash .
If one of the turn signa l light bulbs burn out,
the turn signal will blink twice as fast as nor
mal. Carefully dr ive to your authorized Audi
dealer immed iately to have the malfunction
corrected. The ind icator light does not indi
cate a malfunction if a turn signal on the trail
er or on the vehicle fails in trailer towing
mode.
(D Tips
For more information on the turn signals,
refer to
q page 45.
CRUISE/' (-) Cruise control
The warning/indicator light Ill (USA models)/
l'I (Canada mode ls) illuminates when the
cruise control is activated
q page 82.
Page 36 of 314
34 Openin g and clo sing
- Applies to vehicles with power side door
closer *:
- When closing a door, make sure noth
i ng can interfere w ith the doo r. T his
could cause ser ious perso nal inj ury.
- You ca n stop the door from clos ing at
any time by pulling on the inside or
out side door handle.
(0 Tips
- In the event of a c rash wi th airbag de
ployment a ll locked doo rs will be auto
m atically unlo cked to g ive access to the
vehicle occ upants from the outside.
- If the power loc king system should ma l
func tion, you can lo ck the dr iver's door
u sing the mechanical key
I:!> pdge 3 7.
- If the power locking system should fai l,
you can st ill open the f ue l t ank flap in a n
emergency ¢
page 218.
-You are well advised no t to keep valua
bles inside an unattended vehicle, visib le
or not . Even a properly locked vehicle
ca nnot provide the sec urity of a safe.
- If the LED in the up per edge of the driv
er's door panel comes on fo r abo ut
30
seconds after t he vehicle is locked, there
i s a ma lfunction in the power locking or
the anti-theft warning system. Have the
malfunction corrected by an author ized
A udi dealersh ip or qua lified repa ir fac ili
ty .
Setting power locking
The driver con determine the functions for
power locking in the MMI.
.,. Se lect : I CAR ! funct ion button > (Car )* sy s
tems
control button > Vehicle sett ings >
Central locking .
Unlock doors -You can decide if All doors or
only the
Dr iver should unlock. The rear lid al
so unlocks when
All is selected . If you select
Driver in a vehicle with a convenience key*,
only the door whose handle you pull will un l ock. If you se
lect
Dri ver, a ll the doors and rear lid
will unlock if you press them button on the re
mote control maste r key twice.
Loc k exterior trunk handle -If you se lect On ,
the rear lid handle is locked . In this case the
rear lid can be opened with the b utton
cs on
the master key or with the
cs button in the
driver's door . In veh icles with a convenience
key* , you can still open the rear lid using the
handle if an authorized master key is near the
proxim ity sensor .
Fold mir rors * -If you select On , the exterior
rearview mirrors fold in automatically when
you press the
~ button on the remote control
master key or touch the sensor* in the ha ndle.
Tone when locking -When you select On, a
confirmation tone sounds when you lock the
vehicle .
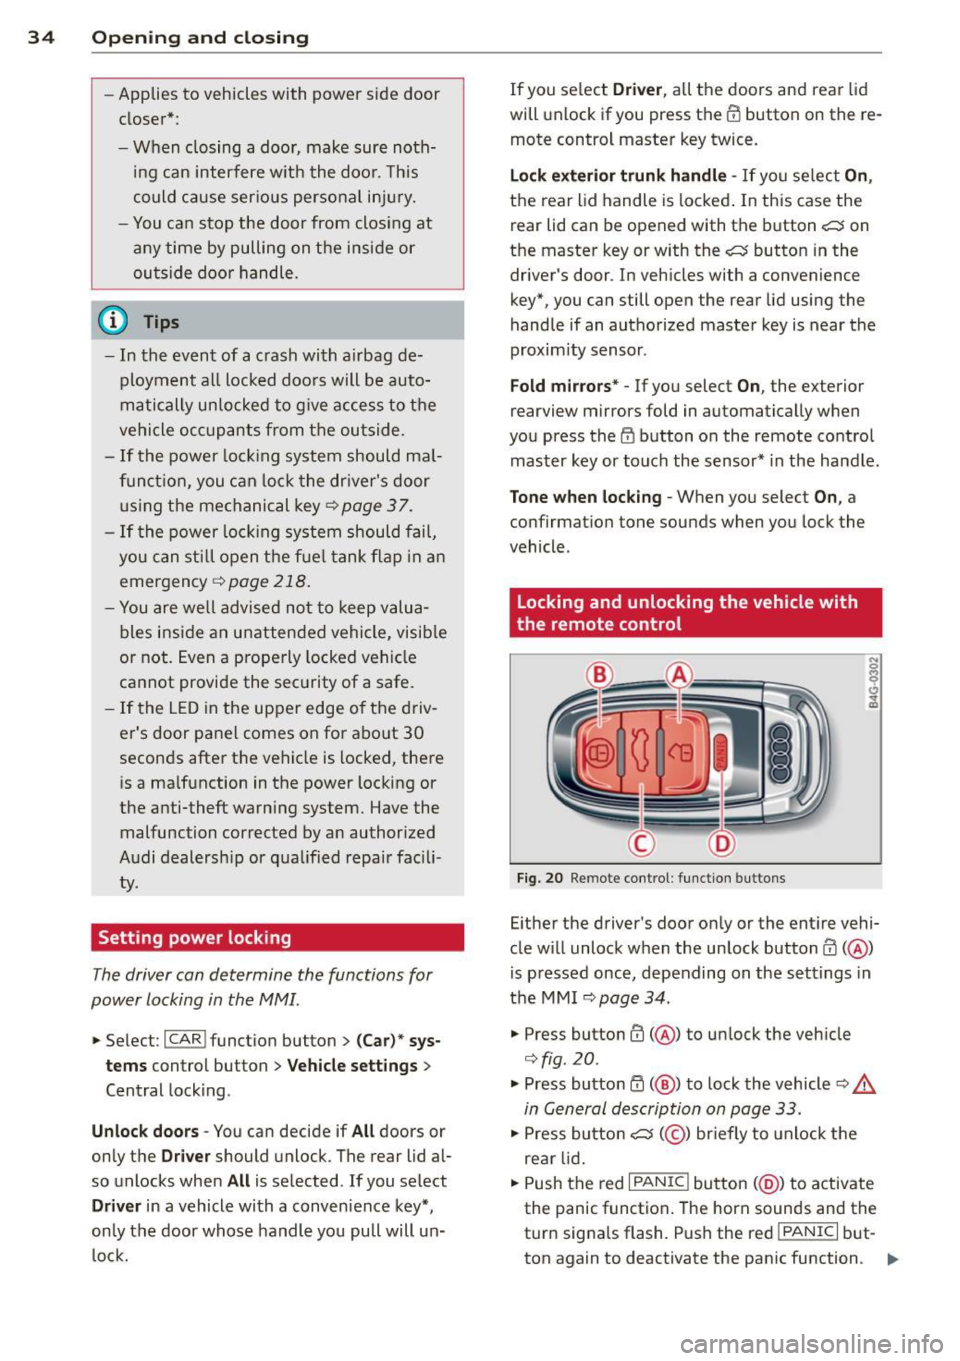
Locking and unlocking the vehicle with
, the remote control
F ig . 20 Remote co ntrol : funct io n buttons
N 0
q Cl
~
Eithe r the driver's door on ly or the ent ire vehi
cle w ill unlock when the unlock button m
(@ )
is p ressed once, depending on the settings in
the MMI
I:!> page 34.
" Press button CD( @) to unlock the veh icle
¢fig. 20.
.,. Press button ~ (@ ) to lock the vehicle I:!> .&.
in General description on page 33 .
.,. Press bu tto n cs( @) briefly to unlock the
re ar lid .
.,. Push the red
I PANIC ! button (@ ) to activate
the panic function . The horn sounds and the
turn signa ls flash. Push the red
I PANIC I but
ton again to deactivate the pan ic function . .,.
Page 37 of 314
M N
0 <.J 'SI: ,...., \!) 1.1'1 ,...., 1.1'1 ,....,
If the vehicle is unlocked and no door, the rear
lid or the hood is opened within 60 seconds ,
the vehicle locks itself aga in automatically.
This feat ure prevents the ve hicle from be ing
accidentally left unlocked over
a long period
of t ime.
It depends on the settings in the MMI wheth
er the entire veh icle is unlocked or on ly cer
t ain doors
Q page 34.
A WARNING
Read and follow all WARNINGS¢.&. in
General description on page 33 .
- In order to make sure the locking func
tion is working, you shou ld always keep
your eye on the vehicle to make sure it is
properly locked .
-
-Do not use the remote control if you are
i nside the car, otherwise you may unin
tentiona lly lock the vehicle, and then you
would set off the anti-t heft ala rm when
you try to s tart the engi ne or open a
doo r. In c ase this happe ns anyhow, push
the un lo ck button
m .
- The vehicle can only be locked whe n the
se lector lever is in the P posit ion .
- Use the panic funct io n only if you are in
an emergency si tu at ion .
Locking and unlocking with convenience
key
Applies to vehicles: with conven ience key
The doors and the rear lid can be unlocked
and locked without operating the master key.
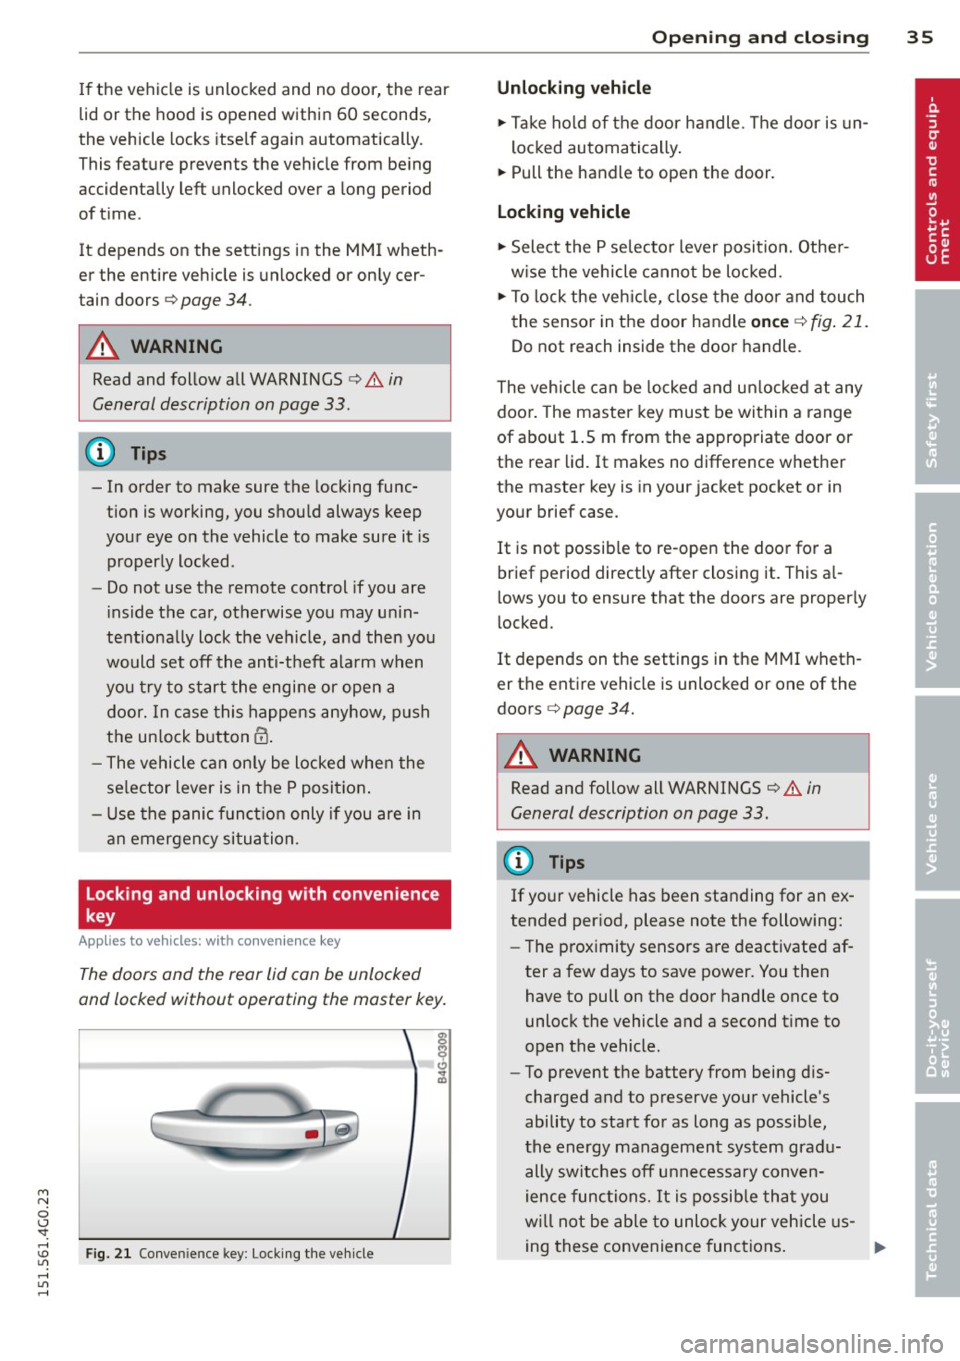
F ig. 2 1 Conve nie n ce key : Lock ing t he ve hicle
Opening and clo sin g 35
Unlocking vehicle
.,. Take ho ld of the door handle . T he door is un-
loc ked automatically .
.,. Pull the handle to open the door.
Locking vehicle
.,. Sele ct the P se lecto r lever posit ion. Othe r
w ise the vehicle canno t be lo cked.
.,. To lock the ve hicle, close the door and touch
the sensor in the door handle
once Q fig . 21 .
Do not reach inside the door handle.
T he veh icle can be locke d an d unl ocke d at any
doo r. The master key mus t be within a range
of about 1.5 m from the appropriate door or
the rear lid. It makes no difference whether
the master key is in your jacket pocket or in
your brief case .
It is not possib le to re -ope n the doo r for a
brief period directly after closi ng it. This a l
l ows you to ensure that the doors are properly
locked.
It depends on the settings in the MMI wheth
er the enti re vehi cle is unloc ked or one of the
doors
Q page 34.
A WARNING
Read and follow all WARNINGS Q .&. in
General description on page 33 .
(D Tips
If your vehicle has been sta nding for an ex
tended period, please note the following:
- The p rox imity sensors a re deactivate d af-
ter a few days to save power. You then
have to pull on the door handle once to
unlock the vehicle and a second t ime to
open the vehicle.
- To prevent the battery from being d is
charged and to preserve your vehicle 's
ability to start for as long as possib le,
the energy management sys tem grad u
ally switc hes off unnecessary conven
ie nce func tions. It is possib le th at you
w ill not be ab le to unlo ck you r ve hicle us-
ing these convenience func tions.
1J1>
Page 46 of 314
44 Clear vision
& WARNING
- Automatic headlights are only intended
to assist the driver . They do not relieve
the driver of his responsibility to check
the headlights and to turn them on man
ually according to the current light and
visibility conditions. For example, fog
cannot be detected by the light sensors.
So always switch on the headlights
io
under these weather conditions and
when driving in the dark.
- Crashes can happen when you cannot see
the road ahead and when you cannot be
seen by other motorists. Always turn on
theheadlightssothatyoucanseeahead and so that others can see your car from
the back .
- The rear fog lights should only be turned
on in accordance with traffic regulation,
as the lights are bright for following traf
fic.
- Please observe legal regulations when using the lighting systems described .
@ Tips
-The light sensor* for automatic head
light range control* is located in the rear
view mirror mount . You should therefore
not apply any st ickers to the windshield
in this area in order to prevent malfunc
tions or failures.
- In the event of a light sensor malfunc
tion, the driver is notified in the instru
ment cluster display
Q page 2 3 .
-You will hear a warning tone if you open
the driver door when the exterior lights
are switched on.
- In cool or damp weather, the inside of
the headlights, turn signa ls and tail
lights can fog over due to the tempera
ture difference between the inside and
outside. They will clear shortly after
switching them on. This does not affect
the service life of the lighting.
Emergency flasher
T he emergency flasher makes other motorists
aware that you or your vehicle are in an emer
gency situation .
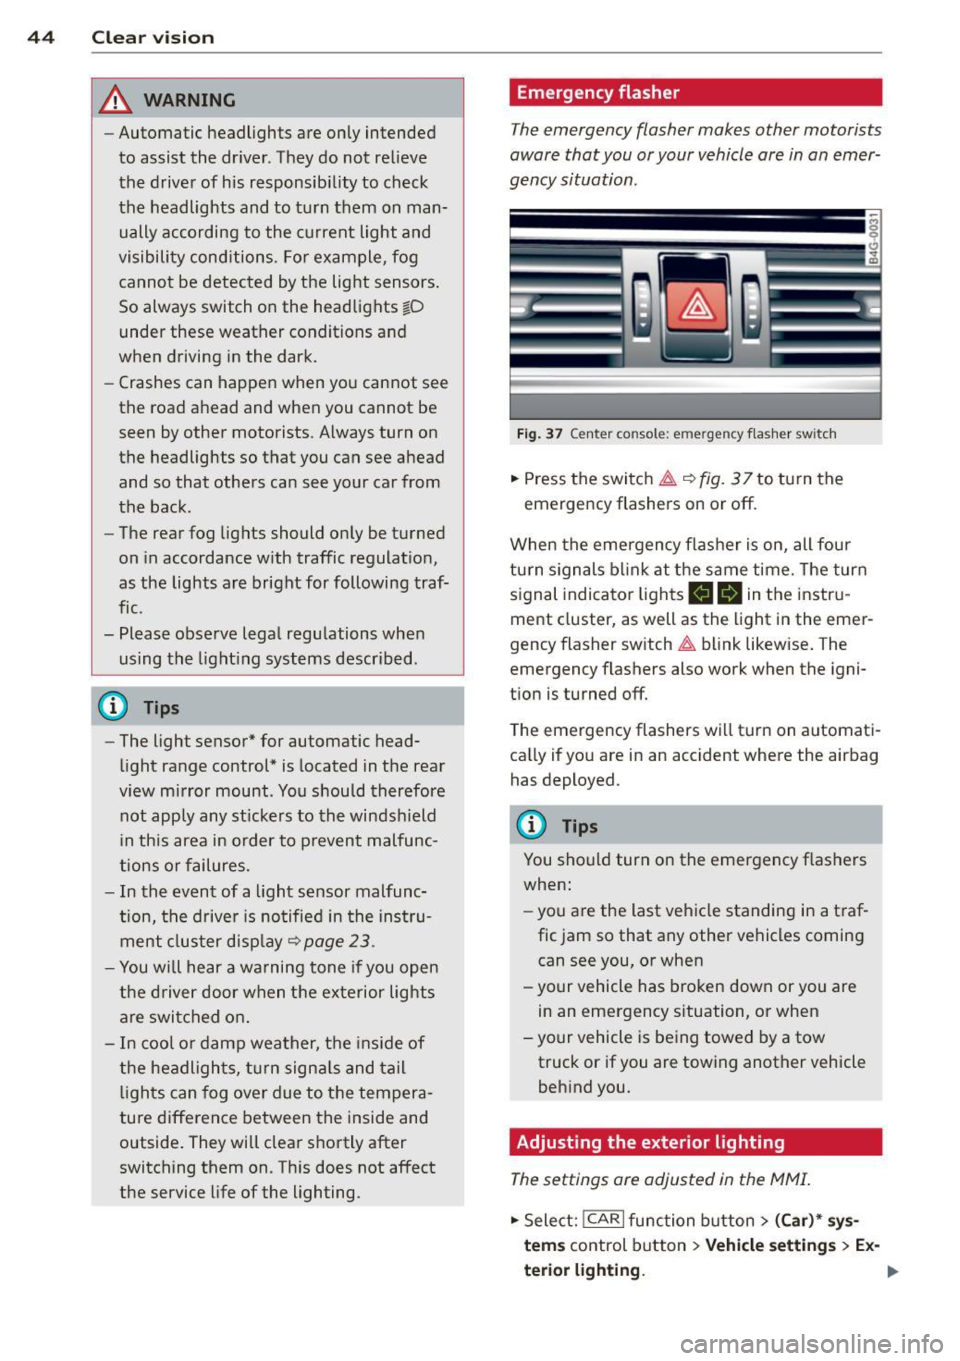
Fig. 37 C ente r co nso le: em erg en cy flash er sw it ch
.. Press the switch ~ Q fig. 3 7 to turn the
emergency flashers on or off.
When the emergency flasher is on, all four
turn s ignals blink at the same time. The turn
signal indicator lights
11111 in the instru
ment cluster, as well as the light in the emer
gency flasher switch~ blink likewise. The
emergency flashers also work when the igni
tion is turned off.
The emergency flashers will turn on automati
cally if you are in an accident where the airbag
has deployed.
@ Tips
You should turn on the emergency flashers
when:
- you are the last vehicle standing in a traf
fic jam so that any other vehicles coming
can see you, or when
- your vehicle has broken down or you are
in an emergency situation, or when
-your vehicle is being towed by a tow
truck or if you are towing another vehicle
behind you.
Adjusting the exterior lighting
The settings are adjusted in the MMI.
.. Select: !CARI function button> (Car)* sys
tems
control button > Vehicle setting s > Ex-
terior lighting.
Ill>
Page 47 of 314
M N
0 I.J "". rl I.O
"' rl
"' rl
Automatic headlights
You can adjust the following settings in the
Automatic headlights menu:
Headlights activation time -You can adjust if
the headlights switch on
Early, Med . or Late
according to the sensitivity of the ligh t sensor.
Audi adaptive light* -You can switch adaptive
light
On and Off.
Daytime running lights
USA models:
You can switch the dayt ime run
n ing lights
on and off .
Canada models :
The function cannot be
turned off . It is activated automatically each
time the ignition is switched on. This menu
item is shown "greyed out" .
Coming home, Leaving home
The coming home function illuminates the
area outside the vehicle when you switch the
ignition off and open the driver's door. To turn
the function on, select
Lights when leaving
car > On .
The leaving home function illuminates the
area outside the vehicle when you un lock the
vehicle. To turn the funct ion on, select
Lights
when unlocking car > On .
The coming home and leaving home functions
only operate when it is dark and the light
switch is in the
AUTO position. Clear
vision 45
Turn signals and high beam lever
The lever on the left side of the steering col
umn is used to operate the turn signals and
the high beam as well as
the headlight flash
er.
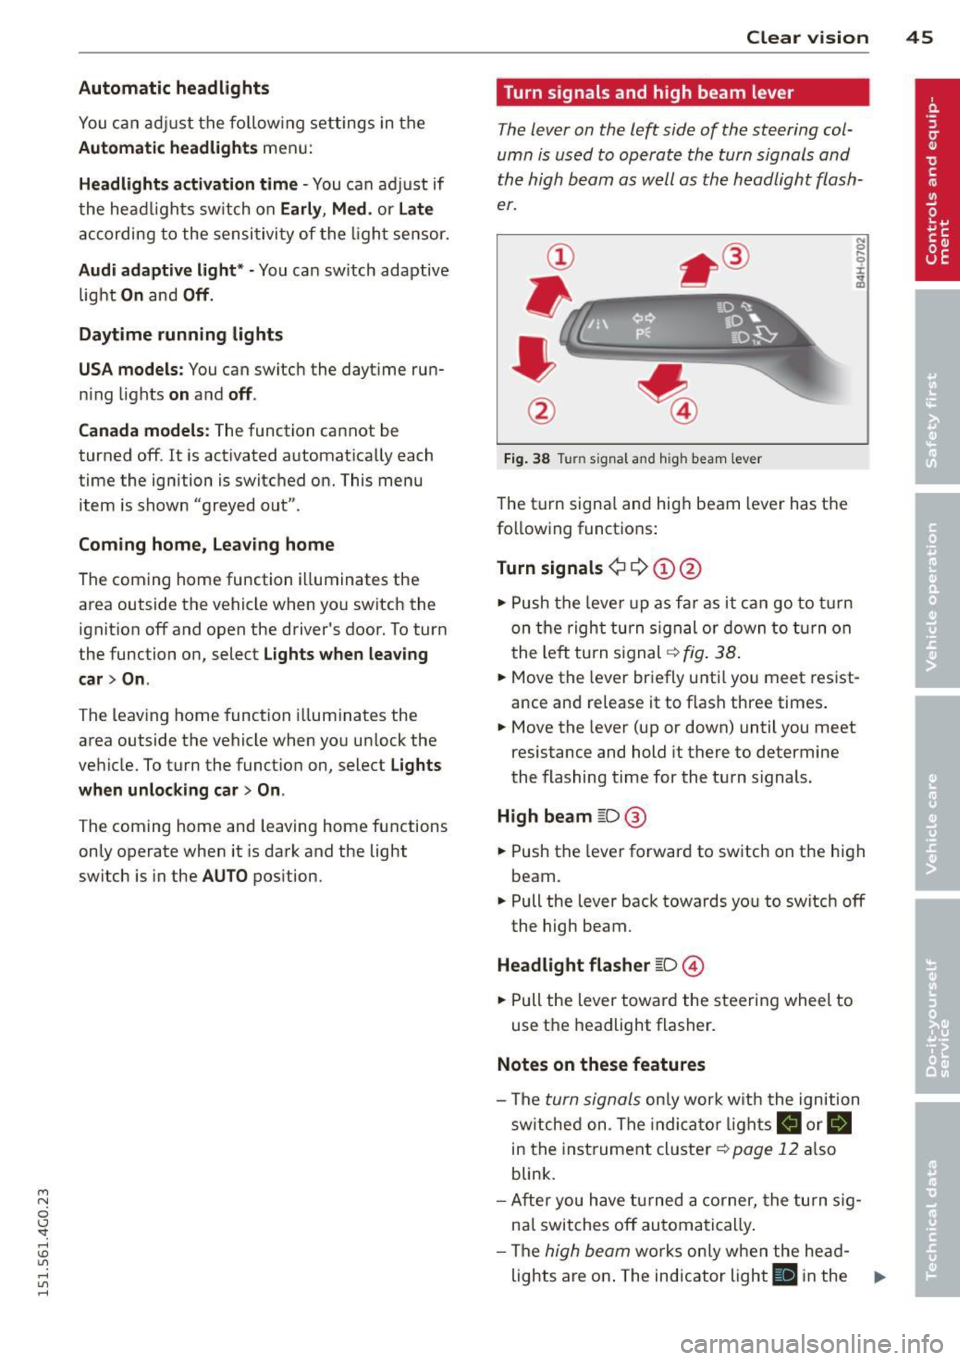
Fig. 38 Tu rn signal and high beam lever
The turn signal and high beam lever has the
following functions:
Turn signals ¢ 9 ©@
.,. Push the lever up as fa r as it can go to turn
on the right turn signa l or down to turn on
the left tu rn s ignal ¢
fig. 38.
.. 0 ....
~
... Move the lever briefly unti l you meet resist
ance and re lease it to flash three times.
.,. Move the lever (up or down) until you meet
resistance and hold it there to determine
the flashing time for the turn signals.
High beam ~D @
... Push the lever forward to switch on the high
beam .
.,. Pull the lever back towards you to switch off
the high beam.
Headlight flasher ~D ©
... Pull the lever toward the steering wheel to
use the headlight flasher.
Notes on these features
-The turn signals on ly work w ith the ignition
sw itched on. The indica tor l ights
a or.
in the instrument cluster¢
page 12 also
blink.
- After you have turned a corner, the turn sig
nal switches off automatically .
- The
high beam works only when the he ad-
lights are on . The indicator light
El in the ..,.
Page 50 of 314
48 Clear vis ion
Wiper and washer
system
Switching the windshield wipers on
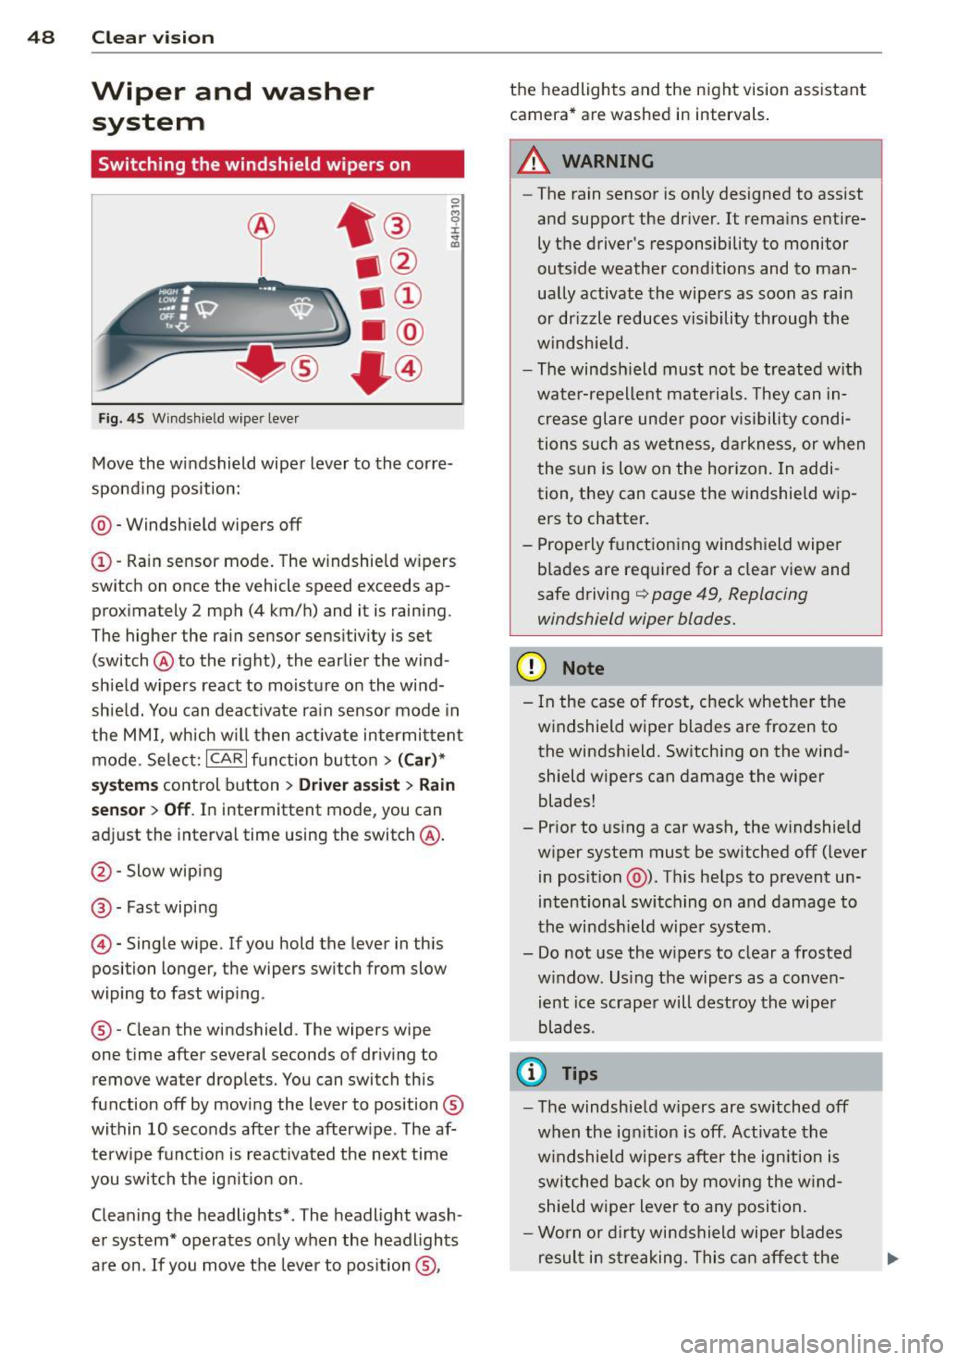
F ig. 45 Windsh ie ld wiper lever
Move th e windshield wiper lever to the corre
sponding pos ition:
@ -Windshie ld wipers off
(I) -Rain sensor mode . The windshield w ipers
switch on once the vehicle speed exceeds ap
p roximately 2 mph (4 km/h) and it is raining.
The higher the rain sensor sensitivity is set
(switch @to the right), the earlier the wind
shield wipers react to moisture on the wi nd
shie ld. You can deact ivate rain sensor mode in
the MMI, which w ill then activate intermittent
mode. Selec t:
ICAR I function bu tton > ( Car )*
system s control button > Driver ass is t > Rain
se nsor
> Off . In intermittent mode, you can
adjust the interval time using the switch@.
@-Slow wiping
@-Fast wiping
© -Single wipe. If you hold the lever in this
position longer, the wipers switch from slow
wiping to fast wip ing.
® - Clean the windshield. The wipers wipe
one time after several seconds of driv ing to
remove water drop lets. You can switch this
function off by mov ing the lever to position ®
within 10 seconds after the afterw ipe . The af
terw ipe fun ct ion is react ivated the next time
you swit ch the ig nition on.
Cleaning the headlights* . The headlight wash
e r system* operates only when the headlights
are on. If you move the lever to pos ition ®, t
h e headlights and the night vision assistant
camera* are washed in intervals.
.&_ WARNING
-
-The rain sensor is only designed to assist
and support the driver.
It remains entire
ly t he driver's responsibility to monitor
outside weather cond itions and to man
ually activate the wipe rs as soon as rain
or drizzle reduces v isibility through the
windshie ld.
- The windsh ield must no t be treated w ith
wate r-repellent mate rials. They can in
crease glare unde r poo r vis ibility condi
tions such as we tness, d arkness, or when
the s un is low on the hor izon. In addi
tion, they can cause the w indshield w ip
ers to chatter .
- Prope rly f unctioning windshield wiper
b lades are required for a clear view and
safe driving
q page 49, Replacing
windshield wiper blades.
(D Note
- In the case of frost, check whethe r th e
windshield wiper blades are frozen to
the windsh ield. Sw itching on the wind
shield wipers can damage the wiper
blades!
- Prior to us ing a car wash, the w indshield
w iper system must be sw itched off (lever
in posit ion @). Th is he lps to prevent un
intentional switching on and damage to
the winds hield wiper system.
- Do not use the w ipers to clear a frosted
w indow. Us ing the wipers as a conven
ient ice scrape r will destroy the wipe r
blades .
(D Tips
-The windshie ld w ipers are switched off
w hen the ignit ion is off . Activate the
w indshield wipers after the ign ition is
s witched back o n by moving the w ind
shield wiper lever to any position.
- Worn or dirty windshield wipe r blade s
result in streaking. This can affec t the
Page 51 of 314
M N
0 <.J 'SI: ,...., \!) 1.1'1 ,...., 1.1'1 ,....,
rain sensor function. Check your
windshield wiper b lades regularly.
- The washer fluid nozzles of the wind
sh ield washer system are heated at low
temperatures when the ignit ion is on .
- When stopping temporarily, e .g . at a
traffic light , the set speed of the wind
shield wipers is automatically red uced by
one speed.
Cleaning windshield wiper blades
Clean the wind shield wiper bl ades when they
begin to leave streaks . Use a soft cloth and
glass cleaner to clean the windsh ield wiper
b lades.
.,. Pl ace the wind shield wiper arm s in the serv
ice position . Refer to ¢
page 49.
.,. Lift the w iper arm away from the front win
dow.
_& WARNING
Dirty w indshie ld w iper blades can imp air
your view. This can lead to accidents.
Replacing windshield wiper blades
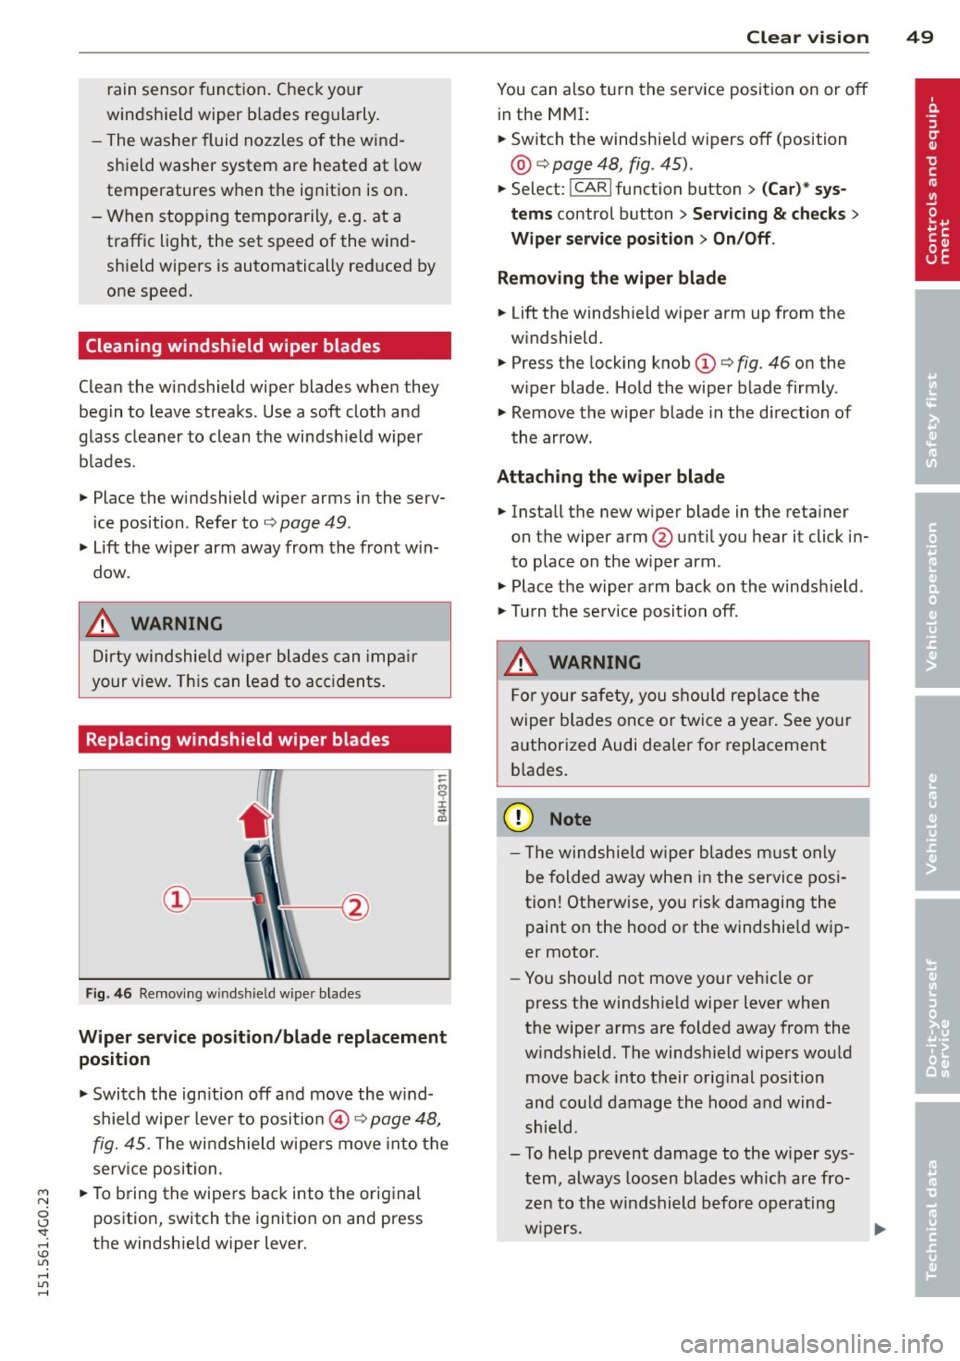
Fig. 46 Re movi ng winds hield w ipe r blade s
-
Wiper ser vice position /blade replacement
position
.,. Switch the ign ition off and move the w ind
shield wipe r lever to posit io n @ ¢
page 48,
fig. 45. The windshield wipers move into the
service position.
.,. To b ring th e wipe rs back into the original
position, switch the ignition on and press
the windshie ld wipe r lever.
Clear v is ion 49
You can also t urn the se rv ice position on or off
in the MMI:
.,. Switch the windsh ie ld wipers off (position
@ ¢ page 48, fig. 45) .
.,. Select: !CAR ! function but ton> (Car )* sy s
tem s control button > Servicing & check s >
Wiper service po sition > On /Off .
Remo ving th e wiper bl ade
.,. Lift the windsh ie ld wipe r arm up from the
w indshield.
.,. Press the locking knob
(D ¢ fig. 46 on the
w iper blade. Hold the wiper blade firmly .
.,. Remove the wiper blade in the direction of
the arrow .
Attaching the wipe r blade
.,. Install the new wiper blade in the reta iner
on the wipe r arm @unti l you hear it click in
to place on the w iper arm .
.,. Place the w iper arm back on the windshield .
.,. Tu rn the se rvice position off.
_& WARNING
-
F or your safety, you s hou ld rep lace the
wiper b lades once or twice a yea r. See your
authorized Audi dea ler for replacement
b la d es .
Q) Note
- Th e windsh ie ld wiper b lades must only
be folded away when in the service posi
tion! Otherwise, yo u ris k damaging the
paint on the hood or the windshie ld wip
er motor.
- Yo u should not move your vehicle or
press the windshield wiper lever when
the wiper arms are folded away from the
w indshield . The windsh ield wipers wou ld
move back into their original position
and could damage the hood a nd wind
shield .
- To help prevent damage to the w iper sys
tem, always loosen blades w hich are fro
zen to the windshield before operating
w ipers. ..,.
Page 86 of 314
84 Audi ad apti ve cruise control and bra king gu ard
Audi adaptive cruise
control and braking
guard
Introduction
App lies to vehicles: with Audi adaptive cruise co ntrol
The adaptive cruise control system assists the
driver by regu lat ing vehicle speed and helping
to maintain a set distance to the vehicle
ahead, within the limits of the system.
If the
system detects a moving vehicle up ahead,
adaptive cruise control can brake and then ac
celerate your vehicle. This helps to make driv
ing more comfortable both on long highway
stretches and in stop-and-go traffic.
The braking guard system can warn you about
an impending collision and initiate braking
maneuvers
c:::> page 90.
Adaptive cruise control and braking guard
have technical limitations that you must
know, so please read this section carefully, un
derstand how the system works and use them
properly at all times.
General information
General information
Applies to vehicles: with Audi adaptive cruise control
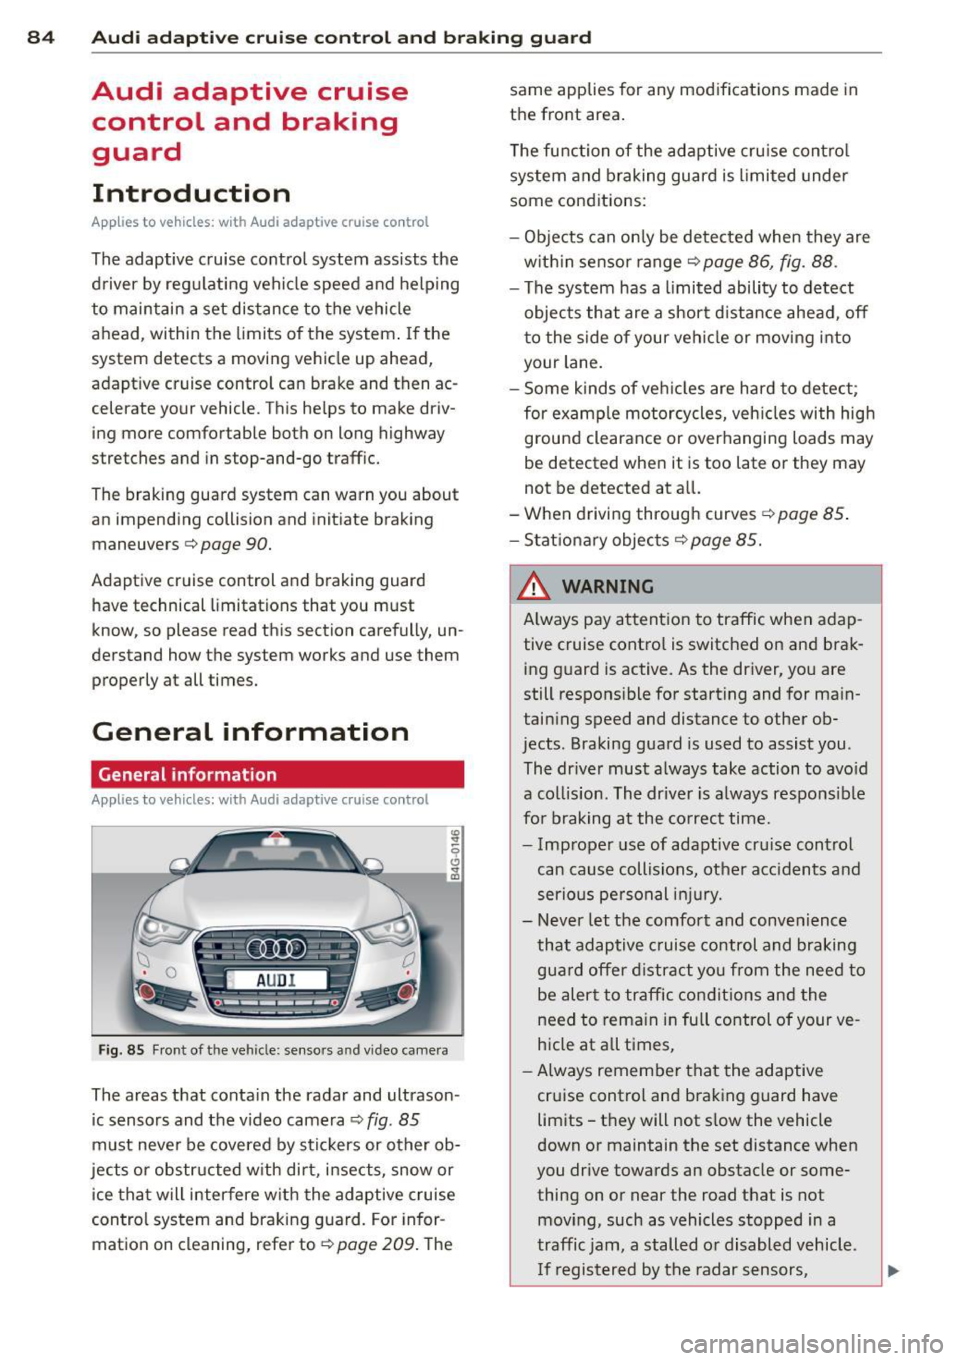
Fig. 85 Front of th e veh icle: senso rs and video camera
The areas that conta in the radar and ultrason
ic sensors and the v ideo camera
c:::> fig. 85
must neve r be cove red by stic kers or other ob
jects or obstructed w ith dirt, insects, snow or
i ce that will interfere with the adaptive cruise
control system and braking guard. For infor
mation on cleaning, refer to
c:::> page 209. The same applies for any modifications made in
the front area.
T he function of the adaptive cru ise contro l
system and braking guard is limited under
some cond itions:
- Objects can only be de tected when they are
w ith in sensor range
c:::> page 86, fig. 88 .
-The system has a limited ability to detect
objects that are a short d istance ahead, off
to the side of your vehi cle or mov ing into
your lane.
- Some kinds of veh icles are hard to detect;
for examp le motorcycles, veh icles with high
ground clearance or overhanging loads may
be detected when it is too late or they may
not be detected at all.
-When driving through curves
c:::>page 85 .
-Stat ionary objec ts c:::> page 85.
& WARNING
A lways pay attention to traffic when adap
tive cruise contro l is switched on and brak
ing g uard is active. As the driver, you are
still respons ible for starting and for main
taining speed and distance to other ob
jects. Braking guard is used to assist you .
The dr iver must a lways take action to avo id
a collis ion . The driver is a lways respons ible
fo r braking a t the co rrec t time.
- Imp roper use of adaptive cru ise control
can cause collisions, other acc idents and
serious pe rsonal in jury.
- Never let the comfort and convenience
that adaptive cruise control and braking gua rd offer d istract you from the need to
be alert to traffic condit ions and the
need to rema in in fu ll control of your ve
h icle at a ll times,
- Always remember that the adaptive
cruise control and braking guard have
limits -they will not s low the vehicle
down or maintain the set distance when
you drive towards an obstacle or some
thing on or near the road that is not
mov ing, such as vehicles stopped in a
traffic jam, a stalled o r disabled vehicle.
I f registered by the radar sensors,