change time AUDI A6 2016 User Guide
[x] Cancel search | Manufacturer: AUDI, Model Year: 2016, Model line: A6, Model: AUDI A6 2016Pages: 294, PDF Size: 73.88 MB
Page 100 of 294
Audi side assist
-Improper reliance on the side assist system
can cause collisions and serious personal in
jury:
- Never rely only on side assist when chang
ing lanes.
- Always check rear view mirrors to make
sure that it is safe to change lanes.
- Side assist cannot detect all vehicles under
all conditions- danger of accident!
- Please note that side assist indicates there
are approaching vehicles, or vehicles in your blind spot, only after your vehicle has
reached a driving speed of at least 19 mph
(30 km/h).
- In certain situations, the system may not
function or its function may be limited. For
example:
- if vehicles are approaching or being left
behind very quickly . The display may not
turn on in time .
- in poor weather conditions such as heavy
rain, snow or heavy mist .
- on very wide lanes, in tight curves or if
there is a rise in the road surface . Vehicles
in the adjacent lane may not be detected
because they are outside of the sensor
range.
(D Note
The sensors can be displaced by impacts or damage to the bumper, wheel housing and
underbody . This can affect the system . Have
your authorized Audi dealer or authorized
Audi Service Facility check their function.
(D Tips
-If the window glass in the driver's door or
front passenger's door has been tinted, the
display in the exterior mirror may be misin
terpreted.
- For Declaration of Compliance to United
States FCC and Industry Canada regulations
¢page 276.
98
Switching on and off
Applies to vehicles: with A udi side assist
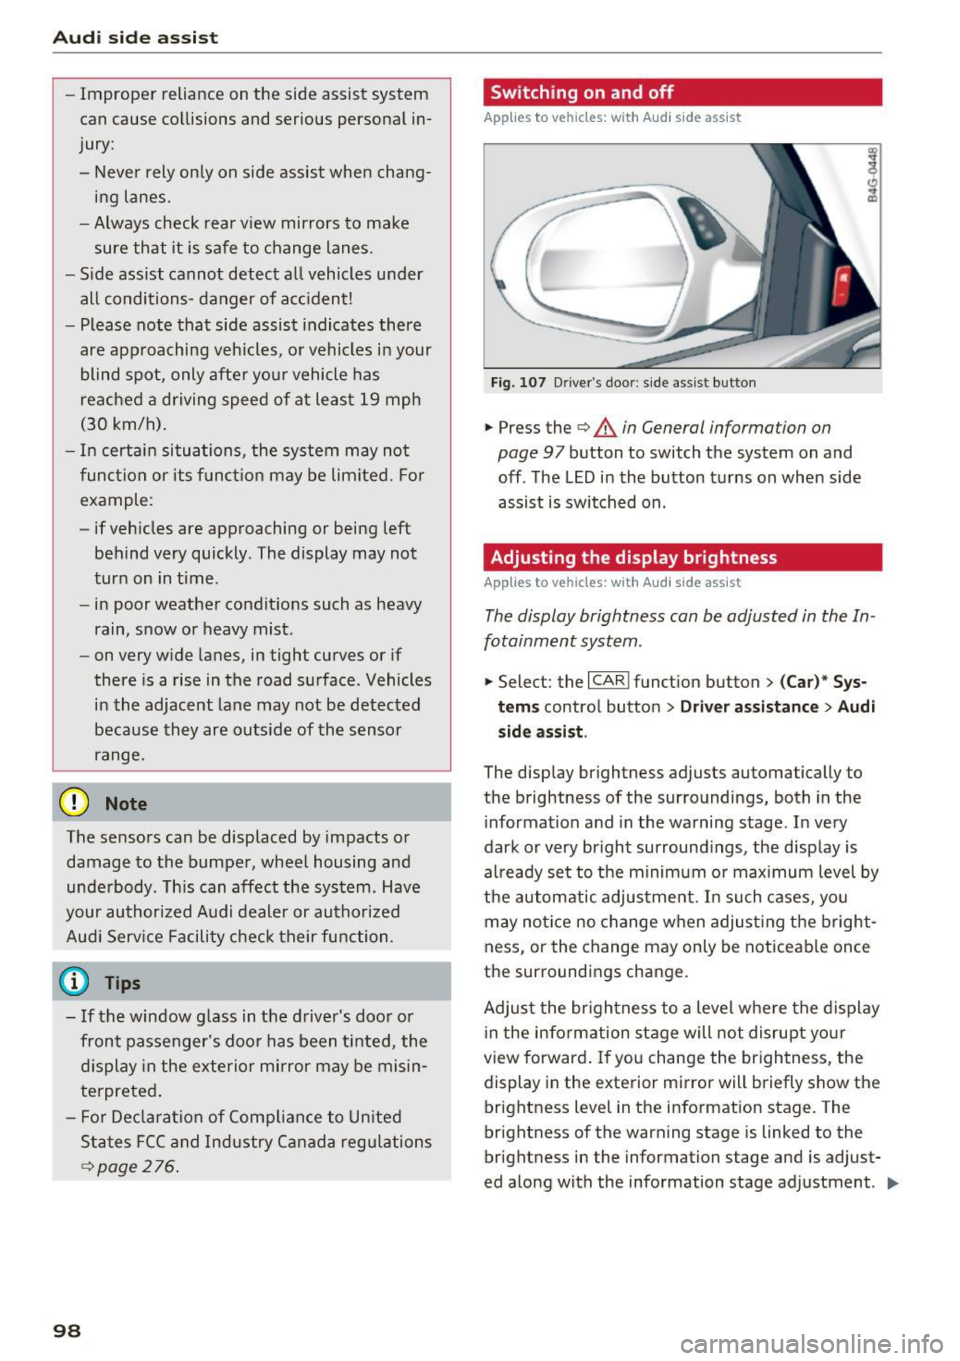
Fig. 107 D river 's doo r: side assi st but ton
.,.. Press the ¢&. in General information on
page
97 button to switch the system on and
off . The LED in the button turns on when side
assist is switched on .
Adjusting the display brightness
Applies to vehicles: with A udi side assist
The display brightness can be adjusted in the In
fotainment system .
.,.. Select: the I CARI function button > (Car)* Sys
tems control button > Driver assistance> Audi
side assist .
The display brightness adjusts automatically to
the brightness of the surroundings, both in the
information and in the warning stage . In very
dark or very bright surroundings, the display is
already set to the minimum or maximum level by
the automatic adjustment. In such cases, you
may notice no change when adjusting the bright
ness, or the change may only be noticeable once
the surroundings change.
Adjust the brightness to a level where the display
in the information stage will not disrupt your
view forward. If you change the brightness, the
display in the exterior mirror will briefly show the
brightness level in the information stage. The
brightness of the warning stage is linked to the
brightness in the information stage and is adjust
ed along with the information stage adjustment . ..,.
Page 102 of 294
Audi drive select
Audi drive select
Driving settings
Introduction
Drive select makes it possible to experience d if
ferent types of vehicle settings in one vehicle.
The driver can select
Comfort, Auto and Dynami c
modes in the Infotainment system to switch be
tween a sporty and a comfortable driving mode.
In the
Individual mode, the settings can be ad
justed to your personal preferences. This makes it possible to combine settings such as a sporty
engine tuning with light steering.
A WARNING
-
Improper use of the Audi dr ive select can
cause collisions, other accidents and serious
personal injury.
Description
The follow ing systems are affected by drive se
lect:
Engine and transmission
Depending on the mode, the eng ine and the
transmission respond quicker or in a more bal
anced manner to acce lerator pedal movements.
I n the sporty dynamic mode, the transmission
shifts at h igher RPMs.
Air suspension*
The adaptive air suspension/adaptive air suspen
sion sport*
(Air suspension in the MMI) is an
e lectronically controlled air suspens ion and
damping system. They are adjusted depend ing
on the selected dr iv in g mode, the driver's steer
ing, braking and acceleration input and the road
surface, vehicle speed and load. A sporty setting
is generally used in vehicles with adaptive air sus
pension sport*.
The vehicle clearance varies depending on these
lected mode and the speed.
The highway setting is activated automatically
when yo u drive above 75 mph (120 km/h) for
mo re than 30 seconds in the
Auto or Dynamic
100
mode. The ground clea rance is increased auto
matically if the speed drops below 44 mph (70
km/h) for more than 120 seconds.
Steering
The steering adapts in terms of steering effort
and steering ratios. Indirect stee ring that moves
easily, like the steering in comfort mode, is best
suited to long drives on a highway. In contrast,
dynamic mode provides sporty, direct steering.
The following applies to vehicles with dynamic
steering*: the steering ratio changes based on
vehicle speed in order to maintain optimum
steering effort for the driver at a ll times . This
sets the steering to be less sensitive at higher
speeds in order to provide improved vehicle con
trol. At reduced speeds, however, steering is
more direct in order to keep the steering effort as
min imal as possible when the dr iver is maneuver
i ng the vehicle. At low and average speeds, dy
namic steering additionally provides more re
sponsive steering performance.
Sport differential*
As a component of the all wheel dr ive system
(quattro)
c::;> poge 191, the Sport differentia l*
distributes the d riving powe r to the rear axle de
pending on the situation . T he distr ibutio n of
power varies depending on the selected mode,
from ba lanced (comfort) to agile (dynamic). The
goal is a high level of agility and ability to accel
erate on curves. The vehicle is very responsive to
steering.
Curve light*
The curve light adapts to driving on curves. The
pivoting action and the lighting are also adapted
to the mode.
Adaptive cruise control*
The behav ior when accelerating can be adjusted
from comfortable to sporty, depending on the
drive select mode. Adaptive cruise control also
responds to the driving behavior of the vehicle
ahead in a more conservative or sporty manner . .,..
Page 108 of 294
Automatic transmission
Automatic transmission S tronic, tiptronic
Introduction
The automatic transmission is controlled elec
tronically. The transmission upshifts or down
shifts automatically depending on which drive
program is selected.
When a
moderate driving style is used, the
transmission selects the most economical driving
mode. The transmission upshifts at a lower RPM
and downshifts at a higher RPM to improve fuel
efficiency.
The transmission switches to a sporty mode after
a kick-down or when the driver uses a
sporty
driving style
characterized by quick accelerator
pedal movements, heavy acceleration, frequent
changes in speed and traveling at the maximum
speed.
If desired , th e driver can also select the gears
manually (tiptronic mode) 9 page 110.
Various automatic transmissions may be instal
led, depending on the model:
S tronic transmission
The S tronic is a dual-clutch transmission. Power
is transferred using two clutches that work inde
pendently from one another. They replace the
torque converter used in conventional automatic
transmissions and allow the vehicle to accelerate
without a noticeable interruption in traction.
tiptronic transmission
In the tiptronic transmission, power is transfer
red by a torque converter.
106
Selector lever positions
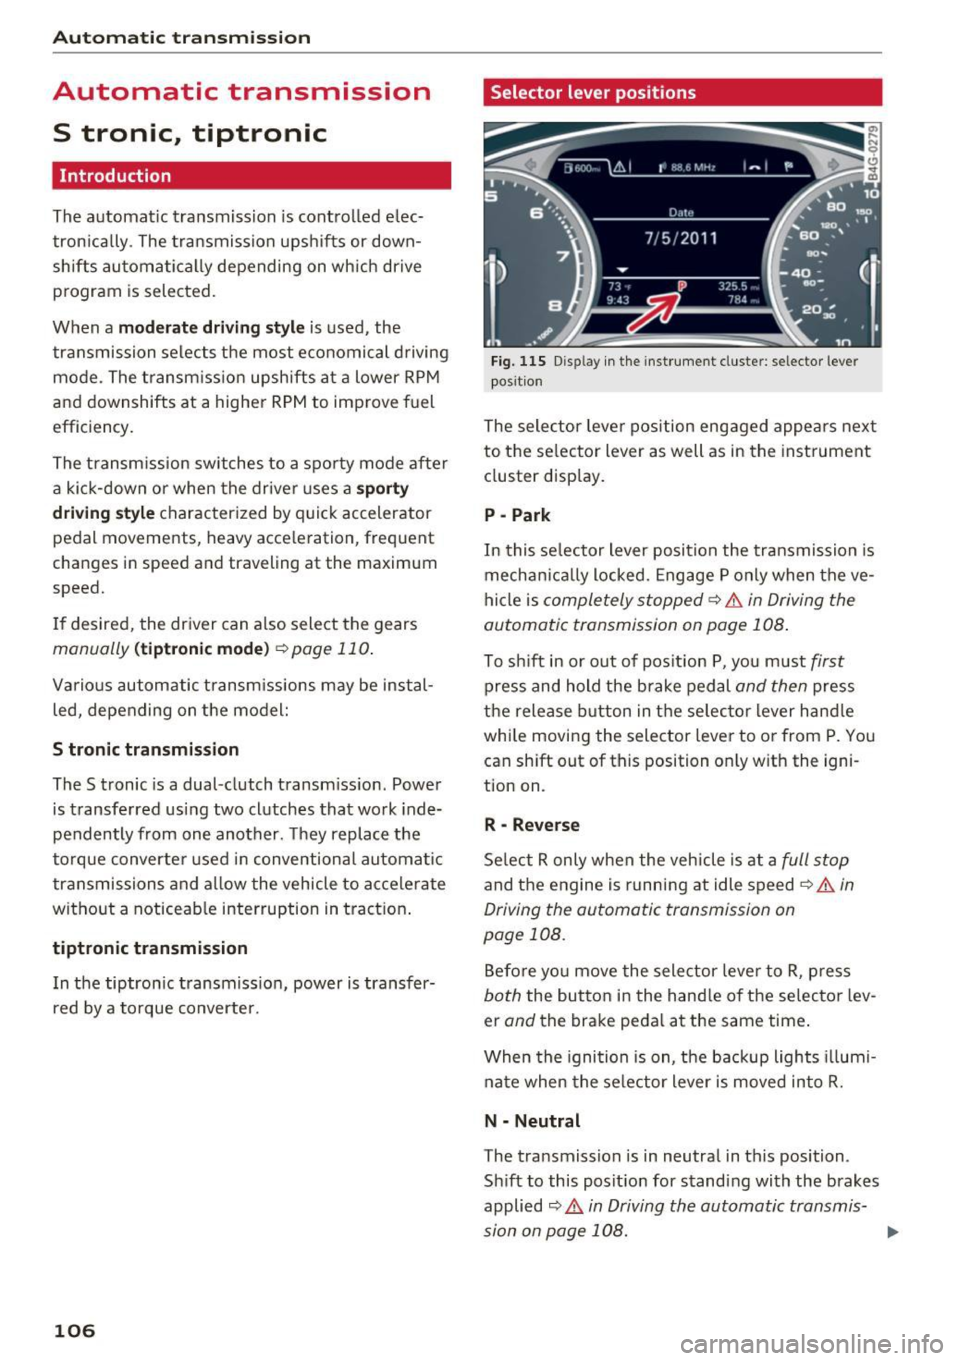
Fig. 115 Display in the instrument cluster: selector lever
position
The selector lever position engaged appears next
to the selector lever as well as in the instrument
cluster display.
P -Park
In this selector lever position the transmission is
mechanically locked. Engage P only when the ve
hicle is
completely stopped¢&. in Driving the
automatic transmission on page 108.
To shift in or out of position P, you must first
press and hold the brake pedal and then press
the release button in the selector lever handle
while moving the selector lever to or from P. You
can shift out of this position only with the igni
tion on.
R -Reverse
Select R only when the vehicle is at a full stop
and the engine is running at idle speed¢&. in
Driving the automatic transmission on
page 108.
Before you move the selector lever to R, press
both the button in the handle of the selector lev
er
and the brake pedal at the same time.
When the ignition is on, the backup lights illumi
nate when the selector lever is moved into R.
N -Neutral
The transmission is in neutral in this position.
Shift to this position for standing with the brakes
applied
9 A in Driving the automatic transmis
sion on page 108.
...
Page 115 of 294
Parking systems
General information
Applies to vehicles: with parking system plus/rear view cam
era/peripheral cameras
Depending on your vehicle's equipment, various
parking aids will help you when parking and ma
neuvering.
The
parking system plus assists you when park
ing by audibly and visually indicating objects de
tected
in front of and behind the vehicle
r::!:>page 114.
The rear view camera shows the area behind the
vehicle in the Infotainment display. This display
assists you when you are cross or parallel parking
r::!:> page 115. In addition, you are assisted by the
functions from the parking system plus
r::!:>page 114.
The peripheral cameras assist you with parking
and maneuvering. You are aided by various cam
e ras depending on the vehicle equipment leve l
¢ page 118. In addition, you are assisted by the
functions from the parking system plus
r::!:>page 114.
A WARNING
-Always look for traffic and check the area
around your vehicle by looking at it directly
as well. The parking system cannot replace
the driver's attention. The driver is always
responsible for safety during parking and
for all other maneuvers.
-
-Please note that some surfaces, such as
clothing, are not detected by the system.
- Sensors and cameras have blind spots in
which people and objects cannot be detect ed. Be especially cautious of children and
animals.
- The sensors can be displaced by impacts or
damage to the radiator grille, bumper,
wheel housing and the underbody. The park
ing systems may become impaired as a re
sult. Have your authorized Audi dealer or
qualified workshop check their function.
- Make sure the sensors are not covered by
stickers, deposits or any other obstructions
Parking systems
as it may impair the sensor function. For in
formation on cleaning, refer to
r::!:>page203.
(D Note
-Some objects are not detected by the sys
tem under certain circumstances:
- Objects such as barrier chains, trailer draw
bars, vertical poles or fences
- Objects above the sensors such as wall ex tensions
- Objects with specific surfaces or struc
tures such as chain link fences or powder
snow.
- If you continue driving closer to a low-lying
object, it may disappear from the sensor
range. Note that you will no longer be
warned about this obstacle.
(D Tips
- The system may provide a warning even
though there are no obstacles in the cover age area in some situations, such as:
- certain road surfaces or for long grass.
- external ultrasonic sources e.g. from cleaning vehicles.
- heavy rain, snow or thick vehicle exhaust.
- We recommend that you practice parking in
a traffic-free location or parking lot to be
come familiar with the system. When doing
this, there should be good light and weath
er conditions.
- You can change the volume and pitch of the
signals as well as the display
r::!:>page 123.
-Please refer to the instructions for towing a
trailer
r::!:>page 123.
-What appears in the infotainment display is
somewhat time-delayed.
113
Page 125 of 294
Adjusting the display and the warning tones
A ppl ies to vehicles: W it h parkin g system plus/rearview c am·
era/peripheral ca meras
The display and warning tones can be adjusted in
the Infotainment.
~ Se lect: the ICARI function button > ( Car)* Sys
tems control b utton
> Driver ass istance > Pa rk
ing aid .
Display
On * -An op tical d isp lay is shown for the parking
system plus, a rearview camera image is s hown
for the rearview camera *.
Off -Whe n the par king system is switched off,
only audib le signa ls are give n.
Warning tones Front volume - Volume for the front a rea
Rear volume - Volume fo r the rear area
Front frequency· Frequency for the front a rea
Rear frequency · Freq uency for the rear area
Entertainment volume lowering - When the
pa rking system is turned on, the volume of the
aud io/video so urce is lowered .
The new ly adjusted value is briefly heard from
the signal generato r.
@ Tips
- The warning tones can also be adjusted d i
rectly by the vis ual disp lay or the pictu re
from the camera. Simply press the Settings
control bu tton.
- Changed settings are activated when the
parking system is switched o n aga in.
- The settings for volume and frequency are
automat ica lly saved and assigned to the re
mote control key be ing used .
Error messages
Appl ies to vehicles: W ith pa rk in g syste m plus/rearview ca m·
era/per ipheral ca meras
There is an erro r in the system if the LED in the
Pw , button is b linking and yo u hear a continuous
Parking systems
alarm for a few seconds after sw itch ing on the
par king system or w hen the pa rking system is a l·
ready activated. If the error is not cor rected be
fo re you switch
off the ignition, the LED in the Pw ,
button wi ll blink the next time you switch on the
park ing system by shifting into reverse.
Parking sy stem plus
If a sensor is fa ulty, the .l?4 symbo l will appear i n
front of/behind the vehicle in the Infotainment
display. If a rear sensor is faulty, on ly obstacles
that are in areas @and @ are shown
¢ page 114, fig . 120 . If a front sensor is faulty,
only obs tacles tha t are in areas © and @are
shown. The re is a lso a system ma lf u nction if all
segme nts ar ound the veh icle are red or if no seg·
me nts are disp laye d.
Peripheral cameras*
T he re is a system malfu nction if t he
t8> • symbol
appea rs and the co rresponding disp lay area is
shown in bl ue. The camera is not wo rking in this
area.
Drive to an authorized A udi dealer or authorized
Audi Service Facility immed iate ly to have the
malfunction corrected.
Trailer hitch
App lies to vehicles: wit h parking system pl us/rea rv iew cam
era/periphera l cameras an d tra ile r hitc h
For vehicles using the t rai ler socket, the park ing
system rear sensors do not tu rn on whe n you
shift into reverse gear or when yo u press the
Pwi
button. This resu lts in the following restrict ions.
Parking system plus
There is no distance warning for the rear. The
front senso rs remain activated. The v isua l display
switches to t he tra iler tow ing mode.
Rearview camera* /peripheral cameras *
T he re is no distance warning for the rear . The
front sensors remain activated . The visua l display
switches to the tra ile r towing mode. The rearv iew
camera image w ill not show the orientation lines
and the b lue surfaces. .,,.
123
Page 155 of 294
A WARNING 1=-
Objects between you and the airbag will in
crease the risk of injury in a crash by interfer
ing w ith the way the airbag unfolds or by be
ing pushed into you as the a irbag inflates .
- Never hold th ings in your hands or on your
lap when the vehicle is in use .
- Never transport items on or in the area of
the front passenger seat . Objects could
move into the area of the front airbags dur
ing brak ing or other sudden maneuvers and
become dangerous projectiles that can
cause serious personal injury if the airbags
inflate.
- Never place or attach accessories or other
objects (such as cup holders, te lephone
brackets, large, heavy or bulky objects) on
the doors, over or near the area marked "AIRBAG" on the steering wheel, instru
ment pane l, seat backrests or between
those areas and yourself . These objects
could cause injury in a crash, especially
when the airbags inflate .
- Never recline the front passenger 's seat to
transport objects . Items can also move into
the area of the side airbag or the front a ir
bag dur ing bra king or in a sudden maneu
ver. Objects near the airbags can become
projectiles and cause injury, particular ly
when the seat is reclined.
-
- Never place or transport objects on the
front passenger seat . Objects on the front
passenger seat could cause the capacitive
sensor in the seat to signal to airbag system
that the seat is occup ied by a person when it
in fact is not, or that the person on the seat
is heavier than he or she actually is . The
change in electric capac itance because of
such objects can cause the passenger front
airbag to be turned on when it shou ld be
off, or can cause the airbag to work in a way
that is different from the way it would have
worked without objects on the seat.
- Always ma ke sure that there is nothing on
the front passenger seat that wi ll cause the
capacit ive passenger detection system in
the seat to signa l to the Airbag System that
Airb ag sys tem
the seat is occupied by a person when it is
not, or to signal that it is occupied by some
one who is heavier than the person actually
sitt ing on the seat . The presence of an ob
ject could cause the passenger front airbag to be turned on when it should be off , or
could cause the airbag to work in a way that
is different from the way it would have
worked without the object on the seat.
A WARNING
=
The fine dust created when airbags deploy can
cause breathing prob lems for people with a
history of asthma or other breathing condi
tions .
- To reduce the risk of breathing problems,
those with asthma or other respiratory con
ditions should get fresh air right away by
getting out of the vehicle or open ing win
dows or doors.
- If you are in a collision in wh ich airbags de
ploy, wash your hands and face w ith m ild
soap and water before eating .
- Be carefu l not to get the dust into your eyes,
or into any cuts or scratches.
- If the residue should get into your eyes,
flush them w ith water .
Monitoring the
Advanced Airbag System
t!~ (USA models) /!t (Canada models)
Airbag monitoring indicator light
T wo separate indicators monitor the function of
the Advanced Airbag System : the airbag moni
toring indicator light and the
PASSENGER AIR
BAG OFF
light.
The Advanced Airbag System as well as the side
airbags and side curtain airbags with ejection
mitigation fea tures (including the electronic con
trol unit, sensors and system wiring) are all monitored continuously to make sure that they
are functioning properly whenever the ignition is
on. Every time you turn on the ign ition, the a ir
bag system indicato r light
II (USA models) tfll
(Canada models) wi ll come on for a few seconds
(function check).
153
...
Page 158 of 294
Airbag syste m
-the adu lt on the front passenger seat is proper
ly seated on the center of the seat cushion with
his or her back up against the backrest and the
backrest is not reclined,
- the ad u Lt is not taking weight off the seat by
holding on to the passenger assist handle
above the front passenger door or supporting
their we ight on the armrest,
- the safety belt is being properly worn and that
there is not a lot of slack in the safety belt web
bing,
- there are no aftermarket seat covers or cush
ions or other things (such as blankets) on the
front passenger seat that might cause the ca
pacit ive passenger detection system to miscal
cu late electrical capacitance.
Important safety instructions on
monitoring the Advanced Airbag System
A WARNING
- If the status of the Adva need A irbag System
has changed wh ile the vehicle is mov ing, the
PASSENGE R AIR B AG OFF light blinks for
about 5 seconds to catch the driver's atten
t ion. If this happens, a lways stop as soon as
it is safe to do so and check the steps descri
bed above.
- If the PASSENGER AIR BAG OFF light does
not go off when an adul t who is not very
small is sitt ing on the front passenger seat
after taking the steps described above,
make sure the adult is properly seated and
restra ined at one of the rear seating posi
t ions. Have the airbag system inspected by
your authorized Aud i dealer before trans
porting anyone on the front passenger seat.
A WARNING
An airbag system that is not funct ion ing prop
erly cannot p rovide supplemental p rotection
in a frontal crash.
- If the airbag indicator light
r:::;, page 18
comes when the vehicle is being used, have
the system inspected immediate ly by yo ur
authorized Aud i dealer. It is possible that
156
the airbag will inflate when it is not sup
posed to, or will not inf late when it should.
A WARNING
If the front a irbag inflates, a ch ild without a
chi ld restraint, or in a rearward-facing child
safety seat, or in a forward-fac ing ch ild re
stra int that has not been properly instal led
will be ser iously injured and can be killed .
- Even though you r vehicle is equipped with
an Advanced A irbag System, make certain
that a ll children, espec ia lly 12 years a nd
younge r, always ride on the bac k sea t prop
erly rest rained for thei r age and s ize.
- Always install fo rwa rd o r rea r-facing child
seats on the re ar seat -even w ith an Ad
vanced Ai rbag System.
- If you must install a rea rwa rd-facing child
seat on the fron t passenge r seat bec ause o f
except ional circumstances and the
PASSEN
GER AIR BAG OFF
light does not appear and
stay on, immediate ly install the rear-facing
child seat in a rear seat ing pos ition and have
the airbag system inspected by your Audi
dea ler.
- If, in exceptional circumstances, you must
install a forward-facing child restraint on
the front passenger seat, always move the
seat into its rearmost position in the seat's
fore and aft ad justment range, as far away
from the a irbag as poss ible. The back rest
m ust be adjus ted to an upr ight position.
Ma ke sure that the
PASSENGER AIR BAG
OFF
li ght comes on and stays on all the time
whenever the ignition is switched on .
A WARNING
-If the PASSENGER AIR BAG OFF light does
not go out when an adult is sitting on the
front passenger seat afte r taking the steps
described above, make sure the adult is
properly seated and restra ined at one of the
rear sea ting posit ions.
- Have the airbag system inspected by your
Aud i deale r before transporting anyone on
the front passenge r seat .
Page 170 of 294
Child safety
Advanced front airbag system and children
Your vehicle is equipped with a front "Advanced
Airbag System" in compliance with United States Federal Motor Vehicle Safety Standard (FMVSS)
208, as well as Canada Motor Vehicle Safety
Standard (CMVSS) 208 as applicable at the time
your vehicle was manufactured.
The Advanced Airbag system in your vehicle has
been certified to meet the "low-risk" require
ments for 3- and 6-year old children on the pas
senger side and small adults on the driver side.
The low risk deployment criteria are intended to
reduce the risk of injury through interaction with
the airbag that can occur, for example, by being
too close to the steering wheel and instrument panel when the a irbag inflates. In addition, the
system has been certified to comply with the
"suppression " requirements of the Safety Stand
ard, to turn off the front airbag for infants up to
12 months who are restrained on the front pas
senger seat in child restraints that are listed in
the Standard.
Even though your vehicle is equipped with an Ad ·
vanced Airbag system, all children, especially
those 12 years and younger, should always ride in the back seat properly restrained for their age
and size. The airbag on the passenger side makes
the front seat a potentially dangerous place for a
child to ride . The front seat is not the safest place
for a child in a forward-facing child safety seat . It
can be a very dangerous place for an infant or a
larger child in a rearward-facing seat.
The vehicle's Advanced Airbag System has a ca
pacitive passenger detection system in the front
passenger seat cushion that can detect the pres
ence of a baby or a child in a child restraint sys
tem on this seat .
The capacit ive passenger detection system regis
ters the changes that result in an electrical field
when a child, a child restraint, and a baby blanket
are on the front passenger seat. The change in
the measured capacitance due to the presence of
a child, a child restraint, and a baby blanket on
the front passenger seat is related to the child restraint system resting on the seat. The meas
ured capacitance of a child restraint system var-
168
ies depending on the type of system and specific
make and model.
The electrical ca pacita nee of the various types,
makes, and models of child restraints specified
by the U.S .National Highway Traffic Safety Ad
ministration (NHTSA) in the relevant safety
standard are stored in the Advanced Airbag Sys
tem control unit together with the capacitances
typical of infants and a 1-year old child. When a
child restraint is used on the front passenger
seat w ith a typical 1 year-old infant, the Ad
vanced Airbag System compares the capacitance measured by the capacitive passenger detection
system with the data stored in the electronic con
trol unit.
Child restraints and Advanced front airbag
system
Regardless of the child restraint that you use,
make sure that it has been certified to meet Safe
ty Standards and has been certified by its manu
facturer for use with an airbag . Always be sure
that the child restraint is properly installed at
one of the rear seating positions. If in exception
al circumstances you must use it on the front
passenger seat, carefully read all of the informa
tion on child safety and Advanced Airbags and heed all of the applicable WARNINGS. Make cer
tain that the child and child restraint are correct ly recognized by the capacitive passenger detec
tion system in the front passenger seat, that the
front passenger airbag is turned off, and that the airbag status is always correctly signaled by the
PASSENGER AIR BAG OFF light .
Many types and models of child restraints have
been available over the years, new models are in
troduced regularly incorporating new and im
proved designs and older models are taken out of
production. Child restraints are not standardized.
Child restraints of the same type typically have
different weights and sizes and different "foot
prints", the size and shape of the bottom of the
child restraint that sits on the seat, when they
are installed on a vehicle seat. These differences make it virtually impossible to certify compliance
with the requirements for advanced airbags with
each and every child restraint that has ever been .,..
Page 189 of 294
shared, please see your contract with the
wireless telecommunications provider and the
"About Aud i connect" tab in your vehicle's
MMI:
! MENUI button> Aud i connect > About
Audi conn ect.
Electronic Stabilization
Control (ESC)
Description
ESC helps to improve road ho ld ing and vehicle
dynamics to help reduce the probability of skid
d ing and loss of vehicle control. It works only
when the engine is runn ing . E SC detects certain
d ifficult dr iving sit uat ions, including when t he
ve hicl e is begin ning to spin (yaw) out of contro l
and helps you to ge t the veh icle back under con
tro l by se lective ly braking the wheels, and/or re
ducing engine powe r and provid ing steering as
sistance to help hold the vehicle on the dr iver's
intended course. The indicator light
GJ in the in
strument cluster blinks when ESC is taking action
to help you co ntrol the vehicle.
ESC has limitations. It is important to remember
that ESC cannot overcome the laws of physics. It
will not a lways be able to help out under all con
d itions you may come up aga inst. For example,
ESC may not always be able to help you master
situations where there is a sudden change in the
coeff icient of friction of the road surface. When
there is a section of dry road that is sudde nly cov
e red with water, slush o r snow, ESC cannot pe r
form the same way it wo uld on the dry s urface . If
the vehicle hydrop lanes (rides on a cushion of wa
ter i nstead of the road su rface), ESC wi ll not be
ab le to he lp you steer the veh icle because contact
with the pavement has been interrupted and the
ve hicle cannot be braked or steered. Dur ing fast
cornering, pa rticula rly on w inding roads, ESC
cannot always deal as effect ively w it h difficult
d riving si tuations tha n at lowe r speeds.
Always adjust your speed and driving style to road , traffic and weather cond itions . ESC cannot
override the vehicle's physical lim its, increase the
ava ilab le traction, o r keep a ve hicle on the road if
road departure is a resu lt of driver in attention .
I nstead, ESC imp roves the possibi lity of keep ing
Intellig ent Technology
the vehicle under contro l and on the road d uring
extreme mane uvers by using the driver's steering
i nputs to help keep the vehicle go ing in the in
tended direction. If you are traveling at a speed
that causes you to run off the road before ESC
can provide any assistance, you may not exper i
ence the benefits of ESC.
ESC is switched on all the time. In certain s itua
tions when you need less tract ion, you can sw itch
off ASR by press ing the button
lm c> page 188,
fig . 177 . Be sure to switc h ASR on again whe n
you no longer need less traction.
The following systems are integrated in the ESC:
Anti-lock braking sy stem (ABS )
ABS prevents the wheels from locking when brak
ing. The vehicle can still be steered even dur ing
hard braking. Apply steady pressure to the brake
pedal. Do not pump the pedal. A pulsing in the
brake pedal ind icates that the system is acting to
stab ilize the veh icle .
Brake assist system
The brake assist system can decrease braking dis
tance. It increases braking power when the dr iver
presses the brake peda l quickly in emergency sit
uat ions. You must press and ho ld the brake pedal
unt il the dange rous situation is over . In vehicles
with adaptive c ruise cont rol*, the b rake ass ist
system is more se nsitive if the distance detected
to the ve hicle ahead is too sma ll.
Anti-slip regulation (ASR)
ASR reduces engine power whe n the dr ive wheels
begin spin ning and adapts the force to the road
co ndit ions. This makes it eas ier to s tart, acce ler
ate a nd d rive up incl ines.
Electronic differential lock (EDL)
The EDL brakes wheels that are spinning and
transfers the drive power to the other dr ive
wheel or wheels if the vehicle is equ ipped with all
whee l drive*) . This function is not available a t
highe r speeds .
In extreme cases, EDL automat ica lly switches off
to keep t he brake o n the braked wheel from over
hea ting . T he veh icle is still working co rrectly. EDL
IJJ>
187
Page 220 of 294
Checking and Filling
Engine compartment
Engine compartment overview
These are the most important items that you can check.
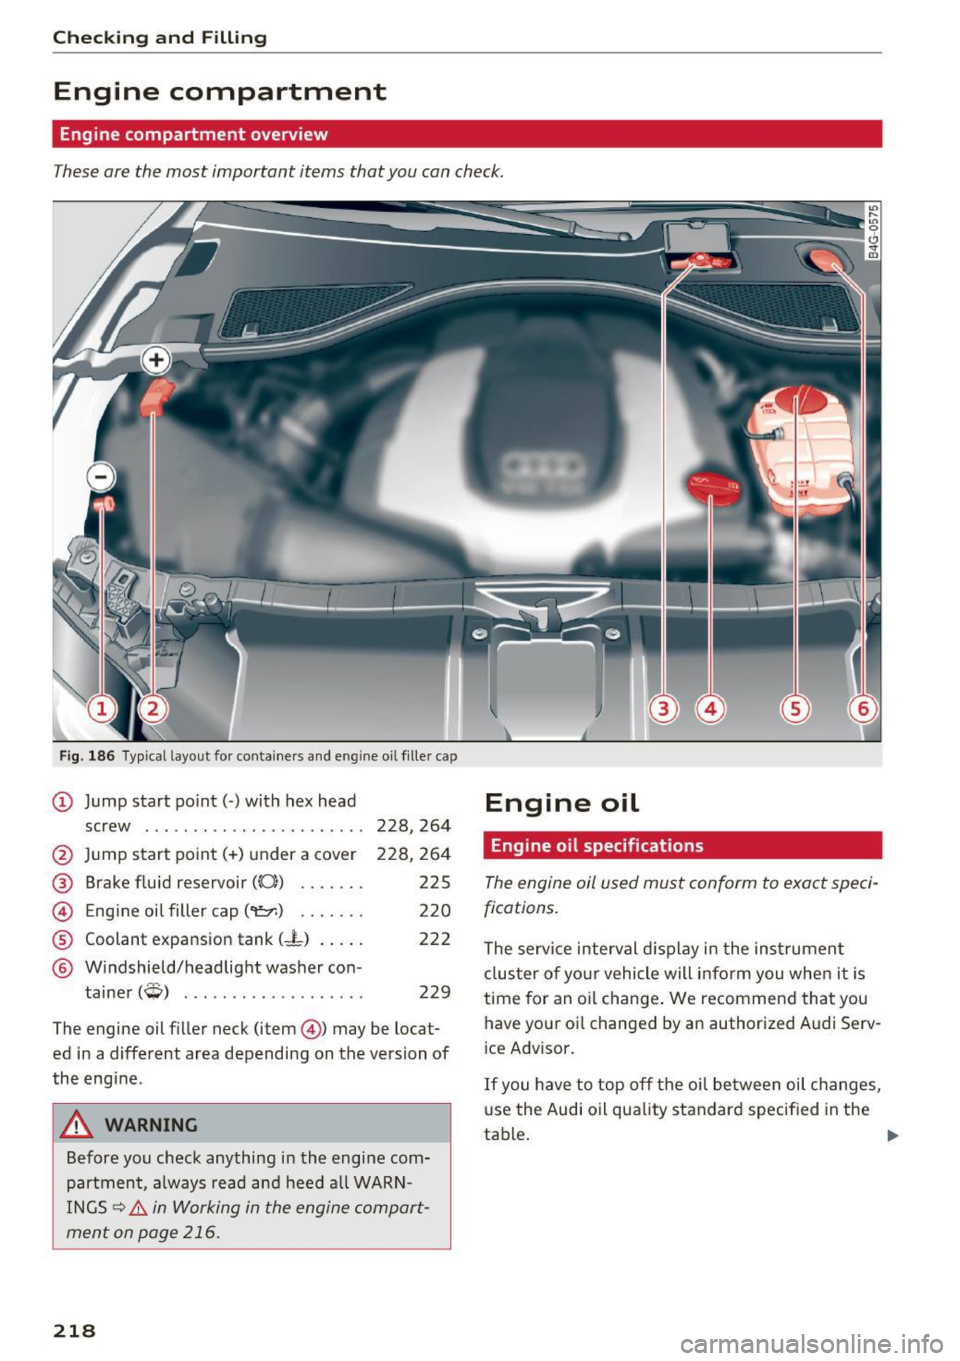
Fig. 186 Typical layout for containers and eng ine oil fille r cap
@ Jump start point(+) under a co ver
® Brake fluid reservoir ((0}) ...... .
@ Eng ine oil filler cap ('t::r.) ...... .
® Coolant expansion tank (-t) .... .
@ Windshield/headlight washer con -
t . (ffi) amer ~ ..................
. 228,264
225
220
222
229
The engine oil filler neck (item@) may be locat
ed in a different area depending on the version of
the engine.
A WARNING
Before you check anything in the engine com
partment, always read and heed all WARN
INGS ~.&.
in Working in the engine compart
ment on page 216.
218
Engine oil specifications
The engine oil used must conform to exact speci
fications.
The serv ice interval display in the instrument
cluster of your vehicle will inform you when it is
time for an oi l chang e. We recommend that you
have your oil changed by an authorized Audi Serv
i ce Advisor.
If you have to top off the oil between oil changes,
us e the Audi oil quality standard specified in the
ta ble.
~