key AUDI A6 2016 User Guide
[x] Cancel search | Manufacturer: AUDI, Model Year: 2016, Model line: A6, Model: AUDI A6 2016Pages: 294, PDF Size: 73.88 MB
Page 40 of 294
Opening and clo sin g
_& WARNING
Read and follow all WARNINGS¢ page 31,
General description.
- After closing the rear lid, always pull up on
it to make sure that it is properly closed.
Otherwise it could open suddenly when the
vehicle is mov ing.
- To help prevent poisonous exhaust gas from
being drawn into the veh icle, always keep
the rear lid closed while driving. Never
transport objects larger than those which fit
comple tely into the luggage area, because
then the rear lid cannot be fully closed.
- Never leave yo ur vehicle unattended espe
c ially w ith the rea r lid left open. A child
could crawl into the car through the luggage
compartment and pull the lid shut, becom
ing trapped and unable to get out. To re
duce the r isk of personal injury, never let
children play in or around your vehicle. Al
ways keep the rear lid as well as the vehicle doo rs closed when not in use.
- Never close the rear lid inattentively or with
out checking first. Although the closing
force of the rear lid is lim ited, you can still
seriously injure yourse lf or others.
-Always ensure that no one is within range of the rear lid when it is moving, in particular
close to the h inges and the upper and lowe r
edges -fingers or han ds can be pinched.
- Never try to interfere w ith the rear lid or
help it when it is being opened or closed a u
tomat ica lly.
(D Tips
- The setti ngs i n the Infota inment system de
termine if the l uggage compartment lid can
be opened using t he handle
Q page 33.
-When the vehicle is locked, the luggage
compartmen t lid can be unlocked separately
by p ressing the b utton
l= I on the remote
contro l key. W hen the luggage compart
ment lid is closed aga in, it locks a utomati
ca lly.
- You can close the luggage compartment lid
us ing the maste r key (veh icles with conven -
38
ience key*) up to a distance of approximate
ly 9
ft (3 m).
- Th e luggage compartment lid can be oper
ated by hand if the vehicle battery is low . It
is necessa ry to use more force w hen doing
this. Move the lid s low ly to reduce the
amount of force needed.
Luggage compartment with movement
activated opening
Applies to vehicles : wit h convenience key and sensor -control
led luggage comp artm en t lid
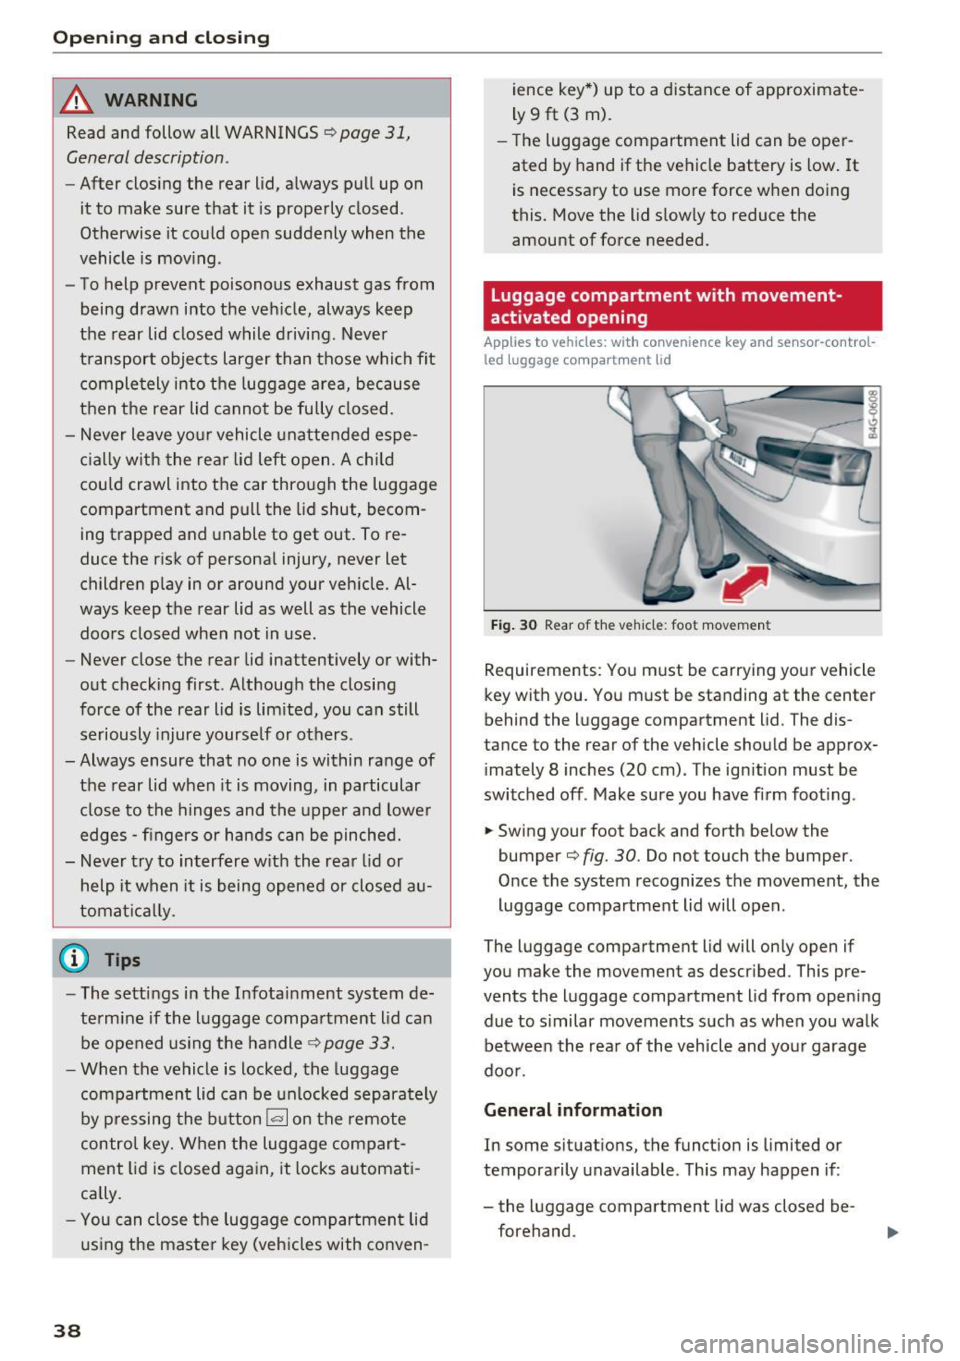
F ig . 30 Rear of the vehicle: foot movemen t
Requirements: You m ust be carrying your vehicle
key with you . You must be standing at the center
behind the luggage compartment lid. The dis
tance to the rear of the vehicle should be approx
i mately 8 inches (20 cm) . The ignition must be
switched off . Make sure you have firm foot ing .
.. Swing your foot back and forth below the
bumper¢
fig. 30. Do not touch the bumper.
O nce the system recognizes the movement, the
luggage compartment lid will open .
The luggage compartment lid will only open if
you make the movement as descr ibed . This pre
vents the luggage compartment lid from opening
due to s imilar movements such as when you walk
be tween the rea r of the v eh icle and yo ur garage
doo r.
General information
In some situat ions, the funct ion is limited or
temporarily unavailable . Th is may happen if :
- the luggage compartment lid was closed be
forehand.
Page 41 of 294
.... N
0 CJ '
- you park close to a hedge and the branches move back and forth under the vehicle for a
long period of time.
- yo u clean yo ur vehicle, for example with a pres
sure washer or in a car wash.
- there is heavy rain.
- the bumper is very dirty, for example afte r driv-
ing on salt-covered roads.
- there is interfe rence to the radio signal from
the veh icle key, s uch as from cell phones or re
mote controls.
Luggage compartment lid emergency
release
The luggage compartment lid can be released in
an emergency from inside the luggage compart
ment.
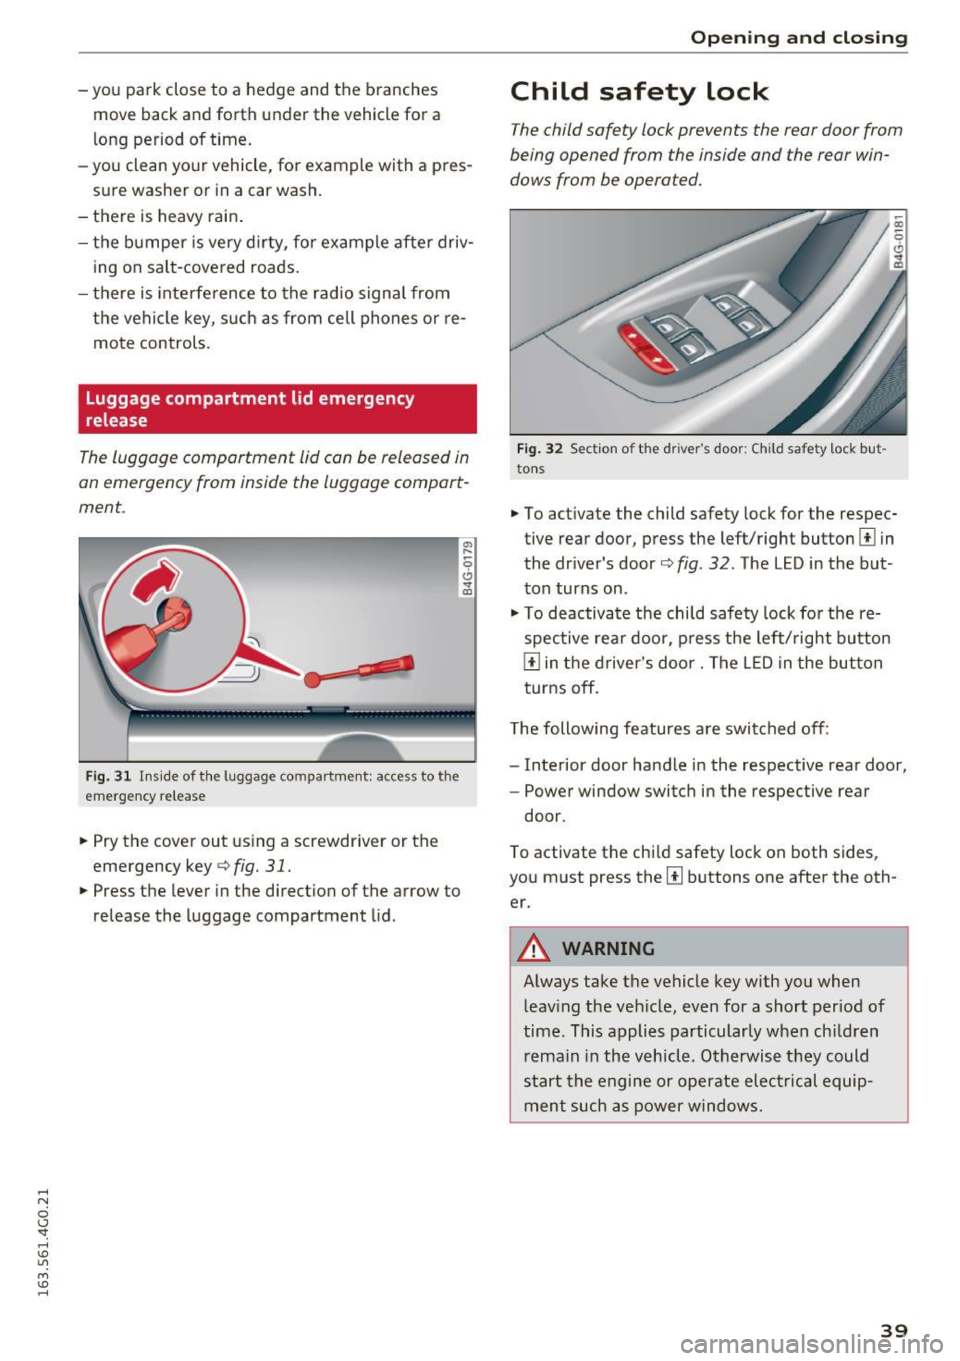
F ig. 31 Ins ide of the luggage compartme nt: access to the
emergency re lease
"' Pry the cover out using a screwdriver or the
emergency key
¢ fig. 31.
"'Press the lever in the direction of the arrow to
release the luggage compartment lid.
Open ing and closing
Child safety lock
The child safety lock prevents the rear door from
being opened from the inside and the rear win
dows from be operated.
Fig. 32 Sectio n of the driver's door: Ch ild sa fety lock but
to ns
• To activate the child safety lock for the respec
tive rear door, press the left/right button
1±1 in
the dr iver's door¢
fig. 32 . The LED in the but
ton turns on .
"' To deactivate the child safety lock fo r the re
spective rear door, press the left/right button
1±1 in the driver's door. The LE D in the button
turns off.
The following features a re switched off:
- Interior door handle in the respective rear door,
- Power window switch in the respective rear
door.
T o activate the chi ld safety lock on both sides,
you must press the
[ii buttons one after the oth
er.
A WARNING
-Always take the vehicle key with you when leaving the vehicle, even for a short period of
time. This applies particularly when ch ildren
remain in the vehicle. Otherwise they could
start the engine or operate electrical equip
ment such as power windows .
39
Page 42 of 294
Opening and closing
Power Windows
Controls
The driver can control all power windows.
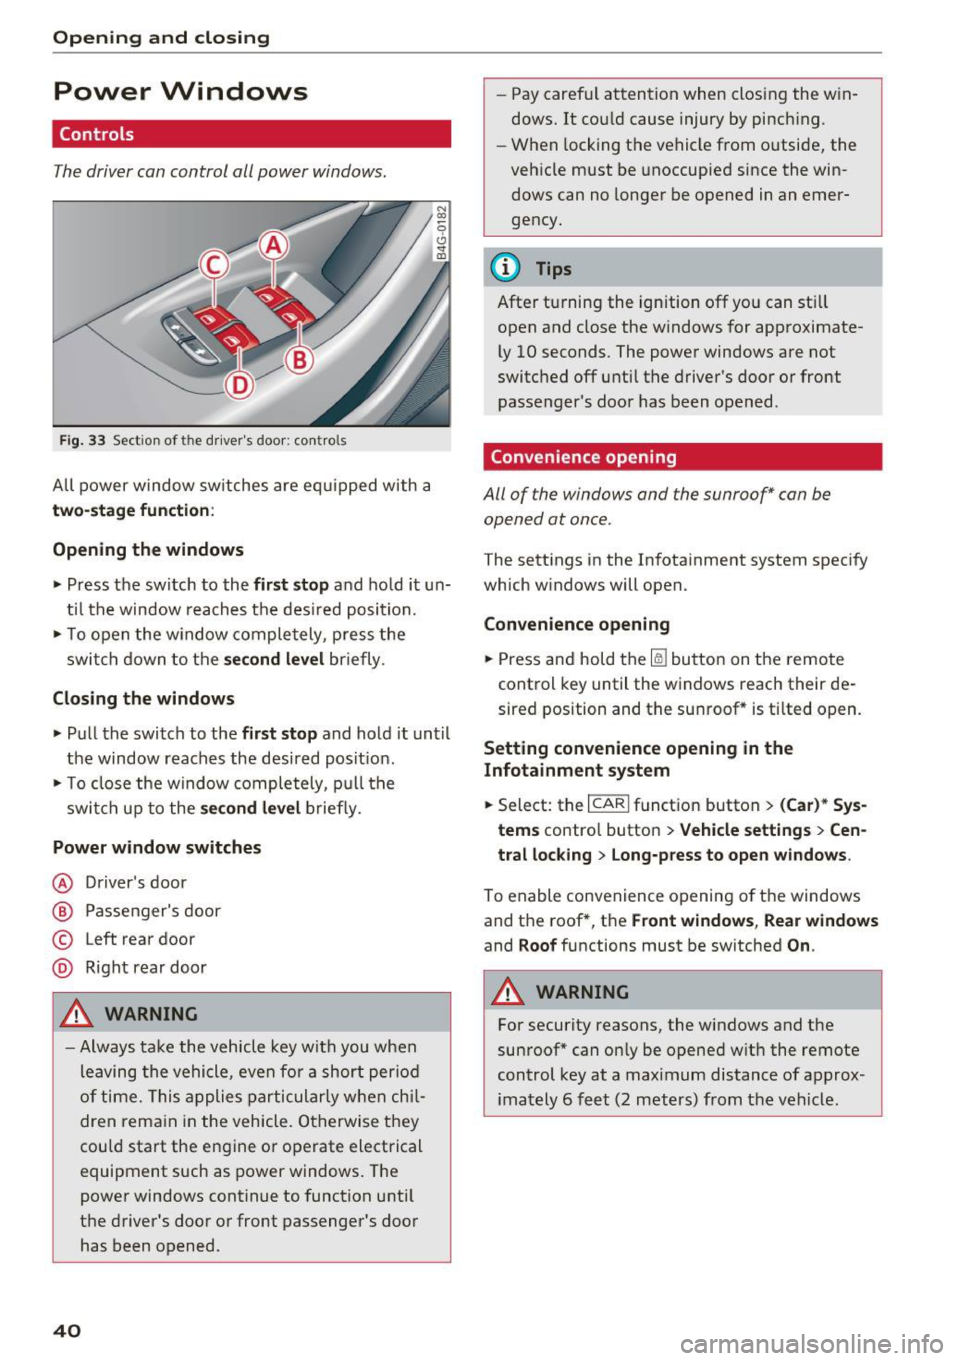
Fig. 33 Section of the driver's door: controls
All power window switches are equipped with a
two-stage function :
Opening the windows
• Press the switch to the first stop and hold it un
til the window reaches the desired position.
• To open the w indow completely, press the
switch down to the
second level briefly.
Closing the windows
• Pull the switch to the first stop and hold it until
the window reaches the desired posit ion.
• To close the window completely, pull the
switch up to the
second level briefly.
Power window switches
@ Driver 's door
@ Passenger's door
© Left rear door
@ Right rear door
A WARNING
-Always take the vehicle key with you when
leaving the vehicle, even for a short period
of time. This applies particularly when chil
dren remain in the vehicle. Otherwise they
could start the engine or operate electrical
equipment such as power windows. The
power windows continue to function until
the driver's door or front passenger's door
has been opened .
40
"
-Pay carefu l attention when closing the win
dows. It could cause injury by pinch ing.
- When locking the vehicle from o utside, the
vehicle must be unoccupied since the win
dows can no longer be opened in an emer
gency.
{!) Tips
After turning the ignition off you can still
open and close the windows for approximate
ly 10 seconds . The power windows are not
switched off until the driver's door or front
passenger's door has been opened .
Convenience opening
All of the windows and the sunroof* can be
opened at once .
The settings in the Infotainment system specify
which windows will open.
Convenience opening
• Press and hold the~ button on the remote
control key until the windows reach their de
sired position and the sunroof * is tilted open.
Setting convenience opening in the
Infotainment system
• Select: the I CARI funct ion button > (Car)* Sys
tems
contro l button > Vehicle settings > Cen
tral locking
> Long-press to open windows.
To enable convenience opening of the windows
and the roof *, the
Front windows, Rear windows
and Roof functions must be switched On .
A WARNING
-
For security reasons, the windows and the
sunroof* can only be opened with the remote
control key at a maximum distance of approx
imately 6 feet (2 meters) from the vehicle.
Page 43 of 294
.... N
0 CJ '
Correcting power window malfunctions
After disconnecting the vehicle battery, the one
touch up and down feature must be activated
again .
.,. Pull the powe r window switch until the window
is completely ra ised.
.,. Release the switch and pull it aga in for at least
one second.
Valet parking
The valet parking feature protects the luggage
compartment from unauthorized access .
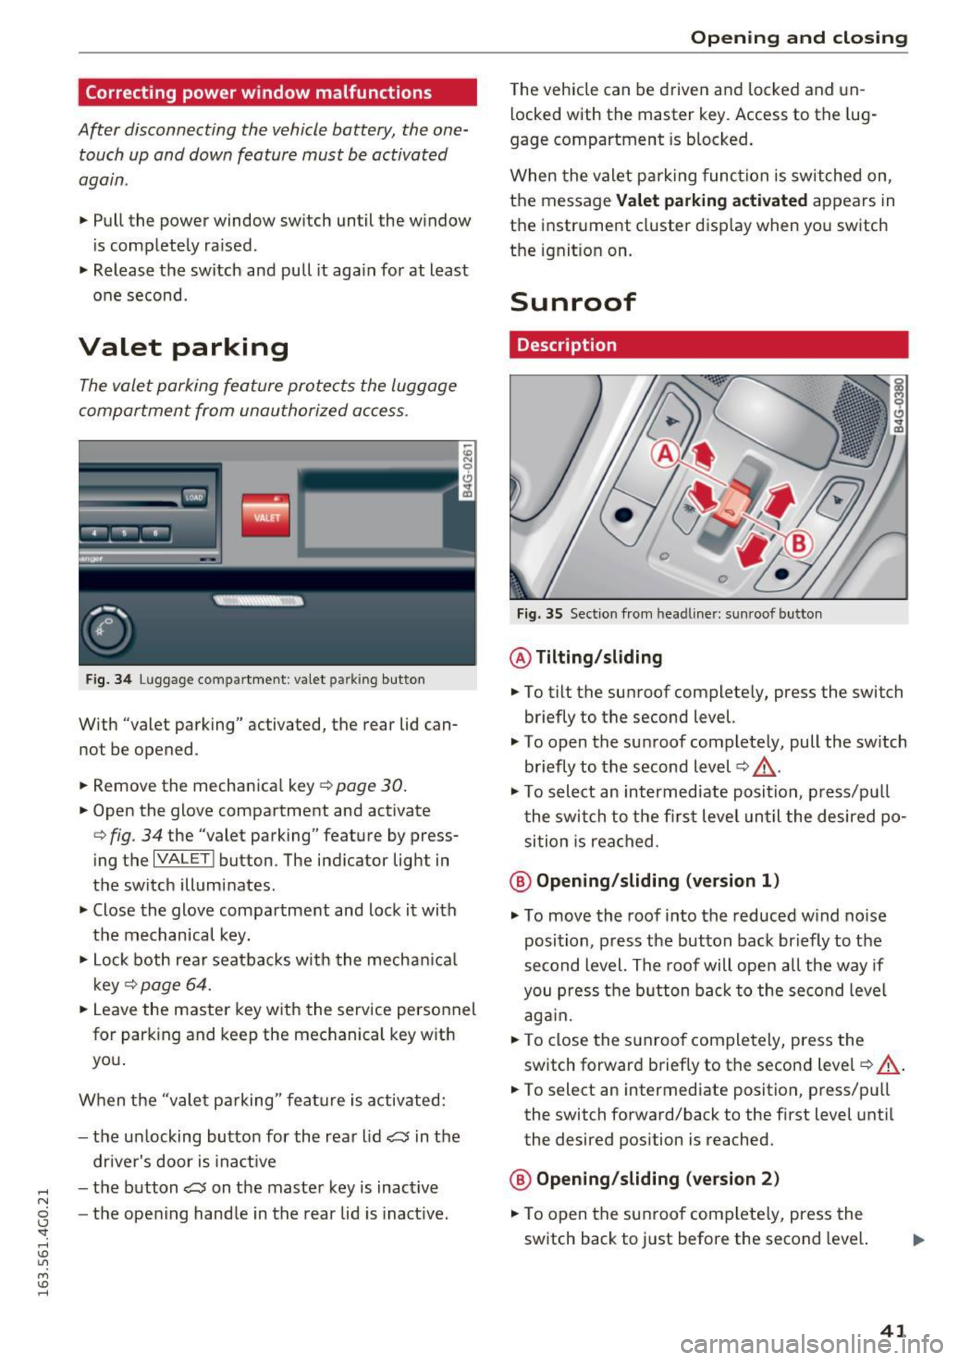
Fig. 34 Lu gg age comp artment : v a let parkin g button
W ith "valet parking" activated, the rea r lid can
no t be opened .
.,. Remove the mechanical key
Q page 30.
.,. Open the glove compartment and activate
Q fig . 34 the "valet parking" feature by press
ing the
I VA LETI button . The indicator light in
the switch illuminates .
.,. Close the glove compartment and lock it with
the mechanical key.
.,. Lock both rear seatbacks w ith the mechanical
key
Q page 64 .
.,. Leave the master key with the service personnel
for park ing and keep the mechanical key with
you .
When the "valet parking" feature is activated:
- the un locking button for the rear lid
~ in the
driver's door is inact ive
- the button~ on the master key is inactive
- the opening handle in the rear lid is inactive.
Opening and closing
The vehicle can be driven and locked and un
locked with the master key. Access to the lug
gage compartment is blocked.
When the valet parking function is switched on ,
the message
Valet parking activated appears in
the instrument cluster display when you switch
the ignition on .
Sunroof
Description
Fig. 35 Section from hea dline r: sun roo f b utton
@ Tilting /sliding
.,. To tilt the sunroof completely, press the switch
briefly to the second level.
"' To open the sunroof completely, pull the sw itch
briefly to the second level¢,&. .
.. To select an intermediate position , press/pu ll
the switch to the first level until the desired po
sition is reached .
@ Opening /sliding (version 1)
"'To move the roof into the reduced wind noise
position, press the button back briefly to the
second level. The roof will open all the way if
you press the button back to the second level
again.
.,. To close the sunroof completely, press the
switch forward briefly to the second level
Q ,&..
.. To select an intermediate position, press/pull
the switch forward/back to the first level until
the desired position is reached.
@ Opening/sliding (version 2)
.,. To open the sunroof complete ly, press the
switch back to just before the second level.
41
Page 44 of 294
Opening and clo sin g
~ To close the sunroof comp letely, press the
switch forward briefly to the second level
c::> ,&. .
~ To select an intermediate pos ition, press/pull
the switch forward/back to the first level until
the desired position is reached .
The sun shade can be opened and closed by hand
when the roof is closed. The sun shade opens au
tomatically when the roof is opened.
You can still operate the sliding/tilt ing sunroof
for about 10 minutes after the ignition is switch
ed off. The switch is deactivated once the driver's
or front passenger 's door is opened.
A WARNING
Pay careful attent ion when closing the slid
ing/t ilting sunroof -otherw ise ser ious injury
cou ld result! Always take the ign ition key with
you when leaving the vehicle .
@ Note
Always close your sliding/tilting sunroof when
leaving your veh icle. Sudden ra in can cause
damage to the interior equ ipment of your ve
hicle, particularly the electron ic equ ipment.
@ Tips
- For informat ion on convenience opening, re
fer tor:::.>
page 40.
-The sunroof will only open down to -20 °C
(-4 °F) .
Sunroof power emergency closing
-
If the sunroof detects an object in its path whe n
it is clos ing, it w ill open again automatically. In
this case, you can close the roof with the power
emergency closing function .
~ Within five seconds afte r the sunroof opens au
tomat ica lly, pull the switch unt il the roof
closes.
I f you let go of the sw itch early, the sunroof will
open aga in.
42
Garage door opener
(Homelink)
Description
App lies to vehicles : wit h garage door o pener (Horne Link)
Fig. 36 Ga rage door opener: examples of using w ith differ·
ent syste ms
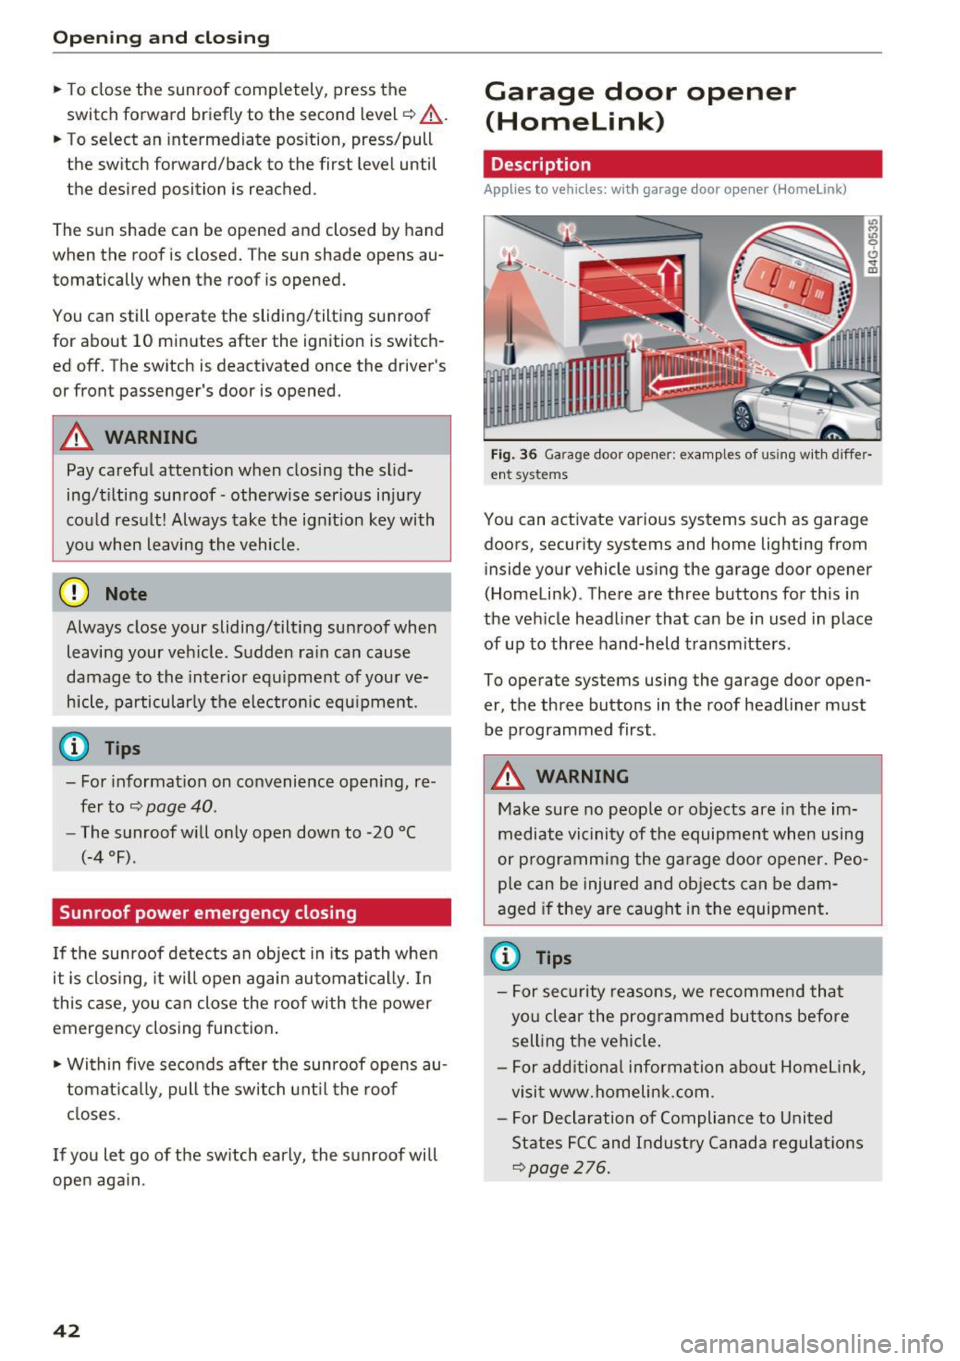
You can act ivate various systems such as garage
doors, security systems and home lighting from inside your vehicle using the garage door opener
(Homelink) . There are three buttons for th is in
the veh icle headliner that can be in used in place
of up to three hand-held transmitters .
To operate systems using the garage door open
er, the three buttons in the roof headliner must be programmed first .
A WARNING
Make sure no people or objects are in the im
mediate vicinity of the equipment when using
or p rogramming the garage door opener. Peo
ple can be injured and objects can be dam
aged if they are caught in the equipment .
(D Tips
-For security reasons, we recommend that
you clear the prog rammed buttons before
sell ing the vehicle .
- For add itiona l information about Homel ink,
visit www.homelink .com .
- For Declaration of Compliance to United
States FCC and Indust ry Canada regulat ions
<::.>page 276.
Page 50 of 294
Lights and Vision
.. To increase or reduce the brightness, turn the
knob and press it.
The interior lighting turns on when you switch
the headlights on while the ignition is on .
(i)} Tips
The setting is a utomat ica lly stored and as
signed to the remo te control key th at is in
use.
Instrument illumination
The brightness of the illumination for the instru
ments, display and head-up display* con be ad
justed .
Fig . 44 Inst rument illuminat ion
.. Press the knob to release it.
.. Turn the knob toward" -" o r"+" to reduce or in
c rease the brightness .
" Press th e knob again to re turn it to its original
pos ition.
(D Tips
The instr um ent ill umination for th e need les
a n d dia ls tur ns on when the igni tio n is tur ned
on and t he lights are turned off. The i llumina
t ion for t he dia ls reduces automatically and
eventua lly tu rns off as brightness outside in
creases . T hi s function reminds the drive r to
turn the headlights on at the appropriate
time.
48
Vision
Adjusting the exterior mirrors
Fig. 45 Driver's door: kno b for the ex terio r mirrors
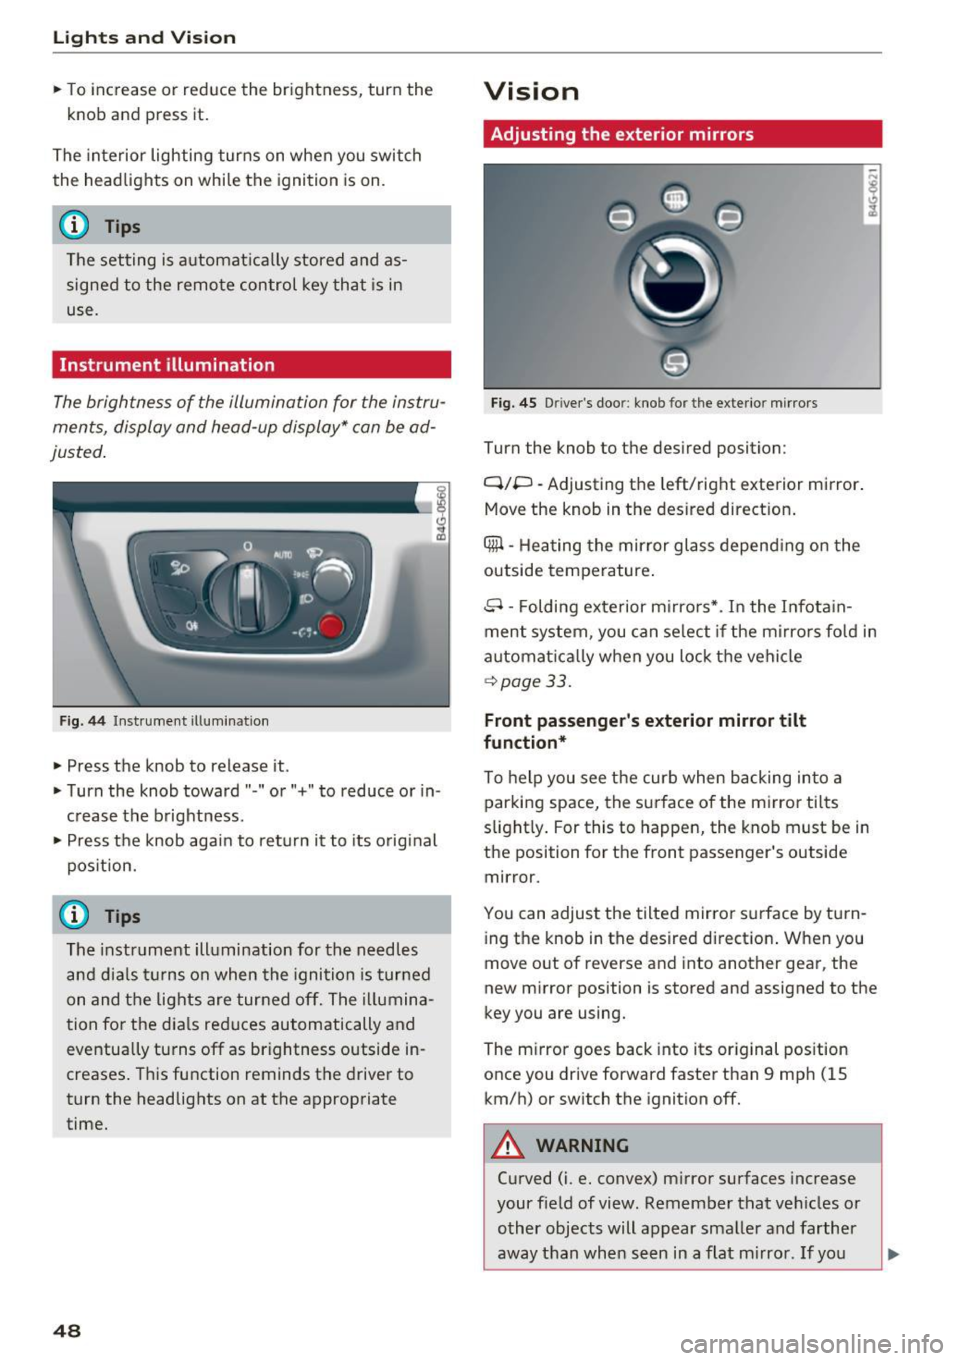
Turn the knob to the desired position :
Q/P -Adjusting the left/right exterior mirror.
Move the knob in the des ired dir ect ion .
Qill -Hea ting the mirror glass depend ing on the
outside temperature .
8 -Folding exterior m irro rs*. I n the I nfota in
ment system , you can se lect if the m irro rs fo ld in
automat ica lly when you lock the vehicle
~ page 33.
Front passenger 's exterior mirror tilt
function*
To help you see the curb when backing into a
par king space, the surface of the m irror tilts
s light ly . For this to happen, the knob must be in
the position for the front passenger's outside
mirror.
You can adjust the tilted mirror s urface by tu rn
i ng the knob in the desired directio n. When you
move out of reverse and i nto anot her gea r, the
new m irror position is stored and assigned to the
key you are using.
The m irror goes back into its or ig inal pos ition
once you drive forward faster than 9 mp h (15
km/h) or switch the ignition off.
A WARNING
Curved (i .e. convex) m irror surfaces increase
your f ield of view. Remember that ve hicles or
o ther objects will appear sma ller and farther
away than when s een in a flat m irro r. If yo u
Page 52 of 294
Lights and Vision
-The automatic dimming mir rors do not dim
when the interior lighting is turned on or
the reverse gear is selected.
- Automatic dimming for the mi rror only op
erates properly if the light str iking the in
s ide mirror is not hindered in any way.
Sun visors
( )
Fig . 4 7 Front passenger 's side: sun v isor
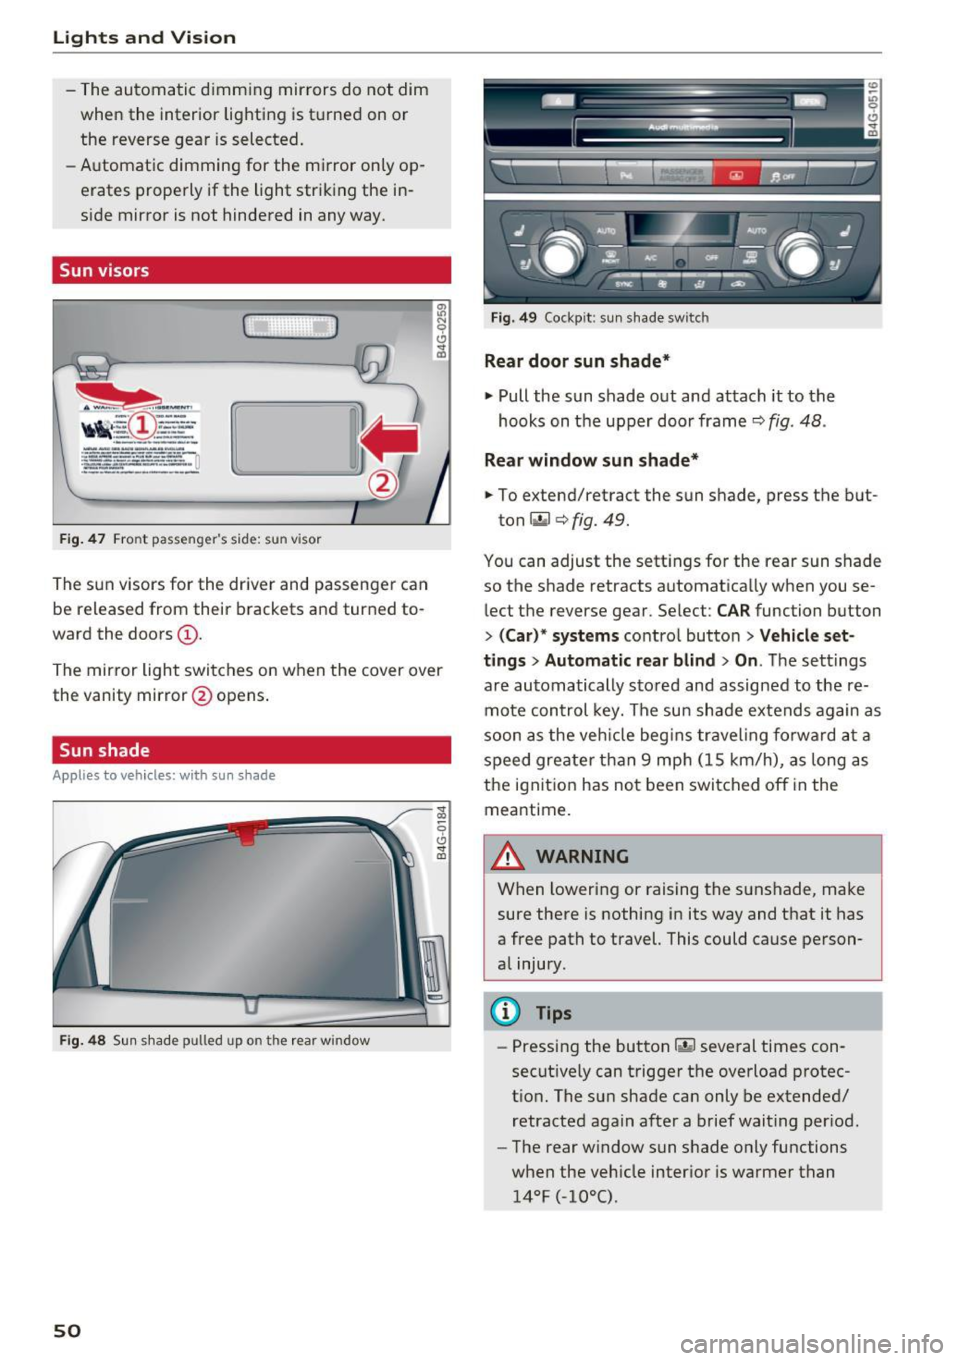
The sun visors for the driver and passenger can
be released from their brackets and turned to
ward the doors
(D .
The mirror light switches on when the cover over
the vanity mirror @opens .
Sun shade
A ppl ie s to ve hicles: w ith s un shade
Fig. 4 8 Sun shade pulled up on the rear window
50
Fig. 49 Cockp it: sun s hade switch
Rear door sun shade*
~ Pull the sun shade out and attach it to the
hooks on t he upper door frame¢
fig. 48 .
Rear window sun shade*
~ To extend/retract the sun shade, press the b ut-
ton
r.,.I ¢ fig. 49.
You can adjust the sett ings fo r the rear sun shade
so the shade retracts automatically when you se
lect the reverse gear. Select:
CAR function button
> ( Car )* systems contro l button > Vehicle set
t ings > Automatic rear blind
> On . The sett ings
a re automatically sto red and assigned to the re
mote con trol key. The su n shade e xtends again as
soon as the veh icle beg ins traveling fo rwa rd a t a
speed greate r tha n 9 mp h (15 km/h) , as long as
the ignit ion has no t been swi tched off in the
meantime.
A WARNING
When lowering or raising the sunshade, make
sure there is nothing in its way and t hat it has
a free path to travel. This could cause person
a l injury.
@ Tips
- Pressing the button~ several times con
secut ively can trigger the overload protec
t ion. The sun shade can only be extended/
retracted again after a brief wait ing per iod.
- The rear w indow sun shade only functions
when the veh icle inter ior is warmer than
14°F (-10°().
Page 59 of 294
.... N
0 CJ '
Rear head restraints
Fig. 56 Re ar seat s: Head restra int
•
Fig. 57 Rea r head restra ints: re lease
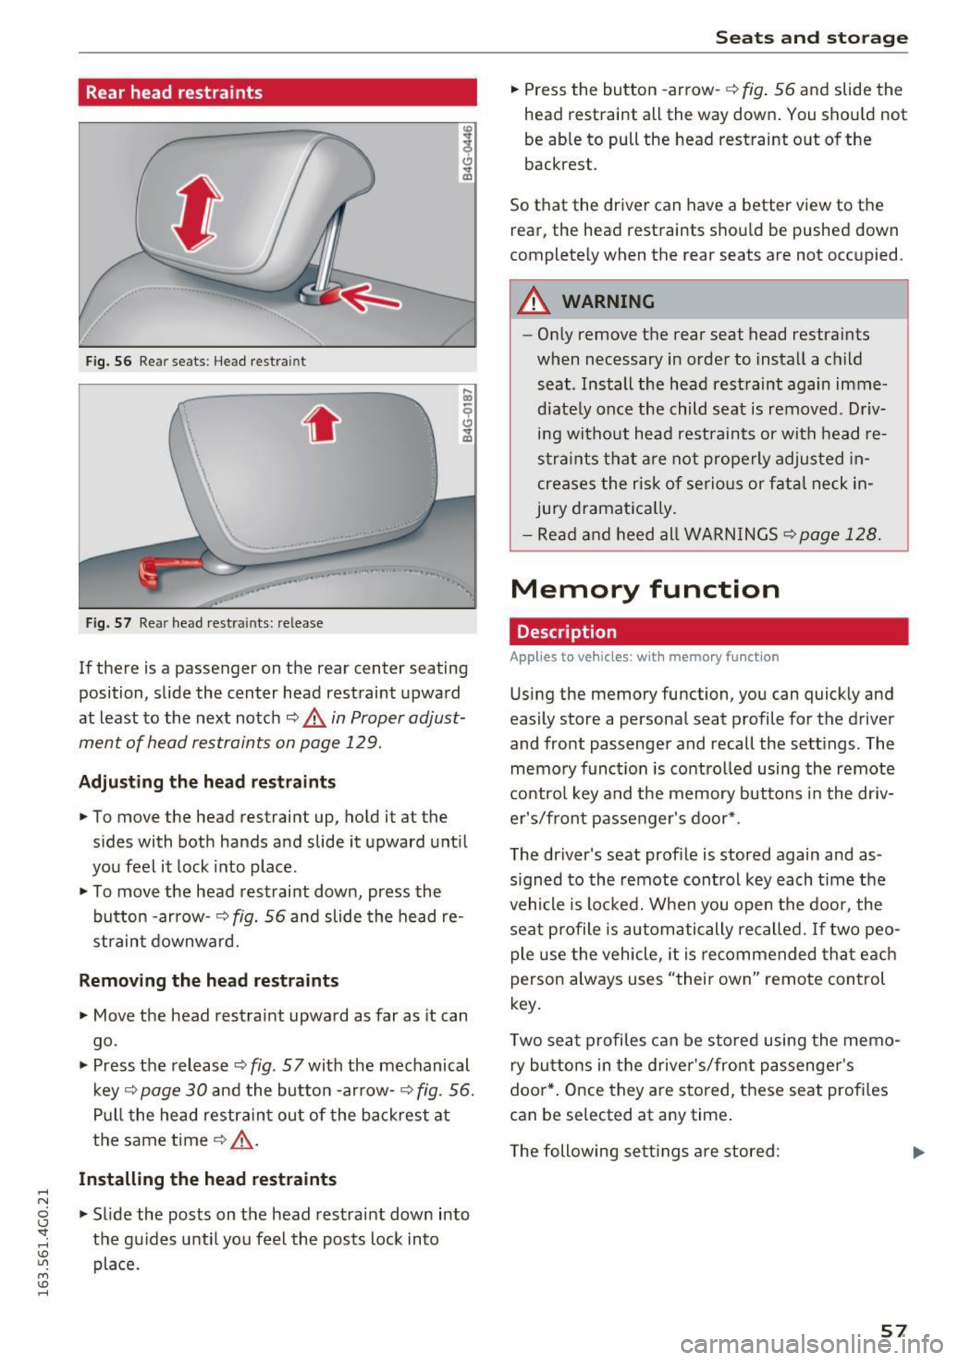
If there is a passenger on the rear center seating
position, slide the center head restraint upward
at least to the next notch
~ & in Proper adjust
ment of head restraints on page 129.
Adju sting the he ad re straints
• To move the head restraint up, hold it at the
sides with both hands and slide it upward until
you feel it lock into place.
• To move the head restraint down, press the
button -arrow- ¢
fig. 56 and slide the head re
straint downward.
Removing the head re straints
• Move the head restraint upward as far as it can
go .
• Press the release ¢
fig. 57 with the mechanical
key -=>
page 30 and the button -arrow- ¢ fig. 56.
Pull the head restrain t out of the backrest at
t h e same time¢&_ .
Installing th e head re st raints
• Slide the posts on the head restraint down into
the gu ides unti l you feel the posts lock into
pla ce.
Seats and storag e
• Press the button -arrow- -=> fig. 56 and slide the
head restraint all the way down . You shou ld not
be able to pull the head restraint out of the
backrest.
So that the driver can have a better view to the rear, the head restraints should be pushed down
completely when the rear seats are not occupied .
A WARNING
--On ly remove the rear seat head restraints
when necessary in order to install a child seat . Install the head restraint again imme
diately once the child seat is removed. D riv
ing without head restraints or with head re
s tra ints that are not prope rly adjusted in
creases the risk of serious or fat al neck in
jury dramat ica lly.
- Read and heed all WARN INGS
¢page 128 .
Memory function
Description
Applies to vehicles : with memory funct ion
Using the memory function, you can quickly and
easily store a personal seat profile for the driver
and front passenger and recall the sett ings . The
memory funct ion is co ntrol led using the remote
contro l key and the memory buttons i n the dr iv
er's/front passe nger's door* .
The driver's seat prof ile is stored again and as
s igned to the remote control key each t ime the
vehicle is locked. W hen you open the door, the
seat profile is automatically recalled. If two peo
ple use the vehicle , it is recommended that each
person always uses "their own" remote control
key.
T wo seat p rofiles can be stored using the memo
ry bu ttons in the driver 's/front passenger's
doo r*. Once they are stored, these seat prof iles
can be selected at any time .
T he following sett ings are stored :
57
Page 60 of 294
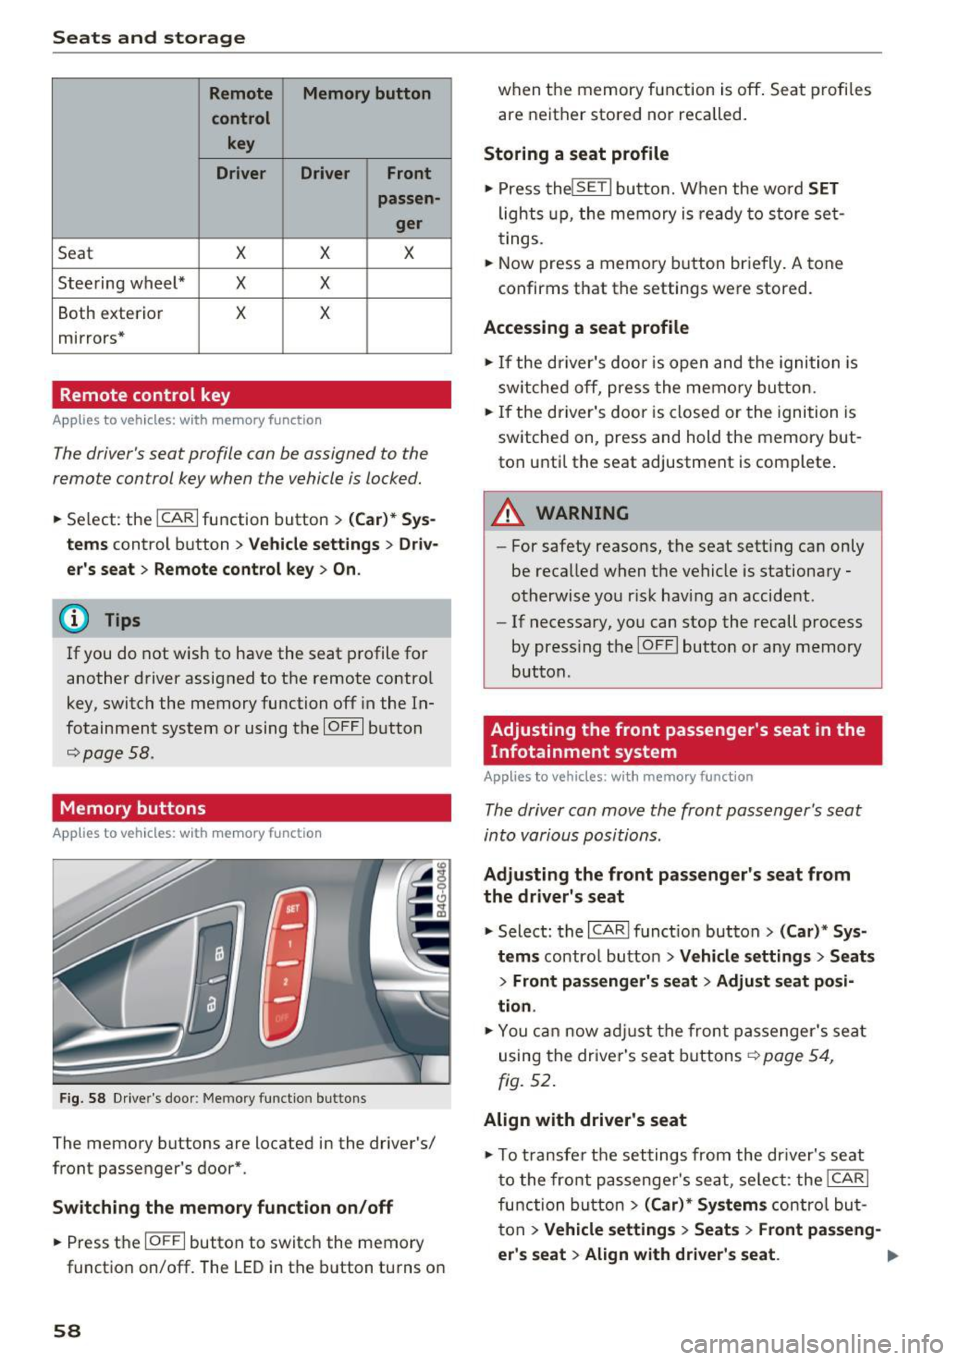
Seats and storage
Remote Memory button
control key
Driver Driver
Front
passen-
ger
Seat X X X
Steering wheel* X
X
Both exterior X X
mirrors*
Remote control key
Applies to vehicles: w ith memory function
The driver 's seat profile con be assigned to the
remo te control key when the vehicle is locked.
• Se lect : the ICARI function button > (Car)* Sys
tems
control button > Vehicle settings > Driv
er's seat
> Remote control key > On.
(D Tips
If you do not wish to have the seat profile for
another driver assigned to the remote contro l
key, switch the memory function off in the In
fotainment system or using the IOFFI button
r::::;,poge 58.
Memory buttons
Applies to vehicles: with memory function
F ig. 58 Drive r's door : Me mory funct io n button s
The memory buttons are located in the driver's/
front passenger 's door*.
Switching the memory function on/off
• Press the IO FFI button to switch the memory
functio n on/off. The
LED in the button turns on
58 when the memory function is off
. Seat profiles
are neither stored nor recalled.
Storing a seat profile
• Press thelSE TI button. When the word SET
lights up, the memory is ready to store set
tings .
• Now press a memo ry button briefly.
A tone
confirms that th e settings were stor ed.
Accessing a seat profile
• If the driver's door is open and the ignition is
sw itched off, press the memory button.
• If the driver's door is closed or the ignition is
switched on, press and hold the memory but
ton until the seat adjustment is complete .
A WARNING
-For safety reasons, the seat sett ing can only
be recalled when the vehicle is stationary -
otherwise you r isk having an accident .
- If necessary, you can stop the recall process
by press ing the IOF FI butto n or any memory
button .
Adjusting the front passenger's seat in the
Infotainment system
Applies to vehicles: with memory function
The driver con move the front passenger's seat
into various positions .
Adjusting the front passenger's seat from
the driver's seat
• Select: the I CARI function button > (Car)* Sys
tems
control button > Vehicle settings > Seats
> Front passenger's seat > Adjust seat posi
tion .
• You can now adjust the front passenger's seat
using the driver's seat buttons
r:::;, page 54,
fig. 52.
Align with driver's seat
""To transfer the settings from the dr iver's seat
to the front passenge r's seat, se lect : the
I CAR I
function button
> (Car)* Systems contro l but
ton
> Vehicle settings > Seats > Front passeng-
er 's seat
> Align with driver 's seat . .,.
Page 62 of 294
Sea ts and stor age
12 Volt sockets
Applies to veh icles: w ith 12-vo lt socke ts
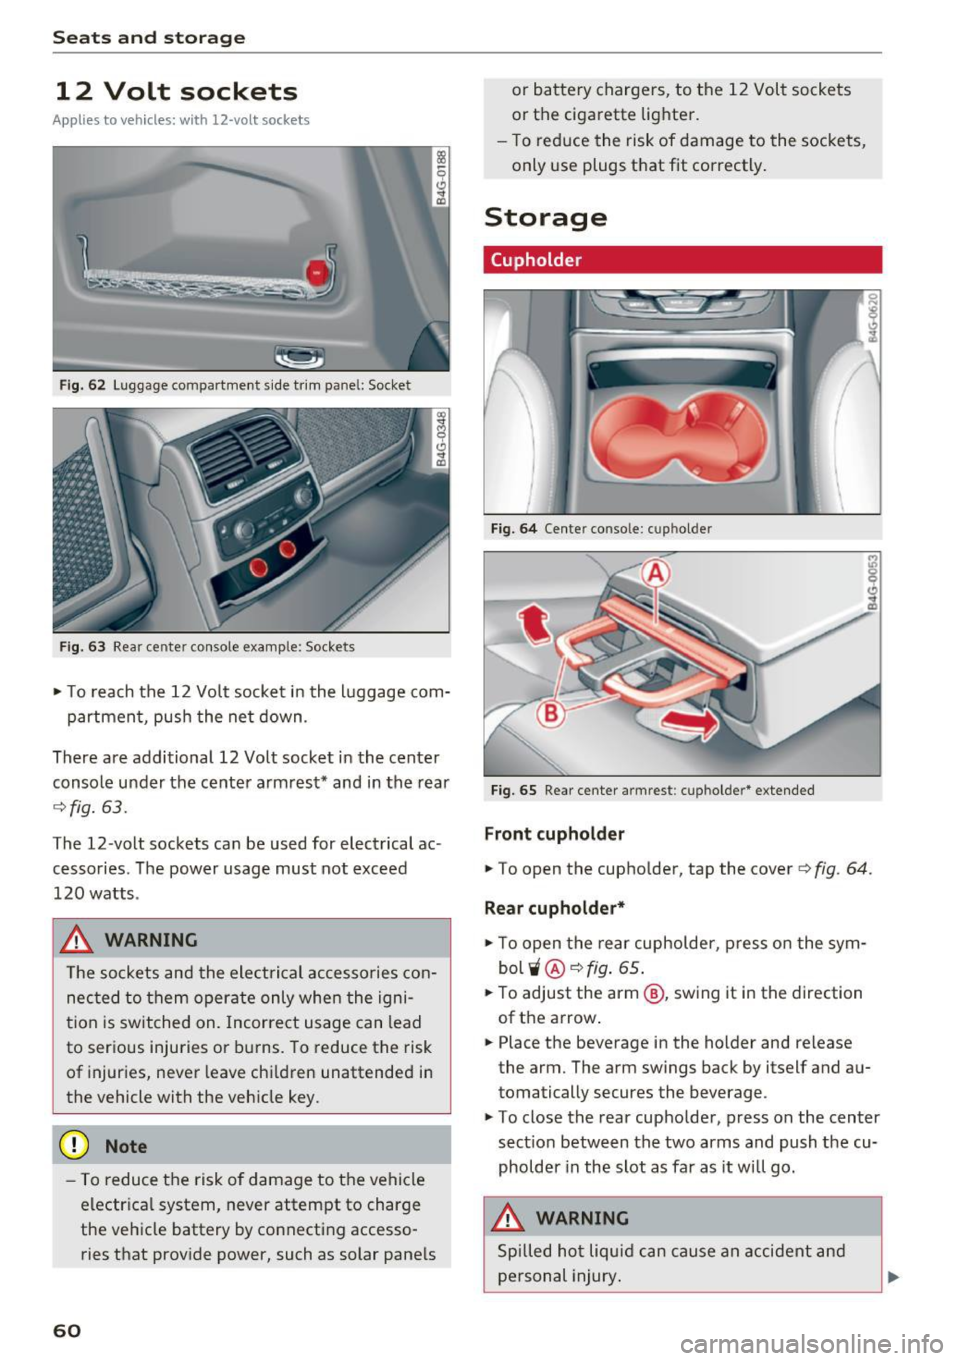
F ig . 62 Luggage compartment s ide tr im pane l: Socket
F ig . 6 3 Rear center co nsole example: Sockets
• To reach the 12 Vo lt socket in the l uggage com-
partment, push the ne t down .
There are additional 12 Volt socket in the center
console under the center armrest* and in the rear
c:> fig. 63.
The 12-volt sockets can be used for electrical ac
cessories. T he power usage must not exceed
120 watts .
_& WARNING
The sockets and the electrical accesso ries con
nected to them operate only when the igni
t ion is switched on. Incorrect usage can lead
to serious injuries or burns. To reduce the risk
of injuries, never leave chi ldren unattended in
the vehicle with the veh icle key.
(D Note
- To reduce the risk of damage to the vehicle
electr ica l system, never attempt to charge
the ve hicle battery by connecting accesso
ries that provide power, such as solar pane ls
60
or battery chargers, to the 12 Volt sockets
or the cigarette lighter.
- T o reduce the risk of damage to the sockets,
only use plugs that fit correctly .
Storage
(upholder
Fig. 64 Cente r conso le : cu p holder
Fig. 65 Rear center armrest : cupholde r* exte nded
Front cupholder
• To open the cup ho lder, tap the cover ¢ fig. 64.
Rear cupholde r*
• To open the rear cupholder , press on the sym
bol
'i @ c:> fig . 65 .
• To adjust the arm @, sw ing it in the direction
of the arrow .
• Place the beverage in the holder and release
the arm. The arm swings back by itself and au
tomatically secures the beverage.
• To close the rear cupholder, press on the center
sect ion between the two arms and push the cu
pholder in the slot as far as it will go.
_& WARNING
Spilled ho t liquid can cause an accident and
personal injury .