stop start AUDI A6 2016 Owner's Manual
[x] Cancel search | Manufacturer: AUDI, Model Year: 2016, Model line: A6, Model: AUDI A6 2016Pages: 294, PDF Size: 73.88 MB
Page 112 of 294
Automatic transmission
Manual shift program
Using the manual shift program you can man
ually select gears .
)
r
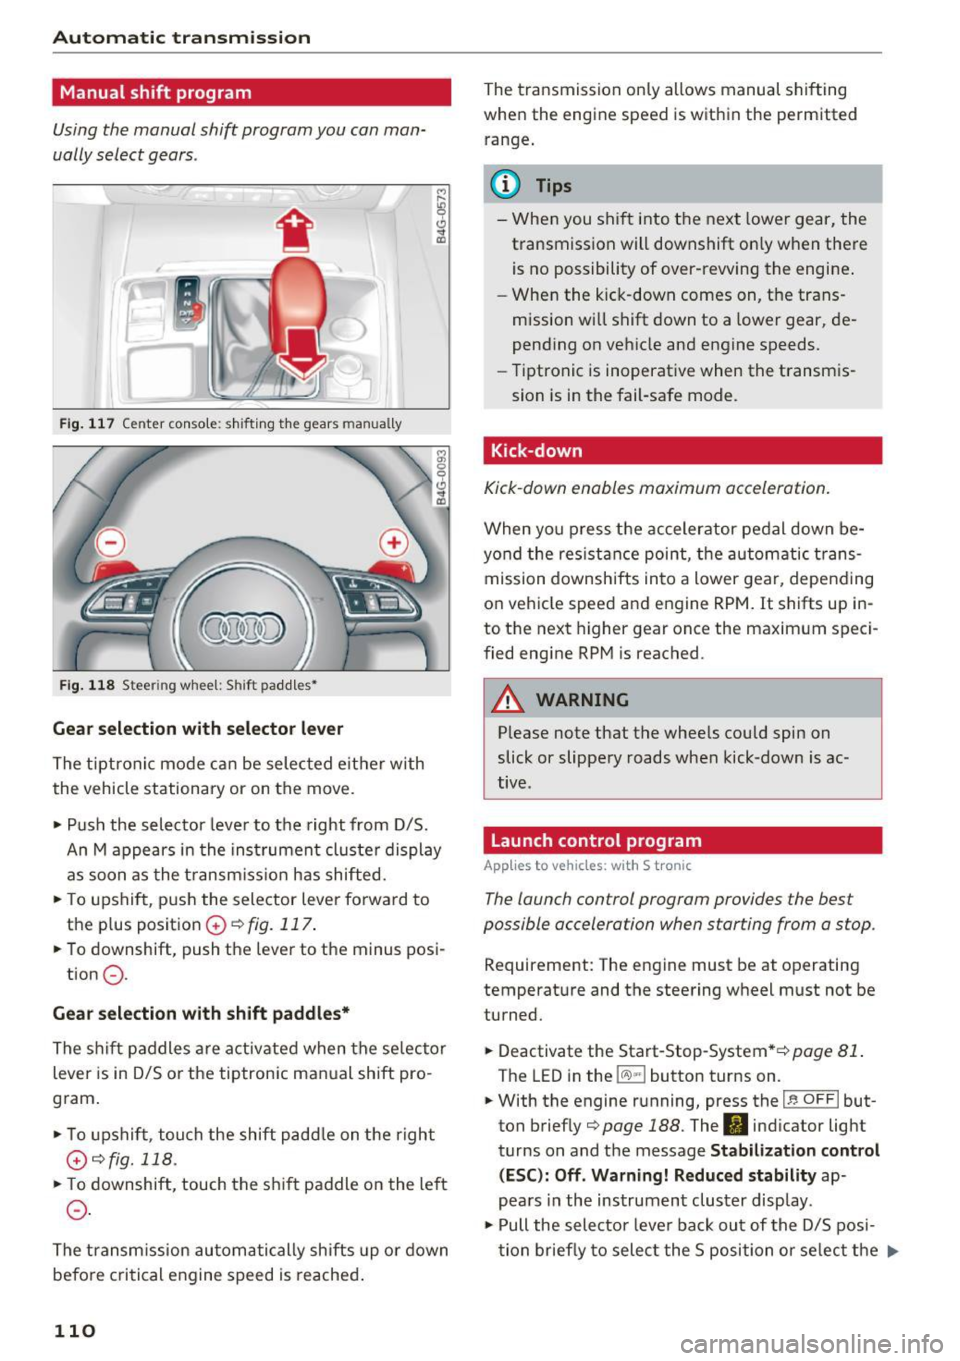
Fig. 117 Center console: shifting the gears manually
Fig. 118 Steering whee l: Shift paddles•
Gear selection with selector lever
The tiptronic mode can be selected eith er with
the vehicle stationary or on the
move.
• Push the selector lever to the right from D/S.
An M appears in the instrument cluster display
as soon as the transmission has shifted.
• To upshift, push the selector lever forward to
the plus position
G) ¢ fig. 117 .
• To downshift, push the lever to the minus posi-
tion
0 .
Gear selection with shift paddles*
The shift paddles are activated when the selector
lever is in D/S or the tiptronic manual shift pro
gram.
• To upshift , touch the shift padd le on the right
G)¢fig. 118.
• To downshift, touch the shift paddle on the left
0.
The transmission automatically shifts up or down
before critical engine speed is reached .
110
The transmission only allows manual shifting
when the engine speed is within the permitted
range.
(D Tips
- When you shift into the next lower gear, the
transmiss ion will downshift on ly when there
is no possibility of over-rewing the engine .
- When the kick-down comes on, the trans
mission will shift down to a lower gear, de
pending on vehicle and engine speeds.
- Tiptronic is inoperative when the transmis
sion is in the fail-safe mode.
Kick-down
Kick-down enables maximum acceleration.
When you press the accelerator pedal down be
yond the resistan ce point, the automatic tra ns
mission downshifts into a lower gear, depending
on vehicle speed and engine RPM. It shifts up in
to the next higher gear once the maximum speci
fied engine RPM is reached.
A WARNING
Please note that the whee ls could spin on
slick or slippery roads when kick-down is ac
tive.
Launch control program
App lies to vehicles: with S t ronic
The launch control program provides the best
possible acceleration when starting from a stop .
Requirement: The engine must be at operating
temperature and the steering wheel must not be
turned.
• Deactivate the Start-Stop-System *¢
page 81 .
The LED in the !CA.l "'! button turns on.
• With the engine running, press the
~,~-0-F F~I but
ton briefly¢
page 188. The II indicator light
turns on and the message
Stabilization control
(ESC): Off. Warning! Reduced stability
ap
pears in the instrument cluster display.
• Pull the selector leve r back out of the D/S posi
tion briefly to select the S position or se lect the .,..
Page 113 of 294
DYNAMIC driving mode in drive select
¢page 101.
~ Press the brake pedal firmly with your left food
and hold it all the way down for at least 1 sec
ond.
~ At the same time, press the gas pedal all the
way dow n with your right foot unt il the engine
reaches and stays at a high RPM level.
~ Remove your foot from the b rake pedal within
5 seconds
¢ /1. .
& WARNING
-
-Always adapt yo ur driv ing to the tra ffic flow.
- Only use the La unch control prog ram when
road and traffic conditions allow it and oth
er drivers wi ll not be endangered or both
ered by your driving and the vehicle's accel
eration.
- Please note that the drive whee ls can spin
and the vehicle can break away when sport
mode is switched on, especia lly when the
road is s lippery.
- Once the vehicle has started moving, press
the
I~ OF FI button briefly to tu rn the sport
mode off.
@ Tips
- The t ransmission temperature may increase
s ignificantly after using the launch control
program. If that happens, the program may
not be available for a few m inutes. It w ill be
available again after a cool-down pe riod .
- When accelerating using the la unch control
p rogram, all veh icle parts are subject to
heavy loads. This can lead to increased
wear .
Transmission malfunction
[il Transmi ssion : Please press brake pedal and
s elect gear again.
Press the brake pedal and se lect the des ired se
l ecto r lever pos it io n aga in . You can t hen continue
,... driving.
N
~ [il Transmission overheating : Pl ease drive con-
~ se rvatively . Lil
M v:, ....
Autom atic tran sm iss ion
The t ransmission temperature has inc reased sig
nificantly due to the sporty driving manner . Drive
i n a less spo rty manner unt il the temperatu re re
turns to the normal range and the ind icator light
switches of.
[il Tran smission malfunction: you can continue
driving
T he re is a system malfunction in t he tra nsmis
s ion . You may contin ue driving . Dr ive to your A udi
dealer or authorized A udi Service Faci lity soon to
have the malfunction cor rected.
[il Transmission malfunction: You can continue
dri ving with limited functionality
T he re is a system malfu nction in t he transmis
s io n. The transm ission is swi tc hi ng to eme rge ncy
mode. This mode only sh ifts into ce rtain gears or
will no longer shift at a ll. The eng ine may sta ll.
Drive to an authorized A udi dealer or authorized
Audi Se rvice Facility immed iate ly to have the
malfunction corrected.
l'iJ li'J Transmission malfunct ion: No reverse
gear . You can continue driving
S tronic t ransm iss io n: Th ere is a sys tem ma lf u nc
t io n in the t ransm iss ion. The tra nsmission is
swi tching to emergency mode . This mode only
shifts into ce rtain gears or w ill no longer shift at
al l. The engine may stal l. You cannot engage the
reve rse gear. Dr ive to an a uthori zed Audi dealer
or authorized Audi Serv ice Facility immediately to
have the malfunction corrected .
[il Transmission malfunction: Stop vehicle and
shift to park.
Do not continue dr iving. Se lect t he P selector lev
er position and see an authorized A udi dealer or
autho rized Aud i Serv ice Facility for ass istance.
(D Note
If t he transm ission has swi tched to emergen
cy mode, drive to your autho rized Aud i dea ler
or authorized Audi Service Facility immediate
l y to have the ma lfunction co rrected.
111
Page 119 of 294
.... N
0 CJ '
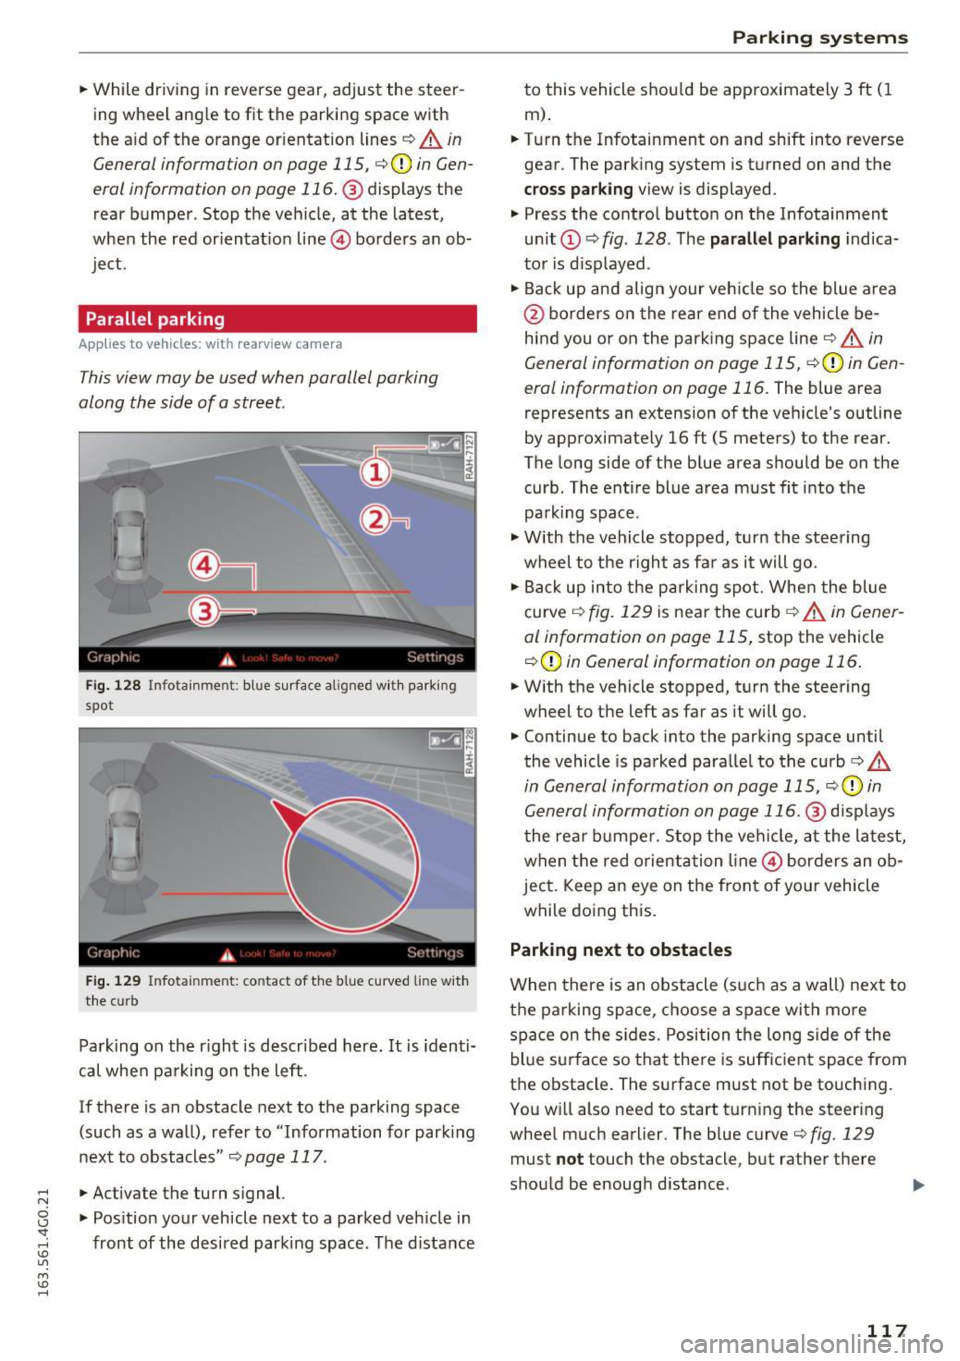
.. While driving in reverse gear, adjust the steer
ing wheel ang le to fit the parkin g space with
the a id of the orange orientation lines
c::> A in
General information on page 115,
c:> (D in Gen
eral information on page 116. @
displays the
rear bumper . Stop the veh icle, at the latest,
when the red or ientat io n line @ borders an ob
ject.
Parallel parking
App lies to vehicles : wit h re arv iew camera
This view may be used when parallel parking
along the side of a street.
Fi g. 128 Infotai nmen t: b lue surface a lig ned w it h park ing
spot
F ig . 12 9 In fota inmen t: co ntac t of t he blue curved li ne w it h
t h e cu rb
Pa rk ing on the r ight is descr ibed here. It is iden ti
cal whe n pa rking on the left .
If there is an obstacle next to the pa rking space
(such as a wall), refe r to "Information for park ing
nex t to obstacles"
c:> page 117 .
.. Activate the turn s ignal.
.. Pos ition your vehicle next to a parked veh icle in
front of the desired parking space. The d istance
Parking systems
to this vehicle shou ld be app roximately 3 ft ( 1
m).
.. Turn the Infotainment on and shift into reverse
gear . The park ing system is turned on and the
cross parking view is displayed .
.,. Press the contro l button on the Infotainment
unit
(D c:> fig . 128 . The parallel parking indica
to r is d isp layed .
.,. Back up and align your veh icle so the blue a rea
@ bo rde rs on the re a r end of the vehicle be
hind you o r on the park ing spa ce line
c::> A in
General information on page 115,
c::> (D in Gen
eral information on page 116.
The blue area
represents an extension of the ve hicle's outline
by approximate ly 16 ft (5 meters) to the rear.
The long side of the b lue area should be on the
curb . The ent ire blue area must fit into the
pa rk ing space .
.,. With the vehicle s topped, t urn the stee ring
wheel to the r ight as far as it will go .
.,. Back up into the park ing spot. Whe n the blue
curve
c::> fig . 129 is near the curb c::> A in Gen er
al information on page 115,
stop the vehicle
c::> (D in General information on page 116 .
.. W ith the vehicle stopped, t urn the steering
wheel to the left as far as it will go .
.. Continue to back into the parking space until
the vehicle is parked para llel to the curb
c:> .&.
in General information on page 115, c::> (D in
Gen eral information on page 116. @
disp lays
t he rea r bu mpe r. Stop the ve hicle, at the la test,
w hen t he red o rient ation line @ bor ders an o b
ject. Keep a n eye on the fron t of yo ur vehicle
while do ing this.
Parking next to obstacles
When there is an obstacle (suc h as a wall) next to
t h e pa rking space, c hoose a spa ce with mo re
spa ce on the s ides. Posi tion t he long side of the
bl ue su rface so that the re is suff ic ient space from
the obstacle . The su rface must not be touching.
Yo u w ill also need to start t urn ing the steer ing
whee l much earlier. The b lue curve
c:> fig. 129
must not touch the obstacle, but rathe r the re
sho uld be enough d istance .
117
Page 124 of 294
Parking system s
to this vehicle should be approximately 3 ft (1
m).
.. Turn the Infota inment on and shift into reverse
gear. The parking system is turned on and the
cro ss park ing view is disp layed .
.. Press the control button on the Infotainment
unit (D
¢page 117, fig . 128 . The par all el park
ing
ind icator is displayed .
.,. Back up and align yo ur vehicle so the b lue area
@ borders on the rear end of the ve hicle be
hind you or on the parking space line
¢ ..&. in
General information on page 118, ¢(D in Gen
eral information on page 118 .
The blue area
represents an extension of the vehicle's out line
by approximately
16 ft (5 meters) to the rear .
The long side of the blue area should be on the
curb . The entire blue area must f it into the
parking space .
.,. With the veh icle stopped, turn the steer ing
whee l to the right as far as it w ill go .
.,. Back in to the par king space until the b lue curve
¢
page 117, fig. 129 touches the curb¢..&. in
General information on page 118, ¢(D in Gen
eral information on page 118 .
Stop the vehicle.
.. With the veh icle stopped, turn the steering
whee l to the left as far as it will go.
.. Cont inue to back into the parking space unt il
the ve hicle is parked parallel to the curb¢
&
in General information on page 118, ¢(D in
General information on page 118. @
displays
the rear bumper. Stop the vehicle, at the latest ,
whe n the re d or ien ta ti on line @ borders an ob
ject. Keep an eye on the front of your vehicle
whi le doing this.
Parking next to obstacles
When the re is an obs tacle (such as a wa ll) next to
the par king space, choose a space with more
space on the sides. Posit ion the long side of the
b lue area so t hat there is sufficient space from
the object . The area must not be on the curb . You
will also need to start turn ing the steer ing whee l
much earlier. The b lue curve¢
page 117,
fig . 129
must not touch the obstacle, but rather
there should be enough distance.
122
@ Tips
The left or right orientation lines and surfaces
will be d isp layed, depend ing on the tu rn s ig
nal be ing used.
Trailer mode
App lies to vehicles: wit h peripheral ca meras a nd trailer hitch
This view assists you in positioning the vehicle in
front of a trailer.
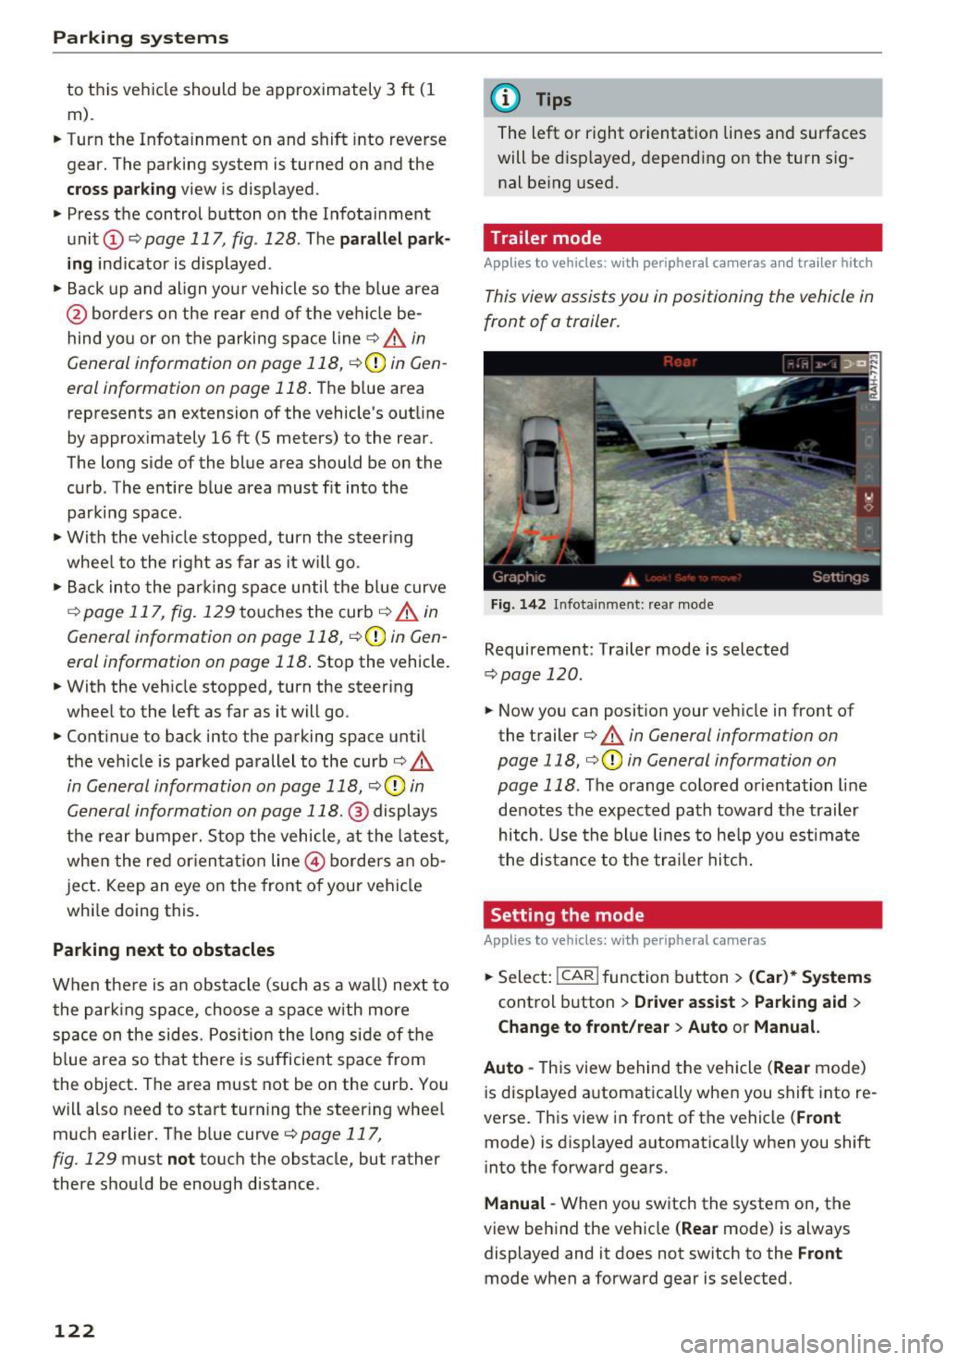
F ig. 142 I n fota inment: rea r mode
Requirement: Trailer mode is selected
¢ page 120 .
.. Now you can posit ion your veh icle in front of
the trailer
¢ & in General information on
page 118, ¢(D in General information on
page 118 .
The orange colored orientation line
denotes the expected path towa rd the trailer
hitch. Use the bl ue lines to he lp you est ima te
the distance to the tra ile r hitc h.
Setting the mode
App lies to vehicles : wit h peripheral ca meras
.. Select: !CAR ! function b utton> (Car )* System s
control button > Driver assi st > Parking aid >
Change to front/rear > Auto or Manual.
Auto -
This view behind the vehicle (Rear mode)
i s disp layed automatica lly when you shift into re
verse. This view in front of the vehicle
( Front
mode) is displayed automat ica lly when you shift
i nto the forward gears.
Manu al -When yo u sw itch the system on, the
view beh ind the veh icle
( Rear mode) is always
displayed and it does not switch to the
Front
mode when a forward gear is se lected.
Page 193 of 294
Indicator lights and m essa ges
• Do not dri ve v ehicle : steerin g defe ctive
If th is ind icator light turns on and stays on and
this message appears, the power steer ing may
h ave fa iled.
Stop the vehicle in a safe locat ion as soon as pos
sib le . Do
not continue dr iving. See an authorized
Aud i deale r or autho rized Aud i Serv ice Facility fo r
assistance .
'1:I Stee ring: System fau lt You ca n continu e
dri ving
If the indicator light turns on and the message
appears, the steering may be more difficult to
move or more sensit ive tha n usual. The steering
wheel may also be at an angle when driving
stra ight.
Drive s lowly to your author ized Audi dealer or au
thor ized Audi Service Fac ility to have the mal
function corrected.
kr.ij D ynam ic steering : Ini tializing
If the indicator lig ht ls b link ing and th is message
appears, dynamic steering* is being initialized.
Once you start the engine after this is finished,
the steering wheel will be easy to move. Re-in iti
alization m ight be necessary if the steering wheel
was moved hard to the left and right wh ile the
ve hicle was not moving . The display turns off if
the initialization was successfu l.
{D) Tips
-If the . or '1:I indicator light only stays on
for a short time, you may continue driving .
- The dynamic steering stability systems
¢ page 187 are not available in the event of
a system ma lf u nction.
- For additional informat io n on dynamic
steering, refer to¢ page 100.
Intelligent Technology
All wheel drive (quattro)
Applies to vehicles: with all wheel drive
In all wheel drive, all four wheels are powered.
General informat ion
In all whee l dr ive, the dr iving power is div ided be
tween all fou r wheels . This happens automatical
ly depending on yo ur driving behavior as we ll as
the cur rent road conditions . Refer to ¢ page 187,
E lectronic Stabilization Control (ESC).
A center d ifferential d istribu tes the driving power
variab ly to the front and rear axle. It works to
gether with selective whee l torque contro l, w hich
activates when driving through curves
¢ page 188. With the sport d ifferential*, power
distribution to the rear wheels is variable and can
be adjusted with drive select¢ page 100 .
The all wheel drive concept is designed for high
engine power. Your vehicle is except ionally pow
erfu l and has excellent driv ing characteristics
both under normal driving conditions and on
snow and ice . Always read and follow safety pre
cautions ¢
..1:)..
Winter tires
By using all wheel dr ive, your veh icle has good
forward motion with standard tires in w inter con
ditions. However, in w inter we recommend using
winter or all seaso n tires on all four wheels, be
ca use this will improve the brak ing effect.
Snow chains
If there are snow chain laws, snow cha ins must
also be used on veh icles w ith all wheel dr ive
¢ page 246 , Snow chains .
Replacing tires
For vehicles with a ll wheel drive, on ly wheels with
the same roll ing circumference should be used.
Avo id whee ls with different tread depths
¢ page 238, New tires or wheels .
Offroad vehicle?
Your Audi is not an offroad vehicle - there is not
enough ground clearance. For this reason, avoid
difficult terrain. ..,.
191
Page 197 of 294
CD Note
-Vehicle components such as the engine,
transmission, suspension or electrical sys
tem can be severely damaged by driving
through water.
- Always switch the Start-Stop-System* off
when driving through water
9 page 79.
@ Tips
- Determine the depth before driving through
water.
- Do not stop the vehicle, drive in reverse or
switch the engine off when driving through
water.
- Keep in mind that oncoming vehicles may
create waves that raise the water level and
make it too deep for your vehicle to drive
through safely.
-Avoid driving through salt water (corrosion).
Catalytic converter
Applies to vehicles: with gasoline engine
It is very important that your emission control
system (catalytic converter) is functioning prop
erly to ensure that your vehicle is running in an
environmentally sound manner .
... Always use lead-free gasoline 9 page 208,
Fuel supply.
... Never run the tank down all the way to empty.
.,. Never put too much motor oil in your engine
9 page 220, Adding engine oil~-
.,. Never try to push- or tow-start your vehicle.
The catalytic converter is an efficient "clean-up"
device built into the exhaust system of the vehi
cle. The catalytic converter burns many of the
pollutants in the exhaust gas before they are re
leased into the atmosphere.
The exclusive use of unleaded fuel is critically im
portant for the life of the catalytic converter and
proper functioning of the engine.
A WARNING
The temperature of the exhaust system is
high, both when driving and after stopping
the engine.
Driving and the environment
- Never touch the exhaust tail pipes once they
have become hot. This could result in burns.
- Do not park or operate the vehicle in areas
where the hot exhaust system may come in contact with dry grass, brush, fuel spill or
other material which can cause a fire.
- Do not apply additional undercoating or
rustproofing on or near the exhaust mani
fold, exhaust pipes, catalytic converter or heat shields. During driving, the substance
used for undercoating could overheat and
cause a fire.
CD Note
- Be aware that just one tank filling with
leaded fuel will already seriously degrade
the performance of the catalytic converter .
- Do not exceed the correct engine oil level
9page220.
- Do not drive until the fuel tank becomes
completely empty . The engine could mis
fire. Unburned fuel could also get into the
exhaust system and this could cause the
catalytic converter to overheat.
- Do not switch off the ignition while the vehi
cle is moving.
- Do not continue to operate your vehicle un
der these conditions, as otherwise fuel can
reach the catalytic converter. This could re
sult in overheating of the converter, requir
ing its replacement .
- To assure efficient operation of the Emis
sion Control System:
- Have your vehicle maintained properly and
in accordance with the service recommen
dations in your Warranty
& Maintenance
booklet.
- Lack of proper maintenance as well as im
proper use of the vehicle will impair the
function of the emission control system
and could lead to damage.
@ For the sake of the environment
Even when the Emission Control System is op
erating properly, the exhaust gas can have a
sulfur-like exhaust gas smell under some op
erating states. This depends on the sulfur
195
Page 199 of 294
Reducing unnecessary idling
Even when your car is just idling it burns up fuel.
~ Shut the engine off when you are not driving
the vehicle.
~ Do not warm up the vehicle by letting the en-
gine run at idle .
The idling phase is automat ically reduced for
veh icles w ith the Start-Stop-System. It is effi
cient to switch off the engine in vehicles without
the Start-Stop-System when stopped at ra ilroad
crossings and long red lights . Turning the engine
off for just 30-40 seconds saves more fuel than is
b ur ned by sta rting the engine ag ain.
It takes a long t ime for the engine to warm up
fu lly when it is runni ng at idle . Howeve r, wear
and noxio us emiss ions a re espe cially high when
the eng ine is wa rm ing up. So you sho uld d rive
away as soon as you sta rt the engi ne and avoid
r u nning at high rpms whi le the engine is still
warming up .
(D Note
Do not leave engine id ling unatten ded a fter
starting . If warning lights should come on to
indicate im proper operation, they wou ld go
unheeded. Extended id ling a lso produces
heat, wh ich could result in overheat ing or
other damage to the vehicle or other proper
ty.
Regular maintenance
A badly tuned engine unnecessarily wastes a lot of fuel.
~ Have your veh icle serviced at regu lar intervals.
By having your veh icle reg ularly serviced by an
Audi dea ler helps to ensure that it runs proper ly
and econom ica lly. The condition of your veh icle
not on ly affects its safety and ability to ho ld its
va lue, it a lso affects
fuel consumption .
Check you r oil each time you fill your tank.
The amount of oil use d i s re lated to e ngine lo ad
a nd speed.
Driving and the envir onment
It is normal for the oil consumption of a new e n
gine to reach its lowest value after a certain mi le
age has been dr iven.
Yo u m ust dr ive your ve hicl e abou t 3,0 00 m iles
(S, 000 kilometers) befo re yo u can properly as
sess oil consumption .
T h is also ap plies to f ue l cons umption and eng ine
o utput .
CD Note
-Have your ve hicle maintained pro perly and
in acc ordance w ith the se rvice rec ommend a
ti ons i n your W arra nty
& M ain ten ance book
let . Lack of proper maintenan ce as we ll as
improper use of the ve hicl e w ill impair the
function of the em ission cont rol system and
co uld lead to damage.
- Do not alte r or remove any component of
the Emission Contro l System unless ap
proved by the man ufacturer.
- Do not alte r or remove any device, such as
heat shields, switches, ign it ion w ires,
valves, which are designed to protect your
vehicle's Emission Contro l System a nd othe r
im por tan t ve hicle components .
Fewer short trips
Fuel consumption will always be relatively high
on short trips.
~ Try to avo id driv ing short distances with a cold
eng ine .
T he engine and cata lytic conve rter have to reach
their opt imal
operating temperature to reduce
fuel consumpt io n and noxious emiss ions effec
tively.
Just afte r starting, a cold engine in a mid-size car
only achieves a fuel economy of 6-8 m iles per
gallo n (30-40 l/ 100 km) . After about a half a
mile, fuel economy climbs to 12 mpg (20 l/100
km) . Afte r about
2 .5 m iles (4 km), the eng ine is
at its p roper operat ing temperature and fue l
eco nomy has reached a no rma l level. So yo u can
see th at yo u should avoid short trips w heneve r
poss ible. .,.
197
Page 203 of 294
braking effect to slow the vehicle. Use of the
brakes alone can cause them to overheat and fail.
Air suspension*
When driving with a tra ile r, activate the trailer
mode of the air suspension. Switch the air sus
pension trailer mode on when you are towing a
trailer. This will limit the regulation by the air
suspension while driving. Select in the MMI :
ICARI function button > (Car)* systems control
button>
Vehicle settings> Air susp.: towing>
On.
Coolant temperature
The coolant temperature gauge¢ page 10 must
be observed carefully . The coolant temperature
can increase if you drive on long inclines in a low
gear at high engine speeds. Reduce your speed immediately if the LEDs in the top part of the dis
play turn on .
For more information about ind icator lights, re
fer to. ¢
page 15.
A WARNING
Anyone not properly restrained in a moving
vehicle is at a much greater risk in an acci
dent. Never let anyone ride in your car who is
not p roperly wearing the restraints p rovided
by Audi.
Trailer mode notes
Important to know -
Your vehicle handles differently when towing a
trailer because of the additional weight and dif
ferent weight distribution. Safety, performance
and
economy will greatly depend on how careful
ly you load your trailer and operate your rig .
Before you actually tow your trailer, practice
turning, stopping and backing up in an area away
from traff ic. Keep practicing until you have be
come comp letely fami liar with the way your vehi
cle-trailer comb inat ion behaves and responds.
Backing up is difficult and requires practice.
Backing up with a trailer generally requires steer-
Trailer mode
ing action opposite to that when backing up your
vehicle without a trailer .
Maintain a greater distance between your vehicle
and the one in front of you. You will need more
room to stop . To compensate for the trailer, you
will need a larger than normal turning radius .
When passing, remember that you cannot accel
erate as fast as you normally wo uld because of
the added load . Make sure you have enough room
to pass. After passing, allow p lenty of room for
your trailer before changing lanes again .
Avo id jerky starts, sharp turns or rapid lane
changes.
(D Tips
- Do not tow a trailer during the break-in peri
od of your veh icle.
-If you tow a trailer, your Audi may require
more frequent maintenance due to the ex
tra load ¢
page 2 73.
Parking on a slope
Do not pork on a slope with a trailer. If it cannot
be avoided, do so only ofter doing the following:
When parking:
"Apply the foot brake .
" Have someone place chocks under both the ve
hicle and the trailer wheels.
"W ith chocks in place, slowly release the brakes
until the wheel chocks absorb the load.
" Turn the whee ls towards the curb.
" App ly the parking brake.
" Select the P selector lever position.
When restarting after parking:
"App ly the foot brake.
" Start the engine .
"S elect the D/S se lector lever position.
" Release the parking brake and slowly pull out
and away from the wheel chocks.
" Stop and have someone retrieve the wheel
chocks.
201
Page 205 of 294
Care and cleaning
General information
Regular, proper care helps to maintain your vehi
cle's value.
It can a lso be a requirement when
submitting warranty claims for corrosion damage
and paint defects on the body.
The necessary care products can be obtained
from your authorized Audi dealer. Read and fol l ow the instructions for use on the packaging.
A WARNING
- Using clean ing and care products incorrectly
can be dangerous to your health.
-Always store cleaning and care products out of reach of chi ldren to reduce the r isk of po i
soning .
@) For the sake of the environment
- Preferably use environmentally-friendly
products when buying cleaning agents.
- Do not dispose of leftover cleaning and care
products with household trash.
Car washes
The longer that deposits remain on the vehicle,
the mor e the surface may b e damaged . High
temperatures such as those caused by sunlight
increase the damag ing effect.
Before washing, rinse off heavy deposits with
p lenty of water .
S tu bborn depos its s uch as bird d roppings or tree
sap are best removed with plenty of water and a
microfiber cloth.
A lso , wash the underside of yo ur vehicle once
road sa lt stops being used for the season.
Pressure washers
When washing your ve hicles w ith a pressure
washer, always follow the operating instructions
p rovided w ith the pressure washer. This is espe
cially importa nt in regard to the pressu re and
sp raying distance . Do no t aim the sp ray directly
at seals on side windows, doors, the hood, the
rear lid or the sunroof * or at tires, rubber hoses,
Ca re and cleaning
insulating materia l, sensors* or camera lenses* .
Keep a distance of at least 16 inches (40 cm) .
Do no t remove snow and ice with a p ressure
washe r.
Never use rota ry nozzles or high pressure noz
z les.
The water temperature must not be above 140 °F
(60 °().
Automat ic car washe s
Spray off t he vehicle before washing .
Make s ure that the windows and roo f* are closed
and the windsh ie ld wipers are off . Follow instruc
tions from the car wash operator, especially if
there are accessories attached to your vehicle .
If possible, use car washes that do not have
brushes .
Washing
by hand
Clean the vehicle starting from the top and work
ing down using a soft sponge o r cleaning br ush.
U se solven t-free cleaning produ cts .
Washing vehicles with matte finish paint
by
hand
T o avo id damag ing the pa int w hen washi ng, fi rst
remove d ust and large p articl es from you r vehi
cl e. Insects, grease spots and f ingerprints are
best removed with a special cleaner for matte
finish paint.
Apply t he p roduct using a microfiber cloth. To
avo id damag ing the pa int surfa ce, do not use too
much pressure.
Rinse the ve hicle thorough ly w ith wate r. Then
clean usi ng a neutral shampoo and a soft micro
fiber clo th .
Rinse the ve hicle thorough ly agai n and let it air
dry. Remove a ny wate r residue using a sham my .
A WARNING
- On ly wash the vehicle when the ign ition is
off and follow t he instr uctions from the car
wash operator to reduce the risk of acci
dents.
-
203
Page 215 of 294
... N
0 CJ '
Messages in the instrument cluster display
Applies to vehicles: with selective catalytic reduction
The display indicates if the Ad Blue level is low or
if there is a system malfunction .
AdBlue le vel low
You will be informed if the Ad Blue in the tank
drops below a certa in level.
Plea se refill Ad Blue. Range 1500 mi (2400 km )
This message appears whe n there is only eno ugh
Ad B lue lef t to d rive the distance indicated in the
d river i nformation system. Fill the AdBl ue.
AdBlue ,0 Refill AdBlue! No re start in 600 mi
( 1000 km )! See owner 's manual
This message appea rs when there is only eno ugh
Ad Blue left to drive the distance indicated in the
driver info rmation system . Fill the Ad Blue . Ot her
wise the eng ine will not sta rt aga in if you s top it
once the d ist anc e in dicate d ha s been d riven. Yo u
can also check t he remai ning dis tan ce in the on
board com puter* .
Refill Ad Blue! No restart! See own-
er's manual
This message appears whe n the AdBlue ta nk is
empty. F ill the AdB lue. Otherwise you will not be
ab le to s tart the engine aga in once yo u stop it.
The AdBlue must be refilled when t he amount in
the tank has reached the minimum level
q page 213, Filling Ad Blue.
Incorrect filling /system malfunction
A message appears if the AdBlue tank was filled
with a fluid other than AdBlue and the system
has detected that the tan k was fi lled incor rect ly,
or if there is a system malfunction .
Ad Blue -I' Ad Blue: System fault! No restart in
600 mi (1000 km ). See owner's manual.
This message appears when it is only poss ible to
drive the d istance indicated in the dr iver informa
tion system. Drive to the nearest authorized Audi
dealer or authorized Audi Serv ice Facility to have
the ma lfunction co rrected. Otherwise the engine
w ill not start agai n if you stop it once the d is
tance ind icated has been driven .
Fuel and Refueling
AdBlue: System fault No re start!
See owner's manual
T his mess age app ea rs if the sy stem ha s detec ted
t h at the t ank was fi lled incor rec tly or tha t there
is a ma lf u nction . Drive immediate ly to the near
est authorized A udi dealer or authorized A udi
Se rvice Facility to have the ma lf u nction co rrect
ed. Ot herwise you wi ll not be able to start the en
gine again once you stop it .
Filling AdBlue
Applies to vehicles: with selective catalytic reduction
Fig. 182 Right rear vehicle side: removing the Ad Bl ue cap
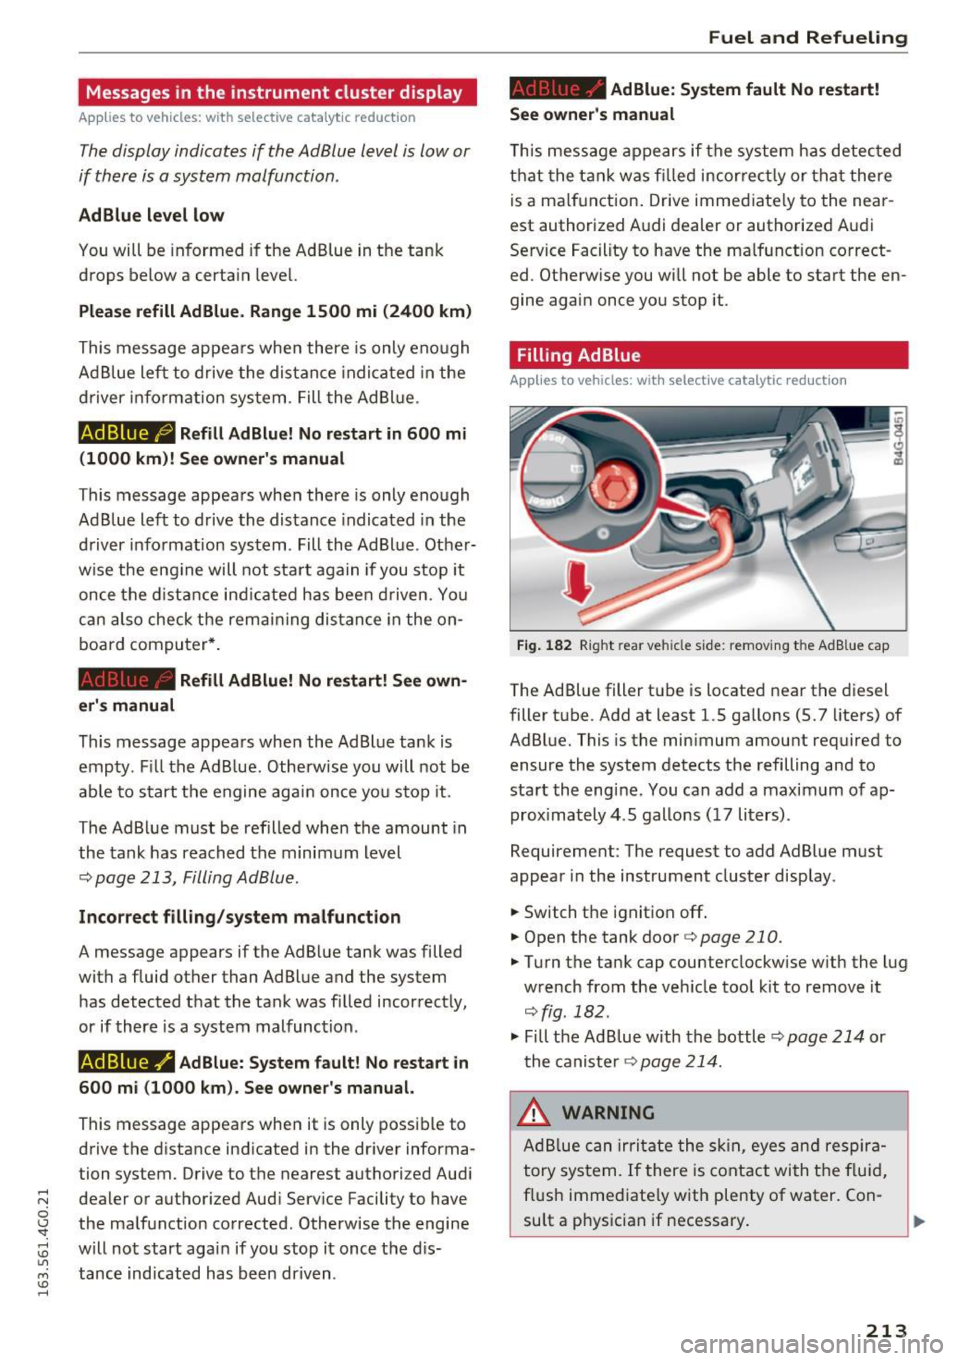
The Ad Blue filler t ube is located near the d iesel
filler t ube. Add at least 1.5 gallons (5.7 lite rs) of
AdBl ue. This is the min imum amount required to
ensure the system detects the refilling and to
sta rt the eng ine . You can add a maxim um of ap
prox imately 4 . 5 gallons ( 17 li ters) .
Requirement: The request to add Ad Blue must
appear in the instrument cluster display.
.. Switch th e ignition off .
.. Open the tank door
q page 210.
.. Tu rn the ta nk cap counterclockw ise w it h the l ug
w rench from the veh icle tool k it to remove it
qfig. 182.
.,. Fill the Ad Blue with the bottle ~ page 214 or
t he ca nister ~
page 21 4.
.&_ WARNING
Ad Bl ue can ir rit a te the s kin, eyes an d respir a
tory sy stem.
If there is co nta ct wi th t he f lu id ,
f lus h imme diate ly w ith plenty of water . Con-
su lt a p hys ician if necessary .
IJII>
213