display AUDI A6 2016 Workshop Manual
[x] Cancel search | Manufacturer: AUDI, Model Year: 2016, Model line: A6, Model: AUDI A6 2016Pages: 294, PDF Size: 73.88 MB
Page 125 of 294
Adjusting the display and the warning tones
A ppl ies to vehicles: W it h parkin g system plus/rearview c am·
era/peripheral ca meras
The display and warning tones can be adjusted in
the Infotainment.
~ Se lect: the ICARI function button > ( Car)* Sys
tems control b utton
> Driver ass istance > Pa rk
ing aid .
Display
On * -An op tical d isp lay is shown for the parking
system plus, a rearview camera image is s hown
for the rearview camera *.
Off -Whe n the par king system is switched off,
only audib le signa ls are give n.
Warning tones Front volume - Volume for the front a rea
Rear volume - Volume fo r the rear area
Front frequency· Frequency for the front a rea
Rear frequency · Freq uency for the rear area
Entertainment volume lowering - When the
pa rking system is turned on, the volume of the
aud io/video so urce is lowered .
The new ly adjusted value is briefly heard from
the signal generato r.
@ Tips
- The warning tones can also be adjusted d i
rectly by the vis ual disp lay or the pictu re
from the camera. Simply press the Settings
control bu tton.
- Changed settings are activated when the
parking system is switched o n aga in.
- The settings for volume and frequency are
automat ica lly saved and assigned to the re
mote control key be ing used .
Error messages
Appl ies to vehicles: W ith pa rk in g syste m plus/rearview ca m·
era/per ipheral ca meras
There is an erro r in the system if the LED in the
Pw , button is b linking and yo u hear a continuous
Parking systems
alarm for a few seconds after sw itch ing on the
par king system or w hen the pa rking system is a l·
ready activated. If the error is not cor rected be
fo re you switch
off the ignition, the LED in the Pw ,
button wi ll blink the next time you switch on the
park ing system by shifting into reverse.
Parking sy stem plus
If a sensor is fa ulty, the .l?4 symbo l will appear i n
front of/behind the vehicle in the Infotainment
display. If a rear sensor is faulty, on ly obstacles
that are in areas @and @ are shown
¢ page 114, fig . 120 . If a front sensor is faulty,
only obs tacles tha t are in areas © and @are
shown. The re is a lso a system ma lf u nction if all
segme nts ar ound the veh icle are red or if no seg·
me nts are disp laye d.
Peripheral cameras*
T he re is a system malfu nction if t he
t8> • symbol
appea rs and the co rresponding disp lay area is
shown in bl ue. The camera is not wo rking in this
area.
Drive to an authorized A udi dealer or authorized
Audi Service Facility immed iate ly to have the
malfunction corrected.
Trailer hitch
App lies to vehicles: wit h parking system pl us/rea rv iew cam
era/periphera l cameras an d tra ile r hitc h
For vehicles using the t rai ler socket, the park ing
system rear sensors do not tu rn on whe n you
shift into reverse gear or when yo u press the
Pwi
button. This resu lts in the following restrict ions.
Parking system plus
There is no distance warning for the rear. The
front senso rs remain activated. The v isua l display
switches to t he tra iler tow ing mode.
Rearview camera* /peripheral cameras *
T he re is no distance warning for the rear . The
front sensors remain activated . The visua l display
switches to the tra ile r towing mode. The rearv iew
camera image w ill not show the orientation lines
and the b lue surfaces. .,,.
123
Page 193 of 294
Indicator lights and m essa ges
• Do not dri ve v ehicle : steerin g defe ctive
If th is ind icator light turns on and stays on and
this message appears, the power steer ing may
h ave fa iled.
Stop the vehicle in a safe locat ion as soon as pos
sib le . Do
not continue dr iving. See an authorized
Aud i deale r or autho rized Aud i Serv ice Facility fo r
assistance .
'1:I Stee ring: System fau lt You ca n continu e
dri ving
If the indicator light turns on and the message
appears, the steering may be more difficult to
move or more sensit ive tha n usual. The steering
wheel may also be at an angle when driving
stra ight.
Drive s lowly to your author ized Audi dealer or au
thor ized Audi Service Fac ility to have the mal
function corrected.
kr.ij D ynam ic steering : Ini tializing
If the indicator lig ht ls b link ing and th is message
appears, dynamic steering* is being initialized.
Once you start the engine after this is finished,
the steering wheel will be easy to move. Re-in iti
alization m ight be necessary if the steering wheel
was moved hard to the left and right wh ile the
ve hicle was not moving . The display turns off if
the initialization was successfu l.
{D) Tips
-If the . or '1:I indicator light only stays on
for a short time, you may continue driving .
- The dynamic steering stability systems
¢ page 187 are not available in the event of
a system ma lf u nction.
- For additional informat io n on dynamic
steering, refer to¢ page 100.
Intelligent Technology
All wheel drive (quattro)
Applies to vehicles: with all wheel drive
In all wheel drive, all four wheels are powered.
General informat ion
In all whee l dr ive, the dr iving power is div ided be
tween all fou r wheels . This happens automatical
ly depending on yo ur driving behavior as we ll as
the cur rent road conditions . Refer to ¢ page 187,
E lectronic Stabilization Control (ESC).
A center d ifferential d istribu tes the driving power
variab ly to the front and rear axle. It works to
gether with selective whee l torque contro l, w hich
activates when driving through curves
¢ page 188. With the sport d ifferential*, power
distribution to the rear wheels is variable and can
be adjusted with drive select¢ page 100 .
The all wheel drive concept is designed for high
engine power. Your vehicle is except ionally pow
erfu l and has excellent driv ing characteristics
both under normal driving conditions and on
snow and ice . Always read and follow safety pre
cautions ¢
..1:)..
Winter tires
By using all wheel dr ive, your veh icle has good
forward motion with standard tires in w inter con
ditions. However, in w inter we recommend using
winter or all seaso n tires on all four wheels, be
ca use this will improve the brak ing effect.
Snow chains
If there are snow chain laws, snow cha ins must
also be used on veh icles w ith all wheel dr ive
¢ page 246 , Snow chains .
Replacing tires
For vehicles with a ll wheel drive, on ly wheels with
the same roll ing circumference should be used.
Avo id whee ls with different tread depths
¢ page 238, New tires or wheels .
Offroad vehicle?
Your Audi is not an offroad vehicle - there is not
enough ground clearance. For this reason, avoid
difficult terrain. ..,.
191
Page 209 of 294
avoid scratches, move the scraper only in
one direction and not back and forth.
- Never remove snow or ice from door win
dows and mirrors using warm or hot water
because this could cause cracks to form.
- To avoid damage to the rear window de
fogger , do not apply any stickers on the
heating wires on the inside of the window.
- Decorative parts/trim
- Never use chrome care or cleaning prod-
ucts .
- Paint
- To reduce the risk of scratches, the vehicle
must be free of dirt and dust before pol
ishing or waxing .
- To prevent paint damage, do not polish or
wax the vehicle in direct sunlight .
- To reduce the risk of paint damage, do not
polish away rust spots .
- Remove cosmetics and sunscreen immedi
ately- these could damage the paint.
- Displays
- To avoid scratches, do not use dry cleaning
methods on displays.
- Controls
- Make sure that no fluids enter the con-
trols, because this could cause damage.
- Safety belts
- Do not remove the safety belts to clean
them.
- Never clean safety belts or their compo
nents chemically or with corrosive fluids
or solvents and never allow sharp objects
to come into contact with the safety belts.
This could cause damage to the belt web
bing .
-If there is damage to the webbing, the
connections, the retractors or the buckles,
have them replaced by an authorized deal
er.
- Textiles/artificial leather/ Alcantara
- Never treat artificial leather/ Alcantara
with leather care products, solvents, floor polish, shoe polish, spot remove or similar
products .
- Have a specialist remove stubborn stains
to prevent damage.
Care and cleaning
- Never use steam cleaners, brushes, hard
sponges, etc. when cleaning.
- Do not turn on the seat heating* to dry the
seat.
- Objects with sharp edges such as zippers,
rivets on clothing or belts can cause dam
age to the surface.
- Open hook and loop fasteners , for exam
ple on clothing, can damage seat covers.
Make sure hook and loop fasteners are
closed .
- Natural leather
- Never treat leather with solvents, floor
polish, shoe polish, spot remover or simi
lar products.
- Objects with sharp edges such as zippers, rivets on clothing or belts can cause dam
age to the surface .
- Never use steam cleaners, brushes, hard
sponges, etc . when cleaning.
- Do not turn on the seat heating* to dry the
seat .
- To help prevent the leather from fading,
do not leave the vehicle in direct sunlight
for long periods of time. If leaving the ve
hicle parked for long periods of time, you
should cover the leather to protect it from
direct sunlight.
(D Tips
-Insects are easier to remove from paint that
has been freshly waxed.
- Regular waxing can prevent rust spots from
forming.
207
Page 214 of 294
Fuel and Refueling
case, try turning the nozzle before inserting
it in the fuel fi ller neck, use a different fue l
pump or see your authorized Audi dea ler or
authorized repair facility for ass istance.
- The fuel filler flap of your vehicle is not
locked when you lock the vehicle from the
inside.
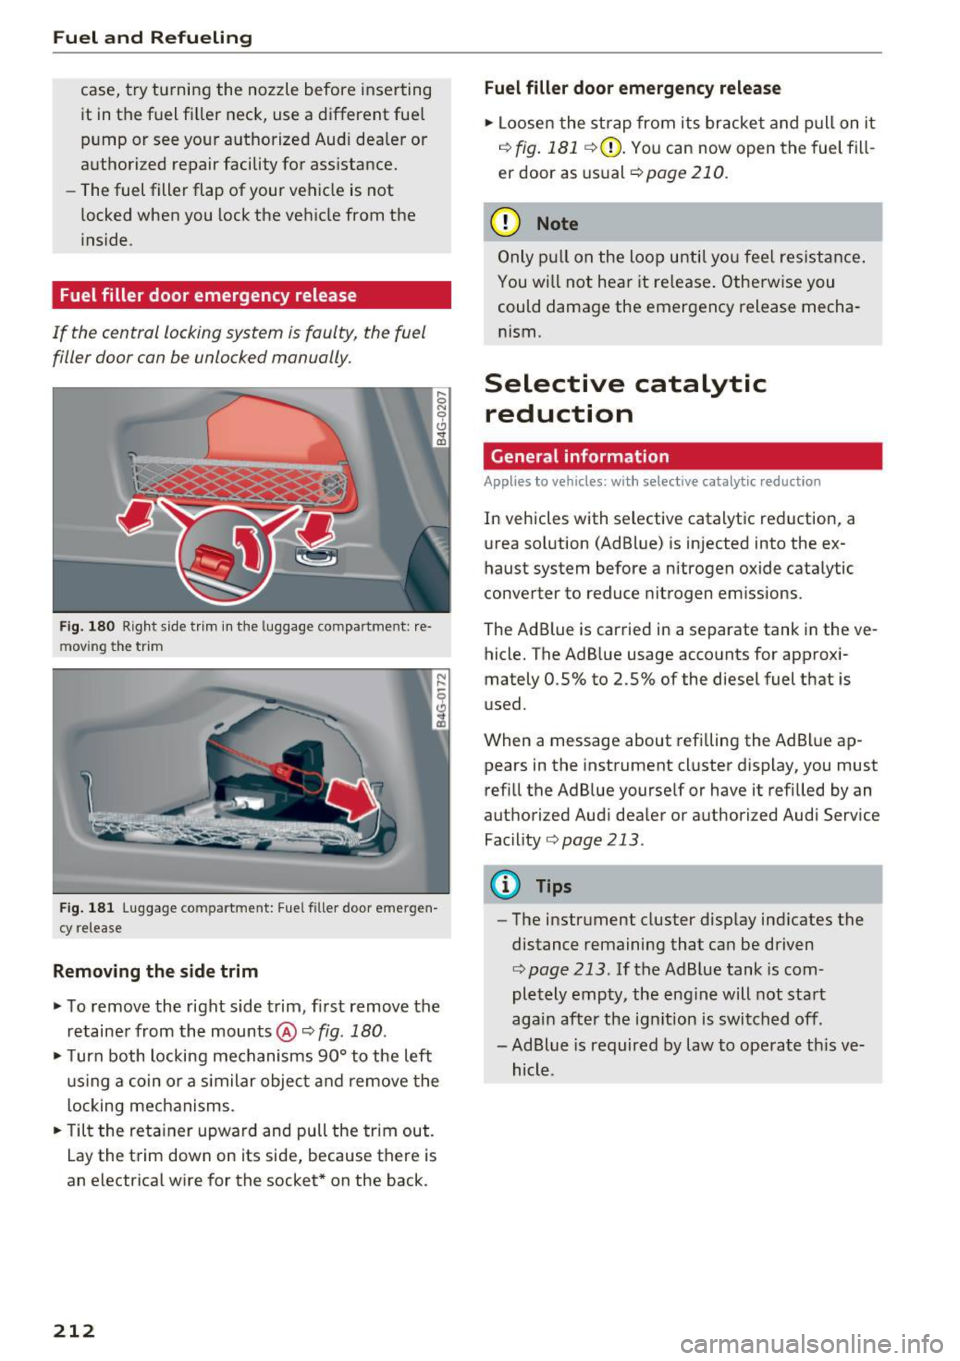
Fuel filler door emergency release
If the central locking system is faulty, the fuel
filler door can be unlocked manually.
F ig. 180 Right side t rim in the luggage compartme nt: re ·
m ov ing the trim
Fig. 181 Luggage co mpa rtment: Fue l filler door emergen
cy release
Removing the side trim
• To remove the right side trim, first remove the
retainer from the mounts @¢
fig. 180.
• Turn both locking mechanisms 90° to the left
usi ng a coin or a similar object and remove the
locking mechanisms.
• Tilt the retainer upward and pull the trim out.
Lay the trim down on its side, because there is
an electrical wire for the socket * on the back.
212
Fuel filler door emergency release
• Loosen the strap from its bracket and pull on it
r:!.>fig. 181 ¢(2) . You can now open the fuel fill
er door as usual ¢
page 210.
(D Note
Only pull on the loop until you feel resistance .
You wi ll not hear it release . Otherwise you
could damage the emergency release mecha nism.
Selective catalytic reduction
General information
Applies to vehicles: with selective catalytic reduction
In vehicles with selective catalytic reduction, a
urea solution (AdBlue) is injected into the ex
haust system before a nitrogen oxide catalytic
converter to reduce nitrogen emissions.
The Ad Blue is carried in a separate tank in the ve
hicle. The AdBlue usage accounts for approxi
mately 0.5% to 2.5% of the diesel fuel that is
used.
When a message about refilling the AdBlue ap
pears in the instrument cluster display, you must
refill the Ad Blue yourself or have it refilled by an
authorized Audi dealer or authorized Audi Service
Facility
r:!.>page 213 .
{!) Tips
-The instrument cluster display ind icates the
distance remaining that can be driven
¢ page 213. If the AdBlue tank is com
pletely empty, the engine will not start
again after the ign ition is switched off.
- Ad Blue is required by law to operate th is ve
hicle.
Page 215 of 294
... N
0 CJ '
Messages in the instrument cluster display
Applies to vehicles: with selective catalytic reduction
The display indicates if the Ad Blue level is low or
if there is a system malfunction .
AdBlue le vel low
You will be informed if the Ad Blue in the tank
drops below a certa in level.
Plea se refill Ad Blue. Range 1500 mi (2400 km )
This message appears whe n there is only eno ugh
Ad B lue lef t to d rive the distance indicated in the
d river i nformation system. Fill the AdBl ue.
AdBlue ,0 Refill AdBlue! No re start in 600 mi
( 1000 km )! See owner 's manual
This message appea rs when there is only eno ugh
Ad Blue left to drive the distance indicated in the
driver info rmation system . Fill the Ad Blue . Ot her
wise the eng ine will not sta rt aga in if you s top it
once the d ist anc e in dicate d ha s been d riven. Yo u
can also check t he remai ning dis tan ce in the on
board com puter* .
Refill Ad Blue! No restart! See own-
er's manual
This message appears whe n the AdBlue ta nk is
empty. F ill the AdB lue. Otherwise you will not be
ab le to s tart the engine aga in once yo u stop it.
The AdBlue must be refilled when t he amount in
the tank has reached the minimum level
q page 213, Filling Ad Blue.
Incorrect filling /system malfunction
A message appears if the AdBlue tank was filled
with a fluid other than AdBlue and the system
has detected that the tan k was fi lled incor rect ly,
or if there is a system malfunction .
Ad Blue -I' Ad Blue: System fault! No restart in
600 mi (1000 km ). See owner's manual.
This message appears when it is only poss ible to
drive the d istance indicated in the dr iver informa
tion system. Drive to the nearest authorized Audi
dealer or authorized Audi Serv ice Facility to have
the ma lfunction co rrected. Otherwise the engine
w ill not start agai n if you stop it once the d is
tance ind icated has been driven .
Fuel and Refueling
AdBlue: System fault No re start!
See owner's manual
T his mess age app ea rs if the sy stem ha s detec ted
t h at the t ank was fi lled incor rec tly or tha t there
is a ma lf u nction . Drive immediate ly to the near
est authorized A udi dealer or authorized A udi
Se rvice Facility to have the ma lf u nction co rrect
ed. Ot herwise you wi ll not be able to start the en
gine again once you stop it .
Filling AdBlue
Applies to vehicles: with selective catalytic reduction
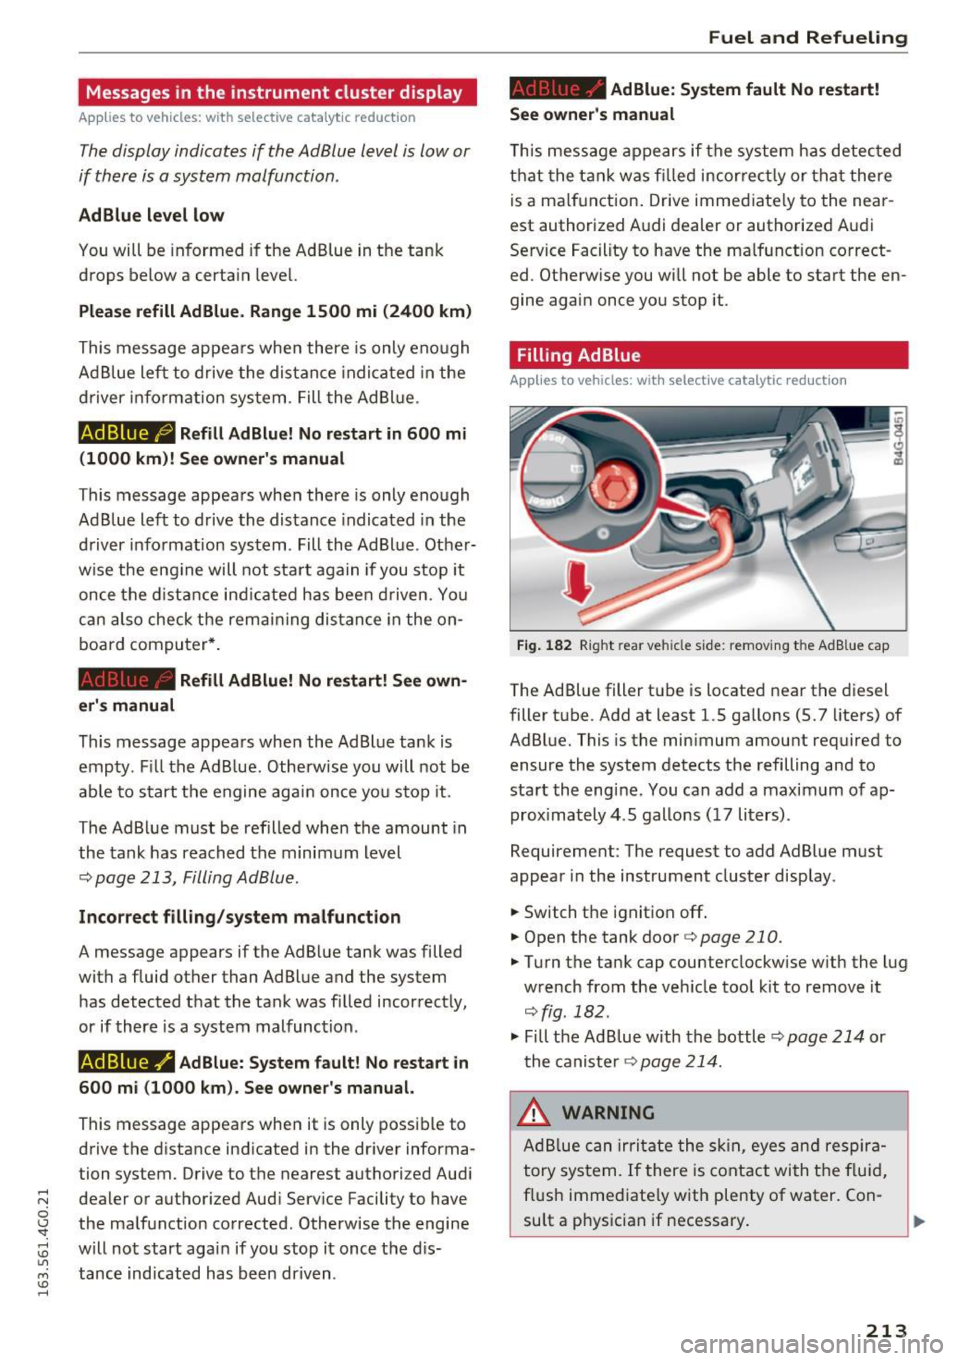
Fig. 182 Right rear vehicle side: removing the Ad Bl ue cap
The Ad Blue filler t ube is located near the d iesel
filler t ube. Add at least 1.5 gallons (5.7 lite rs) of
AdBl ue. This is the min imum amount required to
ensure the system detects the refilling and to
sta rt the eng ine . You can add a maxim um of ap
prox imately 4 . 5 gallons ( 17 li ters) .
Requirement: The request to add Ad Blue must
appear in the instrument cluster display.
.. Switch th e ignition off .
.. Open the tank door
q page 210.
.. Tu rn the ta nk cap counterclockw ise w it h the l ug
w rench from the veh icle tool k it to remove it
qfig. 182.
.,. Fill the Ad Blue with the bottle ~ page 214 or
t he ca nister ~
page 21 4.
.&_ WARNING
Ad Bl ue can ir rit a te the s kin, eyes an d respir a
tory sy stem.
If there is co nta ct wi th t he f lu id ,
f lus h imme diate ly w ith plenty of water . Con-
su lt a p hys ician if necessary .
IJII>
213
Page 217 of 294
-A refill can ister contains 1.3 gallons (5 lit
ers) of Ad Blue.
Completing AdBlue refill
Applies to vehicles: with selective catalytic reduction
Closing the filler ne ck
~ Turn the cap to the right on the filler neck with
the wheel wrench unti l the cap clicks into place.
This tightens the cap to the specification
<=> A
in Filling AdBlue on page 213, <=> CD in Filling
AdBlue on page 214 .
~ Then press on the left side of the tank door un-
t il you hear it lock.
After filling
The vehicle must be driven . The system may take
up to two minutes to detect that the Ad Blue has been filled.
~ If there was no Ad Blue left in the tank and a
range of
O mi (0 km) was shown in the display,
switch the ign ition on for about 30 seconds be
fore starting the engine.
Fuel and Refueling
215
Page 220 of 294
Checking and Filling
Engine compartment
Engine compartment overview
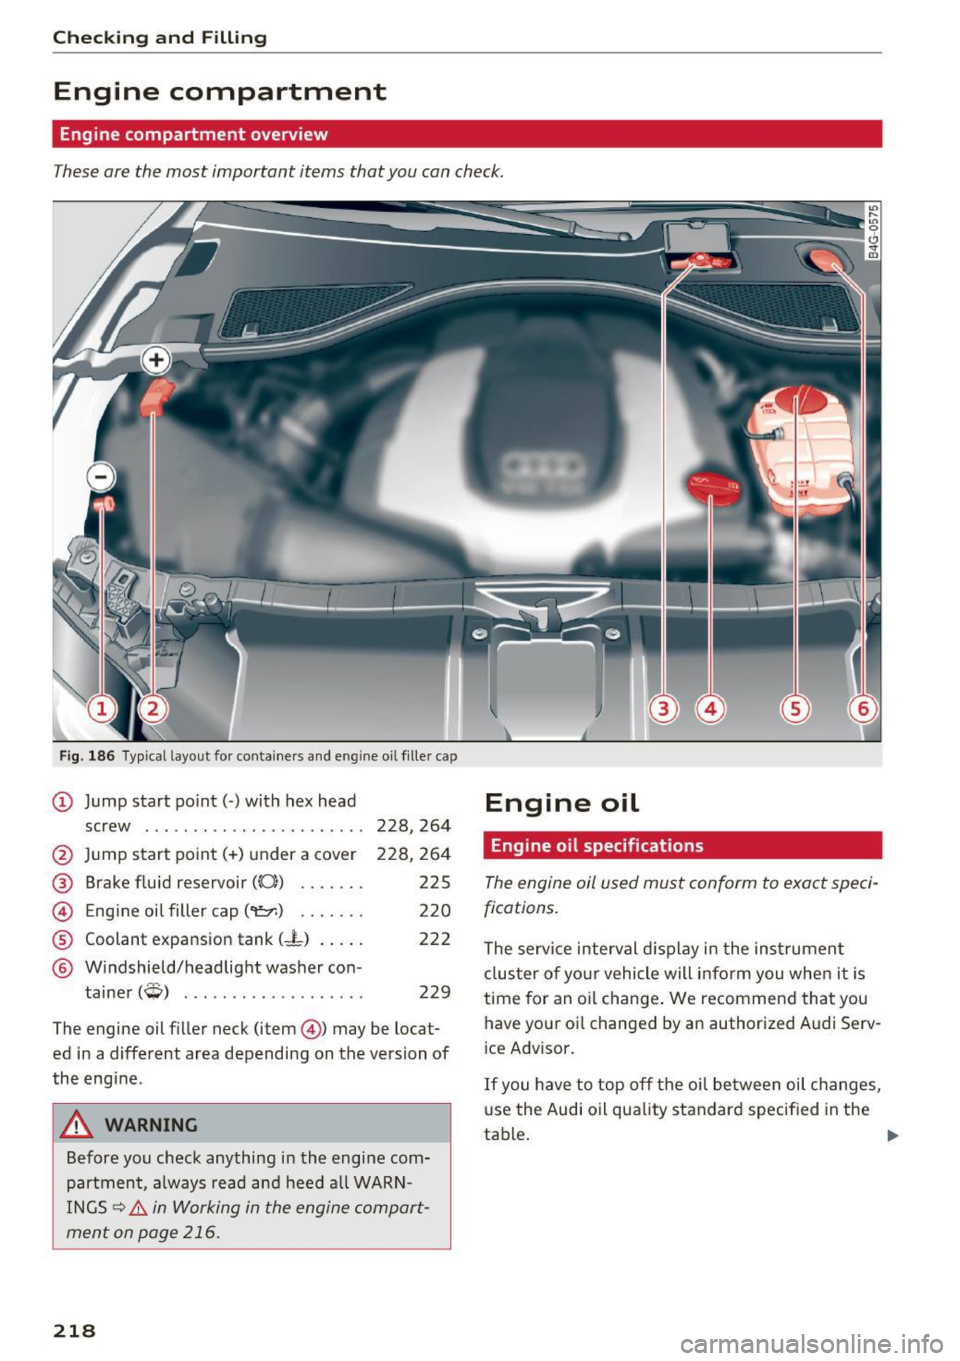
These are the most important items that you can check.
Fig. 186 Typical layout for containers and eng ine oil fille r cap
@ Jump start point(+) under a co ver
® Brake fluid reservoir ((0}) ...... .
@ Eng ine oil filler cap ('t::r.) ...... .
® Coolant expansion tank (-t) .... .
@ Windshield/headlight washer con -
t . (ffi) amer ~ ..................
. 228,264
225
220
222
229
The engine oil filler neck (item@) may be locat
ed in a different area depending on the version of
the engine.
A WARNING
Before you check anything in the engine com
partment, always read and heed all WARN
INGS ~.&.
in Working in the engine compart
ment on page 216.
218
Engine oil specifications
The engine oil used must conform to exact speci
fications.
The serv ice interval display in the instrument
cluster of your vehicle will inform you when it is
time for an oi l chang e. We recommend that you
have your oil changed by an authorized Audi Serv
i ce Advisor.
If you have to top off the oil between oil changes,
us e the Audi oil quality standard specified in the
ta ble.
~
Page 222 of 294
Checking and Filling
@ Tips
-The oil pressure warning display. is not
an indicator of the oil level. Do not rely on
it. Instead, check the oil level in your en
gine at regular intervals, preferably each
time you refuel, and always before going
on a long trip.
- If you have the impression your engine con
sumes excessive amounts of oil, we recom
mend that you consu Lt your Audi dealer to
have the cause of your concern properly di
agnosed . Keep in mind that the accurate
measurement of oil consumption requires
great care and may take some time. Your
Audi dealer has instructions about how to
measure oil consumption accurately.
Checking the engine oil level
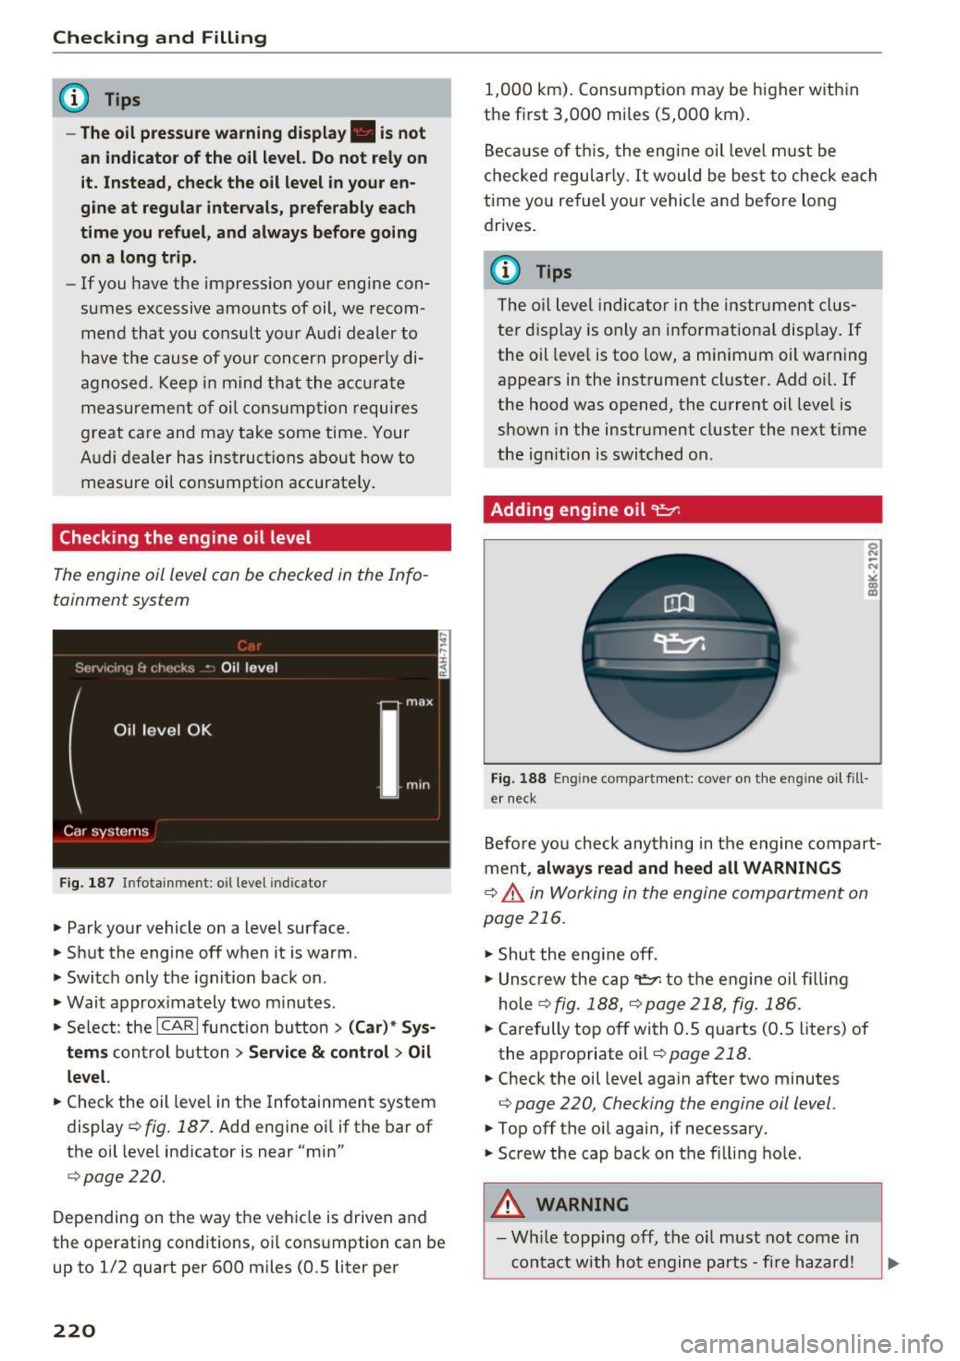
The engine oil level can be checked in the Info
tainment system
Fig. 187 I n fo tai nme nt: oil level indic a to r
• Park your vehicle on a level surface.
" Shut the engine off when it is warm .
.. Switch only the ignition back on.
.. Wait approximately two minutes.
" Select : the
ICAR I function button > (Car)* Sys
tems
control button > Service & control > Oil
level.
.. Check the oil level in the Infotainment system
display ¢
fig. 187. Add engine oil if the bar of
the oil level indicator is near "min"
¢page 220.
Depending on the way the vehicle is driven and
the operating conditions, oil consumption can be
up to 1/2 quart per 600 miles (0 .5 liter per
220
1,000 km). Consumption may be higher within
the first 3,000 miles (5,000 km).
Because of this, the engine oil level must be
checked regularly. It would be best to check each
time you refuel your vehicle and before long
drives.
{!) Tips
The oil level indicator in the instrument clus
ter display is only an informational display. If
the oil level is too low, a minimum oil warning
appears in the instrument cluster. Add oil. If
the hood was opened, the current oil level is
shown in the instrument cluster the next time
the ignition is switched on.
Adding engine oil 'l:::1:
Fig. 188 En g in e compartment : cover on the engine oil fill
er neck
Before you check anything in the engine compart
ment,
always read and heed all WARNINGS
¢ .&. in Working in the engine compartment on
page 216.
"Shut the engine off .
"Unscrew the cap~ to the engine oil filling
hole
¢ fig. 188, ¢page 218, fig. 186.
.. Carefully top off with 0.5 quarts (0.5 liters) of
the appropriate oil ¢
page 218.
.. Check the oil level again after two minutes
¢ page 220, Checking the engine oil level.
"Top off the oil again, if necessary.
"Screw the cap back on the filling hole.
_&. WARNING
- While topping off, the oil must not come in
contact with hot engine parts - fire hazard!
Page 251 of 294
.... N
0 CJ '
_& WARNING
Temperature grades apply to tires that are properly inflated and not over or underinflat
ed .
Tire pressure monitoring
system
CD General notes
Each t ire, including the spare (if provided),
should be checked monthly when cold and inflat
ed to the inflation pressure recommended by the
veh icle manufac turer on the vehicle placard or
tire inflation pressure label. (If your vehicle has
tires of a different size than the size indicated on
the vehicle placard or tire inf lation pressure la
be l, you should determine the proper tire infla
tion pressure for those tires).
As an added safety feature, your veh icle has been
equipped with a tire pressure monitoring system
(TPMS) that illuminates a low tire press ure te ll
tale when one or more of your tires is significant l y under-inflated. Accordingly, when the low tire
pressure tellta le illuminates, you should stop and
check your tires as soon as possible, and inflate
them to the proper pressure. Driving on a s ignifi
cantly under-inflated tire causes the tire to over
heat and can lead to t ire failure. Unde r-inflation
also reduces fuel efficiency and tire tread life,
and may affect the vehicle's handling and stop
ping ability .
Please note that the TPMS is not a substitute for
proper tire maintenance, and i t is the driver's re
sponsib ility to ma inta in correct tire pressure,
even if under -inflation has not reached the level
to trigger illum inat ion of the TPMS low tire pres
sure telltale.
Your veh icle has also bee n eq uipp ed w ith a TPMS
mal function indicator to indicate when the sys
tem is not operating properly. The TPMS mal
function indicator is combined w ith the low tire
pressure tellta le. When the system detects a
malfunction, the telltale will flash for approxi
mately one minute and then remain cont inuously
illuminated . This sequence will continue upon
Wheels
subsequent vehicle start-ups as long as the mal
function exists .
When the malfunction indicator is illuminated ,
the system may not be able to detect or signal
low tire pressure as intended. TPMS malfunctions
may occur for a variety of reasons, including the
i nsta llation of replacement or alternate tires or
whee ls on the vehicle that prevent the TPMS
from functioning properly. Always check the
TPMS ma lfunction telltale after replac ing one or
more tires or wheels on your vehicle to ensure
that the replacement or a lternate tires and
whee ls allow the TPMS to continue to function
properly.
If the Tire Pressure Monitoring System
indicator appears
The tire pressure indicator in the instrument
cluster informs you if the tire pressure is too low
or if there is a system mo/function .
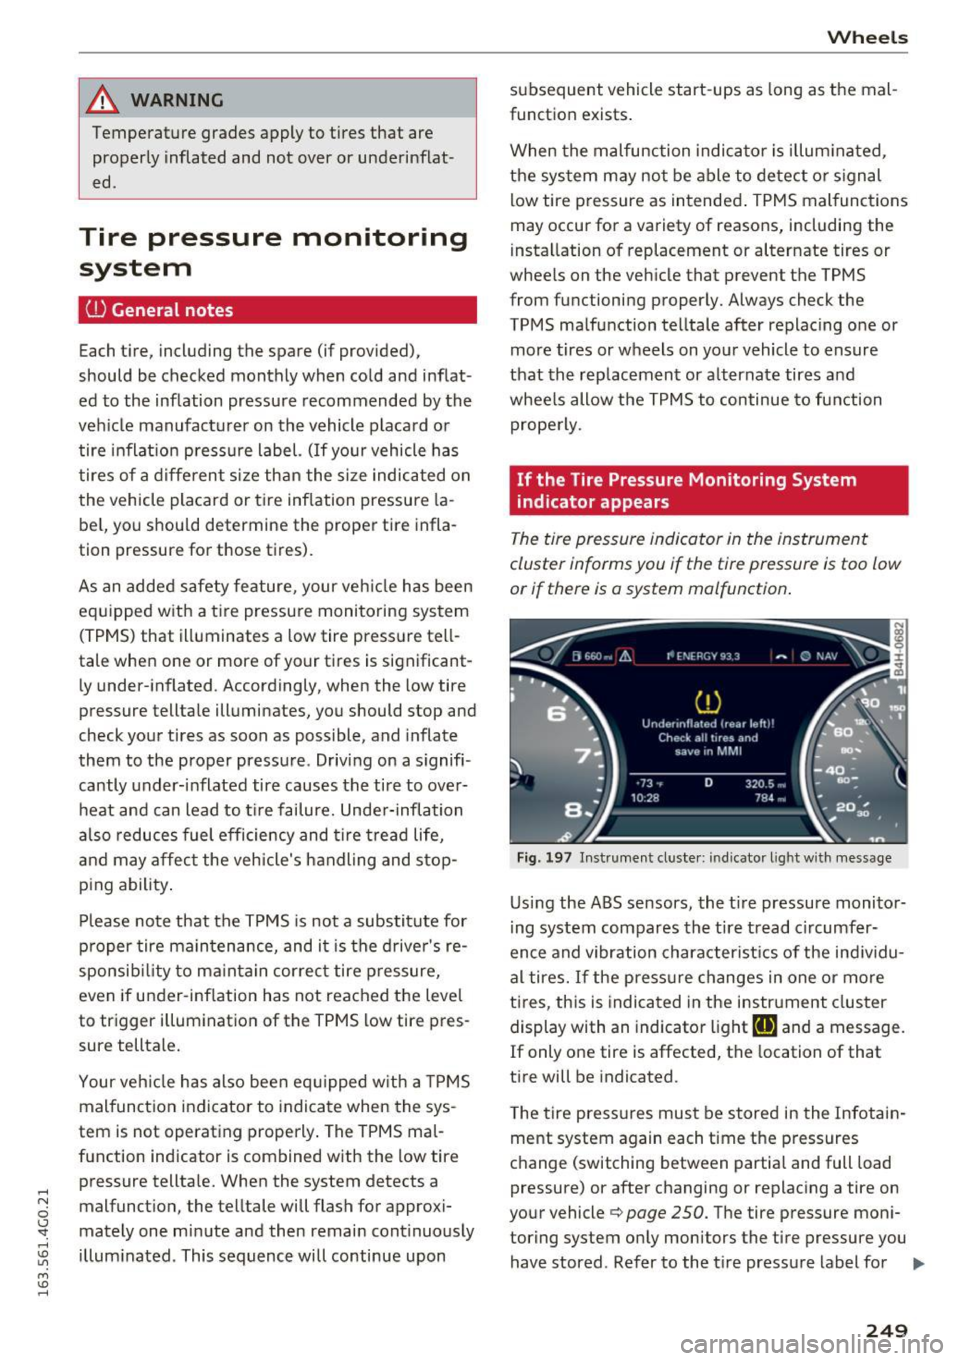
Fig. 197 Instrume nt cluste r: indicator light with message
Us ing the ABS sensors, the tir e pressure monitor
ing system compares the tire tread circumfer
ence and vibration characteristics of the individu
al tires. If the press ure changes in one or more
tires , this is indicated in the instrument cluster
display with an indicator light
ti] and a message.
If only one tire is affected, the location of that
tire will be indicated.
T he tire press ures must be stored in the Infotain
ment system again each time the pressures
change (switching between partial and full load
pressure) or after changing or replacing a tire on
your vehicle¢
page 250. The tire pressure moni
toring system only monitors the tire pressure you have stored. Refer to the tire pressure label for ..,.
249
Page 252 of 294
Wheels
the recommended tire pressure for your vehicle
¢ page 241, fig. 196.
Tire tread circumference and vibration character
istics can change and cause a tire pressure warn
ing if:
- the tire pressure in one or more tires is too low.
- the tire has structural damage .
- the tire was replaced or the tire pressure was
changed and it was not stored¢
page 250.
-the spare tire* is installed.
Indicator lights
IE Loss of pressure in at least one tire¢&. .
Check the tires and replace or repair if necessary.
Check/correct the pressures of all four tires and
store the pressure again in the Infotainment sys
tem ¢
page 250 .
mm (Tire Pressure Monitoring System) Tire
pressure: System malfunction!.
Ifmm appears
after switching the ignition on or while driving
and the
IE indicator light in the instrument clus
ter blinks for approximately one minute and then
stays on , there is system malfunction . Try to
store the correct tire pressures¢
page 250. If
the indicator light does turn off or turns on again
after a short period of time, drive to your author
ized Audi dealer or qualified repair facility imme
diate ly to have the malfunction corrected.
A WARNING
- If the ti re pressure indicator appears in the
display, reduce your speed immediately and
avoid any hard steering or braking maneu
vers. Stop as soon as possible and check the
t ir es and their pressure .
- The driver is responsible for maintaining the
correct tire pressure. You must check the
t ir e pressure regularly.
- Under certain conditions (such as a sporty
dr iv ing style, winter cond itions or unpaved
roads), the tire pressure mon itoring system
indicator may be delayed.
- Do not use run-flat tires on your vehicle. Us
ing them when not permitted can lead to
vehicle damage or accidents.
250
(D Tips
-The tire pressure monitoring system can al
so stop working when there is an ESC mal
function.
- Using snow chains may result in a system
malfunction.
- The tires with the identification "AO" or
"RO" ¢
page 2 38 have been matched with
your Audi tire pressure monitoring system.
We recommend that you use these tires.
Storing tire pressures
If the tire pressure changes or a tire is replaced,
it mus t be confirmed in the Infotainmen t sys
tem.
... Make sure before storing that the tire pressures
of all four tires meet the specified values and
are adapted to the load ¢
page 241.
... Switch the ignition on .
... Select: the
I CARI function button > (Car)* Sys
tems
contro l button > Servicing & checks >
Tire pressure monitoring > Store tire pressures
> Yes, store now.
(D Tips
Do not sto re the tire pressures if snow chains
a re installed.