cup AUDI A6 2017 Owners Manual
[x] Cancel search | Manufacturer: AUDI, Model Year: 2017, Model line: A6, Model: AUDI A6 2017Pages: 280, PDF Size: 70.24 MB
Page 9 of 280
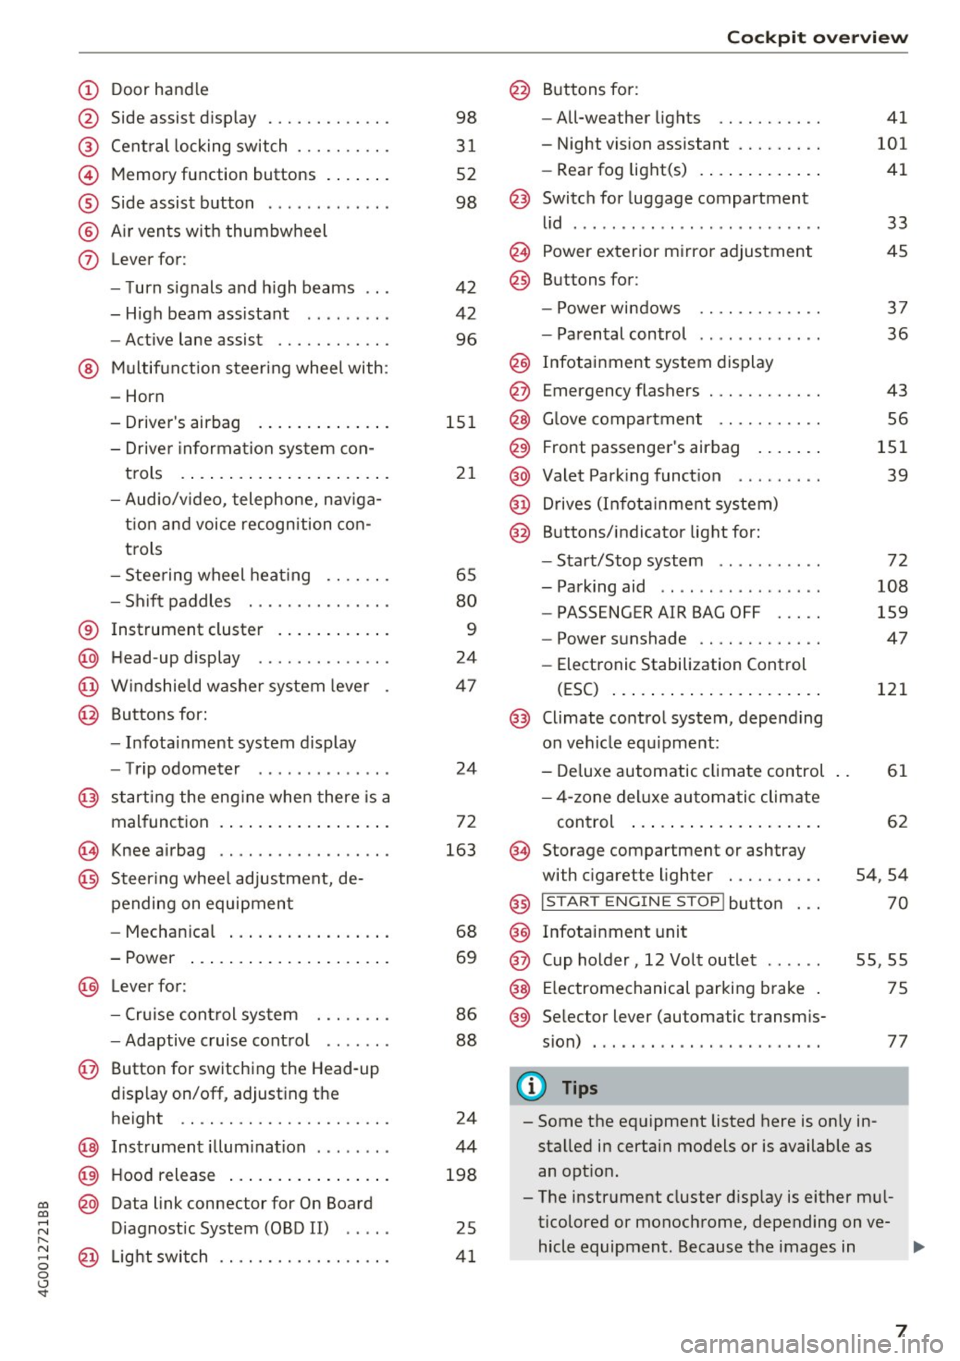
(!) Door handle
@
®
©
®
®
(j)
Side assist display
Cent ral locking switch ....... .. .
Memory function buttons . ... .. .
Side assist button ... ..... ... . .
A ir ven ts wit h thumbwheel
Lever for:
- T urn s ignals and h igh beams
- H igh beam assistant .. .. ... . .
- Active lane assist ......... .. .
@ M ultifunction steer ing wheel with:
- Horn
- Drive r's airbag . ..... ... .. .. .
- Drive r informa tion sys tem con-
t rols . ... ... .. ..... ... .. .. .
- Audio/v ideo, telephone, nav iga
t ion an d voice recognition con
trols
- Stee ring wheel heat ing .... .. .
- Sh ift paddles ............ .. .
® Instrument cluster .... ... .. .. .
@ H ead-up display ............. .
@ W indshield w ashe r system leve r
@ Buttons for:
- Infota inment system display
- Trip odometer ............. .
@ starting the eng ine when there is a
malfunc tion . ... .. .... ... .. .. .
~ Knee airbag .. ............. .. .
@ Steer ing whee l adjustment, de
pending on equipment
- Mechan ica l . ... ..... ... .. .. .
- Power ... .. .. .. .... ... .. .. .
@ Lever for:
- Cruise cont rol system ... .. .. .
- Adaptive c ruise cont rol ...... .
@ Button for switching the Head-up
d isplay on/off , adjust ing the
height .. .. ............... .. .
@ Instrument illum ination ....... .
@ Hood release .. .. ..... ... .. .. .
~ @ Data link connector for On Board
;:::: Diagnostic System (OBD II) .....
,..._
8 @ Light switch ............. .. .. .
0 <..:l -
3 1
52
98
42
42 96
15 1
21
65
80
9
24
47
24
72
163
68
69
86
88
24
44
198
25
4 1
Coc kpit o ve rv iew
@ Buttons for :
- All-weather lights
- Night vision assistant ........ .
- Rea r fog light(s) . ... . ..... .. .
@ Switch for luggage compartment
li d ...... ... .. .. ... ......... .
@ Power exterior m irro r adjustment
@ Buttons for :
- P owe r wi ndows
- Parental control
@ Infotai nment system display
@ Emergency flashers ........... .
@ G love compartment .......... .
@) Front passenger's airbag .... .. .
@ Valet Park ing funct ion .. ..... . .
@ Drives (Infot ainment system)
@ Buttons/ indicator light for:
- Start/Stop system .......... .
- Parking aid .. .. .... .. ... .. . .
- PASSENGER AIR BAG OFF .... .
- Power s unshade ............ .
- Elect ronic Stabilization Control
(ESC) ... .. .. .. .... . ..... .. .
@) Climate control system, depending
on vehicle equ ipment:
- De luxe automatic climate control
- 4-zone del uxe au tomatic climate
con trol ... .. ... .. .. ..... .. .
@ Storage compartment or ashtray
with c igarette lighter ... ...... .
@ I S TAR T EN GINE ST OP I butto n
@ Infotainment unit
@ Cup holder, 12 Vo lt outlet
41
101 41
33
45
3 7
36
43
56
151 39
72
108
159
47
121
61
62
54,54
70
55,55
@ E lectromechanical parking b rake 75
@ Se lector lever (automatic transm is-
sion) . . . . . . . . . . . . . . . . . . . . . . . .
77
(!) Tips
- Some the eq uipment listed here is on ly in
sta lled in certain models or is available as
an opt io n.
- The instr ument cluster d isp lay is either m ul
ticolored or monochrome, depending on ve-
hicle equipment. Because t he images in .,..
7
Page 25 of 280
co
co
.... N
" N .... 0 0 <.,;) 'SI'
Unlike the short-term memory, the long -term
memory is not erased automatica lly. Yo u can se
l ect the time period for evaluat ing trip informa
tion yourself .
F or some veh icle functions, you can access the
driving information from the short -term memory
i n the
line @¢poge21, fig. 5.
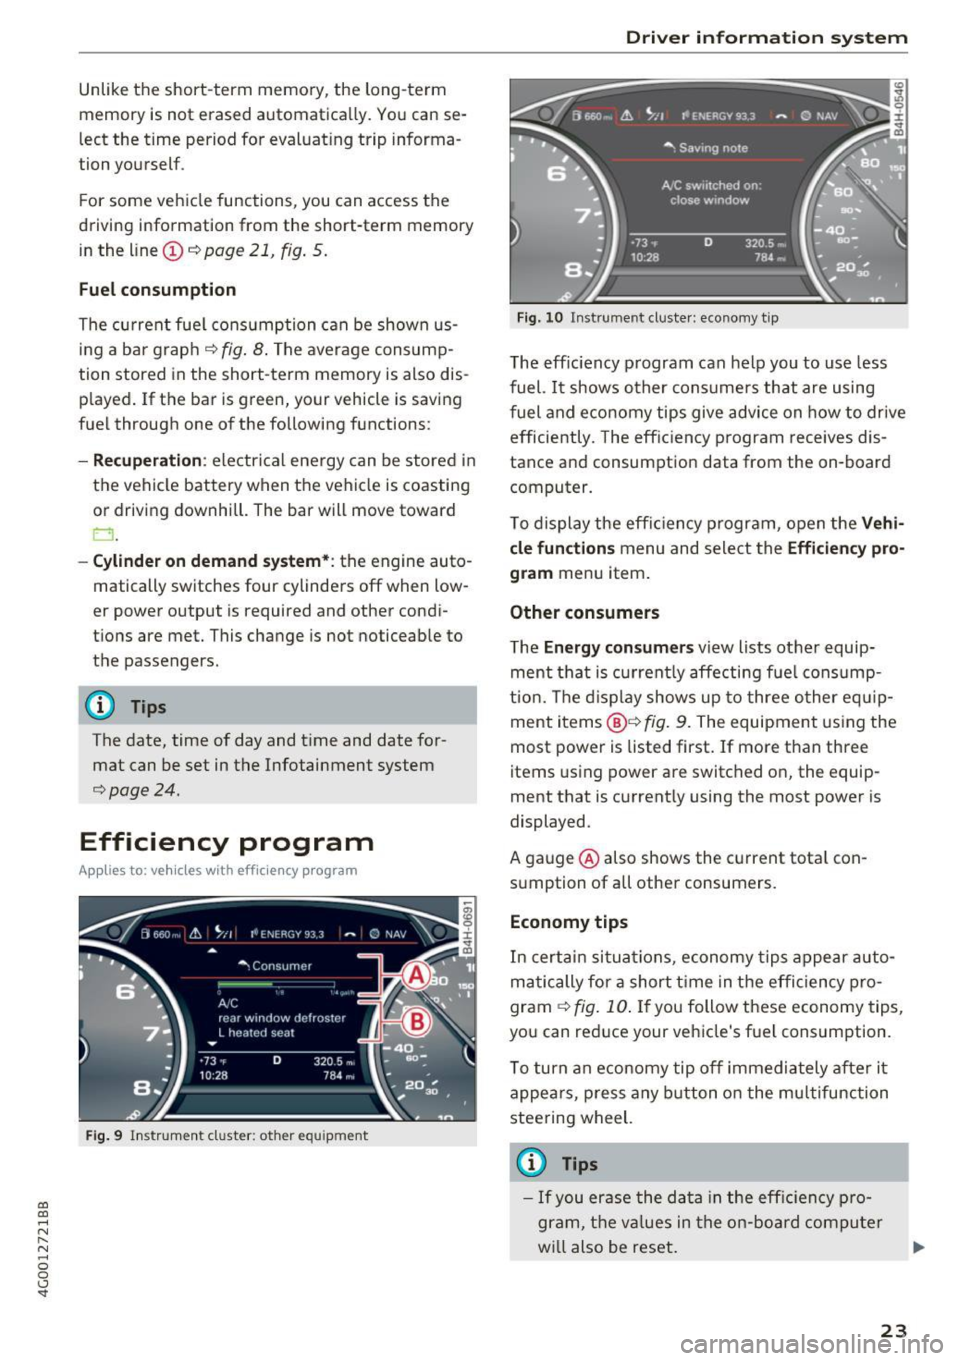
Fuel consumption
The cu rrent fue l co nsu mption c an be shown us
i ng a ba r g rap h
¢fig . 8 . The aver age consum p
tion stored in the short -term memory is also dis
p layed . If the bar is green, your vehicle is saving
fuel throug h one of the following functions:
-Re cuperation : electr ical ene rgy can be store d in
the vehicle battery when t he vehicle is coasting
or driving downhill. The bar will move toward
0 .
-Cylinder on demand system* : the engine auto
matically switches four cylinde rs off when low
er powe r output is required and other condi
tions are met. This change is not noticeab le to
t h e passengers.
(]} Tips
The date, time of day and t ime and date for
mat can be set in the Infotainment system
¢page 24.
Efficiency program
Applies to: ve hicles with effic ie ncy p rogram
F ig. 9 In str ume nt cluste r: ot her equ ipment
Driver in forma tion system
Fig. 10 Instrument cluster: econo my t ip
T he eff ic iency p rogram can help you to use less
fuel. It shows o ther cons umers th at are using
f uel and e co nomy tip s give a dvice on how to drive
efficie ntly. The eff ic ien cy pr ogr am receives dis
tance and consumption data from the on -board
computer.
To dis play the eff icien cy p rogram, o pen the
Vehi
cle functions
m enu and select the Efficiency pro
gram
menu item.
Other consumers
The Energy con sumers view lists other equip
ment that is c urren tly affe cting f ue l cons ump
tio n. Th e displ ay shows up to three o ther eq uip
ment items @¢
fig. 9. The equipment using the
most power is listed first. If more than three
items using power are switched on, the equip
ment that is current ly using the most power is
displayed.
A ga uge @ also shows the c urrent tota l con
s u mption of all othe r consumers.
Economy tips
In c ertai n sit ua tio ns, economy tips appe ar auto
ma tic ally for a short t ime in the e ffic iency pro
gram
¢ fig . 10 . If you follow these economy tips,
yo u can red uce your vehicle's fuel cons umption.
T o turn an e cono my tip off immedia tely afte r it
appea rs, p ress any button o n the mu ltifun ction
stee ring wheel.
© Tips
- If you era se the d ata in t he eff ic ien cy pr o
gram, t he v alues in the on -boar d compu te r
wi ll also be reset .
23
Page 39 of 280
co
co
.... N
" N .... 0 0 <.,;) 'SI"
time. T hi s app lies pa rt icu larly when children
remain in the vehicle. Othe rw ise children
co uld start t he engine or operate elect rical
equipment (such as power windows), which
increases the r is k of an accident .
Power windows
Controls
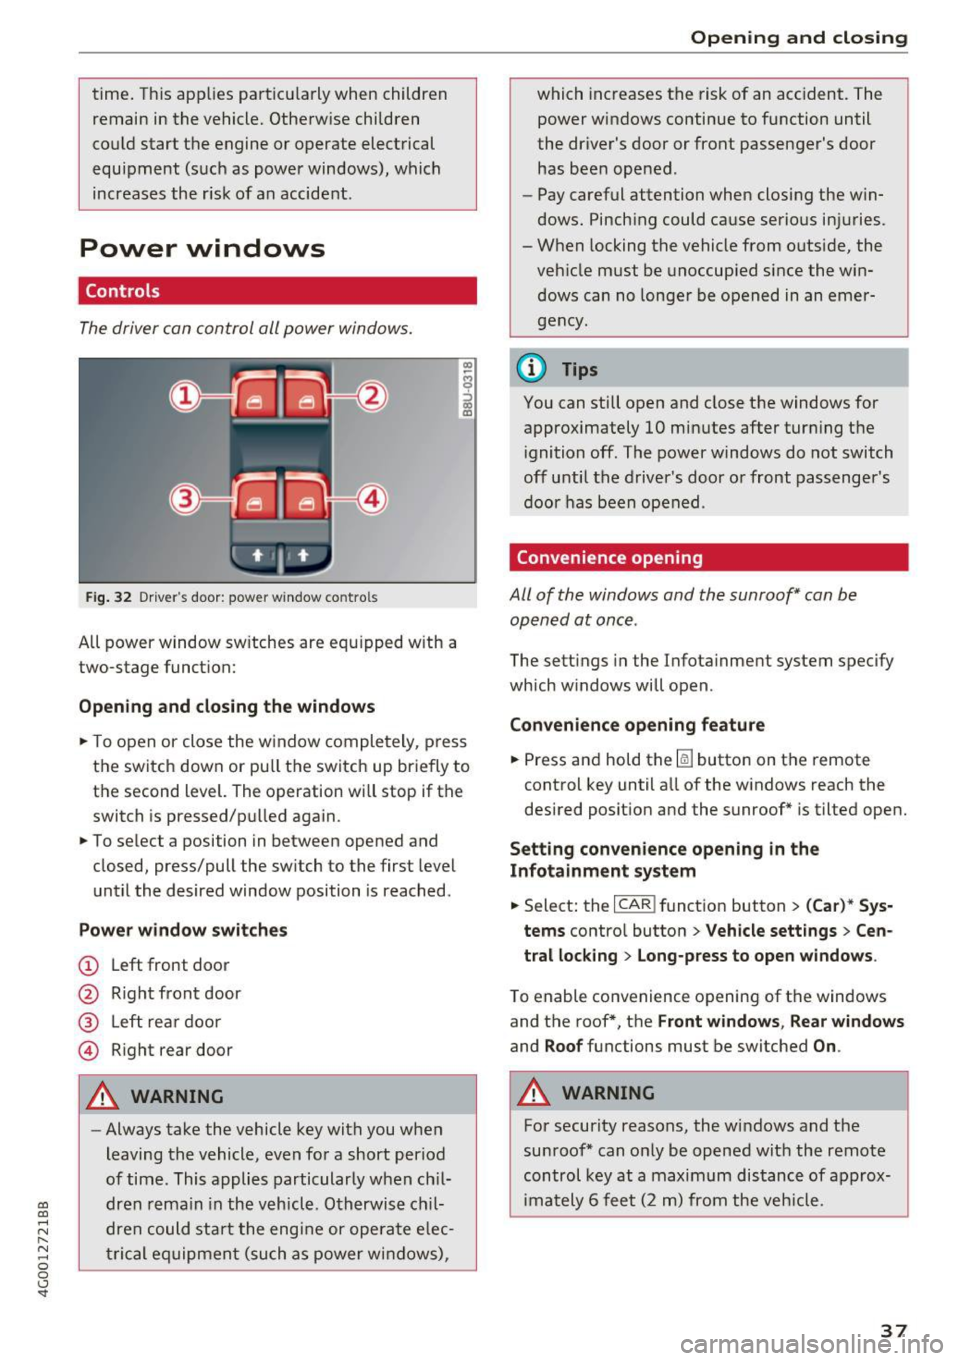
The driver can control all power window s.
F ig. 32 Dr ive r's door : power w indow co ntro ls
All power window sw itches are eq uipped w ith a
two-stage funct ion:
Opening and closing the windows
"' -$ :,
"' CD
~ T o open or close the w indow completely, p ress
the switch down or pu ll the switch up briefly to
the second level. The operation will stop if the
switch is pressed/pu lled again.
~ To se lect a position in between opened and
closed, press/pull the sw itch to the first level
u nt il the desired window position is reached.
Power window switches
(!) L eft front door
@ R ight front door
® L eft rea r d oor
© Right rear door
A WARNING
- Always take the vehicle key wit h you when
leaving the vehicle, even fo r a short period
of time . This applies particularly w hen ch il
dr en re ma in in the vehicl e. O th erwis e chi l
dre n cou ld st art t he engi ne or ope ra te e lec
t ric al eq uip m ent (such as power wi ndows),
Open ing and closing
which increases the risk of an acc ident. The
power windows continue to function until
the dr iver's door or front passenge r's door
has been opened .
- Pay careful attention when closing the w in
dows . Pinch ing could ca use serio us in juries.
- When locking the vehicle from o utside, the
veh icle must be unoccup ied since the win
d ows can no longe r be o pened in an emer
g e ncy .
@ Tips
You can still o pen and close the windows for
approximately 10 mi nutes after tur ning t he
i gnition off . The power windows do not switch
off until the driver 's door o r front passenger 's
door has been open ed .
Convenience opening
All of the windows and the sunroof* can be
opened at once .
The settings in the Infota inment system specify
which w indows will open .
Convenience opening feature
~ Press and hold the~ button on the remote
control key until a ll of the w indows reach the
desired position and the sunroof* is tilted open.
Setting convenience opening in the
Infotainment system
~ Select: the I CAR I funct io n button > (Car) * Sys
tems
contro l button > Vehicle sett ings > Cen
tral locking
> Long-press to open windows .
To enable convenience openin g of the w indows
and the roof *, th e
Front windows , Rear windows
and Roof functions must be switched On .
A WARNING
For security reasons, the w indows and the
su nroof* can o nly be opened wit h the remote
control key at a maximum distance of a pprox
im ately 6 fee t (2 m ) from the veh icle .
37
Page 57 of 280
co
co
.... N
" N .... 0 0 <..:l 'SI'
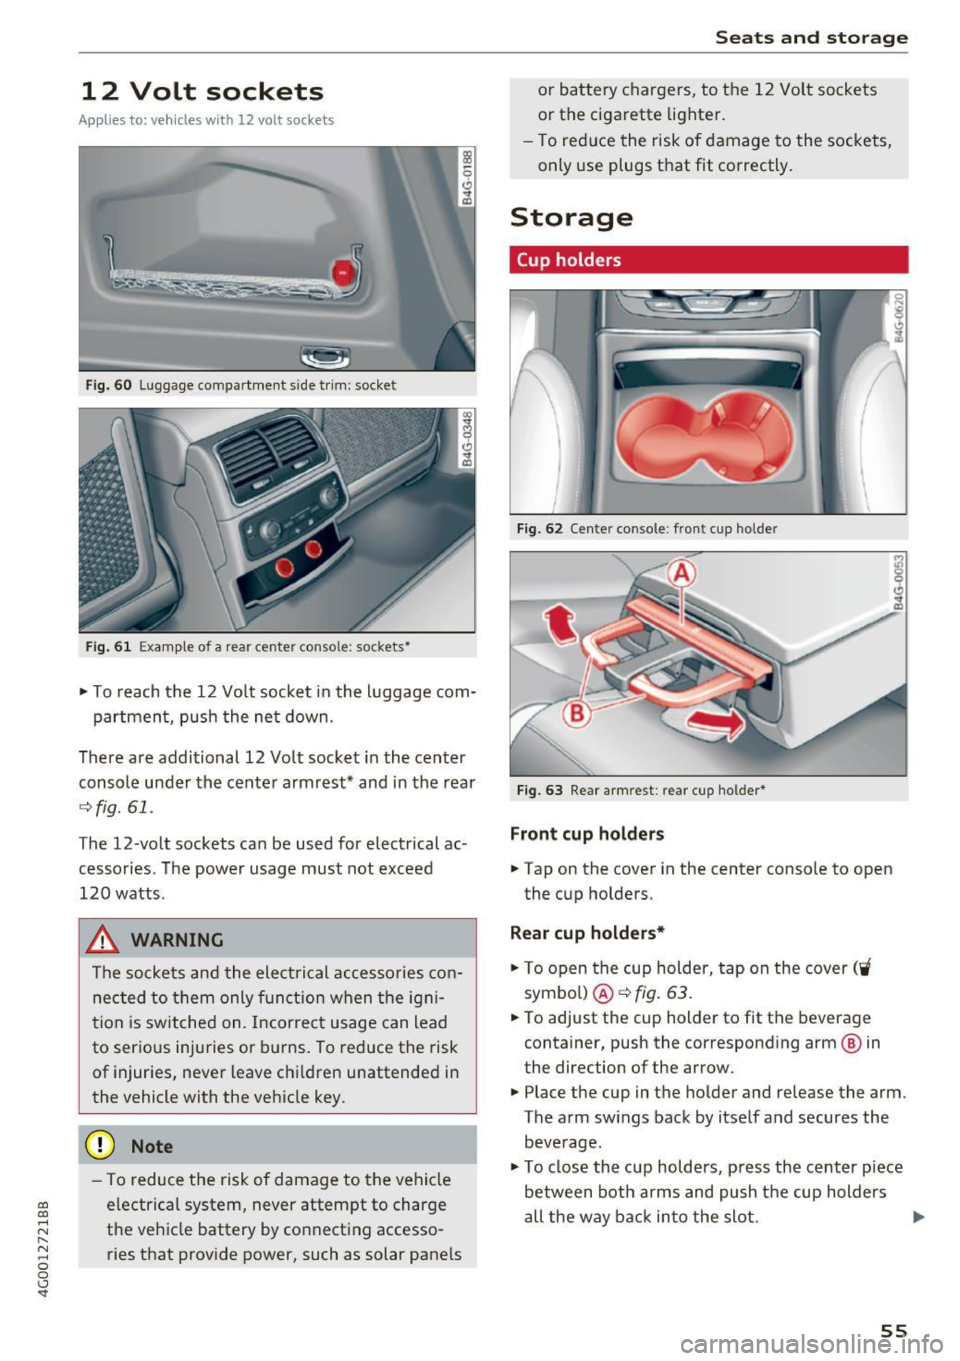
12 Volt sockets
App lies to: ve hicles with 12 volt socke ts
Fi g. 60 Luggage compartment s ide tr im: socket
Fi g. 61 Exa mple of a rear center conso le: sockets•
~ T o reach the 12 Vo lt socket in the luggage com-
partmen t, push the ne t down.
There are additional 12 Volt socket in the center
console under the cente r armrest* and in the rear
¢ fig.61.
The 12-volt sockets can be used for electrical ac
cessories. The power usage must not exceed
120 watts .
_& WARNING
The sockets and the electrical accessories con
nec ted to them only f unction when the ig ni
t ion is switched on. Incorrect usage can lead
to serious injuries or b urns . To reduce the risk
of injur ies, never leave chi ldren unattended in
the vehicle with the vehicle key .
(D Note
-To reduce the risk of damage to t he vehicle
electrica l system, never attempt to charge
t h e veh icle battery by co nnect ing accesso
ries that provide power, such as solar pane ls
Seats and storag e
or battery chargers, to the 12 Vol t sockets
or the cigarette lighter.
- To red uce the risk of damage to the sockets,
only use plugs t hat fit correctly .
Storage
Cup holders
I
I
Fig . 6 2 Cente r console : front cup ho lder
Fi g. 63 Rear a rmrest : rear cup holder•
Front cup holders
~ Tap on the cover in the center conso le to open
the cup holders.
Rear cup holders*
~ To open the cup holder, tap on the cover ('i
symbo l) @ ¢fig . 63.
~ To adjust the cup holder to fit the beverage
container, push the corresponding arm @ in
the direction of the arrow.
~ Place the cup in the holder and release the arm.
The arm sw ings back by itse lf and secures the
beve rage.
~ To close the cup holders, p ress the center piece
between both arms and push t he cup holders
all the way back in to the slot . .,.
55
Page 58 of 280
Seats and storage
_& WARNING
-Do not put any hot beverages in the cup
holder while the vehicle is moving. Hot bev
erages could spill, which can cause injury.
- Do not use any breakable beverage contain
ers (for example, made out of glass or por
celain) . You could be injured by them in the
event of an accident.
0 Note
Beverage containers in the cup holders should
always have a lid . If not, beverages could spill
and cause damage to vehicle equipment, such
electronics or seat covers .
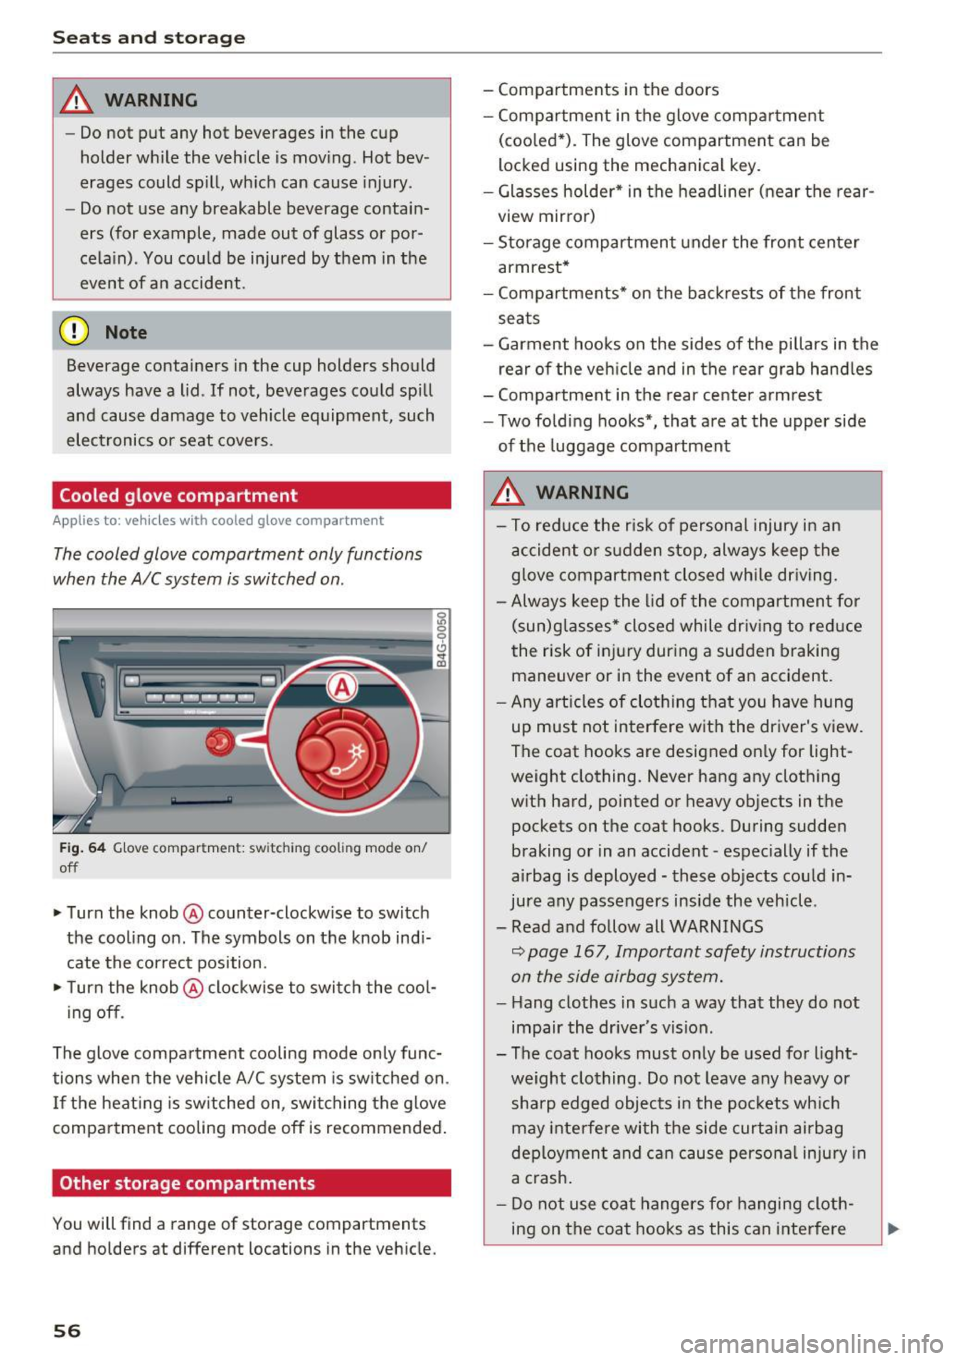
Cooled glove compartment
Applies to: veh icles with cooled glove compartment
The cooled glove compartment only functions
when the
AIC system is switched on.
Fig. 64 Glove compar tm ent: s witch in g coo ling mode on/
off
~ Turn the knob@ counter-clockwise to switch
the cooling on . The symbols on the knob indi
cate the correct position.
~ Turn the knob @ clockwise to switch the cool-
ing off .
The glove compartment cooling mode only func
tions when the vehicle A/C system is switched on .
If the heating is switched on, switching the glove
compartment cooling mode off is recommended.
Other storage compartments
You will find a range of storage compartments
and holders at different locations in the vehicle.
56
- Compartments in the doors
-Compartment in the glove compartment
(cooled*) . The glove compartment can be
locked using the mechanical key.
- Glasses holder* in the headliner (near the rear
view mirror)
- Storage compartment under the front center
armrest*
- Compartments* on the backrests of the front
seats
- Garment hooks on the sides of the pillars in the
rear of the vehicle and in the rear grab handles
- Compartment in the rear center armrest
- Two folding hooks*, that are at the upper side
of the luggage compartment
_& WARNING
- To reduce the risk of personal injury in an
accident or sudden stop, always keep the
glove compartment closed while driving.
- Always keep the lid of the compartment for
(sun)glasses* closed while driving to reduce
the risk of injury during a sudden braking
maneuver or in the event of an accident .
- Any articles of clothing that you have hung
up must not interfere with the driver's view.
The coat hooks are designed only for light
weight clothing. Never hang any clothing
with hard, pointed or heavy objects in the pockets on the coat hooks. During sudden
braking or in an accident -especially if the
airbag is deployed - these objects could in
jure any passengers inside the vehicle .
- Read and follow all WARNINGS
c::> page 167, Important safety instructions
on the side airbag system.
- Hang clothes in such a way that they do not
impair the driver 's vision .
-
- The coat hooks must only be used for light
weight clothing . Do not leave any heavy or
sharp edged objects in the pockets which
may interfere with the side curtain airbag
deployment and can cause personal injury in
a crash.
- Do not use coat hangers for hanging cloth
ing on the coat hooks as this can interfere
Page 130 of 280
Driving sa fe ty
Driving safety
Basics
Safe driving habits
Please remember -safety first!
This chapter contains important information,
tips, instruct ions and warn ings that you need to
read and observe for your own safety, the safety
of your passengers and others. We have summar ized here what you need to know about safety
be lts, a irbags, child restra ints as well as child
safety. Your safety is for us
priority number 1 . Al
ways observe the i nfo rmation and wa rn ings in
this section - for your own safety as well as that
of your passengers.
The information i n this section applies to all
model versions of yo ur vehicle . Some of the fea
tures descr ibed in t his sections may be s tanda rd
equipment on some models, or may be optional
equipment on others . If you are not sure, ask
your authorized Audi dealer.
A WARNING
- Always make sure that you follow the in
structions and heed the WARNINGS in th is
Manual.
It is in your interest and in the in
te rest of your passengers.
- Always keep the comp lete Owner's Litera
ture in your A udi when you lend or sell your
vehicle so that this important information
will always be available to the d river and
passenge rs.
- Always keep the Owner 's literature handy so
that you can find it easily if you have ques
t ions.
Safety equipment
The safety features are part of the occupant re
straint system and work together to help reduce
the risk of injury in a wide variety of occident si t
uations.
Your safety and the safety of your passenge rs
should not be left to chance. Advan ces i n tech
nology have made a var iety of features avai lab le
to help reduce t he risk of injury in an accident .
128
The following is a list of just a few of the sa fety
features in your Audi :
- sophis tica ted safety be lts fo r dr ive r and all pas-
senge r seat ing pos itions,
- safety belt p retensioners,
- safety belt force lim ite rs fo r th e front seats,
- safety belt he ight adjustment systems for the
front seats,
- front airbags,
- knee airbags for the front seats*
- side airbags in the front seats and outer rear
seats*,
- side curtain airbags with ejection mitigation
features,
- special LATCH anchorages for child restraints,
- head rest raints fo r ea ch seating position,
- adj ustab le steering col umn.
These ind iv idual safety features, can work to
ge ther as a system to help protect you and your
passengers in a wide range of acc idents. These
features canno t wo rk as a sys tem if they are not
alw ays cor rec tly adj usted and cor rect ly used.
Safety is everybody' s re sponsibility!
Important things to do before driving
Safety is everybody's job! Vehicle and occupant
safety always depends on the informed and care
ful driver .
For your safety and the safety of your passen
gers,
before driving alway s:
.. Make sure that a ll lights and signals are operat
ing correctly.
.. Make sure that the tire pressure is correct.
.,. Make sure that all windows are clean and afford
good visibility to the outs ide .
.. Sec ure all luggage and othe r items carefully
~page 57, ~page 56 .
.. Ma ke sure that noth ing ca n interfere wi th the
peda ls .
.. Adjust front seat, head restraint and mirrors
correctly for yo ur height .
.. Instruct passengers to adjust the head re
straints according to their he ight.
Page 131 of 280
co
co
.... N
" N .... 0 0 <.,;) 'SI"
.. Make sure to use the right chi ld restraint cor
rectly to protect children
~ page 171 , Child
safety .
.. Sit properly in your seat and make sure that
your passengers do the same¢
page SO, Seats
and storage .
.. Fasten your safety belt and wear it properly . Al
so instruct your passengers to fasten their safe
ty be lts properly ¢
page 139 .
What impairs driving safety?
Safe driving is directly related to the condition of
the vehicle, the driver as well as the driver's abili
ty to concentrate on the road without being dis
tracted.
The driver is responsible for the safety of the ve
h icle and all of its occupants. If you r ability to
d rive is impaired, safety risks for eve rybody in the
veh icle increase and you also become a hazard to
everyone else on the road ¢A -Therefore :
.. Do not let you rself be dist racted by passengers
or by us ing a cellular te lephone .
.. NEVER dr ive when your dr iv ing ability is im
paired (by medications, alcohol, drugs, etc.).
.. Observe all traff ic laws, rules of the road and
speed limits and plain common sense.
.. ALWAYS adjust your speed to road, traffic and
weather cond itions.
.. Take frequent breaks on long trips. Do not drive
for more than two ho urs at a stretch .
.. Do NOT drive when you are tired, under pres
s ur e o r when you are st ressed.
_& WARNING
Impaired dr iv ing safe ty inc reases the risk of
ser ious personal inju ry and death whenever a
vehicle is being used.
.
Dr iving safety
Correct passenger
seating positions
Proper seating position for the driver
The proper driver seating position is important
for safe, relaxed driving .
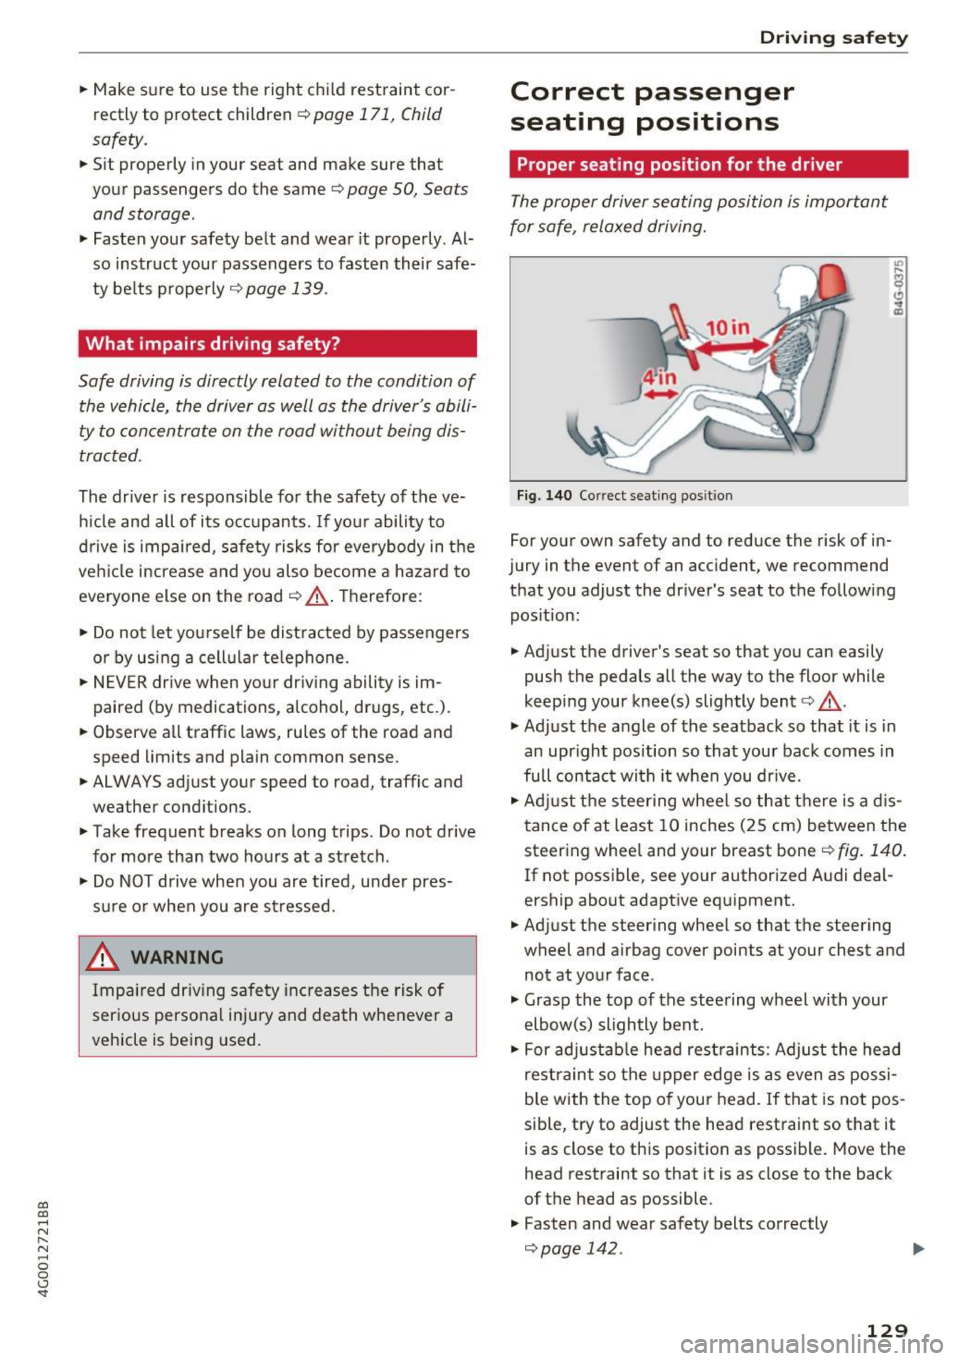
F ig. 140 Correct seat ing pos it io n
For your own safety and to reduce the risk of in
jury in the event of an accident, we recommend
that you adjust the dr iver 's seat to the fo llowing
pos ition:
.. Adjust the driver's seat so that you can easily
push the pedals all the way to the floor while
keep ing your knee(s) slightly bent¢&. -
.,. Adjust the angle of the seatback so that it is in
an upright position so that your back comes in
full contac t wi th it when you dr ive .
.. Adj ust the steer ing wheel so that there is a d is
tance of at least 10 inches (25 cm) between the steering whee l and your breast bone¢
fig. 140.
If not poss ible, see your author ized A udi deal
ership about adapt ive equipment.
.. Adjust the steering wheel so that the steering
wheel and airbag cover points at your chest and
not at your face .
.,. Grasp the top of the steering wheel with your
elbow(s) slightly bent.
.. For adjustab le head rest raints: Adjust the head
rest raint so the upper edge is as even as possi
b le with the top of your head. If that is not pos
sible, t ry to adjust the head restraint so that it
is as close to this posit ion as possible. Move the
head restraint so that it is as close to the back
of t he head as possible.
.. Fasten and wear safety belts correctly
Qpage 142. ..,.
129
Page 133 of 280
co
co
.... N
" N .... 0 0 <..:l 'SI"
-Passengers who are unbelted, out of posi
tion or too close to the airbag can be seri
ously injured by an airbag as it unfolds with
great force in the blink of an eye.
- Always make sure that there are at least
10 inches (25 cm) between the front pas
senger's breastbone and the instrument
panel.
- Always make sure that there are at least
4 inches (10 cm) between the front passen ger's knees and the lower part of the instru
ment panel.
- Each passenger must always sit on a seat of
their own and properly fasten and wear the safety belt belonging to that seat.
- Before driving, always adjust the front pas
senger seat properly.
- For adjustable head restraints: before driv
ing, always also adjust the head restraints
properly.
-Always keep your feet on the floor in front
of the seat. Never rest them on the seat, in
strument panel, out of the window, etc. The
airbag system and safety belt will not be
able to protect you properly and can even in
crease the risk of injury in a crash .
- Never drive with the backrest reclined or
tilted far back! The farther the backrests are
tilted back, the greater the risk of injury due
to incorrect positioning of the safety belt and improper seating position.
- Children must always ride in child seats
c> page 171. Special precautions apply
when installing a child seat on the front
passenger seat
c> page 147.
Proper seating positions for passengers in
rear seats
Rear seat passengers must sit upright with both
feet on the floor consistent with their physical
size and be properly restrained whenever the ve
hicle is in use.
To reduce the risk of injury caused by an incorrect
seating position in the event of a sudden braking
maneuver or an accident, your passengers on the
rear bench seat must always observe the follow
ing:
Driving safety
.,. For adjustable head restraints: adjust the head
restraint so the upper edge is as even as possi
ble with the top of your head. If that is not pos
sible, try to adjust the head restraint so that it
is as close to this position as possible
c>page 131.
.,. Keep both feet flat in the footwell in front of
the rear seat.
.,. Fasten and wear safety belts properly
c> page 142.
.,. Make sure that children are always properly re
strained in a child restraint that is appropriate
for their size and ager:!;>
page 171.
A WARNING
-
Passengers who are improperly seated on the
rear seat can be seriously injured in a crash.
- Each passenger must always sit on a seat of
their own and properly fasten and wear the
safety belt belonging to that seat.
- Safety belts only offer maximum protection
when the safety belts are properly posi
tioned on the body and securely latched. By not sitting upright, a rear seat passenger in
creases the risk of personal injury from im
properly positioned safety belts!
- For adjustable head restraints: always ad
just the head restraint properly so that it
can give maximum protection.
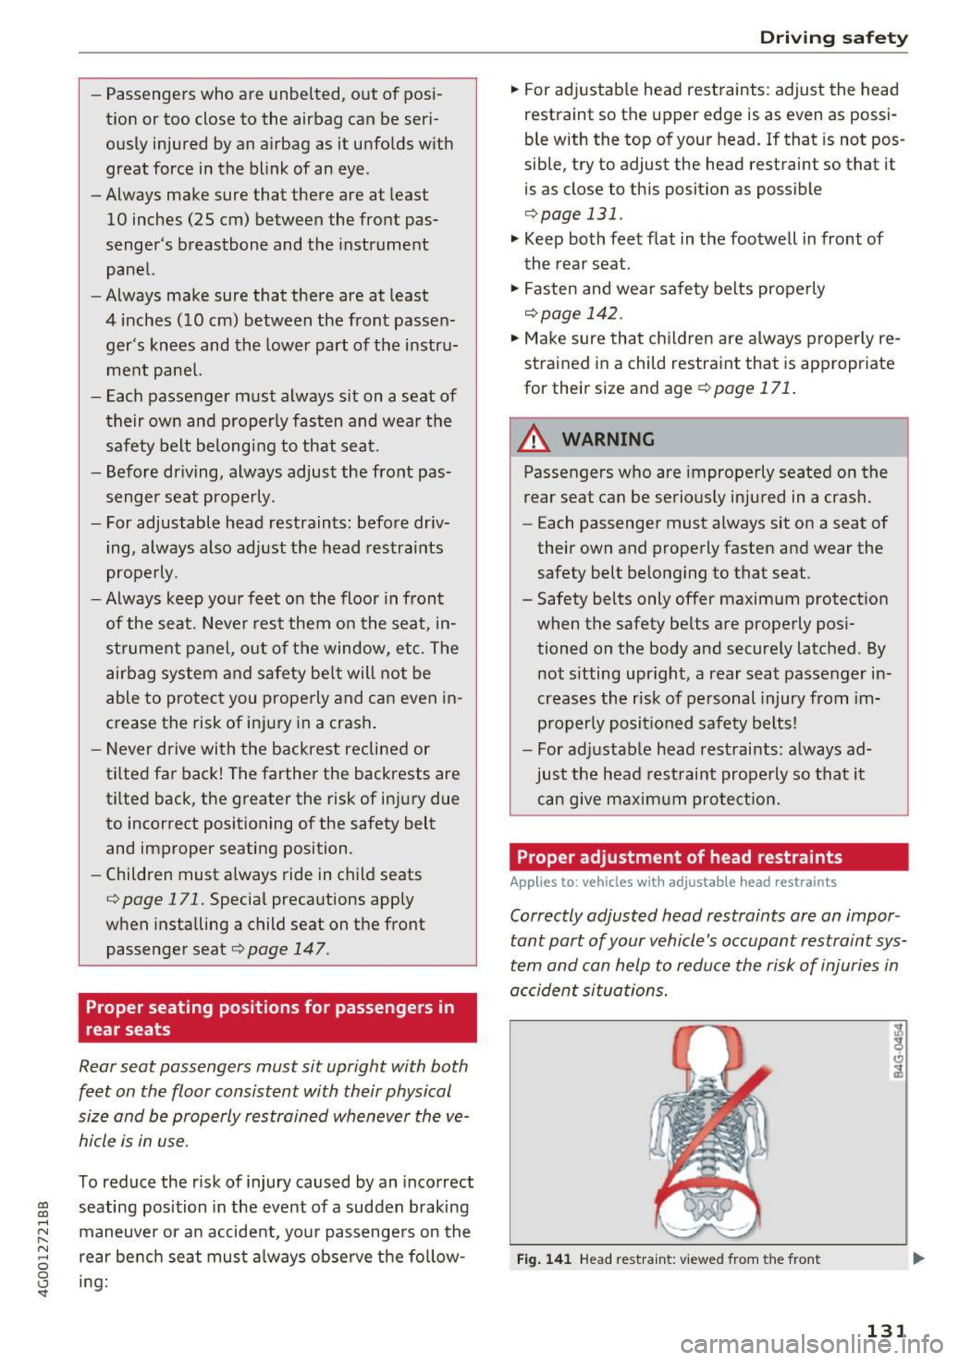
Proper adjustment of head restraints
App lies to: vehicles with adjusta ble head restraints
Correctly adjusted head restraints are an impor
tant part of your vehicle's occupant restraint sys
tem and can help to reduce the risk of injuries in
accident situations.
Fig. 141 Head restraint: viewed from the front
131
Page 134 of 280
Driving sa fe ty
The head restraints must be correc tly adjusted to
achieve the best protection .
.,. Adjust the head restraint so the upper edge is
as even as poss ible with the top of your head.
If
that is not possible, try to adjust the head re
straint so that it is as close to this position as
poss ib le ~
fig . 141. Move the head restraint so
that it is as close to the back of the head as
poss ible.
.,. If there is a passenger on the rear center seat
ing pos it ion, slide the center head restra int up
ward at least to the next notch.
Adjusti ng head restraints
¢ page 51.
A WARNING
All seats are equipped with head restraints.
Dr iv ing without head restraints or with head
restraints that are not p roperly adjusted in
cre ases the risk of serious or fatal ne ck inju ry
dramatically. To help reduce the r is k of injury:
- Always dr ive with the head rest raints in
place and properly ad justed.
- E very person in the vehicle must have a
prope rly adjusted head restra int.
- Always make sure each person i n the vehicle
prope rly adjusts their head res traint. Adjust
the head res tra int so the uppe r edge is as
even as possib le w ith the top of your head.
If that is no t possib le, try to adjust the head
restraint so that it is as close to this position
as possib le. Move the head restra int so that
it is as close to the back of the head as pos
sible.
- Never attempt to adjust head restraint wh ile driving. If you have dr iven off and
must adjust the driver headrest for any rea
son, fi rst s top the vehicle safely before at
tempting to ad just the head restra int.
- Children must always be properly restrained in a chi ld restraint that is appropriate fo r
their age and size
¢page 171.
132
Examples of improper seating positions
The occupant restraint system can only reduce
the risk of injury if vehicle occupants are properly
seated .
Improper seating positions can cause ser ious in
jury or death . Safety be lts ca n only work when
they are properly positioned on t he body . Im
prope r seat ing pos itions red uce the effectiveness
of safety bel ts a nd will even increase t he risk of
i njury and deat h by mov ing the safety bel t to cr it
ic al areas of the body. Improper seating positions
a lso increase the risk of se rio us in jury and death
when an airbag deploys and strikes an occ upant
who is not in the proper seating posit ion. A dr iver
i s responsible for the safety of all vehicle occu
pants and espec ially for children. Therefore :
.,. Never allow anyone to assume an incor rect
seating position when the vehicle is being used
¢ .&_ .
The following bulletins list on ly some samp le po
s itions that will increase the r isk of serious injury
and death . Our hope is that these examples will
make you more aware of seating positions that
are dangerous .
Therefore, whene ver the vehicl e is m oving:
-never stand up in the vehicle
- neve r stand on the seats
- neve r kneel on the seats
- neve r ride w it h the seatback recl ined
- never l ie down on the rear seat
- never lean up against the instrument panel
- never s it on the edge of the seat
- never sit sideways
- never lean out the window
- neve r put your feet o ut the window
- neve r put your feet on the instr ument panel
- neve r res t your feet on the seat c ushion or back
of the seat
- never ride in the footwell
- never ride in the cargo area
Page 135 of 280
co
co
.... N
" N .... 0 0 <..:l '
Improper seating positions increase the risk
of serious personal injury and death whenever
a vehicle is being used.
- Always make sure that all vehicle occupants
stay in a proper seating position and are
properly restrained whenever the vehicle is
being used.
Driver's and front
passenger's footwell
Important safety instructions
Applies to: veh icles with knee airbags
A WARNING
Always make sure that the knee airbag can in
flate without interference. Objects between
yourself and the airbag can increase the risk
of injury in an accident by interfering with the
way the airbag deploys or by being pushed in
to you as the airbag deploys.
- No persons (children) or animals should ride in the footwell in front of the passenger
seat. If the airbag deploys, this can result in
serious or fatal injuries .
- No objects of any kind should be carried in
the footwell area in front of the driver's or passenger's seat. Bulky objects (shopping
bags, for example) can hamper or prevent
proper deployment of the airbag. Small ob
jects can be thrown through the vehicle if
the airbag deploys and injure you or your
passengers.
Pedal area
Pedals
The pedals must always be free to move and
must never be interfered with by a floor mat or
any other object.
Mak e sure that all pedals move freely without in
terference and that nothing prevents them from
returning to their original positions.
Only use floor mats that leave the pedal area free
and can be secured with floor mat fasteners.
Driving safety
If a brake circuit fails, increased brake pedal trav
el is required to bring the vehicle to a full stop.
A WARNING
-Pedals that cannot move freely can cause loss
of vehicle control and increase the risk of seri
ous injury.
- Never place any objects in the driver's foot
well. An object could get into the pedal area
and interfere with pedal function. In case of
sudden braking or an accident, you would
not be able to brake or accelerate!
- Always make sure that nothing can fall or
move into the driver's footwell.
Floor mats on the driver side
Always use floor mats that can be securely at
tach ed to the floor mat fasteners and do not in
terfere with the free movement of the pedals.
.. Make sure that the floor mats are properly se
cured and cannot move and interfere with the
pedals¢ .&,.
Use only floor mats that leave the pedal area un
obstructed and that are firmly secured so that
they cannot slip out of position. You can obtain
suitable floor mats from your authorized Audi Dealer.
Floor mat fasteners are installed in your Audi.
Floor mats used in your vehicle must be attached
to these fasteners. Properly securing the floor mats will prevent them from sliding into posi
tions that could interfere with the pedals or im
pair safe operation of your vehicle in other ways.
A WARNING ~
Pedals that cannot move freely can result in a
loss of vehicle control and increase the risk of
serious personal injury.
-Always make sure that floor mats are prop
erly secured.
- Never place or install floor mats or other floor coverings in the vehicle that cannot be
properly secured in place to prevent them
from slipping and interfering with the ped-
als or the ability to control the vehicle.
Ill>
133