check engine light AUDI A6 2017 User Guide
[x] Cancel search | Manufacturer: AUDI, Model Year: 2017, Model line: A6, Model: AUDI A6 2017Pages: 280, PDF Size: 70.24 MB
Page 198 of 280
Checking and Filling
& WARNING
AdBlue can irritate the skin, eyes and respiratory system. If there is contact with the fluid,
flush immediately with plenty of water . Con
sult a physician if necessary.
(D Note
- Only use Ad Blue that conforms to the
standard ISO 22241 -1. Do not mix any addi
tives with the Ad Blue and do not dilute it
with water.
- Do not add Ad Blue to the diesel tank or add diesel fuel to the Ad Blue tank. Do not start
the engine under any circumstances if the
wrong fuel is filled in the tank. There is a
risk of damaging the fuel tank system and
the engine. See an authorized Audi dealer or
authorized Audi Service Facility for assis
tance.
- AdBlue attacks surfaces such as painted ve
hicle components, plastic and carpet. Re
move the fluid as quickly as possible with a
damp cloth and plenty of cold water. If the
Ad Blue has already crystallized, use warm
water and a sponge . AdBlue residue that is
not removed will crystallize and can damage
the affected surface.
- Do not store refill bottles or canisters per
manently in the vehicle. If the container
leaks, the escaping AdBlue could damage
the vehicle interior.
- Do not allow AdBlue to come into contact
with clothing. If there is contact with the
fluid , flush immediately with plenty of
wa
ter.
(j) Tips
Follow the Ad Blue manufacturer 's instruc
tions for use and storage.
Refilling AdBlue using a bottle
Applies to: vehicles with selective catalytic reduction
... Remove the cap from the refill bottle ¢.&. in
Filling AdBlue on page 196,
c::> (D in Filling
AdBlue on page 196.
196
... Position the bottle on the filler tube and turn
the bottle clockwise until it stops turning.
... Press lightly against the bottom of the bottle
to empty it . Continue pressing the bottom of
the bottle until it is empty or until fluid stops
flowing into the tank .
... Remove the bottle and seal the filler neck
c::> page 197, Completing AdBlue refill.
d) Note
Only use refill bottles that are approved for
your vehicle. Using other systems can cause AdBlue to leak.
(D Tips
- You can obtain refill bottles from an author
ized Audi dealer or authorized Audi Service
Facility.
- A permitted refill bottle contains approxi
mately 0.5 gallon (1.9 liters) of AdBlue.
Refilling AdBlue using a canister
Applies to: vehicles with selective catalytic reduction
®
+®
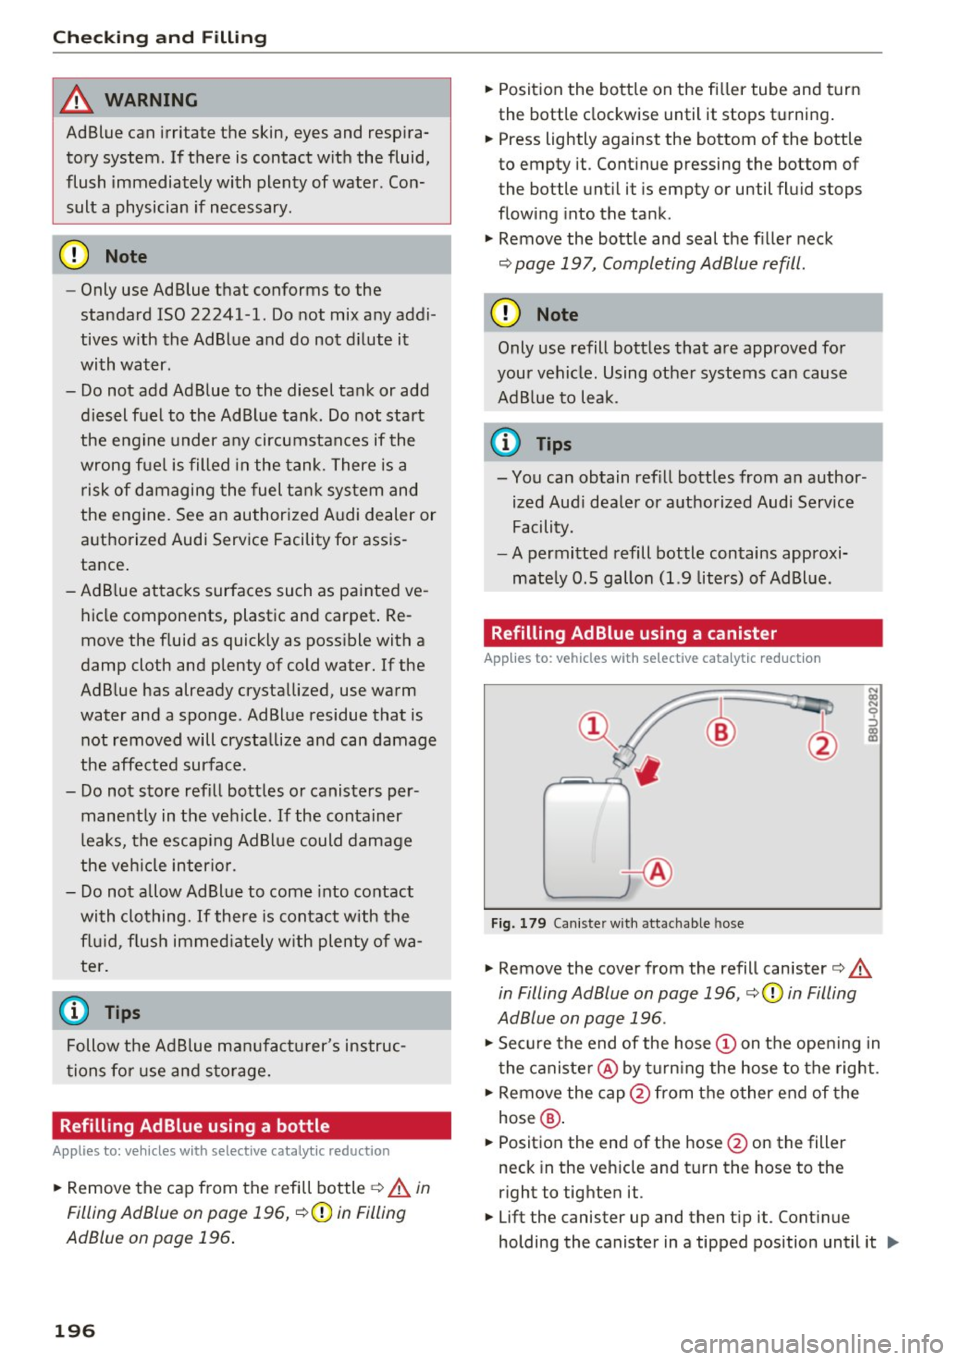
Fig. 179 Canister w ith attachable hose
... Remove the cover from the refill canister c::> .&.
in Filling AdBlue on page 196 , c::>(D in Filling
AdBlue on page 196 .
.,. Secure the end of the hose
.,. Remove the cap @from the other end of the
hose @.
... Position the end of the hose @on the filler
neck in the vehicle and turn the hose to the
right to tighten it .
... Lift the canister up and then tip it . Continue
holding the canister in a tipped position until it
1J,,
Page 202 of 280
Checking and Filling
Opening/closing the hood
The hood is released from inside the vehicle .
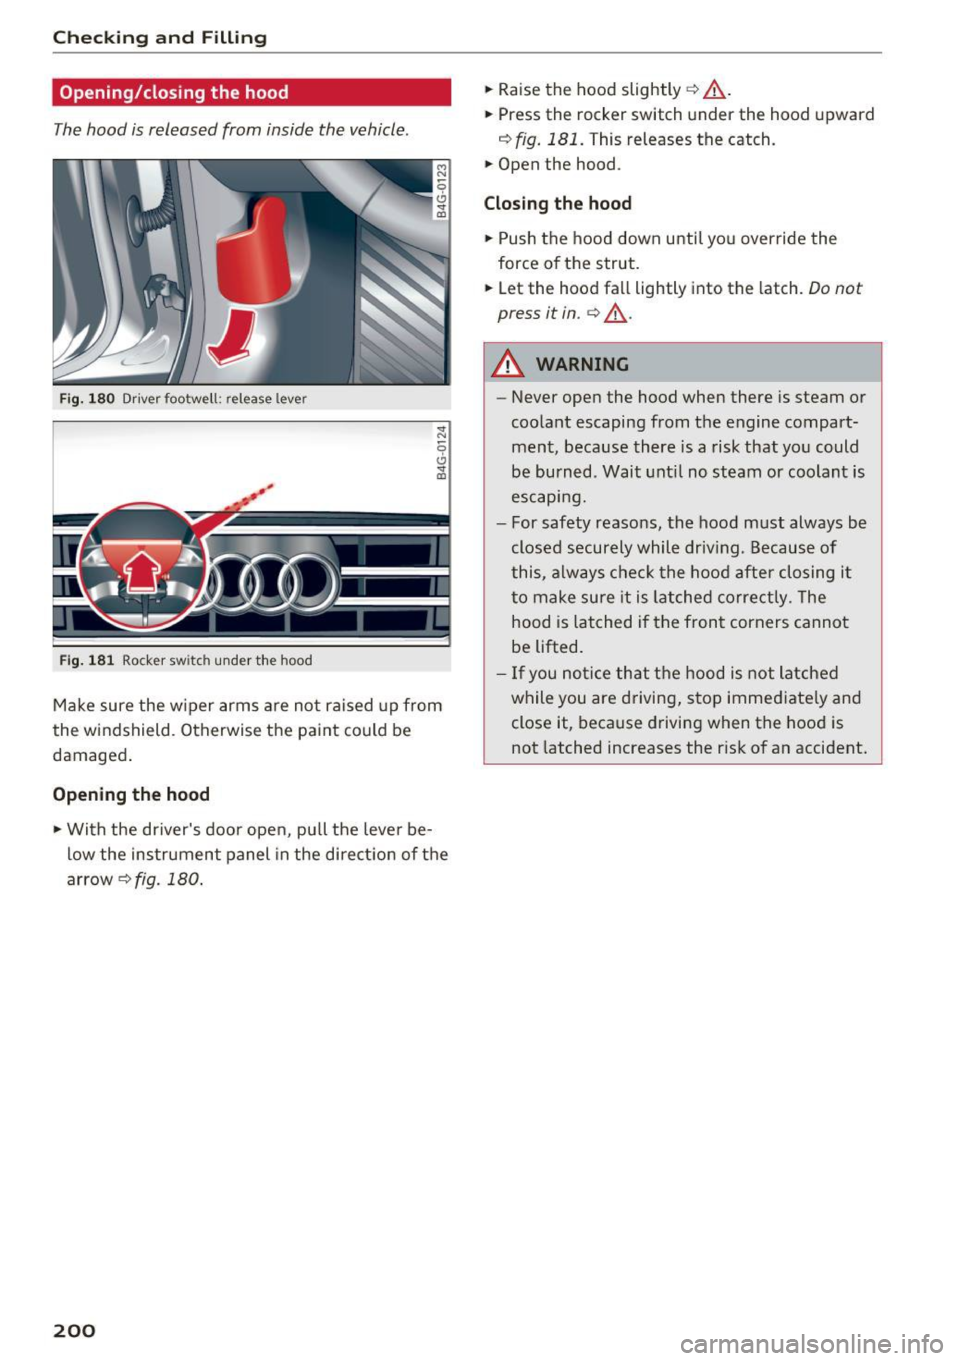
Fig. 180 Driver footwell: release lever
Fig . 181 Rocker switch under the hood
Make sure the wiper arms are not raised up from
the windshield. Otherwise the paint could be
damaged .
Opening th e hood
• With the driver's door open, pu ll the lever be
low the instrument panel in the direction of the
arrow
c!;> fig. 180 .
200
• Raise the hood slightly c!;> &_ .
• Press the rocker switch under the hood upward
i=> fig. 181. This releases the catch.
• Open the hood .
Clos ing the hood
• Push the hood down until you override the
force of the s trut.
• Let the hood fall lightly into the latch .
Do not
press it in .
c> &_.
A WARNING
-Never open the hood when there is steam or
coolant escaping from the engine compart
ment, because there is a risk that you could
be burned. Wait unt il no steam or coolant is
escaping.
- For safety reasons, the hood m ust always be
closed securely while driv ing. Because of
this, always check the hood after closing it
to make sure it is latched correctly . The
hood is latched if the front corners cannot
be lifted.
- If you no tice that t he hood is not latched
while you are driving, stop immediate ly and
close it, because driving when the hood is
not latched increases the r isk of an accident.
Page 204 of 280
Check ing and F illing
Using the proper engine oil is impo rtant for the
functionality and service life of the engine. Your
engine was facto ry-filled with a h igh-quality oi l
which can usually be used throughout the entire
year.
@) Note
Your Limited New Vehicle War ranty does not
cover damage or malfunctions due to failure
to follow recommended maintenance and use
requirements as set forth in the Audi Owner's
Manual and Warran ty
& Maintenance booklet.
- Use only a high quality eng ine oil t hat ex-
p ressly complies with the Audi oil qua lity
standard specified for your vehicle's engine.
Using a ny o ther oil can cause serious engine
d am age.
- D o not mix any lubricants o r other addit ives
i nto the engine oil. Doing so ca n cause en
g ine damage.
(D Tips
I f you need to add oil and there is none availa
ble t hat meets the Audi o il quality standard
your eng ine requi res, you m ay ad d a tot al of
no more than 0.5 q t (0.5
l) of a h igh-quali ty
"synthe tic"oil that meets t he following speci
fications.
- Applies to: gasoline engine: ACEA A3 or
API SM with a viscosity g rade of SAE 0W-30,
SAE SW -30 or SAE SW-40.
- Applies to: diesel engine: ACEA C3 or API C F
with a viscosity grade of SAE 0W-30 or
SAE SW-30.
- Fo r more information about engine o il that
has been approve d for your ve hicle, please
contact either you r authorized Audi dea ler
or Audi C ustome r Relat ions at
1 (800) 822-2834 or visit our web site at
www.audiusa.com or www .aud icanada .ca.
Engine oil consumption
The engine in your vehicle depends on an ade
quate amount of oil to lubricate and cool all of
its moving parts .
In order to provide effective lubr ication and cool
ing of internal engine components, a ll inter nal
202
combust ion engines consume a certa in amo unt
of oil. Oil consumption varies from engine to en
gine and may change signi ficantly over the life of
the engine. Typically, engines w ith a specified
break-in period (see
c:::;, page 66) consume more
o il dur ing the break-in per iod than they consume
af ter o il consumption has stab ilized .
Under normal cond itions, the rate of oil con
sumption depends on the quality and viscos ity of
the oil, the RPM (revo lutions per m inute) at
wh ich the engine is operated, the amb ient tem
perature and road condit ions. Furt her facto rs a re
the amo unt of o il di lution from wate r condensa
t ion or fue l resid ue an d the oxidation level of the
o il. As any engine is sub je ct to wear as mileage
builds up, the oi l cons umption may increase ove r
time unt il replacement of worn components may
become necessary.
With a ll these va riab les coming into p lay, no
standard rate of oil consumption can be estab
li shed or spec ified. The re is no alte rnative to reg
ul ar and freq uent checking of the oi l level, see
Note .
If the yellow engine oi l level warning symbo l in
the instr ument cluster
El lights up, yo u should
check the o il level as soon as possible
c:::;, page 203. Top off the o il at your ea rliest con
venience
c:::;, page 203.
A WARNING
Before you check a nyth ing in the e ng ine com
par tment, always read and heed all WARN
IN GS
c:::;, .&. in Working in the engin e compart
ment on page 198.
(D Note
Drivi ng w it h an insuff ic ient oil level is likely to
cause severe damage to the eng ine.
(D Tips
- The oil pressure warn ing d isplay. is not
an indicator of the oil level. Do not rely on
it. Instead, check the oil level in your en
gine at regular intervals, preferably each
time you refuel, and alway s before going
on a long trip .
Page 207 of 280
co
co
.... N
" N .... 0 0 <..:l 'SI'
The coolant leve l is monitored through the. in
dicator light
c::> poge 14. However, we do recom
mend occasionally check ing the coo lant level
manually.
If you m ust add coolant, use a m ixture o f water
and coolant additive . M ixing the coolant additive
w ith d istilled water is recommended.
Coolant additive
The coolan t addi tive is made of ant i-freez ing and
corrosion protection agents. Only use the fo llow
i n g coo lant additives . These additives may be
mixed wit h each other .
Coolant additive Specification
Gl3 TL774J
Gl2++ TL 774 G
The amount of coo lant add itive that needs to be
mixed with water depends on the climate where
the veh icle will be ope rated. If the coolant addi
tive percentage is too low, the cool ant can freeze
and damage the engine.
Coolant Freeze protec-
additive tion
Warm regions min . 40% m
in. -13 ° F
max. 45% (-25 °C)
Cold regions min . 50% max . -40 °F
max . 55% (-40 °C)
(D Note
-
Befo re the start of winter, have your author
i zed Audi dealer or author ized Audi Se rvice
Facility check if the coolant additive in yo ur
vehicle ma tches the percen tage approp riate
fo r th e climate. This is especially import ant
whe n driving in co lder climates .
-If the approp ria te coolant addi tive is no t
available in an emergency, do no t ad d any
other additive. You co uld damage the en
gine. If this happens, only use wate r and re
store the correct mixture ratio with the
spec ified coolant additive as soon as possi
ble.
- Only refill with new coo lant .
- Radiator sealant must not be mixed with
the coo lant .
Checking and Filling
Adding coolant
Fig. 184 En g in e compa rtment : coo lant expa nsion ta nk
cove r
Observe the safety prec autions c::> A in Working
in the engine comportmen t on page 198.
Checking the engine coolant level
Park the vehicle on a level surface.
.,. Switch t he ignit ion off.
.,. Read the coolant level on the coolant expansion
tank
c::> page 201, fig . 182. The coolant level
must be between the MIN and MAX mark ings
when the engine in cold. When the eng ine is
warm it can be slightly above the MAX marki ng.
Adding coolant
Requirement: there must be a residua l amount of
coolant in the expansion tank
c::> (D .
.,. Let the eng ine cool down .
.,. Place a cloth over the coolant expansion tank
cap and unscrew the cap counterclockw ise
c::> .&_ .
.,. Add coo lant m ixed in the cor rect rat io
c::> page 204 u p to the MAX mark ing.
.,. Ma ke sure that the f luid level remains stab le.
Add mo re coolant if necessary.
.,. Close the cap sec urely.
Coo la nt loss usually i ndicates there is a lea k. Im
med iate ly drive you r ve hicle to a n author ized
Audi dealer or authorized A udi Se rvice Faci lity
and have the cooling system inspected. If the
cooling system is not leak ing, a loss can come
from the coolant boiling through overheat ing
and being pushed out of the cooling system.
205
Page 209 of 280
co
co
.... N
" N .... 0 0 <.,;) 'SI"
@
Fire, sparks, open flame and smoking are
forb idden.
~
A highly explosive mixture of gases can
form when charging batteries.
®
Keep children away from battery acid and
batteries.
A WARNING
All work on the battery or electrical system in
your vehicle can result in injuries, chemical
burns, accidents or burns. Because of this, all
work must be performed
only by an author
ized Aud i dealer or authorized Aud i Service
Facility.
A WARNING
California Proposition 65 Warning:
- Battery posts, terminals and related acces
sories contain lead and lead compounds,
chemicals known to the State of California
to cause cancer and reproduct ive problems.
Wash hands after handling.
(D Note
Protect the vehicle battery against freezing if
the vehicle will be parked for long periods of
time so that it is not destroyed by "freezing"
c:>page207.
@ For the sake of the environment
~ Batteries contain poll uting substances such
as sulfuric acid and lead. Contact an author
ized Audi dealer or authorized Audi Service
Facility for more information.
Vehicle battery
The term "vehicle battery" refers to the 12 Volt
battery in your vehicle.
Not running the vehicle for long periods of
time
If you do not drive your vehicle for several days or
weeks, e lectrical equipment is gradually scaled
back or switched off. This reduces energy use and
ensures the veh icle will be able to start after long
periods of time
c:> page 124. Some convenience
Checking and Filling
functions, such as interior lighting or power seat
adjustment, may not be available under certa in
c ir cumstances. These convenience functions will
be available again once you switch the ignition on
and start the engine .
Even when electrical equipment is switched off,
the equipment can still dra in the vehicle battery
if the vehicle is not driven for long periods of
time . Deep draining results in a chemical reaction
that destroys the inside of the vehicle battery .
T he veh icle battery must be charged every month
to reduce the risk of this happening
c:> page 207 .
Contact an authorized Aud i dea ler or authorized
A udi Service Facility for more information .
Winter operation
Cold weather places higher demands on the vehi
cle battery . This results in reduced starting abili
ty. Have the veh icle battery checked by an au
thorized Audi dea ler or authorized Audi Service
Facility before the cold time of year.
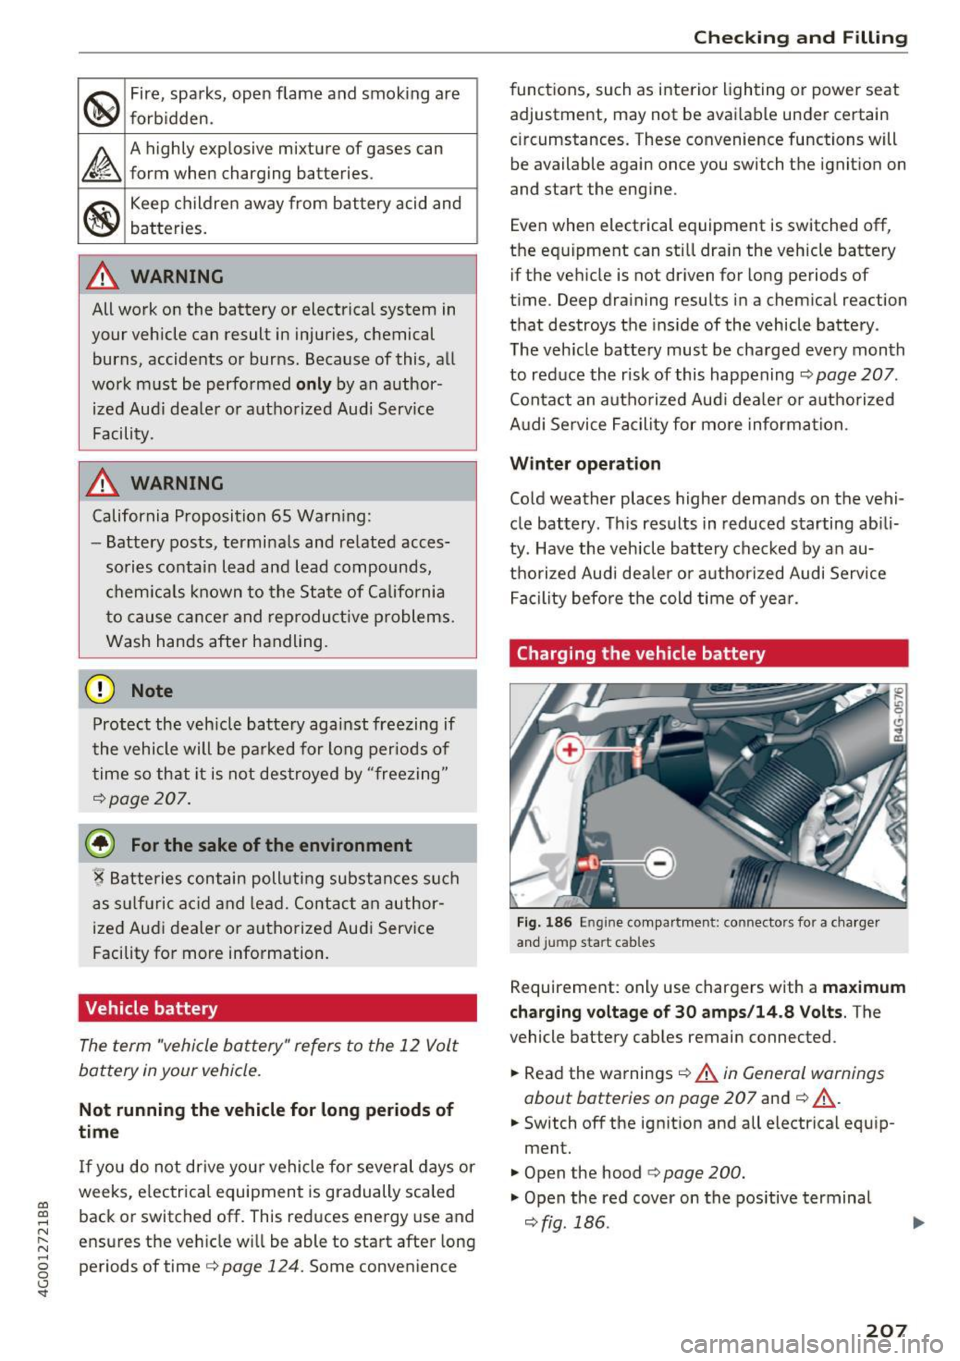
Charging the vehicle battery
Fig. 186 En g in e compa rtment: co nnectors for a cha rge r
and ju mp start cables
Requirement: only use chargers with a maximum
charging voltage of 30 amps/14.8 Volts.
The
vehicle battery cables remain connected .
.,. Read the warnings
c:> &. in General warnings
about batteries on page 207
and ¢ &_ .
.,. Switch off the ignit ion and all electrical equ ip
ment.
.,. Open the hood
c:> page 200.
"'Open the red cover on the pos itive terminal
c:> fig. 186 .
207
Page 239 of 280
co
co
.... N
" N .... 0 0 <..:l '
The vehicle jack* in your vehicle is mainte
nance-free.
Replacing wheels
Before changing a wheel
Observe the following precautions for your own
and your passenger's safety when changing a
wheel .
.,. After you experience a tire failure, pull the car
well away from moving traffic and try to reach
level ground before you stop¢,&. .
.,. All passengers should
leave the car and move
to a safe location (for instance, beh ind the
guardrail)¢ ,&..
.. Engage the
parking brake to prevent your vehi
cle from rolling unintentionally ¢,&. .
.. Move
selector lever to position P ¢ ,&. .
.,. If you are towing a trailer, unhitch the trailer
from your vehicle.
.,. Take the
jack and the spare tire* out of the lug
gage compartment c:> page 236.
A WARNING
You or your passengers could be inju red wh ile
changing a wheel if you do not follow these
safety precautions:
- If you have a flat tire, move a safe distance
off the road. Turn off the engine, turn the
emergency flashers on and use other warn
ing devices to alert other motorists .
- Make sure that passengers wait in a safe
place away from the vehicle and well away
from the road and traffic.
- T o help prevent the vehicle from moving
sudden ly and possibly slipping off the jack,
always fully set the parking brake and block
the wheel diagonally opposite the wheel be ing changed. When one front wheel is lifted
off the ground, plac ing the Automatic
Transmission in P (Park) will
not prevent the
vehicle from mov ing.
- Before you change a wheel, be sure the
ground is level and firm. If necessary, use a
sturdy board under the jack .
Emergency assistance
-Always store the vehicle too l kit, the jack
and the replaced tire in the luggage com
partment
¢page 134.
@ Tips
Before changing the wheel, you must activate
the jacking mode, so that the automatic con
tro ls for the Adaptive Air Suspension* do not
make it more difficult to lift the vehicle with
the jack
c> page 239.
Changing a wheel
When you change a wheel, follow the sequence
described below step-by-step and in exactly that
order .
l. Activate the vehicle jack mode* ¢ page 239 .
2. Remove the decorative wheel cover* or the
wheel bolt caps* . For more details see also
¢ page 238, Decorative wheel covers or
¢ page 238, Wheels with wheel bolt caps .
3. Loosen the wheel bolts¢ page 238 .
4. Locate the proper mounting point for the
jack and align the jack below that point
¢page 239.
5. Raise the car with the jack c> page 239 .
6. Remove the wheel with the flat tire and then
install
the spare ¢ page 241.
7. Tighten all wheel bolts lightly.
8.
Lower the vehicle with the jack .
9 . Use the wheel bolt wrench and
firmly tighten
all wheel bolts
c> page 238.
10. Replace the decorative wheel cover* or the
wheel bolt caps*.
11. Deactivate the vehicle jack mode* in the
MMI:
I CARI function button > ( Car)* systems
control button > Servicing & checks > Air
susp.: jack mode > Off.
The vehicle jack mode* switches off automatica l
ly at speeds above 6 mph (10 km/h).
A WARNING
--
Always read and follow all WARNINGS and in
formation
¢ .&. in Raising the vehicle on
page 240
and c> page 242 .
237
Page 251 of 280
co
co
.... N
" N .... 0 0 <..:l '
General
This chapter is intended for trained emergency
crews and working personnel who have the nec
essary tools and equipment to perform these
ope rations.
Starting by pushing or
towing
CD Note
Veh icles with an automatic transmission can
not be started by pushing or towing.
Starting with jumper
cables
If necessary, the engine can be started by con
necting it to the battery of another vehicle.
If the engine shou ld fail to start because of a dis
charged or weak battery, the battery can be con
nected to the battery of
another vehicle, using a
pair of jumpe r cables to start the engine.
Jumper cables
Use only jumper cables of suffic iently large cross
section
to carry the starter current safely. Refer
to the manufacturer's specifications.
Use only jumper cables with
insulated term inal
clamps which are dis tinct ly marked:
plus (+) cable in most cases colored re d
minus( -) cable
in most cases colored black.
A WARNING
Batteries contain electricity, acid, and gas.
Any of these can cause very serious or fatal in
jury. Follow the instructions below for safe
handling of your vehicle's battery.
- Always shield your eyes and avo id leaning
over the battery whenever poss ible.
- A dead battery can freeze at temperatures
around 32 °F (0 °C). If the vehicle battery is
frozen, you must thaw it before connecting
the jump start cab les. If you do not, this in-
Emergency situations
creases the risk of an explosion and chemi
cal burns. After jump starting the vehicle,
drive to an authorized Aud i dealer or author
ized Audi Service Facility immediately to
have the vehicle battery checked.
- Do not allow battery ac id to contact eyes or
skin . Flush any contacted area with water
immed iately.
- Improper use of a booster battery to start a
veh icle may cause an explosion .
- Veh icle batteries generate explosive gases.
Keep sparks, flame and lighted cigarettes
away from batter ies.
- Do not try to jump start any vehicle with a
low acid level in the battery .
- The voltage of the booster battery must also
have a 12-volt rat ing . The capacity (Ah) of
the booster battery should not be lower
than that of the discharged battery. Use of
batter ies of different voltage or substantial
ly different "Ah" rating may cause an exp lo
sion and personal injury.
- Never charge a frozen battery. Gas trapped
in the ice may cause an explosion.
- Never charge or use a battery that has been
frozen . T he battery case may have be weak
ened.
- Use of batteries of different voltage or sub
stantially different capacity (Ah) rating may
cause an exp losion and injury . The capacity
(Ah) of the booster battery should not be
lower than that of the discharged battery.
- Before you check anything in the engine
compartment, always read and heed all
WARNINGS
qpage 198.
CD Note
-App lying a higher voltage booster battery
wi ll ca use expensive damage to sensitive
electronic components, such as control
units, relays, radio, etc.
- There must be no electrical contact between
the vehicles as otherwise current could al
ready start to flow as soon as the positive
(+) terminals are connected.
249
Page 269 of 280
co
co
.... N
" N .... 0 0 <..:l '
Electronic stabilization control
Indicator light . . . . . . . . . . . . . . . . . . . . . . .
16
Elec tronic Stabili zation Control . . . . . . . . . . 120
Sport mode . . . . . . . . . . . . . . . . . . . . . . . . 121
Emergency assistance . . . . . . . . . . . . . . . . . 236
Emergency braking function . . . . . . . . . . . . .
75
Emergency flashers . . . . . . . . . . . . . . . . . . . . 43
Emergency locking the front passenger door 32
Emergency operat ion
Doors . . . . . . . . . . . . . . . . . . . . . . . . . . . . . .
32
Luggage compartment lid . . . . . . . . . . . . . . 36
Selector lever . . . . . . . . . . . . . . . . . . . . . . . .
82
Sunroof .. .. .. ............. .. .. .. .. .. 38
Emergency release
Fuel filler door . . . . . . . . . . . . . . . . . . . . . .
194
Emergency starting . . . . . . . . . . . . . . . . . . . 249
Energy management . . . . . . . . . . . . . . . . . . 124
Indicator light . . . . . . . . . . . . . . . . . . . . . . . 14
Engine
Coolant
... ' .................. ... ' . . 204
Prewarming . . . . . . . . . . . . . . . . . . . . . . . . . 70
Start-Stop system . . . . . . . . . . . . . . . . . . . . 72
Starting . . . . . . . . . . . . . . . . . . . . . . . . . . . . 70
Starting with jumper cab les . . . . . . . . . . . 249
Stopp ing . . . . . . . . . . . . . . . . . . . . . . . . . . . . 71
Warming up/cooling down . . . . . . . . . . . . . 66
E ng ine compartment
Opening/closing the hood . . . . . . . . . . . . .
200
Overview . . . . . . . . . . . . . . . . . . . . . . . . . . . 201
Safety precautions . . . . . . . . . . . . . . . . . . . 198
Eng ine control ( indicator light) . . . . . . . . . . . 17
Engine oil . . . . . . . . . . . . . . . . . . . . . . . . . . . 201
Adding . . . . . . . . . . . . . . . . . . . . . . . . . . . . 203
Changing . . . . . . . . . . . . . . . . . . . . . . . . . . 204
Checking the eng ine o il level . . . . . . . . . . . 203
Fuel consumption . . . . . . . . . . . . . . . . . . . 203
Indicator light . . . . . . . . . . . . . . . . . . . . . . . 1 S
O il consumption . . . . . . . . . . . . . . . . . . . . .
202
Specif ication and viscosity . . . . . . . . . . . . . 201
Engine sound . . . . . . . . . . . . . . . . . . . . . . . . 104
Engine speed limitation (indicator light) 18
Eng ine Start/Stop mode
refer to Sta rt/Stop system . . . . . . . . . . . . . 7 4
Engine warm-up request
Indicator light . . . . . . . . . . . . . . . . . . . . . . .
18
Index
Environment
Catalytic conv erter . . . . . . . . . . . . . . . . . . .
197
Diesel particulate filter . . . . . . . . . . . . . . . 198
Proper disposal of drained engine oil . . . . 204
Unleaded fuel.... .. ............... .. 190
EPC (engine contro l) . . . . . . . . . . . . . . . . . . . . 17
ESC
Automatic post-collision braking system .
120
also refer to Electronic stabilization con-
trol . . . . . . . . . . . . . . . . . . . . . . . . . . . . . . .
120
ESP
refer to Electronic stabilization control . . 120
Event Data Recorder ( EDR) . . . . . . . . . . . . . 126
Exterior lighting . . . . . . . . . . . . . . . . . . . . . . . 41
Exterior mirrors
Adjusting . . . . . . . . . . . . . . . . . . . . . . . . . . . 45
D' . 1mming ........ .. .................. 45
Heating... .... .. .. ............... .. . 45
Ex terior temperature display.......... .. .
21
F
Fastening
Booster seats . . . . . . . . . . . . . . . . . . . . . . .
181
Convertible child safety seats . . . . . . . . . . 179
Infant seats . . . . . . . . . . . . . . . . . . . . . . . . 17 7
Floor mats . . . . . . . . . . . . . . . . . . . . . . . . . . . 133
Folding the rear seats. . . . . . . . . . . . . . . . . . . 57
Foot pedals . . . . . . . . . . . . . . . . . . . . . . . . . . 133
For the sake of the environment
Environmentally-friend ly driving . . . . . . . . 67
Fueling . . . . . . . . . . . . . . . . . . . . . . . . . . . .
192
Leaks . . . . . . . . . . . . . . . . . . . . . . . . . . . . . . 199
Roof rack . . . . . . . . . . . . . . . . . . . . . . . . . . . 57
Warming up the engine . . . . . . . . . . . . . . . . 70
Freeze protection
Coolant additive
Front airbags
. . .. ................ . 204
Description . . . . . . . . . . . . . . . . . . . . . . . . . 151
How they work . . . . . . . . . . . . . . . . . . . . . . 157
Frontal collisions and the laws of physics . . 140
Front seats
Adjusting . . . . . . . . . . . . . . . . . . . . . . . . . .
130
Child restraints in the front seat . . . . . . . . 148
also refer to Seats . . . . . . . . . . . . . . . . . . . . SO
267